Employee User Guide February 2018 - employment hero support
←
→
Page content transcription
If your browser does not render page correctly, please read the page content below
Employee User Guide

      February 2018

                      0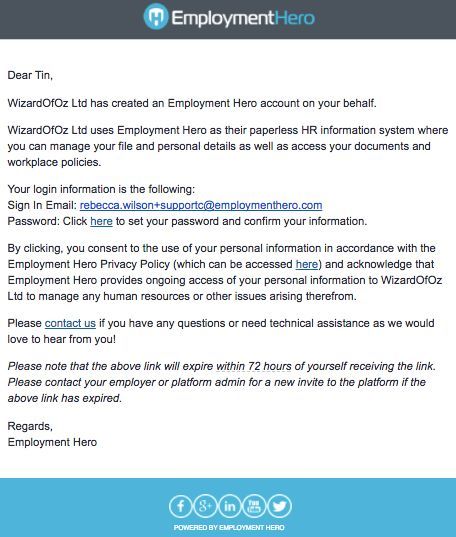
Table of Contents
Employee User Guide 1
Getting Started 2
Login 3
Sign your Employment Contract 3
Confirm your Details 4
Employee Benefits 5
Employment Hero Modules 6
Dashboard 7
Profile 7
Overview: Key personal and work information 7
Files 8
My Documents 9
Policies 10
Induction 10
Leave 12
Timesheets 13
Tasks 17
Rostering 19
Pay Slips 20
Reviews 20
Safety 23
Goals 23
Perks 25
Organisation Chart 26
Notifications 27
Employment Hero Mobile 28
1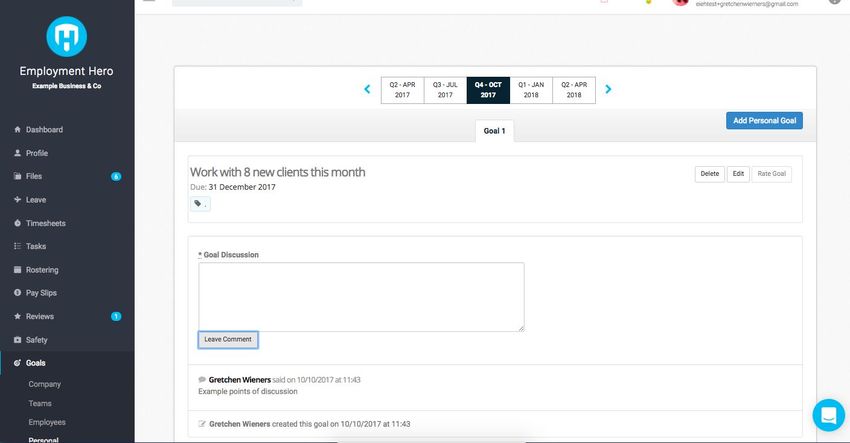
Getting Started
Welcome to Employment Hero!
Let’s get started with setting up your account:
Login
Your employer will invite you to the platform via email, which will contain a link to login and
create a password.
You will only need to set a password once, after which you can easily login by clicking
here.
2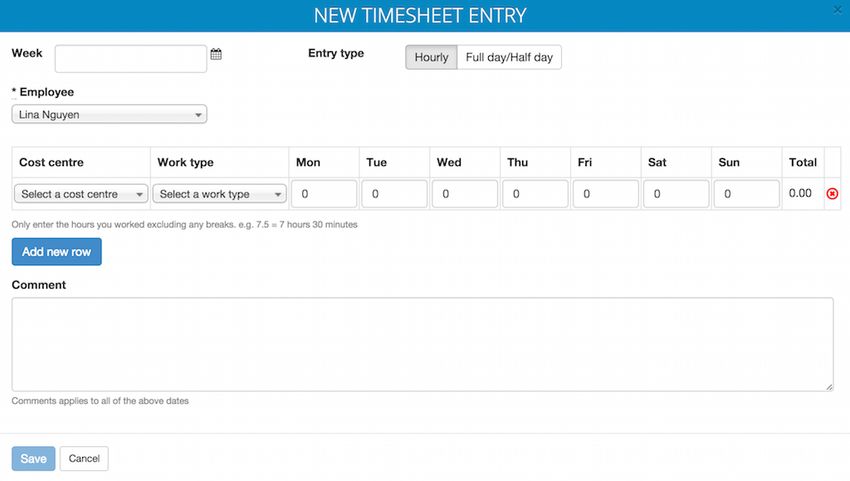
Sign your Employment Contract
If you are a new employee being onboarded for the very first time, you may be asked to sign
your employment contract.
If you are an existing employee, you will not be required to complete this step.
When you have signed in, you will be immediately prompted to read, acknowledge and
electronically sign your employment contract.
When you have read your contract, tick the box at the bottom of the contract. Then using your
mouse, you can draw your signature in the box. Once done, press the Sign and Accept button
to proceed to the next step.
3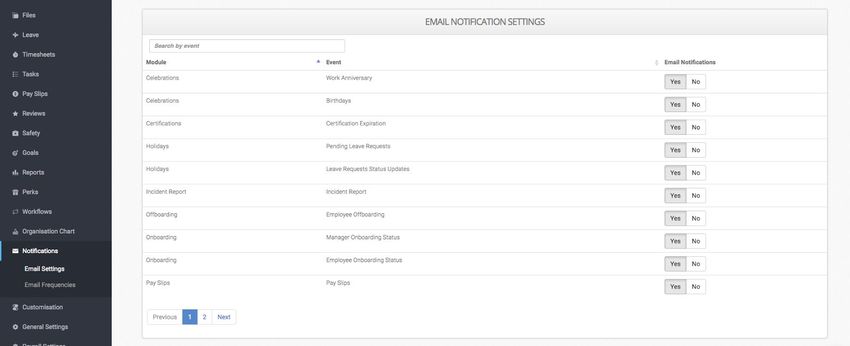
Confirm your Details
You still now be asked to confirm the following details to complete your Profile:
● Personal details
● Emergency Contact
● Bank Details (for the account you get paid into)
● Tax Declaration
● Work Eligibility
● Your Super Fund Choice
These details can be changed later on if needed under Profile.
4
Employee Benefits
You now have access to Employee Benefits through Employment Hero, including our
Purchase Power scheme, which allows you to make your salary go further!
You can select which things would interest you, so we can provide you with relevant offers
such as discounted Health Insurance, Gym Memberships and more.
Note: This step is completely optional. No personal information will be sent to our partners
without your permission.
You are now ready to use Employment Hero!
5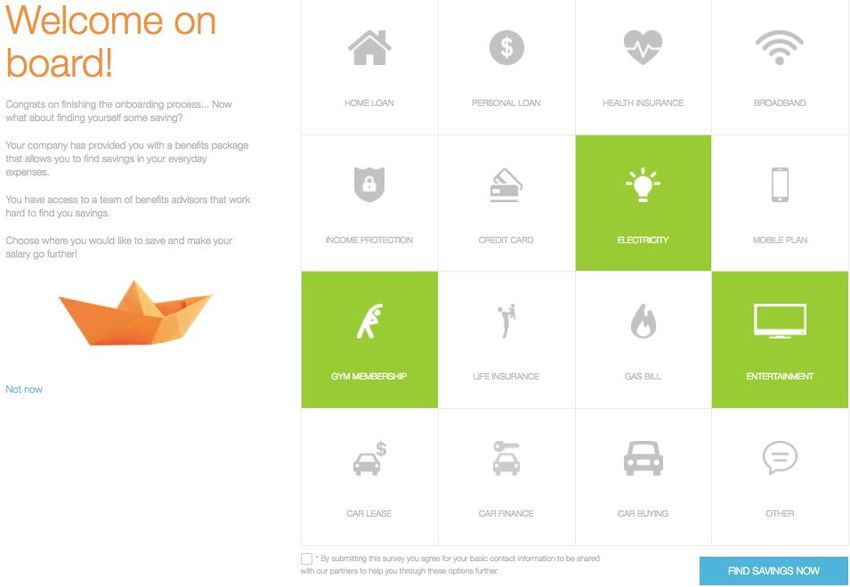
Employment Hero Modules
Now that you are set up with an Employment Hero login, you are free to navigate the
system and perform certain tasks.
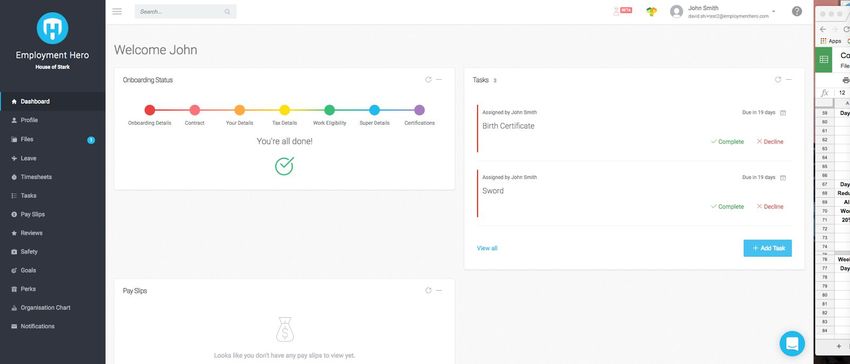
Dashboard
The Dashboard is your default landing page when you log into Employment Hero.
From the Dashboard, you can see your current onboarding status, any assigned tasks and pay
slips.
Profile
Profile takes you to your employee file. This centralises all of your personal employee and
work information into different tabs. To view relevant information, simply click on a specific
tab. If you wish to make changes, click on the Edit button and follow the onscreen
instructions.
● Overview: Key personal and work information, you can even add a profile picture.
● Personal Details: All relevant personal information (Name, DOB, address etc.)
6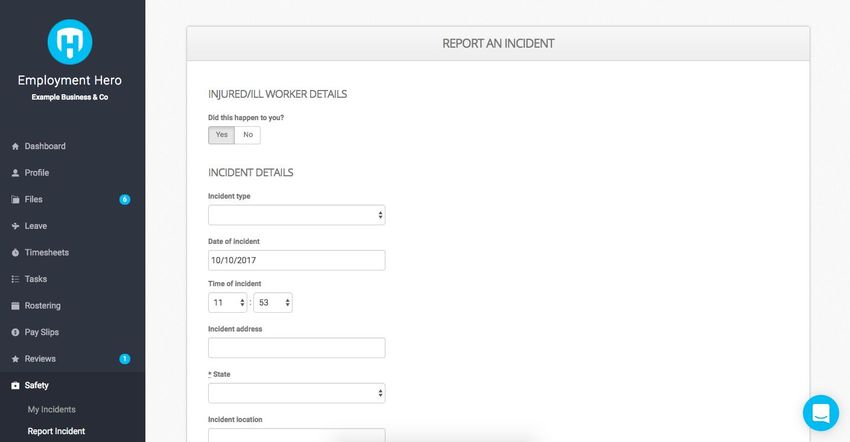
● Employment History: History of positions
● HR Documents: Electronic documentation generated via Employment Hero
● Emergency Contacts: Relevant emergency contact information - please keep this
up-to-date
● Pay Details: Remuneration information (current and historic)
● Banking Details: Bank account information, used to facilitate your pay (multiple
accounts can be stored). Make sure not to include spaces for BSB and Account
Number.
● Superannuation Details: Superannuation fund details, used to facilitate your
Superannuation payments. Simply click edit to input relevant details, uploading
relevant supporting documentation is recommended. Different fund types can be
selected:
○ Company preferred fund
○ Regulated fund
○ Self managed fund
● Tax Declaration: Please make sure you complete your Tax Declaration correctly,
as this will determine the rate at which you are taxed.
● Benefits: Companies can set up company benefits which can be assigned to
employees. These benefits will appear here if they apply to you.
● Work Eligibility: Only applicable to individuals employed under a working visa
(Employees who fit this criteria MUST complete this section - upload a copy of your
visa and passport)
● Certifications: Certifications can be configured in Employment Hero by managers
and admins, to monitor various types of licenses, qualifications and checks that
employees may possess or be required to hold.
● Medical Disclosure Statement: Employers can determine whether an employee
is able to perform the inherent requirements of their role by checking their
Medical Disclosure Statement. Only applicable for employees who claim to
suffer from a pre-existing injury, illness, medical condition or allergy.
● Leave Request Details: Shows details of leave requests you have lodged in the
past.
Note: Please make sure that all of the information in Your Profile is filled out and accurate,
especially payroll related information.
Some sections will be read-only, preventing you from making changes. Please contact
your employer if you have any concerns with this specific data.
7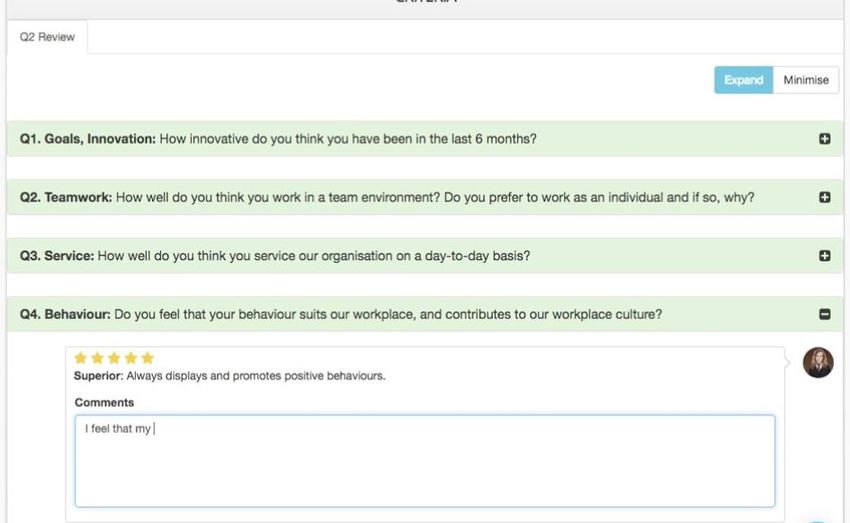
Files
Your employee may ask you to electronically acknowledge certain employment files such as
Contracts, Policies and Induction Content. All these documents are located under the Files
section.
If you have been assigned certain files, you will also see a blue circle with a number in it next to
Files:
This number indicates how many files you need to acknowledge. When you click on Files, you
can see a breakdown of each file type.
You will also be sent an email reminder from Employment Hero if you have any outstanding
Files.
8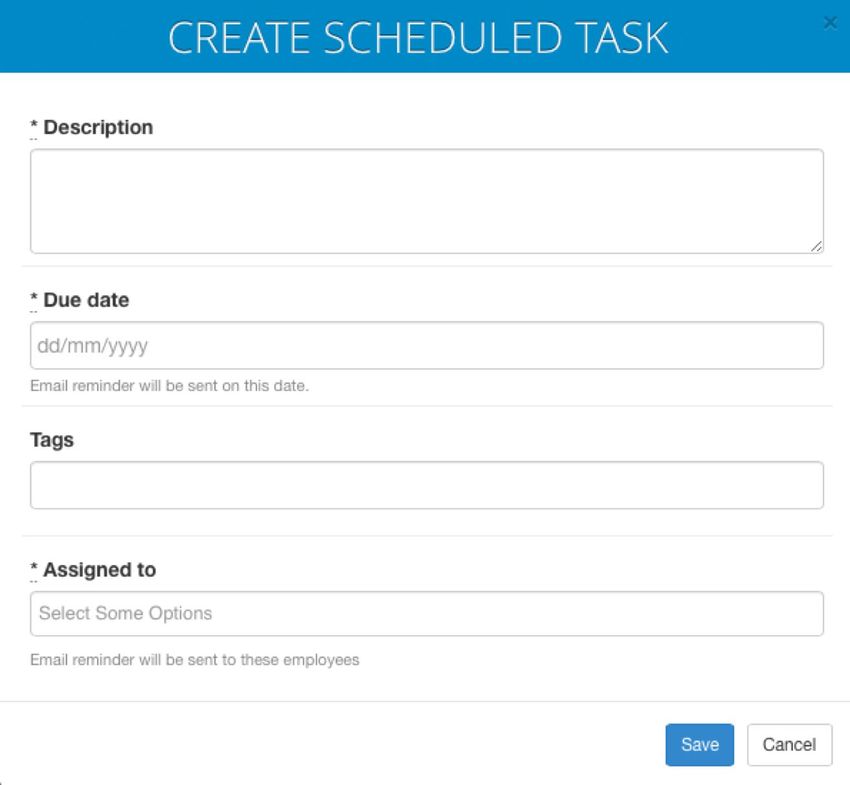
My Documents
My Documents will hold your employee contract if you have been onboarded
electronically or if your employer has uploaded a paper copy of your contract:
You can access your employment contract at any time
Policies
Policies will display the company policies which are applicable to you:
Clicking on each individual policy will either show the specific policy document inline in
Employment Hero, or trigger a download.
Policies that have been marked as mandatory by your employer will appear in red. Please
follow the on screen prompts to acknowledge that you have reviewed these mandatory
policies.
To acknowledge a policy, click on the Red Flag. Scroll to the bottom of the policy, tick the
acknowledge box.
9This will confirm to your employer that you have acknowledged this policy.
Induction
Your employer may have assigned you Induction content to complete via the Employment
Hero Platform.
Navigate to Induction on the left hand side menu to access this module. Induction
centralises important documentation and video content for employees to view and
download. Please note that specific items may be marked as mandatory, requiring one to
acknowledge they have viewed said content - these items will be highlighted in red.
10Leave
This module allows employees to apply for leave, by submitting requests to their manager.
Simply navigate to ‘Request Leave’ and complete the form to submit a leave request:
To lodge a Leave Request, complete the following steps:
1. Select leave category from the drop down menu
2. Enter start & end dates
3. Add a comment for your manager (optional)
4. Attach relevant documentation for your manager (optional)
5. Ensure the correct hours are being taken per day of your leave request - simply click in
the box under the ‘hours’ heading to make changes.
6. Select ‘Submit Leave’ - your manager will be notified instantly of your leave request
Note: The hours populated will default to an ordinary working day
Note: Public Holiday Leave
If a leave request falls on a public holiday, Employment Hero will zero out the hours taken on
this specific day by default:
11Timesheets
You may be required to submit Timesheets to your manager via Employment Hero.
To do this, go to Timesheets, and click My Timesheets
Click Add in Timesheet Entries page to create a new timesheet.
Employment Hero is currently supporting two types of timesheet logging for daily entries:
Start and end times and Daily hours. Depending on which type your company is using, you
need to fill the corresponding fields and lodge your timesheet.
Start and end times
● Date: the date for this timesheet.
● Start time and End time fields: when the work started and ended.
● Cost Centre: where the timesheet related cost happened
● Work Type: an additional rule to set up against timesheets regarding an
individual's pay conditions (only applicable for managed and DIY payroll users).
● Breaks: if you had an unpaid break during the day, such as a meal break, click
Add Break to record it. Enter the time that you were on break in the same way as
you did before. For example, you had a 30 minute break from 11am until
11:30AM. Your break "Start time" would be 11:00AM and your break "End time"
would be 11:30AM.
Daily Hours
● Date: the date for this timesheet entry.
● Hours worked: the number of hours and minutes to be lodged in this entry
● Cost Centre: where the timesheet related cost happened
● Work Type: an additional rule to set up against timesheets regarding an
individual's pay conditions (only applicable for managed and DIY payroll users).
● Comments: add comments for this entry.
Finally, click Save to submit the timesheet. Your employer will be notified via email and will
be able to approve or decline this timesheet entry. Until then it is marked as "Pending".
12You can submit more than one timesheet submission for an entire week, but this confirm
this first with your employer.
Submit weekly timesheets
* Please note that the weekly timesheet option is only available in the Premium subscription
plan. Please check with your employer to see if you can lodge weekly timesheets
As an employee submitting a weekly timesheet entry, the employee needs to log into
Employment Hero and go to:
Timesheets > My Timesheets
Click Add on the Timesheet Entries page to create a new timesheet entry.
You have two Entry type options for weekly timesheets:
● Hourly: Enter the total hours you have worked (excluding breaks) e.g. 7.5 = 7
hours 30 minutes
● Full day/Half day: you can select whether you worked a full day or half day. Your
ordinary work day hours will be displayed e.g. 8 hours
13Weekly timesheets with hourly entries
By default, when you create a new timesheet, the entry type will be 'Hourly'.
When you submit a timesheet with hourly input, you will need to fill in the following fields:
● Week: the week for this timesheet. Weekly timesheets are week ending on
Sundays.
● Cost Centre: where the timesheet related cost happened. If you work at different
locations, you may be required to enter these locations via this section.
● Work Type: if you have multiple work types, please enter the relevant Work Type
here.
● Dates: the days Monday - Sunday will be populated with the dates of the chosen
week. You will need to allocate the daily hours worked for each day of the week
that is worked.
● Comment: any comment written in weekly timesheets will apply to all dates in the
selected week.
Note: You cannot have duplicate cost centre - work type combinations in one
timesheet submission nor can there be multiple rows with the same cost centre.
14Weekly timesheets with full day/half day entries
● Week: the week for this timesheet. Weekly timesheets are week ending on
Sundays.
● Cost Centre: where the timesheet related cost happened. You can work for
multiple cost centres throughout the week, and therefore you can add additional
rows to cater for this.
● Work Type: an additional rule to set up against timesheets regarding an
individual's pay conditions (only applicable for managed and DIY payroll users).
● Dates: the days Monday - Sunday will be populated with the dates of the chosen
week. You can select either:
- Full: equates to the employee's ordinary work day hours e.g. 8 hours
15- Half: equates to half of the the employee's typical work day hours e.g. 4 hours
● Comment: any comment written in weekly timesheets will apply to all dates in the
selected week.
Note: Employees can not have duplicate cost centre - work type combinations in one
timesheet submission nor can there be multiple rows with the same cost centre.
Tasks
The Tasks module can be used to create, assign and manage scheduled tasks.
16To create a new task, go to Tasks and click “Add new task”. The following box will appear:
1. Enter a description of the exact task you wish to issue
2. Set a due date for the task
3. Enter relevant tags (optional)
4. Select the employees you wish to assign the task to
After creating a task, an email will be sent to all assigned employees.
Any tasks which have been assigned to you will appear on the Dashboard:
To acknowledge these tasks, click on the green “Complete” button.
The Task will then disappear from your Dashboard, and the person who assigned you the task
will be notified that you have actioned the Task.
17Rostering
Employers can assign rosters to their employees.
If you have been assigned a roster, click on Rostering and you will see your Schedule details.
You will also be notified via email and your schedule should also be updated accordingly.
If you are not available in a certain period of time, click on the day you are unavailable. A pop
up window allows you to set more details.
On an ongoing basis:
By ticking this box, you can select a particular day and automatically set the unavailability for
that day each week within a certain period of time, which is defined by the From and To fields:
From: The date from which you are not available.
To: The updated schedule should look like the following:
18Note: Rostering is only available for certain organisations. Speak to your employer if you want
to confirm whether your organisation is using Employment Hero’s Rostering module.
Pay Slips
This module allows you to view all of your Pay Slips in one place.
Click on the specific pay period ending date to see your full payslip, showing gross and net
wages, PAYG, deductions, super contributions etc.
You can also download Pay Slips as PDF files.
Note: If you have downloaded the Employment Hero Mobile app, you will receive a
notification on your phone when you receive a new Pay Slip.
Reviews
Reviews can be assigned to you by your employer to assess your performance over a
certain period of time.
Reviews are not based purely on performance however, and may include other
categories such as teamwork, innovation, customer service etc.
If you have been assigned a Review, complete the following steps:
1. Click on the Review that you want to start on:
192. When you open a Review, you can see the below information:
Amount of days left in this period:
● This is how long you have left to reply to your questions.
Remaining questions:
● If you have already started answering your questions, this will tell you how
many you have left to answer until you are finished.
Overall Rating for this period:
● This is the overall score that your manager gives you at the end of your
Review.
● If there were multiple review templates in the review period, then the Overall
Rating for this period is the average of the Overall Rating of each review
template.
203. Under the Criteria heading, answer any questions that have been assigned to you.
Your answers may require selecting a rating (e.g. on a scale of 1 to 5) or a free text
response.
● When filling in a free text response, once you click away from the text box,
your response will be automatically save. This will be indicated by a green
notification at the top of the page as well as a timestamp below the text box.
● For extra measure, it is recommended employees click Save draft at the
bottom of the page before navigating away from the reviews to ensure all
responses are saved
4. Once you have completed all the criteria questions, you will be able to click Publish.
This will mark your review as being 'Completed' as well as make your responses visible
to your manager. Published reviews will no longer be able to be edited. In order to edit
your responses, click Unpublish. This will also change your review status to 'In
progress'.
21Safety
The safety module allows workplace incidents to be logged and managed.
To report an incident, click on Safety then “Report Incident”.
You will then need to enter in the specific details of the incident, which include:
● Enter date/time details
● Enter location of the incident
● Provide details of the incident (how and why the incident occurred)
● Identify the outcome of the incident- use the dropdown menu
● Select the nature of the injury - use the dropdown menu
● Specify body parts injured
● Witnesses
Once you submit an incident report, your organisation’s nominated Worksafe authorities
will be notified.
Goals
22You may be assigned targets and metrics through the Goals module.
Work with your manager to plan goals and keep notes on your progress.
You can also use the Goals to view your Company and Team goals:
23Perks
Employment Hero provides you with access to comprehensive employee benefits.
Some of the companies you can access benefits from include:
Simply click on the relevant deals for discount codes and more.
24Organisation Chart
The Organisation Chart shows a hierarchy all employees and their primary managers.
i.e. the primary manager of Bob Wallace is Paul Allen whose primary manager is William
Fence who has no manager.
All of an employee’s subordinates can be hidden by clicking
They can be made visible again by clicking the
25Notifications
You can use Notifications to decide the type and frequency of emails to be received.
By default, all employees use the default email settings of the company. For emails
notifications that are specific to you, they can be turned on or off depending on your
preferences.
Go to Notifications, then “Email Settings”:
Here are three columns:
● Module:The module related to the emails.
● Event: The event that triggers the emails.
● Email Notifications: Turn on or off email settings for listed events.
Among the email notifications assigned to you, you can decide which should be sent to you by
turning on or off receiving the emails.
An employee's choice always overwrites the company's setting.
You can also set the time and frequency of receiving your emails by going to “Email
Frequencies”
By default, the Email Notification Frequency is set to Daily and the default time to receive your
email is set to 17:00. Change the values to your preferred time and frequency and click “Save”:
26Employment Hero Mobile
You can download the Employment Hero Mobile App for free for your Android or Apple device:
Click on the links below or search for “Employment Hero Mobile”.
The EH Mobile App’s current list of features include:
● Daily timesheet submission
○ Submit daily timesheets on our mobile app
○ Submit overnight timesheets on our mobile app
● Pay Slips: listing, details, push notifications, PDF preview and download/share PDF*
○ Pay Slips on our mobile app
● View leave balance breakdown*
○ View leave balances on our mobile app
● Leave request submission with the ability to edit leave hours
○ Request leave on our mobile app
● Post announcements + react to announcements
○ Announcements on our mobile app
● Daily timesheet approvals
27○ Approve daily timesheets on our mobile app
● Leave approvals
○ Approve leave requests on our mobile app
● Staff directory
○ Staff directory on our mobile app
● Upcoming events
○ View who is on leave on our mobile app
● Employee happiness survey
○ Employee Happiness Survey
● View your daily timesheets and its status
○ View your daily timesheets on our mobile app
● View your leave requests and its status
○ View your leave requests on our mobile app
...and more to come!
* for organisations connected to an Employment Hero supported payroll system. Please confirm
with your Employer if your organisation is able to use these feature.
28You can also read