EYES HD GEN2 OCEAN CAMERA - OceanLED
←
→
Page content transcription
If your browser does not render page correctly, please read the page content below

2021
                             INSTALLATION & OPERATION MANUAL

         EYES HD GEN2 OCEAN CAMERA

L I G H T. Y E A R S A H E A D .                             WWW.OCEANLED.COM
OceanLED MANUAL / EYES CAMERA / EYES HD GEN 2 / REVISION 1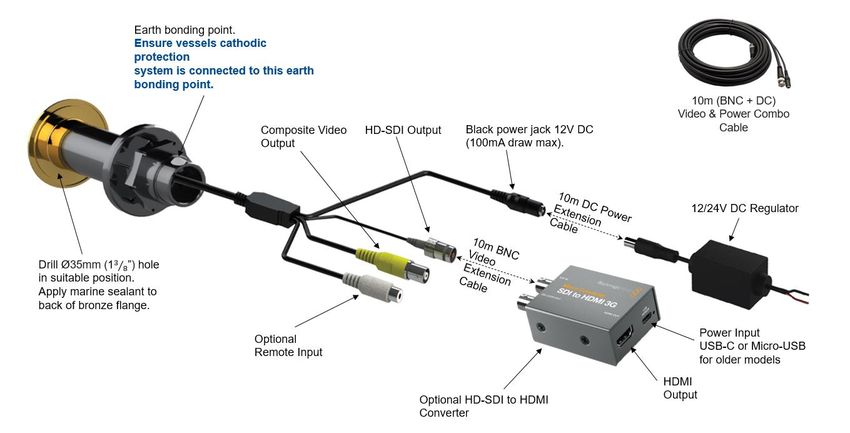
Preface
READ AND FOLLOW ALL INSTRUCTIONS IN THIS MANUAL

WARNINGS
Before installing your OceanLED Eyes Camera, please read and follow all warning notices and instructions
which are included. Failure to follow safety warnings and instructions can result in property damage, severe
injury or even death.

Ensure the bonding point of the camera is fitted to the cathodic protection system on the vessel. Check
conductivity between earth bonding point and aluminium bronze / stainless front bezel. If mounting the
camera to metal, carbon fibre or wooden hull, ensure that suitable measures have been put in place to
account for the effects of galvanic corrosion i.e. use of Delrin sleeve components (Isolation Kit).

Salt is an inherently corrosive material. Metal parts and certain natural and man-made surfaces are
particularly susceptible to corrosion and deterioration when used in and around saltwater. Some OceanLED
products contain combinations of plastic and polymers which are impervious to salt water corrosion,
however, screws and fasteners used for the installation must be of a marine grade type stainless steel or
equivalent and monitored annually to ensure the camera remains in service for years to come.

All electrical connections should be fully waterproofed. Problems caused by water ingress into connections
will invalidate warranty. Also ensure the rear of the camera is in a dry area and not subject to a wet
environment. Failure to do this may invalidate warranty.

Never clean using a high-pressure jet wash.

Never Use Solvents! Cleaners, fuel, and other products that may contain strong solvents, such as acetone,
that attack many plastics greatly reducing their strength and irreversibly damaging the special lens coatings
and cable sheathings.

DANGER
RISK OF ELECTRIC SHOCK OR ELECTROCUTION
This camera must be installed by a licensed or certified electrician in accordance with all applicable local
codes and ordinances. Improper installation will create an electrical hazard which could result in death or
serious injury to swimmers, installers, or others due to electrical shock, and may also cause damage to
property. Always disconnect the power to the camera at the circuit breaker before servicing the camera.
EYES HD GEN2
                                                                                                       2021 INSTALL & OPERATION MANUAL

Contents
1 Overview......................................................................................................................................................................... 3
2 Preparing the Hull ........................................................................................................................................................... 4
3 Installation....................................................................................................................................................................... 5
4 Operation / Maintenance .............................................................................................................................................. 11
5 Troubleshooting ............................................................................................................................................................ 12
6 Appendix ....................................................................................................................................................................... 13
7 Warranty ....................................................................................................................................................................... 14

PRETEST
Always test the camera prior to installation. Failure to do this may result in additional installation time and could
invalidate the warranty.

IMPORTANT NOTICE
Attention Installer: This manual contains important information about the installation, operation and safe use of this
product. This information should be given to the owner and/ or operator of this equipment.

WARRANTY COVERAGE
Please refer to www.oceanled.com/downloads for full warranty statement.

                                                                                                                                                                          2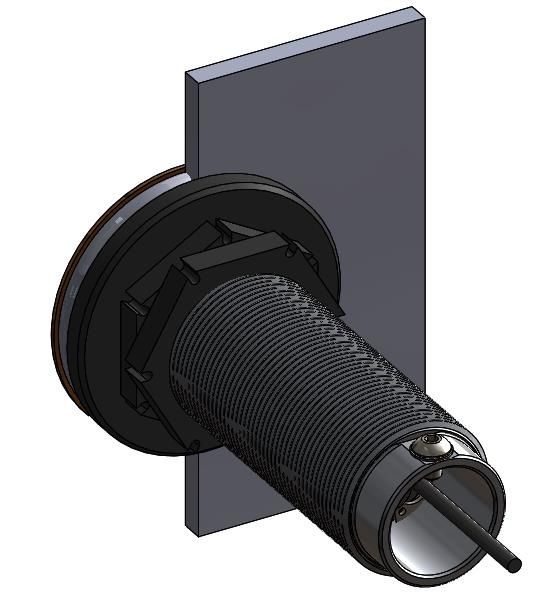
EYES HD GEN2
                                                                  2021 INSTALL & OPERATION MANUAL

1 Overview
Product components breakdown

Power Source

Most installations will utilize the on-board 12/24V DC power supply from a marine battery. However, if AC to DC power
supply is being used, allow at least 15% reserve for voltage fluctuations due to variables beyond your control such as
ambient temperature and supply voltage fluctuations to ensure your camera is always receiving the proper voltage and
to ensure the power supply is not “overloaded” causing premature failure. Use chart below in determining power
supplies. The power wiring to the camera must be fused.

Power Consumption and Recommended Fuse value

                                                                               15% Reserve     Recommended fuse
      Model        Current @ 12V DC Current @ 24V DC           Power (W)
                                                                                   (W)            12V/24V DC

Eyes HD Gen2 100mA                     60mA                2W                  2.3W            500mA

3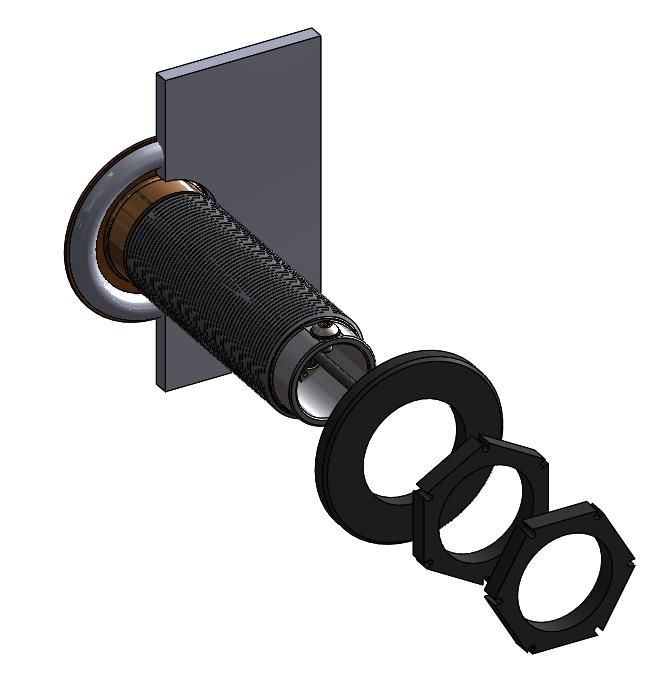
EYES HD GEN2
2021 INSTALL & OPERATION MANUAL
2 Preparing the Hull
OceanLED recommends using a qualified installer / technician when making modifications to your vessel.
Please also consult the manufacturer for more detail on modifications and installation.
If camera is to be installed in a conductive hull, an Isolation Kit must be used. Contact OceanLED for
additional details.
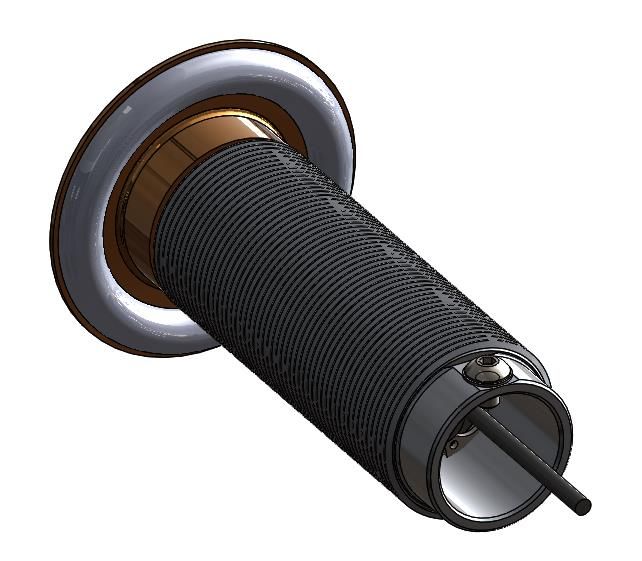
Hole Cut Out
Hole Cut out size - 35mm (13⁄8”) / When using Delrin Isolation Kit 38mm (1 1⁄2”).
Overall Dimensions
4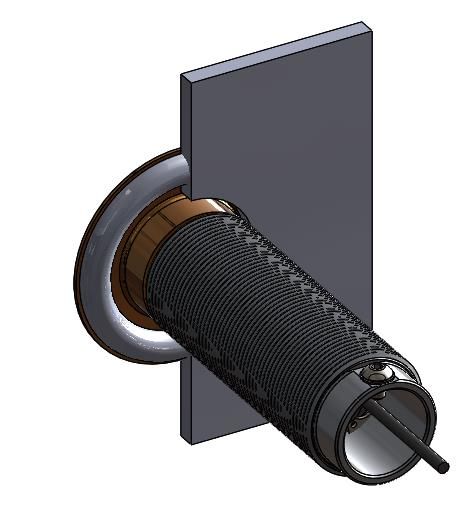
EYES HD GEN2
                                                                  2021 INSTALL & OPERATION MANUAL

3 Installation
3.1 INSTALLING THE CAMERA

Kit Includes

               Camera Body                              Washer                             Locking Nut

Additional Items required:
    •   Marine sealant – 3M 4200 or equivalent.
    •   41mm open-ended spanner.
    •   Wire strippers / cutters / crimp tools etc for making electrical connections.
    •   OceanLED recommends the use the optional OceanLED IP68 Eyes camera connector enclosure (p/n 019908)
        to enclose the camera connections. If this is not used, then a suitable waterproof junction box, or method of
        fully waterproofing the connections will be required.
    •   Suitable cable for supply connection.
    •   Suitable cable / crimps for connection of the vessels sacrificial bonding system to the camera body.
    •   Fuse & fuse holder to fuse supply if not fused already.
    •   Cable ties.
    •   Waterproof connectors/glue lined heatshrink for power connections.
    •   Optional HD-SDI to HDMI converter to convert the HD-SDI output from the camera to HDMI format.
        (OceanLED p/n: 11809).
        This unit needs to be powered via USB (either micro-USB or USB-C connector depending on the model).
        Either an AC-DC or DC-DC adaptor will be required, to provide 5V DC rated at least 1 Amp minimum (not
        provided).

    •   Suitable video monitor / display unit.

                           Optional Eyes IP68 Camera Connector Enclosure (p/n 019908)

OceanLED recommends dry fitting all products. When installing, be sure that the camera fits the area and
secures to the hull using the appropriate hardware before applying any sealant.
5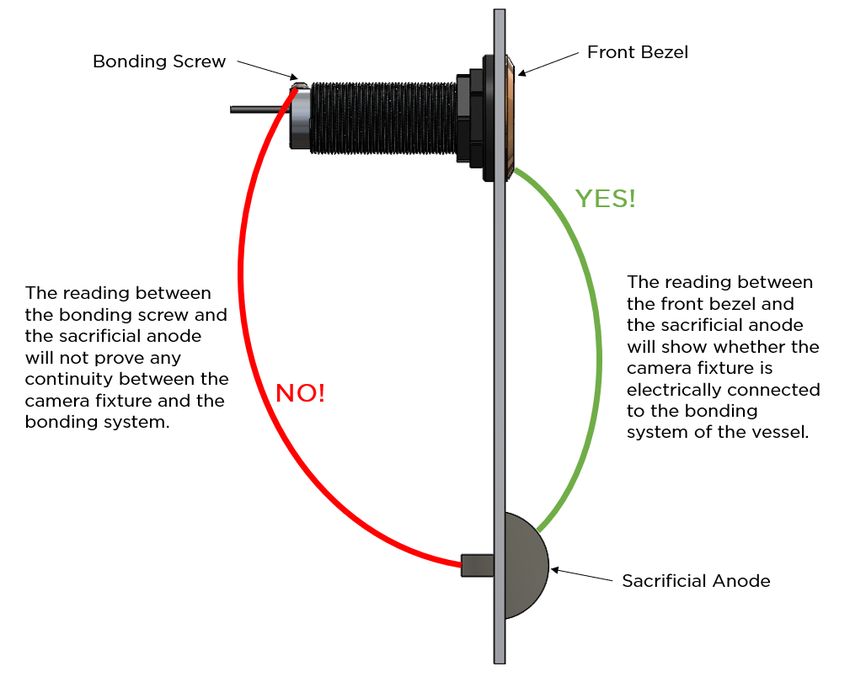
EYES HD GEN2
                                                                         2021 INSTALL & OPERATION MANUAL

3.2 INSTALLATION (ONCE HULL PREPARATION IS COMPLETE)

    1. Test camera before fitting.

    2. If using Isolation Kit (Delrin sleeve): Insert the Isolation Kit front washer into the drilled hole and apply marine sealant
       to seal between the rear of the front washer and the hull.

    3. Apply sealant to the rear of the camera assembly’s bezel to ensure a complete unbroken seal around the
       camera.

Make sure sealant fills in the recess groove on the reverse of the camera bezel:

The next process is made much easier if a second person is inside the hull to receive the camera and install the locking
nut whilst supporting the camera from outside. Breakages due to the camera falling out of the hull are NOT covered
under warranty and can cause serious bodily injury.

    4. Insert the camera body into the hull, pressing and twisting slightly to spread the sealant around behind the
       bezel to ensure good seal and adhesion.

                                                                                                                         6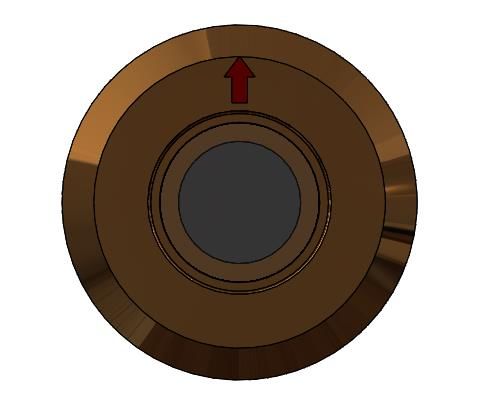
EYES HD GEN2
                                                                   2021 INSTALL & OPERATION MANUAL

    5. Ensure the camera orientation is correct with the red arrow sticker on the front bezel pointing up perpendicular
       to the waterline. The arrow points to the top of the image when viewed on a monitor.

    6. Insert the plastic compression washer over the camera body.

    7. Fit one of the the securing nuts onto the body and tighten. DO NOT over-tighten the nut as you could damage
       the camera body, and this will not be covered under warranty.

    8. Fit the second nut onto the body and tighten against the first to lock the two together.

7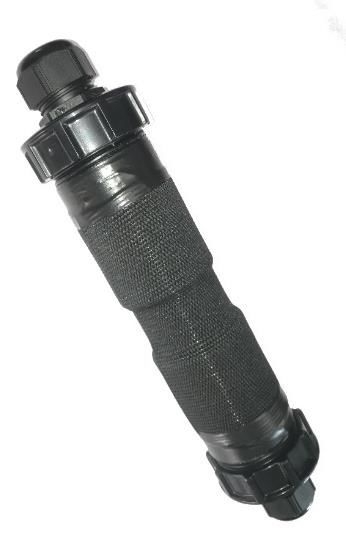
EYES HD GEN2
                                                               2021 INSTALL & OPERATION MANUAL

9. Connect the bonding cable to the bonding screw on the rear of the camera body. Lock in place with the screw
   and shake proof washer provided.

    BONDING: The camera body MUST be attached to the vessels bonding / cathodic protection system. Once
    fitted it is mandatory to check that there is full continuity between the vessels cathodic protection system and
    the outer bezel of the camera assembly (see bonding schematic – Appendix section 6).

                                                                                                           8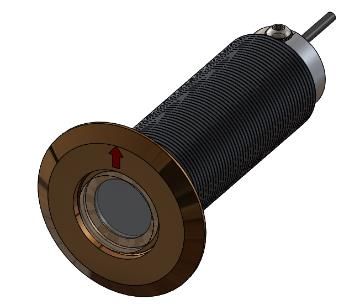
EYES HD GEN2
                                                                  2021 INSTALL & OPERATION MANUAL

3.3 MAKING THE CONNECTIONS

                   Kit Includes

                   DC Regulator                          10M Video & Power Combo
                                                         Cable

Always consult a qualified electrician when connecting OceanLED cameras

Please note that all OceanLED camera units operate within a specific voltage range. Please check the
electrical information to ensure cable gauge follow the recommendations.

All connections MUST be enclosed inside a waterproof housing / junction box.

Never leave the connections / bare cables unprotected. Take care to not leave the bare wire ends / connectors
in bilge water before making the waterproof connections. Water deposits in the connectors and cables will
cause corrosion. Over time water can also work its way into the unit along the inside of the cable due to
capillary action causing the camera to fail. This will NOT be covered under warranty.

For complete instructions on DC connections, please refer to ABYC codes of practice and other applicable
codes and ordinates for DC connections.

    1. Using either the OceanLED Eyes Camera Connector Enclosure, or a suitable waterproof enclosure, connect
       the camera connections to the provided 10m Video & Power Combo cable. If using the standard composite
       video output (PAL/NTSC)– connect the video cable BNC connector to the yellow connector. If using the HD
       video output, connect the video cable BNC connector to the BNC connector with the thinner black wire.
       It is imperative to ensure that these connections (and the unused connections) are fully watertight.
       Warranty will be void if these connections are exposed to water.

    2. Route the 10m Video & Power Combo cable to the required location, ensuring it is not routed next to areas of
       high heat. Secure the cable fully along its length to avoid chaffing.

    3. Pull the correct sized power cable from the DC power source (breaker/fuse panel) to the location of the end of
       the 10m Power & Video Combo cable. Note that it is imperative that the correct sized tinned marine grade
       cable is used to avoid voltage drop issues.

    4. Using waterproof butt splices and/or a waterproof junction box, make the connections at either end of the
       system to attach the camera power. Connect power to the DC regulator ensuring the correct polarity is
       observed (RED +Ve, Black -Ve). Make sure any heat-shrink used completely encapsulates the outer wire
       sheath (the use of glue-lined heat shrink is highly recommended to ensure water tightness).

    5. Plug the output of the voltage regulator unit into the socket on the end of the power/video combo cable. Ensure
       that this connection is fully waterproofed (Glue lined heat-shrink is recommended).

9
EYES HD GEN2
2021 INSTALL & OPERATION MANUAL
6. Plug the video output from the power/video cable either into the optional HD-SDI converter or suitable display
unit.
7. Secure cables ensuring where the cables exit the cameras are not under undue stress. Finish and test the
camera unit BEFORE the vessel goes into the water.
Connection Diagram
3.4 TEST YOUR INSTALLATION
Always test the camera BEFORE the vessel goes back into the water. At this final stage make sure all of the system is
operational. If you have any issues, please contact your local OceanLED representative.
Never install a new camera then leave the vessel in the water unchecked for several days.
When the vessel is placed in the water, immediately check for leaks. Note that very small leaks may not be readily
observed. It is best not to leave the vessel in the water for more than 3 hours before checking it again. If there is a small
leak, there may be considerable bilge water accumulation after 24 hours. If a leak is observed, you must TAKE ACTION
IMMEDIATELY to prevent damage.
10EYES HD GEN2
2021 INSTALL & OPERATION MANUAL
4 Operation / Maintenance
4.1 OPERATION
When power is applied to the camera, the video output should be active. Note that when using an HD-SDI to HDMI
converter, there may be a small delay on power on while the system locks to the HD-SDI signal.
4.2 MAINTENANCE
Marine growth can build up quickly on the camera lens and can reduce the performance in just a few weeks.
To help prevent this, all OceanLED Eyes Cameras have been coated with a specialized Tritonium® coating which
makes the surface of the glass lens a non-stick layer. Lenses should be cleaned with a boat brush or similar
biweekly, or as needed to keep the lens of the camera clean.
Growth varies greatly around the world and maintenance is imperative to the proper operation and longevity of the
product. If heavy fouling occurs, barnacles can be removed from the lens using a plastic scraper and moderate
pressure under water. If cleaning the lens while the boat is out of the water, wet the lens before scraping. Never scrape
or try to remove barnacles from a dry lens. Never use high pressure jet wash to clean the lens / bezel.
11EYES HD GEN2
2021 INSTALL & OPERATION MANUAL
5 Troubleshooting
5.1 TROUBLESHOOTING PROBLEMS AND THEIR SOLUTIONS
Problem: No image or flickering / unstable / unclear image
• Check all electrical connections in the system for signs of corrosion or water ingress.
o If any connections have corrosion or water ingress try cleaning and re-connecting. Note that water
ingress/corrosion of the camera connectors is not covered by warranty.
• Check there is power to the camera:
o Check the supply polarity is correct.
o Check that supply voltage to the camera is within the range 10.8V to 13.2V DC
• If using a HD-SDI converter check that this is powered and receiving the video signal correctly:
o When using the HD-SDI to HDMI converter supplied by OceanLED there should be a steady blinking
indicator LED on the converter unit once it detects and locks onto the camera signal.
• Ensure the correct camera video output is being used for the equipment it is being connected to:
o The yellow BNC plug is the std composite video output (NTSC/PAL).
o The all metal connector with thinner black wire is the HD-SDI output.
• Ensure that the monitor/display can display the video format of the camera:
o For the composite video – PAL or NTSC (depending on eyes camera version)
o For HD, 1080p@30fps (NTSC version) 1080p@25fps (PAL version).
• Ensure that the front lens of the camera is clean and free from marine growth.
• Ensure that there is sufficient light where the camera is mounted to give an image.
Problem: Black & White image
The camera has a sensor that detects light, once this light source drops to a certain level the camera will flick over to
night vision mode and become black and white, this is a normal function.
• If the camera stays in the night vision mode despite correct light level:
o Ensure the lens is clean, dirty lens can obscure the camera light sensor and cause it to switch to night
vision mode.
o If the camera still shows in B&W despite the correct light level, please contact the OceanLED technical
support.
If you have any questions regarding the above, please contact OceanLED:
+44 (0) 1455 637505 or info@oceanled.com
12EYES HD GEN2
2021 INSTALL & OPERATION MANUAL
6 Appendix
Perform this bonding check after installation of the light and before moving the vessel back into the water.
Refer to bonding information in the installation sections in this manual. If in doubt, please contact OceanLED.
1. Connect the camera assembly to the cathodic protection system as explained in Chapter 3.
2. Measure the electrical continuity between the front bezel and the sacrificial anode. This test should give a
reading of up to 0.5 Ω (Ohms). This procedure will guarantee electrical continuity between the front bezel, the
mounting tube and sacrificial anode.
If you have any questions regarding the above, please contact OceanLED:
+44 (0) 1455 637505 or info@oceanled.com
13EYES HD GEN2
2021 INSTALL & OPERATION MANUAL
7 Warranty
Please remove this page and keep for your files
For technical assistance:
Europe: service@oceanled.com
The Americas: warranty@oceanledusa.com
Warranty Serial Code(s):
2020 Ocean LED Marine LTD Ocean LED Marine LTD Ocean LED USA LLC
All Rights Reserved
Unit 1 Jacknell Road 778 South Military Trail
Specifications are subject to change without Dodwells Bridge Industrial Estate Deerfield Beach
notice. Hinckley,
Florida
Leicestershire LE10 3BS FL 33442-3025
United Kingdom
USA
Trademarks are the property of Ocean LED
Marine LTD Tel: +44 (0) 1455 637505 Tel: +1 954.523.2250
Fax: +44 (0) 1455 238553 Fax: +1 954.523.2249
sales@oceanled.com sales@oceanledusa.com
www.oceanled.com
14You can also read