Garden Habitats Fourth Grade Science Exploration - Exploring plant and animal habitats helps students learn more about
←
→
Page content transcription
If your browser does not render page correctly, please read the page content below
Garden Habitats
Fourth Grade Science Exploration

         Exploring plant and animal
habitats helps students learn more about the
        diversity of life in the garden.
Garden Habitats
           Fourth Grade Science Investigations

   Contents
   Teacher Introduction....................................................................................1

   Science Standards.........................................................................................2

   Recommended Literature...........................................................................2

   Materials List.................................................................................................3

   A Habitat is Where...(Pre-Assessment Activity)..................................4

   Living Dangerously.......................................................................................6

   Habitat Hunt ...............................................................................................8

   Garden Food Web .....................................................................................10

   Make More Habitat ...................................................................................12

   Mystery Habitats ......................................................................................14

   Homing In (Post-Assessment Activity)................................................16

   Lab Sheets...................................................................................................18

© Life Lab Science Program 2009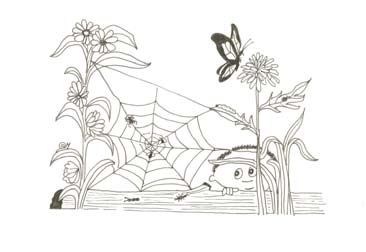
Teacher Introduction
       A habitat is more than the sum of its parts. Natural habitats are a tapestry of nooks and cran-
       nies that are home and sustenance to birds, insects, mammals, mosses, fungi, worms, crustaceans,
       mollusks, flowering plants, bacteria, millipedes, centipedes, reptiles, and more. Cut down a tree or
       strip away topsoil and the homes and livelihoods of many organisms are lost. Many students will
       know that a habitat is a home that provides food, water, shelter and living space for a plant or ani-
       mal. In this unit students expand on their knowledge, exploring how plants and animals interact with
       their habitat to meet their survival needs and respond to the habitat’s physical challenges.

       Students will learn to observe closely and ask questions. They will learn about the direct
       relationship between essential resources, such as water, food and shelter, and the population of
       animal species. Students will examine different microhabitats and observe the plant and animal
       interactions. They will learn about the benefits of a diverse habitat in the garden, and take cuttings
       from beneficial garden plants in order to create new habitat in their garden.

© Life Lab Science Program 2009                                                                                 1
Science Standards
Life Sciences:
2. All organisms need energy and matter to live and grow. As a basis for understanding this concept:
a. Students know plants are the primary source of matter and energy entering most food chains.
b. Students know producers and consumers (herbivores, carnivores, omnivores, and decomposers)
are related in food chains and food webs and may compete with each other for resources in an
ecosystem.
c. Students know decomposers, including many fungi, insects, and microorganisms, recycle matter
from dead plants and animals.
Investigation and Experimentation:
6. Scientific progress is made by asking meaningful questions and conducting careful investigations.
As a basis for understanding this concept and addressing the content in the other three strands,
students should develop their own questions and perform investigations. Students will:
a. Differentiate observation from inference (interpretation) and know scientists’ explanations come
partly from what they observe and partly from how they interpret their observations.
c. Formulate and justify predictions based on cause-and-effect relationships.
d. Conduct multiple trials to test a prediction and draw conclusions about the relationships
between predictions and results.
Resources
Story Books
Bluebird Summer. By Deborah Hopkinson, illustrated by Bethanne Andersen. Greenwillow, 2001
A beautifully illustrated and touching story about two children who restore the habitat in their
grandmother’s garden.
Mr. Carey’s Garden. By Jane Cutter, illustrated by Brian Karas. Houghton Mifflin Co., 1996
Illustrated story about 4 different neighborhood gardens and gardeners who each create and appre-
ciate different types of gardens.
Hey, Little Ant. By Phillip and Hannah Hoose, illustrated by Debbie Tilley. Tricycle Press
A funny, thought-provoking story about a boy’s dilemma about whether or not to squish an ant.
Herman and Marguerite: An Earth Story. By Jay O’Callahan, illustrated by Laura O’Callahan. Peachtree
Press, 1996 - This book tells the story of how a worm and a caterpillar work together to bring life
back into a lonely orchard through their friendship and songs.
Even more story books are found here:
The Good Kids’ Book List, compiled by the The Junior Master Gardener Program and the American
Horticultural Society, includes the top children’s garden books of the last 100 years.
www.cfaitc.org/books/ California Foundation for Ag in the Classroom offers an extensive list of
garden and nature based books for all grade levels.
© Life Lab Science Program 2009 2Materials List: Garden Habitats
A Habitat is Where…
• Chart paper or blackboard
Living Dangerously
• Ball of string
• Paper and pen
Habitat Hunt
• Habitat Cards
• Colored pencils
• Habitat Homes Chart (from A Habitat is Where....)
• Field Log
Garden Food Web
• Dry erase board/ pens
• Food chain labels
• String
• Field Log
Make More Habitat
• Garden clippers
• Moist cutting mix (soil or equal parts vermiculite/perlite blend)
• Small pots, or cups
• Plant labels
• Pencils
• Plastic bags
• Twist ties
• Field Log
Mystery Habitats
• Habitat Homes Chart (from A Habitat is Where....)
• Tape
• Habitat and Microhabitat Lab Sheet
• Mystery Habitat Lab Sheets
• Thermometer (optional)
Homing In
• Habitat Homes Chart (from A Habitat is Where....)
• Field Logs
© Life Lab Science Program 2009 3A Habitat is Where…
(Pre-Assessment Activity)
Description
In this activity, students list what people, other animals and plants need in order to survive.
Students then draw a picture showing how the habitat of a specific plant or animal provides these
essential resources.
Objective
Students describe what a habitat is and what resources living things need in order to survive in
their habitat.
Teacher Background
A habitat is the particular place in which a plant or animal lives and is able to find air, water, food,
shelter, and conditions suitable for reproduction.Your students will probably already know that
people, plants and animals have needs that must be met, even if they do not know the word habitat.
Use this activity to introduce the term.
Materials
• Chart paper or blackboard
© Life Lab Science Program 2009 4Class Discussion
On one sheet of chart paper labeled Habitat Homes, make three columns and label them with the
headings “People”, “Other Animals” and “Plants”. Tape up the chart. On the second sheet of paper
write the heading “A Habitat is Where…” Introduce the activity by asking students what they think
people need in order to live. Accept all ideas, writing them in the “People” chart. What do people
need in order to live? What are the basic things we need? What else do we need to survive? Do you think
other animals and plants have similar needs?
Action
1. Divide the class into groups of four students. Assign half of the groups to brainstorm things
animals need in order to live and the other half to brainstorm things plants need in order to live.
Encourage groups to think of as many things as they can, listing ideas on a piece of paper. Have each
group choose a reporter.
2. Ask the reporter from one group to read aloud from the group’s list while you record ideas on
the chart in the appropriate column. Ask other groups’ reporters to share any ideas they have on
their lists, and add these to the chart.
3. Ask students to identify any items that appear on all three lists. Circle them. The most basic
needs should be the same for all three groups.
Wrap Up
Have each student choose a favorite plant, animal or person. Ask students to draw a picture or a
design that shows how their chosen organism gets these essential needs met by their surroundings.
Make sure the students understand that drawing an accurate picture is not important; the drawing
is a way to communicate ideas.
© Life Lab Science Program 2009 5Living Dangerously Description In this game students discover how the availability of habitat resources affects populations of living things. Objective Students relate the availability of habitat resources to the size and fate of animal populations. Teacher Background Habitat loss is the main reason plants and animals become endangered. Often the loss is as simple and drastic as a bulldozer mowing down everything in its path. But changes may occur slowly, too, gradually diminishing one or more habitat resources. For example, the endangered Red Legged Frog and the Ohlone Tiger Beetle live on the UCSC Farm . Being so limited in their habitats, they are vulnerable to any disturbance—natural or human caused. This game helps students to consider the dependence of plants and animals upon specific resources in their habitat. Materials • Ball of string • Paper & pen Class Discussion Ask students what they think a habitat must provide for its animals and plants. What do animals need to survive within their habitat (food, water, shelter)? What happens to plants and animals when resources they need become scarce? What sorts of animal shelters/homes can you identify? What would happen if some animals in a habitat could not find shelter, food, water? What happens if the habitat itself gets small- er? What might decrease the area of a habitat? © Life Lab Science Program 2009 6
Action
        1. In an open area divide the group so that 1/4 are designated as the endangered Red-Legged Frog,
        or another local species.
        2. The remaining students are the resources—Food, Water and Shelter. For each round of the game
        they can be whichever resource they wish. They signal what resources they are by linking hands
        over their stomachs for Food, hands over their mouths for Water, and hands over their head for
        Shelter.
        3. The endangered animal must find each of these resources to survive. To start the game, the frogs
        go to one end of the field and turn their backs while the resources position themselves in the
        meadow. They then make the signal for the resource they want to represent. They must hold the
        sign and stay in the same spot until they are tagged or the round ends.
        4. On your signal, the frogs turn around and begin to find and tag—gently!—the habitat resources
        they need. Each frog must tag Food, Water and Shelter, in any order, so that they can survive. When
        a resource is tagged, the frog must call out the name of the resource. Once tagged the resource
        student goes to the sidelines and waits for the next round. Each resource can only be tagged once
        per round.
        5. If a frog succeeds in tagging all three resources—Food, Water and Shelter—it can reproduce. The
        third resource it tags joins the frogs for the next round. If a frog cannot find all three resources that
        it needs, it dies and joins the resource students for the next round.
        6. Play a few rounds of the game so that everyone gets an opportunity to play both roles. Keep
        count of the surviving frogs at the end of each round.
        7. After a few rounds, designate 2–3 students to be the Community. The Community has decided
        to build something on this land—a school, housing, hospital. What will happen to the habitat and its
        resources?
        To take this activity to a deeper level continue with steps 8 and 9.
        8. Give the Community the ball of string. After the habitat resources have positioned themselves on
        the field, the Community students use the string to mark out a section of the habitat that will be
        developed. All the habitat resources within the area are off limits to the frogs. The frogs, in their
        search for resources, must avoid the area. Continue to keep count of the surviving animals.
        9. With new construction and people in the area, the Community needs more resources itself.
        Appoint some of the displaced habitat students as additional Community developers. Give them
        the lengths of string you cut and let them join the Community students in marking out areas for
        development. As before, the resource students in these areas cannot be tagged by frogs. Play one
        or two final rounds until students connect impact of habitat with survival of wildlife.

        Wrap Up
        Using the figures on how many frogs survived each round, discuss what students experienced
        during the game. How were the habitat resources and animals balanced at the beginning of the game?
        Could each frog find what it needed for survival? What happened when the frogs reproduced and there
        were fewer resources? Do you think that the changes in the frog population that we found in the activity
        are similar to what happens in the wild? What changes occur when the frogs start losing their habitat? How
        does habitat destruction threaten wildlife?

© Life Lab Science Program 2009                                                                                      7
Habitat Hunt
Description
Students look for evidence of how plants or animals use their habitat for food, water, shelter and
living space.
Objective
Students practice using Field Logs and demonstrate what they know about habitats.
Teacher Background
Every living thing needs a home—not just a shelter but a resource base that provides food,
water, safety and space to live and produce young. Just as we look for homes near jobs, schools,
transportation, shops, parks and services, each animal needs a habitat where it can obtain the things
it needs for survival. Plants, too require certain soil types, light, nutrients, water and temperature
ranges. By spending time in the garden, students can learn to recognize the microhabitats in the
garden and the diversity of plant and animal populations they support.
Materials
• Habitat Cards
• Field Log
• Colored pencils
• Habitat Homes Chart (from A Habitat is Where....)
© Life Lab Science Program 2009 8Class Discussion
Ask students if they know what the place where particular plants and animals live is called— a
HABITAT. Introduce them to the word if they are not familiar with it. Ask students what humans,
plants and animals need for survival and record their ideas on the Habitat Homes Chart. What do
you need for survival? How do you meet your survival needs? Could you live anywhere? How about plants
and animals? What do the plants in our garden need for survival? What do the animals need? How does
our garden help them to survive? What resources do the plants provide for the animals? (food, shelter) What
resources do the animals provide for the plants? (pollination, beneficial predation, seed dispersal).
Action
1. Take students to a place with trees, a meadow, a pond and a garden.
2. Divide students into groups of two or three.
3. Give each group a Habitat Card. Explain that when they finish making and recording their
observations in their log, they should come back for a second card.
Wrap Up
Gather the students together and ask each pair to report what they observed. Have each pair
choose one habitat that they visited. What was unique about that habitat? What animals and plants live
in the habitat? How does that habitat provide shelter, food, water for its inhabitants? Are the plants gettin-
what they need to grow well? How can you tell? What does the habitat provide for its animal inhabitants?
Are these natural habitats? How can you tell?
© Life Lab Science Program 2009 9The Garden Food Web Description Students will recreate a garden food web to learn about the interconnections between animals, plants, soil and sun in a garden habitat. Objective To learn about the different roles producers, consumers (including herbivores, carnivores and omnivores) and decomposers play in the garden habitat and to understand the complexity of the garden food web. Teacher Background Where do pizzas, tacos, macaroni & cheese really come from? From green plants of course. Green plants transform the sun’s energy into food energy that organisms can use. This activity introduces students to the garden food chain—beginning with the sun, energy is passed from the produers—plants—to consumers, including herbivores, omnivores and carnivores, to decomposers. In the garden students can observe numerous different food chains, which comprise an intricate garden food web. © Life Lab Science Program 2009 10
Materials
       •   Dry erase board/ pens
       •   1 index card with the word “sun” and a picture of the sun on it.
       •   1 index card for each student
       •   String
       •   Hole punch
       •   Scissors
       •   Field Log

       Class Discussion
       Seat your group in a circle in a quiet spot in the garden. Introduce the concept of a garden food
       chain. Where do plants in our garden get the energy they need to grow? The sun! Are you able to get your
       energy from the sun? Can sunlight fill up your belly? What can get energy directly from the sun? Plants!
       Plants are called producers because they get their energy directly from the sun.Who eats plants? Who eats
       the animals that eat plants? Animals are called consumers because they rely on plants and other animals
       for their food. Are you a producer or a consumer? Why? What happens to these animals when they die?
       Where do the energy and nutrients go? Introduce the terms herbivore, carnivore, omnivore and
       decomposer.

       Action
       1. Have your students choose a prominent plant or animal in the garden. Write it in the center
       of the dry erase board. Then build a food chain around it. Where does this plant or animal get its
       energy? Who eats this plant or animal? What does it eat? Repeat a couple of times until students are
       comfortable with the concept.
       2. Create a list of all the producers, herbivores, carnivores, omnivores and decomposers they can
       think of that may visit your garden.
       3. Assign one plant or animal to each student from the list. Have them write the word and draw a
       picture on an index card. They can use the hole punch and string to make the card into a label to
       hang around their neck.
       4. Ask each student to explain who he or she is, what they eat and who eats them. Then,
       starting with the sun, have your students spin a garden food web by passing the ball of string from
       one person to any person that is connected (i.e. sun to plants to aphid, etc…). Once the web is
       spun, ask students to tug gently on the string. How does the web feel? Who else feels the tug? Is the
       web supporting you? What would happen if one piece of the web were to be wiped out? Have one student
       led go of the string. What happens to the strength of the web? How is this true in the garden? Can you
       give an example?
       5. Have students draw a picture of a garden food web in their Field Log.

       Wrap Up
       Diverse garden habitats support diverse garden food webs. Why is this important? If you could choose
       to be a different part of the food web, what would you be? Why?

© Life Lab Science Program 2009                                                                                    11
Make More Habitat!
Description
Students learn how to take cuttings from mature plants in the garden to produce new plants, which
will create new beneficial habitat when planted out in the garden.
Objectives
To learn about the different ways that plants can reproduce. To gain appreciation for how a diverse
habitat in the garden attracts beneficial insects and predators.
Teacher Background
Plants can reproduce in two different ways. Sexual reproduction in plants requires pollination, which
happens when the pollen is carried from the flower of one plant to another, either by wind or by
an animal pollinator. This produces a plant with genes from both parents—a plant that looks like a
combination of these parents, just like humans. Plants can also reproduce asexually. By taking cutting
from perennial, woody plants, you can reproduce exact replicas of the parent plant. Each piece of
the plant has all the information it needs to grow into a mature plant. Gardeners use both
techniques to make new plants.
Cuttings are pieces of plants that you root in wet soil or a perlite/vermiculite mix. As the new roots
grow, the cutting will grow leaves and shoots, and soon become another plant, which you can plant
in your garden or give away. Cuttings can be started indoors or outdoors. The key to success is to
watch them carefully to make sure the rooting medium does not dry out. Make several cuttings of
each type of plant, as not all cuttings will survive.
In this activity you will be making stem cuttings. The plants should be perennials (those that grow
year after year) and have woody stems at the base. Cut pieces from the new growth on the plant.
Make sure each cuttings has 4–5 sets of nodes (spots where leaves will eventually grow.) Common
garden plants that work well for taking cuttings include Sage, Geranium, Lavender, Mint, Penstemons
and some Salvias.
Materials
• Garden clippers
• Moist cutting mix (available at garden centers)
• Small pots or cups
• Plant Labels
• Pencils
• Plastic bags
• Twist ties
• Field Log
© Life Lab Science Program 2009 12Class Discussion
Explain that there are different ways a plant can reproduce (sexual reproduction and asexual
reproduction/cuttings.) Can you think of a way that a plant can reproduce? A seed can grow into a
whole new plant. The plant grown from a seed is a combination of both of its parents, just like you!
But sometimes we want a new plant to be exactly like a specific plant. We want an exact replica,
so then we use a different technique called cuttings. Each piece of a plant has all the information
it needs to grow into an entirely new plant. Once these plants grow roots and more shoots, we
can transplant then into our garden. What will these new plants create in our garden? More Habitat!
Why is a diverse habitat important in the garden? We will be growing more plants that attract benefi-
cial insects by providing nectar and/or shelter. What will these insects do for our garden in exchange?
(pollinate, eat pests).
Action
1. Explain that each student is going to take one cutting from a plants around the garden.
2. Direct students to fill their pots 3/4 full with potting mix and poke a whole in the center 1“deep.
3. Demonstrate how to take a cutting (how long, from what part of the plant, etc…) Show the
students how to gently cut off the bottom leaves (because they will rot in the potting mix) and then
bury the bottom half of the cutting.
4. If you are away from school, instruct students to make a label with the plant name and their
name and stick it in the pot. Students will put their pots in a tray and then seal the tray in a plastic
bag to send back to school. All the plant labels should hold the bag off of the plants.
Wrap Up
How do you think growing plants from cuttings is different from growing plants from seeds? Which way do
you think will be faster? What will these plants need to survive back in the classroom? Review the concept
of creating new habitat. When you plant these new pants in your garden what are you creating? Why is
that important?
Follow-Up
Back at school place the tray of cuttings in a warm spot, out of direct sunlight. Check the pots
regularly to make sure they are still moist. If they seem too damp, open the bag slightly to give them
some air.Your plants will be ready for transplant when they have developed many roots. After about
a month, dig down in the mix and check for roots. Allow the plants to mature for several months
and to develop a strong root system before planting into the garden.
© Life Lab Science Program 2009 13Mystery Habitat
Description
Student teams develop Mystery Habitat Cards by investigating and then describing the physical
conditions, plant and animal life found in a specific schoolyard microhabitat. Then student teams
switch cards and guess which Mystery Habitat is being described.
Objective
Student teams will practice relating the physical conditions of a habitat to what lives there.
Teacher Background
The school garden, with its paths, borders, diversity of plant life and soil types, and varying amounts
of sun, shade, moisture, dryness is a treasure trove of microhabitats. These microhabitats offer
opportunities for a wide range of plants and animals to thrive in special niche habitats found all over
the schoolyard. Students will observe, firsthand, how physical conditions influence which plants and
animals can live in both small and large habitats.
Materials
• Habitat Homes Chart (made in “A Habitat is Where...” lesson)
• Tape
• Mystery Habitat Lab Sheets
• Habitat and Microhabitat Lab Sheet
• Thermometer (optional)
Class Discussion
Divide your students into groups of two or three. Pass out one Habitats and Microhabitats Lab
Sheet to each group and discuss the habitats and microhabitats in the drawing. How would you
describe the light, climate, soil and other habitat conditions here? What animals do you see? What resources
do they need for survival? Where do they find these resources?
Record new ideas on the Habitat Homes Chart. Focus on one of the microhabitats in the picture.
Do you see any places in the habitat picture where a different community of plants and animals can find
the resources it needs to live? Point out a microhabitat if students do not recognize one, like the pond or
forest.What lives here? Are the light, moisture, and other conditions the same as elsewhere in the habitat?
How are the plants and animals using the microhabitat’s resources?
© Life Lab Science Program 2009 14Action
1. Ask students what sort of microhabitats the garden and/or schoolyard contain. Where do you find
plants and animals in unexpected places? How do they survive there? How would you describe a garden/
schoolyard microhabitat with enough detail so that someone else could find it?
2. Divide students into groups of 2–3, and look over the Mystery Habitats Lab Sheet.
3. Take students to the garden or schoolyard area. Challenge the group to find a garden
microhabitat that can be described with enough details so that another group can find it. Give
students 10–15 minutes to look for a spot and fill out the Mystery Habitats Lab Sheet. Have them
fold over and tape the flap so that the habitat’s location is hidden.
4. Collect the Mystery Habitat Lab Sheets and pass them out to other groups. Have the groups
look for the microhabitats described on them. Suggest that students check off clues to make sure
they have the right microhabitat.
5. When everybody has found a spot that matches the clues, ask students to uncover the answer.
6. If students did not find the location specified on the Mystery Habitats Lab Sheet, encourage
them to compare the habitat conditions, plants and animals in the microhabitat they selected with
those in the Mystery Habitat. Are the plants and animals the same or different? Are conditions the
same or different?
7. Allow time for groups to meet with the students that created their Mystery Habitat Lab Sheet so
that they can examine the microhabitats together. Does the habitat you found match the description?
What kind of information about plants and animals do you need in order to find the microhabitat? How
could youimprove your clues?
8. Give students who want to revise the clues on their Lab Sheet time to do so. Let others
describe a new mystery habitat based on what they have learned about descriptions and habitats.
Wrap Up
Invite groups to share what they learned about how to describe differences in microhabitats. What
different microhabitats did you find in the garden? What made the microhabitats different from the general
habitat? What information do you need in order to find a microhabitat? Record new ideas and questions
on the Habitat Homes Chart.
© Life Lab Science Pjrogram 2009 15Homing In
(Post-Assessment Activity)
Description
In this post-assessment lesson, students write and draw enticing travel ads for a garden animal’s
habitat.
Objective
Students organize what they know about plant and animal habitats and the environmental factors
that define them.
Teacher Background
What attracts you to a vacation spot? Beautiful natural surroundings that lift your spirit? Good food? Lovely
lodgings? Whatever the attractions, chances are that the vacation spot furnishes in abundance a
habitat resource that is normally in short supply in your life. Encourage students to think about
their own habitats and the resources they supply. Which resources are hard to obtain? Which resources
do they have that friends and relatives in other places do not have, such as good weather, beaches, parks
and so on? Once students have a sense of scarce and plentiful habitat resources, they can reflect
on which resources are easiest and hardest for a garden animal to obtain. What resources would its
dream vacation supply?
Materials
• Habitat Homes Chart (made in “A Habitat is Where...” lesson)
• Field Logs
© Life Lab Science Program 2009 16Preparation
Collect colorful travel magazine stories or ads that tout natural surroundings or outdoor activities,
such as skiing or river rafting. Find at least one ad for each team.
Class Discussion
Ask students to review their Field Logs to name some plants or animals they have studied, and tell
as much as they can about where and how the organism lives.
Name some plants or animals that you know about.Where do they live? How would you describe where
they live? What other plants and animals live there? How do the plants grow? What do the animals eat?
How do plants and animals interact? Record responses on the Habitat Homes Chart.
Then have students classify the habitat factors. Write the names of the plants or animals down
the left-hand side of the paper. Help students come up with habitat factors such as precipitation,
terrain, temperature and climate, food sources, shelter and so on. List the resources across the top
of the poster and fill in the chart, using the list students brainstormed. What have we described for
these plants and animals? What is a habitat?
Action
1. Display or pass around the travel ads and discuss the different habitats that are being advertised.
What habitats are these? What makes them attractive to people? Which ones would you like to
visit? Why? What does the ad emphasize that makes you want to visit this place?
2. Look over the list of plants and animals. Could you create an ad for a habitat that would entice one
of these plants or animals to visit? What would you emphasize? What habitat conditions are most
important to the plant or animal?
3. Divide the class into plant and animal teams of 3–5. and have each team choose a plant or animal
from the garden. The teams must create a travel ad from the organism’s point of view, featuring its
dream habitat. The object is to persuade others of the species to come and visit. Warn students not
to name the plant or animal in the add now. If they want to use the organism’s name in the ad, they
should leave a blank space.
5. After everyone is finished, ask teams to trade travel ads and see if they can determine what
organism is giving the pitch.
Wrap Up
Encourage students to reflect on how plants and animals use their habitats. Would any of our plants
or animals be enticed by the same ad? Do they live in the same or a similar habitat? What do they eat?
When do they look for food and move around? How do plants use their habitats? How are plants and ani-
mals related in a habitat?
© Life Lab Science Program 2009 17Garden Habitats
Lab Sheets
© Life Lab Science Program 2009
18© Life Lab Science Program 2009 19
© Life Lab Science Program 2009 20
Habitat Cards

Visit an area where there are trees.

What animals might live in or visit this habitat? How many animals or
signs of animals can you find?

Do the trees provide food for any creatures?

If you were an animal, where would you make a home in the trees? Why?

Would this be a good place to hide? Why?

Visit a meadow habitat.

Look closely. Can you find any animals or signs of animals that make
their homes here?

What food sources are here?

Would this be a good place to hide? Why?

What are the dangers to an animal living here?
Visit a pond or stream habitat.

What animals might live in or visit this habitat? How many animals
or signs of animals can you find?

Where might these animals find shelter?

What do animals eat in this habitat?

Why do you think this habitat is important?

Visit a garden habitat.

What animals might live here or visit? How many animals or signs
of animals can you find?

What do animals eat in the garden?

If you were an animal, where would you make a home in the
garden? Why?

Do animals help the garden? How?
Garden Habitats Field Log

Name:______________________
Teacher:_____________________
Habitat Hunt
1. Choose five words to describe your habitat.

2. What plants and animals live in your habitat?
3. Choose one plant or animal that lives in your habitat.

     1. How does your habitat provide food for this plant or animal?

     2. How does your habitat provide water?

     3. How does your habitat provide shelter?
Garden Food Web
Draw a picture of a garden food chain starting with
energy from the sun.Make More Habitat Record the following information about your new plant. Plant Name: Date of Cutting: Number of Leaves on your Cutting: What animals might use your plant as habitat back in your school garden?:
Garden-Based Life Lab Science
This two-day workshop uses Life Lab’s K-5 core curricu-
Learning Resources lum- Life Lab Science to teach earth, life and physical science
using the garden.
Life Lab Science Discovering the Garden in Early Childhood
Education
Program Spend a day looking at the garden through the eyes of a
pre-schooler. Sample many activities that encourage young
children to learn about their world using all their senses.
Watch learning Plant It!, Grow It!, Eat It!
Make the connection from seed to table in this fun and deli-
come to life in cious workshop. Explore ways to teach nutrition through
gardening, harvesting and meal preparation while integrating
the garden!. with core academic subjects.
Math and Science in the Garden
Since its inception in 1979 Life Lab Science This is a one-day workshop for upper elementary and mid-
Program has been a leader in Garden-Based dle school teachers who want to use the garden to enhance
Education. Training thousands of teachers math and science learning.
across the nation, creating the Garden
Creating A Waste Free School
Classroom, a nationally recognized model school
Learn how to reduce the amount of waste your school
garden and training center, and publishing
sends to the landfill while you reduce the amount of money
curriculum and activity guides are a few of Life
you are literally throwing away.
Lab’s accomplishments.
Life Lab teaches people to care for themselves, Consultation & School Gardens Tour
eachother and the world through farm- and garden- Life Lab was founded in 1979 at Green Acres Elementary
based programs. School in Santa Cruz. Since that time, Life Lab Science
Learn more and order online at lifelab.org Program has been a leader in the school garden movement,
helping to create thousands of school gardens across the
Professional U.S. Life Lab will lead your garden team on a tour of thriv-
ing school gardens in and around the Santa Cruz area. Gain
Development ideas on design, educational uses, management and nutrition
Workshops education.
Life Lab has developed a wide selection of garden-based learn-
ing workshops, available at our Garden Classroom Training Garden-Based
Center or at your school site. Consulting services and/or
specialized workshops are also available. Contact
Learning
education@lifelab.org or visit the professional development Publications
page at www.lifelab.org.
Creating and Sustaining School Gardens
Life Lab Science K‑5
In this one day workshop you’ll learn how to take the first Curriculum
steps of creating a living laboratory, including setting goals for Recognized by the Smithsonian Institute as an
your site, gathering input from users, making a fundraising plan, “outstanding curriculum”, Life Lab Science is a
finding volunteers and donors, publicizing your garden and garden-based, and grade level specific (K–5) cur-
connecting to academic standards. riculum. Teacher instructional manuals include
pre- and post- assessment, unit planners, parent
The Growing Classroom letters, and suggested connections to language
This two-day workshop is ideal for those interested in sup- arts, math and social studies. Also available: student activity
plementing their existing science program with garden-based guides and Spanish blackline masters for
learning. Using The Growing Classroom activity guide for grades first through fifth, and music CD.
grades 2-6, you’ll experience hands-on activities aligned with Downloadable California State Science
CA State Science Standards, learn basic science concepts Standards matrix available at
and gardening techniques, and develop planning and manage- www.lifelab.org
ment strategies for a school gardening program.
www.lifelab.org (831) 459-2001Life Lab Science K‑5 Curriculum Sowing the Seeds of Wonder:
Kindergarten: Great Explorations Discovering the Garden in Early
Teacher Resource Book $75.95 Childhood Education
Through hands-on activities preschool-
1st Grade: Earth Is Home age children will engage all of their senses
Teacher Resource Book $79.95 as they discover the joys of gardening.
Sowing the Seeds of Wonder is an educa-
2nd Grade: Change Around Us
tor guidebook that provides insight and
Teacher Resource Book $79.95
lessons for educators to help students
3rd Grade: How Things Work develop a lifelong connection to the out-
Teacher Resource Book $79.95 doors. Lessons guide young students to
dig into the soil; observe birds, insects, and other critters in
4th Grade: Connections the garden; and enjoy the tastes of fresh fruits and vegeta-
Teacher Resource Books with Lab Materials $189.00 bles they plant, harvest, and prepare. $16.95
5th Grade: Change Over Time
Teacher Resource Books with Lab Materials $189.00 Popcorn/Maize
Activities help raise awareness about the diversity of local
and national food production, introduce components of
More Resources farming and demonstrate basic ecological concepts related
to growing food sustainably. Popcorn (lower grades)/
The Growing Classroom: Garden-Based Maize (upper elementary and middle grades)
Science and Nutrition Activity Guide $19.95each
The Growing Classroom is our award win-
ning resource book containing step-by-step Create from Waste
instructions for setting up a garden-based K-7 activity guide for engaging students in community based
science program and many outdoor class- ecology and waste reduction.
room activities. Topics include working 75 pages, $19.95
together in the garden, growing, nutrients,
garden ecology, climate, nutrition, gardening
tips and food choices. Downloadable CA Away with School Waste
State Science Standards matrix available at A teachers guide to starting school waste reduction, recy-
www.lifelab.org. 464 pages. $39.95 cling, and composting program. 17 pages, $19.95
Kids’ Garden Activity Cards - 40 Fun Indoor Banana Slug String Band CD
and Outdoor Activities and Games Singing In Our Garden
This boxed card set makes a great gift for Teach ecology, science and nature with
any child or family ready to create and ex- the Banana Slug String Band. A collection
plore the garden. These activities come in a of Banana Slug favorites including: Roots,
set of 40 beautifully illustrated double-sided Stems Leaves; I’m A Tree; Dirt Made My
activity cards. Activity themes include: Lunch; Soil, Sun, Water and Air; Water Cy-
* Exploring the Garden cle Boogie; and Decomposition. This CD
* Planting and Growing accompanies our curriculum. $15.00,
* Having Fun With Plants Singing In Our Garden Lyrics $9.00
* Discovering Garden Critters
* Creating Garden Art
Garden Signs
The box also includes a garden instruction Created by the Life Lab Garden
leaflet providing tips for gardening with kids. $19.99 Classroom Staff and Design Science
Graphics these garden themed signs
Getting Started: A Guide for Creating will turn your garden plot into an
interpretive site. Themes: weather,
School Gardens as Outdoor Classrooms habitat, plant’s needs, investigating the
This 50-page guide that asks and answers most questions
garden, plant adaptations, vermi-composting and composting.
you need to consider for creating an outdoor classroom
Have your sign professionally manufactured at esigns.com.
garden. Free download at www.lifelab.org
$20/design, order online to download PDF files
www.lifelab.org (831) 459-2001Life Lab teaches people to care for themselves, each other, and the world through
farm and garden-based programs.
For more information, please contact Life Lab Science Program (831) 459-2001
www.lifelab.org
© Life Lab Science Program 2007You can also read