Step-by-Step Guide How to Deploy BlueZ on Raspberry Pi3 and Use It Part 1 - Deployment
←
→
Page content transcription
If your browser does not render page correctly, please read the page content below
Step-by-Step Guide
How to Deploy BlueZ on Raspberry Pi3
and Use It
Part 1 - Deployment

BlueZ is the official Linux Bluetooth® protocol stack. As stated in the
BlueZ v5.47 release notes, “this release comes with initial support
for it in the form of a new meshctl tool. Using this tool, it’s possible
to provision mesh devices through the GATT Provisioning Bearer
(PB-GATT), as well as communicate with them (e.g. configure them)
using the GATT Proxy protocol.” This tutorial guides you through the
steps for installing BlueZ v5.50 on Raspberry Pi3 (R Pi3).

Author: Kai Ren
Version: 1.1
Revision Date: 29 Augus 2018
Revision History

       Version            Date              Author         Changes

 1.0               31st May 2018      Kai Ren        Initial Version

                                                     Upgrade BlueZ
 1.1               29th August 2018   Kai Ren
                                                     installation to v5.50

                                                                             2
table of
contents
1.0 Prerequisite . . . . . . . . . . . . . . . . . . . . . . . . . . . . . . . . . . . .  4

2.0 Install BlueZ v5.50. . . . . . . . . . . . . . . . . . . . . . . . . . . . . . .  4
       2.1    Remote Access R Pi3 Through SSH                                            4
       2.2 Install Dependencies for BlueZ                                                5
       2.3 Install json-c for BlueZ v5.50                                                5
       2.4 Install ell for BlueZ v5.50                                                   5
       2.5 Get BlueZ v5.50 source code                                                   6
       2.6 Compile and Install BlueZ                                                     6

3.0 Rebuild the Kernel for BlueZ v5.50. . . . . . . . . . . . . . . . . .  8
       3.1    Install Kernel Building Dependencies                                       8
       3.2 Checking Out Building Tool and R Pi3 Source Code                              8
       3.3 Configuring the Kernel                                                        8
  3.4 Build and Install the Kernel, Modules, and
		    Device Tree blobs                                                                  10
       3.5 Verifying Kernel Installation                                                 10

4.0 Summary . . . . . . . . . . . . . . . . . . . . . . . . . . . . . . . . . . . . . .  12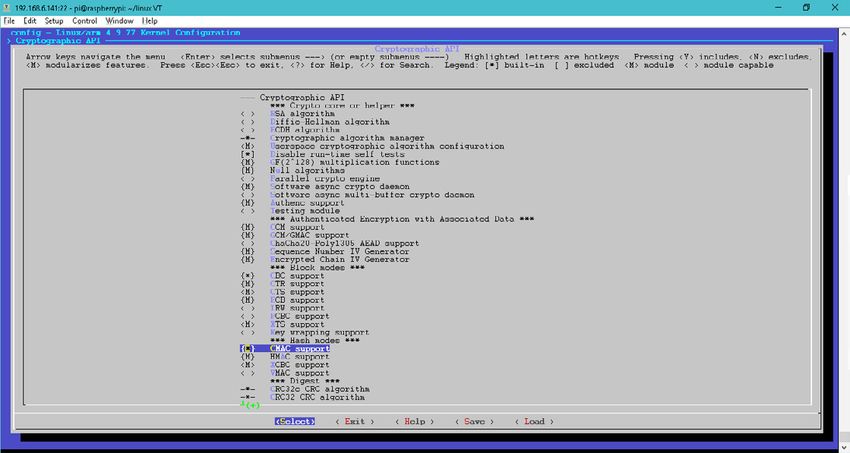
back to contents

1.0 Prerequisite
Before deploying BlueZ, you should have performed the following to setup your R Pi3 board.
    •   The R Pi3 is powered by a USB Micro power supply which can supply at least 2A at 5V
    •   The TF card should be > 16GB, at least class 4
    •   The Raspbian is used in this tutorial:
		      o   RASPBIAN STRETCH WITH DESKTOP Image with desktop based on Debian Stretch
		      o   Version: March 2018
		      o   Release date: 2018-03-13
		      o   Kernel version: 4.9
    •   Flash the correct Raspbian, this link will show you how
  • Change the login username and password, or remember the default one:
		Username: pi
		Password: raspberry
		  It’s important because we will use them to login to R Pi3 remotely through SSH.
  •     Please follow this guide to enable SSH. After that, R Pi3 can be remote accessed through
		      SSH. The image below shows that I use Tera Term on my Windows10 laptop to access
		      R Pi3 remotely

    •   It’s already being “apt-get update” and “apt-get upgrade”

2.0 Install BlueZ v5.50
Once R Pi3 is setup correctly, you can start to install BlueZ v5.50.

2.1 Remote Access R Pi3 Through SSH
As mentioned in the Prerequisite section, you should remote login to R Pi3 through SSH. You need to
make sure that your Windows computer is in the same LAN with R Pi3 and you know the IP address of
R Pi3.

                                                                                                      4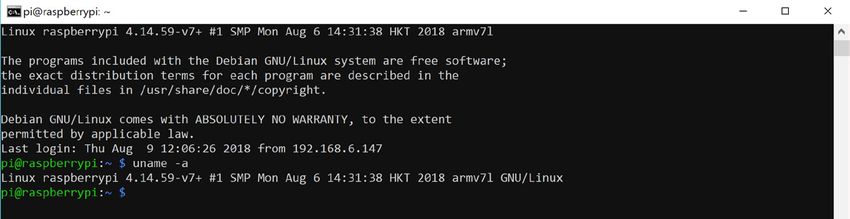
back to contents

2.2 Install Dependencies for BlueZ

 sudo apt-get install -y git bc libusb-dev libdbus-1-dev libglib2.0-dev libudev-dev libical-dev libreadline-dev autoconf

2.3 Install json-c for BlueZ v5.50

 cd ~
 wget https://s3.amazonaws.com/json-c_releases/releases/json-c-0.13.tar.gz
 tar -xvf json-c-0.13.tar.gz
 cd json-c-0.13/
 ./configure --prefix=/usr --disable-static && make
 sudo make install

2.4 Install ell for BlueZ v5.50

 cd ~
 wget https://mirrors.edge.kernel.org/pub/linux/libs/ell/ell-0.6.tar.xz
 tar -xvf ell-0.6.tar.xz
 cd ell-0.6/
 sudo ./configure --prefix=/usr
 sudo make
 sudo make install

2.5 Get BlueZ v5.50 source code

 cd ~
 wget http://www.kernel.org/pub/linux/bluetooth/bluez-5.50.tar.xz
 tar -xvf bluez-5.50.tar.xz
 cd bluez-5.50/

                                                                                                                           5
back to contents
2.6 Compile and Install BlueZ
./configure --enable-mesh --prefix=/usr --mandir=/usr/share/man --sysconfdir=/etc --localstatedir=/var
make
sudo make install
To make sure the upgrade you install is BlueZ to v5.50 tell systemd to use the new bluetooth daemon:
sudo vi /lib/systemd/system/bluetooth.service
After opening this file, bluetooth.service, make sure the ExecStart line points to your new daemon in /
usr/libexec/bluetooth, as shown in the screenshot below.
Now, you need to create a symlink from the old bluetoothd to the new one. First, rename the old file
for backup. Type below command and you will find the backup file as below screenshot shown.
sudo cp /usr/lib/bluetooth/bluetoothd /usr/lib/bluetooth/bluetoothd-543.orig
6back to contents
Create the symlink using the command below and double check the version of bluetoothd
and meshctl.
sudo ln -sf /usr/libexec/bluetooth/bluetoothd /usr/lib/bluetooth/bluetoothd
sudo systemctl daemon-reload
bluetoothd -v
meshctl -v
As shown in the screenshot below, bluetoothd and meshctl are all v5.50 This means that BlueZ v5.50
installation is successful.1
1
About upgrading bluetoothd, reference this article,
https://raspberrypi.stackexchange.com/questions/66540/installing-bluez-5-44-onto-raspbian
7back to contents
3.0 Rebuilding the Kernel for BlueZ v5.50
There are two main methods for building the kernel. You can build locally on a Raspberry Pi, which
takes a long time, or you can cross-compile, which is much quicker but requires more setup. This
tutorial shows you the local building method.
3.1 Install Kernel Building Dependencies
sudo apt-get install -y git bc libncurses5-dev
3.2 Checking Out Building Tool and R Pi3 Source Code
cd ~
git clone --depth=1 https://github.com/raspberrypi/linux
3.3 Configuring the Kernel
cd ~
cd ./linux
KERNEL=kernel7
make bcm2709_defconfig
make menuconfig
After typing menuconfig, the kernel configuration menu will pop up. The menuconfig utility has
simple keyboard navigation. After a brief compilation, you’ll be presented with a list of submenus
containing all the options you can configure; there’s a lot, so take your time to read through them and
get acquainted.
Use the arrow keys to navigate, the Enter key to enter a submenu (indicated by --->), Escape twice to
go up a level or exit, and the space bar to cycle the state of an option. Some options have multiple
choices, in which case they’ll appear as a submenu and the Enter key will select an option. You can
press h on most entries to get help about that specific option or menu. 2
Please include the three modules below:
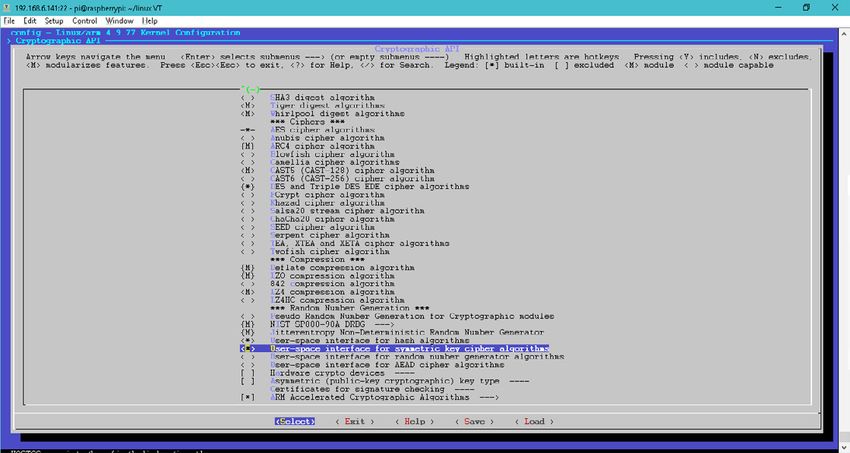
Select Cryptographic API → CMAC support
Select Cryptographic API → User-space interface for hash algorithms
Select Cryptographic API → User-space interface for symmetric key cipher algorithms
2
About this part, reference this article,
https://www.raspberrypi.org/documentation/linux/kernel/configuring.md 8back to contents
9back to contents
Once you’re done making the changes you want, press Escape until you’re prompted to save your
new configuration. By default, this will save to the .config file. You can save and load configurations
by copying this file around.
3.4 Build and Install the Kernel, Modules, and Device Tree blobs
make -j4 zImage modules dtbs
sudo make modules_install
sudo cp arch/arm/boot/dts/*.dtb /boot/
sudo cp arch/arm/boot/dts/overlays/*.dtb* /boot/overlays/
sudo cp arch/arm/boot/dts/overlays/README /boot/overlays/
sudo cp arch/arm/boot/zImage /boot/$KERNEL.img
sudo reboot
This process takes a longtime, maybe 2 to 3 hours.
3.5 Verifying Kernel Installation
After the board restart, issue command uname -a and a new build time will be shown. In the image
below, you can see the build time is Mon Aug 6 14:31:38 HKT 2018. That time and date was exactly
when I built the kernel and it means the kernel building and installation as successful.
10back to contents
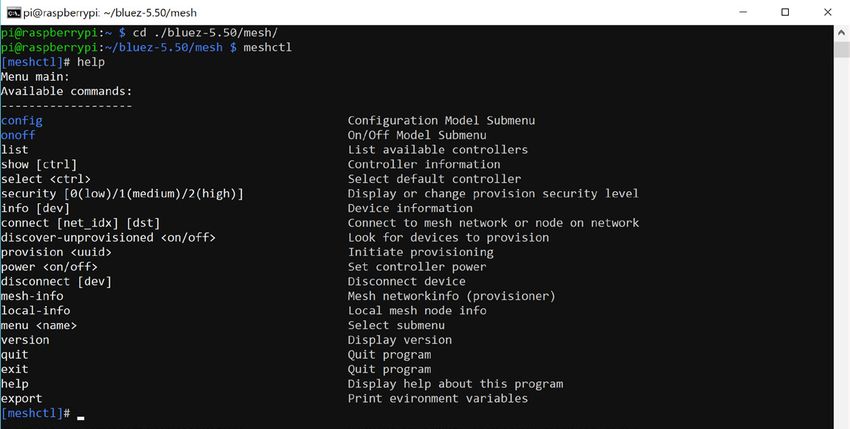
Type meshctl in folder ~/bluez-5.50/mesh to ensure it will work correctly, as shown in the image
below.
11back to contents
4.0 Summary
Once you complete all the steps listed above, you’ll have a Raspberry Pi3 board which can work as a
provisioner to provision any dev kits/boards that support PB-GATT. Future tutorials will show you how
to use meshctl to provision and configure a real Bluetooth mesh device.
12You can also read