Important Information Before You Begin - The Colonial Collection
←
→
Page content transcription
If your browser does not render page correctly, please read the page content below
INSTALLATION GUIDELINES

                                                                              55%, and a temperature range of between 60º and 80º F at all times.
           ATTENTION! READ BEFORE INSTALLING.
       FAILURE TO FOLLOW GUIDELINES WILL RESULT IN                            Failure to ensure a maintain a dry sub-floor and/or crawl-space or
      PRODUCT DAMAGE AND/OR VOID ALL WARRANTIES.                              failure to regulate environmental RH or temperature as required
                                                                              can lead to excessive cupping, splitting, checking and gapping. Such
          ENGINEERED FLOORING MUST BE INSTALLED
                                                                              occurrences will not be covered as manufacturing defects by any
             VIA GLUE-DOWN INSTALLATION ONLY.
        (SOLID FLOORING CAN BE INSTALLED VIA EITHER                           Colonial Collection warranty.
          GLUE-DOWN OR NAIL-DOWN INSTALLATION.

                                                                              INSTALLER/OWNER RESPONSIBILITY
          DO NOT ACCLIMATE BEFORE INSTALLATION.
                                                                              Prior to installation the Installer/Owner should perform a final
                                                                              inspection of the grade, manufacturing and factory finish of the
                                                                              purchased products. Materials installed with visible defects are not
Important Information Before                                                  covered under warranty. Remember – Wood is a natural product

You Begin
                                                                              that can vary in color, grain, and contains natural characteristics
                                                                              that varies from plank to plank and is to be expected. We do not
                                                                              warrant against these natural variations from plank to plank or
It is EXTREMELY IMPORTANT that you read and understand this                   variations from sample to plank. If you are not satisfied with the
information completely prior to starting, since improper installation         flooring prior to installation, simply return the cartons to your
can void the warranties. Only a professional hardwood floor                   dealer for a full replacement. Accepting or rejecting the material
installer should perform the installation.                                    must be done on full shipment of quantities only, not carton by
                                                                              carton or plank by plank. The Installer must use reasonable
If at any time during the installation of this flooring you have a            selectivity and hold out or cut off pieces with defects, whatever the
question or a concern, STOP and call your dealer! Verify that                 cause. Beautiful hardwood floors are a product of nature and
the color, gloss and distressing and T&G fit are acceptable                   therefore not perfect. Our wood floors are manufactured in
prior to starting the installation.                                           accordance with accepted industry standards, which permit a
                                                                              defect tolerance not to exceed 5%. The defects may be of a
The Colonial Collection will only be responsible for obvious                  manufacturing or natural type.
issues in flooring that has not been installed.

                                                                              The Colonial Collection shall not accept responsibility for visible
READ THIS CAREFULLY: The primary cause of problems with any                   defects in flooring that has already been installed. Before installing
hardwood floor is moisture, either too much or too little. It is the          Colonial Collection floors, the Installer and Owner should ascertain
contractor’s / homeowner’s responsibility to ensure that the                  that the jobsite and sub floor meet all necessary requirements of
conditions prior to install, as well as for the life of the hardwood          installation as outlined in these instructions. The Colonial Collection
floor, meet certain criteria. The wood sub-floor to which you are             Limited Warranties do not cover flooring failures resulting from
gluing or nailing your hardwood floor must have a moisture                    poor jobsite and/or sub floor conditions.
content (MC) of 12% or less when measured with a properly
calibrated pin-type moisture meter, and it should be within 3% of
the measured MC of the hardwood flooring prior to installation.
The sub-floor must remain at 12% or less MC throughout the life of
the hardwood floor. It is the contractor’s / homeowner’s
responsibility to verify those measurements, and to ensure that the
environment, including the crawl-space, is and will remain dry.
Other factors which can affect the MC of the floor, and cause
problems, are uncontrolled environmental relative humidity (RH). It
is the homeowner’s responsibility to install, operate and monitor
such systems as necessary to maintain a RH of between 35% and

THE COLONIAL COLLECTION INSTALLATION GUIDELINES                         –1–                                                     (REV. JANUARY 2019)
• Gutters and downspouts should be in place and the exterior
grade complete to allow for proper drainage of water away
Jobsite Conditions and from the building’s exterior perimeter.
• Flooring should not be exposed to extremes of humidity or
Acclimation– All Installations moisture.
• Permanent HVAC should be on and operational a minimum of
7 days and maintained between 60º and 80º F and a relative
A. GENERAL CONDITIONS
It is the installer/ Owners’ responsibility to ensure that the jobsite humidity of 35%- 55% prior to delivery, during, and after
conditions and jobsite subfloor are environmentally and installation of the flooring.
structurally acceptable prior to the installation of any hardwood • If HVAC is not possible at time of installation the
flooring. The manufacturer declines any responsibility for failures environmental conditions must be at or near normal living
or deficiencies of hardwood flooring resulting from or related to conditions between 60º and 80º F and at the average yearly
sub-floor, subsurface, or job-site environmental conditions. All relative humidity for the area.
substrates must be clean, flat, dry, and structurally sound.
It is the Installer’s/Owner’s responsibility to ensure that the
• Subfloors must be clean and free of dirt, curing compounds, conditions are acceptable prior to the installation of the
sealers, drywall mud, paint, wax, grease, urethane, or other hardwood floors. The manufacturer declines any and all
materials that may affect the integrity of the flooring material problems with the hardwood flooring that are related to or
or adhesives used to install the flooring. attributed to improper jobsite conditions.
• All subfloors and subfloor systems must be structurally sound
and must be installed following their manufacturer's
recommendations. Local building codes may only establish B. RECOMMENDED SUBFLOOR SURFACES
minimum requirements of the flooring system and may not Concrete subfloors: Newly poured concrete must be cured for a
provide adequate rigidity and support for proper installation minimum of 42 days before installation. Concrete subfloors must
and performance of a hardwood floor. Whenever possible meet the requirements for the adhesive or adhesive system
install the planks perpendicular to the floor joists for selected.
maximum stability. Our warranties DO NOT cover any
problems caused by inadequate substructures or improper Wood Subfloors – Preferred: ¾” CDX grade Plywood subfloor/
installation of said substructures. underlayment, 4’x8’ sheets or ¾” OSB subfloor/ underlayment
• Test subfloor moisture content and choose adhesive system grade, PS2 rated, sealed side down, with joist spacing of 19” on
according to the Glue-Down Installations section. Record the center or less.
results of the test with permanent marker on the subfloor
such that it can be found later. Wood Subfloors – Minimum: 5/8” CDX Plywood subfloor/
• A “DRY” SLAB, AS DEFINED BY THESE TESTS CAN BE WET AT underlayment, 4’x8’ sheets, maximum 16” on center joist
OTHER TIME OF THE YEAR. THESE TESTS DO NOT GUARANTEE construction. Follow panel manufacturer’s recommendations for
A DRY SLAB. spacing and fastening. Typical panel spacing and fastening for joist
• Basements and crawl spaces must be dry. Use of a 6 mil black systems, 1/8” (3.2mm) around perimeter and fastened every 6” on
polyethylene is required to cover 100% of the crawl space bearing edges and every 12” along intermediate supports.
earth. Crawl space clearance from ground to underside of joist
to be no less than 18” and perimeter vent spacing should be Installation of flooring should not be made over joists spacing
equal to 1.5% of the total square footage of the crawl space greater than 19” on center or parallel to the joists unless the
area to provide cross ventilation. Where necessary, local subfloor has been properly strengthened, applying a second layer
regulations prevail. of underlayment may be necessary to bring the overall subfloor
• The subfloor must be flat, meeting a minimum of 1/8” within thickness to 1-1/8” (minimum).
10’. • Test the moisture content of the wood subfloor and wood
• Repair all cracks in the subfloor greater than 1/8” before flooring with a pin type moisture meter. Wood subfloors must
applying flooring adhesive. not exceed 12% and the wood flooring should be within 3% of
• All “wet” work – i.e. – paint, drywall, concrete, masonry, the wood subfloor.
plumbing must be complete and dry well in advance of • For existing wood floors install new flooring at right angles to
delivery of hardwood flooring. the existing flooring.
THE COLONIAL COLLECTION INSTALLATION GUIDELINES –2– (REV. JANUARY 2019)• Do not glue hardwood flooring over particle board. the casing with a handsaw or use a power jamb saw set at the
• Do not install over existing glue down hardwood floors. correct height.
Blending of Cartons: To achieve a uniform appearance across the
entire floor, we highly recommend that you open and work from
C. HANDLING, STORAGE, AND ACCLIMATION
• Do not store material in a garage, outside or in a home or several cartons at a time and dry-lay the flooring, mixing the planks
building that is not climatized to 35% to 55% RH. from several cartons. This will allow you to blend the planks for
• Storing in environments other than a controlled environment maximum aesthetic appearance. Make certain the room is well lit
will cause the wood to take on moisture lose moisture which to ensure color is consistent and that any visual defects can be
will cause the flooring to shrink or grow. seen and removed.
• The moisture content of the material will be 8%-10% moisture
Match Transition Moldings: For best appearance, blend all
content and is ready to install and does not require
transitions and moldings to planks that have similar color and
acclimation. Please test prior to installing.
graining. Set them aside for use as needed.
• Only open material that will be installed. Leaving planks outs
of plastic wrap exposes the planks to change prior to Layout of Flooring: “Racking the floor” is essential to achieve a
installation. random appearance. Start by either using random-length planks
found in the carton or by cutting four or five planks in random
lengths, differing by at least six inches. As you continue working
across the floor try to maintain a six-inch minimum between end
Preparing for Installation – joints.
All Installations Randomly install different lengths to avoid a patterned appearance.
Never waste materials; the end cuts from starter rows should be
STOP! All questions or concerns regarding the grading or
used at the opposite side of the room to complete rows or used to
milling of this product are required to be resolved prior to
start the next row.
installation. The manufacturer accepts no responsibility or
liability for the cost of this product, replacement and/or labor
Expansion Space: Allow a minimum 1/2” (engineered floors) or ¾”
when flooring containing grade, milling, distressing or
(solid floors) expansion around all vertical obstructions. Large
finishing defects has been installed prior to resolutions.
spans exceeding 20’ (6 m) in hardwood flooring width, in areas of
Installing this product assumes full acceptance of this flooring.
high humidity, may require the addition of internal or field
expansion. This can be accomplished by using spacers, such as
IMPORTANT!
small washers, every 10-20 rows, inserted above the tongue.
Per 3M: ScotchBlue™ Painter’s Tape Original Multi-Surface 2090 is
Remove the spacers after several adjoining rows have been
not recommended for use on pre-finished flooring. The only
fastened. Do not leave spacers in for more than two hours.
adhesive tape which should be used with Colonial Collection
Flooring is ScotchBlue™ Painter’s Tape Delicate Surface 2080.
Traditional “Blue Tape” contains chemical solvents that, over time,
may penetrate and weaken the finish. DO NOT use “Blue Tape”.
Even when using ScotchBlue™ Painter’s Tape Delicate Surface 2080,
do not leave tape on flooring for longer than 3 days. When possible,
apply tape to baseboards or walls rather than flooring.
Inspect the Flooring: Inspect material for color, finish, milling, and
grade. Hold out pieces that may not be acceptable once installed.
PLEASE NOTE: We do not accept responsibility for any costs
incurred when plank(s) with visible defects have been permanently
installed.
Undercut Door Casings: Undercut all door casings 1/16" higher
than the thickness of the flooring being installed. To do this, use a
scrap piece of flooring as a guide. Lay it on the substrate and cut
THE COLONIAL COLLECTION INSTALLATION GUIDELINES –3– (REV. JANUARY 2019)Additionally, the nail-down installation will only be as good as the
Glue-Down subfloor. If the subfloor is unsound or unlevel, this situation must
Installation Guidelines
be corrected prior to installation. The Colonial Collection will not be
responsible for any problems due to an unlevel or unsound
subfloor, especially squeaking and popping.
COLONIAL COLLECTION ENGINEERED FLOORING NOTE: Our products are not warranted against squeaking, popping
MUST BE INSTALLED VIA GLUE-DOWN or crackling when using staple-down or nail-down installation
INSTALLATION ONLY. methods. Some squeaking, popping or crackling is normal and
(For installations over Radiant Heat systems, see also the section on
possible when using staple-down or nail-down installation methods.
Radiant Heat Installations.) These symptoms may be aggravated in arid areas or during dry
Adhesive and Moisture Barrier Systems from the following conditions. This is not a manufacturing defect and is therefore not
manufacturers are permitted for the full-spread glue-down covered under our warranties (see warranty brochure for complete
installation of Colonial Collection Floors: Bostik, Fortane. warranty coverage). You can help reduce squeaking, popping, and
crackling by being sure that the subfloor is structurally sound, does
Follow the Adhesive Manufacturer’s Installation Instructions for the not have any loose decking or joists, and is swept clean prior to
testing of subfloor moisture content. Choose an adhesive and (if installation.
necessary) moisture barrier system that is warranted by the
adhesive manufacturer for installation under those circumstances. SETUP AND USE OF PNEUMATIC STAPLERS AND
The Colonial Collection will not be responsible for problems that NAILERS
You must make certain that your stapler or nailer is setting the
might arise due to moisture transference from a subfloor to the
fastener properly, not damaging the planks, and that you are using
hardwood flooring.
the correct nailing schedule. When used improperly, cleats can
damage wood flooring. If the tool is not adjusted properly the
Please note the following exceptions:
cleats may not be positioned at the proper angle and cause
Adhesive Removal: Use the adhesive manufacturer’s
blistering, peaking, squeaking, or crackling of the floor. Some
recommended Adhesive Remover according to the instructions on
models may require the use of an adapter to adjust for proper 5.
the bottle.
thickness. Test the tool on a piece of scrap material first - set the
stapler/ nailer flush on the tongue side of the plank and install a
In case of any other conflict between adhesive manufacturer
cleat. Should the cleat penetrate too deeply reduce the air pressure;
instructions and The Colonial Collection Installation or Care and
if the cleat is not deep enough then increase the air pressure using
Maintenance Instructions, please contact your dealer for resolution.
an in-line regulator. The crown of the cleat should sit flush within
the nail pocket to prevent damage to the flooring and to reduce
squeaking. The flooring manufacturer is not responsible for
Nail-Down Installation damage caused by the mechanical fasteners.
IMPORTANT NOTE: Only use manufacturer's recommended cleats.
Guidelines FOR 3/4” THICK PRODUCTS THE RECOMMENDED
SOLID FLOORING CAN BE INSTALLED VIA EITHER
LENGTH CLEAT IS 1-1/2” TO 2”.
GLUE-DOWN OR NAIL-DOWN INSTALLATION.
FOR 1/2” PRODUCTS THE RECOMMENDED CLEAT
LENGTH IS 1- 1/4”
ADDITIONAL TOOLS AND MATERIAL NEEDED:
Drill, Tapping Block, Compressor, Air Hose In-line Air Regulator,
Use a power nailer A200 (20 Gauge) with cleat is required, and
Pneumatic Nailer/Stapler Liquid Nails Subfloor & Deck Construction
make sure nailing is appropriate 4” to 6” each cleat. To avoid
Adhesive (Supplemental Adhesive) in 28oz tubes. Before you begin
damage to the tongue (Over driven), be sure to adjust for proper
using the following instructions, please refer to the Pre-Installation
pressure on the compressor. Read and follow the manufacturer's
Jobsite Conditions section above.
instructions for complete set-up and operation of equipment.
IMPORTANT: The Colonial Collection will not be responsible for any
problems caused by damp or humid crawlspaces or basements. It GETTING STARTED
is the contractor’s responsibility to make certain crawlspaces are After the subfloor has been properly cleaned and prepped cover
properly covered and ventilated. the subfloor with 15lb. asphalt felt paper. This material will help to
keep the floor clean and help to retard moisture from below (there
THE COLONIAL COLLECTION INSTALLATION GUIDELINES –4– (REV. JANUARY 2019)is no complete moisture barrier system for staple or nail-down If needed use a tapping block to help engage the boards together
applications). This step is omitted for floors 5” and wider, and it is until the tongue-and-groove is flush and tight and no gaps are
replaced by the Supplemental Adhesive as detailed under present between adjacent planks. NOTE: Never use a rubber mallet
paragraph 6, following. or hammer directly on the flooring to engage the tongue-and
• Select a starter wall. An outside wall is best: it's most likely to groove. This can damage the flooring and/or finish.
be straight and square with the room. Measure out from this
wall, at each end, the overall width of the plank (board width + As you approach the end wall it may be necessary to cut the width
tongue + the space needed (3/8” or 1⁄2”) for expansion). of the last row – be sure to allow for the expansion along the end
• Snap a chalk line from these points, parallel to that wall. wall. Once the final cuts are made set planks into place.
• Install the first row of starter planks along the chalk The last few rows will need to be fastened by hand. To fasten the
line/straightedge and secure into position with the tongue final planks into place, you must either manually blind nail and/or
facing away from the starter wall (toward you). Drill pilot holes face-nail through the surface on the final planks. Drill pilot holes at
through the face of the plank every 6” (in the dark grain); a 45-degree angle to the floor and blind nail using l” finishing nails.
approximately 1” from the back edge of the board and secure Alternatively, drill pilot holes in the face every 6” (try to drill holes in
planks with 1” finishing nails. Countersink nails and fill with darker portion of the wood) and install with 1” finishing nails.
appropriate colored wood filler – remove excess filler from Countersink nails and fill with appropriate colored wood filler –
surface. remove excess filler from surface with a clean rag and proper
• Blind nail at a 45° angle through the tongue 1”-2” from the end cleaner.
joints and every 6” in between along the length of the starter
boards (Predrill holes to make this easier). Depending on the
width of the flooring it may be necessary to do this for the first
few rows prior to using a pneumatic stapler/ nailer. NOTE:
Guidelines for Installation Over
Proper alignment is critical. Misaligned starter rows can cause
side and end gaps to appear in proceeding rows of flooring. Radiant Heat Systems
• Continue to install the flooring making sure to nail/staple 1”- 2”
from the ends and every 3” – 4” thereafter. Make certain the All Colonial Collection Engineered Floors are warranted for
tool is adjusted properly to ensure that the fastener is at the Installation over Radiant Heat system provided the following
proper angle and is flush within the nail pocket. As you installation guidelines as well as the After Installation and Seasonal
continue working across the floor try to maintain a six-inch Operation guidelines detailed herein are strictly followed.
minimum space between end joints. Randomly install different
lengths to avoid a patterned appearance. The Colonial Collection Solid Floors are not warranted for
Supplemental Adhesive: For all nail-down installations we require installation over Radiant Heat systems.
the use of supplemental adhesive in the form of Liquid Nails
Subfloor & Deck Construction Adhesive (Supplemental Adhesive), Failure to strictly follow these guidelines may void all The Colonial
available at retail stores nation-wide. Collection Warranties.
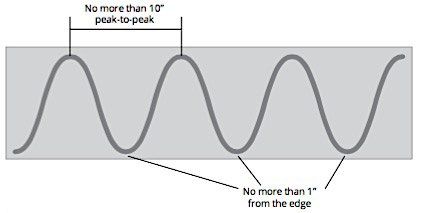
This adhesive should be applied as follows: A 3/16” bead should
• Sub floor must be prepared and tested as detailed under PRE
be applied in a serpentine pattern across the width of, and the
INSTALLATION & JOBSITE CONDITIONS with the following
entire length of the back of the flooring or on the subfloor, as
additional requirement: The moisture content for concrete sub
shown. Make sure that the “peaks and valleys” of the serpentine
floors registered after a calcium chloride test must not be
pattern are not more than 1” from the board edge and the spacing
greater than 2 pounds per 1,000 square feet of area. If it
of the “peaks” is not more than 10”.
exceeds these limits, DO NOT install the flooring.
• Relative humidity of the jobsite must be maintained between
35-55% relative humidity. Use of a humidification system may
be required to maintain the proper humidity level. Failure to
maintain proper humidity level can result in excessive dryness
of flooring.
• It is highly recommended that the radiant heat system be
designed specifically to accept a wood floor.
THE COLONIAL COLLECTION INSTALLATION GUIDELINES –5– (REV. JANUARY 2019)• Use of floor temperature sensor(s) as well as a separate • Unused material should be left with owner and stored in
thermostat for each individual room is required. a dry place in case of future repairs are needed.
• An outdoor temperature sensor should be used to adjust • Use plywood or hardboard when moving heavy
water temperature according to anticipated heat loss. appliances or furniture across floor.
• Prior to installation of flooring the radiant system must be
installed per manufacturer’s instructions. FLOOR PROTECTION DURING CONSTRUCTION
• Radiant heat system should be set to run at 2/3 maximum Always protect the surface of the installed flooring during
output for a minimum of 2 weeks prior to installation of construction by laying a quality rosin paper or other paper that will
flooring to further allow moisture from concrete to dissipate allow the floor to breathe, taping it to the baseboards. Never use
and reach a final moisture content. This must be done in both plastic or polyethylene sheeting to cover the floor since they will
heating and non-heating seasons. trap moisture that will damage the flooring.
• Prior to installation (4 days) reduce to a temperature of 65°.
• Install flooring following the instructions for glue-down AFTER THE JOB
installations as detailed earlier in this document. Carefully follow all guidelines as detailed under The Colonial
Collection Care and Maintenance Instructions, available on
AFTER INSTALLATION & SEASONAL OPERATION our website.
• 48 hours after completion of installation, slowly raise
temperature of the heating system to its preferred operating
level over a period of 5 days. Do not allow the surface
temperature to exceed 80°.
• Humidity level must be maintained between 35%-55% R.H.
• Seasonal gapping should be expected.
• Surface checking can be expected if the proper humidity level
is not maintained between 35-55% R. H. or if the floor’s surface
temperature exceeds 80°.
The floor’s surface temperature must never be allowed to exceed
80°F. Failure to control the maximum floor temperature may void
your Colonial Collection Limited Warranties.
Humidity level must be maintained between 35%-55% R.H. Failure
to control the humidity level may void your Colonial Collection
Limited Warranties.
Completing the Job –
All Installations
• Sweep or vacuum floor.
• Clean the floor with Bona® Swedish Formula® Hardwood
Floor Cleaner.
• Install transition pieces -i.e. – thresholds, t-moldings, base
boards and quarter round. Nail moldings to wall, not the
floor.
• Inspect final floor for nicks and or minor gaps – fill with
appropriate color wood putty. QUESTIONS ABOUT YOUR PURCHASE? PLEASE CONTACT YOUR
• Leave Warranty and Maintenance brochure with CERTIFIED RETAILER OR CONTACT US.
customer.
THE COLONIAL COLLECTION INSTALLATION GUIDELINES –6– (REV. JANUARY 2019)You can also read