OPERATOR MANUAL - DTNVS Binocular Night Vision Device - ActinBlack
←
→
Page content transcription
If your browser does not render page correctly, please read the page content below

DTNVS
Binocular Night Vision Device

OPERATOR MANUAL
Inside Cover
OPERATOR
              MANUAL

                DTNVS
         Binocular Night Vision Device

ACTinBlack Europe S.à r.l.
Rue de l’Industrie,          +352-20 30 10 30
L-3895 Foetz,                info@actinblack.com
Grand Duchy of Luxembourg    www.actinblack.com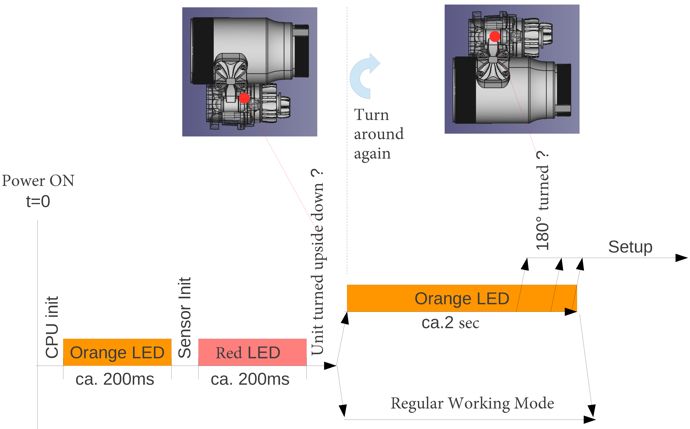
Blank Page
TABLE OF CONTENTS
Table of Contents                                             v
List of Illustrations                                        vii
List of Tables                                              viii

CHAPTER 1: GENERAL INFORMATION                              1
1.1   Introduction                                          1
1.2   Equipment Description                                 1
1.3   Standard Kit Parts List                               3
1.4   System Performance and Data                           4

CHAPTER 2: PREPARATION FOR USE                              7
2.1   Introduction                                          7
2.2   Battery Precautions                                   7
2.3   Battery Installation                                  8
2.4   Eyecup Installation                                   9
2.5   Demist Shield Installation                            9
2.6   Sacrificial Window Installation                       10
2.7   Device Helmet Flip-Up Deactivation                    10
2.8   IPD Locking System Installation                       12

CHAPTER 3: OPERATING INSTRUCTIONS                           13
3.1   Introduction                                          13
3.2   Controls and Indicators                               13
3.3   Device Helmet Flip-Up Angles                          18
3.4   Operation                                             19
3.5   Operations with IR Source                             21
3.6   Operation in Conditions of Blowing Dust or Sand       22
3.7   Operation in Rainy or Humid Conditions                22
3.8   Operation in Salt Water Areas                         23
3.9   Shutting Down the Unit                                23
3.10  Preparation for Storage                               23

        ACTinBlack Europe S.à r.l. Rev 1.2, February 2021
                                                                   v
TABLE of CONTENTS (CONT.)
CHAPTER 4: MAINTENANCE INSTRUCTIONS 25
4.1 Introduction 25
4.2 Deactivation 25
4.3 Battery Removal 25
4.4 Cleaning the DTNVS 25
4.5 Cleaning the Optics 26
4.6 Checking for Damage and Corrosion 26
4.7 Neck Cord 727
4.8 Arm Tension 727
dsds
CHAPTER 5: TROUBLESHOOTING 30d
5.1 Troubleshooting Procedures 30
APPENDIX A: SPARE AND REPAIR PARTS LIST
A.1 Introduction 32
A.2 Contact Information 32
APPENDIX B: WARRANTY INFORMATION 34
ACTinBlack Europe S.à r.l. Rev 1.2, February 2021
viLIST OF ILLUSTRATIONS
1-1 Product Illustration 6
2-1 IPD Attachment 12
2-2 IPD Attachment Screws and Shims 12
2-3 IPD Function 13
3-1 Controls and Indicators 15
3-2 On Position 18
3-3 Off Position 18
3-4 Safety Position 19
4-1 Tension Adjustment 27
ACTinBlack Europe S.à r.l. Rev 1.2, February 2021
viiLIST OF TABLES
1-1 Standard Kit Parts List 3
1-2 System Performance and Data 4
3-1 Controls and Indicators 13
5-1 Troubleshooting 23
ACTinBlack Europe S.à r.l. Rev 1.2, February 2021
viiiCHAPTER 1:
GENERAL INFORMATION
1.1 Introduction:
This manual provides operation and field level
maintenance instructions for the DTNVS. It also provides
specifications and data on the performance of the
Binocular. To ensure the safety of the operator and the
correct operation of the Binocular it is recommended that
this manual is read carefully in its entirety before any
deployment or field application.
1.2 Equipment Description:
The DTNVS is a self-contained night vision device
that enables improved night vision using ambient
light from the night sky. Typically, the moon, star
and/or sky glow.
Optically, it is made up of two sets of objective lens,
image intensifier and eyepiece lens. The objective lens
collects light reflected from the night scene by the moon,
stars, or night sky, inverts the image and focuses that
image on the image intensifier. The
image intensifier converts the captured light into a visible
image and reinverts the image which can then be viewed
through the eyepiece lens.
In situations where there is no light at all the unit can
be switched into the infrared (IR) mode. The
DTNVS is equipped with an internal IR LED
enabling the unit to use this to the human eye
invisible light to operate.
ACTinBlack Europe S.à r.l. Rev 1.0, May 2020 1The DTNVS is designed for differences in the
physical features of individuals. This allows for a
wide range of operators to use the system safely and
comfortably. Some of these design features are the
power switch, eye relief adjustment, dioptre
adjustment, and objective focus. Lightweight and
versatile, the DTNVS can be hand-held, head-
mounted, helmet-mounted.
The DTNVS consists of two identical monoculars
mounted to a body assembly. The monoculars may
be pivoted sideways (when pivoted outside the field
of view, the monocular will individually turn off.)
When the DTNVS is mounted to a helmet or head
mount, the DTNVS may be flipped up and
temporarily stowed, the DTNVS will automatically
go into Standby Mode turning off the monoculars.
The DTNVS will automatically Turn On when
flipped down again. Each monocular is comprised
of three identical primary subassemblies: objective
lens assembly, monocular housing with image
intensifier assembly and eyepiece lens assembly.
ACTinBlack Europe S.à r.l. Rev 1.2, February 2021
21.3 Standard Kit Parts List:
The standard DTNVS kit comes with the items listed in
the following table.
Item Description Qty
1 DTNVS Binocular Assembly 1
2 Demist Shield 2
3 Sacrificial Lens 2
4 Bikini Covers 2
5 Day Caps 2
6 Padded MOLLE Pouch 1
7 Manual Download Card 1
8 Hard Carrying Case 1
Table 1-1 Standard Kit Parts List
ACTinBlack Europe S.à r.l. Rev 1.2, February 2021
31.4 System Performance and Data:
The chart below lists the technical specifications and
data of the DTNVS system. The data contained herein
is subject to change without notice.
ITEM LIMITS
Electrical Data
Power Source Battery (3.0V DC)
Battery Requirements 1x CR123A
Lithium
Battery Life (CR123A) 25 hrs at 18°C (65°F)
Physical Data
Hard Carrying Case Dimensions 33.6cm x 30cm x
14.8cm (13.2” x 11.8”
Binocular Dimensions x 5.8”) x 10.8cm x
10.3cm
7.8cm
Binocular Weight (Depending on 415-515g
optics and IITs)
Optical Data
Magnification 1.0X
Field of View 40° (+/-2° )
Eyepiece of Focus +2 to -6 dioptres
Table 1-2 System Performance and Data
Focus Range 25cm to infinity
Eye Relief 25 mm
ACTinBlack Europe S.à r.l. Rev 1.2, February 2021
4Objective Lens F/1.2 25mm (PVS14)
Resolution up to 1.3 cy/mR with 64 lp/mm
IIT
Environmental Data
Operating Temperature -30°C to 50°C
Storage Temperature -50°C to 70°C
Illumination Required Overcast starlight to moonlight
Immersion 20 meter for 120 minutes
Table 1-2 System Performance and Data, (cont.)
ACTinBlack Europe S.à r.l. Rev 1.2, February 2021
5Figure 1-1 Product Illustration
ACTinBlack Europe S.à r.l. Rev 1.2, February 2021
6CHAPTER 2:
PREPARATION FOR USE
2.1 Introduction:
This section contains instructions for installing and
attaching various components and accessories to the
DTNVS for operation under normal conditions.
2.2 Battery Precautions:
WARNING
Inspect batteries for bulging prior to use. If the
battery shows signs of bulging, do not use.
WARNING
Do not heat, puncture, disassemble, short circuit,
incinerate, attempt to recharge or otherwise
tamper with the batteries. Turn OFF the DTNVS
if the battery compartment becomes unduly hot.
If possible, wait until the batteries have cooled
before removing them.
WARNING
Do not replace batteries in a potentially explosive
atmosphere. Contact sparking may occur while
installing or removing batteries and cause an
explosion. Failure to follow these instructions could
result in death or injury.
ACTinBlack Europe S.à r.l. Rev 1.2, February 2021
72.3 Battery Installation:
Install one CR123A battery as follows.
1. Remove the battery cap by turning it counter-
clockwise.
2. Check to ensure the O-ring is present. If not, replace it.
3. Observe polarity as indicated on the battery cap.
4. Insert battery into the battery compartment, Minus
(-) end first.
5. Replace battery cap by pushing and turning it
clockwise. Tighten it firmly to ensure a watertight
seal.
ACTinBlack Europe S.à r.l. Rev 1.2, February 2021
82.4 Eyecup Installation:
Perform the following procedure to install eyecup
onto the Binocular.
1. Carefully press the eyecup over the end of the eye cup
retainer ring. Rotate the eyecup into proper viewing
position. Adjust for best fit. The eyecup must seal
around your eye and prevent the green glow from
escaping.
2.5 Demist Shield Installation:
Perform the following procedures to install the demist
shield on the eyepiece lens.
1. Carefully remove the eyecup.
2. Carefully remove the eye cup retainer ring by rotating
it counter clockwise
3. Screw the demist shield assembly in clockwise
4. Screw the eye cup retainer ring into the demist shield
5. Carefully replace the eye cup on the eye cup retainer
ring.
CAUTION
If the demist shield is wiped while wet or with wet
lens tissue, you will damage the coating.
NOTE
If inclement operating conditions are expected to exist
(e.g. significant temperature change and high
humidity), install demist shield to minimize eyepiece
lens fog prior to execution of mission.
ACTinBlack Europe S.à r.l. Rev 1.2, February 2021
92.6 Sacrificial Window Installation:
Perform the following procedure to install the sacrificial
window onto the objective lens assembly.
CAUTION
If adverse operating conditions (blowing dust or sand)
are expected to exist, attach the sacrificial window to
protect the objective lens from scratches or other
damage.
1. If the objective lens cap is in place, remove it.
2. Carefully push the sacrificial window onto the
objective lens until it stops. Turn the sacrificial
window clockwise until it snaps into place.
3. The demist shield can be utilized as a screw-in
sacrificial window. Note warnings in 2.5
2.7 Device Helmet Flip-Up Deactivation Sequence:
Perform the following procedure if you want to
deactivate the automatic on-off feature when device is
flipped up onto the helmet or head gear.
1. Turn the device so the dovetail is pointing
downwards.
2. Observe first the orange LED lighting up for
200ms, then the red LED lighting up for 200ms
3. Once the Orange LED turns on steady, the user
has 2 seconds to turn the device so the dovetail is
pointing upwards to enter the Setup Mode.
4. If Setup Mode entered successfully, LEDs start
flashing on one side.
NOTE
ACTinBlack Europe S.à r.l. Rev 1.2, February 2021
10- If LEDs flash on the left side, automatic flip up
shut off is deactivated
- If LEDs flash in the right side, automatic flip up
shut off is activated
5. Tilt the device to the side that corresponds to the
mode you want to activate in order to switch
setting.
6. Tilt the device forwards (towards the objective
side) save the setting.
NOTE
Repeat above steps to change setting again.
ACTinBlack Europe S.à r.l. Rev 1.2, February 2021
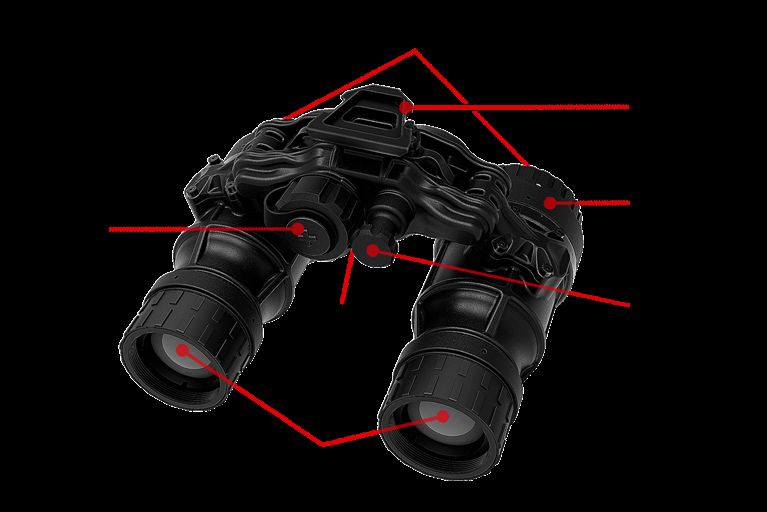
112.1 IPD Locking System Installation
Perform the following procedure to install the IPD
Locking System onto DTNVS housing.
1. Place the IPD Locking System on the back of the
unit.
Figure 2-1 IPD Attachment
2. Place the shims individually in the space behind the
backplate and secure with supplied screws.
Figure 2-2 IPD Attachment Screws and Shims
ACTinBlack Europe S.à r.l. Rev 1.2, February 2021
123. Use dials to adjust and set desired interpupillary
distance for the system.
Figure 2-3 IPD Function
CHAPTER 3:
OPERATING INSTRUCTIONS
3.1 Introduction:
This chapter contains instructions for the safe operation of
the DTNVS under normal circumstances and
environments.
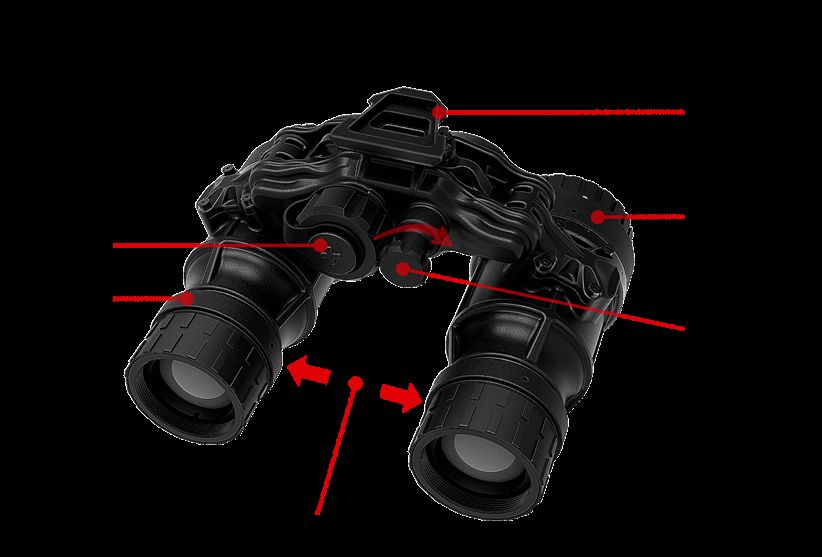
3.2 Controls and Indicators:
The DTNVS is designed to adjust for different users and
corrects for most differences in eyesight. The controls and
indicators for the DTNVS are shown in Figure 3-1 and are
described in Table 3-1.
CAUTION
The DTNVS requires some ambient (moonlight,
starlight, or artificial light, etc.) to operate. The level of
performance depends on the level of light.
Night light is reduced by passing cloud cover, while
operating under trees, in building shadows, etc.
ACTinBlack Europe S.à r.l. Rev 1.2, February 2021
13The DTNVS is less effective viewing into shadows and
other darkened areas.
The DTNVS is less effective through rain, fog, sleet,
snow, smoke, and other reflective material.
ACTinBlack Europe S.à r.l. Rev 1.2, February 2021
14Figure 3-1 Controls and Indicators
ACTinBlack Europe S.à r.l. Rev 1.2, February 2021
15Control and Functions
Indicators
Power Switch Controls Binocular and IR source, ON or OFF.
OFF System OFF.
ON activates the Binocular.
IR/PULL Pull and turn the knob clockwise from
the ON position to continuously activate the IR
source.
CAUTION
Do not use excessive force to place the
power switch into the momentary IR
position
Low Battery An orange light indicates a low battery with less
Indicator than 30 minutes of battery life remaining. It is
visible through the eyepiece just outside the
intensified field-of-view.
Table 3-1 Controls and Indicators
ACTinBlack Europe S.à r.l. Rev 1.2, February 2021
16IR Source On A steady red light indicates that the IR source is
Indicator ON. It is visible through the eyepiece just
outside the intensified field-of-view.
Objective Focus Focuses objective lens. Adjusts for sharpest
image of viewed object.
Dioptre Focuses eyepiece lens to user’s eye. Adjust for
Adjustment sharpest image of intensifier screen.
Interpupillary Adjusts the distance between your eye and the
Adjustment Binocular.
Battery Polarity This feature, moulded into the battery cap,
Indicator shows the proper orientation of the batteries.
Table 3-1 Controls and Indicators, (cont.)
ACTinBlack Europe S.à r.l. Rev 1.2, February 2021
173.3 Device Helmet Flip-Up Angles:
NOTE
The binocular has an independent automatic on-of
function in the case of the system being flipped up on
a helmet mount.
Reactivation / ON position
Device will automatically turn on with a 1.5 sec delay
in the straight forward position.
Figure 3-2 On Position
Deactivation / OFF position
Device will automatically turn off with a 3 sec
delay in the flip up/storage position
Figure 3-3 Off Position
ACTinBlack Europe S.à r.l. Rev 1.2, February 2021
18Safety OFF position
Device will turn off after 30 sec without movement if
device is placed is placed in described position.
Figure 3-4 Table Position
3.4 Operation:
CAUTION
Operate the binocular only under darkened
conditions or use the objective lens cap to cover the
objective lens for daylight conditions.
CAUTION
Cover the objective and ocular lenses by using bikini
covers when device not in use.
NOTE
When using the binocular without a mounting
device, make sure to place a neck cord around your
neck.
1. Ensure that the battery is installed correctly.
2. Turn the power switch to ON.
NOTE
ACTinBlack Europe S.à r.l. Rev 1.2, February 2021
19The sharpest image will be observed only when
the objective lens and eyepiece lens are properly
focused.
NOTE
Both indicator LEDs, red and orange, blink once
when turned on as a self-test.
3. Rotate the dioptre adjustment for the clearest view
of the image intensifier screen.
4. Focus the objective lens while observing an object
until the sharpest image is obtained.
ACTinBlack Europe S.à r.l. Rev 1.2, February 2021
203.5 Operations with IR Source:
WARNING
The IR source is a light that is mostly invisible to the
unaided eye for use during conditions of extreme
darkness. however, the light from the IR source can be
detected by the enemy using night vision devices.
In close proximity of below 5m an enemy might spot a faint
red glow on the IR illuminator.
NOTE
The purpose of the IR source is for viewing at
close distances up to 5 meters when addition
illumination is needed.
1. Pull the power switch knob out and rotate clockwise
to the IR position. With the Binocular held to the
eye, observe that a red light appears in the eyepiece.
This indicates that the IR source is operating.
ACTinBlack Europe S.à r.l. Rev 1.2, February 2021
213.6 Operation in conditions of blowing Dust or Sand:
CAUTION
Operation in conditions of blowing dust or
sand can pit and scratch the optical elements
and damage the mechanical components unless
the precautions given below are observed.
1. Ensure that the sacrificial windows are in place.
2. Avoid pointing the Binocular into the wind
unless necessary for operation.
3. Keep the carrying case closed unless removing or
replacing items.
4. Ensure that all dust and sand is removed from the
DTNVS and carrying case after operation.
3.7 Operation in Rainy or Humid conditions:
CAUTION
Operation in rainy or humid conditions can
cause corrosion and deterioration of the
DTNVS unless the precautions given below are
observed
1. Install the demist shield as instructed in this manual.
2. Keep the carrying case closed unless removing or
replacing items.
3. Dry the Binocular, mounts, and accessories after
exposure to rain or high humidity and before storage.
4. Do not store Binocular in a wet carrying case.
ACTinBlack Europe S.à r.l. Rev 1.2, February 2021
223.8 Operation in Salt Water Areas:
After exposure to salt water, clean the unit as instructed in
this manual, after rinsing with fresh water.
3.9 Shutting Down the Unit:
Perform the following procedures to shut down the
Binocular.
1. Turn the Binocular power switch to the OFF position.
2. Remove the Binocular from the head mount or
helmet mount.
NOTE
It is recommended to turn the battery cap twist
counter-clockwise for one full turn to break the
electric circuit. This will preserve battery life if
device is not operating for long duration.
3.10 Preparation for Storage:
1. Remove battery from the Binocular.
2. Inspect the battery housing for corrosion or moisture.
Clean and dry if necessary.
3. Replace the battery cap.
4. Remove the demist shield or sacrificial window if
installed. Install objective lens cap or utilize bikini
covers.
NOTE
Prior to placing DTNVS into carrying case, ensure
DTNVS and case are free of dirt, dust, and
moisture.
5. Place the Binocular, accessories and cleaning
supplies back into their storage/carrying case.
It is best to place the items in their original
locations to prevent any possible damage to
the unit and/or accessories.
6. Return to storage area.
ACTinBlack Europe S.à r.l. Rev 1.2, February 2021
23ACTinBlack Europe S.à r.l. Rev 1.2, February 2021
24CHAPTER 4:
MAINTENANCE INSTRUCTIONS
4.1 Introduction:
The DTNVS is designed to be used in diverse
environments and rugged conditions. It is recommended
that regular and simple maintenance be performed for
optimal system performance.
CAUTION
The binocular is a precision electro-optical
instrument and must be handled carefully.
Do not scratch the external lens surfaces or touch
them with your fingers.
Wiping demist shield with lens tissue while wet or
with wet lens tissue can damage the coating.
4.2 Deactivation:
Power down the system by turning the power switch
knob to OFF.
4.3 Battery Removal:
Open battery compartment, remove battery and store in
carrying case. Close the battery compartment before
cleaning.
4.4 Cleaning the DTNVS:
When necessary, use a moist clean cloth to wipe the outside
of the unit, EXCEPT FOR THE OPTICAL SURFACES.
Be sure to wipe away excess dirt and dust that may restrict
the performance of and damage moving and mating parts.
If needed, the use of a very diluted detergent solution is
ACTinBlack Europe S.à r.l. Rev 1.2, February 2021
25permissible. Dry with a soft clean cloth, or allow unit to
air-dry before storing it.
4.5 Cleaning the Optics:
When cleaning of the lens is required, first blow any
loose dirt or grit away from the surface of the lens.
EXCEPT FOR THE DEMIST SHIELD, use dedicated
lens tissue lightly moistened with water or lens cleaning
fluid to lightly wipe the optical surfaces, using a circular
motion.
Discard each lens tissue after one use to avoid
transferring grit or foreign matter onto the lens surfaces.
If the lens remains dirty use a cotton swab lightly
moistened with lens cleaning fluid to remove the foreign
matter from the lens. Dry with a clean unused lens tissue.
4.6 Checking for Damage and corrosion:
As a general guideline, conduct an inspection of the
DTNVS, accessories, and the case after every use.
Look for heavy wear and cracks in rubber or plastic.
Inspect for moisture or corrosion in electronic
housings and in the battery compartment. Check for
scratches, condensation and foreign matter on
optical surfaces. Report missing or damaged items,
for replacement.
As a general guideline, conduct an inspection of the
DTNVS, accessories, and the case after every use.
ACTinBlack Europe S.à r.l. Rev 1.2, February 2021
264.7 Neck Cord:
If the neck cord becomes frayed or broken, cut it off
or untie the knot at the attachment points and pull
free. To install a new cord. Thread the ends through
the holes next to the dovetail back to front and tie a
knot.
4.8 Tension Adjustment Screws:
If the tension of the arms drops over the lifetime of
the device, only a technician, officially approved by
ACTinBlack shall adjust the tension of the system.
The tension can be readjusted and friction washers
can be swapped if necessary by a technician
officially approved by ACTinBlack.
CAUTION
If tension screws are over tightened, this may
result in irreparable damage to the device.
Figure 4-1 Tension Adjustment
ACTinBlack Europe S.à r.l. Rev 1.2, February 2021
27Blank Page
ACTinBlack Europe S.à r.l. Rev 1.2, February 2021
28CHAPTER 5:
TROUBLESHOOTING
5.1 Troubleshooting Procedures:
Table 5-1 lists common malfunctions that may occur with
the equipment. Perform the tests, inspections and
corrective actions in the order they appear in the table.
This table cannot list all the malfunctions that may
occur, all the tests and inspections needed to find the
fault, or all the corrective actions needed to correct the
fault. If the equipment malfunction is not listed or
actions listed do not correct the fault, notify your
service department.
Malfunction Test for Inspection corrective Action
Binocular Visual. Turn switch to RESET/OFF
fails to position and then ON.
activate.
Check for defective, Replace battery or install
missing or improperly correctly.
installed battery.
If DTNVS still fails to
activate, refer to higher
level of maintenance.
Table 5-1 Troubleshooting
ACTinBlack Europe S.à r.l. Rev 1.2, February 2021
29IR source In a dark location If IR source still fails to
fails to with system turned activate, refer to higher
activate. on, activate IR source. level of maintenance.
Visually check IR
source operation; scene
should brighten.
IR source Visual. Refer to higher level of
indicator maintenance.
fails to
activate.
Poor image Check objective lens Refocus.
quality. or eyepiece.
Check for fogging or Clean lens surface per
dirt on objective lens paragraph 4.5.
or eyepiece lens.
Check eye relief Readjust for proper eye
distance. relief distance.
Light visible Check eyecup for If eyecup is defective,
around resiliency. refer to higher level of
eyecup. maintenance.
Dioptre Check to see if the If damaged, refer to higher
adjustment dioptre adjustment is level of maintenance.
cannot be bent or broken.
made.
Table 5-1 Troubleshooting, (cont.)
ACTinBlack Europe S.à r.l. Rev 1.2, February 2021
30APPENDIX A:
REPAIR & SPARES
A.1 Introduction:
This section provides information needed to identify,
contact and order spare and/or repair parts for the
DTNVS.
A.2 Contact Information:
To order spare or repair parts for the DTNVS or any of
your night vision products contact:
ACTinBlack Europe S.à r.l.
Rue de l’Industrie,
L-3895 Foetz,
Grand Duchy of Luxembourg
info@actinblack.com
ACTinBlack Europe S.à r.l. Rev 1.2, February 2021
31Blank Page
ACTinBlack Europe S.à r.l. Rev 1.2, February 2021
32APPENDIX B:
WARRANTY INFORMATION
Defects after Delivery and Warranty
Subject to the following provisions, ACTinBlack warrants to Purchaser
that the goods manufactured by ACTinBlack shall be free from defects
in material and workmanship. ACTinBlack’s obligations, set forth
below, shall apply only to failures to meet the foregoing warranties for
parts only occurring within twelve (12) months from the date of
shipment, if not otherwise agreed between the parties.
The warranty terms may be modified on the basis of the ruling
Warranty Policy of ACTinBlack only with written agreement.
The Purchaser shall grant ACTinBlack such adequate time and
opportunity as deemed reasonable to remedy failures to meet the
foregoing warranties. To remedy such failures, ACTinBlack shall
repair or, at its option, replace the defective product.
ACTinBlack’s obligation to repair or replace as aforesaid shall not
apply to any goods which are normally consumed in operation, or have
a normal life inherently shorter that the warranty period specified
above, or are not properly stored, installed, used, maintained or repaired
or are modified other than pursuant to ACTinBlack’s instructions or
approval, or have been subjected to any other kind of misuse or
detrimental exposure, or have been involved in an accident.
ACTinBlack shall have no warranty obligations with respect to defects
resulting from inexpert alterations or repairs carried out by the
Purchaser or his agent.
ACTinBlack Europe S.à r.l. Rev 1.2, February 2021
33Return Material Authorization Number (RMA#):
Warranty and non-warranty items returned to ACTinBlack for
repair or replacement require a RMA#.
Email info@ACTinBlack.com, with a serial number and detailed
information to obtain a RMA#.
THIS WARRANTY IS EXCLUSIVE AND
IN LIEU OF ANY OTHER WARRANTY,
EITHER EXPRESSED OR IMPLIED,
INCLUDING WARRANTIES OF
MERCHANTABILITY OR FITNESS FOR
PURPOSE.
ACTinBlack Europe S.à r.l. Rev 1.2, February 2021
34Blank Page
ACTinBlack Europe S.à r.l. Rev 1.2, February 2021
35Declaration of Conformity
We, ACTinBlack Europe S.àr.l
12 Rue de l’Industrie,
L-3895 Foetz,
Grand Duchy of Luxembourg
Declare under our sole responsibility that our product:
Product name: DTNVS
Trade name: ACTinBlack®
Type of model:
to which this declaration relates is in conformity with the appropriate standards:
following the provisions of
EMC Directive 2014/30/EU
RoHS 2 Directive (EU) 2017/2102
The product is marked with
Signed by or for the manufacturer :
Name (in writing) : Fergal Maher
Title : Co-CEO
Place and date of issue : Luxembourg Sept. 1st 2020
Part No. :MAN-DTNVS001 May 2020Certificate of Conformity
We, ACTinBlack Europe S.àr.l
12 Rue de l’Industrie,
L-3895 Foetz,
Grand Duchy of Luxembourg
Declare under our sole responsibility that our product:
Product name: THE14
Trade name: ACTinBlack®
Fulfils the essential requirements of:
MIL-STD-810G
The following standards were applied:
MIL-STD_810G: 501.5: High Temperature
MIL-STD_810G: 502.5: Low Temperature
MIL-STD_810G: 507.5: Humidity
MIL-STD_810G: 514.6: Vibration
MIL-STD_810G: 516.6: Shock
MIL-STD_810G: 512.5: Immersion: Procedure I
Signed by or for the manufacturer :
Name (in writing) : Fergal Maher
Title : Co-CEO
Place and date of issue : Luxembourg Sept 1st 2020
ACTinBlack Europe S.à r.l. Rev 1.2, February 2021
xxxviiACTinBlack Europe S.à r.l.
12 Rue de l’Industrie,
L-3895 Foetz,
Grand Duchy of Luxembourg
www.actinblack.com
ACTinBlack Europe S.à r.l. Rev 1.2, February 2021
xxxviiiYou can also read