Installation Instructions - Toyota Sienna - Toyota Sienna Forum
←
→
Page content transcription
If your browser does not render page correctly, please read the page content below
Installation Instructions
                           Toyota Sienna
                                X7422S

                 Trailer Weight Rating 3,500 lbs
                 Tongue Weight Rating 525 lbs

                             Torklift Central
                           315 Central Ave N
                            Kent, WA 98032
                             253-854-1832
                          www.torkliftcentral.com
                        support@torkliftcentral.com
                          Rev 5: By DE: 5/1/2020

                                                                   pg. 1
COPYRIGHT © 2021, By Torklift Central, Inc. All rights reserved.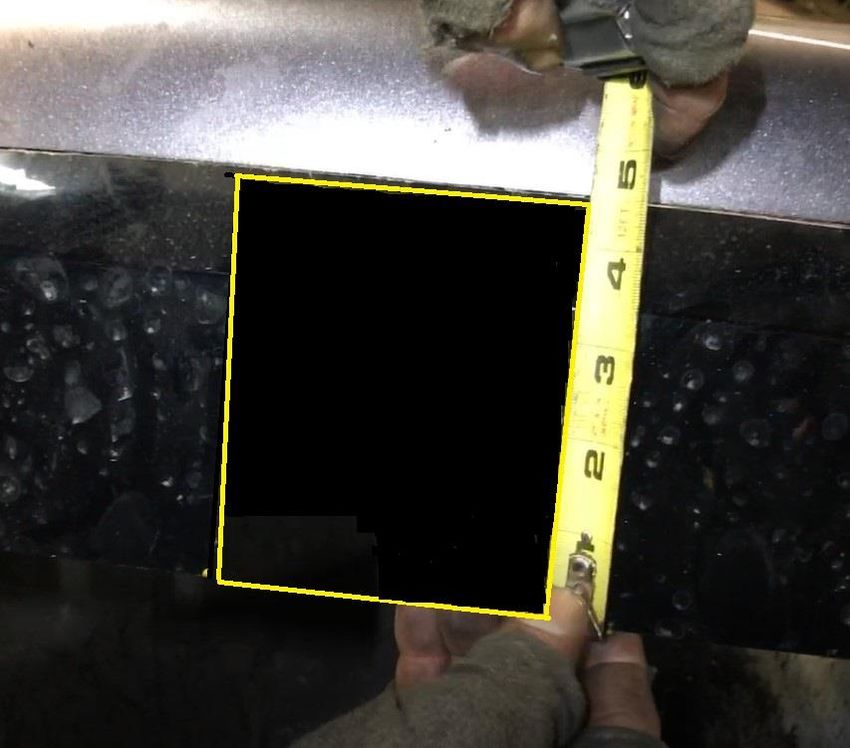
Parts Inventory
     Description                    Image                Item #    Qty.
   X7422 Receiver                                       X7422S-
                                                                    1
       Hitch                                              A1

   Passenger Side                                       X7422S-
                                                                    1
   Support Bracket                                       P1-P

    Drivers Side                                        X7422S-
                                                                    1
   Support Bracket                                       P1-D

  M12 Flat Washer                                        20003      6

   M12 Split Lock
                                                         20004      6
      Washer

 M12-1.25 x 40 mm
  Class 10.9 Hex                                          3661      6
       Bolt

 3/8”-16 Nut Grade
                                                          9959      6
         8

  3/8”-16 x 1-1/2”
                                                          3312      6
  Grade 8 Hex Bolt

   3/8” Split Lock
                                                          6003      6
       Washer

    3/8” SAE Flat
                                                         14139     12
       Washer

                                                                     pg. 2
COPYRIGHT © 2021, By Torklift Central, Inc. All rights reserved.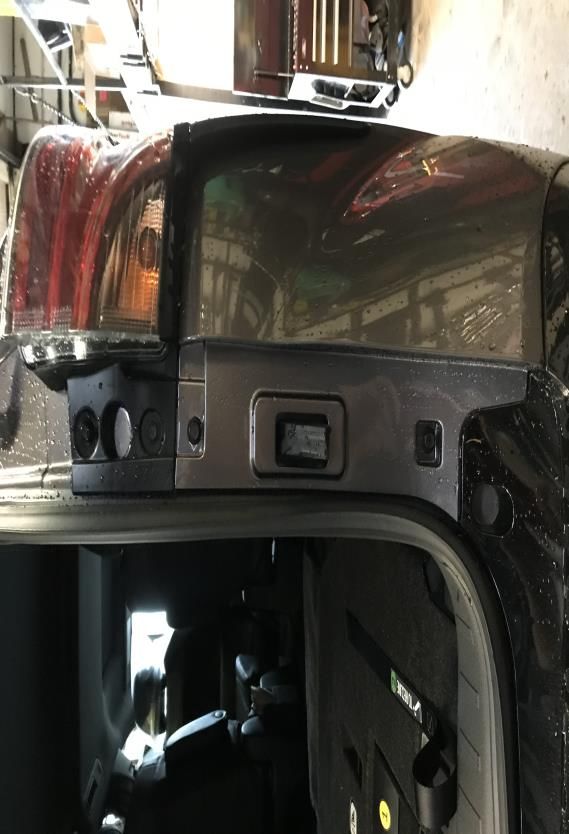
Step 1:
Chalk the front wheels and lift the rear of the vehicle high
enough to access the underside of the vehicle.
Lift the rear hatch. On each side of the vehicle, remove the two
screws on the inside of the taillight, and the two screws directly
below them in the body panel. See Figure 1.1.
Figure 1.1
• Remove both taillight assemblies by pushing them towards
the rear of the vehicle. Make sure not to drop the assemblies
or let them hang from the wiring harnesses.
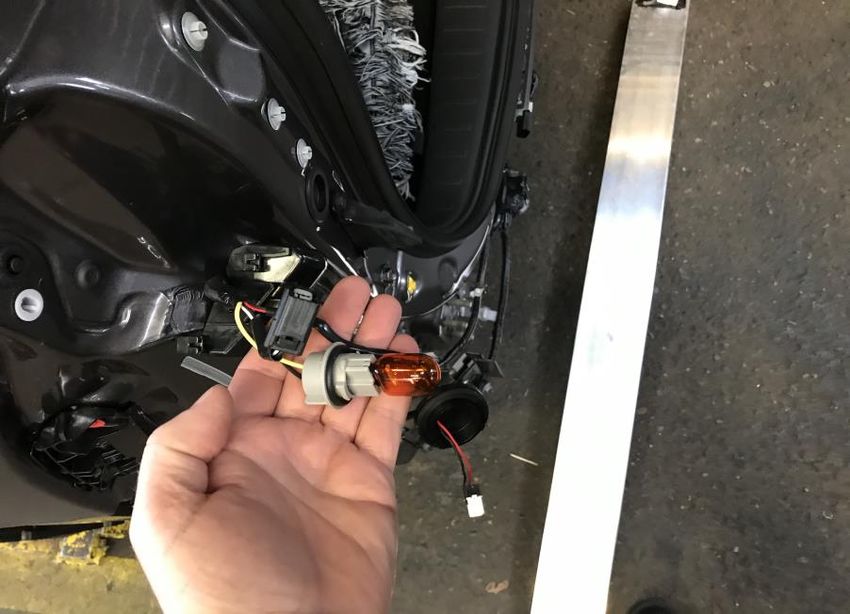
• Remove the three electrical plugs from the each taillight
assembly starting with the smallest one first. See figure 1.2.
pg. 3
COPYRIGHT © 2021, By Torklift Central, Inc. All rights reserved.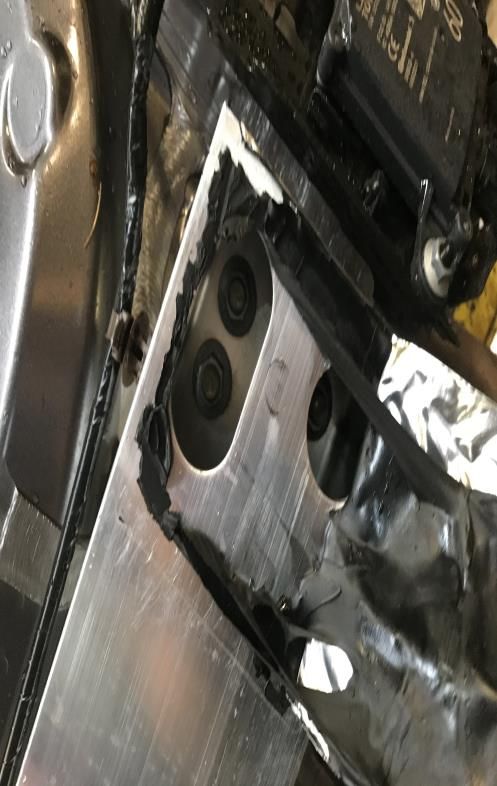
Figure 1.2

Step 2:
    •   Remove the push in clips in the back of the wheel openings
        on both sides of the vehicle. See figure 2.1.
    •   Behind the rear wheels on the front side of the mud guards,
        remove two screws on the driver side and one screw on the
        passenger side. See figure 2.2.
    •   Unclip the mud guard panel behind the driver side rear wheel
        by removing the four push pin clips on rear under panel. See
        figure 2.3.

                                                                   pg. 4
COPYRIGHT © 2021, By Torklift Central, Inc. All rights reserved.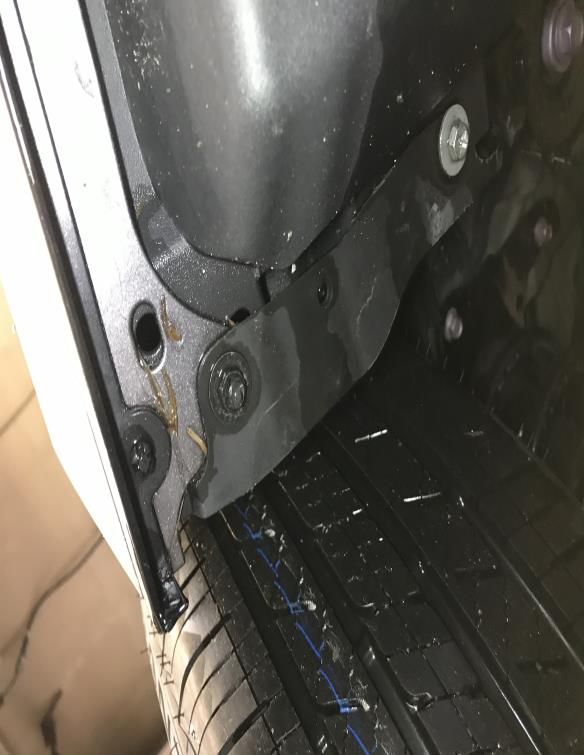
Figure 2.1 – Passenger side shown.

        Figure 2.2 – Driver side shown.

                                                                   pg. 5
COPYRIGHT © 2021, By Torklift Central, Inc. All rights reserved.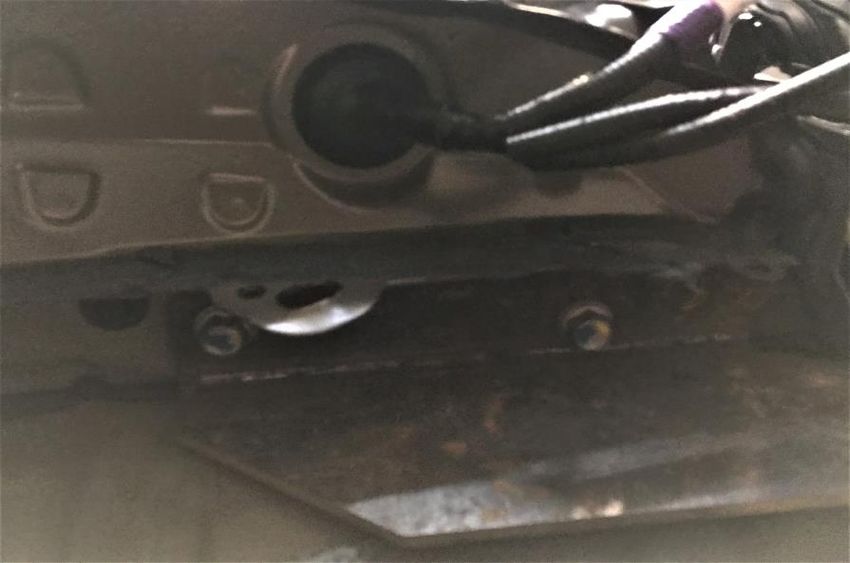
Figure 2.3

Step 3:
With the help of an assistant, remove the rear bumper cover. start
by pulling outwards and back on the outer ends working towards the
center of the vehicle. Disconnect any wiring harness connectors
attached to the cover. Set the bumper in a safe place where a cut
out can be made for the receiver.

Be careful not to damage the bumper finish.

                                                                   pg. 6
COPYRIGHT © 2021, By Torklift Central, Inc. All rights reserved.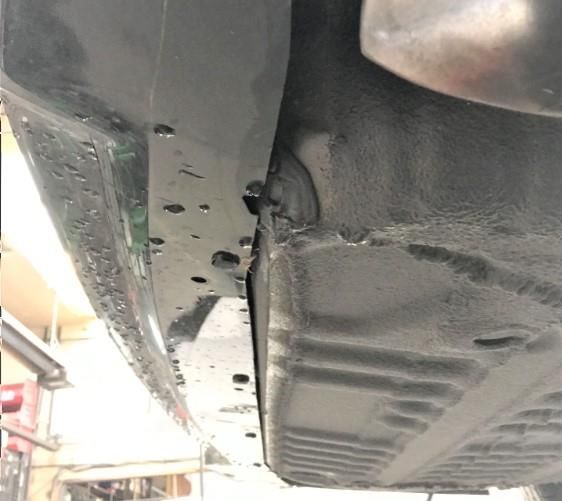
Step 4:
    •    Remove any wiring attached to the factory cross member.

    •    Peel back the metal tape from the ends of the cross member
         to access its retaining nuts.

    •    Remove nuts and the cross member. See figure 4.1.

        Figure 4.1

                                                                   pg. 7
COPYRIGHT © 2021, By Torklift Central, Inc. All rights reserved.
Step 5:
    •   Measure and mark the centerline of the bumper cover on the
        bottom of panel.

    •   Mark a centered section to be cut out that is approximately 4
        3/8” tall and 3 3/8 wide. The cut should have approximately
        1- 11/16” on each side of the marked center line. The top of
        the cut line should be right below the seam line on the
        bottom of the bumper cover. See figure 5.1.

                                       3 ¾”

           Figure 5.1

                                                                   pg. 8
COPYRIGHT © 2021, By Torklift Central, Inc. All rights reserved.
Step 6:
    •   Place the hitch over the studs in the rear and begin to thread
        the OEM nuts leaving them loose. See figure 6.1.

    •   Install the driver and passenger side Support Brackets using
        the three 12mm-1.25 x 40mm bolts with a lock washer and
        then a flat washer on each bolt. There are 3 per side. See
        figure 6.2.

    •   Insert three 3/8”-16 bolts with a 3/8” flat washer on each
        bolt through the hitch side plate holes then through the three
        support bracket holes. The threads need to be facing towards
        the outside of the vehicle. Install a 3/8” flat washer, 3/8”
        split lock washer then a 3/8”-16 nut on each of the 3/8” bolts.

    •   Center the hitch on the studs and tighten the OEM nuts and
        the 3/8” fasteners to 45 ft lb. Tighten the 12mm-1.25 bolts to
        65 ft lb.

                                    OEM NUTS

                                 3/8 Hardware

  Figure 6.1 – Driver Side Shown

                                                                   pg. 9
COPYRIGHT © 2021, By Torklift Central, Inc. All rights reserved.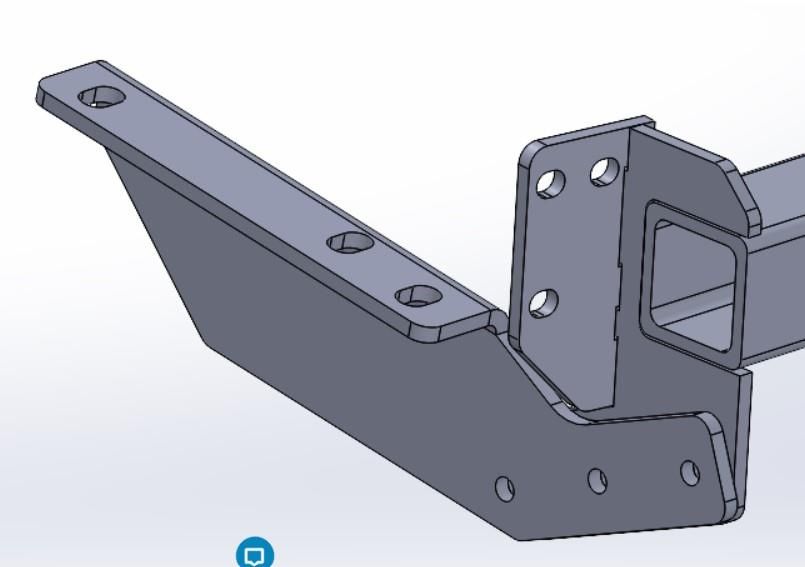
Figure 6.2 – Driver Side Shown

        Step 7:
    •   Re install the bumper panel by snapping it back into place.
        Reinstall all other components in reverse order of
        disassembly starting at step 3. The cross member will not be
        reinstalled. Verify all of the rear lights work and the bumper
        cover is securly snapped back into place.
    •   Installation is complete.

                                                                   pg. 10
COPYRIGHT © 2021, By Torklift Central, Inc. All rights reserved.
WARRANTY/DISCLAIMER
INFORMATION
Torklift Central requires proof of purchase for warranty claim
registration, with pictures of any defective product before issuing a
replacement. Torklift will not accept claims on any product without
proof of purchase, which can be faxed, scanned, emailed or mailed to
the information provided below. Torklift Central warrants its hitches,
custom hitch receivers and accessories (excluding electrical wire
harnesses which carry a warranty from their specified manufacturer)
from date of purchase against defects in material and workmanship
under normal use and service for the ownership life of the original
consumer purchaser. Torklift Central will replace free of charge any
part that proves defective in material or workmanship when presented
to Torklift Central, transportation charges prepaid by purchaser, at the
address below.
This warranty is limited to defective parts
replacement only. Labor charges and/or damage
incurred in installation or replacement, as well as
incidental and consequential damages connected
therewith are excluded.
This warranty does not include normal wear and tear or the
finish and paint. Rusting, cracking or peeling of the finish is also
excluded. Some states do not allow the exclusion or limitation of
incidental or consequential damages, so the above limitation or
exclusion may not apply to you. Any damage to Torklift Central
products as a result of misuse, abuse, neglect, accident, improper
installation or any use violative of instructions furnished by Torklift
Central will void the warranty. This warranty gives you specific legal
rights and you may also have rights, which vary from state to state.
With warranty service, you may be able to go to a small claims court,
a state court or a federal district court.
pg. 11
COPYRIGHT © 2021, By Torklift Central, Inc. All rights reserved.Although Torklift Central trailer hitches are both tested and rated for
towing within the specific capacity label found on each trailer hitch.
Torklift Central assumes no liability for vehicle manufacturers
warranty due to the use of a Torklift Central trailer hitch being used
for towing behind any vehicle or using the trailer hitch in a manner
that it was not designed for. Although this specific trailer hitch has a
load rating, which includes trailer tongue weight, and a trailer weight
carrying capacity, Torklift Central is not responsible for the voiding
of any warranty on any vehicle due to factory towing limitations. All
vehicle warranties are the sole property and responsibility of the
owner of the vehicle that the Torklift Central trailer hitch is installed
upon. Torklift Central does not endorse towing behind any vehicle if
the vehicles manufacturer states that towing is not recommended.
Check your vehicle’s owner’s manual for the proper tow rating of
your vehicle.
ADDRESS: 315 Central Ave N. Kent, WA 98032
*WARNING* Your vehicle may have a lower tow rating than this
trailer hitch. If your vehicle’s tow rating is less than the rated towing
capacity on your Torklift Central trailer hitch, your trailer hitch
capacity is limited to your vehicle’s factory rated towing capacity.
*DANGER* Never exceed your vehicle's manufacturer's
recommended towing capacity which may be a lower rating than this
trailer hitch
pg. 12
COPYRIGHT © 2021, By Torklift Central, Inc. All rights reserved.You can also read