Instructions - Oscha Slings
←
→
Page content transcription
If your browser does not render page correctly, please read the page content below
IMPORTANT! KEEP FOR FUTURE REFERENCE

Instructions

Thank you for your purchase! Zoe, a mother of 3, created Oscha to bring woven art
to your baby carrying experience. Each item has been lovingly hand crafted in our

                     _______
solar-powered Scottish workshop from natural and ethical fabrics. We hope you will
love your new sling as much as we enjoyed making it.

Vielen lieben Dank für Ihren Einkauf! Zoe, selbst Mutter von 3 Kindern, hat Oscha
Slings gegründet, um Babytragen durch gewobene Kunstwerke zu bereichern. Jedes
einzelne Produkt wurde in unserer schottischen, mit Solarenergie betriebenen Werkstatt
in liebevoller Handarbeit gefertigt. All unsere Stoffe sind absolut natürlich und nach-

                     _______
haltig gewachsen. Wir hoffen, dass Sie Ihr neues Tragetuch mit so viel Liebe tragen
werden, wie wir in die Herstellung investiert haben.                                             For full video instructions, including back carries,
                                                                                                           infant adjustments and more visit
Merci pour votre achat ! Zoe, mère de trois enfants, a créé Oscha Slings pour ap-
                                                                                                                  www.oschaslings.com/instructions
porter l’art du tissage à votre expérience de portage. Chaque article a été fabriqué
soigneusement à la main dans notre atelier écossais fonctionnant à l’énergie solaire,

                     _______
à partir de tissus naturels et éthiques. Nous espérons que vous aimerez votre nouveau
moyen de portage autant que nous avons aimé le fabriquer.

ご注文ありがとうございます。3人の母親であるゾイが、あなたの抱っこおん
ぶ経験に織物アートを届けるためにオーシャをつくりました。どのアイテム
も、太陽光発電のスコットランドの工房でナチュラルでエシカルな生地より愛
を込めて手作りされています。私達が楽しんで作っているのと同じくらい、あ
                     _______
なたにもこの新しいスリングを愛してもらえますように願っています。

Grazie per il vostro acquisto! Zoe, mamma di tre figli, ha creato Oscha Slings per
contribuire con l’arte della tessitura all’esperienza del portare. Ogni articolo è fatto a
mano con cura, a partire da materiali naturali ed ottenuti nel rispetto dell’etica, nel
nostro laboratorio alimentato ad energia solare in Scozia. Speriamo amerete il vostro
                     _______
nuovo supporto tanto quanto a noi è piaciuto realizzarlo.
                                                                                             Exclusively
Bedankt voor je aankoop! Zoë, moeder van 3, heeft Oscha opgericht om geweven
kunst onder de aandacht te brengen voor al uw draagervaringen. Leder product is              licensed original
liefdevol met de hand gemaakt, in ons op zonnepanelen gebaseerde, Schotse werk-              designs inspired
plaats. Daar werken wij met natuurlijke en ethische materialen. Wij hopen dat u net
                     _______
zo gelukkig wordt van uw nieuwe draagdoek, als wij van het maken ervan.
                                                                                             by the Lord of
                                                                                             the Rings and the
Dziękujemy za Twój zakup! Zoe, mama trójki dzieci, założyła Oschę by móc połączyć            Hobbit by J.R.R.
piękno tkanych materiałów ze sztuką chustonoszenia. Każdy z naszych produktów
został ręcznie wykonany z naturalnie i etycznie pozyskiwanych tkanin, w zasilanej            Tolkien
energią słoneczną pracowni w Szkocji. Mamy nadzieję, że obdarzysz swoją nową
chustę taką samą miłością, jaką my włożyliśmy w jej powstanie.                               Visit oschaslings.com/
                                                                                             middle-earth
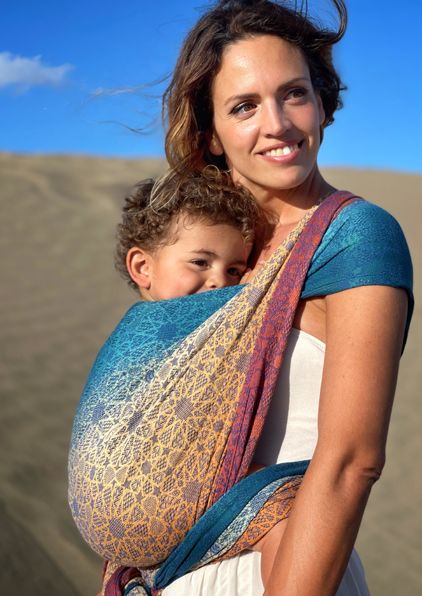
Why Babywearing? Why Oscha?
Founded by mum Zoe, Oscha began when her love for wrapping became a day to
day life-saver after her twin boys were born just 16 months after her daughter. With a
passion for slings and for design, Zoe’s vision of a wrap company which offers parents
elegant, colourful baby carriers quickly became a reality. Zoe and the Oscha team
continue to design unique woven patterns and use innovative weaving techniques to
make baby carrying a beautiful and comfortable experience for all.

Oscha is a carbon-neutral company
and our baby carriers are made with
zero-waste. Our fabrics are woven in
the British Isles from responsibly sourced
yarns before they are lovingly hand-
crafted into slings in our solar-powered
Scottish workshop. Plus, each sling sold
contributes to our growing Oscha grove
which is helping to reforest the Scottish                                                Oscha Lifestyle
Highlands.
                                                                                         Ethically made scarves, bags
                                                                                         and homeware featuring your
Babywearing brings many wonderful benefits
to parents and children. From the everyday       *   Promotes Bonding & Attachment         favourite Oscha designs.

joys of popping out to the shops hands-
free and navigating public transport with
                                                 *   Soothes Symptoms of Colic &
                                                     Reflux
ease, to the long-lasting developmental and
bonding carrying facilitates, your Oscha sling   *   Guards Against Flat Head
                                                     Syndrome
will be right there with you from newborn to
toddlerhood.                                     *   Supports Physical, Mental &
                                                     Emotional Development

                                                 *   Supports Breastfeeding Mothers
Top Tips                                                                        Fabric Characteristics
Make sure you and your baby are feeling calm and happy before trying the                  Oscha slings are woven with the highest quality, natural yarns. Each yarn has
sling out. Take your time to practice and allow your baby time to get used to             unique textures and natural variations. During the weaving process small visual
being in the sling. Let them settle by going out for a walk the first few times. You      imperfections may appear. These are all normal, allowing you to enjoy the texture
could practice using a teddy or a doll and check in front of a mirror.                    of the natural fibre or the guiding hand of our weavers in this British-made fabric.

                                                                 A SUPPORTED              NUBS, SLUBS, FLECKS
       ‘M’ SHAPE               VISIBLE AND KISSABLE                                                                                SM ALL LOOPS                     SKIPPED THREADS
                                                                    CARRY                      & KNOTS
 Baby’s bottom should be       Keep baby’s face in view.     Wear baby snug enough        These may be uneven yarn             A normal part of the yarn,          Small areas of skipped
below their knees, imitating     Ensure their chin is not    to support their back and     widths, an intentional part           they do not affect the           threads are an inevitable
   the position they would        resting on their chest.     prevent slumping. Allow      of the style, or knots made        integrity of the fabric; more           part of the weaving
  take in arms. Spread the      Keep their face clear of      a gentle curve in a small   by our skilled weavers - all        wispy filaments than pulls -         process and should be
 carrier base from knee-pit    fabric and ensure it is not    baby’s spine. Make sure       add to the unique look.            they do not create tension         considered a normal part
         to knee-pit.            buried into your chest.      their head is supported.                                        on the fabric around them.          of the texture of your sling.

                                                                                                                           Ready to Wear
                                                                                          As woven slings are made using natural fibres they may need a little time before they reach
                                                                                          their final, and softest, state. Our special chemical-free Soft Touch Finishing technique starts
                                                                                          the process of breaking in your new sling for you.

                                                                                          Depending on the fabric used to make your carrier, it might benefit from a little love before it
                                                                                          is as soft as it can possibly be. If this is the case, check out our site for all the tips and tweaks
                                                                                          babywearers use - oschaslings.com/readytowear.

TAKE CARE BENDING                 YOUR COMFORT                    TEMPERATURE

Bend with your knees and       Ensure the fabric is spread    Be aware of your baby’s
                                                                                                                      Washing and Care
 support baby with one          across your shoulder and       body heat when using       Always follow the instructions on the label of your sling. Spot clean where possible.
         hand.                 back without being twisted.       a sling and avoid        Place items with buckles or rings in a pillow case for protection. Do not iron over labels
                                                                    overheating.          and webbing. Store in a cool, dry place, roll or hang to avoid perma-creasing.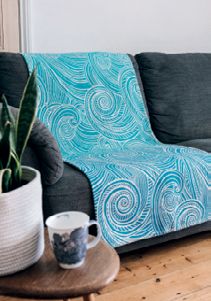
Baby Wrap - Front Wrap Cross Carry                                                                1.    2.    3.

1.   Find the middle marker on the wrap and align it to the centre of your chest. Take hold
     of the top edge (called the top rail) an arms length away from your body.

2. Bring the top rail under your arm, across your back and over the opposite shoulder.

3. Repeat for the other side.

4. The fabric should form an ‘X’ across your back.

5. Adjust the wrap so the tails are equal length. Tighten gently so the wrap is snug with         4.    5.    6.
   enough room to pass your baby into the pouch in front of you.

6. Pick up your baby and hold them against you. Pass their legs through the wrap and
   seat them on the band of fabric, ensuring it goes from knee-pit to knee-pit and baby is
   in a good seated position with knees level or higher than the hips. Now use one hand
   to bring the fabric up over baby’s back to the base of the occiput whilst using the other
   hand to support baby and as a break to ensure you do not bring up any excess fabric,
   which should remain under the seat.

7.   Support baby with one hand. Pull out one side of the wrap, tightening across the width,
     removing slack and giving support. Hold the tightened side under baby’s bum while
                                                                                                  7.    8.    9.
     you tighten the other side.

8. Hold one end of the wrap tightly in each hand, bring them under your baby’s bum and
   cross them over.

9. Take the ends under baby’s legs and bring them behind you.

10. Tie the wrap off behind you in a secure double knot. If the wrap is very long, bring it
    around again under your baby’s legs and tie again under their bum.

11. For added support you can open out the crosses on each side. Adjust the wrap for your
    comfort, and if you feel constricted around the neck pull the wrap away.                      10.   11.   12.
12. To get baby out - Open the crosses up. Lift your child under their arms. Rest them on
    your shoulder whilst you bring their legs out of the wrap.

Comfort Checks:
Check to make sure you have spread the fabric smoothly across the baby’s back and that
the fabric goes from knee pit to knee pit. For your own comfort check the fabric is not twisted
and are sitting in a comfortable position on your shoulder - you can spread the fabric over
your shoulders.
Baby Wrap - Infant Front Wrap Cross Carry                                                          1.   2.   3.

1. Follow steps 1-7 on previous page for Front Wrap Cross Carry. Ensure baby is held so
   that they are mimicking the natural position upright in your arms, with knees tucked up
   and not too far apart. Make sure the wrap is well tightened and each end of the wrap
   is held snugly in each hand. Cross the ends over beneath baby’s bum once.
2. Cross the tails over again to form a twist (this can be repeated if necessary to keep the
   tails (rope passes) away from baby’s feet).
3. Bring the tails to your back and secure in a double knot.

Ring Sling                                                                                         1.   2.   3.

1.   Take the rings in one hand and the loose end of fabric in the other.
2. Feed the loose end of fabric through both rings.
3. Lift the upper ring, pass the fabric over the upper ring and pull the fabric though the
   lower ring.
4. Pull the fabric through one strand at a time ensuring there is no twisting or bunching.
   This will make it easier to adjust later. Pass the sling over your head and one arm.
   Ensure the rings are sitting just below your shoulder and the fabric is well spread and
   not twisted. Tighten enough to make a snug pouch ready for your baby.                           4.   5.   6.
5. Rest your baby against you, holding them securely. Pass their legs through the fabric
   and out the other side. They should be in a spread-squat position with the fabric going
   knee-pit to knee-pit. Allow their weight to rest on the fabric. If the rings have moved
   down, slightly lift your baby so you can slide the fabric round to move the rings back up.
6. Spread the fabric up baby’s back to the base of their neck whilst you support them.
   Move any ‘slack’ in the fabric towards the rings ready to tighten. The fabric should be
   smooth across baby’s back with any excess tucked into the knee pit.
7.   Pull the fabric through the rings so it feels nice and secure. Rather than pulling in a
     downwards motion, lift up and over. This helps keep the rings in the correct position, just
     below the hollow area in front of the shoulder. Tighten by pulling small sections of fabric   7.   8.   9.
     at a time out radially from the ring centre. Place your hand under baby’s bum to lift
     them a little so that you can adjust the fabric easily.
8. Especially focus on tightening the upper third of the sling so that your baby is drawn in
   closely to you, and ensure the middle third and bottom third are snug too. Make sure
   the fabric is still well spread out over your back and your shoulder.
9. To take baby out: Lift the upper ring to allow some fabric to slide through, loosening the
   pouch. Lower the fabric under her shoulders and hold baby around the waist. Lift your
   baby up, rest them on your shoulder and bring their legs out.
Carriers - Adjusting the Panel Height                                                          1.   2.   3.

You may need to shorten the panel height to ensure it only comes up the base of the head
(the occiput). To do this you can place the waistband high up on your waist. Alternatively
you can roll the waistband:
1.   Hold the carrier with the label facing away from you, panel hanging down.
2. Fold the waistband down over the panel and then clip around your waist securely.
3. Check that your baby’s head is close enough to kiss and the panel is at the right height.

Carriers - Using the Hood & Webbing Tidies                                                     1.   2.   3.

When you find your child has grown too tall for the body panel to provide support
when they fall asleep, the hood can be used. Rolling the hood can provide additional
head support for smaller babies (0 - 4 months).
1.   To attach the hood (if necessary) feed the short poppered ties through the loops on
     the body panel below the shoulder straps and press to fasten.
2. Bring the hood over the back of your child’s head; feed the hood tie through the
   shoulder strap loop on the shoulder strap. Adjust to create the necessary support and
   tie off.
                                                                                               4.   5.   6.
3. We recommend only fastening one side of the hood, ensuring you can see baby’s
   face at all times.
4. Rolling the hood can provide additional head support for smaller babies (0 - 4
   months).
5. Secure at the side.
6. Excess webbing can be rolled away to keep it tidy, and the elastic loop used to
   secure it.

Breastfeeding in a Sling, Wrap or Carrier
Loosen the shoulder straps and waist band (or fabric through the rings on a Ring Sling)
to lower baby down slightly. Ensure a good air supply at all times with no fabric over
the head and that baby’s chin is not resting on their chest (check you can fit two fingers
between chin and chest if you are unsure). Support baby’s head with your band, ensure
they can latch on and off as needed - do not force their head forward with sling fabric.
Keep their head aligned with their spine and only turned slightly to one side if needed.
Allow baby’s hands to be up next to your breast. Keep focused on your child while they
nurse - re-position them and tighten the carrier once they have stopped feeding.
Cairis Baby & Toddler Carrier 1. 2. 3.
1. Review above section ‘Carriers - Adjusting the Panel Height’. Hold the Cairis in front of
you by the waistband with the buckle facing away and the panel hanging over the
waistband and down.
2. Wrap the long Strata-linea Waistband around the back of your waist.
3. Bring the webbing over the tongue and click the buckle securely together. Pull on the
webbing to tighten so it is comfortably snug. Keep the waistband horizontal.
4. To adjust the panel width for younger babies tie the Cynch accessory around the body
panel near to the waistband - you want enough width so that the fabric can be spread
from knee-pit to knee-pit when your baby is in it. Move the strap around so the knot is
under the waist fabric. 4. 5. 6.
5. Hold your baby to your chest and position them comfortably with their bottom over the
waistband. The top of your child’s head should be close enough to kiss easily; if it is not,
put baby down and move the waistband higher up your body.
6. Support baby with one hand, and with the other hand, reach underneath the body
panel to smooth the fabric up your baby’s back. Keeping one hand on baby, ensure
baby’s knees are bent and their pelvis is tucked inwards. Make sure that baby’s back is
supported by fabric up to the back of the neck. Keeping one hand on baby’s back, use
the other hand to bring the shoulder straps up and over each of your shoulders. Both
shoulder straps should now be hanging vertically down your back.
7. Support baby with one arm, and with the other hand, reach around behind your back
to gather the opposite strap. Pull this vertically downwards so it is snug on your shoulder. 7. 8. 9.
Then bring it around your side and hold it just below your child’s bottom. Keep holding
this strap and use that forearm to support baby.
8. Your other hand can now reach around your back to find the remaining strap on your
opposite shoulder. Tighten in a downwards motion then bring the strap across your
back and around your baby. The straps now form a cross on your back.
9. You should now have both straps in front, one in each hand, and held just below
baby’s bottom. Supporting baby with one hand, give each strap a gentle forward pull,
wriggling your opposite shoulder as you pull, to get any slack out and to bring baby’s body
close to your chest.
10. Bring each strap down the side of baby so that the fabric passes outside the bend of
the knees. For newborns, bring the strap underneath the leg. Cross the straps over in 10. 11. 12.
your hands below baby’s bottom.
11. Keeping the tension, bring the straps underneath baby’s lower legs and around your
sides. Tie in a secure double knot at your back.
12. You may choose to spread the wrap fabric of the straps across baby’s bottom for some
extra warmth or support. This can have the effect of creating a wider seat, more useful
with bigger children.
To take baby out - undo the long straps and bring the panel down from baby’s back whilst
keeping one hand supporting your baby.Bairn Carrier 1. 2. 3.
1. Your Bairn Carrier comes with an integrated adjuster, the Slider-Cinch, to size the panel
width so it will fit your baby perfectly as they grow. Simply push the fabric along the
waistband to reach the desired width - the aim is that the panel fabric will support your
baby knee-pit to knee-pit when the carrier is in use.
2. Loosen the webbing of each shoulder strap, leaving just a couple of inches. This will
make putting on the carrier much easier and will leave enough to hold onto to tighten.
Review above section ‘Carriers - Adjusting the Panel Height’. Place the carrier at your
waist with the label facing in towards your body and the body panel hanging down. 4. 5. 6.
3. Bring the waist straps around to your back and clip the buckle. Tighten the webbing as
needed for a snug fit.
4. Pick up your baby and place their pelvis in front of the waistband (do not position their
bottom so it is resting above the waistband or it will draw it away from you, creating
gaping). Raise baby’s arms to rest on your chest. The top of your baby’s head should be
close enough to kiss easily. If it is not, reposition the waistband higher or lower on your
waist and/or position baby lower on the waist band.
5. Bring the body panel up over your baby’s back and place the shoulder straps over 7. 8. 9.
each shoulder while supporting baby’s bottom with your other hand.
6. Reach behind you and grab the webbing of the opposite shoulder strap. Pull down-
wards to tighten.
7. Bring the strap across your back, under your arm and clip up the buckle at your side.
8. Tighten the webbing by pulling backwards.
9. Repeat on the other side.
10. 11. 12.
10. Make adjustments to ensure M position/pelvic tuck.
11. Adjust shoulder straps for a more comfortable fit as needed.
12. The cross should sit in the middle of your back.
To take baby out - unclip buckles at side and bring the panel down, always supporting your
baby with one hand.Nook Encompass and Evolve 1. 2. 3.
1. You can adjust the width of the Nook by pulling the in built Width Cinch (just above the
waist belt) and securing with a knot. You are aiming to make the body panel the correct
width so that when your baby is seated in the carrier the fabric spreads from knee-pit
to knee-pit. The Nook Evolve also has a Height Cinch (located on the sides of the body
panel) so that the fabric can be sized to the height of your child. Simply pull on the
Cinch until the desired height is reached and then tie in a knot.
2. Review previous section ‘Carriers - Adjusting the Panel Height’. Hold the Nook in front
of you by the buckled waistband, with the body panel folding over the waistband and
away from you, make sure this panel is centred on your body.
4. 5. 6.
3. Wrap the padded Strata-linea Waistband around the back of your waist.
4. Bring the webbing over it. Clip securely and pull on the webbing to tighten.
5. Buckle up the arm strap and loosen the webbing significantly (this will allow you to
pass the straps over your head). Leave a handful of webbing at the end for you to
tighten later.
6. Clip the chest strap and set to the right size for you. You will learn what width is
comfortable through practice.
7. Hold your baby to your chest and position them comfortably with their pelvis in front
of the waistband (not above the waistband as this will cause gaping). The top of your
baby’s head should be close enough to kiss easily. If it is not, reposition the waistband 7. 8. 9.
higher or lower on your waist. Support baby with one hand under their bottom ensuring
a good ‘M’ position with their knees higher than their bottom.
8. Bring the body panel up over baby’s bottom and, with the other hand, take hold of
the chest strap. Bring the chest strap over both of your heads, ensuring little feet are not
caught up as you do so. Smooth the fabric up over baby’s back, ensuring it is pulled up
to the nape of the neck.
9. Put your arms through each strap - both straps should now be over your shoulders.
10. For newborns - place the straps under the legs. For a child over 12 weeks - you can
choose to have the strap over or under the leg depending on what you both find most
comfortable. Still supporting baby under the bottom, with the other hand tighten the 10. 11. 12.
shoulder straps by pulling the webbing forward in a diagonal motion. Shrugging your
shoulder back and lifting under babies bottom as you do so will help.
11. Make sure the chest strap is tight enough to secure the straps on your shoulders. The
chest strap should be approximately the height of your armpits for comfort.
12. Check your baby’s positioning and that their back is fully supported.
To take baby out - unclip buckles at side and bring the panel down, always supporting your
baby with one hand.Coorie Baby & Toddler 1. 2. 3.
1. Wrap the Coorie around your waist with the panel hanging down your back.
2. Gather in the waist fabric and pass it through both rings. Separate the two rings.
3. Pass the fabric over the upper ring and back through the lower ring. Fan out the fabric
and make small adjustments so it fits snugly around your waist.
4. Rotate the carrier around your waist so the panel is hanging down in front of you.
Tighten again if necessary. Hold your baby to your chest and position them with their
bottom over the waistband. The top of your child’s head should be close enough to kiss
easily; if it is not, put baby down and move the waistband higher up your body.
5. Support baby with one hand, and with the other hand, reach underneath the body 4. 5. 6.
panel to smooth the fabric up your baby’s back, ensuring little feet are not caught as
you go. Make sure that baby’s back is supported by fabric up to the back of the neck.
Keep one hand on your baby and use the other hand to bring each shoulder strap up
and over your shoulder on the same side, so it hangs down your back. Both shoulder
straps should now be hanging vertically down your back.
6. Support baby with one arm, and with the other hand, reach around behind your back
to gather the opposite strap. Pull this vertically downwards so it is snug on your shoulder.
Then bring it around your side and hold it just below your child’s bottom. Keep holding
this strap and use that forearm to support baby.
7. Your other hand can now reach around your back to find the remaining strap on your
opposite shoulder, tighten in a downwards motion then bring the strap across your back 7. 8. 9.
and around your baby. The straps now form a cross on your back.
8. You should now have both straps in front, one in each hand, and held just below
baby’s bottom.
9. Supporting baby with one hand without letting go of the strap, give each strap a gentle
forward pull, wriggling your opposite shoulder as you pull, to get any slack out and to bring
baby’s body close to your chest. Bring each strap down the side of baby so that the fabric
passes outside the bend of the knees, and cross the straps over in your hands below
baby’s bottom.
10. Keeping the tension, bring the straps underneath baby’s lower legs and around your
sides.
10. 11. 12.
11. Tie a secure double knot at the back. Baby’s knees should be able to move freely, their
chin should be off their chest and they should be close enough to kiss. Ensure that they
are safe and comfortable.
12. You may choose to spread the wrap fabric of the straps across baby’s bottom for some
extra warmth or support. This can be done by finding the top edge of each strap as it
comes around baby’s side, and pulling it upwards gently to spread the fabric to its full
width. This can have the effect of creating a wider seat, more useful with bigger children.
To take baby out - undo the long straps and bring the panel down from baby’s back whilst
keeping one hand supporting your baby.Safety & Warnings WARNING
• Read all instructions before assembling and using the soft carrier. FALL AND SUFFOCATION HAZARD
• Use common sense when using a sling: your baby’s safety is your responsibility.
• Check to ensure all buckles, snaps, straps, and adjustments are secure before each use. FALL HAZARD - Infants can fall through a wide leg opening or out of carrier.
• Check for ripped seams, torn straps or fabric and damaged fasteners before each use. • Adjust leg openings to fit baby’s legs snugly.
• Stop using immediately if you notice any damage. • Before each use, make sure all fasteners are secure.
• Ensure proper placement of child in product including leg placement. • Take special care when leaning or walking. Leaning, bending over, or
• Constantly monitor your child and ensure the mouth and nose are unobstructed. tripping can cause baby to fall. Keep one hand on baby while moving
• Premature infants, infants with respiratory problems, and infants under 4 months are at
• Never bend at the waist; bend at the knees.
greatest risk of suffocation. Check often to make sure baby’s face is uncovered, clearly visible,
and away from caregiver’s body at all times. Make sure baby does not curl into a position
• Cairis Baby and Nook Encompass - Only use this carrier for children
with the chin resting on or near baby’s chest. This position can interfere with breathing, even between 7lb and 45lb.
when nothing is covering the nose or mouth. Ensure your child’s chin is not resting on its chest • Coorie Baby - Only use this carrier for children between 15lb and 45lb.
and its breathing may be restricted which could lead to suffocation. • Cairis Toddler, Nook Evolve and Coorie Toddler - Only use this carrier for
• If you nurse your baby in the carrier, always reposition after feeding so baby’s face is not children between 25lb and 45lb.
pressed against your body. • Wrap and Ring Sling - Only use this carrier for children between 8lb and
• Never use a baby wrap or ring sling with babies smaller than 8 pounds without seeking the 45lb.
advise of a healthcare professional. For pre-term, low birth weight babies and children with
medical conditions, seek advice from a health professional before using this product. SUFFOCATION HAZARD – Infants under 4 months can suffocate in this
• Never use a soft carrier when balance or mobility is impaired because of exercise, drowsiness, product if face is pressed tight against your body.
or medical conditions. • Do not strap infant too tight against your body.
• Never use a soft carrier while engaging in activities such as cooking and cleaning, which • Allow room for head movement.
involve a heat source or exposure to chemicals. • Keep infant’s face free from obstructions at all times.
• Take extra care when around hot liquid or drinks. Failure to follow the manufacturer’s instructions can result in death or serious
• Never wear a soft carrier while driving or being a passenger in a motor vehicle. injury.
• Do not use in place of a car seat.
• Do not operate machinery or drive a vehicle when using a carrier.
• Do not use the sling during sporting activities e.g.. running, cycling, swimming and skiing.
• Be aware of your baby’s body heat when using a sling. The carrier provides extra layers of
fabric and therefore warmth for you both; you are also sharing each other’s body heat. You
will probably need a layer or two less clothing than normal.
• Ensure your baby’s head is well supported.
• Do not leave a carrier around your child unsupervised.
• We do not recommend back carries until your child has good head control & is over 4
months old.
• Do not position your child in the carrier so that their body is facing away from you. This
✓ ✓ × ×
carrier has not been designed for carrying children in this position, nor do we recommend it.
• Only use the carrier with one child at a time. Keep this sling away from children when it is not in use.
• Be aware of an increased risk of your child falling out of the sling as the child becomes more active.
• Your balance may be adversely affected by your movement and that of your child. CORRECT CORRECT INCORRECT INCORRECT
• Take care when bending or leaning forward or sideways. Upright (optimal) Reclined Baby’s face covered Baby is hunched with
• To prevent hazards from falling ensure that your child is securely positioned in the sling. Chin up; face visible Chin up; face visible and pressed tight chin touching chest;
Nose and mouth free Nose and mouth free against wearer face coveredJoin our thriving community - Clan Oscha - for more
support in babywearing and beyond
Oscha Slings LTD, 24/4 Dryden Rd, Loanhead EH20 9HX
Tel: (+44) 0131 440 9767 www.oschaslings.comYou can also read