INTRODUCTION - Gus and Co
←
→
Page content transcription
If your browser does not render page correctly, please read the page content below

YE R
                                                                                                               PLA
                                                                                                         PER
                                                                                                   MIN
                                                                                            S I 20
                                                                                         ER
                                                                                  L AY
                                                                             O 5P
                                                                          2T
                                                                   R D AI
                                                              AC E
                                                        TA LL
                                                    V I
                                             E   BY
                                       AM
                                    AG

INTRODUCTION
After a successful bank heist, you and your fellow thieves are laying low and enjoying the good life. Most of the
cash has been hidden away, and the rest has been invested in businesses throughout the city. Everything is going
according to plan until the police make a breakthrough in their investigation. Accusations are made, fingers are
pointed, and after a heated argument, you decide to go your separate ways.

Chaos ensues as the SWAT team is called in and start to close off the city’s exits. Your only choice now is to escape
the city before it is completely locked down. But you need a plan — a route that allows you to leave the city while
recovering as much of the money as possible.

You will need to call in some favors and hire local gangs to create diversions. Disguises may help, but they don’t
fool everyone. Setting the police on the trail of your former colleagues will give you a better chance of escape, but
the other thieves are thinking the same thing...

Will you escape with the most money, or will the police lockdown the city before you can get out?
TABLE OF CONTENTS
Game Components 				 3                                         Transportation 					 11                                          Use a Fixer tile				 19
                                                               Subway 					 11                                                  Perform First Aid				 19
Board Setup 					 4                                            Heliport 				 11                                                 Use a Gang member 			                           19
Player Setup 					 5                                                                                                            Use an Unlocked Asset tile		 19
                                                               Step2:Avoid 					 12
Game Overview 				 6                                                                                                            Only 2 Player 					22
Goal of the Game 				 6                                        Step3:Visit 					 13
                                                               Business 				 13                                                 End Game Scoring 				22
Gameplay 					 6                                               Safe Houses 				 14
1. Income 				 6                                               Gangs					 14                                                    Tips 						23
2. Patrol 				 6                                               Convenience Stores			                           15
3. City 					 7                                                Clinic					 17                                                   Cards and tiles description			                             24
4. Turn Order 				 8                                           Church					 17
5. Day Turns 				 8                                            Exits					 17

Actions 						 9                                               6, Change of Day 			 18
Rest 						 8
Move 						 8                                                  Executive Actions 				 18
Step1:Travel 					 10                                          Use a Contact card			                           19
Notoriety 				 10                                              Use an Equipment tile			                        19

CREDITS
Game Design: Vital Lacerda
Game Art: Ian O’Toole                                          The Author wishes to warmly thank for playtesting, comments and suggestions:
Head of development: Paul Incao                                Alexandre Abreu, Alexandre Bezerra, Alexandre Correia, André Almeida, André Silva, Alex Soued, Adam Wells, Bruno Ribeiro,
Main playtesters: Herwin Prem, Julián Pombo, Jun Baik          Cathy Bock, Carlos Paiva, Catarina Sarmento, César Mendes, Chris Giovingo, Cristina Neves, Christopher Incao, Cristovao Neto,
                                                               David Bock, David da Silva, Diogo Trindade. Duarte Barbosa, Helena Pereira, Eduardo Cruz, Eduardo Neto, Elsa Romão, Garry
Graphic Design & 3D Illustrations: Ian O’Toole
                                                               Perrin, Helena Marques, Helena Pereira, Hugo Elias, Ian O’Toole, Jake Blomquist, Jason Grantz, João Madeira, João Martins, João
Rulebook & 3D Illustrations: Vital Lacerda                     Mendonça, João Quintela, Jorge Graça, Josh Acosta, Kayla Nimis, Lago Ribeiro, Laura Ward, Luca Giordano, Mário Bastidas,
English Rules Editing: Paul Grogan                             Miguel Pascoal, Nathan Morse, Ori Avtalion, Paulo Renato, Paulo Terça, Pedro Almeida, Pedro Freitas, Pedro Sampaio, Michael
                                                               Varela Da Silva, Nicola Bocchetta, Rand Lemley, Randal Lloyd, Raquel Guiomar, Ricardo Almeida, Ricardo Lebre, Ricardo
Official Rules Video: Paul Grogan, Gaming Rules!               Trindade, Ruben Rodrigues, Sandra Sarmento, Sara Rodrigues, Sofia Passinhas, Susana Batel, Tiago Rebelo, Vasco Almeida.
Proofreading: Chris Clarke, Hui Sian Richardson, K. Novak,
              Ori Avtalion, Paul Grogan, Patrick Morrison
                                                               A very special thanks to Ian O’Toole for the amazing art and graphic ideas, to Paul Grogan, for many working hours on the
Project Manager: Alex Soued, Rick Soued                        rulebook, Ori for his eagle eye on catching issues in the rules.
                                                               My discord group for the huge design discussions and suggestions, all of the BGG community for their support, and finally
                                                               to Paul Incao, who keeps following me on this adventure, with many great ideas, and for being available at every hour for
                                                               developing. To Alex, and the entire EGG team for believing in this game. Without all of these people this game would not have
For support, email us at: customer-service@eagle-gryphon.com   been possible.
LIKE us on Facebook: www.facebook.com/Eagle-Gryphon-Games
                                                               All my love to my beautiful daughters Catarina and Inês and to my muse and greatest friend, my wife Sandra, for their patience,
FOLLOW us on Twitter: @EagleGryphon                            support, inspiration, and many hours of discussion on this game.

© 2018 Eagle-Gryphon Games, 801 Commerce Drive, building #5.
Leitchfield, KY 42754, All Rights Reserved.

www.eaglegames.net

2
GAME COMPONENTS
                                                                                          Back     Back                                                                                   Back

                                                                     Front

                                                                                                                                                                       Front
                                                                                                                    Front

1 double-sided Game board         5 Player boards and 5 screens    14 City tiles                 6 Business tiles                 3 Safe House tiles                 8 Fixer tiles
                                  in player colors

                           Back                    Back                                 Back       Back                             Back                              Back

  Front                            Front                            Front                                              Front            Front                           Front

15 Locker tiles in 3 types        16 Equipment tiles in 4 types    9 keys in 3 colors            10 Exit tiles in 2 types         35 Asset tiles in player colors    5 Rest tokens in player colors
                                                                                                                                                                     and 5 First Aid tiles

                                     Back                            Back                           Back                           Back
       x20

                    x15

           x15
                                                       Front                            Front                           Front                           Front

Money tokens in 3 types:          6 Patrol cards                   32 Contact cards              9 Escape Plan cards              15 Inspector cards (only used in   2 Exit Cost Cards and
$1k, $3k, $5k                                                                                                                     2-player games)                    10 Handcuff cards

                                                        County

                                                   Federal

                                              SWAT

5 Player aids and a pad of        30 Police Officers, 10 of each   8 Gang members                6 Gas can tokens                 15 Wound cubes                     20 Notoriety cubes
scoring sheets                    type

5 Player pawns, one color for     10 Gang Control markers,         45 Income cubes, 9 in each    5 Notoriety markers and 5 Turn   8 Action discs and 1 Time          1 bag
each player                       2 in each player color           player color                  order markers in player color    marker                                                              3
BOARD SETUP                                                  “Marvin: I already told you I don’t know anything about any §@#$#!& setup; you can torture me all you want.
                                                              Mr. Blonde: Torture you? That’s a good idea. I like that.” — Reservoir Dogs

CITY SETUP
1. Place the Game board in the middle of the playing
   area. Ensure that the correct side is face up
   according to the number of players in game.
   (Look for this symbol in the business area).
2. Place the 2 starting City tiles face down in the
   marked spaces at random. The arrows on the backs
   of both tiles must be pointing in the same direction,
   either up or down. Then, flip both tiles face up,
   maintaining their respective orientation.                                                            18.                                       11.
3. Separate the remaining City tiles according to the                                                                     10.
                                                                                                                                                                                5.
   letter on the back of the
   tiles. Separately shuffle
   each group of tiles and
   place them in 4 face-                                                                                                                             9.
   down stacks next to the
   Game board.
4. Flip over the top City tile
   of each stack (leaving
   the tiles on top of their                                                                                                                    1.
   stacks).                                                                                                                                                                A.
                                                                                                                                         9.

P O LI C E S E T U P
5. Shuffle the 6 Patrol cards and randomly return one
   to the game box without anyone seeing it. Place the                                   18.
   5 remaining cards face down in their proper place
   on the board, forming the Patrol deck.
6. Place all Police Officers into the bag and mix them up.                                                                             9.
7. Add 2 Police Officers at random from the bag to
   each of the City tiles on            top of the                                               15.
   stacks. Then, draw 2 more
                                                                                                                                                                           14
   Police Officers and place
   them on the starting City
   tile without the hospital.
8. If any City tile (on the
   board or in the display)
   now has 2 Police Officers
   of the same type (color)
   on it, return 1 back to
   the bag (do not draw a
   replacement).

B U S I N E S S A N D SA F E H O U S E
LO CATI O N S S ETU P
9. Place all Business and Safe House tiles face up on
   their proper spaces of the Game board (matching
   the icons relating to each business type).
                                                             13. Separate the Equipment tiles by type and place                  16. Place 6 Gang members on
10. Place the 9 Key tiles face up at random in the 9             them face up in the corresponding spaces near the                   their place on the board,
    spaces of the Safe Houses.                                   Convenience Store. Place the 6 Gas can tokens next                  and the remaining 2 Gang
11. Place the Fixer tiles in a face-up stack on their            to the Equipment tiles.                                             members on the Gang HQ
    space next to the Safe Houses. The order of these        14. Separate the Exit tiles by their backs, shuffle each                of the starting City tile.
    does not matter.                                             stack separately, and place them near the Game board.           17. Place the Time marker on
12. Separate the Locker tiles by color. Shuffle each                                                                                 the starting space of the
    stack and place them face down in their matching                                                                                 Time track.
    locker spaces of the Convenience Store.
                                                             ADDITIONAL SETUP
                                                                                                                                 18. Place all the Extra Action
                                                             15. Shuffle the Contact cards and place them face                       discs, money, Handcuff
                                                                 down as a Contact deck near the Game board.                         cards next to the board.
                                                                 Reveal the top 7 cards of this deck and place them
                                                                 face up next to the deck to form a display.
4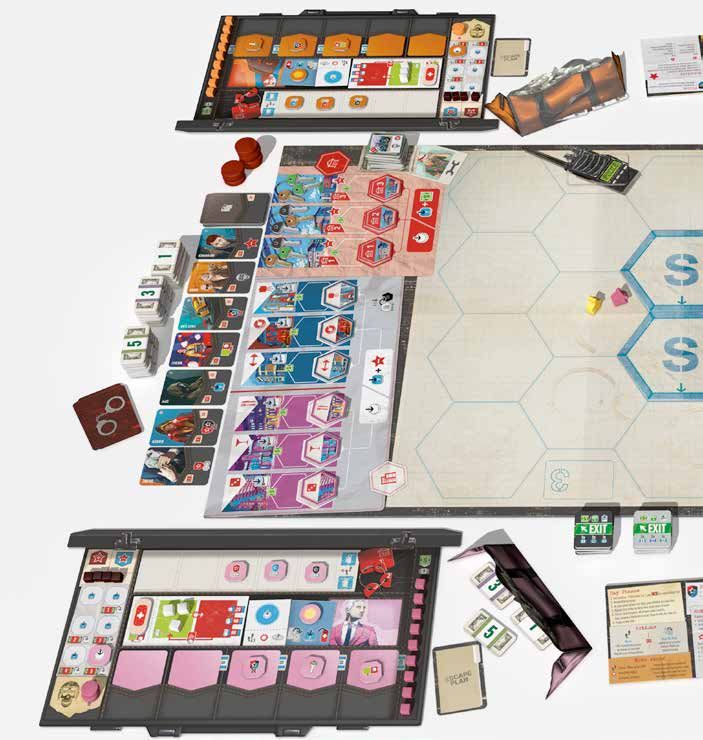
All game components are limited with the exception of money. G. Place a First Aid tile face up on its space.
H. Place 3 Wound cubes in your Green Wounds box.
I. Place your Rest token with the sun face up on its
space.
J. Place 4 Notoriety cubes in the space below the red
and blue Notoriety boxes.
K. Place your Player screen in
front of you, take $9k in
money and place it behind
your screen. Your money
should remain hidden from
other players during the
game.
L. Shuffle the Escape Plan
12. cards and deal one at
3-4
random face down to
13. each player. Return any remaining cards to
the box without anyone seeing them. Players should
look at their own card, but keep it secret from other
players until the end of the game.
M. The first player is the player who most recently
robbed a bank. They place their Turn order
16. marker on the first space of the turn order track.
2. 7. Continuing in clockwise order, each other player
places their Turn order markers in the next available
17. space.
N. Players place their Notoriety marker on an empty
M. 6. space at the bottom of the Notoriety track (the
order does not matter here) on the Game Board.
8.
N.
2- P L AY E R S E T U P
“Sandra is back, she left her job at the Kanban factory and
decided on a new career as a Police Inspector.”
When playing a 2-player game, add the following to
the setup instructions:
J. a. Choose one player color not currently in use this
game. These pieces will be used by Sandra, a game-
controlled 3rd player.
C.
b. Place the Inspector (the player pawn for Sandra) on
B. the Hospital tile.
G. H. I. c. Place Sandra’s Notoriety marker on one of the
D. bottom spaces of the Notoriety track.
K. L. d. Place Sandra’s Turn order marker in
E. position 3 on the turn
order track.
F. e. Place 4 Sandra’s Notoriety
cubes and her 9 Income
cubes next to the Game
board.
PLAYER SETUP B. Place your 9 Income cubes on the spaces of your
Income track (spaces 0 to 8).
f. Take the Inspector cards,
shuffle them, and place
them face down as the
C. Place your 3 Asset tiles depicting the Police Officer
Each player chooses a color and takes the respective shields face up in the indicated Item spaces (the Inspector deck next to the
Player board, Player screen, and all pieces of their order does not matter). Game board.
chosen color.
D. Place your Asset tile depicting the Extra Action icon
Place your Player board in on the $5k unlocked Asset tile space.
front of you and arrange the
pieces as shown above: E. Place your 3 remaining Asset tiles face up on the Note : Ch eck th e rules for 1- an d 2-playe r gam es
indicated Contact card spaces (the order does not at th e e n d of th e m an ual.
A. Place your Player pawn matter).
on the Hospital Location
on the Game board. F. Place your 2 Gang Control markers in your Gang
area.
5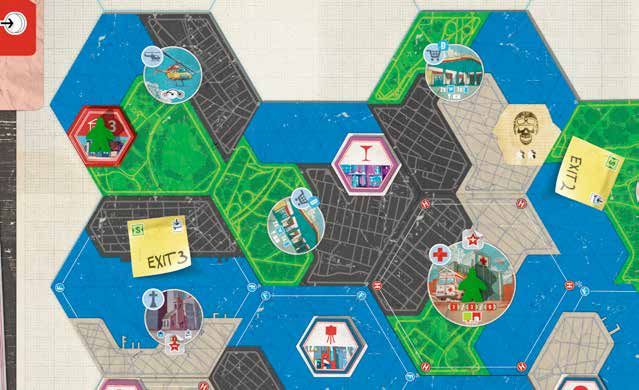
GAME OVERVIEW                                                                                              GOAL OF THE GAME
Escape plan is played over 3 rounds, each round representing one day. Over the                             On the 3rd day, players attempt to leave the city through the only open exit, but
course of a round, Police Officers spread throughout the city, populating the streets                      they need to have enough money to pay for their escape; otherwise, they are
and closing off exits.                                                                                     arrested, score no points, and cannot win the game.
On their turns, players will use between 3 and 5 Actions to travel around the city                         The winner is the player who escapes with the highest amount of total cash.
recovering their hidden money, hiring gangs, visiting stores to buy disguises and
open lockers, etc. Due to these actions, players’ notoriety may increase, unlocking
new abilities but in turn causing the Police Officers to be more aware of them.

     GAME PLAY
     Each round consists of the following 6 phases:
     1. Income Phase — Receive money for your investments and may pay to unlock an Asset tile.
     2. Patrol Phase — The police start to close the exits.
     3. City Phase — The city gradually gets revealed.
     4. Turn order Phase— Change the order of play for the rest of this round.
     5. Day turns Phase— Split into 5 parts (Morning, Afternoon, Evening, Night, Dawn); this is where players take their actions.
     6. Change of Day Phase— Prepare for the next day.

1. INCOME                                                                  2. PATROL
     Jer r y: “ S how me t he m o n ey ! ” — Je rr y Mag u i re              Ove r the cour se of the g am e , SWAT teams se t up p at ro ls at t he vario us exit s o ut o f t he cit y. On Day 4, all
                                                                             the exits wil l be bl oc ked, so you m ust e scap e dur ing Day 3 w hen t he last exit is st ill o pen.
     Note: Sk i p this Phase o n Da y o n e.
     Each cu be on yo u r in co m e trac k rep re se n ts a
     retur n you rece ive f ro m m o n ey i nvested i n vari o us          Reveal the top 2 cards from the Patrol deck and place
     busine sse s t hro u g ho u t th e c i ty. D u ri n g th e g am e ,   them face-up on the corresponding patrol space of the
     you will be recove r in g th i s i nvested m o n ey f ro m            Game board. If it is Day 3, draw the last remaining card.
     th ose b u sine ss, t he reby red u c i n g th e i n co m e yo u      If a second card is placed on a Patrol space, that exit is
     receive .                                                             now blocked.
                                                                           If the City tile depicting that exit is either on the board
In this phase, all players receive income based on the                     or face up on one of the stacks of City tiles in the display,
number of Income cubes on their Player board.                              take one of the face-down stacks of Exit tiles (it does not
                                                                           matter which) and place it on that City tile, covering the
The amount of money you gain is equal to the lowest                        exit space.
visible number on your Income track. At the start of
the game, this is $9k, but as cubes are removed from                       If the City tile depicting the given exit is not yet visible,
your track, your income decreases.                                         place one stack of Exit tiles on top of the Patrol cards for
                                                                           that exit. As soon as the exit becomes visible on a City tile        Pat ro l s pace
                                                                           in the display, place a stack of Exit tiles on top of the newly
                                                                           revealed exit space.
    E xa mpl e:
    Vin n ie ha s 6
    c ubes o n t he
    in come spa ce s, so                                                      E x am pl e 1:
    h e rece ive s $6k                                                        The top card of the Patrol dec k is re veal ed. It
    (6 is the lowe st                                                         shows a 1 . The card is p l aced face up on Patrol
    v isible nu mbe r on                                                      sp ace 1 on the board. S ince this was the f ir st card
    h is Pla ye r bo a rd ).                                                  p l aced in this sp ace , nothing hap p e ns. The second
                                                                              card is re veal ed, and it shows a 3 . The card is
                                                                              p l aced face up on Patrol sp ace 3 . This is the
                                                                              second card p l aced the re , so exit num be r 3 is now
                                                                              bl oc ked. As the City til e de p ic ting exit num be r 3
                                                                              is al ready on the board, one of the two stac ks of
After taking Income, all players with a Notoriety of 1 or                     Exit til e s is p l aced on that sp ace of the City til e .
2 may spend $3k to unlock an Asset tile (see page 19).

6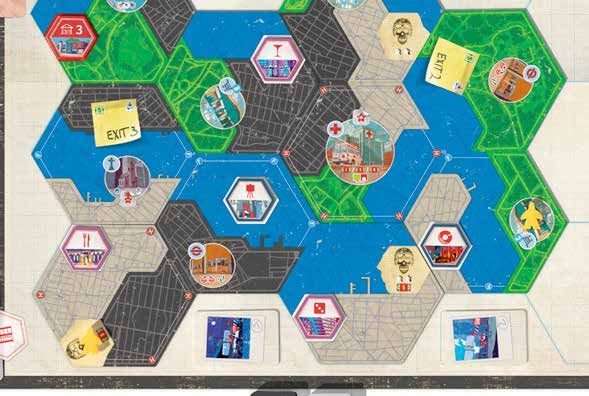
E xa m pl e 2:
   The top ca rd o f t he Patro l d ec k i s reveal ed . I t
   sh ows a 2, so it is p l aced o n Patro l s p ace 2 . Th i s
   is the second ca rd p l aced th e re, so ex i t 2 i s n ow
   bloc ked . The Cit y t il e d e p i c ti n g ex i t 2 i s n o t
   c ur re nt ly o n t he b o ard o r face u p o n o n e o f th e
   stacks. One of t he stac k s o f E x i t ti l e s m u st b e
   pla ced o n to p of t he Patro l card s o f ex i t n u m b er
   2. On ce t he Cit y t ile d ep i c ti n g ex i t 2 ap p ears,
   the Ex it t ile s a re moved fro m th e Patro l card s
   onto t he Ex it spa ce o f th at C i ty ti l e.

3. CITY
  Dur in g t he g a me , t h e g eo g rap hy o f th e c i ty i s s l owl y re veal ed al ong with the p ositions of the p ol ice in the st reet s. Use t his info rmat io n to yo ur ad vantage.

Beginning with the first player and continuing in turn
order, players place 1 new City tile from the display                LEGAL PLACEMENT                                                      ILLEGAL PL ACE ME NT
onto the board until all of the 4 face-up tiles in the
display have been placed in the city. Therefore, in a
4-player game, each player will place 1 new tile. In
games with fewer than 4 players, the sequence repeats
again with some players placing more than one tile. In
a 5-player game, the player last in turn order does not
get to place a tile.

  E x a m pl e:
  Vin n ie , Sca r, a nd Claws are p l ay i n g a 3 - p l ayer
  game , in t ha t pla ye r o rd er. Vi n n i e i s th e fi rst
  playe r, a nd pla ce s th e f i rst ti l e. Scar p l aces
  th e 2 nd , Claws pla ces th e 3 rd . Now th at al l
  playe r s ha ve pla ced a ti l e, th e seq u en ce starts                                                                                                                    None of the Land types
  a gain a nd Vi nni e places th e 4 th ti l e.                                                                                                                                on the new tile are
                                                                                                                                                                               connected to a matching
                                                                                                                                                                               land on an existing tile.

When placing new City tiles, they must be placed
adjacent to at least 2 existing City tiles, and rotated
in such a way that at least one of the Land types of
the new tile is connected to the same Land type on
another tile.

                                                                                                                                                     The new tile is not
                                                                                                                                                     placed adjacent to at
                                                                                                                                                     least two other tiles.

    Tip: Ma tching mo re th an o n e Lan d typ e
    ma ke s t he move me n t o f th e p l ayers i n th e
    city ea sie r.

                                                                                                                                                                                                           7
The following rules also apply to placing a City tile:
LAND TYPES                                                                 • All Police Officers on the tile are moved along with it.
                                                                           • If the tile has a Business (A) space on it, choose any
                                                                             available Business tile (one not already placed on a City
    There are 4 different Land types on the City tiles:                      tile) and place it on the Business space.
    1. Black zones: Industrial                                             • If the tile has a Safe House (B) space on it, choose any
                                                                             available Safe House tile (one not already placed on a
    2. Grey zones: Commercial
                                                                             City tile) and place it on the Safe House space.
    3. Green zones: Residential
                                                                           • If the tile has a Gang space on it, place 2 Gang
    4. Blue zones: Water                                                     members from their area on the board onto that
                                                                             Location.

                                     2.Commercial                          After all 4 tiles City tiles have been placed, flip the top
                                                                           tile of each City tile stack to form a new display. Then,
        1.Industrial                                                       for each of the new face-up City tiles, draw 2 Police                                     A.
                                                                           Officers at random from the bag and place them on top
                                                                           of each tile.
                                                                                                                                                                                                      B.
                                                                           After placing all the Police Officers onto tiles, if any tile
                                               4. Water                    has 2 Police Officers of the same type, return 1 back to
                                                                           the bag (do not draw a replacement).
            3. Residential

4. TURN ORDER                                                                                              5. DAY TURNS
     Tur n orde r is a d ju sted b ased o n th e p os i ti o n o f pl aye r s’ Notor ie ty m ar ke r s.      This phase is divided into 5 parts: Morning, Afternoon, Evening, Night, and Dawn.

The player with the highest Notoriety becomes the first player regardless of                               In each part of the day, in turn order, players first take one Action
previous position, the player with the second highest Notoriety is the second player,                      each (and any number of Executive Actions), and after that, the
and so forth in order of descending Notoriety.                                                             Notoriety track is updated, which is also done in turn order.
In case of a tie, the relative positions of the tied players are reversed. This means
that on Day 1, because everyone is tied on Notoriety, the last player will become the                      The Time marker is advanced along the Time track to keep track of
first player, and so forth.                                                                                which part of the day it is, and whether players are taking Actions
                                                                                                           or updating their Notoriety.
                                                                                                           All players must take one action during the Morning, Afternoon,
     E x a m pl e:                                                                                         and Evening. Taking turns during the Night and Dawn is optional
     In a 4-player game, the current turn order is: Claws, Vinnie, Scar, and Ruby.                         and requires the use of Extra Action discs.
     Scar has the highest Notoriety, with Claws, Vinnie, and Ruby all tied with the                        Therefore, you will take between 3 and 5 turns each day. The only
     lowest Notoriety.                                                                                     time you may take fewer than 3 turns is during Day 3 when you can
                                                                                                           escape the city. Once you have done this, you take no further turns.
     The new turn order is: Scar, then Ruby, Vinnie, and Claws.

                                                                                                           During the Night of each day, each player, in turn order,
                                                                                                           decides whether or not they want to discard one of their
                                                                                                           Extra Action discs to play during that part of the day. If
                                                                                                           they do, they complete their turn before the next player
                                                                                                           decides if they wish to do the same, and so on. Once all
                                                                                                           players have taken their actions, the Notoriety track is
                                                                                                           updated as normal.
                                                                                                           The Dawn part of the day is resolved in the same way. It is
                                                                                                           possible to use an Extra Action disc at Dawn, even if you
                                                                                                           did not use one at Night.

                                                                                                                           No te: In ord er to use an Ext ra Act io n d isc to take a t urn d uring
                                                                                                                           Nig ht and /o r Daw n, yo u must have t hat d isc b efo re t he part o f
                                                                                                                           the day in which yo u are ab o ut to use it .

8
ACTIONS
  Dur ing t he f ir st ha lf o f eac h p art o f th e d ay, eac h p l aye r in tur n orde r p e r for ms one Ac tion. You m ust c hoose o ne o f t he fo llow ing Act io ns : Rest o r Move.

REST
                                               When you choose to Rest, complete these               3. Unlock any one locked Asset tile from your board. Do this by moving it to the most
                                               steps in order:                                          expensive empty Asset space on the left side of your Player board. If you have no
                                                1. Flip your Rest token to the moon side. You           empty spaces, discard the tile to the box instead (see Asset tiles on page 19).
                1.
                                                cannot rest if the token is already showing
                                                the moon side.                                          N OTE: You can onl y Re st o nce per Day (at most 3 t imes d uring t he ent ire
                                                                                                        g am e ) . You can stil l use Execut ive act io ns.
                                                2. Flip back all used Contract cards and
                                                Equipment tiles you have on your board
                                                as well as your First Aid tile. They are now
         2.    3.
                     2.
                                                available again.                                                                        NOTORIETY SPECIAL CASES

                                                                                                                                           If yo u gain No to riet y and t here are no mo re
MOVE                                                                                                                                       cub es in t he b o t to m part o f yo ur No to riet y b ox,
                                                                                                                                           move 1 cub e fro m yo ur Blue No to riet y b ox b ack
                                                                                                                                           to t he b o t to m part instead . If t here are no cub es
When you choose to Move, complete these steps in                                                                                           in yo ur Blue No to riet y b ox, yo u canno t gain any
order:                                                             Also, when you Move, you can take any number of                         mo re No to riet y t his t urn.
                                                                   Executive Actions. These are additional things that
                                                                                                                                           If yo u lose No to riet y and t here are no mo re
              1. T R AV E L                                        you can do on your turn in addition to your regular
                                                                                                                                           cub es in t he b o t to m part o f yo ur No to riet y b ox,
                                                                   Move (see page xx for the full details on Executive
                                                                                                                                           move 1 cub e fro m yo ur Red No to riet y b ox b ack
              2 . AVO I D                                          Actions).
                                                                                                                                           to t he b o t to m part instead . If t here are no cub es
                                                                                                                                           in yo ur Red No to riet y b ox, yo u canno t lose any
              3. VISIT                                                                                                                     mo re No to riet y t his t urn.

 NOTORIETY
   During your turn, depending on your choices, you will either gain
   or lose Notoriety. This is tracked by moving your Notoriety cubes
   into your Red and Blue Notoriety boxes. The Notoriety track is not
   adjusted until the second half of each part of the day, when your
   Notoriety marker will rise by 1 for each cube in your Red Notoriety
   box and fall by 1 for each cube in your Blue Notoriety box.
   Notoriety is explained in more detail on page XX, but for now, you just
   need to know about how to track gains and losses during your turn.                                                                       Example:
   When you g a in No to ri e ty, m ove 1 No to ri ety c u b e f rom the bottom                                                             On his t urn, Vin n ie has gained 4 No to riet y
   par t o f you r Noto ri ety b ox to yo u r Red No to ri ety box.                                                                         so far and no t lost any. Therefo re, all o f his
                                                                                                                                            No to riet y cub es are in his Red No to riet y
   When you lose No to ri e ty, m ove 1 No to ri ety c u b e f rom the bottom                                                               b ox. He d ecid es to vis it a Safe Ho use, w hich
   par t o f you r Noto ri ety b ox to yo u r Bl u e No to ri ety box.                                                                      causes him to lose 1 No to riet y. Since he has
                                                                                                                                            no cub es in t he b o t to m part o f his No to riet y
                                                                                                                                            area, he moves o ne o f t he cub es fro m his Red
                                                                                                                                            No to riet y b ox b ack to t he b o t to m part . When
                                                                                                                                            t he No to riet y t rack is upd ated , he w ill gain 3
     E x a m pl e:                                                                                                                          No to riet y.
     It is Sca r ’s t u r n. S h e u ses h e r I n fo rm er
     card a s a n Execu t ive Ac ti o n w h i c h al l ow s
     her to lose 1 Noto ri ety. S h e m oves o n e o f
     her Noto r ie t y cu b es to h e r b l u e b ox . Sh e
     th e n visit s t he Ga l l e ry, w h ere M r. Bo n es
     a nd Ruby a re a lread y. Becau se o f th i s,
     she g a ins 2 Noto ri ety, an d m ove s 2 o f h e r
     No tor ie t y cu be s to h e r red b ox .
     Whe n t he t ime co m e s to ad j u st No to ri ety,
     Sca r w ill move her No to ri ety m arker u p 1
     spa ce o n t he No to ri e ty trac k .
                                                                                                                                                                                                         9
STEP 1: TRAVEL
              “Danny: You gotta walk before you crawl. Rusty Reverse that.” — Oceans 11

 You must move from one Location to another Location by spending 1, 2, or 3
                                                                                                  LOCATIONS                        Location
 Movement points (MP).
 You must always end your movement on a different Location than the one you                       A Location is any
 started on, and may never end on a Land space (streets or water).                                space on a City tile
                                                                                                  which is not a Land
 Each Movement point you spend may be used for one of the following:                              type. It is adjacent
                                                                                                  to all Land spaces
 • Leave a Location: Move from a Location to an adjacent Land space.                              touching any part of
 • Enter a Location: Move from a Land space to an adjacent Location.                              the Location.
 • Crossing Land: Cross from one type of Land to a different type of Land.
 • Move between Locations: Move from a Location to an adjacent Location
   			                     (the Locations are touching).

     NOTE : You ca n move ac ros s any n u m b er o f C i ty ti l e s with the sam e
     La nd t ype wit ho u t sp e n d i n g any Movem e n t p o i n ts.

                  When moving, if you have any Gas Can tokens, for each one you
                                                                                                          Water can only be crossed using normal movement if there is a Ferry icon
                  return to the Convenience Store you gain 1 extra MP during your
                                                                                                          on the Water space of a City tile that is part of the same body of water.
                  Move action that turn. See page XX on how you get Gas Can tokens.
                                                                                                          The presence of a Ferry icon indicates there is a Ferry on the entire body of
                                                                                                          water and it can be used even if your movement does not start or end on
                                                                                             Ferry icon   the tile with the Ferry icon.
     E xa mpl e:
     It is Vi nni e’s t u r n. He u ses 1 M P to l eave th e sto re whe re he e nded
     the pre viou s t u r n a n d m ove s to th e i n d u stri al area ( bl ac k ) . He
     continu e s moving t h ro u g h i n terco n n ec ted i n d u strial sp ace s (costing
     0 MP), u nt il he u se s h i s 2 n d M P to c h an g e to a re s ide ntial Land
     type. He t he n f ina lly m oves i n to th e S afe Ho u se, sp e nding his 3 rd
     and la st M P.

                                                                                                                                                                 2MP 3MP
                                                 1MP
                                                                                                                     1MP

                                                 2MP

                                                                                                               E x am pl e :
                                                                                                               Ruby is c ur rent ly at t he Bus ines s in t he water. Because t his t ile has
                                                                                                               the Fe r r y ico n, all o t her Water s paces o n C it y t iles t hat are part o f
                                                                                                               this body of water can b e cros sed us ing no rmal movement .
                                                                                                               She spends one Movement point to leave the Business and onto the
                           3MP
                                                                                                               water, moves freely across the water, spends another Movement point
                                                                                                               to move from the water to the Commercial area, and then her final
                                                                                                               Movement point to enter the Convenience Store.

10
TRANSPORTATION
There are two extra means of transportation available in the city: the Subway and the Heliport. These Locations follow special rules, namely that you can only use their
abilities during your TRAVEL step, whereas the other Locations are only visited during step 3 (VISIT) of your turn. If you begin your turn on a Subway or Heliport (i.e., you
ended the previous turn there), you may use its ability or leave as normal.
SUBWAY
“Lyl e : Me t ro j u st p as sed th e stati o n , yo u are c l ear for 9 0 seconds. Go! ” — I talian Jo b ( 2 0 0 3 )
The subway allows you to move faster and further in the
city. If you enter a subway Location, you may immediately
move directly to another subway Location without spending
any movement points. 3MP 3MP
Using the subway on your turn also rewards you with 1 extra
Movement point (allowing you to spend 4 movement points
during that turn instead of the usual 3).
4MP
E xa m pl e S U BWAY:
Claws is a t a Ga ng Lo cati o n i n th e so u th -we st o f the
c ity. S he spe nd s 1 M P to m ove to th e I n d u stri al area,
and t he n 1 more M P to m ove to th e S u bway Lo ca tion.
Sh e the n immed ia te l y m ove s to an o th e r S u bway Location 2MP
and u se s he r re ma in i n g 2 M P ( i n c l u d i n g th e ex tra one
for u sing t he S u bway ) to m ove to th e Res i d en ti al area
and t he n t he S to re .
1MP
HELIPORT
“Liv i ng ston e De l l : th ey ’ l l b e watc h i n g you l ike hawks. Hawks with v ideo cam e ras. ” — Oceans 1 1
If you enter the Heliport Location (or start your
turn there), you may spend 1 Movement point
to move to any Land or Location on a City tile
either 1 or 2 tiles away.
2MP 3MP
1MP
E xa m pl e H E LI P O R T:
Scar is a t a S a fe Ho u se . Sh e s p en d s 1 M P
to move to t he Re si d e n ti al area, an o th e r
to th e He lipor t Lo ca ti o n , an d fi n al l y u ses
h er re ma ining M P to take th e Hel i co p ter
to th e Hospita l.
11STEP 2: AVOID
“ The police are every w h ere l o o k i n g fo r you and doing e ve r y thing the y can to catc h you. But you are s mart and always manage to hid e ins id e b uild ings.
I t ’s ea sy to g e t i n , b u t n o t to g e t o u t! ”
“Char l i e Cro ke r: Yo u wo u l d n ’t h i t a m an with no trouse r s on, woul d you?” — I talian Jo b ( 1 9 6 9 )
If you moved from one Location to another Location
on the same tile, skip this step, as you were not out in
the open long enough to be spotted.
If you ended your move on a different City tile than
the one you started on, you must try to avoid the
Police Officers from each tile that you left (i.e., the
tile you started from and all tiles you passed through 2
during movement, but not the Police Officers on the
tile you ended your movement on.)
2MP 3MP
E x am pl e:
1
Vin ni e move s f ro m th e Safe Ho u se, th ro u g h th e
Indust r ia l a nd Co mm e rc i al areas, an d to th e S to re . 1MP
He mu st t r y to a vo id th e fed eral ( 1 ) Po l i ce O ff i cer
on th e t ile w he re he started , an d al so th e fed e ra l ( 2 )
a nd cou nt y(2) Po lice O ff i cers o n th e ti l e h e m oved
th rou g h, b u t no t t h e Po l i ce O ff i cers o n th e ti l e
where she e nded his m ovem e n t.
If you moved using the Subway or Heliport (and end
your move on a different tile), you must avoid the
Police Officers from the tile you started on, but not on 5MP 4MP
any tiles in between your start and end points of that
particular transportation, since the Subway or Heliport
takes you directly to the destination; you do not move
through any other tiles.
2MP
3MP
E xa m pl e:
1
Scar spends 2MP to move to the Heliport Location, 1MP
and then spends her remaining MP to f ly to the
Subway. Using the Subway gives her 1 extra MP
this turn, and she also uses a Gas can token to get
another 1 MP. This allows her to move to the Exit.
Now she needs to avoid the county(1) and the
2
SWAT(1) Police Officers from the original tile
she left (with the Helicopter), then the federal(2)
Police Officer from the first Subway ( for leaving
the tile ). No other Police Officers need to be
avoided.
No te: To a vo id Police O ff i cers, yo u n eed to u se E xec utive Ac tions (see p age 1 9 ) .
12For each Police Officer you are unable to avoid, you A.
suffer a Wound: move one of your cubes in the Green
Wounds box to the Red Wounds box.
E x am pl e :
Claw s has al ready take n
3 Wounds; al l of he r
When your Green Wounds box is empty and you take another Wound, perform the Wound c ube s are in his
following steps: Red Wounds box (A) . S he
1. Take a Handcuff card and place it on the rightmost space on the bottom of the n fail s to avoid 3 Pol ice
your Player board that does not currently have a Handcuff card on it. This Of f ice r s and take s 3 m ore
space is blocked for the remaining of the game; you cannot place a contact Wounds. The f ir st Wound
card there. give s he r a Handc uf f card ,
but she the n m ove s a B.
a. If the space had an Asset tile on it, discard that tile to the box. Wound c ube bac k to he r
b. If the space had an Contact card on it, cover it with the Handcuff card. Gree n Wounds box ( B) .
The second Wound m ove s
3. Move one of your cubes from the Red Wounds box back to the Green Wounds box.
that c ube bac k to the Red
Wounds box, and the n the
If you take multiple Wounds at the same time, resolve each Wound separately. third Wound cause s he r
to take anothe r Handc uf f
card (C ) .
Note: At t he e nd o f th e g am e , any c u b es i n yo u r Red Wounds box wil l reduce
your f ina l sco re . C.
Neil Mc Caul e y : “Do n ’t l e t yo u rsel f g et attac h ed to any thing you are not wil l ing to wal k out on in 3 0
seconds f la t if you feel th e h eat aro u n d th e co rn er. ” — Heat
STEP 3: VISIT
“N i ce Guy Edd i e : We g o t p l aces al l ove r the p l ace s. ” — Reser vo ir do gs TAKING CONTACT CARDS
If you end your movement on a Subway or Helicopter Location, skip Step 3. Other than the Subway and the
Helicopter, another 8 different Locations can be find in the game: “ Thank fully yo u have yo ur ow n co ntact s
aro und t he cit y, w illing to help yo u in
ret urn o f a s mall fee o f co urse.“
Each Location has a series of steps which are carried
out when you visit it.
BUSINESSES Each step is carried out in order and must be carried Co ntact card s represent services o ffered by
out unless the step includes the word may, in which o t her criminals to help yo u escape. So me
case it is optional. Lo cat io ns allow yo u to take a Co ntact card .
SAFEHOUSES Some Locations list possible situations where you When yo u d o, yo u must cho ose o ne o f t he
cannot visit that Location. This means that you cannot Co ntact card s fro m t he d is play and t hen take
end your movement at the Location. o ne o f 3 cho ices :
GANGS A. Ret urn t he chosen card to t he b ox (A ).
Take the chosen card and place it on
CONVENIENCE STORES the leftmost empty Contact card space
of your Player board (contains no
other Contact card or an Asset tile ). If
B. the leftmost space is not empty, you
CLINIC cannot choose this option (B).
Take t he chosen card and replace any
Co ntact card yo u alread y have o n
CHURCH yo ur Player b o ard . If yo u cho ose t his
o pt io n, gain 1 No to riet y and ret urn t he
replaced card to t he b ox (C ).
HOSPITAL A fter tak ing t he card , d raw a new card
fro m t he to p o f t he Co ntact d eck and place
it face up in t he d is play. If t he Co ntact d eck
EXITS is empt y, d o no t d raw a replacement .
C. 13BUSINESSES
You ha ve inve sted a l o t o f th e sto l en m o ne y in busine sse s around the c ity.
The amount of money you have in the various Businesses is shown on your Escape Plan card. You can only visit each Business once during the game.
When you visit a Business, do the following:
ESCAPE PLAN CARDS 1. Gain 1 Notoriety for each other player in your current
Location.
2. Take the uppermost most cube from your Income track
Each Escape Plan card is unique and depicts and then look up the Business on your Escape Plan card.
different values for each Business, but the total 1.
a. If an amount of money is listed, place the cube inside
amount is always $450k. Escape Plan cards are the white hexagon without the Income
revealed only at the end of the game. symbol of the corresponding Business 2.
display.
Escape Plan cards are divided into three groups: b. If the Income symbol is listed, place the
the top two groups are for the Businesses and the cube inside the hexagon with the Income
bottom group is for the Safe Houses. Within each symbol of the corresponding Business
group are two listings which have an amount of display. Then, immediately receive
money shown (which adds up to $150k), and one Income.
listing which has the Income symbol. 3.
3. Take a Contact card.
If you visit a Business depicting an amount of
money listed, this will be added to your final
score (should you manage to escape); you do not Reminder: Whe ne ve r you rece ive Incom e , take an a mo unt o f mo ney fro m t he general supply equal to t he
get any immediate money. l owe st v isibl e num be r on your Incom e trac k . In the case ab ove it s $5k .
If you visit a Business depicting the
Income symbol, you receive income C losing a Business
immediately. “You took all the money we have, how can we carry on?”
After a certain number of visits to a Business (i.e., a specific
E xa m pl e. number of cubes on the hexagons of that Business), flip the
Business tile face down. That Location is now closed and
If t his is yo u r Escap e Pl an card , yo u rece ive cannot be visited unless you use a key. I.e., you cannot end
mone y if you vis i t Safe Ho u se 1 , th e Bar, an d your Movement at this Location if you cannot get in.
th e Ar t Ga lle r y. Al l o th er p l aces are wo rth
mone y o nly a t t h e en d o f th e g am e.
The number of visits needed to cause a Business to close
depends on the number of players in the game:
• 2 visits in a game with 1-3 players
• 3 visits in a game with 4-5 players
I mp o rtant Ru le: Any ke y can op e n any c l osed Busin es s (eit her a master key fro m an A s set t ile o r any
l oc ke r ke y ) . Once a ke y is used, f l ip the ke y til e face d ow n.
Visiting a ll Businesses in a group
At the end of your turn in which you have visited all the Locations in the same group of businesses
(i.e., you have a cube on each of the Businesses in
that group), you may immediately choose one of the
following bonuses:
• Take an Extra Action disc, placing it in its proper
space on your Player board.
• Lose 1 Notoriety and unlock an Asset tile (see Asset
tiles on page xx).
No te: You onl y g e t this bonus once in the gam e for each gro up o f Bus ines ses (at t he end o f t he t urn in
whic h you have f ir st v isited al l of the busine sse s in t hat gro up).
14SAFE HOUSES
“You fee l at h o m e, an d yo u th i n k yo u are safe . Kee p ing som e m one y he re is a g ood dec ision. ”
The amount of money you have in the various Safe Houses is shown on your Escape Plan card. You c an on l y visit each Safe Ho use o nce d ur ing the gam e.
When you visit a Safe House, do the following: 3. Lose 1 Notoriety.
1. Gain 1 Notoriety for each other player at your 4. Take one of the available keys above the Safe House
Location. display (if any) and place it face up on your Player
2. Take the uppermost most cube from your Income board in the key slot corresponding to the number
track and then look up the Safe House number on of the Safe House.
your Escape Plan card. 5. You may buy a Fixer tile (see below).
a. If an amount of money is listed, place the cube
inside the hexagon without the Income symbol of
the corresponding Safe House display.
b. If the Income symbol is listed, place the cube
inside the hexagon with the Income symbol of
the corresponding Safe House display. Then,
immediately receive Income.
Th e Fix e r
“The Wolf: Get it straight buster - I’m not here to say please, I’m here to tell you what to do and if self-preservation is an instinct you possess
you’d better $&•#*% do it and do it quick. I’m here to help - if my help’s not appreciated then lots a luck, gentlemen.” — Pulp Fiction
Choose any one tile from the stack of Fixer tiles, pay the price
depicted on the tile, and place it in an empty Item space on your No te: Usi ng t he ab ilit y o f a Fixer t ile is an Execut ive Act io n
Player board (one not containing an Asset tile). If you place the tile (see p ag e 19).
on a space that already contained a non-Asset tile), gain 1 Notoriety
and return the replaced tile to the box.
V is it i n g a l l S a f e Hou se s
At the end of your turn in which you have visited all of the Safe Houses (i.e., you have a cube on each of the Safe
House displays), you may immediately choose one of the following bonuses:
• Take an Extra Action disc, placing it in its proper space on your Player board.
• Gain income and unlock an Asset tile (see unlocking an Asset tile on page xx).
Note: Yo u only g e t th i s b o n u s o n ce i n th e g am e (a t the e nd of the tur n in whic h you have f ir st v isited al l of
th e Safe Hou se s).
GANGS
“H ir ing Gan g s i s n o t g o o d . Mayb e o n l y this tim e . ”
You can only visit a Gang Location if there is currently no other player present and no Gang Control marker
present (either yours or another player’s):
When you visit a gang, do the following:
1. Pay $5k. If you do not have $5k, you cannot visit this Location.
2. Take both Gang members from the City tile and place them on your Gang members space on your Player board.
3. Place 1 of your Gang Control markers on the location.
No te: Ga ng me mbe r s can b e u sed as E xec u tive Ac tions (see p ag e 1 9 ) .
15CONVENIENCE STORES
“M r s. Bri dge r: d o es h e real l y n eed al l this equip m e nt?” — I talian Jo b ( 1 9 6 9 )
When you visit a store, do the following:
1. Gain 1 Notoriety for each other player at your Location.
2. You may take 1 Gas Can token from the store and place it on one of the Gas icons on your 1.
Player board (you cab keep up to 2 Gas Can tokens).
3. You may buy up to 2 different pieces of Equipment. For each piece of Equipment you buy,
pay the cost depicted on the board below the tile and place the tile on an available Item
space on your Player board (one not containing an Asset tile). If you place the Equipment tile
on a space that already contained another non-Asset tile (a Fixer or Equipment tile), gain 1
Notoriety and return the replaced tile to the box.
4. If you have the right key, you may open one locker (see below).
Remi nde r : Ga s Ca n to kens can b e s p e n t d u ri n g your TRAVEL ste p to gain extra MP.
Loc ke r s
You also ha ve a g o o d c h u n k o f m o n e y h i d d en awa y in safe ty l oc ke r s. Ge tting it won’t be easy thoug h. Example:
There are 5
The back of the Locker tiles depict the number of tiles of a specific value in each stack, and note that all stacks b lack Lo cker
also have 1 tile in them with a value of $0. t iles in t he game.
2 o f t hem have
To open a Locker, you must meet the following criteria: If you meet the criteria, do the following: a value o f $70k ,
1. You must have the Key tile with the same color of the 1. Flip the Key tile used (or the master key Asset tile) 2 o f t hem have a
Locker or have unlocked the master key Asset tile. face down. value o f $100k ,
and o ne o f t hem
2. The sum of your position on the Notoriety track, 2. Secretly draw a number of tiles from the is wo rt h no t hing.
plus the number of Contact cards you have on your corresponding stack. The number of tiles you draw
Player board must be equal to or higher than the depends on the locker. This is depicted below the
big number on the bottom of the Locker tile. Both lockers.
face-up and face-down Contact cards count, but • Green locker: Draw a number of tiles equal to
not ones covered by Handcuff cards. the number of Contact cards you have on your
Player board plus one.
• Black locker: Draw a number of tiles equal to
the number of Contact cards you have on your
Player board.
• Brown locker: Draw a number of tiles equal to
the number of Contact cards you have on your
Player board minus one.
3. Choose one of the taken tiles and place it face
down on an empty Item space on your Player board
(one not containing an Asset tile). If you place the
Equipment tile on a space that already contained
another non-Asset tile, gain 1 Notoriety and return
the replaced tile to the box.
4. Return all the other tiles to the stack of Locker tiles
and then shuffle those tiles.
16CLINIC
When you visit the Clinic, do the following:
1. Gain 1 Notoriety for each other player at the Clinic.
2. You may unlock an Asset tile (see Asset tiles on page XX).
3. You may heal 1 Wound (move 1 Wound cube from your Red Wounds box to your Green Wounds box).
4. Take a Contact card.
CHURCH
When you visit the Church, do the following:
1. Gain 1 Notoriety for each other player at the Church.
1
2. You may pay $1 to lose 1 Notoriety.
3. You may unlock an Asset tile (see Asset tiles on page 19).
4. Take a Contact card.
HOSPITAL
When you visit the Hospital, do the following:
1. Pay $1, $3, or $6 to heal 1, 2, or 3 Wounds respectively. For each Wound healed, move a cube from your Red
Wound box to your Green Wound box.
2. Gain 1 Notoriety (because doctors always have to report the police when someone arrives with bullet wounds). 1
3
6
Note: Unlike the other Locations, you do not gain Notoriety when visiting the Hospital based on the number of other players there.
EXITS
“ To bu r y some money n ear th e ex i ts o f th e c i ty i n the case you need to e scap e , showed to be a sm ar t m ove , o r mayb e no t .”
When you visit an Exit, do the following: If you choose to take an Exit tile:
1. Gain 1 Notoriety for each other player in your 1. Draw a number of Exit tiles from the appropriate
current Location. stack equal to the number of Contact cards you
2. If the Exit is open (there are fewer than 2 Patrol have on your Player board (whether face up or face
cards on the Patrol space for that Exit): down, but not ones covered by Handcuff cards).
a. You may receive income. Then, 2. Choose one of them secretly and place it face
down in one of your empty Item spaces. If you do
b. Take a Contact card. not have an empty Item space, you must replace a 2.
3. If the Exit is closed (there are 2 Patrol cards on the previous non-asset tile.
Patrol space for that Exit): 3. If you do replace a tile, gain 1 Notoriety.
a. You may either receive income OR 4. Return all other tiles face down to the stack and
take an Exit tile. Then, shuffle it again.
b. Take a Contact card.
N ote: I f you visit t h e o p e n E x i t o n Day 3 (th e E x i t whic h has onl y 1 Patrol card on the cor re sp onding Patrol s pace ), yo u may cho ose to escape t he cit y instead
of taking a ny of t he ab ove b e n ef i ts (see Escap i n g the City on p ag e xx) .
176. CHANGE OF DAY
Sk ip t his Pha se on Day 3 .
2.
In this phase, the following steps are performed:
1. All players with Rest tokens that are moon-side up flip them back over to show the sun side.
2. Reset the Time marker to the start space on the Time track.
1.
EXECUTIVE ACTIONS
During your turn, there are a number of different Executive Actions that you can perform.
If game components that allows you to take Executive Actions has a symbol in the T he E xec uti v e Acti o ns a r e:
top corner, it can only be used during the appropriate step of your turn:
• Use a C o nt a ct c a r d
U se d in t h e T R AV E L step • Use a n Equi pm ent ti l e
• Use a F i xer ti l e
Use d in t h e AVO I D step • Per fo r m F i r st Ai d
• Use a G a ng m em ber
If there is no symbol depicted (for example Asset tiles, First aid tile), you can use the
Executive action at any point during your turn. • Use a n Unl o cked Asset ti l e
Any number of Executive Actions can be used in the same step.
HELIPADS MOVING POLICE OFFICERS
Some Execu t ive Act i o ns al l ow yo u to m ake u se o f a He l ip ad. A City til e S om e Exec utive Ac tions allow yo u to move Po lice Officers aro und . The
th a t ha s sma ll He lip ad i co ns o n th e co rn e rs i s conside red to have a fol l owing r ul e s al wa ys apply:
Helipa d o n a ll of t he Lan d s p ace s an d Lo cati o ns on that til e .
• The Pol ice Of f icer chosen can b e moved fro m any t ile to any o t her
til e , regardl e ss of d istance.
E x am pl e: • No m ore than one Po lice Officer o f each t ype can b e o n t he same t ile.
Meaning that is n o t pos s ib le to move o ne Po lice Officer to a t ile t hat
Mr. Bones is o n Ex it 3 , h e co u l d s p en d 1 M P to m ove to the Industr ial area
al ready has anot her Po lice Officer o f t he same t ype.
on th e sa me t ile , t hen m ove to th e I n d u stri al area on the til e to the l e f t
( for 0 M P). Once t here , h e m ay u se any ab i l i ti es that require him to be on • No Pol ice Of f ice rs can ever b e o n t he Hos pital t ile.
a Helipor t .
18Use a C on t act c ard
1. To use a Contact card, do the following:
2. Pay the value depicted on the card
3. If is shown, gain 1 Notoriety.
4. Use the benefit of the card (see Cards and Tiles Description on page 24).
5. Flip the card face down. 3.
1. 2.
1.
U se an E q u ip me n t tile E x am p l e :
Flip the tile to use the benefit of the tile (see Cards and Tiles Description
on page 24). Clau s want s to avo id a fed eral Po lice
Of f ice r (1). She has t he b oxer Co ntact
card. S he pays $2k (2) and f lips t he
No te : Wh en yo u c h o ose th e Rest ac tion, your face-down Equip m e nt card over. The card has a no to riet y
t i l es are f l i p p ed b ac k face u p. sym bol (3), so s he gains 1 No to riet y.
3.
Use a Fix e r t ile
Flip the tile to use the benefit of the tile (see Cards and Tiles Description
on page XX).
No te : Fi xer ti l es are o n e- u se onl y. The y are not f l ip p ed bac k up whe n
yo u c h o ose th e Re st ac ti o n b ut the y re m ain on your Pl aye r board. The y
a re o n l y d i scard ed i f rep l aced (see p age XX) .
ASS ET TILE S
Pe r form First A id
Flip this tile to heal 1 Wound (move 1 Wound cube from your Red Wounds
box to your Green Wounds box. You have a total of 7 Asset tiles
on your Player board. Your Extra
Action Asset tile starts the game
No te: Th e Fi rst Ai d ti l e i s f l i p ped bac k up whe n you c hoose the Re st unlocked on the left side of your
a c ti o n . Player board (on the $5k Asset
space ). 3 of your Asset tiles start
the game occupyin g three of
your Item spaces, and the other 3
U se a Gan g me mb er occupy three of your Contact card
spaces. These 6 Asset tiles are
Return one of your Gang members to the Gang space where you have a locked when the game begins.
Gang Control marker to use any one of their 3 abilities.
• Lose 1 Notoriety.
• During the Travel step, if you are on a tile with a Heliport, spend 1 MP When you unlock an Asset tile,
to move to any Location or Land space on a City tile adjacent to or 2 choose any locked Asset tile and
tiles away from your current tile. If you move 2 tiles away, ignore all move it to the most expensive
Police Officers from the tile you move through. You still need to avoid empty Unlocked Asset space.
the ones on the tile you left. If you unlock an Asset tile on
a Contract space, move all
• During the Avoiding step, ignore all the Police Officers on a tile of your remainin g Asset tiles on your
choice. Contract spaces to the right to fill
Once both Gang members have been returned, take back your Gang Control any gaps.
marker. The gang is available again to any player who wants to control it.
When you unlock your final
Asset tile, remove it from the
U se an U n locke d Asset tile game, as you only have space
Once unlocked (on an Asset space on the left of your Player board), for 6 unlocked Asset tiles on
each of these tiles can be used once per game. your Player board; you may
not replace an existing one.
To use an unlocked Asset tile, do the following:
1. Pay the value indicated below the tile.
2. Gain the benefit of the tile (see tiles description on page XX). Unlocked Asset tiles may be
used as an Executive Action
3. Flip the tile. (see at left).
All used tiles are worth 10k at the end of the game.
19ADJUSTING NOTORIETY
“Having hig he r No to ri e ty i s g o o d b etween th i eves, see ms l ike cops don’t l ike it” .
“Mr. Bl onde : Eit he r h e ’s al ive o r h e ’s d ead , o r th e cops g ot him . . . or the y don’t. ” — Reser vo ir Do gs
During the game your In turn order, each player adjusts their Notoriety Example:
Notoriety will increase, marker on the Notoriety track according to their Mr. Bon es has 2
allowing you to unlock more Notoriety cubes. cub es in his Red
Asset tiles which in turn allow No to riet y b ox
you to have more Equipment and 1 cub e in his
and Contact cards. However, Each cube in your Red Notoriety box moves you up
on the Notoriety track, and each cube in your Blue Blue No to riet y
as your Notoriety increases, b ox. H is No to riet y
you will have to deal with Notoriety box moves you down on the Notoriety track.
Calculate how much your Notoriety marker will move moves t wo
more Police Officers. You can try and keep your steps up o n t he
Notoriety low, since maintaining a low profile will draw (and in which direction) before moving your token.
No to riet y t rack .
less attention to yourself. At the end of the game,
having a high Notoriety will reduce your final score.
After adjusting your token on the Notoriety track, reset
your Notoriety cubes by placing them all back in the
As mentioned earlier, you track your gains and losses bottom part of your Notoriety box.
of Notoriety during your turn using your Notoriety Note that your token cannot go below the bottom of the
cubes. You do not update the Notoriety track directly track. If it were to do this, leave it on the bottom row.
when taking your Action.
If your token is at the top of the track and would
In each part of the day, after all players have taken increase further, take 1 Wound for each increase above
their Action, the Notoriety track is updated. the top row and leave the token on the top row.
Mr. Pink: I don’t wanna kill anybody. But if I gotta get out that door, and you’re standing in my way, one way or the other, you’re gettin’ outta my way.”— Reser voir Dogs
C ro s s i ng the Th re sh old
Every time your Notoriety marker crosses a threshold
line when moving upwards, you gain an immediate
E x am pl e :
benefit (before other players adjust their Notoriety). Vinnie m ove s his Notor ie ty
If your Notoriety marker would later drop below the m ar ke r ac ross the f ir st red l ine .
threshold line, you get the bonus again the next time In tur n orde r, al l p l aye r s with
it rises over the line. l e ss Notor ie ty than Vinnie move
a Pol ice Of f ice r in his direc tion.
First, when you cross a threshold, all players with less Ru by has m ore Notor ie ty than
Notoriety than you (their Notoriety markers are lower him , so she doe s not m ove
on the Notoriety track) in turn order must move one anyone .
Police Officer towards you (if possible). Scar has the sam e Notor ie ty
than Vinnie, so again, she doe s
not m ove anyone .
The player moving the Police Officer can take them
from any City tile and place them on any other tile M r. Bo nes has l e ss Notor ie ty
(does not have to be adjacent), with the following than Vinnie, so he take s a Red
conditions: Pol ice Of f ice r f rom 2 til e s away
• The moved Police Officer must end up on a tile f rom Vinnie and m ove s it onto
which is at least one tile closer to the active his til e . He coul d not m ove a
player’s Location than the one on which the Police Bl ue Pol ice Of f ice r to Vinnie’s
Officer started. til e because the re is al ready one
the re .
• There can never be 2 Police Officers of the same
type on the same tile. Cl aws al so has l e ss Notor ie ty
than Vinnie but is c ur re ntl y in
• There can never be any Police Officers on the the sam e l ocation as him , so she
Hospital City tile. needs to be care f ul whe n m ov ing
Pol ice Of f ice r s towards Vinnie
Second, crossing a threshold unlocks Asset tiles to the to e nsure that it doe sn’t cause
active player (see page XX). he r p robl e ms on he r next tur n.
S he m ove s a Red Pol ice Of f ice r
• Crossing the 1st threshold line: Unlock 1 Asset tile. one til e c l ose r to Vinnie, to a
• Crossing the 2nd threshold line: Unlock 2 Asset tiles. til e whe re she is not p l anning to
m ove to next tur n.
• Crossing the 3rd threshold line: Unlock 1 Asset tile
and take an Extra Action disc.
20ESCAPING THE CITY
“ Steve to Char l i e : yo u’ re o u t o f m ove s. Th e g am e is ove r. J ust g ive up al ready. ” — I talian Jo b
Only on Day 3 can you escape the city. To do this, you When you escape the city, remove your pawn from the
must move to the open Exit Location and choose to board. Example:
exit. You then remove your pawn from the board. This in a 4- player game, Mr. Bon es is t he seco nd
happens during the Travel step of your turn. In the player to escape t he cit y. He must pay $1k
Avoid step, you must try to Avoid any Police Officers As soon as the first player escapes, all other players
must pay $1k on each of their turns before they to b e ab le to take his t urn, and after moving
as normal, including any that were on the tile with the to t he exit and t rying to avo id t he Po lice
Exit (since you are also leaving that tile). On the turn in take an action. If they are unable to pay, they are
immediately arrested and out of the game. This cost is Officers, he pays $5k to leave t he cit y.
which you exit the city, you do not perform step 3.
always $1k no matter how many players have escaped.
To exit the city, you must pay a certain amount of
money. If you are first player to escape, it costs
nothing, but after that, the cost depends on the
number of players in the game and also the order
in which you are leaving the city. If you do not have
enough money to escape the city, you are arrested and
out of the game.
2-player games:($k) 0, 10
3-player games:($k) 0, 5, 10
4-player games:($k) 0, 5, 10, 10
5-player games:($k) 0, 5, 5, 10, 10,
Note: Yo u r Noto r ie ty i s sti l l u p d ated o n th e tu rn you e scap e . This m ay cause othe r p l aye r s to m ove Pol ice O fficers toward s yo u. In t his case, t he po lice are
moved towa rd s you r l ast k n ow n l o cati o n : th e ex i t til e whe re you e scap ed.
FINAL SCORING
Only players who manage to escape the city are eligible to win the game.
Before final scoring, each player must discard 1 Contact card from their Player board for each Handcuff card they have.
T he pla yer with the most money win s
Fill the scoring pad with the following: I n the c a se o f a ti e:
• Total money collected on the visited buildings of the first group (check Escape Plan card) • The tied player with the most money
• Total money collected on the visited buildings of the second group (check Escape Plan card) behind their screen wins.
• Total money collected on the visited Safe Houses (check Escape Plan card) • If there is still a tie, the tied player
with the least notoriety wins.
• Money behind your Player screen
• If there is still a tie, the tied player
• $10k per each Asset tile used (flipped face down) with the least Wounds wins.
• 0,10,30,60,100k for having 1,2,3,4,5 Contact Cards on your Player board • In the rare case of another tie, all
• Total money from collected Locker and Exit tiles tied players share victory.
You lose money for the following:
• Your position on Notoriety track (between 0 and -100 depicted to the side of the track)
• -20k for each Wound cube in your Red Wound box.
21ONLY 2 PLAYER
In a 2-player game, there is an game-controlled 3rd player: Sandra’s cards are explained below.
Sandra the Police Inspector. Business Locations:
1. Sandra gains 1 Notoriety.
During Phase 1, Sandra does not receive any income. 2. Place one of Sandra’s cubes in the white hex of the business. If this
During Phase 2, each player will get to place 2 City tiles (Sandra does not count as a is the 2nd cube placed for that business, the building closes as usual.
player for this). 3. Discard the 2 rightmost Contact cards (back to the game box). If
During Phase 4, adjust Sandra’s turn order according to her Notoriety as normal. any or both of the discarded cards have the ability of giving an Extra
During Phase 5, Sandra takes an Action in turn order as normal. Action disc, she gets that disc.
4. If, this turn, Sandra has now visited a group of businesses, she receives an Extra
Action disc.
• Also, for the purpose of a player avoiding Police Officers, Sandra counts as
another Police Officer of any type (chosen by the player avoiding her).
• Sandra visits closed businesses if the card comes out. Safe Houses:
• At night and dawn, Sandra uses her Extra Tokens if she has any. 1. Sandra loses 1 Notoriety.
2. Place one of Sandra’s cubes in the red hex of the Safe House.
Note: Af te r ta king a Co n tac t card i n a 2 - Pl ayer gam e , sl ide al l Contac t cards 3. Discard one key at random from that Safe House (return it to the box).
to the r ig ht to f ill a ny g aps an d th en d raw a n e w card to p l ace in the l e f tm ost 4. Discard one Fixer tile at random (return it to the box).
posit ion o f t he d ispl ay. Do th e sam e w h e n S an d ra take s Cantac t cards. 5. If, this turn, Sandra has now visited all 3 Safe Houses, she gets an
Extra Action disc
SANDRA’S TURN
Stores:
1. Sandra gains 1 Notoriety (Stores A and C) or loses 1 Notoriety
(Stores B and D).
On her turn, Sandra always moves, she never rests.
2. Discard one Locker tile at random from the depicted stack of
Locker tiles (return it to the box without anyone seeing it).
For Store D, discard one Locker tile at random from every stack of
ST E P 1 : T R AV E L Locker tiles.
Reveal cards one by one from the Inspector deck until you reveal a card depicting a
Location which is currently in the city. Move Sandra directly there (she has unlimited MP). 3. Discard the 2 rightmost Contact cards (back to the game box). If any of the
discarded cards gives an Extra Action disc, she gets that disc.
Exception: Ignore Exit cards for open exits, Sandra will only move to a closed exit.
Closed Exits:
1. Sandra loses 1 Notoriety.
ST E P 2 : AVO I D 2. Discard one of the Exit tiles on this exit at random (return it to the
Sandra is a Police Officer herself, so she ignores this step. box without anyone seeing it).
3. Discard the 2 rightmost Contact cards (back to the game box). If any
of the discarded cards gives an Extra Action disc, she gets that disc.
ST E P 3 : V I S I T
If one or more other players are at her Location, her Notoriety increases according
to the normal rules.
Each time Sandra gains Notoriety during her turn, place one of her Notoriety cubes
above her Notoriety marker. Similarly, each time Sandra loses Notoriety during her
ADJUSTING NOTORIETY
turn, place one of her Notoriety cubes below her Notoriety marker. Sandra’s Notoriety is adjusted at the relevant time by checking the number of her
Then, follow the instructions on Sandra’s card. Notoriety cubes above and below her Notoriety marker on the Notoriety track. If
there is a cube above, her token moves up, and vice versa. If there is one cube above
After all steps have been performed, remove that card from the game; Sandra never
and one below, her token does not move. After her token has been moved, return all
visits the same location twice. Cards that were skipped in the TRAVEL step are
of her Notoriety cubes back to beside the board.
returned to the deck and shuffled back in. There is no Discard Pile.
If she passes a threshold, each player with less Notoriety than her moves one Police
Officer in her direction following the normal rules.
If any player passes a threshold and Sandra has less Notoriety, the non-active player
moves one Police Officer on Sandra’s behalf. The rules for moving Police Officers
remains the same.
22You can also read