ISolved | Go v13.2 Employee User Guide - The Progress Center
←
→
Page content transcription
If your browser does not render page correctly, please read the page content below
iSolved | Go v13.2
                                                                          Employee User Guide
iSolved | Go Introduction
iSolved | Go is an optional add-on for the iSolved platform that allows employees and supervisors to
punch IN and OUT from an Android or Apple smart phone. While the app is free, there may be a charge
for the ability to use the mobile application for some customers, so please check with your payroll
provider if you are unsure if your company elected to use this application.
Information entered via iSolved | Go is securely stored in the iSolved database and can be used
interchangeable with the other forms of data entry. Punches can be made from a physical time clock,
the ESS screens of iSolved, or the iSolved | Go app. For example, your “IN” punch for the day can be
entered at your desk using ESS, while your lunch and/or “OUT” punch can be entered via your mobile as
you are waiting for the elevator at the end of the day.
This guide includes instructions on how to download and install iSolved | Go from the Google Play/Apple
Store, and how to use the application to punch in and out as an employee.

Downloading iSolved | Go from Google Play/Apple Store
On your Android/Apple smart phone, open the application store and use the search term “iSolved” or
“iSolved | Go” to find the application. Select the option to install this application. Once you have
downloaded and installed iSolved | Go, please open it to proceed.

MARCH 2019                                                                                     PAGE 2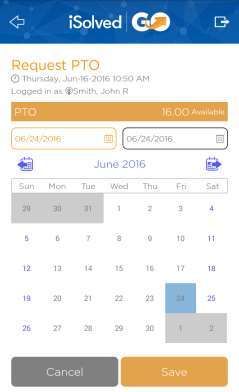
iSolved | Go v13.2
Employee User Guide
Logging into the iSolved | Go Application
This is the login page for the iSolved | Go Interface. All users must exist in iSolved as self-service users
with the appropriate permissions to use the features of the application.
Note: The system accepts login from Employee Self Service users only. Client-level iSolved user
information will not be accepted as a login for iSolved GO.
1. Enter your iSolved user name in the User Name field.
This is always your email address.
2. Enter your iSolved password in the Password field.
3. Click on the Login button to log into the application.
With the Remember Me option selected, the app will
automatically log in upon launching.
Note: Your phone must use a lock screen secured with a PIN,
pattern or fingerprint in order for auto-login to function.
Otherwise, the User Name will be remembered, but you will
have to enter your Password to log in.
Before entering your username and password, click the icon
indicated on the left and enter CGIPayroll as the Network Partner.
After three unsuccessful login attempts a message will appear which reads:
“It looks like you are having problems signing in. It could be caused by:
Your company does not allow mobile sign-ins.
You have not configured the Network Partner.
For assistance please contact your service provider.”
MARCH 2019 PAGE 3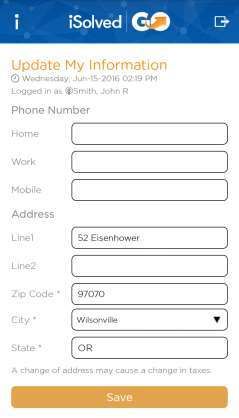
iSolved | Go v13.2
Employee User Guide
iSolved | Go Overview
Once you have successfully logged into the iSolved | Go
application, the main screen appears.
The main application screen is broken up into two sections. The selection options at the top of the
screen are reviewed in detail later in this guide. The bottom of the screen contains the Punch and Log
Out options.
Your current punch status is displayed, along with the date and time of your last “In” or “Out” punch. If
the last punch recorded is over 8 days old, no data is displayed.
Select the Punch icon to enter punch directly, without having to navigate the “iSolved Time” menu.
Note: Whether this icon enters a “Quick Punch” or a “Detailed Punch” is defined by the option specified
in the Settings menu. Click on the gear icon in the upper right-hand corner of the screen to review this
setting.
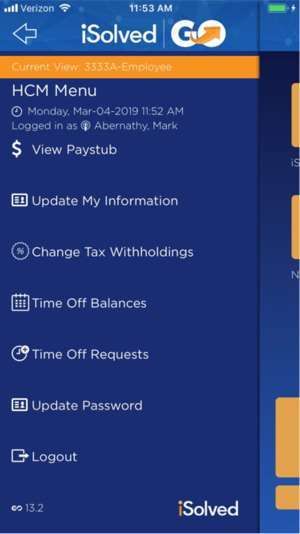
The iSolved HCM area contains the following options:
Note: Not all options may be available to all users.
View Paystub
Update My Information
Change Tax Withholdings
Time Off Balances
Time Off Request
Update Password
MARCH 2019 PAGE 4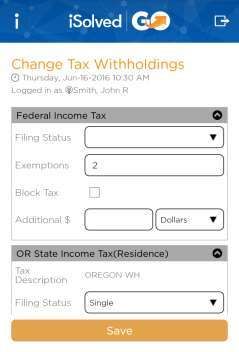
iSolved | Go v13.2
Employee User Guide
The iSolved Time area contains the following options:
Note: Not all options may be available to all users.
Time Card
Mobile Punch
View My Schedule
Settings
Additional Options
The Notification area contains any notifications that have been sent to you from the iSolved
system. See “Appendix D” on page 19 for details on this screen and its function.
The Downloads area allows you to download paystubs and W-2s to your mobile device in PDF
format. See “Appendix E” on page Error! Bookmark not defined. for details on this screen and
its function.
Click on the icon to access the Settings screen. Refer to page Error! Bookmark not defined.
for more information on this screen.
The Log Out icon at the bottom of the screen will log you out of the application.
The following sections outline more detail on the different options in the iSolved HCM and iSolved Time
areas.
MARCH 2019 PAGE 5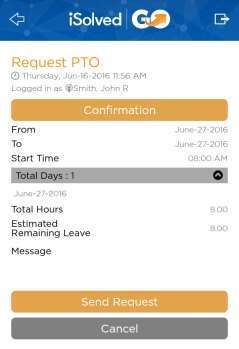
iSolved | Go v13.2
Employee User Guide
iSolved | HCM
Once you have logged into iSolved HCM, your name and current
date/time will be displayed on the upper left hand side of the
screen.
From this menu, the following areas can be selected:
View Paystub
Update My Information
Change Tax Withholdings
Time Off Balances
Time Off Requests
Update Password
View Paystub
Select the desired Paydate from the drop-down menu.
By clicking on the button using a finger, the details under
each section of the Paystub Summary screen can be viewed.
The Finished button returns you to the iSolved HCM menu.
MARCH 2019 PAGE 6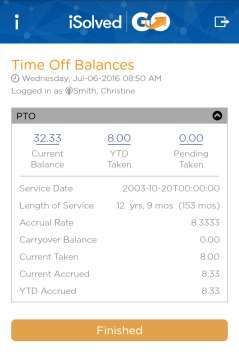
iSolved | Go v13.2
                                                           Employee User Guide
Update My Information

                          This screen allows you to update your personal information
                          in the iSolved system.
                          Make any necessary edits to the information in the Phone
                          Number and Address sections, and click on the Save icon.
                          When you specify a Zip Code first, the application will
                          download a list of appropriate city/state selections from the
                          host. A School District code may be presented as well,
                          depending on the Zip Code entered.
                          Note: A change of address may cause a change in taxes.

Change Tax Withholdings

                          By using the Change Tax Withholdings screen, you can
                          update your Tax Withholding setup in iSolved.
                          The Save button sends the updated information to iSolved
                          and takes you back to the HCM Menu.

MARCH 2019                                                                       PAGE 7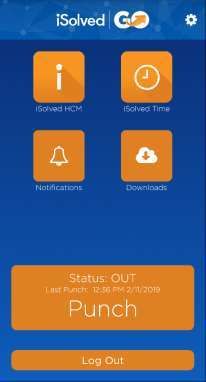
iSolved | Go v13.2
                                                     Employee User Guide
Time Off Balances

                    The Time Off Balances screen allows you to view your up-to-
                    date accrual balance information from iSolved.
                    The Finished button takes you back to the HCM Menu.

Time Off Requests

                    To request time off, please follow the instructions below:
                        1. Select Time Off Requests in the HCM Menu.
                        2. Any time off used or requested is displayed in the
                           calendar.
                        3. Select the accrual you wish to use for the time off
                           request from the drop-down menu.

MARCH 2019                                                                 PAGE 8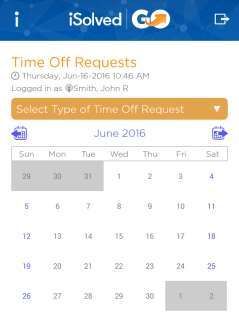
iSolved | Go v13.2
                                         Employee User Guide

             1. Select the From and To dates for the time off
                request. Dates can be selected by pressing each
                desired date directly from the calendar. The
                selected dates are highlighted.
                Note: The From and To fields select the “Start” and
                “End” dates of the desired range only. The days in
                between must still be selected.
             2. Press the Save button at the bottom of the screen
                to continue.

             3. Select the Start Time, and enter the number of Hours
                Per Day.
             4. The Total Hours requested and Estimated Remaining
                Leave for the accrual policy selected are displayed.
             5. Enter an optional Message to be attached to this
                request, if desired.
             6. Click on the Save icon. You are taken to the
                Confirmation screen.

MARCH 2019                                                    PAGE 9
iSolved | Go v13.2
                                                                           Employee User Guide

                                              7. Verify that the time off request is accurate and
                                                 complete.
                                              8. Click on Send Request to process and send the
                                                 request to iSolved.

Update Password
This option allows you to update your login password. Upon opening this screen, a message appears
notifying you that a temporary authorization code must be entered. Select either the “Email” or “Text”
options to receive this code.
Note: The “Text” option only appears if there is a cell phone number in the system.

MARCH 2019                                                                                     PAGE 10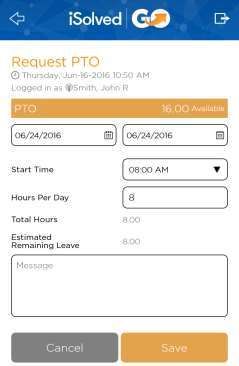
You can also read