Getting Started Guide HTC one
←
→
Page content transcription
If your browser does not render page correctly, please read the page content below
Getting Started Guide
HTC one                               ®

©2013 Cbeyond, All Rights Reserved.

GETTING STARTED GUIDE
HTC EVO ONE

Contents
Charging and turning on your HTC one . . . . . . . . . . . . . . . . . . . . . . . . . . . . . . . . . . . . . . . . . . . . . . . . . . . . . . . . . . . . . . . . .  4
		Hands-free activation. . . . . . . . . . . . . . . . . . . . . . . . . . . . . . . . . . . . . . . . . . . . . . . . . . . . . . . . . . . . . . . . . . . . . . . . . 4
Phone activation. . . . . . . . . . . . . . . . . . . . . . . . . . . . . . . . . . . . . . . . . . . . . . . . . . . . . . . . . . . . . . . . . . . . . . . . . . . . . . . . . . .  4
Email activation . . . . . . . . . . . . . . . . . . . . . . . . . . . . . . . . . . . . . . . . . . . . . . . . . . . . . . . . . . . . . . . . . . . . . . . . . . . . . . . . . . .  5
		3-way calling. . . . . . . . . . . . . . . . . . . . . . . . . . . . . . . . . . . . . . . . . . . . . . . . . . . . . . . . . . . . . . . . . . . . . . . . . . . . . . .  5
Setting up your voice and text messaging features. . . . . . . . . . . . . . . . . . . . . . . . . . . . . . . . . . . . . . . . . . . . . . . . . . . . . . . . .  5
Bluetooth. . . . . . . . . . . . . . . . . . . . . . . . . . . . . . . . . . . . . . . . . . . . . . . . . . . . . . . . . . . . . . . . . . . . . . . . . . . . . . . . . . . . . . . .  6
		          Enabling your bluetooth. . . . . . . . . . . . . . . . . . . . . . . . . . . . . . . . . . . . . . . . . . . . . . . . . . . . . . . . . . . . . . . . . . . . . . .  6
		          Pairing with your bluetooth device. . . . . . . . . . . . . . . . . . . . . . . . . . . . . . . . . . . . . . . . . . . . . . . . . . . . . . . . . . . . . . .  6
Multimedia camera and camcorder . . . . . . . . . . . . . . . . . . . . . . . . . . . . . . . . . . . . . . . . . . . . . . . . . . . . . . . . . . . . . . . . . . . .  6

Page 2 | Getting Started Guide | HTC one
GETTING STARTED GUIDE
HTC ONE
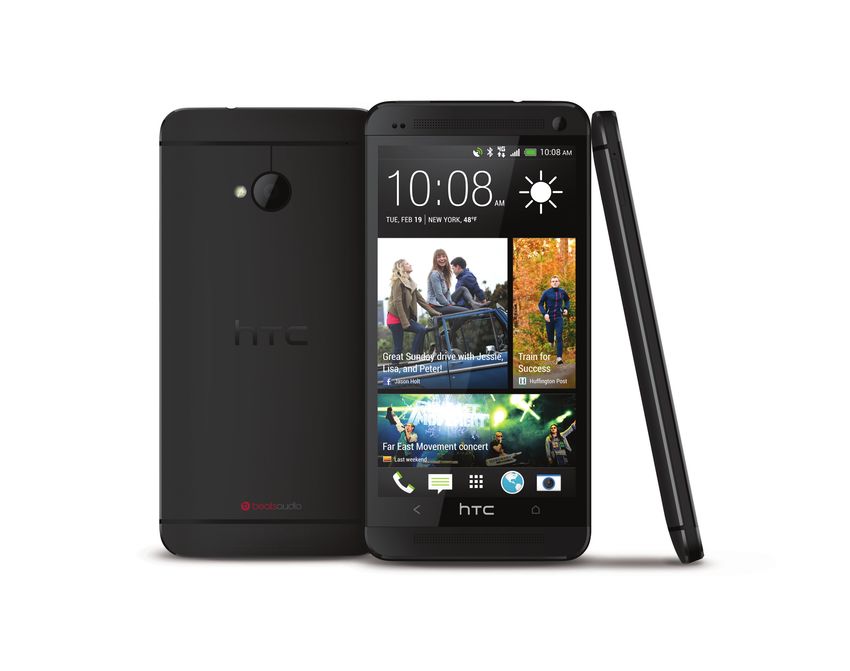
Device Features
• 1.7 GHz Quad Core processor • Dual front speakers with Dr. Dre
• 4G LTE speeds* BoomSound
• 4.7-inch HD 1080p Super LCD • Removable Micro SIM card
multitouch screen • 32GB Internal memory
• HD quality video/full media experience • GPS and voice navigation
• Long lasting 2300 mAh battery • Visual voicemail
providing 9.0 hours talk time • Voice dialing
• 8.0 ultra pixel rear-facing, LED flash & • Wi-Fi
2.0 MP front-facing VGA camera • Mobile hotspot
• Android 4.1 Ice Cream Sandwich • Bluetooth®
• International capabilities
HEADSET POWER
JACK BUTTON
FRONT
CAMERA FLASH
EARPIECE
CAMERA
LENS
VOLUME
BUTTON
TOUCHSCREEN
BACK HOME KEY
KEY
SPEAKER
CHARGER/ACCESSORY JACK
*where available
Page 3 | Getting Started Guide | HTC oneGETTING STARTED GUIDE
HTC EVO ONE
Let’s Get Started
Charging and turning on your HTC one
Hint:
After opening the box, insert the battery and remove the charger. Plug the
charger into a power outlet and then plug the charger into the HTC EVO 4G Before proceeding, please
LTE. Once charged, press the POWER BUTTON, which is found on the right make sure you are in an area
top corner of the device. of sufficient coverage.
Activate the phone
Hands-free activation
If you are activating a new phone number from Cbeyond follow these
steps for hands-free activation
• After starting the device, hands-free activation will start
• Once activation is complete, click on the OK button
• The device checks for the latest PRL and firmware
• The device reboots
Under some circumstances, the automatic hands-free activation process doesn’t
work. In that case, please go to step 2b for manual activation.
Manual activation
Visit www.cbeyond.net/mobilesupportcenter for either of the
following cases:
• Transfer your mobile number from your previous provider to Cbeyond
• Activate your mobile phone
• Activate your Cbeyond replacement mobile phone
Page 4 | Getting Started Guide | HTC oneGETTING STARTED GUIDE
HTC ONE
Let’s Get Started
Wi-Fi setup
• After your HTC one has been turned on, you may receive a Hint:
prompt to initiate a Wi-Fi connection. Wi-Fi usage can provide
a faster data transfer than
Note You will only be asked to set up Wi-Fi if there is a Wi-Fi
using the mobile network.
connection available.
• To initiate a Wi-Fi connection, press the MENU button, select SETTINGS >
WIRELESS & NETWORK.
• Select the WI-FI check box to turn Wi-Fi on. The phone will scan for available
wireless networks.
• Select WI-FI SETTINGS. The network names and security settings (OPEN
NETWORK or SECURED WITH WEP) of detected Wi-Fi networks are
displayed in the Wi-Fi networks section.
• Select a Wi-Fi network to connect. If you select an open network, select
CONNECT to automatically connect to the network. If you select a network
that is secured with WEP, enter the key or password and select OK.
Email activation
Visit www.cbeyond.net/mobilesupportcenter for step-by-step instructions to
set up wireless email.
Setting up your voice and text messaging features to access
your voicemail:
• From the HOME screen, press the PHONE icon at the bottom of the screen,
and then press and hold 1
• Follow the voice prompt instructions at the end of the message to manage
your voicemail. You can SAVE, FORWARD, REPLY, DELETE, REPLAY
and more, based on numerical commands.
• Your default password is 1000.
To initiate a 3-way call:
• From the home screen, press the PHONE icon at the bottom of the screen.
• Dial a number or select a contact to begin the call.
• Once the session is established, unlock the screen, press MENU, select ADD
CALL and dial the number of the second participant.
• The first participant will be put on HOLD as you dial the second participant.
• When connected to the second participant, select MENU > MERGE CALLS.
Page 5 | Getting Started Guide | HTC oneGETTING STARTED GUIDE
HTC ONE
Let’s Get Started
Using speakerphone
During a call, unlock the screen and press MENU > SPEAKER or press the
speaker icon.
Note To avoid damage to your hearing, do not hold your phone against your ear
when the speakerphone is turned on.
Using text messaging (SMS)
From the HOME screen, select MESSAGES > NEW MESSAGE and proceed
to enter the desired contact’s number or name. Select the blank field, type your
message and select SEND.
Enabling Bluetooth®
From the Home Screen, press MENU and select SETTINGS.
• Select WIRELESS & NETWORK > BLUETOOTH SETTINGS and select the
BLUETOOTH check box.
Pairing with your Bluetooth® device
• From the BLUETOOTH SETTINGS menu select SCAN FOR DEVICES.
Your phone will begin scanning for Bluetooth devices within range and will
display all detected devices below the Bluetooth devices section.
• Select the hands-free headset or desired device in the list to start pairing.
• Once the connection is made, the BLUETOOTH CONNECTED ICON
will appear in the status bar.
Multimedia camera & camcorder
• Capture your life’s moments as stunning 8 MP photos or crisp HD videos and
share them at a touch of the screen or watch them on your computer or TV.
Contact Customer Support
Please access the CbeyondOnline Find-It-Fast Answer Center at
www.cbeyondonline.net or call Cbeyond Customer Support at
1-866-424-5100, or email mobile.support@cbeyond.net, or visit
the Mobile Support Center at www.cbeyond.net/mobilesupportcenter.
Page 6 | Getting Started Guide | HTC oneYou can also read