INSITE PORTAL - WEBADVISOR - REGISTRATION INSTRUCTIONS AND INFORMATION CONTRA COSTA COMMUNITY COLLEGE DISTRICT
←
→
Page content transcription
If your browser does not render page correctly, please read the page content below
InSite Portal - WebAdvisor

            Registration Instructions
                and Information
              Contra Costa Community College District
Contra Costa College Diablo Valley College   Los Medanos College
Alerts are holds on your record. Some alerts block
My Alerts   registration and/or official transcripts. If you have an
            alert, please click on the link for further information.

                                    Follow the instructions outlined in the
                                    alert to resolve the issue.

                                                                          2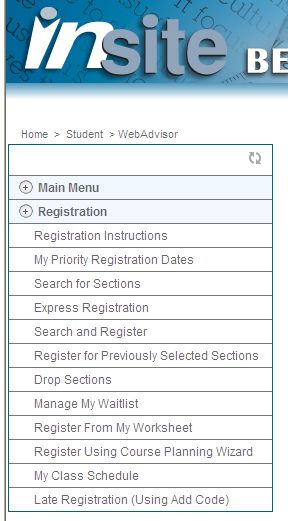
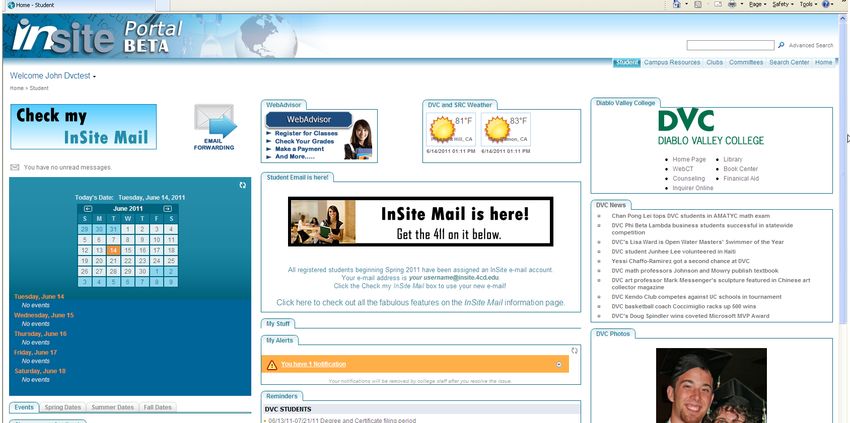
Access WebAdvisor by clicking on the
   WebAdvisor logo. Important:  Once you are logged in you have five
                     minutes to make your transaction. This five minute
                                          time limit is between clicks of the SUBMIT buttons.
                                          If you take longer than five minutes you will be
                                          timed out. Using Express registration is the
                                          quickest way to register.

                                 WebAdvisor Student Menu
        Click on a link (for
        example, Registration)
        to expand the menu
        options.

Important reminder: Payment is due immediately after registration. Use the Make a
Payment link (under the Financial Information menu) to pay using Visa or MasterCard.
                                                                                            3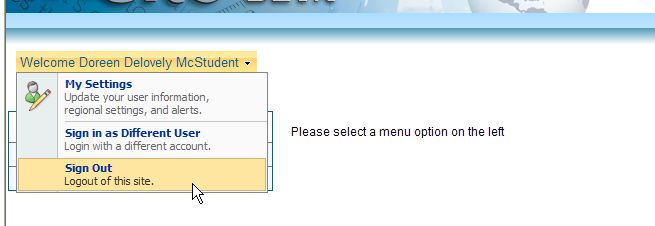
Registration Menu Options
          My Priority Registration Dates – View your registration dates and times.
          Search for Sections – Use this option to search for classes based on term, location,
          course, subject, etc.
          Express Registration – When you know the four digit section number you want to
          add (detailed instructions on page 7).
          Search and Register – Select the classes that you want from the search results.
          Register for Previously Selected Sections – Use this option if you selected the classes
          that you want previously and you are now ready to register or add to the wait list.
          This is like your shopping cart that holds the sections you are interested in adding.
          You may select sections prior to your priority registration appointment date and then
          register from here once you are eligible.
          Drop Sections – This is the option to use when you want to drop a class.
          Manage My Waitlist – View your waitlisted classes and statuses. Enroll in a class
          when you have Permission Granted. Remove a class that you no longer want.
          Register From My Worksheet – You can use this option if you have an active
          Educational Plan (usually this has been done with the help of a counselor).
          Register Using the Course Planning Wizard – This is used with an academic program
          and is based on program requirements.
          My Class Schedule – Use this option to view/print your class schedule.
          Late Registration (Using Add Code) – This option is for registering with a late add
          code given to you by the instructor. This is only available during the add period for
          the class (detailed instructions on page 9).
                                                 Important: On the Register for Previously Selected
                                                 Sections page you can modify the unit value of variable
                                                 credit sections. In this example the section is available for
                                                 1, 1.5, 2, 2.5, or 3 credits (1-3 credits in .5 increments).

                                                                                                       4
WebAdvisor features within the InSite portal
Note that multiple options can be open at one time. In the
example, the My Priority Registration Dates page is active and the
inactive tab is for the Search for Sections option. Close any tabs
that you no longer need by clicking the tab and then click on the X.
Make sure that you have properly submitted any processes you are
working on before closing the tab!
Tabs
Many pages show your contact
information. To update your contact
information click on the Change contact
information link. Note: mailing address
changes take approximately two weeks to
process.
An automated message will be sent to
this e-mail address when you have
permission to register in a waitlisted
5
section.My Priority Registration Dates
You must have a priority registration date for any term that you want to
register for. If you do not have a registration date listed for the term,
please contact your college’s Admissions & Records office (contact phone
numbers are listed at the end of this document).
Appointment Term, Date, and Time. You
can register on or after this date and time.
6You must have the four digit section
Express Registration number to use this registration method.
Enter the four digit Section Number (include
any leading zeros) and select the term from
the drop down menu. (Enter co-requisite
sections, if applicable.) Then click SUBMIT and
wait for the next page to continue with the
registration process.
Next select a registration action for ALL preferred
sections OR select an action for individual sections.
Update the credits as needed for variable unit sections (see page 4
for additional information on variable credit classes).
Then click SUBMIT.
7Registration Results – IMPORTANT
The Registration Results page confirms your transaction!
8Late Registration – Using Add Code
Late Add Codes are given out by the instructor and must be used during the add period.
Fill in the four digit section number (include any leading zeros), the
four digit late add code (as issued by the instructor, include any
leading zeros) and select the term. (Enter co-requisite sections, if
applicable.) Then click SUBMIT. You will then be taken to the
Register for Previously Selected Sections page.
To complete the registration, select the appropriate
action – Register or Waitlist, adjust units as needed (for
variable unit sections only, see page four for information on
variable unit classes) and click SUBMIT.
Or Select the Remove option and
SUBMIT to delete classes that
you are no longer interested in.
9Error Messages -
If your transaction did not process you will see a message
notifying you of the reason (Pre-requisite not met, class is full,
etc.).
10Manage My Waitlist
Important Note: If you are on a wait list it is your responsibility to check your
status daily.
Your Rank and number of students on
the wait list. This example shows a
student at the top of the waitlist
(number 1 of 1).
You may register for the class when When registering for a
you have a status of Permission variable unit section
Granted (select Register then SUBMIT). you can modify the
You may remove yourself from the waitlist at any Credits.
time by selecting Remove and then clicking on
SUBMIT.
11Pay Your Fees- Select the Make a Payment option under the Financial
Information menu.
Fill in the dollar amount and
select the Payment Type - VISA or
MasterCard. Click SUBMIT.
You will then be taken to the Electronic
Card Entry page.
Fill in all the information. Click SUBMIT.
You will get a confirmation page if the transaction
processed successfully and an e-mail confirmation
will be sent to the e-mail address you enter.
Warning: Please do not refresh your browser, click on the back
button, or close the browser after you have submitted your
credit card transaction. Please remain patient until the payment
confirmation page is displayed. Wait times will vary especially
during increased activity between WebAdvisor and the credit
card Processor (PayPal). Failure to comply will result in multiple
charges to your account.
12Sign Out
When you are finished using the Portal make sure you properly log
off by clicking the down arrow following your name and then
selecting the Sign Out option. You will get another message to
confirm that you want to log out. Lastly, close the browser.
13If you have questions or need further assistance please contact your
college Admissions and Records office.
Contra Costa College – (510) 215-6027 or
admissions@ccc.edu
Diablo Valley College – (925) 685-1310 or
admissions@dvc.edu
Los Medanos College – (925) 473-7500 or
admissions@lmc.edu
To exit this presentation close the browser by clicking on the X in the
upper right corner.
14You can also read