Lincoln Fire & Rescue Emergency Medical Services ALS Procedure Guidelines
←
→
Page content transcription
If your browser does not render page correctly, please read the page content below
Lincoln Fire & Rescue Emergency Medical Services Standard Patient Care Protocols
                            Last edit October 2021
                     ALS Procedure Guidelines

       Lincoln Fire & Rescue
    Emergency Medical Services
     ALS Procedure Guidelines
                            Last Edit October 2021

                         Changes highlighted in Yellow

                                       1
Lincoln Fire & Rescue Emergency Medical Services Standard Patient Care Protocols
                                            Last edit October 2021
                                                  ALS Procedure Guidelines
                                             ALS Procedure Guidelines Table of Contents

PROCEDURES:
12-LEAD ECG ................................................................................................................................................. 3
CO AND SpCO MEASUREMENT ..................................................................................................................... 6
ETCO2 DETECTION / MONITORING – CAPNOGRAPHY.................................................................................. 8
CONTINUOUS POSITIVE AIRWAY PRESSURE (CPAP) PROTOCOL ................................................................ 10
I-GEL INSERTION PROTOCOL ....................................................................................................................... 12
CRICOTHYROTOMY – NEEDLE ..................................................................................................................... 15
CRICOTHYROTOMY – SURGICAL ................................................................................................................. 17
DEFIBRILLATION – MANUAL ....................................................................................................................... 20
ENDOTRACHEAL TUBE INTRODUCER (BOUGIE) or (POCKET BOUGIE)........................................................ 21
INTRAOSSEOUS INSERTION – EZ-IO® .......................................................................................................... 25
INTRAOSSEOUS INSERTION – JAMSHIDI STYLE ........................................................................................... 31
ENDOTRACHEAL INTUBATION .................................................................................................................... 33
PREEXISTING VASCULAR ACCESS DEVICE.................................................................................................... 37
SUCTIONING – TRACHEOBRONCHIAL ......................................................................................................... 39
SYNCHRONIZED CARDIOVERSION ............................................................................................................... 40
THORACENTESIS – NEEDLE ......................................................................................................................... 43
TRANSCUTANEOUS CARDIAC PACING ........................................................................................................ 45
VEIN CANNULATION – EXTERNAL JUGULAR ............................................................................................... 47
VEIN CANNULATION – PERIPHERAL ............................................................................................................ 48

Last edited October 2021

                                                                              2
Lincoln Fire & Rescue Emergency Medical Services Standard Patient Care Protocols
                                       Last edit October 2021
                                 ALS Procedure Guidelines

                                        12-LEAD ECG
INDICATIONS:
   1. Chest pain.
   2. Epigastric pain.
   3. Back, neck, jaw, or arm pain without chest pain.
   4. Palpitations.
   5. Pulmonary edema.
   6. Exertional dyspnea.
   7. Weakness and diaphoresis unexplained by ambient temperature.
   8. Feeling of impending doom or unexplained anxiety.
   9. Suspected diabetic ketoacidosis.
   10. Suspected cardiac events.
   11. Cardiac dysrhythmias.
   12. Syncope or near syncope of unknown etiology or in patients greater than 65 years old.
   13. Post cardiac arrest.

PRECAUTIONS:
   1. Treatment of lethal dysrhythmias (e.g., VF, pulseless VT) and life-threatening problems
      associated with airway, breathing, and circulation should be initiated prior to obtaining a 12-
      lead ECG.

PRODEDURE:
   1. Prepare all the equipment and ensure the cable is in good repair. Check to make sure there are
      adequate leads and materials for prepping the skin.
   2. Prep the skin. Dirt, oil, sweat and other materials on the skin can interfere with obtaining a
      quality tracing.
   3. Place the four limb leads in accordance with manufacturer’s recommendations. Limb lead
      electrodes are typically placed on the wrists and ankles as shown in Figure 1. The limb lead
      electrodes can be placed anywhere along the limbs. Do not place the limb lead electrodes on
      the torso when acquiring a 12-lead ECG.

                                                   3
Lincoln Fire & Rescue Emergency Medical Services Standard Patient Care Protocols
                                  Last edit October 2021
                             ALS Procedure Guidelines

                            Figure 1 – Limb lead electrode placement
4. Place the precordial leads in accordance with manufacturer’s recommendations. Precordial
   leads are typically placed as shown in Figure 2. Proper lead placement is important for accurate
   diagnosis.

                                       Lead     Lead Location
                                       V1       Fourth intercostal space to the right of the
                                                sternum
                                       V2       Fourth intercostal space to the left of the sternum
                                       V3       Directly between leads V2 and V4
                                       V4       Fifth intercostal space at mid-clavicular line
                                       V5       Level with V4 at left anterior auxiliary line
                                       V6       Level with V5 at left midaxillary line

                             Figure 2. – Precordial lead electrode placement
       a. Locating the V1 position (fourth intercostal space) is critically important because it is the
          reference point for locating the placement of the remaining V leads. To locate the V1
          position:
                i. Place your finger at the notch in the top of the sternum.
               ii. Move your finger slowly downward about 1.5 inches (3.8 centimeters) until you
                   feel a slight horizontal ridge or elevation. This is the Angle of Louis where the
                   manubrium joins the body of the sternum.
              iii. Locate the second intercostal space on the patient’s right side, lateral to and
                   just below the Angle of Louis.
              iv. Move your finger down two more intercostal spaces to the fourth intercostal
                   space, this is the V1 position.
               v. Place V1 by attaching the positive electrode to the identified location.

                                                4
Lincoln Fire & Rescue Emergency Medical Services Standard Patient Care Protocols
                                      Last edit October 2021
                                ALS Procedure Guidelines
           b. Place V2 by attaching the positive electrode to the left of the sternum at the fourth
              intercostal space.
           c. Place V4 by attaching the positive electrode at the mid-clavicular line at the fifth
              intercostal space. (Note: V4 must be placed prior to V3)
           d. Place V3 by attaching the positive electrode in the line midway between lead V2 and V4.
           e. Place V5 by attaching the positive electrode at the anterior axillary line as the same level
              as V4.
           f. Place V6 by attaching the positive electrode to the midaxillary line at the same level as
              V4.

CAUTION: When placing electrodes on female patients, always place leads V3-V6 under the breast
rather than on the breast.

CAUTION: Never use the nipples as reference points for locating the electrodes for male or female
patients, because nipple locations may vary widely.

   5.   Ensure that all leads are attached.
   6.   Activate 12-lead function.
   7.   Record the tracing.
   8.   Select the appropriate facility and transmit the 12-lead
            a. Select the hospital radio channel and monitor the channel in the event the base
                physician needs to contact you for additional information.

CONSIDERATIONS:
   1. Perform the 12-lead ECG within five (5) minutes or as soon as possible.
   2. If the patient’s clinical condition changes, acquire an additional 12-lead ECG.
   3. If a patient refuses or if you are transporting to Bryan Health West Campus, consider
      transmitting the 12 lead to a receiving hospital for a base physician over read.

                                                   5
Lincoln Fire & Rescue Emergency Medical Services Standard Patient Care Protocols
                                      Last edit October 2021
                                ALS Procedure Guidelines

                        CO AND SpCO MEASUREMENT
INDICATIONS:
   1. Multiple patients presenting with symptoms.
   2. Headache, dizziness, syncope, weakness, altered mental status, and/or lethargy.
   3. Nausea, vomiting, and/or abdominal complaints.
   4. Any ill or injured patient with vague complaints.
   5. Shortness of breath, chest pain.
   6. CO detector(s) alarming.
   7. Extended time on or near fire-ground.

PROCEDURE:
   1. Apply finger probe on patient. Consider covering probe with towel.
   2. Initial CO assessment parameters.
           a. 0-5% - Considered normal in non-smokers. When greater than 3% with symptoms,
               consider high flow oxygen and evaluate environment for CO sources. Consider
               measuring others in same room/office/vehicle as patient. In absence of symptoms, no
               further medical evaluation of SpCO needed.
           b. 5-10% - Considered normal in smokers, abnormal in non-smokers. If symptoms present,
               consider high flow oxygen and inquire if others are ill. Evaluate environment for CO
               sources.
           c. 10-15% - Abnormal in any patient. Assess for high flow oxygen. Evaluate environment
               for CO sources.
           d. Greater than 15% - Significantly abnormal in any patient. Administer high flow oxygen,
               assess for symptoms, and consider transport. Evaluate environment for CO sources.
           e. Greater than 30% - Transport immediately. Administer high flow oxygen. Patient will
               likely be transferred to hyperbaric facility. Evaluate environment for CO sources.
   3. CO reassessment parameters
           a. 0-5% - If symptoms, persist, recommend transport regardless of SpCO readings. If
               symptoms resolved, no further medical evaluation of SpCO needed.
           b. 5-10% - If symptoms persist, recommend transport regardless of SpCO readings. If
               symptoms resolve and SpCO remains greater than 5% in any patient, recommend
               further medical evaluation. Non-smokers should be encouraged to have their
               home/work environment evaluated for CO.
           c. 10-15% - If symptoms persist or SpCO remains greater than 10 % in any patient,
               recommend transport. Encourage patient to have their home/work environment
               evaluated for CO.
           d. Greater than 15% - Recommend transport regardless of symptoms. Ensure that others
               in the patient’s home or workplace are not ill.

                                                 6
Lincoln Fire & Rescue Emergency Medical Services Standard Patient Care Protocols
                            Last edit October 2021
                     ALS Procedure Guidelines
e. Greater than 30% - Transport immediately. Administer high flow oxygen. Patient will
   likely be transferred to hyperbaric facility. Evaluate environment for CO sources.

                                       7
Lincoln Fire & Rescue Emergency Medical Services Standard Patient Care Protocols
                                      Last edit October 2021
                                ALS Procedure Guidelines

      ETCO2 DETECTION / MONITORING – CAPNOGRAPHY
INDICATIONS:
   1. Used for confirmation, monitoring and documentation of endotracheal intubation or I-gel
       placement.
   2. Assessment, monitoring and documentation of the respiratory status of the non-intubated
       patient experiencing respiratory distress including but not limited to asthma and COPD.
   3. Confirmation, monitoring and documentation of ROSC during CPR.

PROCEDURE: – INTUBATED PATIENTS
   1. Confirm tube placement via physical exam as outlined in the INTUBATION, ENDOTRACHEAL
      PROCEDURE: guideline.
   2. After verifying proper tube placement, apply the capnography circuit and use according to
      manufacturer’s instructions.
   3. Secure the endotracheal tube and resume ventilations at the appropriate rate. Do not use
      continuous hyperventilation.
   4. Observe the waveform and numerical values that appear during exhalation.
   5. ETCO2 numerical values and corresponding capnograph should be compared to normal values
      and morphology (Figure 3.).

                                        Normal ETCO2 Values
                                          35 – 45 mm/Hg

                                                          Waveform Labels
                                                          A       End of inhalation
                                                          B       Beginning of exhalation
                                                          B-D     Exhalation of alveolar gas
                                                                  End exhalation and point of
                                                          D       maximal or highest CO2
                                                                  concentration (end-tidal CO2)
                                                          D-E     Inhalation
                                               Figure 3
PROCEDURE: – NON-INTUBATED PATIENTS
   1. Patients should be assessed, oxygenated, and ventilated with the appropriate delivery device
      dependent upon their presenting degree of respiratory distress or obstruction.
   2. Interface the end-tidal CO2 sampling device with the oxygen delivery device being used. (I.E.,
      nasal sampling device used under a non-rebreather mask).
   3. Observe for a waveform and numerical values to appear during exhalation.

                                                  8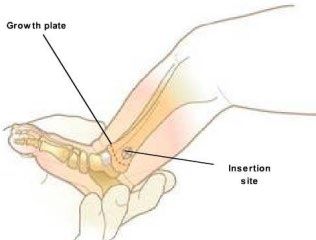
Lincoln Fire & Rescue Emergency Medical Services Standard Patient Care Protocols
                                      Last edit October 2021
                                ALS Procedure Guidelines
   4. ETCO2 numerical values and corresponding capnograph should be compared to normal values
      and morphology. (Figure 3)
         a. NOTE: ETCO2 monitoring should be discontinued while administering nebulized
              medications.
   5. ETCO2 numerical values and capnograph should be monitored following medication
      administration to determine the patient’s response to the intervention and the need for
      additional intervention.

CONSIDERATIONS:
   1. Capnography is only an adjunct to careful patient assessment.
   2. Do not use capnography as the sole method of assessing correct tube placement, especially in
      the pulseless patient.
   3. Capnography may not indicate right mainstem bronchus intubation or pyriform placement.

                                                 9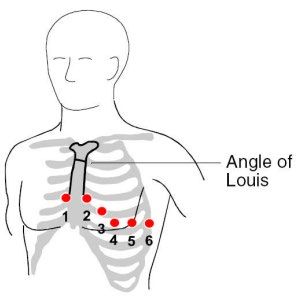
Lincoln Fire & Rescue Emergency Medical Services Standard Patient Care Protocols
                                      Last edit October 2021
                                ALS Procedure Guidelines

      CONTINUOUS POSITIVE AIRWAY PRESSURE (CPAP)
                      PROTOCOL
Continuous Positive Airway Pressure (CPAP) has been shown to rapidly improve vital signs and gas
exchange; reduce the work of breathing, decrease the sense of dyspnea, and decrease the need for
endotracheal intubation in patients who suffer from shortness of breath secondary to asthma, COPD,
pulmonary edema, and CHF. In patients with CHF, CPAP improves hemodynamics by reducing left
ventricular preload and afterload.

INDICATIONS:
   1. Any patient who is in respiratory distress with signs and symptoms consistent with asthma,
       COPD, pulmonary edema, or CHF, and who is:
          a. Awake and able to follow commands.
          b. Is over 18 years old and can fit the CPAP mask.
          c. Has the ability to maintain an open airway.
          d. AND exhibits two or more of the following:
                   i. A respiratory rate greater than 25 breaths per minute.
                  ii. SPO2 of less than 94% at any time.
                 iii. Use of accessory muscles during respirations.

CONTRAINDICATIONS:
   1. Patient is in respiratory arrest/apneic.
   2. Patient is suspected of having a pneumothorax or has suffered trauma to the chest.
   3. Patient has a tracheostomy.
   4. Patient is actively vomiting or has upper GI bleeding.
   5. Patient systolic blood pressure is less than 90 mmHg.

PROCEDURE:
   1. Explain the procedure to the patient.
   2. Ensure adequate oxygen supply to ventilation device.
   3. Initiate continuous SPO2 and ETCO2 monitoring.
   4. Place the patient on cardiac monitor and record rhythm strips with vital signs.
   5. Place the delivery device over the mouth and nose.
   6. Secure the mask with provided straps.
   7. Set PEEP valve to five cmH2o initially, may titrate to max of 10 cmH2o.
   8. Check for air leaks.
   9. Monitor and document the patient’s respiratory response to treatment.
   10. Check and document vital signs every five minutes.
   11. Administer appropriate medication as needed. (Continuous nebulized Albuterol for
       COPD/Asthma and repeated administration of nitroglycerin spray for CHF)

                                                 10
Lincoln Fire & Rescue Emergency Medical Services Standard Patient Care Protocols
Last edit October 2021
ALS Procedure Guidelines
12. Continue to coach patient to keep mask in place and readjust as needed.
13. Advise receiving facility that CPAP has been initiated.
14. If respiratory status deteriorates, remove device, and consider positive pressure ventilation via
BVM and/or placement of non-visualized airway or endotracheal intubation.
REMOVAL PROCEDURE:
1. CPAP therapy needs to be continuous and should not be removed unless the patient can’t
tolerate the mask or experiences respiratory arrest or begins to vomit.
2. If the patient is removed from CPAP therapy, consider positive pressure ventilation with a Bag-
Valve-Mask, the placement of a non-visualized airway and/or endotracheal intubation.
SPECIAL NOTES:
1. Do not remove CPAP until directed by hospital staff or physician.
2. Watch patient for gastric distention, which can result in vomiting.
3. Procedure may be performed on patient with a “Do Not Resuscitate Order”.
4. Due to changes in preload and afterload of the heart during CPAP therapy, a complete set of
vital signs must be obtained every five minutes.
11Lincoln Fire & Rescue Emergency Medical Services Standard Patient Care Protocols
Last edit October 2021
ALS Procedure Guidelines
I-GEL INSERTION PROTOCOL
Non-visualized supraglottic airway placement to establish control of the patient's airway may be
performed by a Lincoln system certified paramedic, paramedic intern under the direct supervision
of a Lincoln system certified paramedic and all BLS providers.
Indications:
a. Adult (showing signs of puberty) cardiac arrest patient.
b. Apneic patient when endotracheal intubation is not possible or not available.
c. Patient must be unconscious, without a gag reflex.
d. Failed airway.
Contraindications - Precautions:
a. History of esophageal foreign body, disease, or caustic ingestion.
b. Obstructive lesions below the glottis.
c. Trismus, limited mouth opening, pharyngo-perilaryngeal abscess, trauma, or mass.
d. Stoma.
e. Conscious or semi-conscious patients with an intact gag reflex.
f. Do not use excessive force to insert the device.
g. As with all supraglottic airway devices, particular care should be taken with patients
who have fragile and vulnerable dental work, in accordance with recognized airway
management.
h. Use care to avoid the introduction of lubricant in or near the ventilatory openings.
I-gel Size Patient Criteria Patient Size Patient weight
3 4-5 foot Small adult 30-60 kg
(122-155 CM)
4 5-6 foot Medium adult 50-90 kg
(155-180 CM)
5 6 foot Large adult 90+ kg
(> 180 CM)
12Lincoln Fire & Rescue Emergency Medical Services Standard Patient Care Protocols
Last edit October 2021
ALS Procedure Guidelines
Procedure:
a. Take and maintain appropriate body substance isolation precautions including eye
protection.
b. Determine and select appropriate airway for size of patient.
c. Lubricate per the manufacturer’s recommendations.
d. Grasp the lubricated I-gel firmly along the integral bite block. (Tube portion of the
device) Position the device so that the I-gel cuff outlet is facing toward the chin of
the patient.
i. NOTE: be sure that there is only a thin layer of lubricant on the end of the I-
gel to avoid blowing it into the lungs with bag valve mask ventilations.
ii. Suction the upper airway PRIOR to insertion as needed.
e. The patient should be in the “sniffing” position, with head extended and neck
slightly flexed forward. If cervical injury is suspected, use modified “jaw thrust”
instead of flexion at the neck. The chin should be gently pressed down/inferior
before proceeding to insert the I-gel.
f. Introduce the leading soft tip into the mouth of the patient in a direction toward the
hard palate.
g. Glide the device downwards and backwards along the hard palate with a
continuous, but gentle push until a definitive resistance is felt.
h. WARNING: Do not apply excessive force to the device during insertion. It is not
necessary to insert your fingers or thumbs into the oral cavity of the patient during
insertion of this device. If there is resistance during insertion, a ‘jaw thrust’ and
slight rotation of the device is recommended.
i. At this point, the tip of the device should be located into the upper esophageal
opening and the cuff should be located against the laryngeal framework. The
incisors should be resting on the integral bite block.
13Lincoln Fire & Rescue Emergency Medical Services Standard Patient Care Protocols
Last edit October 2021
ALS Procedure Guidelines
Post Placement:
a. Auscultate breath sounds, check for chest rise and confirm placement with ETCO2
monitoring and SpO2 monitoring as allowed by protocol.
iii. Attach pulse oximeter probe and ETCO2 circuit.
iv. ETCO2 monitoring.
1. Head injuries: 30-35 mmHg.
2. All other patients should be between 35-40 mmHg.
b. Secure the tube per manufacturer’s instructions.
c. Place suction catheter into side port and advance to appropriate position, apply
suction to decompress the stomach.
d. Continue to monitor, sedate per protocol as necessary. (ALS Procedure)
e. Consider definitive airway placement, if possible and necessary. (ALS Procedure)
v. Endotracheal tube placement.
vi. You can intubate through the I-gel tub with a Bougie introducer.
Indications for I-gel removal:
a. Patient regains consciousness. (Consider sedation and/or paralytics {ALS
Procedure} if authorized)
b. Protective gag reflex returns. (Consider sedation and/or paralytics {ALS Procedure}
if authorized)
c. Ventilation is inadequate.
d. Improperly placed I-gel airway.
Removal:
a. Ensure suctioning equipment is ready, roll patient onto left side.
b. Carefully remove I-gel airway with gentle, but firm traction. Suction as needed.
c. Insert an oropharyngeal or nasopharyngeal adjunct, as needed.
d. Continue ventilations with a BVM at 10-15 LPM flow, as needed or place on non-
rebreather mask at 15 LPM.
e. Document time of removal and ongoing vitals.
Key Points
a. This is NOT a definitive airway and aspiration can occur with this device.
b. Preload the OG port with a 12 French suction catheter to prevent any fluid leakage
from this hole during insertion.
c. Apply a small amount of lubricating gel to the tip of the I-gel to aid in insertion, but
do not over lubricate!
d. Do not leave in place for greater than four hours.
14Lincoln Fire & Rescue Emergency Medical Services Standard Patient Care Protocols
Last edit October 2021
ALS Procedure Guidelines
CRICOTHYROTOMY – NEEDLE
INDICATION:
1. To establish emergency airway access on patients less than 8 years old when other conventional
means of securing an airway fail due to trauma or airway obstruction.
2. This is a last resort maneuver for securing an airway.
CONTRAINDICATIONS:
1. Age greater than 8 years.
2. Ability to ventilate the patient and maintain the airway by other means.
3. Ability to intubate the trachea with an endotracheal tube.
4. Inability to identify the cricothyroid membrane.
PRECAUTIONS:
1. Patients with airway injuries may have significant spinal injuries. Whenever possible, the cervical
spine should be immobilized before beginning the procedure. Care should always be exercised
to avoid additional spinal injuries.
2. Whenever possible and appropriate, utilize aseptic technique for the procedure.
NECESSARY EQUIPMENT
1. 14 G, 1.25” long IV needle-over-catheter.
2. 3-, 5-, or 10-mL syringe.
3. Alcohol wipes.
4. Twill tape.
5. 15 mm adapter off a 3.0 mm ET tube.
6. BVM with high flow oxygen source.
PROCEDURE:
1. Identify the clinical indications for
needle cricothyroidotomy.
2. Place patient in supine position.
3. Palpate cricothyroid membrane between
thyroid cartilage and cricoid cartilage.
(Figure 4)
4. Cleanse area well with alcohol swabs.
5. Attach 14 G over-the-needle catheter to
the syringe.
6. Puncture skin mid-line and directly over
the cricothyroid membrane.
Figure 4
15Lincoln Fire & Rescue Emergency Medical Services Standard Patient Care Protocols
Last edit October 2021
ALS Procedure Guidelines
7. Direct needle caudally at 45-degree
angle. (Figure 5)
8. Advance needle through lower half of
cricothyroid membrane, aspirating as
needle is advanced.
9. Aspiration of air identifies position is
tracheal lumen.
10. Remove needle and gently advance
catheter.
11. Attach catheter needle hub to #3.0 mm
pediatric ETT adapter.
12. Connect ETT adapter to Bag Valve.
13. Confirm position by auscultation and
visualization of lung inflation.
14. Secure apparatus to neck with twill tape.
15. Document the procedure and the
patient’s response.
COMPLICATIONS:
1. Asphyxia.
2. Subcutaneous or mediastinal
emphysema or bleeding.
3. Hematemesis.
4. Vocal cord damage.
5. Esophageal or thyroid perforation.
6. Posterior tracheal wall perforation.
7. Inadequate ventilation.
Figure 5
8. Hypercapnia/Hypercarbia.
16Lincoln Fire & Rescue Emergency Medical Services Standard Patient Care Protocols
Last edit October 2021
ALS Procedure Guidelines
CRICOTHYROTOMY – SURGICAL
INDICATION:
Establish emergency airway access on patients that are eight years old or older when other conventional
means of securing an airway fail due to trauma or airway obstruction. This is a last resort maneuver for
securing an airway.
CONTRAINDICATIONS:
1. Ability to intubate the trachea.
2. Ability to ventilate the patient and maintain the airway by other means.
3. Inability to identify the cricothyroid membrane.
PRECAUTIONS:
1. Suspected laryngeal fractures.
2. Bleeding disorders.
NECESSARY EQUIPMENT:
1. 6.0 Endotracheal Tube (may utilize other sizes if indicated by patient size or condition).
2. #15 Scalpel blade.
3. Bougie.
4. 10mL syringe.
5. Tube restraint.
6. Stethoscope.
7. ETCO2 Circuit.
8. Sterile gloves if available.
9. Alcohol wipes.
10. Sterile Dressings.
11. Suction.
12. BVM with oxygen source.
PROCEDURE:
1. Hyperextend the patient's neck. (Unless cervical
spine injury is suspected) This position brings the
larynx and cricothyroid membrane into the
extreme anterior position.
2. Use standard isolation precautions. Preferably,
don sterile gloves if available.
3. Locate the cricothyroid membrane between the
cricoid and thyroid cartilages by palpating the
Figure 6
17Lincoln Fire & Rescue Emergency Medical Services Standard Patient Care Protocols
Last edit October 2021
ALS Procedure Guidelines
depression caudal (towards the feet) to the
midline thyroid cartilage.
4. Cleanse the area well with povidone-iodine
solution or alcohol.
5. Make a midline, vertical 1.5-2 cm skin incision in
the neck over the cricothyroid membrane. Insert
scalpel through the cricothyroid membrane.
Make a small incision in the membrane. There
should be air escape at this point.
6. Note: Brisk bleeding may occur. Do not waste
time attempting to control bleeding.
7. Insert the bougie into the incision. Remove the
scalpel. Insert your gloved finger into the incision
next to the bougie and use your finger to dilate
the opening. In an obstructed airway, the patient
should be able to inhale air in at this point if still
conscious. Proceed to step 9.
8. Optional procedure: Once the incision is made;
rotate the scalpel blade 90° and widen the
incision, first to one side, then rotate the blade
180° and widen to the other side. Insert the
bougie next to the scalpel blade. Proceed to step
9.
9. Insert the 6.0 ET tube over the bougie and
Figure 7
advance until the cuff is immediately inferior to
the incision.
10. Remove the bougie ensuring the tube remains in
place.
11. Inflate the ETT cuff with 5-10 mL of air. Inflate
the pilot balloon enough to prevent air leaking
around the balloon.
12. Ventilate patient with 100% 02.
13. Immediately assess tube placement by
auscultating the chest in the axillae and apex
locations and over the epigastrium. Bilateral
breath sounds and no sound over the epigastrium
is the goal.
14. Remove or reposition the tube as needed and
then secure with twill tape.
18Lincoln Fire & Rescue Emergency Medical Services Standard Patient Care Protocols
Last edit October 2021
ALS Procedure Guidelines
15. Capnography must be used in conjunction with
frequent auscultation to verify correct ET Tube
placement. ETCO2 levels should be maintained at
35-40 mm/Hg (30-35 mm/Hg for head injury
patients with signs of impending brain stem
herniation).
16. Document the procedure and patient response.
19Lincoln Fire & Rescue Emergency Medical Services Standard Patient Care Protocols
Last edit October 2021
ALS Procedure Guidelines
DEFIBRILLATION – MANUAL
INDICATIONS:
1. Ventricular fibrillation and pulseless ventricular tachycardia.
PROCEDURE:
1. Turn on monitor/defibrillator.
2. Apply defibrillation electrodes to the patient according to the manufacturer’s recommended
placement and in accordance with the monitor/defibrillator manufacturer’s recommendation
(anterior-lateral).
a. Ensure the electrodes do not touch and there is room for the LUCAS device suction cup.
b. Pediatric electrodes may be used on children 1-8 years old in a shockable rhythm.
i. Pediatric energy reducing electrodes are not compatible with the Life Pak 15
and are not used for manual defibrillation.
c. Pediatric electrodes may be placed either anterior-lateral or anterior-posterior for
manual defibrillation.
d. Pediatric electrodes can only be placed anterior-lateral when used in the AED mode.
3. Connect defibrillation electrodes to Life Pak 15 therapy cable.
a. Ensure therapy cable is plugged into Life Pak 15
4. Select energy level at 360 j.
a. Pediatric energy levels for initial defibrillation two j / kg, subsequent energy levels four
j /kg.
5. Visually check the monitor display and assess the rhythm. (Subsequent steps assume VF/VT is
present).
6. Press CHARGE button on defibrillator controls. CPR should be provided while the defibrillator
charges (when possible), until it is time to “clear” the victim for shock delivery.
7. When the defibrillator is charged, give the shock as quickly as possible. State firmly in a forceful
voice your intent to shock:
a. Check to make sure you are clear of contact with the patient, stretcher, and equipment
and that no one continues to touch the patient or stretcher. Don’t forget about the
person providing ventilations. That person's hands should not be touching the
ventilation adjuncts, including the tracheal tube.
8. Press the DISCHARGE button.
9. Immediately after shock delivery, resume CPR (beginning with chest compressions) without
delay and continue for five cycles (or about two minutes if an advanced airway is in place), and
then check the rhythm.
20Lincoln Fire & Rescue Emergency Medical Services Standard Patient Care Protocols
Last edit October 2021
ALS Procedure Guidelines
ENDOTRACHEAL TUBE INTRODUCER (BOUGIE) or
(POCKET BOUGIE)
INDICATIONS:
1. Difficult intubation with a restricted view of the glottic
opening.
2. Predicted difficult intubation.
CONTRAINDICATIONS:
1. Three attempts at orotracheal intubation.
2. ETT size less than 6.0 mm.
PROCEDURE:
1. Prepare position and oxygenate the patient with 100%
oxygen.
2. Select proper sized ET tube without stylet, test cuff and
prepare suction.
3. Lubricate the distal end and cuff of the endotracheal tube Figure 8
(ETT) and the distal 1/2 of the Endotracheal Tube
Introducer (Bougie). (Note: Failure to lubricate the Bougie and the ETT may result in being
unable to pass the ETT).
4. Using laryngoscope technique, visualize the vocal cords if possible, using Sellick’s/BURP as
needed.
5. Introduce the Bougie with curved tip anteriorly and visualize the tip passing the vocal cords or
above the arytenoids if the cords cannot be visualized.
6. Once inserted, gently advance the Bougie until you meet resistance or “hold-up”. (If you do not
meet resistance, you have a probable esophageal intubation and insertion should be
reattempted or the failed airway protocol implemented as indicated)
7. Withdraw the Bougie ONLY to a depth sufficient to allow loading of the ETT while maintaining
proximal control of the Bougie.
8. Gently advance the Bougie and loaded ET tube until you have hold-up again, thereby assuring
tracheal placement and minimizing the risk of accidental displacement of the Bougie.
9. While maintaining a firm grasp on the proximal Bougie, introduce the ET tube over the Bougie
passing the tube to its appropriate depth. It is recommended that 2 providers perform steps 9-
11.
10. If you are unable to advance the ETT into the trachea; and the Bougie and ETT are adequately
lubricated, withdraw the ETT slightly and rotate the ETT 90 degrees COUNTER clockwise to turn
the bevel of the ETT posteriorly. If this technique fails to facilitate passing of the ETT you may
attempt direct laryngoscopy while advancing the ETT. (This will require an assistant to maintain
the position of the Bougie and, if so desired, advance the ETT)
21Lincoln Fire & Rescue Emergency Medical Services Standard Patient Care Protocols
Last edit October 2021
ALS Procedure Guidelines
11. Once the ETT is correctly placed, hold the ET tube securely and remove the Bougie.
12. Confirm tracheal placement according to the intubation protocol, inflate the cuff with 3 to 10 cc
of air, auscultate for equal breath sounds and reposition accordingly.
13. When final position is determined secure the ET tube, reassess breath sounds, apply end tidal
CO2 monitor, and record and monitor readings to assure continued tracheal intubation.
Figure 8:
The bougie tip advances toward the epiglottis as the laryngoscope blade lifts the floor of the mouth to
visualize the glottic opening. (Courtesy of Phelan MP: Use of the endotracheal bougie introducer for
difficult intubations. Am J Emergency Med 22:479-482, 2004.)
Figure 9:
The top of bougie passes just beneath the epiglottis. (Courtesy of Phelan MP: Use of the endotracheal
bougie introducer for difficult intubations. Am J Emergency Med 22:479-482, 2004.)
22Lincoln Fire & Rescue Emergency Medical Services Standard Patient Care Protocols
Last edit October 2021
ALS Procedure Guidelines
Figure 10:
Vibrations, or clicks, can be palpated as the soft tip of the bougie passes against the rigid tracheal rings.
(Courtesy of Phelan MP: Use of the endotracheal bougie introducer for difficult intubations. Am J
Emergency Med 22:479-482, 2004.)
Figure 11:
After presuming the bougie is in the trachea, the bougie is pulled back a few centimeters to keep the tip
inside the trachea. The endotracheal tube is threaded onto the distal end of the bougie. Advancement
of the bougie must be avoided when sliding the endotracheal tube over the bougie. On some bougie a
thick black mark is present 15 cm from the distal end of the device, which helps the operator determine
how far to withdraw the bougie before inserting the endotracheal tube. (Courtesy of Phelan MP: Use of
the endotracheal bougie introducer for difficult intubations. Am J Emergency Med 22:479-482, 2004.)
23Lincoln Fire & Rescue Emergency Medical Services Standard Patient Care Protocols
Last edit October 2021
ALS Procedure Guidelines
Figure 12:
The bougie must be prevented from advancing down the trachea as the endotracheal tube is
“railroaded” over the bougie. As the tip of the endotracheal tube reaches the vocal cords a hold-up
usually occurs, preventing further advancement. (Courtesy of Phelan MP: Use of the endotracheal
bougie introducer for difficult intubations. Am J Emergency Med 22:479-482, 2004.)
Figure 13:
The endotracheal tube needs to be rotated approximately 90° to avoid the hold-up. The endotracheal
tube is advanced and the bougie is pulled out. Standard means for assessing correct placement of the
endotracheal tube are then performed. (Courtesy of Phelan MP: Use of the endotracheal bougie
introducer for difficult intubations. Am J Emergency Med 22:479-482, 2004.)
24Lincoln Fire & Rescue Emergency Medical Services Standard Patient Care Protocols
Last edit October 2021
ALS Procedure Guidelines
INTRAOSSEOUS INSERTION – EZ-IO®
INDICATION:
The EZ-IO® product system is approved for patients weighing 40 kg and greater using the EZ-IO® AD or
LD needle and for patients weighing between 3 - 39 kg using the EZ-IO® PD needle. It is indicated
whenever fluid or pharmacological therapy is critical but traditional vascular access techniques are not
possible or require too much time to achieve a successful insertion.
CONTRAINDICATIONS:
1. Fracture of the tibia or femur.
2. Previous orthopedic procedures. (Example – knee replacement)
3. An extremity that is compromised by a pre-existing medical condition. (Example – tumor or
peripheral vascular disease)
4. Any infection at the insertion site.
5. The inability to locate the anatomical landmarks.
6. Excessive tissue over the insertion site. If suspected this can be determined by powering the
needle set through the skin and up to but not into the bone. At this point the 5 mm mark on the
EZ-IO® catheter should be visible. If this mark is NOT visible, then there is excessive tissue over
the site. This excessive tissue may prevent the catheter from penetrating into the IO space.
CONSIDERATIONS:
1. Due to the anatomy of the IO space, you may note flow rates to be slower than those achieved
with IV catheters.
a. Ensure the administration of a 10 mL rapid bolus (flush) with a syringe.
b. Use a pressure bag or pump for continuous infusions if needed.
2. Insertion of the EZ-IO® in conscious patients causes mild to moderate discomfort and is usually
no more painful than a large bore IV. However, IO for conscious patients has been noted to
cause severe discomfort, therefore, prior to IO syringe bolus or continuous infusion in alert
patients, SLOWLY administer Lidocaine 2% through the EZ-IO® catheter into the medullary space
in the following dosing regimens. Ensure that the patient has no allergies or sensitivity to
Lidocaine.
a. Adult - EZ-IO® AD or LD slowly administer Lidocaine 20-40 mg.
25Lincoln Fire & Rescue Emergency Medical Services Standard Patient Care Protocols
Last edit October 2021
ALS Procedure Guidelines
PRECAUTIONS:
The EZ-IO® is not intended for prophylactic use.
EQUIPMENT:
1. EZ-IO® driver. 2. 10 mL syringe.
3. EZ-IO® needle set. 4. Normal saline IV solution and tubing.
5. Alcohol or povidone-iodine swab. 6. Tape or gauze.
7. Extension set or EZ-Connect. 8. Pressure bag (optional).
PROCEDURE:
If the patient is conscious, advise them of the EMERGENT NEED for this procedure.
1. Locate proper site for EZ-IO® insertion.
2. Adult proximal tibia insertion: There are three
anatomical landmarks of the insertion site that MUST be
identified before using the device. The first landmark is
the patella or kneecap. To locate it, feel the front surface
of the leg just below the femur or thigh bone for a
“floating” bony structure. The second landmark is
approximately two finger widths below the patella. It is
the tibial tuberosity, a round oval elevation or “bump”
on the front surface of the tibia or lower leg. Now, one
finger width medial (toward the inside) of the tibial Figure 1
tuberosity is the final landmark. This is the insertion site
for the EZ-IO®. (Figure 1)
3. Adult humeral insertion: Expose shoulder and adduct
humerus (place the patient’s arm against the patient’s
body) resting the elbow on the stretcher or ground and
the forearm resting on the abdomen. With the patient
in this position, you may immediately note the humeral
head on the anterior-superior aspect of the upper arm
or anterior-lateral shoulder. Palpate and identify the
mid-shaft humerus and continue palpating toward the
proximal aspect or humeral head. As you near the Figure 2
shoulder you will note a small protrusion. This is the
base of the greater tubercle insertion site. With the
opposite hand you may consider “pinching” the anterior
and inferior aspects of the humeral head while
confirming the identification of the greater tubercle.
This will ensure that you have identified the midline of
the humerus itself. (Figure 2)
26Lincoln Fire & Rescue Emergency Medical Services Standard Patient Care Protocols
Last edit October 2021
ALS Procedure Guidelines
4. Pediatric proximal tibial insertion: If the tibial tuberosity CANNOT be palpated, the insertion site
is two finger widths below the patella and then medial along the flat aspect of the tibia. (Figure
3) If the tibial tuberosity CAN be palpated, the insertion site is one finger width below the
tuberosity and then medial along the flat aspect of the tibia. (Figure 4)
Figure 3 Figure 4
5. Adult distal tibial insertion: The insertion site is approximately two finger widths proximal to the
medial malleolus and midline along the tibia. (Figure 5)
6. Pediatric distal tibial insertion: The insertion site is approximately one finger width (patients less
than 12 kg) and one to two finger widths (patients between 12 and 39 kg) proximal to the
medial malleolus and midline along the tibia, (Figure 6)
Figure 5 Figure 6
27Lincoln Fire & Rescue Emergency Medical Services Standard Patient Care Protocols
Last edit October 2021
ALS Procedure Guidelines
PROCEDURE:
1. Always observe body substance isolation (BSI) procedures and aseptic techniques when using
the EZ-IO®.
2. Clean the insertion site. (Use aseptic technique) Use povidone-iodine swab and/or alcohol to
clean the site prior to powering the EZ-IO® into position.
3. Prepare the EZ-IO® driver and needle set:
4. Open the EZ-IO® case.
5. Remove the driver and one EZ-IO® needle.
6. Open the EZ-IO® needle package and attach the needle set to the driver. (You should feel a
“snap” as the small magnet connects)
7. Remove the safety cap from the needle set. One way to remove the cap from the needle set
(with the needle facing you) is to grasp the cap tightly and rotate clockwise to loosen and
remove. Attempting to “pull” the cap off may remove the entire needle set from the driver –
rotating counterclockwise will cause the catheter and stylet to separate.
8. Begin insertion of the EZ-IO® Needle Set. (Figure
7)
9. Holding the EZ-IO® driver in one hand, stabilize
the leg near the insertion site with the opposite
hand. Make sure your hands and fingers are a
safe distance from the path of insertion. Be
cautious of sudden patient movements.
10. Position the driver at the insertion site with the
needle at a 90-degree angle to the surface of
the bone. Power the needle set through the skin Figure 7
at the insertion site until you feel the needle set
tip encounter the bone itself.
11. At this point if there is any doubt that the needle set is not long enough, verify that you can see
the 5 mm marking on the catheter itself. (This is the mark closest to the flange) If this mark is
not visible, you should abandon the procedure as the needle set may not be long enough to
penetrate the IO space.
12. Continue to insert the EZ-IO®.
13. Apply firm and steady pressure on the driver and power through the cortex (hard, outer surface)
of the bone, ensuring the driver is always maintained at a 90-degree angle.
14. Stop when the needle flange touches the skin or a sudden decrease in resistance is felt. This
indicates entry into the bone marrow cavity (intramedullary space).
28Lincoln Fire & Rescue Emergency Medical Services Standard Patient Care Protocols
Last edit October 2021
ALS Procedure Guidelines
15. Remove driver from the needle set.
16. While supporting the needle set in one hand, gently pull
straight up on the driver, and lift away.
17. Return the driver to its case.
18. Remove the stylet from the catheter. (Figure 8) While
grasping the hub firmly with one hand, rotate the stylet
counterclockwise. (Unscrew the stylet from the
catheter). Pull the stylet out of the catheter and
consider placing it into the empty cartridge, now called
the stylet shuttle. The stylet shuttle must then be placed
Figure 8
in an FDA–approved biohazard container as soon as
possible. Do not replace or attempt to “recap” the
stylet.
19. Confirm proper EZ-IO® catheter tip position. Proper placement of the IO catheter tip can be
confirmed through any of the following:
a. The IO catheter stands straight up at a 90–degree angle and is firmly seated in the tibial
bone.
b. Blood at tip of the stylet (sometimes visible).
c. Aspiration of a small amount of bone marrow with a syringe.
d. A free flow of drugs or fluids without difficulty and with no evidence of leakage
(extravasation) underneath the skin.
20. Attach the primed EZ-Connect or any standard
Luer lock extension set to the EZ-IO® hub and
slowly administer the Lidocaine bolus. Then use a
syringe to flush the IO space with 10 mL of
normal saline. (Figure 9) Prior to fluid
administration be certain to flush the EZ-IO®
catheter with 10 mL of fluid. A rapid syringe flush
will “clear the pathway” allowing for an
acceptable infusion rate.
21. Initiate the infusion. Administer the infusion or Figure 9
medications per your local medical protocol. A
pressure infuser may be necessary to maintain
adequate flow rates.
22. Apply the wristband and a dressing. The wristband
is designed as a reminder of EZ-IO® placement and
need for timely removal. The EZ-IO® catheter may
be secured in place with a standard dressing.
29Lincoln Fire & Rescue Emergency Medical Services Standard Patient Care Protocols
Last edit October 2021
ALS Procedure Guidelines
REMOVAL
1. The EZ-IO® catheter should be removed within 24 hours.
2. Either grasp the hub directly or attach a sterile syringe. The
syringe will serve as a larger handle for the catheter hub
and is preferred. (Figure 10) Support the patient’s
extremity while rotating the catheter clockwise and gently
pulling. Rotating the hub during removal reduces catheter
to bone friction and will allow for an easier removal
process. Once the catheter has been removed immediately
Figure 10
place it in an approved biohazard sharps container.
NOTE: Removal of the extension or fluid administration set, without proper protection of the EZ-IO® hub
(in the form of a sterile cap, port or extension set), could cause bleeding or infection.
NOTE: Maintaining a 90-degree angle while rotating the catheter will insure proper removal without
complications.
NOTE: Be certain that you DO NOT ROCK the catheter while removing. Rocking or bending the catheter
with a syringe may cause the catheter to separate from the hub.
NOTE: If hub-catheter separation occurs use an appropriate hemostat to grasp and gently remove the
catheter in the same manner as suggested above (rotating while gently pulling).
30Lincoln Fire & Rescue Emergency Medical Services Standard Patient Care Protocols
Last edit October 2021
ALS Procedure Guidelines
INTRAOSSEOUS INSERTION – JAMSHIDI STYLE
INDICATIONS:
When vascular access is critical; but a peripheral IV site cannot be located or secured. Use only in
unconscious, unresponsive patients. Contact the base physician [Medical Direction] for permission to
use in patients six years or age or older.
CONTRAINDICATIONS:
1. Available secure IV line.
2. Current or recent fracture of the tibia (use the opposite leg).
3. Severe injury (fractures, crush, etc.) of the proximal extremity (use the opposite leg).
4. Pelvic fractures.
5. History of bone disorders.
6. Previous IO attempt in the same extremity.
EQUIPMENT:
1. IO needle. (Figure 1)
2. Normal saline IV solution and tubing.
3. 10 mL syringe filled with normal saline.
4. Alcohol wipes.
5. Tape.
Figure 1
PROCEDURE:
1. Prepare equipment and IV administration set.
2. Place the patient in a supine position.
3. Support the child’s leg (small towel roll under the knee) and externally rotate to expose medial
aspect of the leg.
4. Select and prepare the insertion site.
a. Palpate the proximal tibia to find the tibial tuberosity, and then locate a point on the flat
aspect of the tibia 2-3 cm below the tuberosity.
5. Prep site with alcohol wipes.
6. Insert the needle at a 90-degree angle to the surface of the tibia with firm downward pressure
using a firm, back-and-forth twisting motion to penetrate the skin and then the periosteum and
bone cortex. Entrance into the medullary cavity will be felt by a “pop” or sudden loss of
resistance.
7. Manually stabilize the needle. Remove the stylet from the needle (keep sterile) and aspirate
marrow contents with a 10 mL syringe filled with normal saline. Inject entire contents of
aspirate and NS into the bone marrow. If marrow cannot be aspirated but fluid flushes easily
without evidence of swelling, the needle can be considered properly placed.
a. If IV fluid will not infuse:
31Lincoln Fire & Rescue Emergency Medical Services Standard Patient Care Protocols
Last edit October 2021
ALS Procedure Guidelines
i. Remove the IV line without moving the needle.
ii. Repeat aspiration and flush with 10cc syringe.
b. If IV fluid will still not infuse:
i. Reinsert the sterile stylet.
ii. Advance the needle slightly.
iii. Remove the stylet (keep sterile).
iv. Restart the infusion.
8. May re-attempt x 1 if both attempts fail begin immediate transport to the receiving hospital or
contact [Medical Control] for further options.
9. Attach IV tubing to the hub and infuse at w/o rate. Observe for continuous free flow without
signs of infiltration.
10. Secure needle: screw down the needle depth guard until it is flush to the skin, tape securely in
place.
11. Set desired drip rate.
12. Monitor the calf to ensure that there is no swelling to indicate leakage or fluid.
32Lincoln Fire & Rescue Emergency Medical Services Standard Patient Care Protocols
Last edit October 2021
ALS Procedure Guidelines
ENDOTRACHEAL INTUBATION
INDICATIONS:
1. Respiratory arrest.
2. Unresponsive medical or trauma patients who lack a gag reflex.
3. Cardiopulmonary arrest.
4. Patients with a GCS less than 8.
5. Conscious patients with respiratory distress who are unable to ventilate adequately.
CONTRAINDICATION:
1. Epiglottitis.
NECESSARY EQUIPMENT:
1. BVM with oxygen source.
2. Laryngoscope blade and handle.
3. Twill tape.
4. Appropriate size ETT and stylet.
5. 10 cc syringe.
6. Stethoscope.
7. ETCO2 circuit
8. Magill forceps.
9. Oropharyngeal Airway. (For initial airway management and / or use as a bite block)
10. I-gel. (If unable to intubate)
PROCEDURE: (MAXIMUM OF 2 ATTEMPTS per PROVIDER)
1. Use standard isolation precautions including eye protection. Use a facemask and gown when
splashing is likely.
2. Open the airway and pre-oxygenate the patient with a bag-valve-mask supplied with 100%
oxygen for at least one minute. (BVM ventilation requires cricoid pressure until the tube is
confirmed to be in the trachea) Ventilation should be repeated for a minimum of one minute
anytime 30 seconds without ventilation has elapsed for an intubation attempt.
3. Auscultate for breath sounds to establish a baseline.
4. Assemble and check the equipment including:
a. Check the distal cuff for leaks.
b. Lubricate the distal end of the endotracheal tube with a water-soluble lubricant.
(Optional)
c. Ensure the stylet, if used, is recessed two CM from the distal end of the endotracheal
tube.
d. The laryngoscope is bright, white, and tightly secured in place.
5. Turn on the suction unit and attached the appropriate tip.
33Lincoln Fire & Rescue Emergency Medical Services Standard Patient Care Protocols
Last edit October 2021
ALS Procedure Guidelines
6. Place the head and neck into a “sniffing position” to align the three axis of the mouth, pharynx,
and trachea.
a. When there is a potential for cervical spine injury, ensure the head is firmly held in a
neutral position during intubation.
7. Holding the handle in the left hand, insert the laryngoscope blade into the right side of the
patient’s mouth. Using a sweeping motion, displace the tongue to the left.
8. Move the blade slightly toward the midline and advance it until the distal end is positioned at
the base of the tongue.
9. Visualize the tip of the epiglottis and then place the laryngoscope blade into the proper position.
a. Curved (Macintosh) blade is advanced into the vallecula.
b. Straight (Miller) blade is inserted under the epiglottis.
10. Lift the laryngoscope slightly upward and forward to displace the mandible and airway
structures without allowing the blade to touch the teeth.
11. Keeping the left wrist straight, use the shoulder and arm to continue lifting the mandible and
tongue at a 45° angle to the ground until the glottis is exposed. If necessary, have another
provider apply cricoid pressure.
12. Grasp the endotracheal tube in the right hand, holding it the same way a pencil is grasped. Hold
the tube horizontal to the ground. Advance it through the right corner of the patient’s mouth,
directing the distal end of the tube up or down to pass it into the pharynx.
13. Insert the endotracheal tube into the glottic opening and advance it until the cuff disappears
slightly (one to two cm) past the vocal cords. Observe the tube as it enters the glottic opening.
14. Hold the tube in place with a free hand. Do not release the tube before it is secured in place.
With your other hand, remove the stylet and then insert the oropharyngeal airway between the
teeth or gums as a bite block.
15. Inflate the distal cuff with the prefilled syringe. Use only the minimum amount of air necessary
to create an effective seal and prevent air leakage. Do not overinflate the cuff.
a. Ensure the syringe is removed after the distal cuff is inflated.
16. Attach a bag-valve-mask to the tube.
a. Place the ETCO2 circuit onto the ET tube with the BVM.
b. Ensure supplemental oxygen @ 15 L/min is attached to the BVM via oxygen connecting
tube.
17. Deliver several breaths with the bag-valve-mask and confirm proper tube placement as follows:
a. Auscultate over the epigastrium.
b. Auscultate the chest bilaterally at the axillae, apices, and the bases for the presence of
equal, bilateral lung sounds.
c. Observe for symmetrical chest rise and fall with each breath.
d. Observe patient for clinical improvement. (I.E., pulse oximetry, skin condition).
18. Confirm proper tube placement with a ETCO2 detection circuit:
a. ETCO2 DETECTION / MONITORING – CAPNOGRAPHY
i. ETCO2 should be maintained at 35-45 mm/Hg.
34Lincoln Fire & Rescue Emergency Medical Services Standard Patient Care Protocols
Last edit October 2021
ALS Procedure Guidelines
ii. For head-injured patients with signs of impending brain stem herniation,
maintain @ 30-35 mm/Hg.
19. Note and record the depth of the endotracheal tube at the teeth.
20. Ventilate the patient with the bag-valve-mask supplied with 100% oxygen as indicated.
a. During CPR: Deliver 8 to 10 breaths per minute. Deliver each breath over about one
second while chest compressions are delivered at a rate of at least 100 per minute, and
do not attempt to synchronize the compressions with the ventilations.
b. Patients with a perfusing rhythm: Deliver approximately 10 to 12 breaths per minute
(one breath every 6 to 7 seconds). Deliver these breaths over one second.
21. Secure the endotracheal tube in place with a commercial device or twill tape while continuing
ventilatory support.
22. Re-confirm tube placement after the tube is secured, after every patient movement and at
regular intervals. Application of a cervical collar and immobilization device will help prevent the
patient from moving in such a way as to dislodge the endotracheal tube.
SEDATION:
1. If patient regains consciousness or gag reflex returns AND the patient’s airway needs continued
protection AND the patient is hemodynamically stable.
a. Give Midazolam 2.5 mg slow IVP titrated to effect.
COMPLICATION: ESOPHAGEAL INTUBATION
1. Deflate the distal cuff.
2. Remove ET tube from patient.
3. Vigorously suction the oropharynx as needed.
4. Pre-oxygenate the patient prior to re-intubation if an additional attempt is permitted.
COMPLICATION: ENDOBRONCHIAL INTUBATION
1. Loosen the securing device.
2. Deflate the distal cuff.
3. For a right main stem bronchus intubation, continue ventilating and slowly withdraw the tube
while simultaneously auscultating the left side of the chest.
4. Stop withdrawing the tube once breath sounds are heard on the left side.
5. Auscultate both sides of the chest. Breath sounds should be heard equally and bilaterally.
6. Note and record the tube depth, re-inflate the distal cuff, and secure the tube in place.
35Lincoln Fire & Rescue Emergency Medical Services Standard Patient Care Protocols
Last edit October 2021
ALS Procedure Guidelines
EXTUBATION:
Extubation is indicated if the patient can protect and maintain an open airway, the risks for needing to
re-intubate are significantly reduced and the patient is not sedated. This should rarely if ever be
performed in the field!
To perform the procedure:
1. Ensure adequate oxygenation.
2. Confirm patient responsiveness.
3. Suction the oropharynx.
4. Deflate the distal cuff.
5. Remove the endotracheal tube on cough or respiratory expiration.
36Lincoln Fire & Rescue Emergency Medical Services Standard Patient Care Protocols
Last edit October 2021
ALS Procedure Guidelines
PREEXISTING VASCULAR ACCESS DEVICE
Peripherally Inserted Central Catheters (PICC) may be used in emergency situations. PICC lines are
located on the arm and usually contain saline but other central lines may be flushed with Heparin.
Only PICC lines may be accessed. If a PICC line must be accessed, withdraw and discard at least 20 ml
of blood and maintain sterility.
INDICATION:
1. Obtaining venous access when peripheral access in not obtainable or is inadequate.
CONTRAINDICATION:
1. Other peripheral access is readily available.
PROCEDURE:
1. Set up a normal saline IV with emphasis on fully flushing the IV tubing.
2. Expose the access device area.
3. Prepare equipment:
a. Alcohol pads or equivalent.
b. Several sterile 4x4 pads.
c. Three (3) 10 mL syringes.
d. Surgical mask.
4. Use one 10 mL syringe to draw 10 mL of normal saline from the IV bag.
5. Open a 4x4 dressing and place it around the tip of the access port to create a sterile field.
6. Apply surgical mask.
7. Cleanse the tip of the port aggressively with an alcohol pad or equivalent cleanser (i.e.,
povidone- iodine solution, etc.).
8. Remove the cap to the port and attach one empty 10 mL syringe to the catheter port.
9. Unlock the clamp on the access line, if applicable, and aspirate blood from the port. Aspirate at
least 20 mL of blood and discard. Blood should aspirate freely. If it does not, replace the cap
and DO NOT use the access port.
10. Lock the clamp, if applicable, and remove the syringe with the aspirated blood. Dispose of the
syringe in a biohazard container.
11. Connect the syringe containing 10 mL of normal saline to the port, unlock the clamp, and flush
the device. The line should flush easily. Re-clamp the line.
12. Remove the syringe and connect the IV to the port. Unclamp the line and adjust flow rate as
needed.
37You can also read