Mobile App User Guide - ANDRIOD VERSION 6.2.3 IOS VERSION 6.2.5
←
→
Page content transcription
If your browser does not render page correctly, please read the page content below
Mobile App User Guide
   ANDRIOD VERSION 6.2.3
     IOS VERSION 6.2.5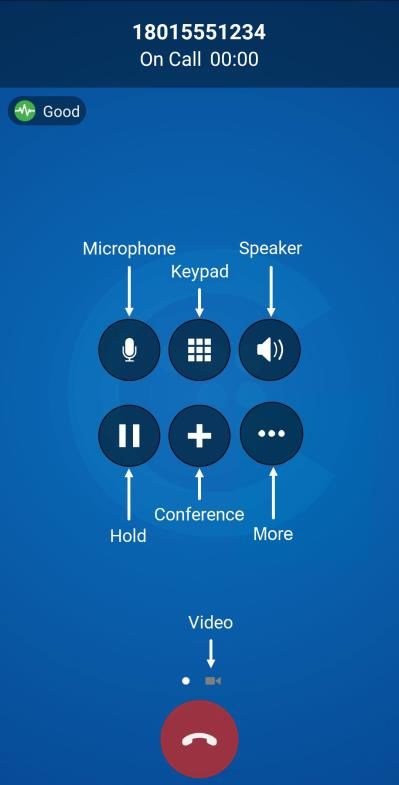
QUICK REFERENCE GUIDE

Getting Started
A VoIP service subscription with a local service provider or ISP is required to make audio or video
calls with Cymbus. Contact your service provider to set up an account. Once your account is set
up, you will receive an email from Cymbus with your username and password.

System Requirements
 Operating System            Android version 6.0 (Marshmallow) or higher
                             iOS 12 or higher

 Supported Devices           Android smartphones, tablets, and chromebooks
                             iPhone 5s and higher
                             iPod Touch 6th generation and higher
                             iPad Air, Mini, or Pro and higher

 Supported Accessories       Headset with microphone (including Bluetooth™): Cymbus uses the
                             earpiece and microphone on the headset.

                             Headphones (no microphone): Cymbus uses the earpiece on the
                             headphone and the built-in microphone on the device.

 VOIP OVER MOBILE AND CELLULAR DATA NOTICE
 Some mobile network operators may prohibit or restrict the use of VoIP functionality over their network
 and may also impose additional fees or other charges in connection with VoIP use. Cymbus will not be
 held liable for any charges, fees, or liability imposed by your carrier for use of VoIP over mobile and
 cellular data.

 EMERGENCY CALLS WARNING
 Cymbus products provide handling designed to redirect emergency calls to the native cellular dialer
 when possible on a best reasonable commercial-efforts basis. However, this functionality is also
 dependent on the operating system of the mobile device, which is outside of our control and is subject to
 change at any time. As a result, the official position of Cymbus is that Cymbus product is not intended,
 designed, or fit for placing, carrying, or supporting emergency calls. Cymbus will not be liable for any
 costs or damages arising either directly or indirectly from the use of the software for emergency calls.
 Using Cymbus as a default dialer may interfere with dialing emergency services.

 © 2020 Cymbus                                          2
QUICK REFERENCE GUIDE

Install and Log In
To get started, download your cloud communications app at https://cymbus.com/. You can log in
to Cymbus on up to two devices.

                              Open the app and log in with the username and password
                              provided by your VoIP service provider. Remember to toggle on
                              Keep Password and Auto Login.

                              When prompted, give Cymbus the following permissions:

                                  •   Allow Cymbus to make and manage phone calls

                                  •   Allow Cymbus access to your contacts

                                  •   Allow Cymbus to access to the microphone

                                  •   Allow Cymbus access to the camera

                                  •   Allow Cymbus to send notifications

  EXIT CYMBUS

  To exit the Cymbus application, tap Settings and then tap Logout in the top right corner.

© 2020 Cymbus                                     3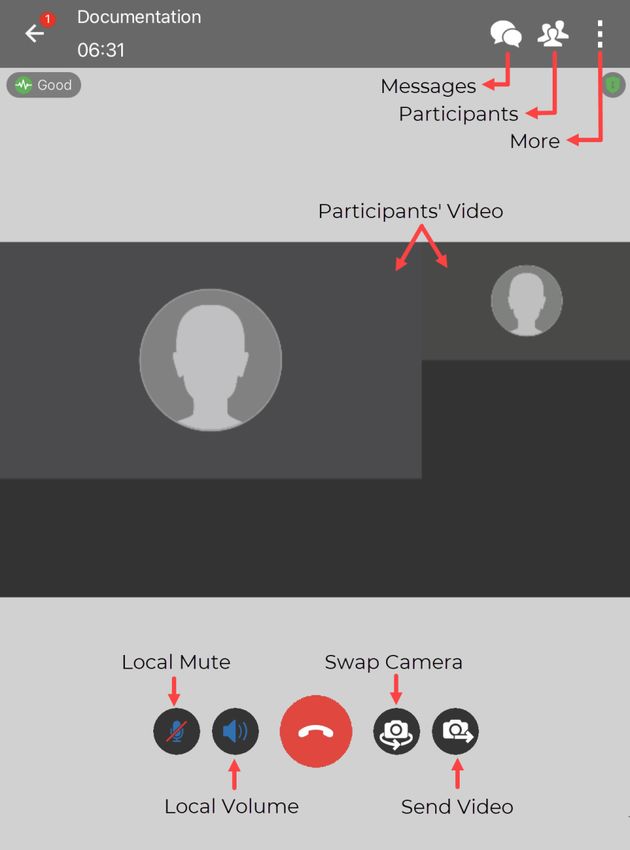
QUICK REFERENCE GUIDE

Using Cymbus
The screenshots in this guide are from both the Android and iOS apps. While the device layouts
and options on each platform may be slightly different, the features and functions are the same.

PHONE                                TABLET

                The screenshots above are from iOS devices. On Android, the icons are not labeled.

Navigation Tabs
The device status and service provider are listed at the top center of the screen. The navigation
tabs are located at the bottom of the screen on a phone, and at the top of the screen on a tablet.

      PHONE              CONTACTS                  HISTORY              MESSAGING                    SETTINGS

  QUICK MENU
  The      Quick Menu contains links to start or schedule a conference call, copy a conference
  link, and access voicemail.

© 2020 Cymbus                                            4
QUICK REFERENCE GUIDE

iPad Multitasking
Cymbus on iPad can be used in Slide Over or Split View. In these modes, the interface is the same
as the iPhone app.

Slide Over
When you use two apps in Slide Over, one app sits on top of the other and blocks part of the
content. You can move the app in Slide Over to either side of the screen, but it always covers a
portion of the app underneath.

  1.   With Cymbus in the foreground, swipe up from the
       bottom of the screen to open the Dock.

  2.   Long-press the second app you want to open and drag
       it off the dock. The app opens in Slide Over on top of
       Cymbus.

Split View
When you use two apps in Split View, both apps adjust in size and run side by side. You can adjust
the size of the apps to be equal in size or a 25/75 split.

                                         1.   With Cymbus in the foreground, swipe up from the
                                              bottom of the screen to open the Dock.

                                         2.   From the dock, long-press the second app you want to
                                              open and drag it to the far right or left of the screen until
                                              Cymbus shrinks, leaving a space beside it.

                                         3.   Release the second app. Both apps are now in Split View.

  IOS PREFERENCES

  To use Slide Over or Split View, make sure iOS Settings > General > Multitasking & Dock > Allow
  Multiple Apps is turned on.

 © 2020 Cymbus                                         5
QUICK REFERENCE GUIDE

Making Calls
You can place a voice or video call from almost anywhere in the app. If you know the number, you
can place a call from the dialer on the Phone tab. If you don’t know a number, you can place the
call from Contacts, History, or from a chat room.

Using the Dialer
                               Type the name, phone number, or extension you want to call in
                               the dialer field. As you type, Cymbus will display suggestions for
                               completing the entry. Tap a contact from the list to dial.

                               REDIAL
                               Tap    Dial to bring up the last number you called and then tap
                                 Dial again.

Using Contacts
In the Contacts tab, search for or locate a contact and tap on
their name to open their contact details. Tap the number you
want to dial, then choose Call or Video to complete the call.

If you choose Video, Cymbus starts sending your video when the
other party accepts the call.

Using History
                                ANDROID
                                 1.   Go to the History tab and locate the entry containing the
                                      contact you want to call.

                                       - ANDROID. Tap    Phone. Alternatively, long-press the entry
                                          containing the contact you want to call.

                                       - IOS. Tap the entry. Alternatively, tapInfo next to the
                                          entry, then tap the number you want to dial.

                                 2.   Tap Call or Video to dial.

© 2020 Cymbus                                       6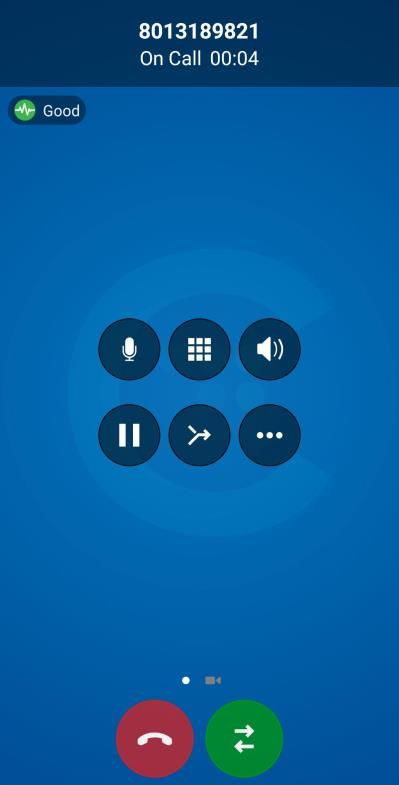
QUICK REFERENCE GUIDE

Android Call Screens
ON CALL               MORE       CONFERENCE

iPhone Call Screens
ON CALL               MORE       CONFERENCE

© 2020 Cymbus                7
QUICK REFERENCE GUIDE

Tablet Call Screens
ON CALL                                           CONFERENCE

 LETTERS TO NUMBERS

 Some phone numbers are given with words to help you remember them (1-800-NUMBERS).
 Rather than convert the letters to numbers, you can type letters into the dial pad and let
 Cymbus convert the letters to numbers when placing the call.

 To turn this on, go to Settings > Preferences: Outgoing Call, and enable Turn Letters to Numbers.

© 2020 Cymbus                                    8

QUICK REFERENCE GUIDE

Features
Add Video to Voice Call
During an established call, swipe left on the screen or tap the  More menu and tap Start Video.
On an iPad, tap the     Video icon at the top of the screen. Cymbus initializes the video. You’ll see
the other party’s video after they add video on their end.

Call Transfer
In an unattended or blind transfer, you transfer the call to the target without talking to them first.
An attended transfer occurs when you talk to the target before transferring the call. When you
transfer a video call, the call is transferred as an audio call. Both parties can add video to the call.

Attended Transfer
 1.   While on an established call, use any method to establish a second call to the target. Cymbus
      automatically puts the first call on hold and dials the second call.
 2.   When you’ve finished speaking to the target, tap      More, then tap Transfer or Transfer to…
 3.   Don’t hang up yet—Once the call connects the second party to the remote party, you will see
      Call Ended.

Unattended Transfer
 1.   While on an established call, tap    More, then tap Transfer or Transfer to…

 2.   If necessary, go to the Phone tab on the resource panel. Type the name or number of the
      person you want to transfer the call to and tap   Transfer.

       - CONTACTS. To select a contact from the Contacts tab, go to that tab on the resource panel
          (on Android, tap the Back button first), then search for or locate and tap on the contact
          you want to transfer to the call to, tap the number, and tap Transfer or Transfer to…

       - HISTORY. To select a contact from the History tab, tap    Phone on the group containing the
          contact you want to transfer the call to, then tap Transfer or Transfer to… Alternatively,
          long-press the contact entry, then tap Transfer to… (Android).

 3.   Cymbus puts the remote party on hold while dialing the target. Once the call connects,
      Cymbus ends the call between you and the remote party. If the target answers the call, the
      call continues between the target and the remote party. If the target declines, the call ends.

 © 2020 Cymbus                                       9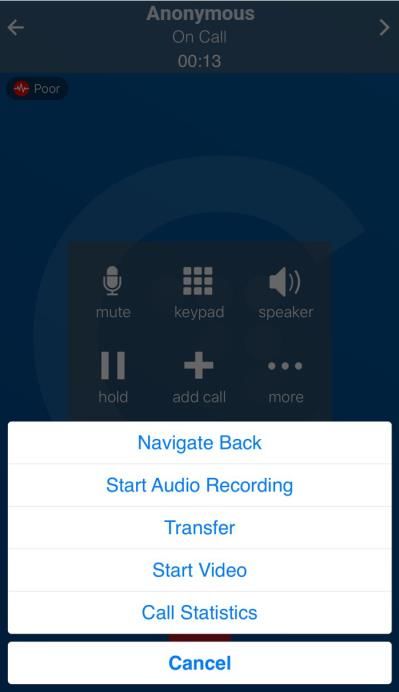
QUICK REFERENCE GUIDE

Contacts
Cymbus uses contacts saved on your device. Cymbus contacts are continually synchronized with
your native contacts, which means adding, modifying, or deleting a contact from one list updates
the other list.

Buddies are contacts that share their online status with you using an XMPP address or softphone
number. These are pre-populated and managed by your system administrator. You can also
exchange instant messages (IMs) with your Buddies.

Add contacts
In the Contacts tab, tap    (Android) or   (iOS) to add a person to
your contact list.

From the History tab, long-press an entry (Android) or tap   Info next
to an entry (iOS), then tap Create New Contact or Add to Existing
Contact. Cymbus auto-populates the phone number.

In the Add Contact window, enter the contact’s name, company, and
email address. If necessary, tap  to add a phone number.

When you’re done, tap    or Add. The contact is added to Cymbus
                                                                              iOS has additional options.
contacts and the device’s native contacts.

Delete a contact
In the Contacts tab, tap a contact to view their information.

ANDROID. Tap More > Delete. Alternatively, long-press a contact and tap Delete.

 • IOS. Tap Edit, then scroll to the bottom and tap Delete. Alternatively, swipe to the left and tap
   Delete Contact.

The contact will be deleted from both Cymbus and the device’s native contacts.

 BUDDIES

 Buddies, which are managed by your system administrator, cannot be permanently deleted by
 you. If you delete a Buddy, the contact will reappear in your Buddy list the next time you log in.

 © 2020 Cymbus                                     10
QUICK REFERENCE GUIDE
Presence
Cymbus allows you to share your online status (presence) with
team members (Buddies). Your status is displayed on the
Messaging tab.
When Cymbus is launched, your online status is Available. To
change it, tap next your status and select a new one: Away, Busy,
Do not disturb, Appear offline. Optionally, type in a custom note to
be displayed next to your status.
Cymbus updates your status to On the phone when you make or
receive a call and your status was Available.
Record Audio
When you record a call, Cymbus plays a recording tone to the remote party
when the recording starts. You can record a video call, but only the audio
portion of the call is recorded.
To record an established call, tap More > Start audio recording. Cymbus
starts recording the call.
To stop the recording, tap More > Stop audio recording. To listen to, share,
or delete a recording, go to the History tab and tap the call entry.
Voice Mail
Voice Mail is offered through your VoIP service provider or through
your enterprise’s IP PBX; it is not part of Cymbus.
A small red number on the Phone icon indicates the number of new
messages you have.
To access your voice messages, go to the Phone tab (phones) or the
Dial Pad (tablets). Tap Quick Menu (Android) or Quick Start (iOS),
then tap Voice Mail. Cymbus dials your Voicemail Management star
code.
© 2020 Cymbus 11QUICK REFERENCE GUIDE
Collaboration
Collaboration, also known as Virtual Meeting Rooms, combines audio, HD video, screen sharing,
messaging, and presence in one virtual meeting. Anyone can join your collaboration conference
using desktop and mobile devices.
CONFERENCE PIN (OPTIONAL)
If you want to set a participant PIN, go to Settings > Preferences > Conferences. Enable Require
PIN/Passcode, then enter a PIN.
Place a Second Call
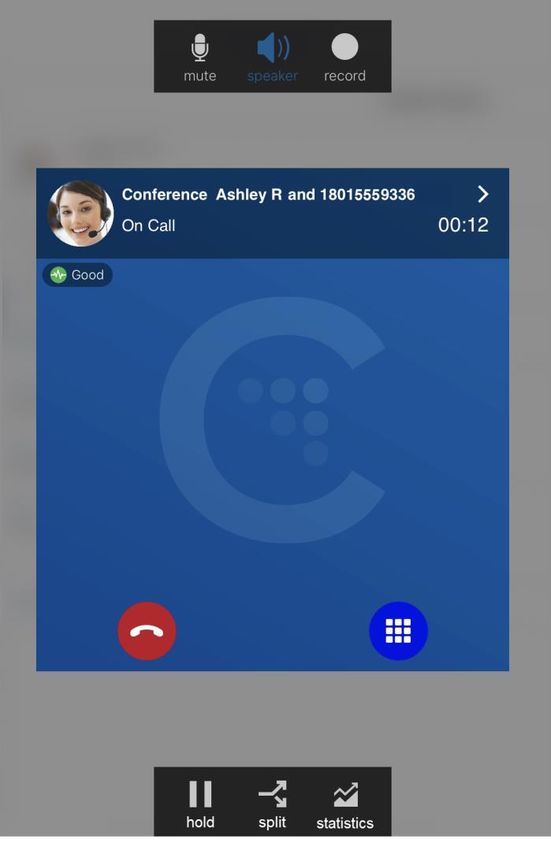
When you have two calls established, you can merge two calls into a three-way conference call
where you can add more participants.
1. While on an established call, tap Hold to place the first call on hold, then tap Add Call.
2. Enter the name or phone number of the second party into the dial pad, tap their name, then
tap Dial. Alternatively, select a contact from the Contacts or History tabs, then tap Call or
Video to dial.
3. Cymbus connects the second call. If you end one of the calls, Cymbus automatically switches
back to the other call.
MERGE CALLS
While you have two calls established, tap to merge the
calls into a three-way conference. If you end the call, both
remote parties are disconnected.
SPLIT CALLS
After you have merged two calls together, you can tap to
split them into two calls. Cymbus displays the name of the
remote party for the active call.
SWITCH CALLS
While on individual calls, tap to switch between them.
VIDEO
To send your video to the other caller, swipe left.
© 2020 Cymbus 12QUICK REFERENCE GUIDE
Create a Conference
The host is responsible for inviting people to a conference as well as starting a conference. Make
sure to use a desktop device if you want to share your screen.
Schedule a conference
1. From the Phone tab, tap Quick Menu > Schedule a Conference Call.
2. Your primary calendar application will open. Add invitees and set a time. If set, the PIN will be
included in the invite.
3. When you’re done, tap or Add to send the invitation.
Alternatively, tap Copy Conference Link to Clipboard and send the link in the way you prefer.
Start a conference now
1. From the Phone tab, tap Quick Menu > Start a Conference Call.
2. Tap Participants then tap Add.
3. Search for and select Buddies to add to the conference. When you’re done selecting
participants, tap or Done.
Invite participants during a conference
1. Tap Participants then tap Add.
2. Start typing the name of a Buddy that you want to invite. Cymbus will make suggestions.
3. Click on the participant’s name when it appears in the suggestions.
4. When you’ve selected all participants, tap or Done. Cymbus sends instant messages to the
invitees with your conference link.
Join a Conference
Participants can join a conference using the Cymbus app, a web browser, or by dialing in.
Depending on the host’s settings, participants may enter the conference immediately or must wait
until the host joins. Cymbus needs access to your microphone and camera for a conference.
• LINK. Click the link in the invitation email. The Cymbus app will launch.
HISTORY. In the Contacts tab, locate an entry belonging to the host. On Android, long-press the entry
and tap Join a Conference. On iOS, tap Info, then tap the URL.
• CONTACTS. In the Contacts tab, tap Buddies. Locate and tap the buddy that is hosting the
conference, then tap on their conference link.
© 2020 Cymbus 13QUICK REFERENCE GUIDE
Host Controls
Participants panel
In a conference you are hosting, tap Participants. These settings apply to the whole conference.
ANDROID
At the top of the panel is Mute All Participants button and the
More menu, which contains Unmute All Participants and Lock The
Bridge Mute.
IOS
The participant controls are at the bottom of the panel. Here you
can mute or unmute all participants, lock the bridge mute, disable
the chime for incoming participants, and lock the conference (no
new participants).
Participant controls
In the Participants panel, tap on a participant’s name to expand the options:
Mute the participant.
Send the participant an instant message.
Assign the floor to the participant.
Remove the participant.
Video
The video that the host sees is automatically sent to all participants. If the host pauses or stops the
video, other participants no longer receive video. Participants can choose whether to share their
own video.
VIDEO. To starts sending video and receiving remote video in the conference, go to More > Stop
Video. To remove all incoming and outgoing video from the call, tap More > Stop Video.
LAYOUT. The video layout the conference members see is determined by the setting chosen by the
host. To change the layout, tap More > Video Layout and choose a layout.
Mute
To mute all participants, tap Mute All Participants, then tap Lock The Bridge Mute.
To mute a single conference member, go to the Participants panel, locate the person you want to
mute, and tap the Mute microphone beside their name. Tap to unmute.
© 2020 Cymbus 14QUICK REFERENCE GUIDE
Participant Controls
If the call controls are hidden, tap the screen.
More menu
From the More menu, access the
following settings:
• Put Call On Hold
• Stop Video
• Local Preview On
• Start Audio Recording
• Assign Video Floor To Me
• Disable Chime (Android)
• Lock Conference (Android)
On iOS, the Disable Chime and Lock
Conference settings are in the
Participant panel.
Video
You can choose whether to share your video.
YOUR VIDEO. Tap Send Video to send your video to conference members. To stop sending video,
tap Stop Video. Cymbus stops sending your video to conference members but still displays the
incoming conference video.
LOCAL PREVIEW. To see your video feed on a local preview, tap Local Preview (Android) or go to
More > Local Preview (iOS).
• VIEW. When Cymbus is running on a mobile device, you will see only the screen share or the
conference video. Use the Screen share view and Remote video view buttons to swap views.
© 2020 Cymbus 15QUICK REFERENCE GUIDE
Messaging
Instant messages (IMs) can be sent to a Buddy from the Messaging tab, the Contacts tab, the
Favorites tab, from a chat room or an active call. Cymbus will notify you when there is a new
message or when you have been @mentioned in a chat room.
Send a Message
New conversation
1. Go to the Messaging ta and tap People.
2. Tap Add (Android) or Compose (iOS).
3. Search for a Buddy and then tap their name.
4. Compose your message and tap Send.
Existing conversation
1. Do one of the following:
- In the Messages tab, scroll through your conversations or search for the person you want
to send a message to, then tap on the conversation.
- From the Contacts or Favorites tab, tap a Buddy and then tap Send Instant Message. On
Android, you can also long-press a Buddy and select Send IM.
- During an active call, tap More > Send Instant Message.
2. Compose your message, then tap Send.
Send IM from a chat room
1. In the Messaging tab, tap Rooms, then tap the chat room.
2. In the top right corner, tap More > Members. On a tablet, tap
Members in the toolbar.
- ANDROID. Next to the member you want to send a message
to, tap the expand arrow and then tap Message.
- IOS. Tap the member you want to send a message to,
then tap Send Instant Message.
3. Compose your message and tap Send.
© 2020 Cymbus 16QUICK REFERENCE GUIDE
Chat Rooms
Chat rooms are used when sending messages to multiple recipients. Chat rooms can be private
or public. Private rooms can only be joined by invitation from the group owner. Public rooms can
be joined by anyone in the XMPP group.
Join a room
1. In the Messages tab, tap Rooms.
2. Tap (Android) or (iOS) then tap Join Room.
3. Tap the room(s) you want to join and tap Add.
Cymbus adds the public chat room(s) to the Rooms section of
the Messaging tab.
Create a room
1. In the Messages tab, tap Rooms.
2. Tap (Android) or (iOS) then tap Create Room.
3. Choose if the new room will be private or public.
4. Enter the room name.
5. If the room is private, add participants.
6. Optionally, enter a description and topic.
7. When you’re done, tap to create the room.
Invited members are automatically added to the room. Cymbus
adds the room to the Rooms section of the Messaging tab.
Edit room settings
After a room has been created, the room owner can change the room name and description, add
new members, and add a topic. Both room owners and members can change the topic.
1. Go to the Messaging tab and tap the chat room you want to edit.
2. Tap More > Room Settings > Edit.
3. Make any changes as necessary, then tap or Save.
© 2020 Cymbus 17QUICK REFERENCE GUIDE
Settings
On the Settings tab, you can find:
• END USER PORTAL. Manage some of your own settings, including device logs and avatar photo.
• PREFERENCES. Choose how you want Cymbus to work.
• ADVANCED SETTINGS. Settings that apply to Cymbus as a whole. Most cannot be modified.
• CONFERENCES. Choose if Conferences will require a PIN/Passcode and when Conferences on
your bridge will start (Only When The Host Joins) and end (Immediately).
• HELP DESK ASSISTANT. Initiate a support session for remote diagnostics. Android only.
• ABOUT CYMBUS. Information about Cymbus, such as the version history and third-party credits.
User Portal
Device Logs
Search through your device logs by filename or full text. Sort the
results by date, relevance, and size.
Manage Devices
You can log in to Cymbus on only two devices. If you need to
switch to a new device, one of your old devices will need to be
deactivated.
1. Go to Devices to view your activated devices.
2. Find the record of the device that you wish to deactivate,
then tap Delete.
3. A message will pop up asking if you're sure you want to
delete this device. Tap Delete to confirm.
Now you can log in on another device.
© 2020 Cymbus 18QUICK REFERENCE GUIDE Conferences CONFERENCE SETTINGS Manage various conference settings, including: • The bridge title and description • If new participants are automatically muted when they join • If tones are played when participants enter or exit the conference • Moderator and participant PINs • Grace period after the host leaves • Enable automatic conference recordings • Set up Dropbox for server-based recording • And more CONFERENCE RECORDS View the records of each of your conferences, including the start and end times, number of participants, and each participant’s information. © 2020 Cymbus 19
QUICK REFERENCE GUIDE

Change Avatar Photo
                           Your avatar is the image that will be displayed for your contact.

                             1.   Go to XMPP Photo.

                             2.   Tap Choose File and locate the image file on your computer that
                                  you want to use as your avatar.

                             3.   Tap Upload JPEG or PNG Image.

Change Password
  1.   Go to Change Password.

  2.   Enter your old and new passwords. The indicator at the
       bottom will tell you if your password meets the following
       requirements:

         - Your new password must contain at least one
           uppercase letter, one lower case letter, one digit, and
           one punctuation character.

  3.   Tap Change Password.

Preferences
In Preferences, you can make Cymbus work the way you want it to. Due to differences in operating
systems, options are different between Android and iOS. Here are some of the common settings:

INCOMING CALL                        CALL IN PROGRESS                MESSAGES
  • Disable Call Waiting               • Contact Image                 • Enable IM & Presence

  • Decline Options (Android)          • Auto-Record Calls             • Alert Sound

  • Call Blocking (iOS)                • Play Tone on Network Lost     • Hyperlink Preview

OUTGOING CALL                        PHONE NUMBER                    VIDEO CALLS
  • Turn Letters to Numbers            • Single Touch to Call          • Enable Video

                                                                       • Video Quality Wi-Fi

© 2020 Cymbus                                         20
© 2020 CYMBUS
ALL RIGHTS RESERVED
Need further assistance with Cymbus or Voice Connect? Contact
the Horizon NOC: HNOC@horizonconnects.com or 866.533.0859You can also read