Optimize Productivity by Pruning for Maximum Light - California ...
←
→
Page content transcription
If your browser does not render page correctly, please read the page content below
Optimize Productivity by
Pruning for Maximum Light
By Tim Spann, PhD
Research Program Director
M
ost growers are faced with a very light crop for the
2019 season. Although income may be low this year,
the light crop presents an opportunity for pruning.
The first thing to understand is that there is no single best way
to prune avocados. However, there are at least three objec-
tives to consider when pruning:
1. Maximize fruiting potential
2. Control tree size for ease of harvest
3. Correct tree structural issues
How you achieve these objectives is up to you and will vary
from grower to grower and grove to grove.
Before beginning to prune, it’s important to remember a
couple of things about the avocado tree. First, branches bear-
ing fruit right now have a low likelihood of flowering and pro-
ducing more fruit next year. Second, flowers develop on sum-
mer flush growth — a branch that grows in summer 2019 has
the potential to produce flowers and fruit in 2020 for harvest
in 2021 — thus, you are trying to maximize summer flush
growth with pruning done now.
You are always trying to balance three types of branches in
the avocado tree:
• Those currently producing fruit
• Those that will flower and produce next year’s crop
• Those that will grow this year and flower next year to
produce a crop two years from now
Maximizing Fruiting Potential
The primary reason for growing avocado trees is fruit pro-
duction, and all cultural activities should be focused on maxi-
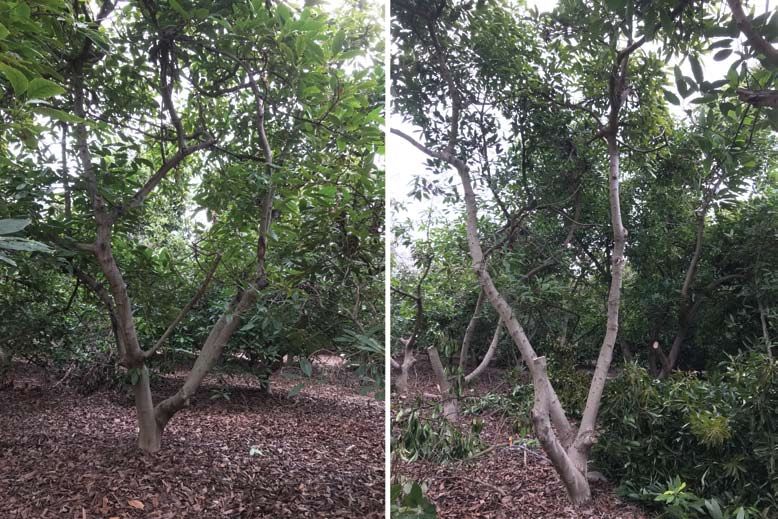
mizing fruit production. Pruning is no exception. Numerous Figure 1. Examples of different tree structural issues, including
pruning trials over the years have shown that maximum yields scaffold limbs too low to the ground (A), limbs crossing through the
are achieved from very large (30-feet tall or larger) trees center of the canopy (B), and crossing limbs (C).
18 / From the Grove / Spring 2019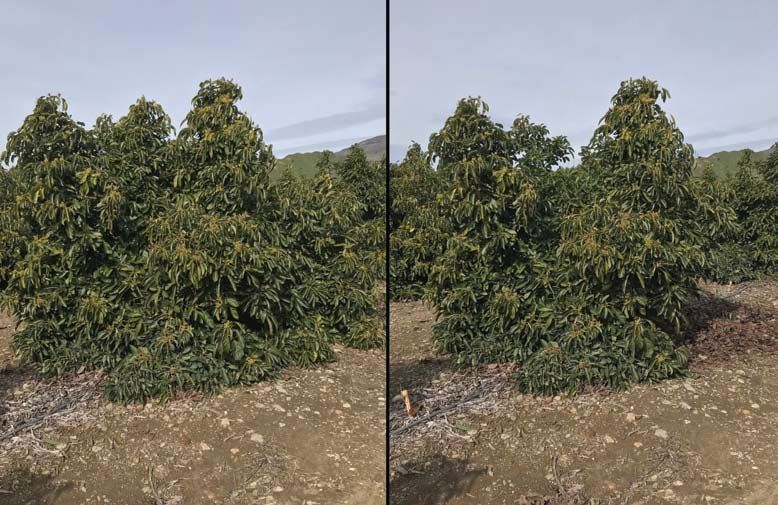
Figure 2. A large tree (left) that lost all lower branches causing productivity to be on the canopy periphery very high off the ground. Trees
in this state need to be rejuvenated either through traditional stumping or over a period of a several years by removing one limb at a time
(right).

widely spaced. But the economics of producing avocados in                    It’s difficult to answer these questions in isolation from one
the 21st century dictate that we must do things differently.              another, so we’ll tackle them collectively. Looking for where
   There is one key objective to any pruning program and that’s           there is current fruit production or lack thereof will help you
light penetration. Poor light penetration into an avocado tree            know where you can expect fruit production next year. Fruit
canopy causes the interior and lower branches to die off and              suppresses the development of flower buds on a branch. A
pushes fruit production to the exterior of the canopy. Why                heavily fruiting branch this year likely had a small summer flush
have a 25-feet tall tree, that’s 20-feet wide, if fruit is only           last year and has a low probability of flowering and producing
being produced on a few feet of the canopy periphery?                     fruit for next year. Therefore, you can start to see where your
   Flower production and fruiting will occur where there is               potential fruiting branches are for next year by seeing where
light. The key to maintaining productive trees of smaller stat-           the fruit isn’t this year.
ure and more closely spaced than was the historical norm is to               Now that you’ve identified those branches that have the
ensure light penetration throughout the canopy.                           potential to flower and produce fruit for next year, look at
   When you approach a tree to begin pruning ask yourself                 where they are located in the canopy. Are they heavily shaded
these questions:                                                          by other branches or will they become heavily shaded as other
    • Where do I have fruit production on this tree?                      branches grow? You need some shading to prevent sunburn
    • Where do I have flowering potential for fruit                       on the fruit, but too much shade will result in lower fruit set
       production next year?                                              and potentially smaller fruit size.
    • Which branches are shading other branches within the                   Next, consider where your summer flush will be coming
       canopy?                                                            from this year. Summer flush growth is where next year’s
    • How is the tree you’re about to prune affecting or                  flower buds will be produced. You can help direct where this
       being affected by neighboring trees?                               growth occurs by making strategic pruning cuts to expose

                                                                                                                Spring 2019   / From the Grove /   19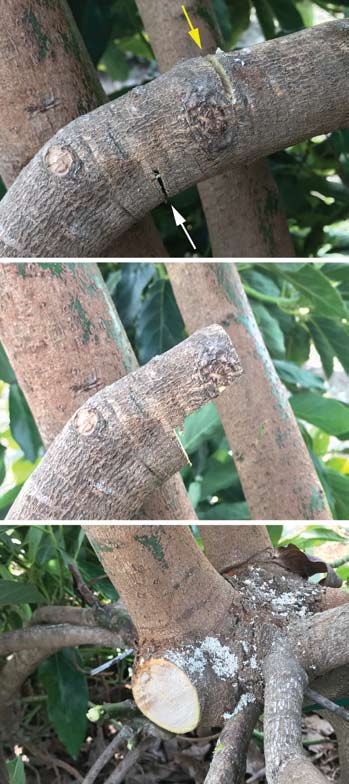
Figure 3. A 4-year-old Hass tree on Toro Canyon rootstock before pruning (left) and after pruning (right). Note how the width of the tree
has been adjusted (lower right of each image) and the center has been opened to allow light penetration. This was achieved with two pruning
cuts (see Figure 4).

shaded areas to sunlight and encourage new growth. By mak-             portant to consider your management objectives. For many
ing strategic pruning cuts that allow light into the canopy in-        growers today, a primary objective is to reduce or eliminate
terior, you are maintaining shoot growth and flowering poten-          the use of ladders. Thus, a tree height of not more than about
tial, thus making the most of the tree’s “real estate.”                15 feet is ideal for harvesting from the ground using picking
   And while you’re considering shading, look to the neigh-            poles.
boring trees and determine how the tree you’re pruning is
influencing or being influenced by those adjacent trees. A             Correcting Tree Structural Issues
very tall limb casting a shadow is probably a good candidate              Avocado trees are typically not trained like peaches, apples
for removal.                                                           or most other tree crops. Often, trees are planted and they
                                                                       are left alone until they begin to crowd — then pruning be-
Control Tree Size for Ease of Harvest                                  comes a necessity. Usually, at this point some corrective ac-
   The general rule of thumb in any orchard is that tree height        tion will be needed to fix issues with basic tree structure. This
should not exceed 80 percent of the row spacing. For exam-             can include, but isn’t limited to:
ple, for rows spaced 20-feet apart the trees should not exceed             • Scaffold limbs originating too low to the ground
16 feet: 20 x 0.80 = 16. This spacing-to-height relationship               • Competing central leaders (if a central leader is your
ensures that direct sunlight can reach the lowest limbs on the               objective)
tree as the sun moves across the sky, assuming your rows are               • Crossing limbs or branches crossing through the center
oriented north-south.                                                        of the tree
   This rule of thumb goes out the window for growing trees               Pruning cuts to correct these types of structural issues
on slopes where rows may not go north-south or the entire              should be made before any other cuts are made.
hillside may not face due south. In those cases, it’s more im-

20   / From the Grove /   Spring 2019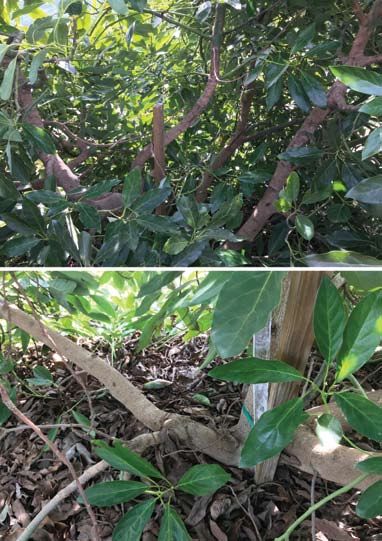
Figure 4. The interior of the 4-year-old tree shown in Figure 3 (top).
Note how the interior shoots are already beginning to die-off due
to shading and the there is minimal production in the center of the
tree. Also note the limb that curves through the center of the tree
from left to right. A scaffold limb arising at ground level (bottom)
has grown horizontally trying to find light. Removal of the limb
crossing through the center of the tree and the low scaffold limb
achieved the results shown in Figure 3.

Putting it all Together
   So, you’ve studied your tree and corrected any structural
issues, now what? Consider how to achieve everything you
want to achieve with the fewest cuts possible. Is there one
tall branch shooting straight up? This is a good candidate to
remove because it helps you manage tree height and reduces               Figure 5. Large branches (>1-inch diameter) should always be
shading within the tree and on adjacent trees. Similarly, look           pruned using the 3-cut method. Begin by making an under-
                                                                         cut about one-third of the way through the branch from
for branches protruding out of the side of the canopy that
                                                                         the underside of the branch (top photo, white arrow). Next,
have a good chance of breaking or dragging on the ground if              make a cut from the top of the branch about 1 to 2 inches
heavily loaded with fruit. Remember, a couple of larger cuts             beyond (toward the end of the branch) the under-cut (top
are quicker and more economical than many small cuts.                    photo, yellow arrow). As the top cut is made, gravity will pull
   It may not be possible to get to where you want to be in one          the branch down, breaking it between the two cuts (center
season, but there’s always next year. What’s important is that           photo). Finish by removing the remaining stub with a clean
you have a clear objective in mind when you begin pruning and            cut at the branch collar. Following the 3-cut method ensures
work toward that objective over time.                                    that the final cut can be made cleanly with no bark tear out.

                                                                                                       Spring 2019   / From the Grove /   21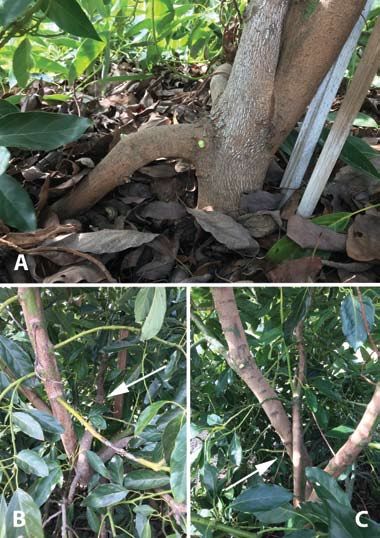
You can also read