PHILIPPINE NATIONAL BANK - INTERNET BANKING USER GUIDE
←
→
Page content transcription
If your browser does not render page correctly, please read the page content below
PHILIPPINE NATIONAL BANK
    INTERNET BANKING
        USER GUIDE

                           1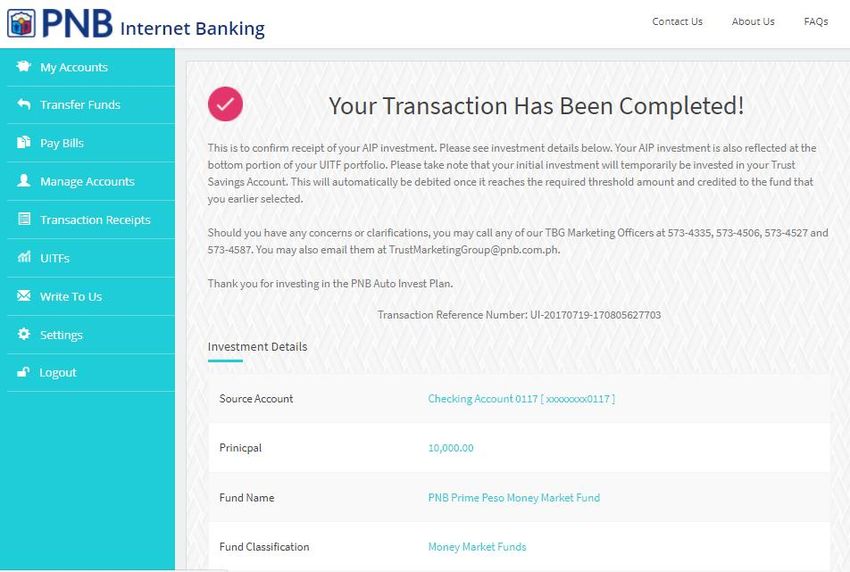
CONTENTS
Enrollment ........................................................................................................................................................3
Login ....................................................................................................................................................................8
Add Other Deposit and Credit Card Accounts..........................................................................9
Account Inquiry ......................................................................................................................................... 13
Funds Transfer ........................................................................................................................................... 16
Bills Payment............................................................................................................................................... 22
Manage Payments and Transfers .................................................................................................. 25
Checkbook Reorder ................................................................................................................................. 31
Transaction Receipts .............................................................................................................................. 32
UITF ................................................................................................................................................................... 33
Settings ........................................................................................................................................................... 45
Log Out............................................................................................................................................................ 46

                                                                                                                                                                        2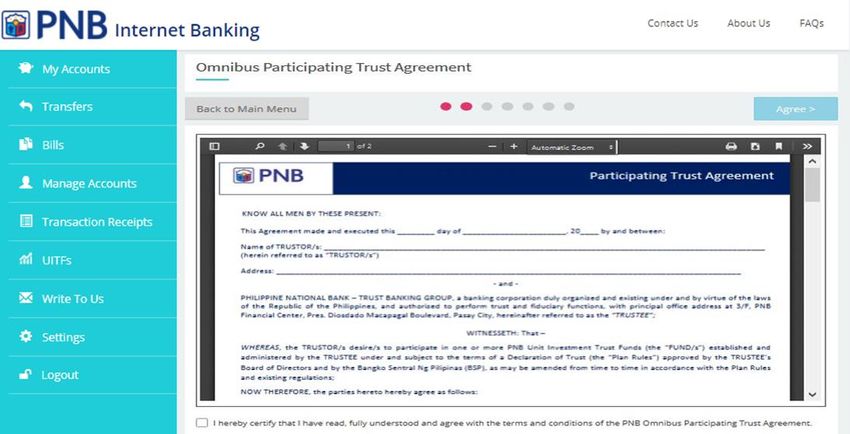
1   Enrollment
          There are two ways to enroll for bank customers.

     In the PNB Internet Banking home page, click Sign Up

      You shall be directed to the Terms and Conditions page.

      After reading the agreement, click AGREE

                                                                3
Sign-Up using an ATM Card

For all individual ATM accounts only

         In the ATM Card Details page, choose the type of account to be enrolled
         then input the valid Card Number and PIN. Then click Continue located
         at the upper right corner of the page.

                                                                                   4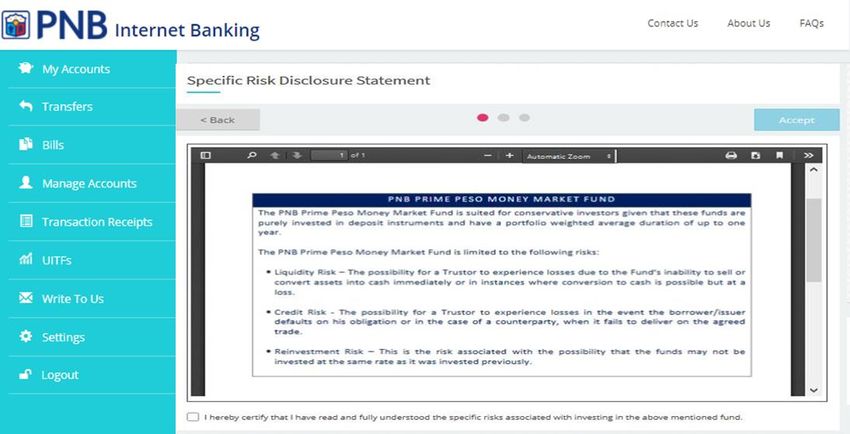
Fill out the Login Details correctly. Ensure that your mobile number and
email address are correct. Click Continue.

* Password must be eight characters including one upper-case letter,
one special character and alphanumeric characters.

Enter the 6-digit One Time Password (OTP) which will be sent to your
registered mobile number. Click Continue.

                                                                           5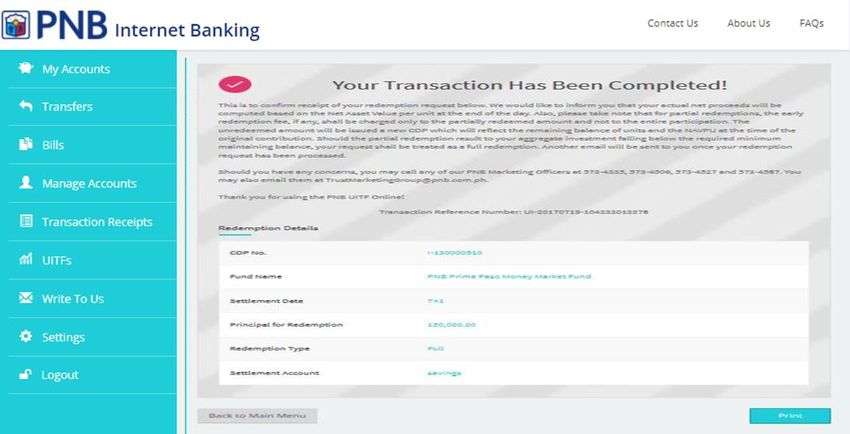
A confirmation page shall appear to acknowledge that your account has
        been enrolled successfully.

Sign-Up using an SMS PIN - Branch enrollment

For all Non-ATM, Joint/Or and Pensioner accounts

        Go to the nearest PNB branch to request for Digital Banking Enrollment
        via SMS PIN. You will be required to fill up the Electronic Banking
        Enrollment Form.

                                                                                 6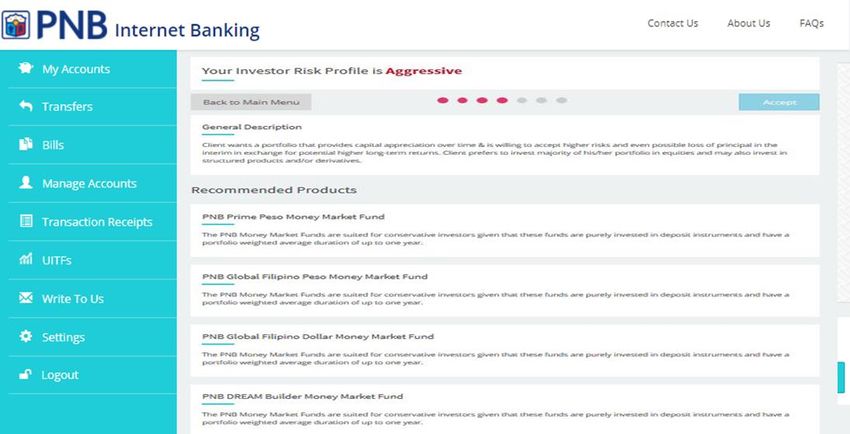
Enter your account number, SMS PIN sent to your registered mobile
number and your mobile number. Then click Continue located at the
upper right corner of the page.

Fill out the Login Details correctly. Ensure that your mobile number and
email address are correct. Click Continue.

* Password must be eight characters including one upper-case letter,
one special character and alphanumeric characters.

                                                                           7
A confirmation page shall appear to acknowledge that your account has
          been enrolled successfully.

2     Login

The first time you log in to PNB Internet Banking, you shall be asked to enter the
Online Activation Code (OAC) sent to your registered e-mail address. Then, click
Continue.

          Once successfully logged-in, PNB Internet Banking, you will be directed
          to the MY ACCOUNTS page.

                                                                                     8
3   Add Other Deposit & Credit Card Accounts

Add Other Deposit Accounts

      In the Account Services top menu, click Add/Remove Accounts.

      Click New Account.

                                                                     9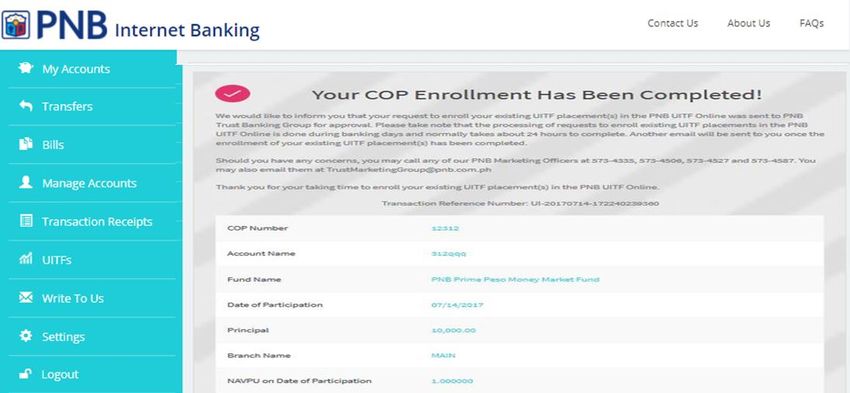
Enter the 6-digit one-time password (OTP) sent through registered
mobile number, then click Continue.

Choose desired account/s from the list of available accounts to be
enrolled.

Click Continue.

                                                                     10
Users shall now be able to view their additional accounts at the MY
ACCOUNTS page.
Add Credit Card Accounts
In the Account Services menu, click Enroll Credit Card.
11Enter your credit card number, card expiry date and date of birth. Click
Continue.
Enter the 6-digit one-time password (OTP) sent through your registered
mobile number with PNB Credit Cards, then click Continue.
Note: If you have more than one card or supplementary, all will
be automatically added in one single enrollment
124 Account Inquiry
Deposit Accounts
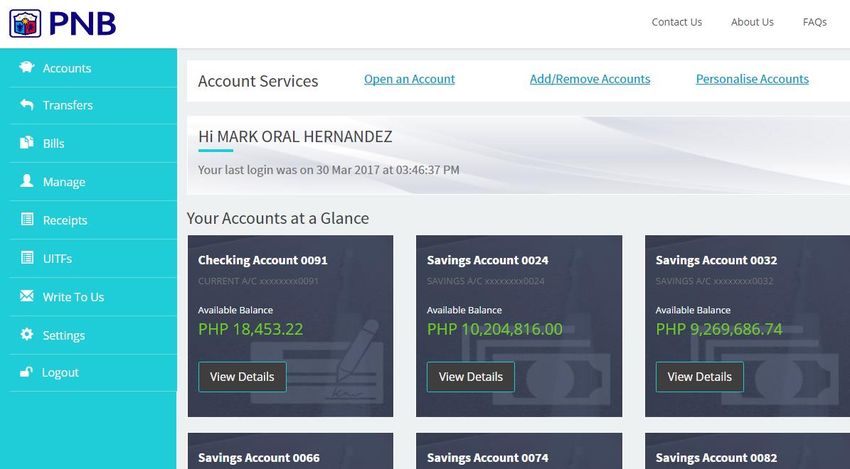
The MY ACCOUNTS page contains the list of your enrolled accounts.
Note that only eligible accounts shall be displayed on the screen. For
inquiries, click View Details and check the account summary.
Account Details field includes the Account Number, Account Type,
Account Name, Available Balance, Current Balance, and Currency.
13The Transaction History of the account may be viewed by scrolling down
the page.
Credit Card Accounts
The MY ACCOUNTS page contains the list of all your credit card
accounts. You will be able to view the type of card and its available credit
limit. If you have more than one card, the aggregate available limit will
be displayed on top. For inquiries, click View Details.
14Account Details field includes the following:
Available Limit
Outstanding Balance
Last Payment Amount
Last Payment Posted
Minimum Amount Due
Payment Due Date
Statement Date
Total Amount Due
You will be able to view your Statement and Unbilled Transactions by
scrolling down the page.
155 Funds Transfer
Transfer to Own Account
In the Main Menu, click TRANSFERS. Select the source account to be
debited.
Choose the destination account to be credited.
16Enter the amount to be transferred as well as the remarks. See to it that
the amount entered is within the available balance of the source account.
Click Continue.
Optional: You may click on Repeat to set recurring transfers.
17Review the transaction details. If the details are correct, click Done.
Otherwise, you can go back to make the necessary adjustments.
Confirmation page shall appear to acknowledge that the transfer has
been successful.
18Transfer to 3rd Party PNB Account
In the Main Menu, click TRANSFERS. Select the source account to be
debited.
Go to Other Accounts and click New Payee
19Enter the Third-Party Account Number and Alias. By clicking the “Save
Payee to List”, information about the payee shall be saved for future
transfers. Click Continue.
Enter the amount to be transferred as well as the remarks. See to it that
the amount entered is within the available balance of the source account.
Click Continue.
20Review the transaction details. If the details are correct, click Done.
Otherwise, you can go back to make the necessary adjustments. Enter
the One Time Password (OTP), which shall be sent to your registered
mobile number. Click Continue.
Confirmation page shall appear to acknowledge that the transfer has
been successful
216 Bills Payment
In the Main Menu, click Bills. Select the source account to be debited.
You shall be directed to My Billers field. Click NEW BILLER
22You shall then be provided with a list of available billers. Enter the Biller’s
Name, then select one.
Enter the Subscriber Number and Alias. By clicking the “Save Biller to
List” button to the right, information about the biller shall be saved for
future payment. Then, click Continue
23Enter the amount of to be paid and remarks. Click Continue
Confirm details before finalizing the transaction. If the details are correct,
click Done.
Enter the One Time Password (OTP), which shall be sent to your
registered mobile number. Click Continue.
24This page shall appear to confirm the payment. This also displays the
summary of the transaction made.
You will receive an email confirmation for every successful bills
payment
7 Manage Payments and Transfers
The Manage Accounts page will enable you to view and edit your saved
payees/billers as well as your scheduled payments/transfers.
25Adding Payees
Click New Payee
Enter account details. Click Continue
26Confirm details and click Save
Payee account has been successfully saved and added to your list.
You have to option to modify and delete this record.
27Adding Billers
Click New Biller
Select Merchant from list
28Enter account details. Click Continue
Confirm details and click Save
29Merchant has been successfully saved and added to your list.
You have the option to modify and delete this record.
Managing Scheduled Payments/Transfers
You have the option to delete any saved recurring payments or transfers.
308 Checkbook Reorder
In the MY ACCOUNTS page, click View Details of your checking
account.
Click the Services button at the upper right and in the dropdown menu,
click Order Check Book.
31You shall be directed to the ORDER CHECK page where the details of
the transaction should be filled out.
Select the number of checkbooks to be ordered. Note that a maximum of
10 may be ordered.
The checks may be picked up from your branch of account. You may also
input the name of the representative who shall pick up the checkbook(s).
Review the details entered then click Order
9 Transaction Receipts
By using this feature, you shall be able to monitor all your online
transactions.
32Selecting a particular transaction shall allow you to see more details
about the transaction selected.
10 UITF
Enroll New UITF
Click UITFs, and then Enroll in UITF Online
33Read and Agree to the terms and conditions of the PNB UITF Online
Service Agreement.
Read and Agree to the terms and conditions of the Omnibus Participating
Trust Agreement.
34Accomplish the UITF Client Suitability Assessment (CSA) Form and click
Submit.
Click the Accept button to indicate acceptance of your resulting risk
profile and the recommended UITF products.
35Read and Agree to the terms and conditions of the General Risk
Disclosure Statement.
Nominate your settlement account.
You must nominate a peso settlement account if you intend to invest in a
peso-denominated UITF or a dollar settlement account if you want to
invest in a dollar-denominated UITF. Click Continue.
36Optional: Accomplish the short survey. Click Submit
You shall be prompted that your UITF Online enrollment has been
completed.
If you wish to enroll an existing UITF participation that was opened in the
branch, click Yes. Otherwise click No.
37Enroll Existing UITF
Clicking on “Enroll Existing UITF Placement” in the UITF submenu
Input the required details found in your Confirmation of Participation
(COP) issued by your maintaining branch. Click Continue
38Review COP enrollment information. Click Confirm
You shall be prompted that your UITF Online enrollment has been
completed.
Note: Your old COP will be invalidated and will be replaced by an
electronic COP. All enrolled UITF participations may only be redeemed
via online.
You may no longer go to the branch and redeem the said participation.
39PNB Trust Banking Group shall process all enrollment requests within the
24-hour commitment period (exclusive of regular, special non-working
and other holidays and weekends).
Once approved, your enrolled existing UITF placement shall appear in
your account portfolio in PNB Internet Banking.
Make a Direct Investment
In the UITF Menu, click “Make an Investment”
Select the UITF product you wish to invest. Click Invest and then Direct
Investment.
40Read and Agree to the terms and conditions of the Specific Risk
Disclosure Statement.
Note: This will only appear during your initial investment in the fund.
Select your Source Account and enter the amount you wish to participate
(Principal). Click Continue.
41Click Continue once you have confirmed your investment details.
You shall be prompted that your UITF investment transaction is
complete. You will receive an email once your Confirmation of
Participation (COP) containing details of your placement becomes
available.
42Auto Investment Plan
If you selected the Auto Investment Plan (AIP), a Trust Savings
Account (TSA) is automatically created by the system upon AIP
subscription. Your funds will temporarily be lodged in the TSA which will
automatically be swept/debited for automatic investment to a UITF of
your choice once it reaches the required threshold amount.
The AIP facility is initially available to selected UITF products.
Redemption
Select the UITF Participation that you wish to redeem and click Redeem.
You can choose either Full or Partial Redemption.
43Click Continue once you have confirmed your redemption details.
You shall be prompted that your redemption request is complete.
Note that only redemption requests received within the cut-off time of
11:00AM shall be considered as transaction for the day.
44Other Services
In the UITF menu, you can Update your Client Suitability
Assessment and Update your Settlement Account or View your
Redemption History.
You can also access more information on PNB UITFs by clicking Learn
More About PNB UITFs.
11 Settings
If you wish to change your password, click SETTINGS in the main menu.
Then click Change Password
45You shall be asked to fill out the required fields and then click Done
12 Log Out
You may LOG OUT by choosing it in the menu.
Note: Being idle for 5 minutes while logged in to PNB Internet Banking
shall prompt the system to log you out automatically.
46You can also read