American Express Corporate Purchasing Point
←
→
Page content transcription
If your browser does not render page correctly, please read the page content below
American Express®
                                       Corporate Purchasing Point

                                         Merchant Administration Portal
                                                  User Guide

Issued by American Express International Inc. and its related bodies corporate including: American Express Australia Limited (ABN 92 108 952 085),
American Express International Inc. (NZ), American Express International Inc. (Singapore), American Express International Inc. (HK), American
Express International Inc. (Japan), American Express International Inc. (Taiwan), American Express (Thai) Co Ltd, and American Express Bank Ltd.
© Copyright 2013 American Express International Inc. All rights reserved.
Disclaimer – Content is correct as at Sep 2013. Information in this document is subject to change without notice and does not represent a
commitment on the part of any American Express Company.

                                                                                                                                                 1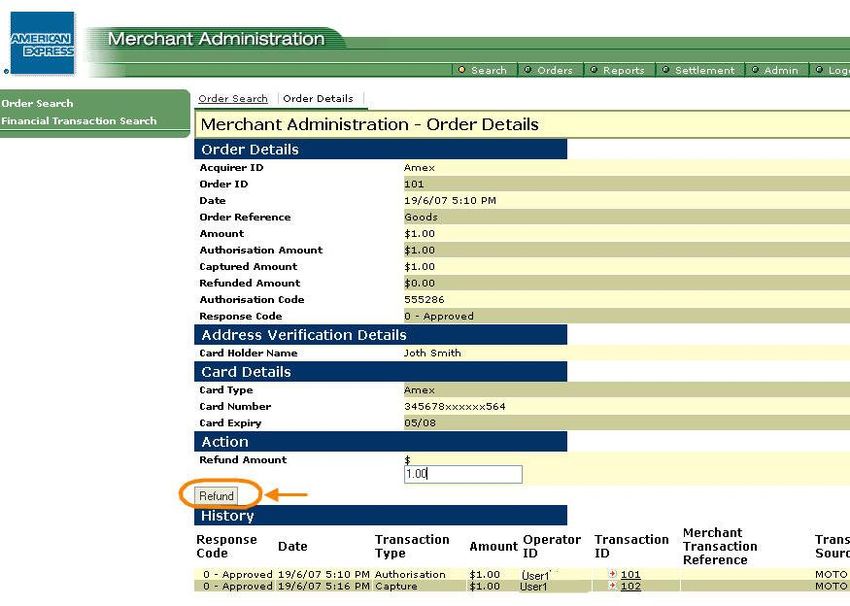
Contents
1. INTRODUCTION ........................................................................................................................................... 3

2. LOG IN .......................................................................................................................................................... 4

3. AUTHORISE ................................................................................................................................................. 5

4. CAPTURE ..................................................................................................................................................... 5

5. REFUNDS OR CREDITS .............................................................................................................................. 6

6. SETTLE......................................................................................................................................................... 7

           Confirming batch settlement status                                                                                                                       8

7. RETRIEVING REPORTS .............................................................................................................................. 8

8. USER ADMINISTRATION ............................................................................................................................. 9

           Adding New Operator Accounts                                                                                                                             9

           Modifying existing operators                                                                                                                           10

           Unlocking Operator Password                                                                                                                            10

                                                                                                                                                                    2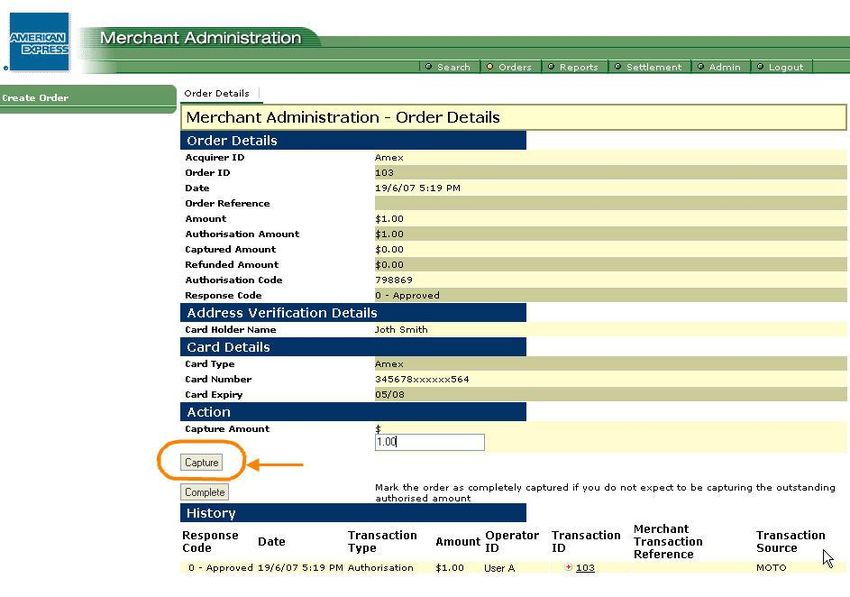
1. Introduction
American Express Corporate Purchasing Point delivers simple, cost-effective & real-time transaction processing.
American Express CPP allows you to perform the same transaction processing functions as a physical credit card terminal
in Card Not Present scenarios. You will need a functioning Internet connection to use the American Express CPP product.
When you receive an order from a customer requesting payment via an American Express Card, you can use this system
to authorise, capture and settle the order payment cost efficiently over the internet. To ensure you receive payment for
your transaction, three steps need to be completed:
1) Authorise the transaction
2) Capture the transaction
3) Settle the transaction
Important Unless all steps indicated above are completed, the transaction will not be processed and payment will not
occur.
Note: With the exception of merchants in the Japanese market, as a default, all American Express CPP accounts are
setup to “auto-settle” at end-of-day. This means that you DO NOT have to perform the third step yourself manually
(although there is no harm if you do perform manual settlement). If you are unsure of the setting for your service or if
you would like to change the setting to “manual settlement” please contact your local American Express representative.
Processing a CPP transaction is simple. The following pages will
take you through each of these steps:
Log in
Authorise a transaction
Capture a transaction
Refund or credit (if required)
Retrieving a report
3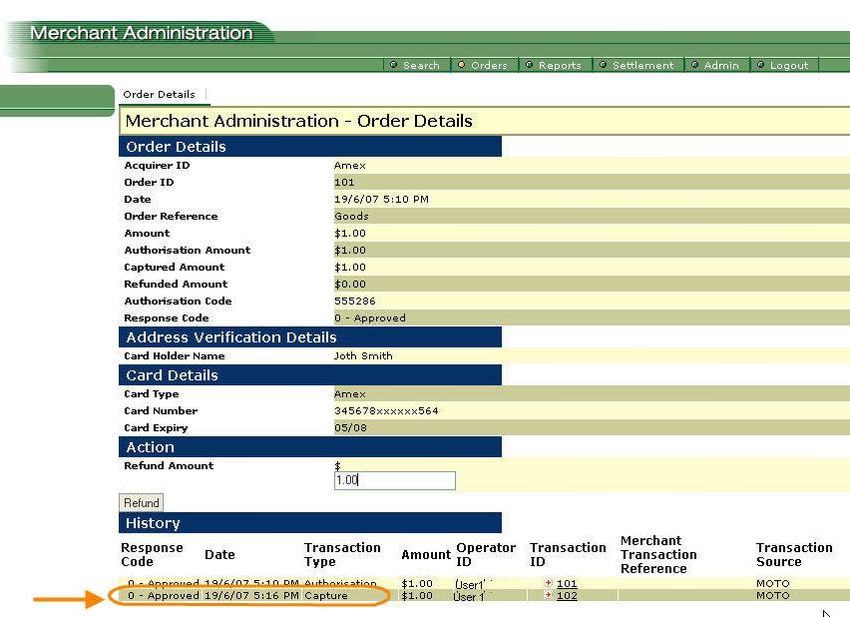
2. Log in
Important Note to Administrators
The initial credentials sent by Amex should be reserved as the Administrator credentials and cannot be used to generate
transactions.
As Administrator, one of your first tasks is to use the initial credentials to log-in to the system and create additional
credentials for each user/operator in your organisation requiring access to the Corporate Purchasing Point service/portal
to generate transactions.
(Please refer to Section 8: User Administration of this guide).
The Merchant Administration portal is a powerful tool which provides you a single port of call to process
transactions/refunds, administer users and even generate reports for your transactions.
Important On each of the screens, a red asterisk in the field indicates a mandatory data field.
To log-in, go to https://vpos.amxvpos.com/ma/ and enter your credentials:
Merchant ID
User name
Password
For security reasons, you are only allowed three login attempts. After three unsuccessful attempts, your access to the
system will be denied.
To regain access to your account, please contact the designated administrator in your company.
Try to avoid this inconvenience by keeping a copy of your log in details in a safe place.
If the Administrator is locked out, you need to contact technical support. Please allow 24 hours for your access privileges
to be reset.
4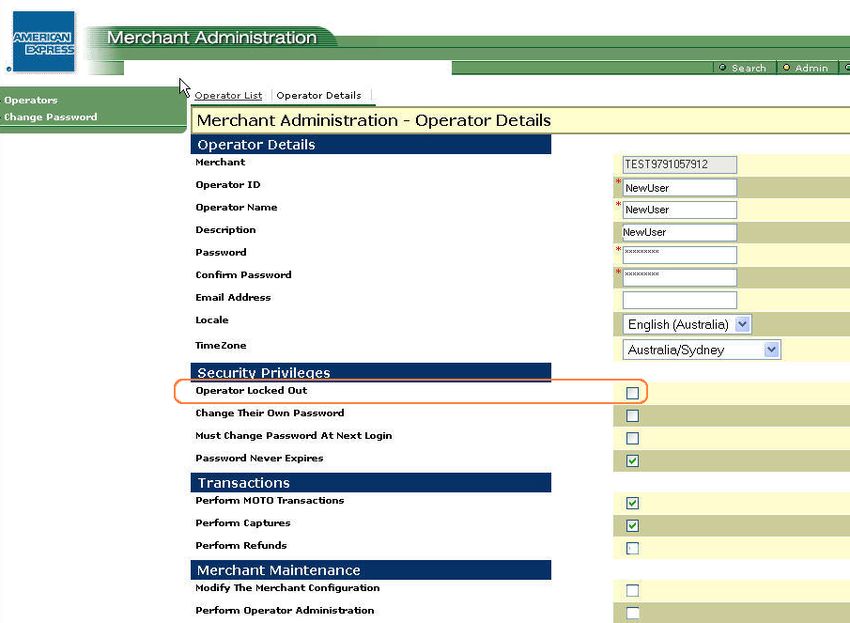
3. Authorise
To process an order, begin by authorising the transaction.

                                                                 Step 1
                                                                 On the Home page, select “Orders” from the top
                                                                 menu bar.
                                                                 Select “Create Order” from the left-hand menu bar.

                                                                 Step 2
                                                                 On the Create Order Entry page (pictured), type the
                                                                 appropriate information in the required fields.

                                                                 Step 3
                                                                 Click “Submit.” You will then receive either a
                                                                 transaction approved or transaction declined page.

                                                                 Transaction approved
                                                                 If your transaction has been approved, proceed to
                                                                 “Capture” the transaction for payment.
                                                                 Note: as an option, you can also capture an authorised
                                                                 transaction at a later date.

                                                                 Transaction declined
                                                                 If your transaction has been declined, you will need to
                                                                 contact American Express Authorisations. (Contact
                                                                 details are supplied with your Merchant Agreement.)

4. Capture
Capture sends authorised transactions into a batch in preparation for submission to American Express.

                                                                 Step 1

                                                                 Following transaction approval, you can proceed to
                                                                 immediately capture the transaction. Confirm the
                                                                 order details on screen prior to the capture process.

                                                                 Step 2

                                                                 Press “Capture Now” to capture the transaction.

                                                                                                                         5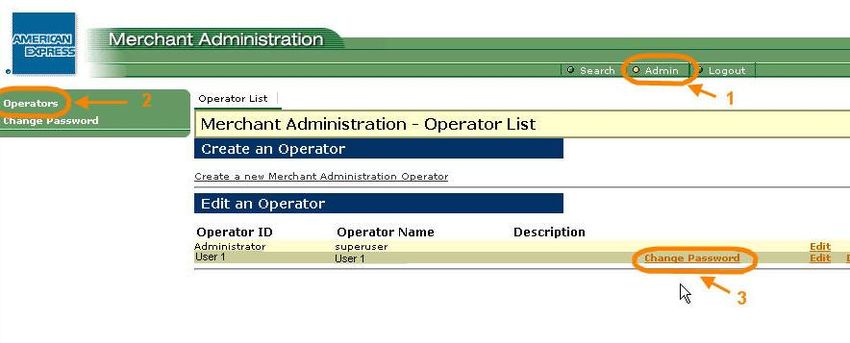
Note: you may see an alternative screen layout
                                                                  pictured on the left for the Capture screen when you
                                                                  perform a capture some time after the Authorisation
                                                                  request (instead of capturing immediately after the
                                                                  Authorisation).

                                                                  Press “Capture” to capture the transaction previously
                                                                  Authorised.

                                                                  WARNING
                                                                  DO NOT press the “Complete” Button. This will flag
                                                                  the transaction as not requiring any further
                                                                  processing, thus you will be unable to capture the
                                                                  transaction.

                                                                  Step 3

                                                                  Once the capture process is attempted, the “History”
                                                                  area will be updated with further details.

5. Refunds or Credits
Refunds or credits can only be processed once a transaction has been captured successfully. First, you will need to locate
the transaction you want to refund.

                                                                  Step 1
                                                                  Select “Transactions” in the top navigation bar.

                                                                  Step 2
                                                                  Select “Order Search” in the left-hand menu bar.

                                                                  Step 3
                                                                  Type in the Search field to locate the transaction to be
                                                                  refunded/credited.
                                                                  Press “Submit” to search for the transaction.

                                                                                                                         6
Step 4
                                                                    Now select the Order ID number to proceed with the
                                                                    refund/credit.

                                                                    Step 5
                                                                    You will be taken to the Order Details page.
                                                                    To process a full refund or credit, click “Refund.”
                                                                    Successful refunds will be updated in the History area
                                                                    on the bottom of the page.

6. Settle
The Settlement screen allows you to view the set of orders that have been billed to the customer and whether those
orders have been submitted to American Express for processing and payment.

Note: With the exception of merchants in the Japanese market, as a default, all American Express CPP accounts are
setup to “auto-settle” at the local market end-of-day. This means that you DO NOT have to perform the settlement
manually yourself. If you are unsure of the setting for your service or if you would like to change the setting to “manual
settlement” please contact your local American Express representative.

To settle a batch of transactions manually, select the “Settlement” tab in the top navigation bar. This will take you to the
Settlement page, where you can begin the process of manually settling a batch of transactions.

                                                                 Step 1
                                                                 Select “Settlement” from the top menu bar.

                                                                 Step 2
                                                                 Select ”Pre-Settlement Summary” this will list any open
                                                                 batches that are available to be settled (This will list all
                                                                 the captured transactions since the last batch was
                                                                 settled). To settle the open batch, click “Settle Now.”

                                                                 Step 3
                                                                 The Batch Closure Receipt will be displayed at the lower
                                                                 portion of the screen.

                                                                                                                                7
Confirming batch settlement status
You can search your settlements by date using the “Settlements” screen.
Step 1
Under ”Settlement Search” tab, type today’s date into
the “Search by Date Range” field and click the
“Submit.”
Step 2
You will now be presented with a Settlement List page
indicating the status of settled batches. If the status is
“OK,” your batch has been settled. If the status is not
returned as “OK,” you will need to contact your local
American Express office (Please refer to your initial
access information email for support contact details).
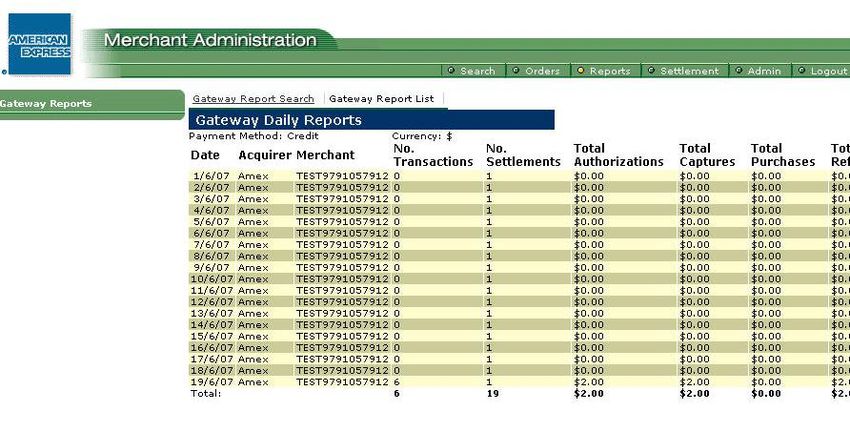
7. Retrieving Reports
You can run transaction reports, over a specified period of time, for a particular time interval (i.e. daily or monthly) using
the Merchant Administration portal
Step 1
Select the “Reports” tab in the top navigation
bar.
Step 2
Select “Gateway Reports” from the left-hand
menu bar.
Step 3
On the Gateway Report page (pictured), type the
dates you wish to run a report for, into the date
range fields.
Step 4
Now select a time interval by which you wish to
group the information in your report. Simply
choose daily, weekly, monthly or yearly from the
dropdown menu.
Note: If you select daily, please choose a small
date range, otherwise the report may take some
time to generate.
8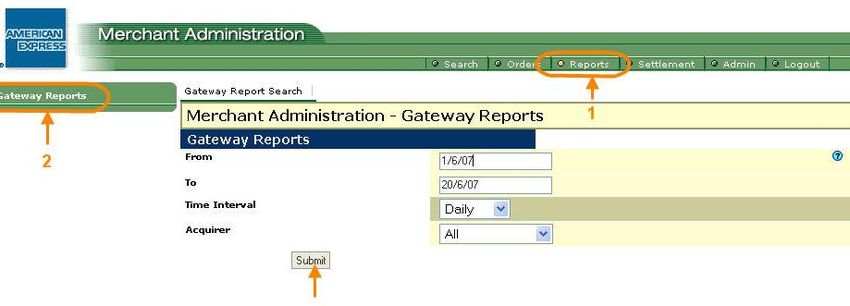
Step 5
Click “Submit.” You will be taken to a page
displaying your report. You can print this report by
using your Internet browser print function.
8. User Administration
With your administrator user ID, you can add/delete operator accounts, modify privileges and manage passwords.
To Administer users begin by logging-in to the Merchant Administration portal using your administrator user ID.
Adding New Operator Accounts
Step 1
Select “Admin” from the top menu bar.
Step 2
Select “Operator” from the left-hand menu bar. The
list of Operator IDs on the account will be listed.
Step 3
To create a new Operator ID, select “Create New
Merchant Administration Operator.”
Step 4
Enter the new operator details to start configuration
Note: Locale & TimeZone should not be changed.
The recommended operator features to enable are:
“Security” section: Password Never Expires
“Transactions” section: Perform MOTO Transactions
Perform Captures
Perform Refunds
“General” section: Perform Settlements
View Report Pages
Advanced Merchant Admin
Features (only for PC/VPC
operators)
View Settlement Pages
9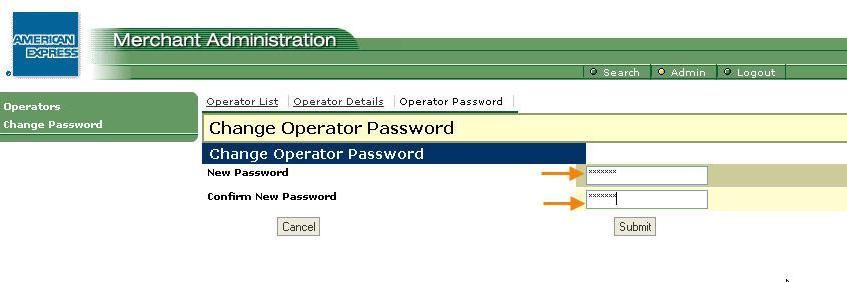
Step 5
Select “Submit” to complete setup.
The operator/user is now ready to process
transactions on your service.
Modifying existing operators
Step 1
Select “Admin” from the top menu bar.
Step 2
Select “Operator” from the left-hand menu bar. The
list of Operator IDs on the account will be listed.
Step 3
Select “Change Password” to change the password.
Select “Edit” to modify operator privileges. Select
“Delete” to remove the operator.
Step 4
Make the necessary changes and select “Submit” to
activate your changes.
Unlocking Operator Password
Step 1
To unlock an operator account, return to the
operator listing and select the operator to unlock.
Step 2
Uncheck the security privilege “Operator Locked
Out,” and click “Submit” at the end of the page to
activate this change.
10You can also read


