Picasa , How to: For Beginners and Intermediates - All of US
←
→
Page content transcription
If your browser does not render page correctly, please read the page content below

Picasa , How to:
         For Beginners and Intermediates

                  All of US

Scott Baty          Mar 2015   CCCGC Monthly Meeting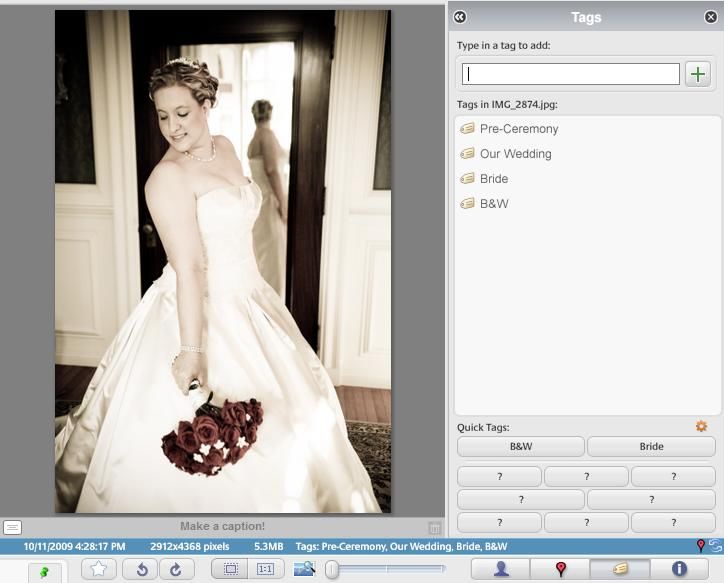
Picasa

    Introduction to Picasa:

       o What is Picasa?

       o What do you need to know to
         use it?

       o What resources do you need
         to run it?
2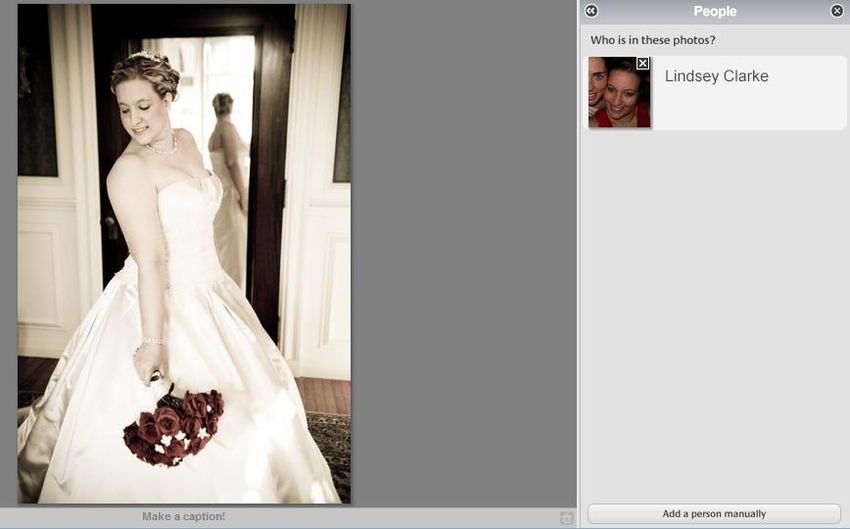
What is Picasa?
Picasa© is a program developed by Google© to provide a
platform for digital photography
It has many features including:
Storage
Organization
Editing
Crafting
Presenting
3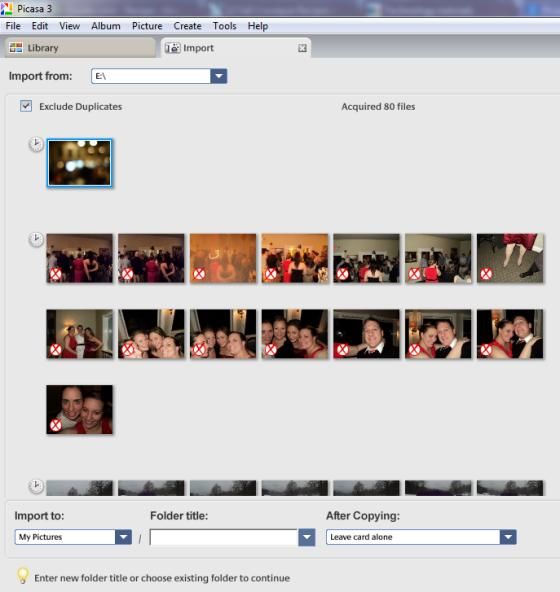
What do you need to know to use it?
While a digital photography novice can use Picasa, the more
knowledge about photography and editing a user has, the
more features will be accessible to them
A user should know basic computer functions like opening
programs, copying and pasting, and intuitively using the right
mouse button to quickly access menu items
4
What resources do you need
to run it?
Picasa requires several resources:
Computer (OS less than 10 years old)
This tutorial is built around a Windows 7 environment. Your
experience may vary based on your unique operating system
Digital Photographs (Photos)
Internet Access
Only necessary for downloading the program and taking advantage of
some intermediate and advanced options/features
Most current version of Adobe Flash (11.6.xx….)
Only for certain advanced features
Available for Download: picasa.google.com
5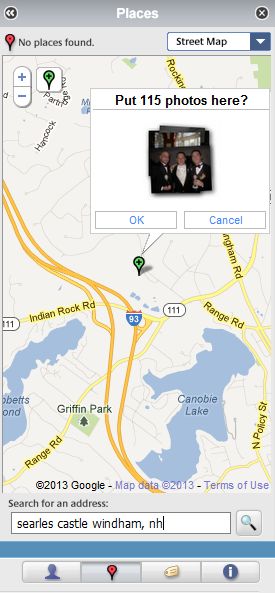
A Person Using Picasa
An individual would use Picasa rather than another program
because:
Relatively easy to use while still providing advanced features
Free Download
Syncs with social media
Organizes photos
6Additionally
Archive events and programs
Create presentable materials
Generate interest and visibility for future programs
Provides outreach through today’s growing social media
environment
7A Club or Group
Archiving and cataloging photographic collections
Turns photographic collections into searchable entities through:
Metadata
Subject Heading Tagging
Facial Recognition Tagging
GeoTagging
8How to use Picasa: A Practical Example
How would a person go from taking photos
from a camera to a finished edited product
capable of web publishing and printing?
Picasa
9How to use Picasa: A Practical Example
o Add/Organize
o Metadata
o Edits and Effects
Picasa
o Projects
o Share and Manage
101. Add/Organize
Photos can be added from many locations
Camera
Memory Stick
Scanner
Already on computer in different folder
Files can be imported the same way for any device
External Hard Drive
Picture Cd/ DVD
111. Add/Organize
Import using the Import Button which is always located near
the upper left corner of the screen:
121. Add/Organize
This will open a panel on the left with many options that looks
like this:
13This
option
ensures
Use this that if a
to select picture is
the already on
source of your
your computer
media to it will not
upload. add it a
In this second
case we time
are
selecting This Icon
pictures appears on
from the pictures
E: Drive that will
be
excluded
14The
“Import
To:” Box is
how you
select the
destination
of the The
pictures. If “After
you leave Copying”
the “Folder box
Title:” explains
empty it will what to do
default to with the
the “Import memory
to:” folder. card after
Use the the photos
“Folder are moved
Title:” to
create a
new folder
15When you are finished select the import all
button to complete the import process.
161. Add/Organize
Sometimes photos on the memory card are from multiple
events and should be stored separately.
Picasa allows you to distribute your photos to multiple albums
To do so select a photo or group of photos using standard
Windows multi-select rules
171. Add/Organize
Right click any of the selection and choose “Add to Album” as
below:
You can add to an existing album (like “Screensaver” above)
You can add to a New Album and name it in the same window
18How to use Picasa: A Practical Example
1. Add/Organize
2. Metadata
3. Edits and Effects
4. Projects Picasa
5. Share and Manage
192. Metadata
There are 3 main types of Metadata you can edit:
People Tagging
Geo Tagging
Subject Heading Tagging
You can also display the fixed Metadata for a particular
picture such as the camera name/type and settings used like
ISO for each individual photo
202. Metadata
There is a button for each Metadata Type
People Geo Subject Fixed
Tagging Headings
212. Metadata - People
Google uses its facial recognition software to scan every
picture uploaded
• Here you can see that it
recognized me from
other pictures on my
computer Typing in
the name of
a person will
yield a list
• There is an option to of known
manually add a person people to
that is not automatically select from
recognized
222. Metadata – Geo Tagging
Select the places button, then type the address in
the box
Uses Google Maps to provide locations like:
Cities
Addresses
Venues
Any location in Google’s Databases
Select “OK” when complete
232. Metadata – Subject Headings Add labels to a picture for easy searching later Used like LC Subject Headings except with an uncontrolled vocabulary 24
2. Metadata –              Subject Headings

                                   Add new Tags by typing
                                   a name in this box then
                                   hitting enter

      Or select pre-existing
      tags by clicking any of
      these buttons

25
2. Metadata – Time and Date In the Tools menu you can use the “Adjust Time and Date Settings” to alter the temporal metadata related to when the picture was taken, not uploaded 26
How to use Picasa: A Practical Example

 1. Add/Organize
 2. Metadata
 3. Edits and Effects
 4. Projects                          Picasa
 5. Share and Manage

27
3. Edits and Effects
Now that we have imported the pictures and assigned the appropriate
Metadata, it is time to edit any photographs necessary
There are various tools for:
Beginners
Intermediates
Filters for Any User Level
No advanced photo editing tools like Photoshop
283. Edits and Effects To edit any photo, simply double click it in the default album display 29
3. Edits and Effects –
     Beginners
            There are many
           general options
           Like:
           Cropping:
           Trimming edges
           off a picture
           Straighten:
           Align the horizon
           within the picture
           with the borders
           around it
           Redeye:
           Automatically
           remove redeye
           from people within
           a picture
30
3. Edits and Effects –
Beginners
There are also some
prebuilt automatic
editing buttons
Auto Color:
Fixes color problems
without affecting
brightness
Auto Contrast:
Fixes lighting
problems without
affecting colors
I’m Feeling Lucky:
Completes both other
auto functions to
optimize the balance
of a picture’s colors
31 and lighting3. Edits and Effects -
Intermediate
Finally you can
perform some more
complex editing
Text:
Allows you to add text
to a photo
Retouch:
Allows you to spot
correct blemishes by
selecting an area of
the picture to edit,
then another area to
blend it with
323. Edits and Effects -
Intermediate
Intermediate usage has some extra
features that allow you to individually
alter lighting, color, shadows and fills
using slide bars
Select the lighting tab to access
these features
333. Edits and Effects -
Filters
Many Filters are available similar to
Instagram©
Google will apply the filter as a
preview in each box so a user doesn’t
need to apply it to see its affect
There are three tabs of Filters
343. Edits and Effects
Although Picasa will not save over your original picture, even if you edit
it, you should save your picture using the “Save As” option
Enables you to select a location
Enables you to select a custom name for this edited version
35How to use Picasa: A Practical Example 1. Add/Organize 2. Metadata 3. Edits and Effects 4. Projects Picasa 5. Share and Manage 36
4. Projects Picasa has several options for creating arts and crafts effects with a picture, or groups of pictures This allows for creative editing and fun Using these tools a user can create a finished product for personal or professional use 37
4. Projects – Creative Kit
A pop-up Dialogue Box will
inform you that Creative Kit
is web based and ask that
Creative Kit is selectable from before
you confirm
the main editing side bar
proceeding
It requires the most recent
version of Adobe Flash© to
use
Allows for clip art to be added
to, and manipulated in, a photo
384. Projects – Creative Kit A new bar will open to the left of the photo with new options There are different and more severe filters that change the whole photo There are also some TouchUp tools that allow spot editing 39
4. Projects – Creative Kit There are also some silly tools that allow free drawing with different specialized tool brushes Some can be drawn in with the cursor like “Fake Beard” Some can be dropped onto the photo and manipulated like “Beards” 40
4. Projects Creative Kit
– Example:
A Purrfect
There are also some silly tools that allow
free drawing with different specialized
tool brushes
Some can be drawn in with the cursor like
“Fake Beard”
Some can be dropped onto the photo and
manipulated like “Beards”
414. Projects – Creative Kit Creative Kit offers graphics that are not traditional, more like fun stickers Speech Bubbles and Face Paint can also liven up a picture 42
4. Projects – Collages Picasa offers several options for making a collage. Picasa makes a collage by randomly assigning pictures from a group a user selects into one of several premade patterns A user should then balance the pictures by selecting and moving them within the pattern 43
4. Projects – Collages To create a collage select “Create” from the menu, then select “Picture Collage” This will open a new tab with a collage editing bar on the left 44
4. Projects – Collages Now you will need to select the type of pattern your collage should take Selecting between them will show you the results in real time to see how they compare visually Lets see how the Picture Pile looks 45
4. Projects – Collages As you can see it left a lot of whitespace around the edges, and also cut the heads off of some people! 46
4. Projects – Collages From here you will need to edit the collage. You can select any photograph and move and rotate it. You can right click the photograph and change its depth so it is on top or on the bottom 47
4. Projects – Collages You can also shuffle or scramble the pictures in the collage by using the button on the bottom 48
4. Projects – Collages
The collage toolbar allows you to set the:
Border type
Background color or image
Aspect Ratio
Orientation
Add Shadows
Show previously added captions
When you are done select “Create
Collage”
49How to use Picasa: A Practical Example 1. Add/Organize 2. Metadata 3. Edits and Effects 4. Projects Picasa 5. Share and Manage 50
5. Share and Manage Picasa has many methods of sharing your photos or projects and managing the security involved in the displaying of the final product The basic tool of emailing and printing are available through buttons always located on the bottom of the screen 51
5. Share and Manage Export will take a custom subset of photos in an album you created, containing photos from various folders on your computer, and adds a copy of each to a single folder on your computer 52
5. Share and Manage In the File menu there is an “Order Prints…” menu option that will automatically export your photos, albums, or projects to a number of different online photo printing companies 53
5. Share and Manage Google used to maintain Picasaweb.Google.com This free photo webhosting service has instead been merged into Google+ Syncing you photos with Google+ allows the user to access all of their photos across any device or computer by logging into their account This does not automatically share your photos with the world, as opposed to Facebook 54
5. Share and Manage
Sharing a photo on Google+ is a separate action from Syncing
Syncing your photos (Private, only you can see your photos from any
computer or device you are logged into)
Can be shared via Link (Public, anyone with link can view it)
A PW protected Link (Semi-Private, need link and password to access)
With specific people or groups of people as limited by your “Circles” (Private
to only specific individuals)
555. Share and Manage
Another method of sharing is create
a slide show
A user can:
order the slides by dragging them
Change Transition Style
Add music to the movie
Coordinate the music with the
pictures
565. Share and Manage
Once the slide show is complete a
user can:
Select Create Movie and it will create
a movie file on your computer
Select YouTube and it will use your
Google Account to directly upload the
video to YouTube
575. Share and Manage Picasa also has a feature to allow your photos to be shared on the internet using a private webhost by exporting an album directly to HTML formatting Right click on any album and select Export as HTML Page… 58
5. Share and Manage Picasa automatically generates as many HTML pages as necessary to display all the pictures in Album. It writes the code in each to navigate between the pictures It offers a few basic styles for a user to select from 59
5. Share and Manage Picasa automatically generates as many HTML pages as necessary to display all the pictures in Album. It writes the code in each to navigate between the pictures It offers a few basic styles for a user to select from 60
5. Share and Manage The output is a folder that just needs to get cut or copied onto your webspace 61
Practical Example Using all the steps just outlined you are able to create a webpage of organized and edited pictures as well as a collage 62
Where to go?
               What to Do?
                Questions?

     It’s Up To You With     Picasa

63
You can also read