PINCH POTS FOR BEGINNERS - The Art Center
←
→
Page content transcription
If your browser does not render page correctly, please read the page content below
PINCH POTS FOR BEGINNERS

Pinch pots are the ideal project for newcomers to do hand-building with clay; perfecting this
technique is a fantastic way to start developing your clay-craft skills.
Materials used can be either wedge clay or self-hardening clay.
Most tutors will start with people making pinch pots to get a feel for the clay and to develop a
sensitivity to the material and its working properties. It is a relatively simple technique because
it’s an instinctive way of handling the material, but nevertheless requires practice to perfect. This
project teaches you the basic making techniques, with lots of tips for success and development.

Practical tip to get started
A small amount of clay will pinch out a long way, and this technique generally is not suitable for
very large amounts. As you gain experience, you will find that you can increase the amount of
clay you use. Start with an amount that will sit comfortably in the palm of your hand. If you want
to duplicate a shape, weigh the clay before you start and keep a record for the next pot.
If you have younger students, focus on the main steps to create the pot.

Materials:
Clay or Self-hardening clay
Credit card
Wooden spoon
Optional Surform, clay rib or kidney

Step by step - Pinch pots

Form a small amount of well-prepared clay into a smooth ball that will fit into the palm of your
hand – weigh it if you want to make several pots of the same size.
Press the thumb of the other hand down through the center of the clay until you can feel some
pressure in the palm of the hand.

The cutaway shows where the thumb should be, inside the clay.

Use your fingers and crooked thumb to pinch out the shape from the bottom of the ball first.
Work in small, close pinching movements, rotating the clay in the palm of the hand in a rhythmic
action to even out the marks made as you thin-out the wall.

The cutaway shows the crooked position of the thumb, which helps prevent the rim opening out
too quickly. It is important to keep the rim of the pot quite thick and as closed as possible at this
stage. This will prevent the wall from flaring out too quickly and becoming misshaped, and stop
the rim tearing or cracking.
Change the position of your hands so that the fingers are inside and thumb outside and pinch
the wall upward and outward in stages. Work the whole form to even thickness first, then again,
a little thinner, and so on.

The cutaway shows the new position of the fingers.

When you’re happy with the shape of the body, begin to refine the rim – working in small, even
pinches to thin it to your requirements between finger and thumb.
Using a small kidney to scrape and smooth the inner surface to remove lumps and bumps, keep
the pot supported in the palm of your hand as you work. The credit card kidney is perfect for this
job because it can be cut to the exact size required.

If the pot seems too floppy and won’t hold its shape, dry the clay off a little inside and out with a
hairdryer.

Place the pot rim down on a board then carefully scrape the surface with a metal kidney / old
credit card to again even out the wall and remove any lumps and bumps.

If you need to refine the shape of the pot, paddle the walls into the required shape with a
wooden spatula.
Tip: You can paddle the walls in this way to change the shape of the whole pot once it’s been
pinched to the correct size.

Making a foot ring:

Roll a coil of clay to a thickness that will balance with the size of your pot. Coil it into a ring and
lap the ends over each other. Cut through both ends on a diagonal then score and slip the cuts
end and join the piece of clay together. Smooth over the join with fingers or wooden tool.

Mark the correct position for the foot ring on the base of the pot using a pin to score around the
edge of the ring. Score and slip the underside of the ring and the marked position, then join the
two together.

Carefully secure the ring to the base by blending the clay as shown.
Turn the pot over and carefully level the rim using a Surform or credit card – for some reason
this can be a very satisfying exercise and it is easy to get carried away and remove too much
clay – you may need to restrain yourself a little!
Once level – work on the rim with a clay kidney tool / credit card to smooth and round the edges
Rims are very important because they lead the eye into the rest of the form. It’s the first thing
you see, therefore it’s vital that it’s finished well, to balance with the rest of the form. Ironically,
this doesn’t mean the rim has to be finely engineered in all cases, because organic, unrefined
rims suit many forms, but it is important to match the rim to the function of the pot.
Pinching the rim out thinly will almost certainly result in a wavy line that will give the form an
attractive, organic-looking finish if you want an alternative to the finish on this pot.
Place the pot rim down on a board then carefully scrape the surface with a metal kidney/credit
card to again even out the wall and remove any lumps and bumps. You can repeat this with a
rubber kidney to smooth it if required.
Images courtesy of John Crouch
HOW TO MAKE A COIL POT – Air Dry Clay

Step One
Take a small piece of clay about the size of a plum.
Roll it into a ball.
Place the ball on the plastic placemat.

Press down with the heel of your hand to flatten it into a circle.
It should be about as thick as your small finger.
This will be the base of your pot.

Step Two

Take a small amount of clay and squeeze it into a long sausage shape.
Spread your fingers and apply even pressure as you roll the clay into a long cylinder.
Keep the thickness of the coil even and round.

Step Three
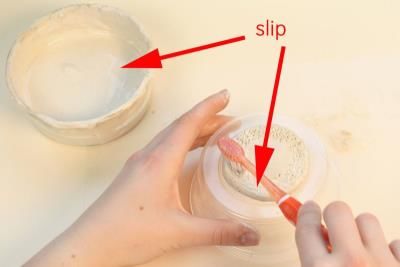
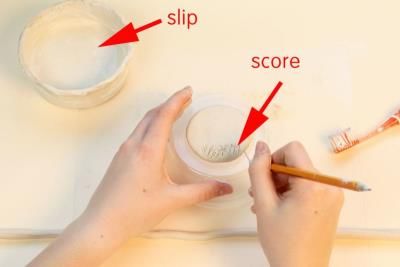
Roll several long, smooth coils and place them aside.

Step Four

Place the clay base on an upside-down plastic container.
Use a pin tool to make some scratch marks on the outer edge of the base.
- make a pin tool by taping an open paperclip to the end of a pencil
This is called SCORING the clay.

Step Five

Use a toothbrush to apply slip to the score marks.
- make SLIP by mixing some clay with water until it is like a creamy milkshake
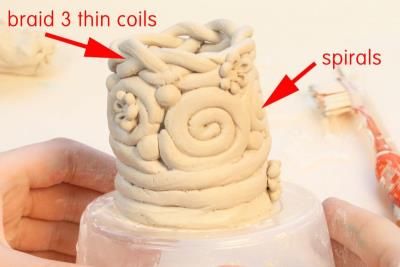
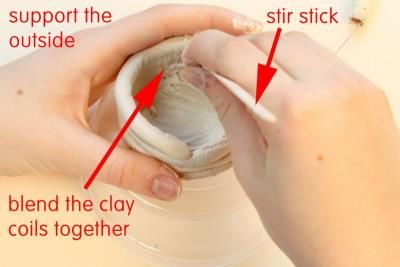
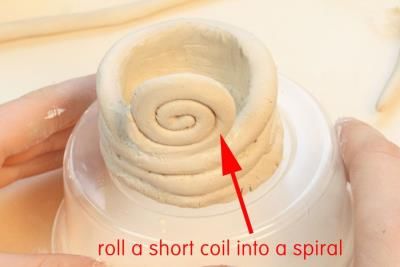
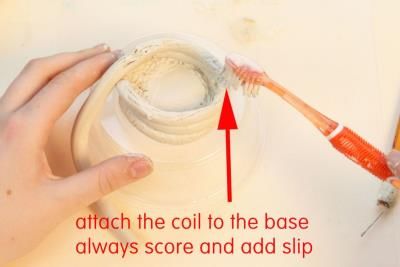
Step Six

Place the coil on top of the scored clay.
Gently wind the coil around the outer edge of the base.
Make sure you blend each end of the clay coil into the clay.

Step Seven

Continue adding coils, attaching one to another using the score and slip technique.
Blend the coils together on the inside of your pot.
Use the end of a stir stick to blend the clay coils.
Support the outside of the pot with one hand when you are smoothing the inside

Step Eight

Use coils to make decorative elements on your pot.
- roll a short coil into a spiral
- attach it using score and slip technique
Step Nine

When you are satisfied with your design set the pot aside and allow it to dry for about one week.
It will be white when it is dry and ready to be painted.
Images courtesy of John Couch
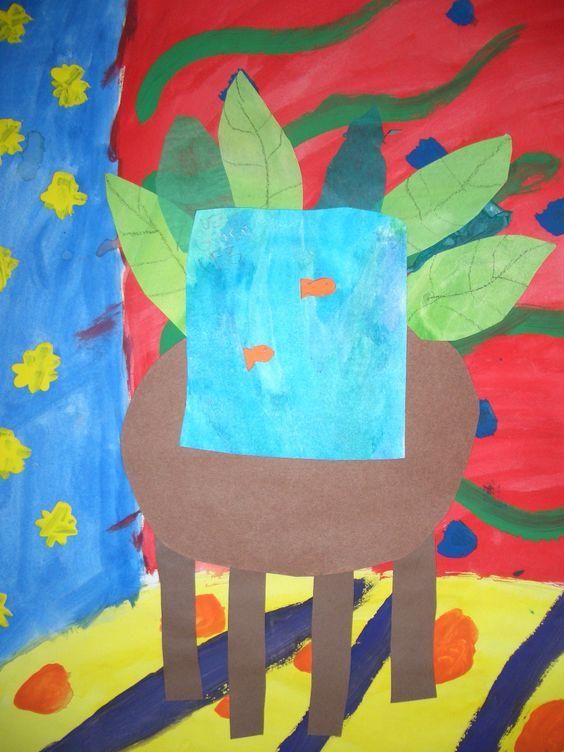
Henry Mattise

COLLAGE
A collage is a piece of art that is made by sticking mixed materials, such as paper and fabric,
down on to another surface. Collage has endless possibilities.
What you will need:
card
selection of collage materials: colored and patterned paper, fabric, maps, music scores etc.
scissors
glue/glue stick
pencil
paint or pens (optional)

Choosing your image
Begin by deciding what kind of collage art you want to create.
Do you want to make a realistic picture, where your art looks like something in the real world?
Or do you want to create an abstract picture, where you might focus on shapes and patterns?
How will you compose your picture? How will you lay out your design card: with a focal point to
catch the eye? Will you have materials across your page, or will you focus in one or two thirds of
your card? Will you fill your page with materials or leave lots of blank, negative space?
You might like to draw the outline of your image with a pencil first, and then use your materials
to fill in the space, or you can decide where to place things as your picture develops. It’s up to
you!
Using color
What colors will you use for your collage? This will depend on the collage materials you have
available but remember that you can add extra color and pattern by drawing or painting on the
pieces of paper you use.
Will you use lots of different colors in your collage or focus on just one or two? You could make
a black and white collage, or one made of shades of green.
Adding texture
The delight of using mixed media to make a collage is that you can add all sorts of texture to
your art by selecting materials that are different: smooth paper, shiny card, rough sandpaper,
soft fabric, metallic foil… You can fold, crumple, mark, and cut your materials to add extra
texture too.
You might like to use scissors to cut out shapes to use in your art or tear the papers with your
hands. Try both and see which you prefer.
You might like to lay out all the pieces of your collage before you stick them in place with glue,
or stick as you go, building up your picture piece by piece.
All these creative decisions that you make are what makes your art unique and special to you.
JUNK SCULPTURE – ASSEMBLAGE
Assemblage is a form of sculpture comprised of "found" objects arranged in such a way that
they create an art piece.
What you need:
Collect some upcycle, recycled, or junk (whatever your preference is in terms). Plastic lids, old
jewelry, small toys, material, thin wood, bottle caps, egg cartons, tinfoil, paper towel rolls all
work great. Let your imagination run wild. Your only concern is to watch for sharp objects and
collect age appropriate material for your students; meaning, the older they are, the more metal
items you can give them. Put it out in a couple tubes or piles.
A base: thin wood square, heavy cardboard or matboard.
Glue (age appropriate); school, tacky glue, low and hot glue, tape

Let’s get started:
Have the students think of a subject or idea that they want to express in their junk sculpture
/assemblage; this gives them a focus and starting point for their sculpture. Explain the term
abstract to them. In this regards, abstract has no recognizable relationship with visible reality. It
uses shape, color and line to create the reality.
Students will get a base to form their sculpture on.
Next they will go to the pile or tubes and pick out items they will like to use. Students seem to
like the process of seeing different items that are possibilities for their sculpture.
Let them start gluing and creating their sculpture.
In the next class period, have a sharing session and allow the students to talk about their
pieces. This will give your students a chance to hear about other students’ thought processes
and also allows students to express their imagination and creativity.
SOFT PASTEL LESSON

Materials:
White or colored drawing paper
Chalk pastels
Pencil
Hairspray
Subject example: magazine pictures or photos of animals (even stuffed animals)
Ask students to bring a photo or magazine clipping of their favorite animal or stuffed animal.

Let’s get started:
Draw a horizon line and sketch the animal lightly with a pencil on your paper. Color it with a light
pastel.
Tell students how to work with chalk pastels by working light to dark. You must color lightly and
then smudge the chalk with your fingers. The students don’t want to produce too much powder,
because they won’t be able to smudge it. Have the students notice the different color they see in
their animal; they may use more than one color and smudge them together. Tell students about
light and show them lighter and darker parts of the animal. Use white pastel to lighten up parts
of the animal and black pastel to darken colors and make shadows.
Use hairspray as a fixative to stop pastel from rubbing off the paper.
TIN FOIL SCULPTURE
Let’s get started:
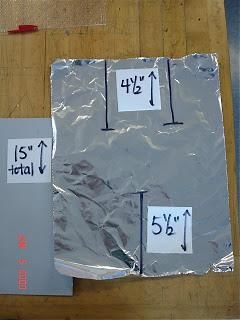
Take a piece of aluminum foil (12" wide) and cut it to be 15 " in length. Mark the foil at the top
and bottom with a sharpie create 2 lines that are 4 ½ in length on top and 5 ½ in length on the
bottom in the center. Have a space of 2 inch between the lines .
Cut slits where lines are marked. (2 at the top to make arm and head areas and 1 at the
bottom for the 2 legs.
Grab the foil in the center and smoosh inward to make the 'waist' area:
Squeeze together each leg and each arm to make more of a cylinder shape:
.Take the foil in the head area and start rolling it forward and crunching it at the same time. This will allow the head to have a 'chin' area. Continue smooshing the foil to thin out the arms and legs, etc. and shape the head. Manipulate the foil by pressing on it to make areas thinner and to get a proportional body shape. Bend the guy into any position you want to. Then, add some clothes with additional pieces of foil. You may have to glue some things in place. To make hats, you pressed a circle or oval of foil on a wooden bead that was about the size of the head to use as a form, and then pulled it off and glued it onto the head. For a skirt, cut out a circle of foil, cut out another small circle in the center of it and cut a slit into it to slip it onto the waist of the foil person. Then ‘hemmed' it, just by folding the foil under to give it more strength, and then played with it to get the folds and shape desired. You take this project and add to it ; let your imagination take over. Images courtesy of John Couch
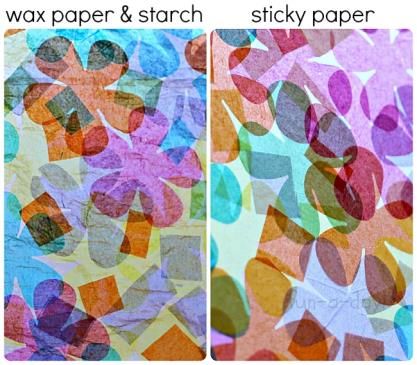
HOW TO MAKE TISSUE PAPER STAINED GLASS - 2 WAYS

Materials:
Tissue paper in various colors
Wax paper
Liquid starch or watered glue
Paintbrushes
Contact paper or wax paper

Set Up
Start out by cutting some squares or any shape out of tissue paper. (squares, triangles, flowers,
oval). You will need more than you think! Amount will vary on how large you make your tissue
stained glass piece.

Show some examples of stain glass.

Tissue Paper Stained Glass Art Technique #1
Begin by taping a large piece of wax paper (you can determine size) to a table. Then place out
bowls of liquid starch or watered-down glue, along with paintbrushes.
Model how to use the materials by painting a little bit of liquid starch/ watered down glue onto
the wax paper. Then add a tissue paper shape and add a bit more liquid starch on top. Layer
the tissue paper on wax paper.
Tissue Paper Stained Glass Art Technique #2
For this version of the art activity, you’ll want a large piece of Contact paper (you can determine
size). Tape a piece to a table, with the sticky side facing up. Set out the tissue paper shapes,
and then sit back and watch the students create. Since the paper was already sticky, the
students just use their fingers to place the tissue paper onto it.
You can also read