Planting & Care Instructions - Colorblends
←
→
Page content transcription
If your browser does not render page correctly, please read the page content below
Planting & Care Instructions
Upon Arrival
• Open all boxes and crates and remove the bags of bulbs so air can get to them.
  As you take the bags from the packages, check them against the packing list.
• Plant as soon as possible. Unless you specified a particular delivery week, your
  bulbs have been shipped at the appropriate time for planting in your area. Get
  them in the ground as soon as you can.
• If you can’t plant right away, you can keep the bulbs for a week or two in a dry,
  cool place with good air circulation. Temperatures between 50° and 60°F are
  ideal, but your bulbs should be fine within a range of 35°–75°F.
Important: Bulbs must be planted this fall

Choosing a Site
There are two key considerations when choosing a site for bulbs.
1: Sunlight. Most bulbs need ample sunshine to bloom well next spring and to
  store up the energy required to flower in future springs. Some bulbs — including
  crocuses and scillas — can be planted beneath deciduous trees; these bulbs
  are able to satisfy most of their light needs before the trees leaf out. (Specific
  requirements are provided in this pamphlet for each kind of bulb we offer.)
2: Drainage. All bulbs need good drainage; never plant bulbs where water
  collects. The drainage of heavy clay soils can be improved by digging in
  organic matter such as compost or composted manure.

Planting
There are two principal ways of planting bulbs.
1: Planting a bed. Excavate the area to be planted and loosen the soil in the
  bottom. Set the bulbs in the bed. Replace the soil (gently at first, to avoid
  knocking the bulbs out of position). If the soil is dry, water thoroughly.
2: Planting bulbs individually. Dig a hole with a trowel, auger or bulb planter.
  Drop the bulb (or bulbs — small bulbs such as those of eranthis and anemones
  can be planted in threes, fours or more) into the hole. Replace the soil. If the soil
  is dry, water thoroughly after planting.
Note: Don’t worry too much about which end is up on a bulb. Bulbs know to send
shoots up and roots down. They will grow and bloom even if you plant them
upside down.

1 (888) 847 8637                                                  colorblends.com

Watering
Bulbs need ample moisture from fall, when they make new roots, until they finish
flowering in spring. If the soil is dry at planting time, water thoroughly after
planting. Thereafter water only if rainfall is scarce. Stop watering after the bulbs
bloom. Supplemental irrigation after bloom — especially in the Deep South — may
cause bulbs to rot.
Fertilizing
The bulbs we ship already have next year’s flowers set inside them, so there’s no
need to fertilize at planting time. If you intend for your bulbs to be long-term
players in your landscape, you may want to fertilize them in early spring, when the
shoots begin to push through the soil. We suggest that you have your soil tested
first to identify any nutrient deficiencies and that you correct those deficiencies
with an organic fertilizer, which will release nutrients slowly. Most bulbs are not
heavy feeders. You can generally do without fertilizer entirely if you mulch your
bulbs with 2–3 inches of an organic material such as compost, shredded bark, aged
wood chips, pine straw or shredded leaves, and freshen it annually.
Note: If you use mulch, you can reduce the planting depth for your bulbs. The
denser the mulch, the greater the reduction, but as a rule of thumb, 2 inches of
mulch is equivalent to 1 inch of soil.
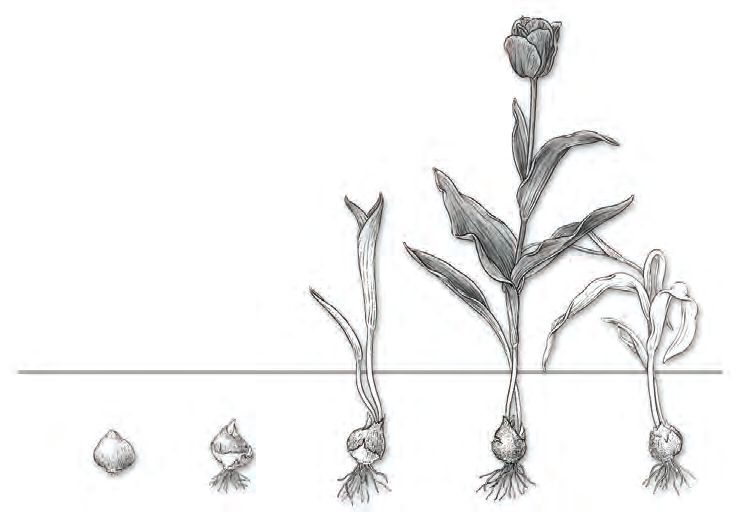
Caring for Your Bulbs After They Bloom
After your bulbs bloom, you may remove the spent flowers or seed heads if they
are unsightly. In the case of tulips, removing the seed heads may also help to
encourage the bulbs to flower again the following
year. Do NOT cut the leaves. You must allow the
foliage to die back naturally (spring-flowering bulbs
go dormant in summer, reappearing the following
spring). If you cut, braid or tie up the foliage before it
yellows and withers, you prevent the bulbs from
storing up the energy they will need to grow and
bloom again the following year. Of course,
if you intend to lift and discard bulbs
after they bloom and plant new
bulbs in the fall, there’s no need
Illustration: Bobbi Angell
to wait for the foliage to yellow.
Bulb growth cycle
early late early spring early
fall fall spring summer
2Alliums Sun: Planting depth: see bag label Spacing: see bag label Plant in full sun or light shade and well-drained soil. Sandy soil is ideal. Allium leaves begin to yellow by the time the flowers open. You can disguise the foliage by planting large alliums behind or among bushy perennials or shrubs, and small alliums among low-growing perennials. The flower heads of Globemaster and Christophii remain attractive for a time even after the color drains away. They can be left in the garden or cut and dried for use in indoor arrangements. Anemone (windflowers) Sun: Planting depth: 2˝ Spacing: 2˝ apart Prefers dappled shade in most climates; will tolerate full sun in northern regions. Grows best in soil that has been loosened before planting. It’s hard to tell top from bottom on anemone tubers, but it doesn’t matter which end is up: The tubers know to send shoots up and roots down. To speed planting, you can put several tubers in a single planting hole. Camassia Sun: Planting depth: 6˝ Spacing: 5˝ apart Plant in full sun or light shade and evenly moist soil. Camassias are among the few bulbs that thrive in damp, or even wet, soil. Foliage is slow to die back in summer; do not cut before it has completely yellowed and collapsed. Chionodoxa (glory of the snow) Sun: Planting depth: 3˝ Spacing: 2˝ apart Full sun or partial shade. Well-drained soil that is not too dry. If left undisturbed, the bulbs may seed themselves about, eventually forming a thick lavender-blue carpet in spring. Chionodoxa can be naturalized in a lawn if you’re willing to hold off on mowing until the seed is dispersed and the foliage begins to yellow. Crocuses Sun: Planting depth: 3˝ Spacing: see bag label Plant in full sun or partial shade and well-drained soil. For earliest bloom, put crocuses in a sunny, protected location — against the south-facing foundation of a house, for example. Can be planted in a lawn if you’re willing to hold off on mowing until the foliage begins to yellow. Daffodils (see Narcissus, page 6) = Full sun (6+ hours sun per day) = Partial shade (3–4 hours sun per day) 3
Eranthis (winter wolf’s bane, winter aconite)                            Sun:
Planting depth:   2˝                           Spacing: 2˝ apart

Best in dappled sunlight and well-drained soil that does not dry out entirely in
summer. It’s hard to tell top from bottom on eranthis tubers, but it doesn’t matter
which end is up: The tubers know to send shoots up and roots down. To speed
planting, you can put several tubers in a single planting hole. If left undisturbed,
eranthis may seed itself about, eventually forming a carpet of bright yellow in
early spring.

Erythronium (trout lily)                                                 Sun:
Planting depth:   4˝                           Spacing: 5˝ apart

Plant in partial shade and evenly moist, woodsy soil. To simulate woodsy soil, dig
plenty of compost or leaf mold into your soil before planting. Mulch after planting
or in spring with compost or shredded leaves to maintain that woodsy quality.

Fritillaria imperialis (crown imperial)                                  Sun:
Planting depth:   6˝                           Spacing: 8˝ apart

Full sun or light shade. Fertile, deeply dug, evenly moist soil. Amend sandy soil
with plenty of compost or leaf mold. These fritillarias are heavy feeders that
benefit from a mulch of composted manure or leaf mold in the fall or a dusting of
bulb fertilizer in early spring.

Fritillaria meleagris (snake’s head)                                     Sun:
Planting depth:   4˝                           Spacing: 3˝ apart

Best in partial shade (will tolerate full sun in northern regions) and evenly moist
soil that doesn’t dry out in summer. This fritillaria can be planted in rough grassy
areas, where it looks very natural. Just be sure you wait to mow until the foliage
begins to yellow.

Galanthus (snowdrops)                                                    Sun:
Planting depth:   3˝                           Spacing: 3˝ apart

Plant in partial shade (will tolerate full sun in northern regions) and loose, rich,
evenly moist soil. Established bulbs may produce leaves in late fall or early winter
but generally wait to flower until the first hint of warmth in early spring. If you
want to relocate snowdrops or divide a clump, the best time to do it is just after
bloom, while the leaves are still green.
Note: Snowdrops suffer from prolonged periods of dry storage; we urge you to get
them into the ground as soon as you receive them.

4         = Full sun (6+ hours sun per day)    = Partial shade (3–4 hours sun per day)
Hyacinthoides (Spanish bluebells)                                         Sun:
Planting depth:   4˝                           Spacing: 4˝ apart

Adaptable bulbs that grow in full sun or shade (as long as it’s not too dense) and in
any well-drained soil that does not dry out completely in summer. In the wild,
they grow on the woodland floor, forming dense colonies in the high shade of
deciduous trees. The same effect can be had in the landscape if the seeds are
allowed to ripen and fall at their parents’ feet.

Hyacinths                                                                 Sun:
Planting depth:   5˝                           Spacing: 5˝ apart

Hyacinths need at least a half day of sun to flower well and store up enough energy
for the following spring’s display. They grow in any well-drained soil. The flower
heads are at their largest and fullest the first spring after planting; in subsequent
years the flowers tend to be more loose and informal.
Note: Hyacinth bulbs can irritate your skin. Wear gloves when handling and plan
on showering soon after planting.

Ipheion (starflower)                                                      Sun:
Planting depth:   2˝                           Spacing: 2˝ apart

Plant in full sun or partial shade and well-drained soil. It’s not unusual for the
foliage of bulbs planted in a prior year to re-emerge in fall. The flowers will open
on schedule the following spring.

Iris                                                                      Sun:
Planting depth:   3˝                           Spacing: 2˝ apart

Iris reticulata requires well-drained soil and full sun, and it likes to be dry in
summer. After bloom, the narrow, grasslike foliage begins to elongate, eventually
standing 12–14˝ tall. It collapses and disappears by early summer.

Save your labels!
We suggest you save
a bag label for each
variety you plant.
You can make notes
in pen or pencil on
the back. When the
bulbs start coming
up in spring, you’ll
have a record of what you planted and where.

   = Full sun (6+ hours sun per day)    = Partial shade (3–4 hours sun per day)         5
Leucojum (snowflakes)                                                       Sun:
Planting depth: 6˝                               Spacing: 5˝ apart

Full sun or partial shade and soil that does not dry out entirely in summer. In the
wild, snowflakes are found in damp meadows and on river banks, so they are a
good choice for a spot where the soil is less than perfectly drained. Bulbs are slow
to go dormant in summer; wait to cut back until the leaves have yellowed.

Muscari (grape hyacinths)                                                       Sun:
Planting depth:     3˝                           Spacing: 2˝ apart

These bulbs thrive in full sun or partial shade and any well-drained soil. Muscari
armeniacum bulbs planted in a prior year often produce tufts of grasslike foliage in
fall, which has the benefit of reminding you where they are when you are planting
additional bulbs. They will bloom on schedule the following spring.
Note: Do not be concerned if you see blue mold on your muscari bulbs. Go ahead
and plant them. The mold will not affect their performance.

Narcissus (daffodils, jonquils)                                                 Sun:
Planting depth: see bag label                    Spacing: see bag label

To get the most from daffodils, follow these 4 basic rules:
1: Plant them where they will get at least 6 hours of direct sunlight,
    even after they have finished flowering and the trees have leafed out.
    Daffodils need lots of sun after they bloom to produce next year’s flowers.
2: Plant them in soil that drains well. Avoid areas where water stands after
    a rain storm.
3: Fertilize very lightly with a low-nitrogen fertilizer, preferably organic,
    just as the shoots emerge from the ground in early spring.
4: After daffodils flower, wait at least 8 weeks — until the leaves turn
   yellow — before cutting them. Never tie or braid daffodil foliage.
    This year’s leaves = next year’s flowers.
If you want to naturalize daffodils (i.e., plant them so that they look as though they
had sprung up on their own), we suggest that you set them out in drifts (not in
blocks or lines) and that you space the bulbs farther apart than recommended on
the bag label (to allow room for the clumps to increase in size). If you want to
naturalize daffodils in a grassy area, you must wait to mow until their foliage has
turned yellow, which means allowing the grass to grow very tall.

Puschkinia (striped squill)                                                     Sun:
Planting depth:     3˝                           Spacing: 2˝ apart

Undemanding bulbs that are happy either in full sun or partial shade. All they
require is well-drained soil.

6          = Full sun (6+ hours sun per day)     = Partial shade (3–4 hours sun per day)
Scilla (blue and white squill) Sun:
Planting depth: 3˝ Spacing: see bag label
Full sun or partial shade. Well-drained soil. Blue squill can self-sow with abandon:
If left undisturbed, a handful of bulbs may eventually become a thick, brilliant
blue carpet in spring. Can be naturalized in a lawn if you’re willing to hold off on
mowing until the seed capsules open and the foliage begins to yellow.
Tulips Sun:
Planting depth: see bag label Spacing: see bag label
Tulips perform best in full sun but will tolerate a bit of shade (some afternoon
shade will prolong flower life, especially in the South). They require well-drained
soil. Treat tulips as annuals if you want a perfect display: After they flower, lift and
discard the bulbs and replant fresh ones in the fall. In a less formal situation, you
can leave the bulbs in place. The flowers will be uneven in size and height and
generally much fewer in number, but that can have its own charm.
To encourage tulips to bloom again in future years we recommend that you:
1: Fertilize the bulbs when the foliage pushes through the soil in early spring.
Don’t overdo it. A light scattering of a low-nitrogen fertilizer, preferably
organic, is enough.
2: Remove the spent flowers as soon as the bulbs finish blooming. Snapping
off the top 3 inches of the flower stem prevents seed formation and focuses
energy instead on bulb growth.
3: Allow the foliage to wither completely before you remove it.
4: Avoid summer irrigation. Tulips prefer to be dry during their dormancy.
Indoor Bulbs
Amaryllis
Plant each bulb in a 7- or 8-inch pot (bulbs may also be clustered in a larger pot). A
terra-cotta pot is a good choice because it helps to counterbalance the weight of the
flowers. Use any commercial potting mix (available at garden centers and home
stores). Plant so that the top one-third to one-half of the bulb is ABOVE the level of
the potting mix. Water thoroughly after planting and set the pot in a sunny
window (south- or west-facing is best). Room temperature (60°–75°F) is ideal — the
warmer the room the faster the bulb will grow.
Water sparingly until growth is clearly under way, then water thoroughly
whenever the surface of the potting mix is dry to the touch. Turn the pot daily to
promote balanced growth (the stems will lean toward the window). In the average
home, flowers will appear 8–12 weeks after planting (Rapido may flower in as little
as 5 weeks after planting). Bloom can be prolonged by moving the bulb to a cool
location at night.
It is possible to get your amaryllis to flower again the following winter. As the
flowers on each stem fade, cut the stem off 2 inches above the top of the bulb. Do
7NOT cut the leaves. Continue to water as needed and begin fertilizing monthly
with a water-soluble houseplant fertilizer (mixed as directed). After the danger of
frost has passed in spring, set the pot outdoors in a shady location. Over the course
of a week or so, gradually increase the bulb’s exposure to sunlight. The bulb needs
lots of sun (ideally more than six hours a day in northern regions) to store up the
energy it needs to flower.
The bulb can be left in its pot, moved to a larger pot or planted (at the same
level) in the ground. Continue to water and fertilize the bulb through summer. In
late summer or fall (some gardeners wait until after the first frost), bring the pot
indoors (or lift the bulb from the soil) and place it in a cool (50°F is ideal), dry
location such as a basement for 8–10 weeks. Then pot the bulb (if necessary) as
directed above and put it in a sunny window.
Paperwhites
Paperwhites can be planted in a commercial potting mix in a conventional pot.
They can also be planted in pebbles in a bowl or similar container that does not
have a drainage hole in the bottom (a clear container allows you to see the water
level). The container should be at least 3 inches deep. Fill the pot or container with
potting mix or pebbles to within 2 inches of the rim. Set the bulbs very closely (it’s
OK if they touch). Cover with additional potting mix or pebbles, leaving just the
necks exposed. Water thoroughly. If you are planting in pebbles, water with care.
The water level should be just below the bottoms of the bulbs. If the bulbs sit in
water, they may rot.
Place the container in a cool (50°F is ideal) place such as a closet or basement.
Cool temperatures stimulate root growth. If you don’t have a cool location, set the
container on the floor away from radiators or heat vents. Check the bulbs
frequently and water as necessary. Do not let the bulbs dry out.
When the bulbs are firmly rooted and growth begins to show (about 2 weeks
after potting), move the container to a sunny window. Water as needed.
Paperwhites in active growth can be very thirsty; they may need to be watered
every 3–4 days. Rotate the container daily to promote balanced growth (the leaves
and stems will lean toward the light). If the plants grow tall and look as though
they may topple, support them with twine and stakes. Florist’s wire can also
be used.
Paperwhites generally bloom 5–6 weeks after planting. You can stagger
plantings to keep the color and fragrance coming. Store unplanted bulbs in a cool
(but not freezing) location.
Paperwhites are frost tender, and it’s difficult to get them to flower well again
indoors. We suggest that you discard the bulbs after they bloom.
0818
1 (888) 847 8637 colorblends.comYou can also read