Present the complete guide to ssl and seo
←
→
Page content transcription
If your browser does not render page correctly, please read the page content below
present
the complete guide
  to ssl and seo
The Complete Guide
to Setting up SSL and SEO
Google recently announced that HTTPS is now being used as a
ranking signal in its search engine algorithm. Websites employing
HTTPS, using a SSL 2048-bit key certificate, are receiving a rankings
boost. At the moment, the boost is minimal, but Google says sites
with HTTPS will likely see even larger rankings boosts in the future.

                 Simply put, SSL (Secure Sockets Layer) is a protocol that encrypts the
    https://     connection between a website and its user. This encryption protects
                 the privacy of the user while also protecting the site and services from
                 attacks. If data integrity and privacy aren’t reason enough to migrate
                 to HTTPS, SSL certificates are also an authentication tool. When a user
                 sees a website’s SSL certificate, they can rest easy knowing the website
                 they are visiting is owned and operated by the entity it claims to be. If
                 Google wants to provide their users with a safe and credible web
                 experience, then it is no wonder they have decided to implement
                 HTTPS as a factor in their search results.

                                                                          2015
                                                                                            0.2548801

Webmasters who want to take advantage of the rankings boost,
                                                                                                        0.933450

                                                                                 0.681963

while simultaneously providing privacy and security to their users,
must now migrate their sites from HTTP to HTTPS. The process of
                                                                                                                   Nam

doing so differs depending on hosting environment and a site’s
needs. Proper server configuration is mandatory, every element of
the site needs to be using HTTPS (Always On SSL), and many other
factors need to be optimized for Google to properly notice the
change. But change is a must, because while Google results are still
primarily derived from credible, high quality and informative con-
tent, Google has admitted they are “working to make the Internet
safer more broadly. A big part of that is making sure that websites
people access from Google are secure.” (Zineb Ait Bahajji and Gary
Illyes) HTTPS is the next step for the Google ranking algorithm, and
it will likely become more and more impactful sooner than later.
Step 1
Choosing the right SSL certificate
for your site
Certificate Validation
There are three different kinds of validation to choose from when picking an SSL certifi-
cate: Domain Validation (DV), Organizational Validation (OV) and Extended Validation
(EV). Each type of validation requires specific verification requirements for a certificate
to be issued.
Domain Validation certificates simply require the purchaser of the certificate to
have access to the website’s administrative email account, therefore identifying the
holder of the DV certificate as the owner-operator of the domain.
Organizational Validation certificates verify not only the domain, but the organi-
zation. For an OV certificate to be issued, the organization must provide outside
proof of the legitimacy of the business. This added level of identity verification is
commonly used by businesses of all sizes because it establishes
a higher level of trust to a site’s visitors.
Extended Validation certificates require the same verification process as an OV
certificate, except the EV certificate adds an additional visual cue in a web
browser’s address bar. With EV certificates, the name of the business is high-
lighted in green and appears directly before the web address. EV certificates
are commonly used by large businesses so the website’s users are immediately
assured their privacy and data are secured.
During the Google I/O 2014- HTTPS everywhere announcement, IIya Grogorik and Pierre
Far emphasized the importance of not only the encryption SSL provides, but also website
authentication. Studies have shown far higher conversion rates from sites using OV
certificates, and even higher from EV certificates, due to an immediate establishment of
trust from site visitors. Because Google emphasizes the importance
of authentication via SSL, an OV or EV certificate is highly recommended for sites where
these needs can be applied.Certificate Type
After you have chosen which certificate validation is best for your website, it is important
to assess the website’s needs and decide upon one of three certificate types: Single
Domain SSL certificates, Wildcard SSL certificates and Multi-Domain SSL certificates.
Single domain SSL certificates are intended for a website owner who doesn’t
own multiple websites and their current site does not have sub-domains.
Wildcard SSL certificates encrypt the main domain (sslguru.com) and
an unlimited amount of sub-domains (mail.sslguru.com, shop.sslguru.com,
smtp.sslguru.com).
Multi-Domain SSL certificates are intended for website owners managing multi-
ple sites under the same organization. For example, Jnj.com also owns
Tylenlol.com, Neutrogena.com and Rembrandt.com. A Multi-Domain SSL would
make the management of the SSL certificates far easier and more cost effective
than issuing Single Domain SSLs individually.
Note: With whatever type of SSL certificate you chose, it is important the certificate issued is using SHA-256 instead of SHA-1.
Many search engines, including Google, are placing far greater emphasis on SHA-256. In addition, plans are to deprecate the
SHA-1 type certificates by the end of 2014.Step 2 Updating and vetting your company information All WHOIS data must be current and your company needs to be correctly displayed in a third party directory before purchasing an SSL certificate and generating a CSR file. Verifying WHOIS Data To verify the accuracy of your WHOIS data, go to http://ipaddress.com/domain_whois/ and perform a Whois Lookup on your domain. If the data is incorrect, you will need to login to your control panel and make the appropriate updates/changes to the WHOIS information. Verify WHOIS Data Matches a Third Party Directory The Certificate Authority issuing your SSL certificate will need to verify that your domain’s WHOIS data matches information on a third party directory. Often times the Certificate Authority will conduct a business search through the secre- tary of state’s website, bbb.org or dnb.com. It is important that a valid phone number is listed on the third party directory. The listed phone number will be used by the Certificate Authority for phone verification. Verify DCV E-mail Access You must have access to one of the acceptable email addresses that will be used to verify the Domain Control Validation (DCV) message. Acceptable e-mails for verification include: Admin@, Administrator@, Postmaster@, Webmaster@, Hostmaster@ or your registered WHOIS e-mail address. Verify SNI/ Dedicated IP Before purchasing and installing your SSL certificate, check with your host or server admin to make sure that you have either Server Name Indication (SNI) enabled, or you are using a dedicated IP address. Without a dedicated IP address or SNI enabled, it will not be possible to install the SSL certificate.
Step 3
Purchasing your SSL certificate
and CSR generation

Now that a proper certificate is selected, identity verification is prepared and certificate is
purchased, the next step is generating the Certificate Signing Request (CSR). When
generating the CSR file it is important that you input the information to precisely match
your WHOIS data.

When generating a CSR file, a Private Key is also created. Best practice suggests saving
the private key in a secure location. Anyone with access to the private key will have access
to the encrypted information.

When the CSR file is generated, fill out the corresponding contact form and select the
e-mail address that will be used for the DCV message. When the CSR generation and the
content form are completed, a request will be sent to the CA and they will contact you to
finalize the verification and issuance process.
Note: To make the issuance easier and more transparent, some Certificate Authorities may request your DUNS number.

Note: For Wildcard Certificate CSR generation only - when generating a CSR file to be used for a Wildcard certificate, be sure
to include an asterisks before the domain name (*.sslguru.com). This will ensure the SSL certificate is configured correctly for all
subdomains.

To practice generating a CSR file, feel free to use this very helpful SSLGURU CSR generation tool.
Step 4
Installing your SSL certificate
and optimizing your site

Before installing a certificate, it is recommended that your server is running the latest
version of your operating system (OS). It is now time to install the SSL certificate. Most
servers/control panels make installation very simple: copy and paste the certificate in to
the control panel, in plain text.

Note: It is best practice and highly recommended to run an OS that is compatible with the minimum security protocols and
cipher suits.

For a full list of installation protocols please follow this link Certificate installation guides.

Once the SSL certificate has been installed (copy and pasted), you should now be able to
access your site from both HTTP and HTTPS. From an SEO stand point, this is known as
“duplicate content.” From a security stand point, the site is still vulnerable. The first step to
correct this issue is to redirect all traffic from HTTP to HTTPS. This is done from the
server’s configuration files or from a simple rewrite rule placed in the .htaccess file
(Apache) in the public html folder.

Example
Apache has TLS enabled by default but will only be able to use the .htaccess file if the Apache
configuration (httpd.conf or conf.d/ or sites-enabled/) file is set to follow symbolic links.

          RewriteEngine ON
          RewriteCond %{HTTP_HOST} ^adres.pl$
          RewriteRule ^(.*) https://www.example.com/$1 [QSA,L,R=301]

 Note: For the most up to date server configurations, please visit Mozilla’s recommend configurations.

If your site is using a CMS, such as Wordpress, there are specific steps needed to enable SSL. For
Example, if using Wordpress, go to the Admin Panel -> Settings -> General and make sure that
the WordPress Address (URL) and Site Address (URL) are both configured to HTTPS. If not, simply
add the “s” after HTTP and save.
Step 5
Server optimization
Optimizing a server increases the overall security of a site, fixes any latency issues and makes a
website run more efficiently over all. It is important to note that without root access enabling,
some or all of these protocols will be very difficult.
HTTP Strict Transport Security (HSTS) speeds up SSL by telling browsers to
always connect using HTTPS and it automatically appends http requests to https,
avoiding the need for the server to perform a redirect.
SPDY (Pronounced Speedy) is a module developed by Google to speed up TLS
connections by multiplexing multiple requests through one connection. Unfortu-
nately, this handy tool is not compatible with all servers. Visit http://spdycheck.org/
for more information and to see if this tool can work for you.
Online Certificate Status Protocol (OCSP) is used to check if a certificate has been
revoked. Normally the browser does this, but with OCSP stapling the server is able to
send its certificate and OCSP results with the initial certificate request. This makes it so
the browser doesn’t have to download or cross reference with the certificate authority.
HTTPS Keep Alives allow an initial connection to stay open, reducing the need for
additional handshakes between browser and server. This is especially important if you
want your connection to run fast. TCP connections start slow and increase their speed
over time until they finally reach their full potential. If you want your connection speed
to grow, you want to give your users enough time to make their next request before
the connection is closed. A good starting point is 60 seconds. It should be noted that
sometimes a user’s browser settings can override Keep Alives. There are many things
to consider when implementing Keep Alives, do some research and find out what
works best for your site.
Resumption and Session Tickets allow servers and browsers to communicate faster
by further reducing time needed for a handshake. If a browser has already visited a
site, it can be offered a session ticket. When the browser returns to the site, the
session ticket tells the server that encryption has previously been negotiated and
would like to be resumed. It is important to use this method wisely because session
tickets can be considered as important as private keys.Step 6 Testing website and server configurations The last step in HTTPS migration is to test the server/ website to make sure protocols are up to date and the website is configured and operating correctly. SSL Labs Certificate and Server Test This test will rate your server’s security score and give you insight into what changes could be made to increase site security. Keep in mind that increased security may limit some of your clients (older browsers) from being able to access your site. Mixed Content Scan If there is any mixed content on your site (a page which includes both HTTP and HTTPS content), you will need to either change the HTTP content to relative links or hard code the content to HTTPS. It is recommended to use relative links because it is far easier to move a site back and forth between dev environments and production. In order to receive the rankings benefits from Google’s new algorithm, it is important not to block your HTTPS site from being indexed by search engines. Allow the site to be crawled using robots.txt and monitor your migration progress in Webmaster Tools. Browser Warnings Browsers block the most dangerious mixed content by default but will often allow most http images to load. While it is possible to enable browsers to block all mixed content, doing so poses a risk for reduced functionality. Here is a quick look at what content is blocked by default on common browsers.
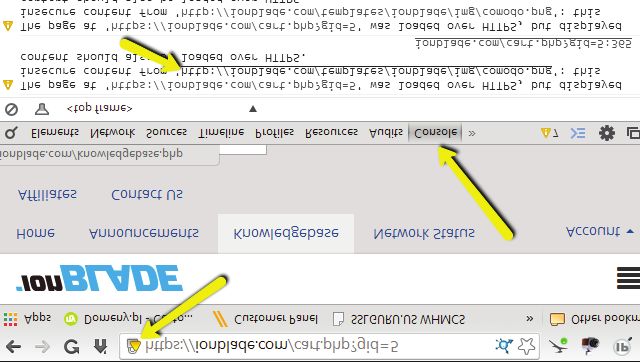
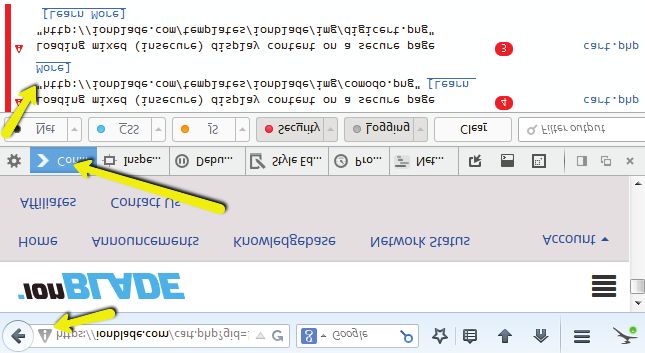
There are multiple sites available to help find mixed content on a page, the two most common
are JitBit and Why No Padlock. It is also possible to use the Firefox or Chrome console tool to
quickly find errors yourself. Access the console by right-clicking anywhere on a webpage and
selecting “Inspect Element.”

Chrome

Firefox
Once the error is located, dig into your website’s code and change the hard coded
“http://“ content to “relative” or “https://” URLs.
For more information about relative URLs see this google post.

If you are using a CMS such as WordPress, Joomla or Drupal, follow these links should
help gain a better understanding on how to enable SSL.

Wordpress            Joomla                       Drupal

There is no reason to serve your site on both http and https (in fact, there is good reason
NOT to, just like www and non www – Google will mark as duplicate content and harm
SEO results). To fix this you can oftentimes download a plugin or you may need to do a
rewrite on your server.

Some common problems with WordPress, for instance, is that content uploaded while
the site was not secure will remain unsecure unless the content is deleted and re-upload
from within the admin area. A good article addressing https for WordPress can be found
here.
When migrating a site from HTTP to HTTPS, be sure to use 301redirect rewrite rules in
conjunction with Google’s site move documentation.

For more information on redirects for different webservers see below.

Apache                      Nginx                 IIS

Browser errors are not simply restricted to mixed content issues. Below are common
browser icons from Firefox and Chrome which help to identify the status of the SSL
certificate, follow the links for each browser for more in depth details on each icon:

Firefox

Chrome
The yellow/orange icons are typically a result of the following occurrences:
Self-Signed Certificate: Self-signed certificates are generated by an individual’s server, not a
certificate authority, and are therefore not trusted by major web browsers.

Certificate Expired: When a website fails to renew a certificate before the end of its validation
period, browsers will prompt a certificate expired message. If a certificate has expired,
Chrome will not allow users to access the site and Firefox will require users to maneuver
through warning prompts acknowledging the risks of the invalid SSL before granting access.
Certificate does not match domain: This certificate error indicates you are likely connecting
to an illegitimate website. This can occur when HSTS is enabled on a server but the website
being accessed does not have SSL installed. The browser will then search the server for
another certificate that does not match the proper website. Also, if attempting to access a
website on a public Wi-Fi network and one of these errors occurs, it is possible that someone
is attempting to impersonate the website and the network is compromised.

Additional warnings: If a website has been reported to be malicious, most browsers will warn
you of the potential threat.
A big reason SSLGuru and Stone Temple recommend OV or EV certificates over DV is because
malicious sites that have not been reported are still able to get DV SSL certificates. Because
DVs are offered simply to domain regiters, it is easy to be unintentionally redirected to an
incorrect domain. A visitor can be on g00gle or gooogIe.com and still see proper https proto-
col in the address bar.

Note: In order to receive the rankings benefits from Google’s new algorithm, it is important not to block your HTTPS site from being
indexed by search engines. Allow the site to be crawled using robots.txt and monitor your migration progress in Webmaster Tools.
Configuring Your Social Sharing Buttons
Once you migrate from HTTP to HTTPS you will find that the display of social share
counts for the pages of your web site will have dropped to zero. The reason this happens
is because the social sites consider http://www.yourdomain.com to be a different URL
than https://www.yourdomain.com.

Fortunately, there is a way to write code that will help you continue to show the correct
social share totals. The following code should handle this for you:
There are many steps related to SEO involved in converting from HTTP to HTTPS. Here
are the most important ones:
Configuring Your Social Sharing Buttons

1. Make sure to convert everything on your site from HTTP to HTTPS. Otherwise, you will
run into problems with your visitors getting security certificate errors. All your internal
links that are absolute links will need to change from HTTP to HTTPS.

2. This also means converting all the widgets on the site, such as your site search widget.
In addition, make sure your CSS and Javascript file references are all changed to https and
references within those files are also converted. All references to your images must be
changed to https as well.

3. Other files that need to be checked and updated are:

  Your XML Sitemap
  Robots.txt
  Your .htaccess file (if you are on an Apache based web server)

4. You will need to implement 301 redirects from your HTTP based site to your HTTPS
based site. Earlier in this guide we recommended that you implement HSTS to tell brows-
ers to treat HTTPS as the default (good for site speed), but you will still want to set up
these 301 redirects to pass the value of those links to the HTTPS version of the site.

Setup Webmaster Tools for the HTTPS version of your site on both Google and Bing. You
will need this to make sure you continue to receive data on how these search engines see
your site. Your original Webmaster Tools account will not receive this data as the search
engines see these as different sites.

If you have a disavow file, load it into Google Webmaster Tools for your new site to
ensure disavowed links are not seen by Google as links to your new HTTPS site.
There are some issues that are common during a site migration. Two of the most
common ones are:

1. Content Delivery Networks (CDN) Incompatible – If you are using a CDN to speed up
the performance of your web site, then you may have a problem. Most CDN’s, including
Akamai, do not currently support SSL.

However, Cloudflare does support SSL.

2. Site Search Tools (and Other Widgets) Generate Security Errors – It’s likely that you will
need to update any third party widgets that you use on your site.
You can also read