Resources for the Derfflinger - EUROMODEL Snc
←
→
Page content transcription
If your browser does not render page correctly, please read the page content below
Euromodel – Derfflinger Resources. July 2020

                              TRANSLATION LINKS
1.    type into your browser ... english+italian+glossary+nautical terms
2.    utilise the translation dictionary ‘Nautical Terms & Expressions’ from
      Euromodel website

                                           Resources
                                             for the
                                           Derfflinger

                                           July 2020

     This resource information file was based on the original text supplied by Euromodel
     and then expanded in detail as the actual ship was constructed by the author, Peter
     Coward.

              Whilst relating to the basic build of this ship, there is
              information in Chapter 4 that is for the advanced builder who
              may wish to pursue more detailed work.

     Neither the author or Euromodel have any commercial interest in this information
     and it is published on the Euromodel web site in good faith for other persons who
     may wish to build this ship. Euromodel does not accept any responsibility for the
     contents that follow.

                                                        1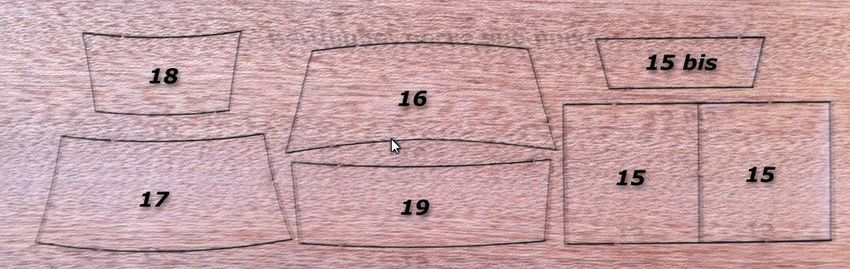
Euromodel – Derfflinger Resources. July 2020

       Derfflinger

                           2
Euromodel – Derfflinger Resources. July 2020

                         [To navigate through the contents – use ‘control + click’]

                                                         Contents
Euromodel Preview ................................................................................................................................. 5

Chapter 1: INTRODUCTION ............................................................................................................... 6
  Historical Notes..................................................................................................................................... 6
  Construction Philosophy ....................................................................................................................... 8
    Kit Building versus ‘Scratch’ Building ................................................................................... 8
    How Did I Build This Ship? ................................................................................................... 8

Chapter 2: TRANSLATION (from Italian to English) ..................................................................... 10

Chapter 3: THE KIT ............................................................................................................................ 15
  Drawings ............................................................................................................................................. 15
  Metal Decorations ............................................................................................................................... 15
  Scrap Timber ....................................................................................................................................... 15
  Component List ................................................................................................................................... 16
    Laser-cut pieces..................................................................................................................... 16
    Lime wood – Listelli tiglio.................................................................................................... 16
    Walnut wood – Listello noce ................................................................................................ 16
    Accessories............................................................................................................................ 18

                                                                               3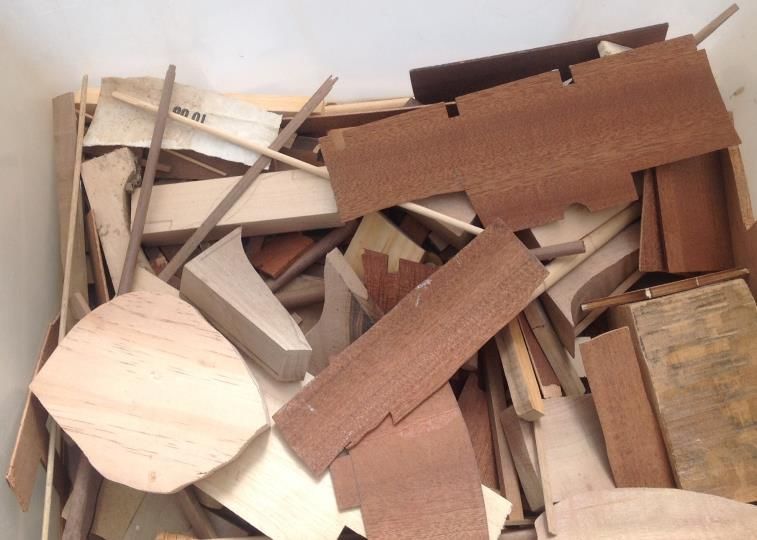
Euromodel – Derfflinger Resources. July 2020

                                                   Illustrations
                                          [The figures below are not hyperlinked]
Figure 1: Gaff-rigged Sails ........................................................... Error! Bookmark not defined.
Figure 2: Section From Plan Sheet 2 .............................................................................................. 8
Figure 3: Typical Gun Port Detail of any Euromodel ship ............................................................. 8
Figure 4: Re-organisation of Plan Sheets (from another kit) ........................................................ 15
Figure 5: Fluyt Model, Maritime Museum Prins Hendrik, Rotterdam ......................................... 16

                                                                        4
Euromodel – Derfflinger Resources. July 2020
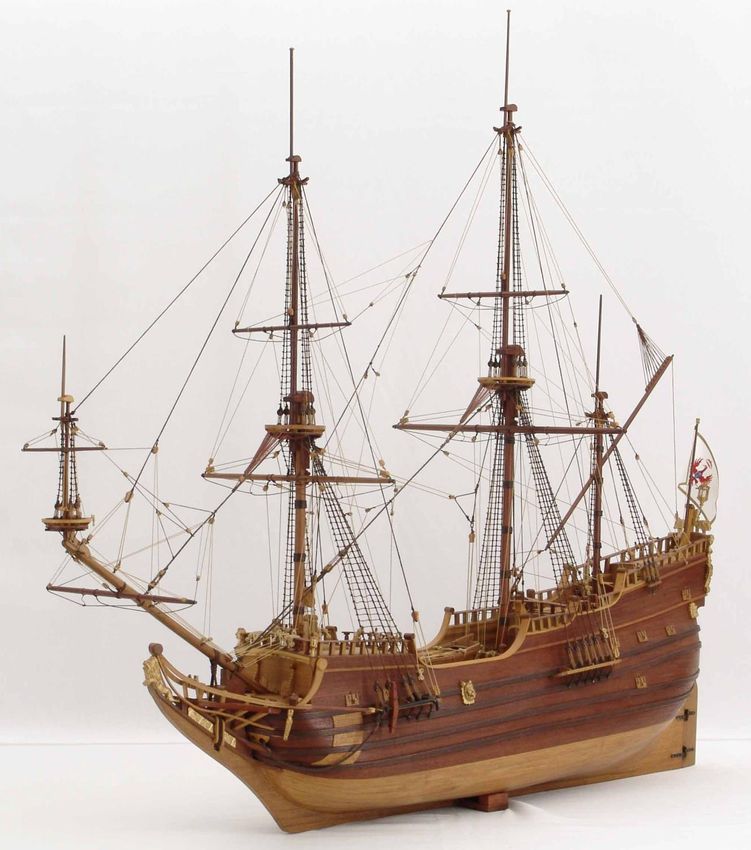
Euromodel Preview
Euromodel kits are based on sets of drawings by a naval architect and contain a comprehensive amount
of detail that are a challenge to the serious ship modeller.
This is in contrast to most other kits that whilst they also contain excellent plans, the intention there is
to achieve a build matching the plans provided.
Euromodel offers plans with an incredible amount of detail not seen in other commercial kits. This
respected company has provided sufficient material in the kit to build a basic form of the ship but a full
interpretation of the plans can easily lead to a full scratch build.
A strong focus should be kept on three drawings – Plan
Sheets 1, 3 and especially 5.
It was these that I used for my base references. If there was any doubt about
other drawings, it was these three that I kept referring to.
Plan Sheet 5 contains the detailed scratch-build drawings upon which this kit is
based.
It could well be argued that the build outcome is somewhere on the continuum between a standard model
construction and a scratch model. How far you wish to extend this continuum is up to you and your build
of this ship will be determined by the degree of complexity you choose.
The kit material will go a long way towards achieving a good model but be aware that the purchase of
some extra material might be necessary depending on how far you wish to go in emulating the plans.
There will be little left over from the kit contents, but during the construction you should experience a
compelling drive to create something better than the basic model. Thus the Euromodel plans – unlike
plans from other commercial kit companies - cannot be taken as a set of prescriptive drawings that the
modeler must emulate.
Euromodel provides just the basic material needs and leaves it up to the modeler to determine how
far he/she will extend his/her skills. In this build, I certainly added extra material and did alter
some components.
One additional aspect to the build could be the seven gaff sails - full details are given for their
construction.
In summary, then, the build is a very fluid process
allowing for a wide variation in the final outcome.
5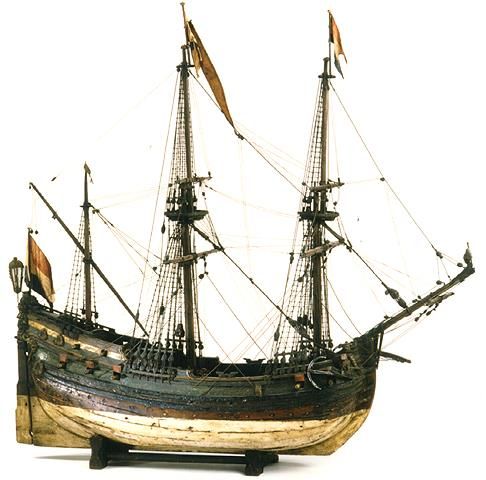
Euromodel – Derfflinger Resources. July 2020

                           Chapter 1: INTRODUCTION

                                                                                   Historical Notes
                                                                             The Dutch fluyt (pronounced
                                                                             ‘flight’) is different to ships used
                                                                             in Europe in the seventeenth
                                                                             century with a lowered quarter
                                                                             deck and a pronounced round or
                                                                             ‘pear-shaped’        hull.     Their
                                                                             dimensions were long and hulls
                                                                             of a very narrow cross-section
                                                                             compared to other square-sailed
                                                                             vessels.

The design minimized its armaments to maximize available cargo space. It had a shallow draft which
allowed the vessel to bring cargo in and out of ports and into rivers that other vessels couldn't reach. The
fluyt was first produced in 1595 with square sails on its foremast and main mast and a lateen spanker on
the mizzen mast. These vessels were requiring only a small crew to operate them and had the advantage
of being cheap to build. Pieter J. Lioorne-Hoorn (Holland) is credited with their design with the first fluyt
built in Lubecca, Germany in 1618. The last one was built around 1780. The ‘Friede’ fluyt, as an
example, was built in Berlin in the dockyards of Berlin in 1682 – its length was 32 metres.
By the end of the 17th century the fluyt Derfflinger belonged to the fleet of the Dutch-based
Kurfuerstentum Brandenburg. In the "triangle trade" of that time she transported rum and other stuff to
Africa, to buy slaves, who were then exchanged in the West Indies for sugar, which was then brought to
Europe. Later she and other Brandenburg ships were used in the War of the Spanish Succession. Fluyt
Derfflinger was built in 1675 for the Elector of Germany Friedrich Wilhelm. The ship was named in
honour of cavalry general Georg von Derfflinger, who 1675 won a Brandenburg victory in the battle of
Fehrbellin against the Swedish. He is depicted on the stern of the ship wearing black breast plate armour,
a navy uniform lined with red and leather trousers, a red scarf and a black hat containing red and white
feathers. The background was blue and the whole picture was surrounded by deep red cloth and fringed
with gold. The flag at the stern shows the Kurbrandenburg red eagle with hat, scepter, sword and breast
shield.

‘Derfflinger’ had two decks. Towards the bow was located the galley and areas for the storage of
munitions, food and water. Below these areas was the stone ballast. Towards the stern, there were
medium-size cannons and the compass. The forecastle generally contained four cannons, as did the stern
area and quarter deck.

                                                             6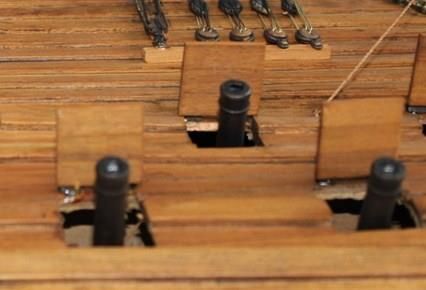
Euromodel – Derfflinger Resources. July 2020

Prior to 1684, ‘Derfflinger’ was named ‘Wolkensaule’. It was purchased in Danzica in January 1681 by
Benjamin Raule and was used during the war against Spain (May 1681) declared by Prince William
Frederick. It was 110 feet long and 23 feet wide; it was armed with 3 – 16 cannons and crewed by about
twenty men. From 1686 – 1693 the fluyt sailed the Western Africa and India routes. The ‘Friedrich
Wilmeln Zu Pferde’ had been its escort as well as the ‘Hoffnung’ during the trips up the Western Africa
coast and up to the Shetland Islands.

                                              EUROMODEL
                        Euromodel Division of the GBM Snc di Mazza Massimo & C.
                                            Via Aldo Galli, 11
                                           22100 COMO (CO)
                                                  ITALY
                                  e-mail : euro@euromodel-ship.com
                              home page http://www.euromodel-ship.com

  Any submitted photos & comments will become the property of Euromodel Division of the GBM Snc di Mazza
                                             Massimo & Co.

                                                            7
Euromodel – Derfflinger Resources. July 2020
Construction Philosophy
Euromodel have tried to simulate all the designs of the
Derfflinger in every possible way, with attention to detail
in order to appeal to the advanced model builder to
construct this model. The designs allow you construction of
the vessel using both pre-cut materials ready to use, and
materials that require preparation.
Plan Sheets 1 & 2 contains a considerable amount
of scratch information. This is a sheet that is
useful in interpreting the hull structure but does
contain much that is outside the scope of this kit.
Kit Building versus ‘Scratch’ Building
There may well be some confusion in looking at the plans
since there is considerable detail intended for the ‘scratch’
builder but which is not provided for in the kit. Fig. 1
shows the detail that could be included below decks if
engaging in a full scratch build. This kit has a
Figure 1: Section From Plan Sheet 2 comprehensive array of items to utilise in building this
ship. In many cases, these items may not display exactly
the same dimensions as the plan sheets but nevertheless will enable the construction of a fine ship. The kit
builder will use what is provided but the ‘scratch’ builder will utilise the plans more fully and decide to
spend far more time building particular items as well as purchasing further items to enhance the ship
build. Fig. 2 illustrates this point further ... a model showing the gunport lids only partially open does not
show the rope and eye pin on the inside surface used as part of the mechanism for controlling the
opening/ closing of the lid as shown in Plan Sheet 1.
i.e. no eye pins
supplied in kit for
gun port lids but
could be added as
part of scratch
build
Figure 2: Typical Gun Port Detail of any Euromodel ship
8Euromodel – Derfflinger Resources. July 2020
How Did I Build This Ship?
I felt compelled to build this ship from the kit provided but at the same time felt myself drawn to the
highly detailed plans which portray far more than the kit provides for. What to do ?
I decided to create a text and photographic portrayal of how the ship could be built from the kit and
located in a document on the Euromodel website named ‘Derfflinger Notes’. However, at many points I
realised that there were alternative and more detailed construction processes that could be carried out.
This usually meant the supply of extra material but having gone to the expense of purchasing the kit, the
cost of the extra items was incidental. For these alternative processes, you will observe the heading
‘Alternative 1’ which uses a very straightforward and basic approach usually with the supplied material as
it is whereas the heading ‘Alternative 2’ often shows the method that I used which probably involved
modifying the supplied pieces and/or using extra material
A good example is shown by the capstans on Plan Sheet 2. Neither are supplied in the kit since they are
hidden below the decks.
In any case it’s essential to exercise patience and attention to detail while constructing this model.
Without question this ship must be built with passion. The plans are there, an outline of the fundamental
steps is there but in the end the modeller must display a high degree of flair. The plans must be studied at
length before beginning because it is there that the builders will develop a ‘set of instructions’ for
themselves. The kit will not necessarily provide all that is required if the modeller aims to include
some of the finer detail.
The kit WILL enable an excellent model to be built from the materials supplied. The plans must be
studied at length before beginning because it is there that the builders will develop a ‘set of instructions’
for themselves.
A complimentary criticism of Euromodel’s kits is that the photos displayed on the internet ‘do not
portray the kit contents provided but in fact are scratch models’. The simple fact is that there are
so many variations and additions to the original design possible that (at the risk of repetition) no
two ships are going to look the same. The more you examine the plans, the more you are likely to
lean towards the ‘scratch’ style of construction.
Euromodel appreciates your choosing this product and wishes you a challenging experience. There is no
question that the detail provided here on the plans and the material contained in the kit sets Euromodel
kits apart from other kits available on the market.
Construction Manual
The following documentation will hopefully offer to other future builders an easier sequential pathway of
construction. There is no doubt that others will see ‘flaws’ or better ways of carrying out some step. In the
end, there can be no one way of doing anything so please read what I have written and then make your
own judgement about the best method for you and your build. This manual simply describes how I
constructed this ship.
Whilst I was working under a limited build-time to create this hull, some might well criticise the quality
of my construction at some points and you might also be aware that photographing a small area on the
hull and enlarging it produces a very different image to the one seen simply through the eye. So whatever
you see, make yours better!
This manual is a real ‘ship building in progress’ and unlike other similar texts, the photographs
show the raw work as it is being done – no ‘pristine publication-type photos.
9Euromodel – Derfflinger Resources. July 2020
Chapter 2: TRANSLATION (from Italian to English)
Whilst every care has been taken with this translation, the author claims little depth of
knowledge of Italian and thus various grammar and syntax errors will be apparent to those who
are bilingual in these two languages.
An on-line dictionary is to be found on the Euromodel website – ‘Nautical Terms’ and this
will provide assistance for a large range of terms NOT included in the following pages of
translation from Italian to English.
As you read this manual on construction page by page, all of the plan sheet text in
Italian will be explained and translated in English so rather than trying to interpret
individual words or sentences on the sheets, just refer to the sequential text. I am
hopeful that it will all become quite clear to you.
(Terms shown on the Plan Sheets but not included in the lists below - refer to Euromodel
website, ‘Nautical Terms’)
10Euromodel – Derfflinger Resources. July 2020
Tavola 1 Plan Sheet 1
Le decorazioni di prua sono dipinte in oro su fondo Bow decorations are painted in gold, bottom surface
noto underneath painted black
Tavola 2 Plan Sheet 2
Elementi Costruttivi Elements of Construction
Da tagliare ad opera del modellista To be cut open by the builder
Supporto specchio di poppa no 2 pezzi Transom support bracket; two items
No 1 pezzi compensato 2 mm. One item; plywood 2 mm.
Ponto di batteria no 2 pezzi Gun Deck; two items
Paratia di prora Bow bulkhead
Paratia del castello di prua Forecastle bulkhead
Paratia del controcassero Upper Quarter Deck bulkhead
Paratia del cassero Quarter Deck bulkhead
Specchio di poppa Transom
Sagoma blocchetto di riempimento a prua Templates for bow filler blocks
1 pezzi no 1e2 sono realizzati in noce da 5mm Items 1 and 2 (5 mm. walnut)
1 pezzi dal no 3 al 14 sono realizzati in compensato Frames 3 - 14 (5 mm plywood)
da 5 mm
1 pezzi dal no 15 al 19 sono realizzati in compensato Deck sections 15 & bulkhead sections 17 - 19 (2 mm
da 2 mm plywood)
1 ponti sono da eseguire con listelli da mm 2 x 4 Main Deck is built from 2 x 4 mm. walnut strips
Le porte ed i portoncini se eseguono a parte con Doors and main doors built with 2 x 1 mm. strips
11Euromodel – Derfflinger Resources. July 2020
Tavola 4 Plan Sheet 4
PARTICOLARI ACCESSORY DETAILS
20. Bittone di drizza no. 2 pezzi 20. Foremast bitt (two items)
21. Bitta di drizza di mezzana no. 1 pezzi 21. Mizzen bitt (one item)
22. Pazienza 22. Main Mast bollard
23. Grue di capone no. 2 pezzi 23. Cathead
24. Scaletta no. 1 pezzo 24. Ladder (1 item)
25. Carabottino del cassero 25. Quarter Deck grating
26. Carabottino del castello di prua 26. Forecastle Deck grating
27. Carabottino del ponte di coperta 27. Main Deck grating
Cannone di batteria no. 12 pezzi Gun Deck cannon (12 items)
Cannone del cassero no. 4 pezzi Main Deck cannon (4 items)
28. Cavigliera del ponte di coperta no. 2 pezzi 28. Belaying pin rack, Main Deck (two items)
29. Cavigliera del ponte di coperta no. 2 pezzi 29. Belaying pin rack, Quarter Deck (two items)
30. Parasartie di trinchetto no. 2 pezzi 30. Foremast channel
31. Parasartie di maestra no. 2 pezzi 31. Main Mast channel
32. Mensola del parapetto del cassero 32. Quarter Deck breast rail support
33. Piede asta di bandiera 33. Base support for flag pole
34. Passacari dell’albero di bompresso 34. Bowsprit fairlead
35. Albero di bompresso 35. Bowsprit mast
36. Pennone di civada 36. Spritsail yard
37. Pennone di parroschetto del bompresso 37. Flying jib boom
38.Alberetto di parrocchetto 38. Sprit topmast
Tratto a sezione quadro square cross-section or octagonal cross section
39. Albero di trinchetto 39. Fore lower mast
Tratto a sezione octagonale octagonal cross section
40. Albero di parrocchetto 40. Fore topmast
41. Freccia di trinchetto 41. Fore topgallant mast
42. Pennone di trinchetto 42. Fore main yard
43. Pennone di parrocchetto 43. Fore royal yard
44. Albero di maestra 44. Lower main mast
45. Albero di gabbia 45. Main topmast
46. Freccia di maestra 46. Main topgallant
47. Pennone di maestra 47. Main lower yard
48. Pennone di gabbia 48. Main lower topsail yard
49. Albero di mexxana 49. Mizzen lower mast
50. Freccia di mezzana 50. Mizzen topmast
51. Antenna di mezzana 51. Lateen yard
52. Asta di bandiera 52. Flag pole
53 – 55 Teste di moro 53 – 55 mast caps
56. Portello dei cannoni no. 14 pezzi da 56. Gun port hatches (14 items) - made from 2 x 10
realizzarsi con listello 10 x 2 mm. strips.
12Euromodel – Derfflinger Resources. July 2020
Tavola 6 Plan Sheet 6
MANOVRE FISSE FIXED RIGGING
A/B/C/D/E/F/G: bozzello block …. 7 mm. / 7 mm. 3-hole/ 5 mm. 2-hole/ 5 mm./
violin 8 mm./ 12 mm. 3-hole / 3 mm.
H/ L : bigotta dead eye … 5 mm. / 3 mm.
Particolare degli aridatoi delle sartie di mezzana Detail for the mizzen shroud
Strallo di mezzana Mizzen mast stay
Strallo di gabbia Main topmast stay
Strallo di maestra Lower main mast stay
Strallo di pappafico Fore topgallant stay
Strallo di parrocchetto Fore topmast stay
Strallo di trinchetto Lower foremast stay
Patterazzi dell’alberetto di parrocchettoi Fore top mast backstay
58. Coffa di maestra e trinchetto no. 2 pezzi 58. Mast top for the main mast & foremast (2 items)
59. Crocetta di gabbia e parrocchetto no. 2 pezzi 59. Cross trees for main & fore lower top masts
60. Coffa di civada 60. Mast top for bowsprit
61. Crocetta di mezzana 61. Cross tree for mizzen mast
Particolare a (and b) Detail a (and b) shown in circles labeled ‘a’ or ‘b’
Landre di maestra e trinchetto (fuori scala) Dead eye straps for main and foremast (not to scale)
Come fissare lo strallo di pappaffico di trinchetto alla Attaching the fore topgallant stay to mast top
coffa di civada
Incapellaggio delle sartie ed esecuzione dell strallo Shroud and stay detail for the main mast and foremast
per l’albero maestra e di trinchetto
13Euromodel – Derfflinger Resources. July 2020
Tavola 7 Plan Sheet 7
MANOVRE DEI PENNONI SPAR RIGGING
Manovre volanti dell’albero di bompresso c civada Running rigging for the bowsprit and spritsail yard
relativi pennoni
Particolare della drizza dei pennoni di maestra e Detail for the foremast and main mast yard running
trinchetto rigging
trozza truss
Manovre volanti del pennone di gabbia Running rigging for topgallant (topsail) yard
Manovre volanti dell’antenna di mezzana Running rigging for mizzen mast lateen
Manovre volanti del pennone di maestra Running rigging for lower main mast yard
Manovre volanti del pennone di trinchetto Running rigging for lower foremast yard
Tavola 8 Plan Sheet 8
MANOVRE DELLE VELE SAIL RIGGING
Colorazione bandiere e stendardi aquila rossa su Red eagle on a white background for flag colour
fondo bianco
Vela di gabbia Main topmast sail
Vela di maestra Main lower mast sail
Vela di mezzana Mizzen lower mast sail
Vela di civada Spritsail
Vela di bompresso Flying jibboom sail
Inferitura della vela al pennone Luff (leading upper edge of sail) on a yard
Vela di parrochetto Fore topmast sail
Vela di trinchetto Fore lower mast sail
Tavola 09 Plan Sheet 09
Assemblaggio Assembly
incintoni wales
Listelli noce 2 x 4 mm. Planks from 2 x 4 mm. walnut
no 24 pezzi 24 items
14Euromodel – Derfflinger Resources. July 2020
Chapter 3: THE KIT
Drawings
The diagrams are beautifully drawn and would allow a scratch-built kit to be
readily developed. The difficulty is to separate the essential detail necessary to
build the kit from the other more seriously accurate detail.
At this stage it is a good idea to spend quite some time ‘pouring’ over the plan
sheets provided to gain some insight into what is ahead of you.
A point I found useful was for many –
but not all – plan sheets to be carefully
cut into small sections and placed into
plastic sleeves in a folder. This way I
could arrange the drawings in
semblance of order of construction.
Another very useful step was to print
off the Italian-English translations, cut
out the English translations and stick
them over the appropriate Italian words
(see below)
Figure 3: Re-organisation of Plan Sheets (from another kit)
Metal Decorations
Much patience is required to identify these pieces and I would caution against direct contact with the skin
– use gloves when cleaning & painting the pieces. Certainly any filing should be carried out in a separate
area that can be easily cleaned up.
Scrap Timber
There is no such thing as ‘throw-away’
timber. Over time, I use every piece of
‘scrap’ timber - and more !
15Euromodel – Derfflinger Resources. July 2020
Component List
Laser-cut pieces
Keel, 5 mm. walnut (1) - Chiglia
Rudder, 5 mm. walnut (1) - Timone
Bulkhead Frames, 5 mm. plywood (10) - Ordinate
Stern Support Pieces, 5 mm. plywood (2) – Supporti specchio
Plywood - Upper Quarter Deck (1) – bis 15
- Gun Battery Deck (2) - 15
- Deck Bulkheads – Paratia del ...
Quarter Deck
Main Deck, aft
Prow Deck
Main Deck, forward
Plywood
1 x 50 x 50 mm (1) Tops
Lime wood – Listelli tiglio
10 x 20 x 80 mm. (1) Filler Blocks for Bow - Blocchetto di riempimento va fatto di prua
1.5 x 5 x 400 mm. (50) First Planking – 1o Fasciame
Walnut wood – Listello noce
1 x 5 x 400 mm. (50) Second Planking - 2o Fasciame
2 x 4 x 350 mm. (28) Deck Planking - Rivestimento ponti
1 x 3 x 350 mm. (8) Bulwark Capping Rail; Bulkhead Surfaces - Capodibanda
6 x 6 x 100 mm. (1) Display Stand Support Railings - Traversa invasatura
2 x 10 x 150 mm. (1) Gun Port Hatch - Portelli cannoni
2 x 10 x 280 mm. (1) Channels - Parasartie
2 x 3 x 350 mm. (3) Top Ribs – of Mast Top; Cross Trees
2 x 4 x 400 mm. (4) Wales – Incintoni
3 x 3 x 400 mm. (3) Bulwark Stanchions - Scalmotti
2 x 5 x 200 mm. (1) Pin & Fife Rails – Pazienza e cavigliera
1 x 2 x 400 mm. (3) Grating edging – Contorno carabottini
7 x 7 x 200 mm. (1) Catheads - Gru di capone; Bollards for Main, Foremasts -
Bittone di drizza
5 x 5 x 200 mm. (1) Fife Rail Posts (20-22) -; Bitta di drizza di mezzana; Pazienza
16Euromodel – Derfflinger Resources. July 2020
17Euromodel – Derfflinger Resources. July 2020
Accessories
Anchors (2) - Ancore da 40 mm. (Art. 11/009)
Stock - Ceppi per ancore; Ring – Anelli per ancore
Belaying Pins: 8 mm. (76) - Caviglia da mm. 8 (Art.22/144)
Blocks & Deadeyes
G: 3mm., 1 hole(96) - Bozzelli da mm. 3 a 1 foro (Art.22/026)
F: 3mm., 2 hole(10) - Bozzelli da mm. 3 a 2 foro (Art.22/031)
D: 5mm., 1 hole (52) - Bozzelli da mm. 5 a 1 foro (Art.22/028)
C: 5mm., 2 hole (5) -Bozzelli da mm. 5 a 2 fori (Art.22/032)
A: 7mm., 1 hole (14) - Bozzelli da mm. 7 a1 fori (Art.22/030)
B: 7mm., 3 hole (4) - Bozzelli da mm. 7 a 3 fori (Art.22/039)
E: Fiddle, 7 mm., 1-hole (13) - Bozzelli a violino da mm. 7 a 1 fori (Art.22/083)
M: Fiddle, 11 mm., 3-hole (2) - Bozzelli a violino da mm. 11 a 3 fori (Art.22/082)
H: 5 mm. (44) (Art. 22/020)
L: 3 mm. (46) (Art. 22/018)
Cleats (‘Staghorns’) (2) - Tacchetti (Art. 11/270)
Chain Plates (22) - Lande 5 mm. (Art. 11/313)
Cloth Sail (1) – Tela per vele 450 x 450 mm. (Art. 15/006)
Dinghy (1) – Scialuppa da 70 mm. (Art. 88/011)
Flag set(1) – Serie Bandiere (Art. 13/032)
Grating Strips (50) – Elementi per paiolato (Art. 22/069)
Guns – Cannoni de batteria, cassero & coperta
30 mm. (Art. 11/015) (12) / 22 mm. (Art 11/362) (4)
Wheels: 4 mm. (Art. 22/148) (40) / 5 mm. (Art. 22/149) (24)
19 mm. carriages - 24 x 5 mm wheels + 24 x 4 mm. wheels
16 mm. carriages - 16 x 4 mm. wheels (same on both axles)
Carriages: 19 mm. (Art 22/001) (12) / 16 mm. (Art 22/154) (4)
Axles: dowels 2 x 160 mm. (3)
Brass dowels 1.5 x 160 mm. (1)
Hinges, gun port (40) – Cerniere timone complete (Art. 11/289)
Ladder (1) - Scala (Art. 22/069)
Masts & Spars - 8 x 380 mm. (1); 8 x 210 mm. (1) 6 x 340 mm. (2); 5 x 380 mm. (1); 5 x 320 mm. (1); 5 x 170
mm. (1); 4 x 310 mm. (1); 3 x 380mm. (1)
Metal decorations, 25 pieces – Serie decorazioni fuse (Art. 11/280)
Rigging yarn – Rafforzino di lino ritorto
0.25 mm. (Art. 77/025)/ 0.50 mm. (Art. 77/050)/ 0.80 mm. (Art. 77/080) / 1.50 mm. (Art. 77/150)
Mast Caps – Teste di moro da 12 mm. (Art. 22/043) (5); 16 mm. (Art. 22/044) (2)
Rudder Hinges (5) – Cerniere timone complete (Art. 11/293)
Plan Set (9) – Serie disegno in scala (Art. 66/007)
18You can also read


