SCREEN PRINTING INSTRUCTIONS
		 INSTRUCCIONES DE SERIGRAFÍA
		 INSTRUCTIONS DE SÉRIGRAPHIE
		 ANWEISUNGEN FÜR DEN SIEBDRUCK
←
→
Page content transcription
If your browser does not render page correctly, please read the page content below

SCREEN PRINTING INSTRUCTIONS INSTRUCCIONES DE SERIGRAFÍA INSTRUCTIONS DE SÉRIGRAPHIE ANWEISUNGEN FÜR DEN SIEBDRUCK

Speedball Screen Printing Manual
                                                                                                                                             Written, designed, and illustrated: Dan Ibarra / Thriving Concern
                                                                                                                                             Photography: Dan Ormsby / Creative Camera
                                                                                                                                             Translation: ENLASO + Keylingo
                                                                                                                                             Published by: Speedball Art Products Company
                                                                                                                                             2301 Speedball Road, Statesville, NC 28677
                                                                                                                                             For more information please visit SpeedballArt.com

            SCREEN PRINTING | SERIGRAFÍA | SÉRIGRAPHIE | SIE
INTRODUCTION TO SCREEN PRINTING                                         INTRODUCCIÓN A LA SERIGRAFÍA                                         INTRODUCTION À LA SÉRIGRAPHIE
Getting Messy is the Fun Part.                                          Ensuciarse es la parte divertida.                                    Salir peut être amusant.

Practically speaking, screen printing is not a complicated process.     En términos prácticos, la serigrafía no es un proceso complicado.    Du point de vue pratique, la sérigraphie n'est pas un processus
It is nothing more than pushing a thin layer of ink through a stencil   No es nada más que empujar una fina capa de tinta a través           compliqué. Il ne s'agit de rien de plus que de pousser une fine
image on a fabric screen. But screen printing is like magic. Ask        de una imagen en un esténcil sobre una pantalla tensada de           couche d'encre à travers une image de pochoir sur un écran en
any practicing screen printer, no matter how many prints they have      tela de malla en un marco. Pero la serigrafía es como magia.         tissu. Mais la sérigraphie, c'est comme de la magie. Demandez
produced, and they will admit to you that they still experience a       Pregúntele a cualquiera que practique la serigrafía, sin importar    à n'importe quel imprimeur sérigraphe, peu importe le nombre
rush of joy and anticipation in pulling the squeegee, lifting up the    cuántas impresiones haya producido, y le confesará que todavía       d'impressions qu'il a produites, et il vous avouera qu'il éprouve
screen frame, and revealing their printed artwork each time.            experimenta una oleada de alegría y expectativa al arrastrar la      toujours une poussée de joie et d'anticipation en tirant la raclette,
                                                                        racleta, al levantar el marco y al ver sus ilustración impresa por   en soulevant le cadre de l'écran et en révélant ses images la
Screen printing is a constant wonder, it is a contrasting mix of        primera vez.                                                         première fois.
satisfying outcomes and unanticipated surprises. If you are just
getting started as a beginning printer, your first printed image        La serigrafía es una maravilla permanente, es una mezcla             La sérigraphie est une source continue d'émerveillement,
may not be perfect, and that’s okay! The splotches, spots or            contrastante de resultados satisfactorios y sorpresas imprevistas.   c'est un mélange contrastant de résultats satisfaisants et de
imperfections are a part of the beauty of the screen printing           Si apenas está iniciando como impresor principiante, su primera      surprises inattendues. Si vous commencez tout juste en tant
process. The secret of screen printing is to allow these outcomes,      imagen impresa puede no ser perfecta, ¡y está bien! Las              qu'imprimeur débutant, votre première image imprimée peut ne
and maybe even embrace them. If as artists we wanted something          salpicaduras, las manchas o las imperfecciones son parte de la       pas être parfaite, et c'est correct! Les éclaboussures, les taches
printed perfectly, we could buy a laser printer.                        belleza del proceso de serigrafía. El secreto de la serigrafía es    et les imperfections font partie de la beauté du processus de
                                                                        permitir estos resultados, y tal vez incluso aceptarlos. Si como     la sérigraphie. Le secret de la sérigraphie est de permettre ces
And even then, if you don’t like your print, you just lower the         artistas quisiéramos algo perfectamente impreso, podríamos           résultats, et peut-être même de les chérir. Si, en tant qu'artistes,
screen back down and pull the squeegee again. As you continue           comprar una impresora láser.                                         nous voulions quelque chose de parfaitement imprimée, nous
to print and become a more experienced screen printer, you will                                                                              pourrions acheter une imprimante laser.
be able to anticipate and remove imperfections. But, believe us,        E incluso entonces, si no le gusta la impresión, simplemente baje
many screen printers work arduously to perfect their craft, only to     la pantalla y deslice nuevamente la racleta. A medida que siga       Et même là, si vous n'aimez pas votre impression, il vous suffit
wish they could re-inject their work with the vibrancy and surprise     haciendo impresiones y llegue a ser un impresor en serigrafía más    d'abaisser l'écran et de tirer la raclette à nouveau. À mesure que
of their messier days as novice printers. One of the main goals         experimentado, podrá anticipar y eliminar imperfecciones. Pero,      vous continuez à imprimer et devenez un imprimeur sérigraphe
of screen printing (besides creating beautiful artwork we can be        créanos, muchos impresores en serigrafía trabajan arduamente         plus expérimenté, vous serez en mesure de prévoir et d'éliminer
proud of) is realizing that the process is just as much fun as the      para perfeccionar su arte, solo para desear que puedan reinyectar    les imperfections. Mais, croyez-nous, plusieurs imprimeurs
outcome. So have fun, and make a mess.                                  su obra con la vitalidad y la sorpresa de sus días más caóticos      sérigraphes travaillent d'arrache-pied pour perfectionner leur art,
                                                                        como impresores principiantes. Uno de los principales objetivos      seulement pour souhaiter qu'ils pourraient réinjecter dans leur
                                                                        de la serigrafía (además de crear obras de arte hermosas de          travail la vitalité et la surprise de leurs jours moins valorisants en
                                                                        las que podemos estar orgullosos) es darnos cuenta de que el         tant qu'imprimeur débutant. L'un des principaux objectifs de la
                                                                        proceso es tan divertido como el resultado. Así que diviértase y     sérigraphie (en plus de créer de belles images dont nous pouvons
                                                                        ensúciese.                                                           être fiers) est de se rendre compte que le processus est tout aussi
                                                                                                                                             amusant que le résultat. Alors amusez-vous et salissez.
A       B

EBDRUCK
 EINFÜHRUNG IN DEN SIEBDRUCK                                                    D
 Man hat Spaß dabei, sich die Hände ein
 wenig schmutzig zu machen.
                                                                        C               E
 In der Praxis ist der Siebdruck kein kompliziertes Verfahren.
 Es ist nichts anderes, als eine dünne Farbschicht durch ein
 Schablonenbild auf einem Gewebesieb zu drücken. Siebdruck
 jedoch ist wie Magie. Fragen Sie jeden geübten Siebdrucker, egal
 wie viele Drucke er hergestellt hat, und er wird zugeben müssen,
 dass man immer noch einen Rausch der Freude und Vorfreude
 beim Ziehen der Rakel, beim Anheben des Siebrahmens und
 beim Freilegen der gedruckten Kunstwerke verspürt.

 Der Siebdruck ist ein ständiges Wunder; es ist eine kontrastreiche
 Mischung aus zufriedenstellenden Ergebnissen und unerwarteten
 Überraschungen. Wenn Sie gerade erst mit dem Siebdruck
 beginnen, kann es sein, dass Ihr erstes Druckbild nicht perfekt ist,
 und das ist in Ordnung so! Die Kleckser, Flecken oder
 Unvollkommenheiten sind Teil der Schönheit des Siebdruck-
 verfahrens. Das Geheimnis des Siebdrucks besteht darin, das
 zuzulassen und das vielleicht sogar anzunehmen. Wenn wir als
 Künstler etwas perfekt gedruckt haben wollten, könnten wir
 einfach einen Laserdrucker kaufen.

 Und selbst dann, wenn Ihnen Ihr Druck nicht gefällt, senken
 Sie das Sieb einfach wieder herunter und ziehen die Rakel
                                                                            F       G
 erneut. Wenn Sie mit dem Drucken fortfahren und ein
 erfahrenerer Siebdrucker werden, werden Sie in der Lage sein,
 Unvollkommenheiten vorherzusehen und zu beseitigen. Aber
 glauben Sie uns, viele Siebdrucker arbeiten mühsam daran, ihr
 Handwerk zu perfektionieren, nur um sich dann zu wünschen, sie
 könnten ihrer Arbeit wieder die Lebendigkeit und Überraschung
 ihrer unerfahrenen Tage als Anfänger verleihen. Eines der
 Hauptziele des Siebdrucks (neben der Erschaffung schöner
 Kunstwerke, auf die wir stolz sein können) ist die Erkenntnis, dass
 das Verfahren genauso viel Spaß macht wie das Ergebnis. Also,
 haben Sie viel Spaß und seien Sie ruhig unordentlich.
                                                                                            1
top (recessed)
    CREATING YOUR WORKSPACE
                                                                                                                                                      E media
    Before you begin printing, you’ll need a usable space in which to                                                                                 FABRIC (SHIRTS, ETC.)
    print. When deciding where to print, here is what to consider:                                                                                    When printing on fabric, first make sure you are printing with inks
                                                                                                                                                      made for fabric printing. Other water-based inks will just wash
    • ACCESS TO WATER: For cleaning screens and tools or washing                                                                                      right out when put through the laundry. After printing on fabric
      out screens. Bathtubs, showers, and utility sinks work great, as                                                                                your ink will dry, but you still need to “cure” your ink to the fabric,
      do large kitchen sinks.                                                                                                                         also known as heat setting. Speedball water-based fabric inks
                                                                                                                                                      can be cured by using a household iron. Check your iron settings
    • A FLAT SURFACE TO PRINT: A table that you don’t mind getting                                                                                    compared to the fabric you printed on. Use only fabrics that can
                                                                                                             bottom (flat)                            be subjected to temperatures of at least 275°-375° F. Do not use
      dirty or a workbench works perfectly.
                                                                            Before using your screen, you should tape up the seams where              nonporous fabrics such as nylon. Place a piece of paper (simple
    • AN AREA TO DRY YOUR PRINTS: Whether you are printing                  the fabric and the frame meet on both the top and bottom of the           copy paper is best) over top of your printed design and cure with
      posters or shirts, you will want a large area for laying all your     screen. This will help with the structural integrity of the screen,       a hot iron for 1-2 minutes.
      prints out to dry. A low-traffic stretch of floor can always do the   and keep water and ink from collecting in the seams of the
                                                                            screen frame.
      job in a pinch.                                                                                                                                 F frame base/hinge clamps (optional)
                                                                                                                                                      A Speedball frame base or hinge clamps can assist in keeping the
    basic tools                                                             C ink                                                                     frame stationary while printing, instead of having to hold the frame
                                                                            Speedball produces both fabric inks as well as acrylic inks (for          yourself. Some Speedball kits include the frame base. The frame
                                                                            printing on flat paper.) They are both water-based inks, contain          base requires attaching the included hinges to the base and frame
    A squeegee                                                              no fumes, and clean up with soap and water. The inks come in a            to allow the frame to be held in place and easily lifted up and down
    A typical squeegee is either a flexible plastic blade or a long         broad range of premixed colors, but can always be mixed together          during the print process. A kick leg is included with every frame
    rubber blade in a wooden handle. Speedball produces a variety of        to create custom colors.                                                  base to help prop up a frame between prints.
    sizes and styles of squeegees including plastic or wood handles
    and 3 different types of rubber. No matter which squeegee you           ♦ Both acrylic and fabric inks can be used to print on paper,
    are using, keep in mind that your squeegee blade should be semi-           but only fabric ink will work on fabric!
    flexible, straight, and clean with no nicks, dents or crud.
                                                                            D modifiers
    B screen                                                                There are ink modifiers available as well; extender and transparent                 pilot hole
    The “screen” in screen printing is the wooden or aluminum framed        base create transparent color and retarder base slows drying time
    fabric through which you print. In the past, silk was the fabric of     of inks. Obviously, water is essential for cleanup, but since you are
                                                                                                                                                                                                      kickleg pilot hole
    choice for these screens — which is why the technique was called        using water-based inks, water can also be an asset while printing
    silkscreen — but now all screens are polyester. Thread-per-inch         as well.
    “meshes” determine the resolution of the screen. Screens with           • Add a bit of water to thin out thick ink for easier printing.
    high mesh (200–300) can print fine detail, and let less ink through        Ink should feel “yogurty.”
    the screen. Lower 85–150 mesh screens print less detail, but let        • A couple spritzes from a spray bottle is a great way to keep                 hinge pin                   kickleg
    more ink through, which is helpful printing textiles or a thick ink        your ink and screen from drying out while you’re printing.
    like white. Speedball carries screens ranging from 85–305 mesh.                                                                                   Hinge clamps also hold the screen in place and allow for lifting up
    All Speedball kits have a 110 mesh.                                                                                                               and down during printing, but do not include a pre-installed base
                                                                            E media                                                                   or kick leg. The hinge clamps are typically installed permanently
    The mesh on a brand new screen can carry some oils, dust, and           PAPER                                                                     onto the chosen print surface (ie. print table or plywood board.)
    dirt from the manufacturing process, and can be problematic             When printing on paper it is best to print on as thick a piece of paper
                                                                            as possible. Paper is measured in pounds (lbs) and categorized
    for emulsion and/or drawing fluid to adhere. We recommend
                                                                            by text (thin) and cover (thick). Text weight papers will be way too
                                                                                                                                                      G additional helpful tools
    "degreasing" new screens by lightly scrubbing the mesh with a                                                                                     • Mixing bowl and spatula — essential for creating custom mixed
    scrub brush, soap or Speedball Speed Clean, and water before            thin for water-based inks and will wrinkle and warp. Paper stock
                                                                                                                                                        colors.
    using in order to remove any oils or debris and create a slightly       labeled “80lb” cover or heavier will be a dream to print on. Also,
                                                                                                                                                      • Sponges or rags — you’re going to need to clean up sometime.
    more toothy surface.                                                    make sure to print on an “uncoated” paper — which means the
                                                                                                                                                      • Speedball Speed Clean™, Speedball Pink Soap™ or dish soap –
                                                                            paper does not have a shiny coating on it. Water-based inks can
                                                                                                                                                        helps clean screens and tools more effectively.
                                                                            have a hard time adhering to coated paper.
    ♦ For effective printing, the tension of your screen should feel                                                                                  • Scrub brush — primarily for agitating and removing Screen
       tight. IMPORTANTLY, this means that the mesh of this fabric                                                                                      Filler, or photo emulsion out of the screen.
       is also extremely fragile. A slight bump to a sharp corner,                                                                                    • Masking tape, Painter's Tape or Speedball®’s Blue Block Out
       or running something jagged over the screen can cause it                                                                                         Tape — essential for numerous purposes.
       to rip and pop. Please be careful. If a screen is popped or                                                                                    • Apron and rubber gloves for printing and working with emulsion.
       ripped you can either replace the screen fabric or purchase a
       complete new screen.

2
parte superior (hacia arriba)
CREACIÓN DE SU ESPACIO DE TRABAJO                                                                                                                                 F Base del marco/abrazaderas
                                                                                                                                                                  de bisagra            (opcional)
Antes de empezar a imprimir, necesitará un espacio apto para imprimir.                                                                                            La base de marco o las abrazaderas de bisagra de Speedball pueden
Cuando decida dónde imprimir, esto es lo que deberá considerar:                                                                                                   ayudar a mantener el marco inmóvil durante la impresión, en lugar de tener
                                                                                                                                                                  que sostener el marco usted mismo. Seleccione kits de Speedball que
• ACCESO A AGUA: Para la limpieza de pantallas y herramientas o para                                                                                              incluyan la base del marco. La base del bastidor requiere unir las bisagras
  el lavado de las pantallas. Las bañeras, las duchas y los lavamanos                                                                                             incluidas a la base y al marco para permitir que el marco se mantenga en su
  funcionan muy bien, al igual que los fregaderos grandes de cocina.                                                                                              lugar y se pueda subir y bajar fácilmente durante el proceso de impresión.
                                                                                                                                                                  Con cada base de marco se incluye una pata movible para ayudar a
• UNA SUPERFICIE PLANA PARA IMPRIMIR: Una mesa que no le importe                                                                                                  apuntalar el marco entre impresiones.
  que se ensucie o un banco de trabajo funcionan perfectamente.
                                                                                                           parte inferior (hacia abajo)

• UN ÁREA PARA SECAR SUS IMPRESIONES: Ya sea que esté imprimiendo
  carteles o camisetas, querrá contar con una gran área para colocar              C tinta
  todas sus impresiones para secar. Una sección de bajo tráfico siempre           Speedball produce tintas para tela y tintas acrílicas (para imprimir en papel
  puede útil.                                                                     plano). Ambas son tintas a base de agua, no contienen vapores y se
                                                                                                                                                                       orificio piloto
                                                                                  limpian con agua y jabón. Las tintas vienen en una amplia gama de colores
                                                                                  premezclados, pero siempre es posible mezclarlas para crear colores
herramientas básicas                                                              personalizados.                                                                                                                       orificio piloto
                                                                                                                                                                                                                           de la pata
                                                                                                                                                                                                                           movible
A racleta                                                                         ♦ Las tintas para tela y las acrílicas se pueden utilizar para imprimir en
                                                                                    papel, pero en tela ¡solo servirá la tinta para tela!
Una racleta típica es una lámina de plástico flexible o una hoja larga
de hule en un mango de madera. Speedball produce una variedad de                                                                                                       clavija de la          pata movible
tamaños y estilos de racletas que incluyen mangos de plástico o madera y          D modificadores                                                                         bisagra
3 diferentes tipos de hule. No importa qué racleta esté utilizando, tenga en      Existen también los modificadores de tinta; el extendedor y la base
cuenta que la cuchilla de la racleta debe ser semiflexible, recta y limpia sin    transparente crean un color transparente, la base del retardador disminuye      Las abrazaderas de bisagra también mantienen la pantalla en su lugar y
desperfectos, hendiduras ni suciedad.                                             el tiempo de secado de las tintas y del agua. Obviamente, el agua es            permiten levantarla y bajarla durante la impresión, pero no incluyen una
                                                                                  esencial para la limpieza, pero como está utilizando tintas a base de agua,     base preinstalada o una pata movible. Las abrazaderas de la bisagra
                                                                                  el agua también puede ser un recurso durante la impresión.                      se instalan típicamente de manera permanente en la superficie de
B pantalla                                                                        • Añada un poco de agua para diluir la tinta espesa para una impresión          impresión elegida (por ejemplo, tabla de impresión o tablero de madera
La "pantalla" en la serigrafía es la tela de malla en un marco de madera o            más fácil.                                                                  contrachapada).
de aluminio a través del cual se imprime. En el pasado, la seda era la tela           La tinta debe sentirse como un "yogurt".
de elección para estas pantallas, por lo que la técnica recibía el nombre
de serigrafía, pero actualmente todas las pantallas son de poliéster. El
                                                                                  • Un par de rociadas de una botella atomizadora es una gran manera
                                                                                      de evitar que la tinta y la pantalla se sequen mientras está usted          G herramientas útiles adicionales
número de hilos por pulgada en las "mallas" determinan la resolución de               imprimiendo.                                                                • Tazón para mezcla y espátula, esenciales para la creación de colores
la pantalla. Las pantallas con malla de alta densidad (200-300) pueden                                                                                              mezclados personalizados.
imprimir detalles finos y dejan pasar menos tinta a través de la pantalla. Las                                                                                    • Esponjas o trapos; algún día va a necesitar limpiar.
pantallas con malla de menor densidad 85-150 imprimen menos detalle,              E medios                                                                        • Speedball Speed Clean™, Speedball Pink Soap™ o el jabón para platos,
pero dejan pasar más tinta, lo que es útil para la impresión de textiles          PAPEL                                                                             ayudan a limpiar las pantallas y las herramientas de manera más
o para una tinta espesa como el blanco. Speedball tiene pantallas en              Cuando imprima en papel, es mejor imprimir en un papel lo más grueso              efectiva.
existencia con mallas de 85-305. Todos los kits de Speedball tienen una           posible. El papel se mide en libras y se clasifica por texto (delgado) y        • Cepillo de fregar, principalmente para remover y quitar el relleno o la
malla 110.                                                                        cubierta (grueso). Los papeles de texto son demasiado delgados para               emulsión fotográfica de la pantalla.
                                                                                  las tintas a base de agua y se arrugan y se deforman. El papel clasificado      • Masking tape, cinta de pintor o Blue Block Out Tape de Speedball®,
La malla en una pantalla nueva puede tener algunos aceites, polvo y               como "80 lb" para cubierta o más pesado será perfecto para imprimir en            esenciales para diversos propósitos.
suciedad debido al proceso de fabricación, y puede haber problemas                él. Además, asegúrese de imprimir en un papel "sin recubrimiento", lo           • Delantal y guantes de hule para imprimir y para trabajar con la emulsión.
para que la emulsión y/o la tinta de dibujo se adhieran. Recomendamos             que significa que el papel no tiene un recubrimiento brillante. Las tintas
"desengrasar" las pantallas nuevas frotando ligeramente la malla con un           a base de agua pueden tener dificultades para adherirse al papel con
cepillo de fregar, jabón o Speedball Speed Clean y agua antes de usarlas,         recubrimiento.
para eliminar cualquier aceite o residuos y crear una superficie un poco
más rugosa.                                                                       TELA (CAMISETAS, ETC.)
                                                                                  Cuando imprima sobre tela, primero asegúrese de que esté utilizando tintas
♦ Para la impresión efectiva, la tensión de la pantalla debe sentirse
  ajustada. IMPORTANTE, esto significa que la malla de esta tela es
                                                                                  hechas para impresión de telas. Las tintas a base de agua se decoloran
                                                                                  al ponerlas en la lavadora. Después de imprimir en tela la tinta se secará,
   también extremadamente frágil. Un ligero golpe en una esquina, o               pero todavía será necesario "curar" la tinta sobre la tela, proceso también
   pasar algo irregular sobre la pantalla puede causar que se rasgue y se         conocido como fijación con calor. Las tintas a base de agua de Speedball
   reviente. Tenga cuidado. Si una pantalla se revienta o se rompe, puede         se pueden curar usando una plancha de uso doméstico. Revise los ajustes
   reemplazar la tela de la pantalla o comprar una pantalla nueva.                de su plancha en relación con la tela que imprimió. Utilice solamente telas
                                                                                  que puedan ser sometidas a temperaturas de al menos 135°-190°C (275°-
Antes de usar la pantalla, debe sellar las costuras en donde convergen la         375°F). No utilice telas no porosas como el nailon. Coloque un pedazo de
tela y el marco en la parte superior e inferior de la pantalla. Esto ayudará      papel (el papel simple de copia es el mejor) sobre la parte superior de su
a la integridad estructural de la pantalla, y evitará que el agua y la tinta se   diseño impreso y cure con una plancha caliente durante 1-2 minutos.
acumulen en las costuras del marco de la pantalla.

                                                                                                                                                                                                                                                3
CRÉATION DE VOTRE ESPACE DE TRAVAIL Dessus (encastré)
E supports
TISSU (T-SHIRTS, ETC.)
Avant de commencer à imprimer, vous aurez besoin d'un espace utilisable Lors de l'impression sur du tissu, assurez-vous tout d'abord que vous
pour l'impression. Voici les éléments à considérer pour décider de l'endroit imprimez à l'aide d'encres destinées à l'impression sur des tissus.
d'impression : Les autres encres à base d'eau seront effacées lors du lavage. Après
l'impression sur le tissu, l'encre sèchera, mais vous aurez encore besoin
• L'ACCÈS À L'EAU : pour nettoyer les écrans et les outils et rincer les de « fixer » votre encre sur le tissu, processus également connu sous le
écrans. Les bains, douches et éviers de services fonctionnent très bien nom de thermofixation. Les encres à base d'eau de Speedball peuvent
tout comme les grands éviers de cuisine. être fixées à l'aide d'un fer à repasser. Vérifiez que les réglages du fer
conviennent au tissu sur lequel vous avez imprimé. Utilisez uniquement
• UNE SURFACE PLANE POUR L'IMPRESSION : une table que vous pouvez des tissus qui peuvent être soumis à des températures d'au moins 275°
salir sans problème ou un établi fonctionne parfaitement. Dessous (plat) à 375 °F. N'utilisez pas de tissus non poreux comme le nylon. Placez un
morceau de papier (le simple papier pour copies convient le mieux) par-
Avant d'utiliser votre écran, vous devez recouvrir de ruban les coutures aux
• UNE ZONE POUR LE SÉCHAGE DE VOS IMPRESSIONS : que vous dessus votre conception imprimée et fixer à l'aide d'un fer chaud pendant
points de jonction du tissu et du cadre situés au haut et au bas de l'écran.
imprimiez des affiches ou des t-shirts, vous avec besoin d'une grande 1 à 2 minutes.
Cela contribuera à assurer l'intégrité structurale de l'écran et empêchera
zone pour étaler toutes vos impressions à des fins de séchage. Une
l'eau et l'encre de s'accumuler dans les coutures du cadre de l'écran.
section de plancher peu utilisée pour circuler peut toujours convenir.
F base de cadre/pentures spéciales (facultatifs)
outils de base C encre Une base de cadre de Speedball ou des pentures spéciales peuvent vous
aider à garder le cadre fixe pendant l'impression et éviter le besoin que
Speedball produit des encres acryliques (pour l'impression sur du papier
vous teniez vous-même le cadre. Des trousses choisies de Speedball
plat) et des encres pour les tissus. Elles sont toutes des encres à base
incluent la base de cadre. La base de cadre nécessite de fixer les pentures
A raclette d'eau, elles ne produisent pas d'émanations et elles se nettoient à l'eau
et au savon. Les encres sont offertes dans une vaste gamme de couleurs
comprises sur la base et le cadre de façon à ce que le cadre soit maintenu en
Une raclette type est soit une lame en plastique souple ou une longue lame place et facilement soulevé et abaissé pendant le processus d'impression.
pré-mélangées, mais elles peuvent toujours être mélangées pour créer des
en caoutchouc fixée à une poignée en bois.Speedball fabrique une variété Une béquille est comprise avec chaque base de cadre pour aider à
couleurs personnalisées.
de tailles et de styles de raclettes, y compris des poignées en plastique ou soutenir un cadre entre les impressions.
en bois et 3 types différents de caoutchouc. Peu importe la raclette que
vous utilisez, gardez à l'esprit que votre lame de raclette doit être semi- ♦ Les encres acryliques et les encres pour les tissus peuvent toutes être
utilisées pour une impression sur du papier, mais uniquement l'encre
flexible, droite et propre, exempte d'entailles, de bosses et d'impuretés.
pour les tissus convient aux tissus!
B écran
L'« écran » en sérigraphie est le tissu avec un cadre en bois ou en D additifs trou de guidage
aluminium à travers lequel vous imprimez. Dans le passé, la soie était le Des additifs pour les encres sont également disponibles; une matière
tissu privilégié pour ces écrans; ce qui explique la raison pour laquelle la de charge et une base transparente créent une couleur transparente,
technique était appelée sérigraphie. Les écrans sont maintenant tous faits le retardateur ralentit le temps de séchage des encres et de l'eau.
Évidemment, l'eau est essentielle pour le nettoyage, mais puisque vous trou de guidage
en polyester. Les « mailles » de fils par pouce déterminent la résolution de
l'écran. Ainsi, les écrans à maille élevée (200 à 300) peuvent imprimer des utilisez des encres à base d'eau, l'eau peut également être un atout pour béquille
détails fins et laissent passer moins d'encre à travers l'écran. Les écrans à pendant l'impression.
maille plus faible (85 à 150) impriment moins de détails, mais laisse passer • Ajoutez un peu d'eau pour diluer l'encre épaisse afin de faciliter
plus d'encre à travers l'écran; ce qui est utile pour les textiles d'impression l'impression. Axe de charnière
L'encre devrait avoir une consistance semblable à celle d'un yogourt.
béquille
ou une encre épaisse comme le blanc. Speedball offre des écrans avec
des mailles variant de 85 jusqu'à 305. Toutes les trousses de Speedball • Appliquer quelques jets de bruine à l'aide d'un flacon pulvérisateur est
comportent une maille 110. une excellente façon d'empêcher l'encre et l'écran de sécher pendant
que vous imprimez.
Les pentures spéciales maintiennent également l'écran en place et
La maille sur un écran tout neuf peut comporter des huiles, de la poussière permettent la levée et l'abaissement pendant l'impression, mais elles ne
et de la saleté résidus du processus de fabrication, qui peuvent entraîner
des problèmes au niveau de l'adhérence de l'émulsion et du liquide à E supports comprennent ni base pré-installée ni béquille. Les pentures spéciales sont
généralement installées en permanence sur la surface d'impression choisie
dessin. Nous recommandons donc de « dégraisser » les écrans neufs en PAPIER
(par ex. table d'impression ou panneau de contreplaqué).
frottant légèrement la maille à l'aide d'une brosse à récurer, du savon ou Lors de l'impression sur du papier, il est préférable d'imprimer sur un morceau
du nettoyant Speedball Speed Clean et de l'eau avant toute utilisation de papier aussi épais que possible.Le papier est mesuré en livres (lb) et est
afin d'enlever les huiles et les débris et de créer une surface un peu plus classé en poids texte (mince) et couverture (épais). Les papiers de poids
texte sont trop minces pour les encres à base d'eau; ils se froissent et
G autres outils pratiques
rugueuse. • Bol à mélanger et spatule; essentiels pour créer des couleurs mélangées
s'enroulent. Les papiers étiquetés couverture de « 80 lb » ou plus lourd sont
personnalisées.
idéaux pour l'impression. De plus, assurez-vous d'imprimer sur un papier
♦ Pour une impression efficace, la tension de l'écran doit sembler
élevée au toucher. IMPORTANT, cela signifie que la maille de ce
« non couché »; ce qui signifie que le papier n'est pas enduit de couchage
• Éponges ou chiffons; vous devrez bien nettoyer tôt ou tard.
• Nettoyant Speedball Speed Clean™, savon Speedball Pink Soap™ ou
brillant. Les encres à base d'eau peuvent avoir de la difficulté à adhérer au
tissu est également extrêmement fragile. Un léger coup dans un coin savon à vaisselle; aide à nettoyer plus efficacement les écrans et les
papier couché.
pointu ou passer quelque chose dentelée sur l'écran peut provoquer outils.
une déchirure et la sortie du cadre. Veuillez donc faire attention. Si un • Brosse à récurer; utilisée principalement pour agiter et enlever le
écran est sorti du cadre ou déchiré, vous pouvez remplacer le tissu remplisseur d'écran ou l'émulsion photographique de l'écran.
d'écran ou acheter un nouvel écran complet. • Ruban-cache, ruban de peintre ou le ruban obscurcissant bleu de
Speedball®; essentiel à de nombreux usages.
• Tablier et gants en caoutchouc pour l'impression et le travail avec l'émulsion.
4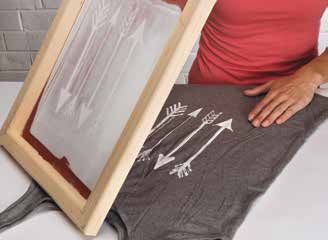
IHREN ARBEITSBEREICH ANLEGEN Oben (vertieft)
E Hilfsmittel
GEWEBE (HEMDEN USW.)
Bevor Sie mit dem Drucken beginnen, benötigen Sie einen geeigneten Wenn Sie auf Gewebe drucken, vergewissern Sie sich zunächst, dass Sie
Bereich, auf dem Sie drucken können. Bei der Entscheidung, wo gedruckt mit Druckfarben drucken, die für den Gewebedruck hergestellt wurden.
werden soll, sollten Sie Folgendes berücksichtigen: Andere Farben auf Wasserbasis waschen sich durch Wäsche einfach
heraus. Nach dem Bedrucken von Gewebe wird Ihre Farbe trocknen, aber
• ZUGANG ZU WASSER: : Zur Reinigung von Sieben und Werkzeugen Sie müssen Ihre Farbe noch auf dem Gewebe „aushärten“, was auch als
oder zum Auswaschen von Sieben. Badewannen, Duschen und Thermofixierung bezeichnet wird. Speedball-Stofffarben auf Wasserbasis
Waschbecken eignen sich hervorragend, ebenso wie große können mit einem Haushaltsbügeleisen ausgehärtet werden. Überprüfen
Küchenspülen. Sie Ihre Bügeleinstellungen im Vergleich zu dem Gewebe, auf den Sie
gedruckt haben. Verwenden Sie nur Gewebe, die Temperaturen von
• EINE FLACHE OBERFLÄCHE ZUM DRUCKEN : Ein Tisch, bei dem es Unterseite (eben) mindestens 275°-375° F ausgesetzt werden können. Verwenden Sie kein
Ihnen nichts ausmacht, ihn zu beschmutzen, oder eine Werkbank sind nicht poröses Gewebe wie Nylon. Legen Sie ein Blatt Papier (am besten ein
Bevor Sie Ihr Sieb verwenden, sollten Sie die Nähte an der Stelle,
optimal. einfaches Kopierpapier) über Ihr gedrucktes Design und härten Sie es 1-2
an der Gewebe und Rahmen aufeinander treffen, sowohl oben als auch
Minuten lang mit einem heißen Bügeleisen aus.
unten am Sieb zukleben. Dies trägt zur strukturellen Integrität des Siebs
• EINEN BEREICH ZUM TROCKNEN IHRER DRUCKE : Ganz gleich, ob
bei und verhindert, dass sich Wasser und Farbe in den Nähten des
Sie Plakate oder Shirts drucken, Sie benötigen eine große Fläche,
auf der Sie all Ihre Drucke zum Trocknen auslegen können. Ein Siebrahmens ansammeln. F Rahmensockel/Scharnierklemmen (optional)
Fußbodenbereich, der wenig strapaziert wird, kann notfalls immer Ein Speedball-Rahmenfuß oder Scharnierklemmen können dazu beitragen,
verwendet erledigen.
C Farbe dass der Rahmen während des Druckens stationär bleibt, anstatt den
Rahmen selbst halten zu müssen. Einige Speedball-Kits enthalten
Speedball produziert sowohl Stofffarben als auch Acrylfarben (für den
den Rahmensockel. Der Rahmensockel erfordert die Anbringung der
Grundwerkzeuge Druck auf flachem Papier). Sie sind beide auf Wasserbasis, enthalten keine
Dämpfe und lassen sich mit Wasser und Seife reinigen. Die Farben sind
mitgelieferten Scharniere an Basis und Rahmen, damit der Rahmen an
seinem Platz gehalten und während des Druckvorgangs leicht auf und ab
in einer breiten Palette von vorgemischten Farben erhältlich, können aber
gehoben werden kann. Jedem Rahmensockel liegt ein Stützbein bei, um
A Rakel immer zusammengemischt werden, um maßgeschneiderte Farben zu
erstellen.
einen Rahmen zwischen den Drucken abzustützen.
Ein typischer Rakel ist entweder eine flexible Kunststoffklinge oder ein
lange Klinge aus Gummi in einem Holzgriff. Speedball stellt eine Vielzahl
von Größen und Ausführungen von Rakeln her, darunter mit Kunststoff- ♦ Sowohl Acryl- als auch Stofffarben können zum Drucken auf Papier
verwendet werden, aber nur Stofffarbe funktioniert auf Gewebe!
oder Holzgriffen sowie drei verschiedene Arten aus Gummi. Unabhängig
davon, welche Rakel Sie verwenden, denken Sie daran, dass Ihr Rakelblatt
halbflexibel, gerade und sauber sein sollte, ohne Kerben, Beulen oder
Schmutz. D Modifikatoren Vorbohrung
Es sind auch Farbmodifikatoren erhältlich; Füllstoffe und transparente Basis
erzeugen eine transparente Farbe und die Verzögererbasis verlangsamt die
B Sieb Trocknungszeit der Farben. Natürlich ist Wasser für die Reinigung unerlässlich,
Trittfuß
Das „Sieb“ im Siebdruck ist das hölzerne oder aluminiumgerahmte Gewebe, aber da Sie Farbe auf Wasserbasis verwenden, kann Wasser auch beim
Drucken ein Pluspunkt sein. Vorbohrung
durch den Sie drucken. In der Vergangenheit war Seide das Gewebe
der Wahl für diese Siebdrucke – weshalb die Technik auch Seidendruck • Fügen Sie etwas Wasser hinzu, um die dicke Farbe zum leichteren
genannt wurde – aber heute sind alle Siebe aus Polyester. Faden- Drucken zu verdünnen. Farbe sollte sich eine „joghurtähnliche“
„Maschen“ pro Zoll bestimmen die Auflösung des Siebs. Siebe mit hoher Konsistenz haben. Scharnierklemmen Trittfuß
Maschenweite (200-300) können feine Details drucken und lassen weniger • Ein paar Spritzer aus einer Sprühflasche sind eine gute Möglichkeit,
Farbe durch das Sieb hindurch. Niedrigere 85-150er Maschensiebe drucken um zu verhindern, dass Ihre Farbe und Ihr Sieb während des Druckens
weniger Details, lassen jedoch mehr Farbe durch, was beim Drucken von austrocknen.
Textilien oder einer dicken Farbe, wie weiß, hilfreich ist. Speedball führt Scharnierklemmen halten das Sieb auch an seinem Platz und ermöglichen
Siebe mit einer Maschenweite von 85-305. Alle Speedball-Kits haben eine
110er Maschenweite. E Hilfsmittel das Anheben und Absenken während des Druckens, enthalten jedoch
keinen vormontierten Sockel oder Stützbein. Die Scharnierklemmen
PAPIER
werden in der Regel fest auf der gewählten Druckfläche (z. B. Drucktisch
Die Masche auf einem fabrikneuen Sieb kann einige Öle, Staub und Beim Drucken auf Papier ist es am besten, auf ein möglichst dickes Stück
oder Sperrholzplatte) montiert.
Schmutz aus dem Herstellungsverfahren mit sich führen und das Anhaften Papier zu drucken. Papier wird in Pfund (lbs) gemessen und nach Text (dünn)
von Emulsion und/oder Zeichnungsflüssigkeit kann problematisch sein. Wir und Einband (dick) kategorisiert. Papiere mit Textgewicht werden für Farben
empfehlen, neue Siebe durch leichtes Schrubben des Gewebes mit einer auf Wasserbasis viel zu dünn sein und knittern und sich verziehen.
Papierbestand mit der Aufschrift „80lb“ bezogen oder schwerer sind ideal zum
G Zusätzliche hilfreiche Werkzeuge
Schrubbbürste, Seife oder Speedball Speed Clean™ und Wasser vor • Rührschüssel und Spatel – unerlässlich für die Erstellung
dem Gebrauch zu „entfetten“, um Öle oder Rückstände zu entfernen und Bedrucken. Achten Sie auch darauf, auf „unbeschichtetes“ Papier zu drucken maßgeschneiderter Mischfarben.
eine etwas zahnförmigere Oberfläche zu schaffen. – das heißt, das Papier hat keine glänzende Beschichtung. Druckfarben auf • Schwämme oder Lappen – irgendwann werden Sie aufräumen müssen.
Wasserbasis können auf gestrichenem Papier nur schwer haften. • Speedball Speed Clean™, Speedball Pink Soap™ oder Spülseife – hilft,
♦ Für einen effektiven Druck sollte sich die Spannung Ihres Siebs straff
anfühlen. WICHTIG: Dies bedeutet, dass auch die Masche dieses
Siebe und Werkzeuge effektiver zu reinigen.
• Scheuerbürste – in erster Linie zum Aufrühren und Entfernen von
Gewebes äußerst zerbrechlich ist. Ein leichter Stoß an eine scharfe Siebfüller oder Fotoemulsion aus dem Sieb.
Ecke oder wenn etwas Zackiges über das Sieb läuft, und es könnte • Abdeckband, Malerband oder Speedball®'s blaues blockieren Band
reißen und platzen. Seien Sie bitte vorsichtig. Wenn ein Sieb geknickt – für zahlreiche Zwecke unverzichtbar.
oder gerissen ist, können Sie entweder das Siebgewebe ersetzen • Schürze und Gummihandschuhe zum Drucken und Arbeiten mit
oder ein komplett neues Sieb kaufen. Emulsion.
5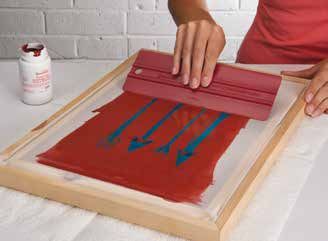
SELECTING YOUR PRINT TECHNIQUE
    There are three primary means of producing a screen printed image,
    each one with their own features, benefits, and limitations. Before
    getting started, read through these descriptions to see which technique
    best suits your artwork and interest, or matches the kit purchased.

    SELECCIÓN DE LA TÉCNICA DE IMPRESIÓN
    Hay tres métodos principales de producir una imagen impresa en
    la pantalla, cada uno con sus propias características, beneficios y
    limitaciones. Antes de empezar, lea estas explicaciones para ver qué
    técnica se adapta mejor a su diseño e interés, o se ajusta al kit adquirido.

    SÉLECTION DE VOTRE TECHNIQUE D'IMPRESSION
    Une image imprimée par sérigraphie peut être produite par
    trois techniques principales, chacune comportant ses propres
    caractéristiques, avantages et limites. Avant de commencer, veuillez lire
    ces descriptions pour déterminer la technique qui convient le mieux à
    votre image et vos intérêts ou qui correspond à la trousse achetée.

    AUSWAHL IHRER DRUCKTECHNIK
    Es gibt drei Haupttechniken zur Herstellung eines Siebdruckbildes,
    jedes mit seinen eigenen Merkmalen, Vorteilen und
    Unvollkommenheiten. Lesen Sie diese Beschreibungen durch bevor
    Sie damit beginnen, um herauszufinden, welche Technik am besten zu
    Ihrem Kunstwerk und Ihrem Interesse oder zu dem gekauften Kit passt.

6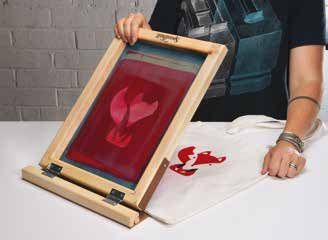
CUT PAPER STENCIL                                            P.6         DRAWING FLUID & SCREEN FILLER                              P.8       PHOTO EMULSION                                             P.11
best for:                                                                best for:                                                            best for:
• Fast, graphic image making                                             • Hand-drawn/painted imagery                                         • Creating a photographic stencil of a
• Introducing yourself to the screen printing technique                  • Greater detail and control without need for exposure                 pre-printed black and white image.
features:                                                                features:                                                            features: Photo emulsion allows for highest fidelity and detail.
This technique relies on cutting your stencil out of thin paper.         Drawing fluid and screen filler work together to create a painted    Almost anything you can print from a black and white printer you
Given its simplicity, it requires the least amount of preparation, but   stencil. This is an effective technique for detailed hand-drawn      can expose as a photo stencil. Because of the specific tools and
paper stencils also allow for limited detail.                            images, or images with a “painterly” quality.                        intricate steps, this is also the most complicated technique.

  ESTÉNCIL DE RECORTE DE PAPEL                                P.18         TINTA DE DIBUJO Y RELLENADOR DE PANTALLA                  P.20       EMULSIÓN FOTOGRÁFICA                                     P.23
es la mejor opción para:                                                 es la mejor opción para:                                             es la mejor opción para:
• La creación rápida de imágenes gráficas                                • Imágenes dibujadas a mano/pintadas                                 • La creación de un esténcil fotográfico a partir de una
• Iniciarse en la técnica de serigrafía                                  • Mayor detalle y control sin necesidad de exposición                  imagen preimpresa en blanco y negro.
características:                                                         características:                                                     características: La emulsión fotográfica permite una mayor
Esta técnica se basa en el recorte de un esténcil en papel               La tinta de dibujo y el rellenador de pantalla trabajan              fidelidad y detalle. Casi cualquier cosa que puede imprimir en una
delgado. Dada su simplicidad, requiere muy poca preparación, sin         conjuntamente para crear un esténcil pintado. Esta es una técnica    impresora blanco y negro, puede exponerla como un esténcil
embargo, los esténciles de papel permiten un detalle limitado.           eficaz para imágenes detalladas a mano, o para imágenes con          fotográfico. Debido al uso de herramientas específicas y a los
                                                                         una calidad "pictórica".                                             pasos intrincados, esta es también la técnica más complicada.

  POCHOIR EN PAPIER À DÉCOUPER                               P.30         LIQUIDE À DESSIN ET REMPLISSEUR D'ÉCRAN P.32                          ÉMULSION PHOTOGRAPHIQUE                                  P.35
idéal pour :                                                             idéal pour :                                                         idéal pour :
• Création rapide d'image graphique                                      • Images dessinées à la main et peintes                              • Création d'un pochoir photographique d'une image
• Vous familiariser avec la technique de sérigraphie                     • Plus de détails et de contrôle sans besoin d'exposition              pré-imprimée en noir et blanc.
caractéristiques :                                                       caractéristiques :                                                   caractéristiques : L'émulsion photographique permet le
Cette technique repose sur le découpage de votre pochoir dans            Le liquide à dessin et le remplisseur d'écran travaillent ensemble   niveau le plus élevé de fidélité et de détails. Presque tout ce que
du papier mince. Étant donné sa simplicité, elle nécessite le            pour créer un pochoir peint. Il s'agit d'une technique efficace      vous pouvez imprimer à partir d'une imprimante en noir et blanc,
moins de préparation, mais les pochoirs en papier ne permettent          pour les images détaillées dessinées à la main ou des images de      vous pouvez l'exposer comme un pochoir photographique. En
également que des détails limités.                                       qualité « peintre ».                                                 raison des outils spécifiques et des étapes complexes, c'est aussi la
                                                                                                                                              technique la plus compliquée.

  GESCHNITTENE PAPIERSCHABLONE                               P.30         ZEICHNUNGSFLÜSSIGKEIT UND SIEBFÜLLER P.32                             ÉMULSION PHOTOGRAPHIQUE                                  P.35
Beste für :                                                              Beste für :                                                          Beste für :
• Schnelle, grafische Bilderstellung                                     • Handgezeichnete/gemalte Bilder                                     • Erstellen einer fotografischen Schablone von einem
• Einführung in die Siebdrucktechnik                                     • Größere Detailgenauigkeit und Kontrolle ohne notwendige              vorgedruckten Schwarz-Weiß-Bild
                                                                           Belichtung
Eigenschaften :                                                                                                                               Eigenschaften : Die Fotoemulsion ermöglicht höchste
Bei dieser Technik wird die Schablone aus dünnem Papier                  Eigenschaften :                                                      Wiedergabetreue und Detailtreue. Fast alles, was Sie von einem
ausgeschnitten. Aufgrund seiner Einfachheit erfordert es den             Zeichnungsflüssigkeit und Siebfüller arbeiten zusammen, um eine      Schwarz-Weiß-Drucker ausdrucken können, können Sie als
geringsten Vorbereitungsaufwand, aber auch Papierschablonen              gemalte Schablone zu erstellen. Dies ist eine effektive Technik      Fotoschablone belichten. Aufgrund der spezifischen Werkzeuge und
erlauben nur begrenzte Details.                                          für detaillierte handgezeichnete Bilder oder Bilder mit einer        der komplizierten Schritte ist dies auch die komplizierteste Technik.
                                                                         „malerischen“ Qualität.

                                                                                                                                                                                                                      7
CUT PAPER STENCIL                                                       1                                                                       2

    necessary tools
    A Bienfang® Graphics 360™ Marker Paper
    B Craft Knife

     A                                    B

    creating your artwork                                                creating your print
    • With a pencil, draw your image on a sheet of                       See “Creating Your Workspace” (Pg. 3) for tool and
      Bienfang® Graphics 360™ paper. (A)                                 workspace descriptions.
    • Allow for at least a 2” margin on all sides between
      your image and the inside of your screen frame. (Fig. 1)
    • Using your craft knife (B) on top of a cutting mat or other safe
                                                                         off-contact
                                                                         To create a cleaner and crisper printed image, it helps to have the
      cutting surface, cut your drawn image out, creating your paper
                                                                         mesh slightly up off your print surface until the moment you press
      stencil. (Fig. 2)
                                                                         it down onto the surface with your print stroke. This is called “off-   Once your print paper is placed correctly, carefully lift up your
                                                                         contact.” A coin taped under each bottom corner of your screen          screen, making sure to not move your paper, and stick two pieces
    ♦   Other paper such as rice paper, wax paper, and acetate can
                                                                         can be an effective way to provide enough “off-contact” for the         of thick tape or thin cardboard against the bottom edge of your
        at times be a suitable paper stencil media as well.
                                                                         mesh before you print.                                                  paper, and two on the left or right edge. These registration tabs
                                                                                                                                                 will stay on the table and act as a “jig” to keep all paper placed in
    ♦ Keep in mind the fundamental rule of any cut stencil: any                                                                                  the same area under your print.
        shape can easily be cut into a stencil, but a shape within       paper
        another shape is impossible because the middle shape falls       One of the keys to a successful print is making sure your paper is
        out. (Once you become more experienced with cut paper            in the right place every time. This is especially true when printing    fabric
        stencil you may be able to carefully place free-floating         a multi-color image, which requires the art to be lined up, or “in      If printing shirts or bags, cut a piece of thick paper, cardboard, or
        counter-form shapes on your print surface before printing.)      registration.”                                                          foam board to slide inside the shirt to keep ink from bleeding onto
                                                                                                                                                 the other side when printing.
                                                                         With your screen frame secured (if necessary — see “frame base/
                                                                         hinge clamps” in “creating your workspace”), place your sheet           If your goal is printing a single color image on a shirt, rule of thumb
                                                                         of paper underneath your screen and adjust your sheet so that it        for printing shirts is to try and print the artwork three fingers width
                                                                         is placed accurately in relation to your image stencil. (If you are     down from the collar. (Fig. 3)
                                                                         using paper stencils, this is as easy as making sure your paper
    Position your paper stencil under your screen in preparation for     stencil and paper are aligned and centered underneath your              ♦ Given its tendency to bend and stretch, printing multicolor
    printing. Pat yourself on the back and relish the available hours    screen.) You may need to lift and lower your screen a few times to         artwork on fabric can be a bit more of a challenge than
    that still stretch ahead of you because of all the time you just     check placement.                                                           printing on paper, but it is not impossible. As long as your
    saved making a paper stencil.                                                                                                                   additional imagery does not need to line up too closely,
                                                                                                                                                    you can easily eyeball additional screens over the top of
                                                                                                                                                    previously printed images and print additional color to great
                                                                                                                                                    success. Any tighter registration on fabric may require more
                                                                                                                                                    elaborate screen printing set-ups than provided.

8
3 4 5
printing your image printing steps clean up
Oh boy, oh boy, now we get to print!
Pulling your squeegee is the heart of the craft of screen printing.
additional materials: ink
• spray bottle of water (optional) Using a spatula, squeegee, or hand-held scraper, collect any
The speed of your pull, squeegee angle, pressure, and “ink-
excess ink and return it to the original jar or any other airtight
wrangling” are some of the core skills for a good print.
The following steps will guide your through the mechanics of a container — a container with a removable lid works well. You can
how to print. Good luck! See you on the print side: easily store any excess ink at room temperature for a few weeks,
The full print stroke is comprised of pulling the ink toward you on
or even months.
the “print stroke,” then lightly pushing the ink back up to the top of
1 Scoop out and add a few tablespoons of ink along the top of the
the screen as a “flood stroke” to re-ink the screen and print again.
screen (farthest from you). All Speedball inks are water-based, and safe to wash down the
Do not lay any ink on your design or open mesh. drain. Soap and water will easily wash up any excess ink. Ink
2 Place your squeegee behind the ink, tilted approximately 60 which has dried into the screen may need to be scrubbed or
print stroke flood stroke
degrees in order to create a sharp print edge. Pull the squeegee removed. It is natural that some inks may permanently stain a
toward you and across your image, evenly applying as much screen, but this will not affect print quality at all.
pressure as it might require to open a heavy door. (Fig. 4)
3 Stop your pull BEFORE you reach the bottom of the screen,
6
5
and lift your screen slightly to separate the screen from your
work area, tools and supplies
1 2 3 4 Make sure to pick up and wipe down your work area.
7 print surface.
4 Lift your squeegee, and place it in FRONT of the bead of ink.
Using Speedball Pink Soap or dish soap, and a scrub brush, remove
5 Applying light to no pressure at all, “flood” the ink back over
any excess ink from the blade and edges of the squeegee. Let
test printing your screen and image, towards the top of the screen.
dry. Remove tape from your screen frame and wash away excess
Before printing, it is always wise to print some “test prints” on 6 Finish your flood stroke BEFORE you reach the top of the
ink with warm water before continuing on to removing the stencil.
scrap paper or fabric. This will help you recognize and remedy screen, lift your squeegee, and lean it against the back of the
any issues before any legitimate printing. You can test print on screen, behind the ink.
anything you have laying around. 7 Lift your screen and… cleaning your stencil
As you wash ink from the screen, your stencil should fall loose
from the screen. Use soap, water, and a soft scrub brush to
experience the miracle of screen printing remove all ink and paper from your screen. Dispose of paper
Congratulations, you just produced your first screen print using
stencil in the garbage and leave screen to dry.
the paper stencil method! (Fig. 5)
9DRAWING FLUID AND SCREEN FILLER 2 3
1
necessary tools B C D E
A drawing fluid
B paintbrush
C screen filler drawing screen
D squeegee or flat board for spreading fluid filler
draw your image screen filler washing out the drawing fluid
• You can either sketch your image out on paper first, or lightly The purpose of screen filler is to coat all areas of the screen which • Once the screen filler is completely dry, rinse your screen front
draw your artwork directly onto the screen. (Careful not to tear you do not want to print. Do not let the screen filler become too and back with cold or room temperature water.
or puncture the screen with your pencil.) thick or drip through the screen. Don’t worry if the screen filler • As you continue to rinse your screen, the blue drawing fluid
• Make sure you allow at least a 2” margin between your artwork does not fully cover all the way to the inside edges of your frame will begin to wash away from underneath the screen filler and
and all four sides of the inside of your screen. — you will be taping these areas just before printing. reveal your painted stencil. (Fig. 3)
• Lay your screen face down on a flat work surface. • Hold your screen to the light to check on the quality of your
♦ If you’d like a little texture around the outside your image, stencil. If some portions of your stencil are not washing out,
you can also intentionally NOT coat the screen perfectly with scrub gently with a non-soapy scrub brush. Conversely, portions
drawing fluid screen filler, or also dry brush some of the edges for a more of your stencil which are unintentionally washing away can be
organic and painterly textured border when you print. (Fig. 2) touched up and patched with tape or screen filler once your
Anything drawn with drawing fluid will become your printed image, screen is dry.
so you may take advantage of the opportunity for painterly lines in • Stir the screen filler (C) thoroughly. Once you have effectively washed out your image, set your
your drawing. (Over time, it will settle forming a white layer on top.) screen aside and let your screen dry one last time.
• If you are tracing a sketch, place your sketch under the screen. • Working over a sink, carefully drizzle a small amount of screen
• Using drawing fluid (A) and a paintbrush (B), paint your desired
image. (Fig. 1)
filler onto the same side of the screen as your drawing fluid. ♦ Knowing that you can paint with screen filler just as easily as
• With a SINGLE PASS of your squeegee or any flat-edge tool (D), with drawing fluid, you can simply paint on the screen filler
• Try not to let the drawing fluid collect and drip through the coat the entire screen including your drawn image. (Fig. 2) leaving the screen open where you wish the stencil to print.
screen, or become too thick. • Do not "overwork" the screen filler over the drawing fluid or it
• Once done, let your screen dry completely. will dissolve some of the drawing fluid.
• Let your screen dry completely.
10You can also read