FUSION GTX200 User Manual Benutzerhandbuch Manuale utente
←
→
Page content transcription
If your browser does not render page correctly, please read the page content below
FUSION
     GTX200

  User Manual
  Benutzerhandbuch
  Manuale utente

www.aguriworld.co.uk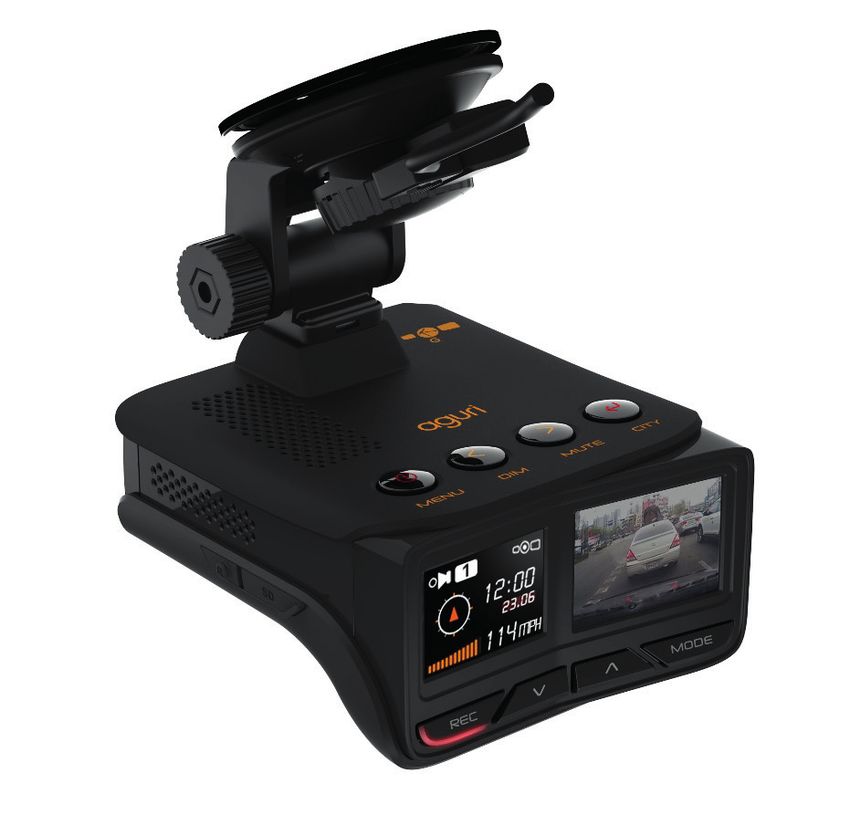
Fusion GTX200 User Manual
Contents
Fusion speed trap detection settings               Fusion DVR Dash cam settings
Product overview                     3            Resolution21
What’s in the box                    5            Video quality                  21
Speed trap detection                               Set Video loop time            21
standby screen explained             5            Microphone22
Installation6                                     Time lapse                     22
Fusion default speed                               Language22
detector settings                    7
                                                   Car number set                 23
Using Fusion around Europe           8
                                                   Format the SD Card             23
GPS speed trap settings             10
                                                   Date/time stamp                23
Quick start setting                 10
                                                   Auto LCD off                   24
Software version                    10
                                                   Parking Mode                   24
Change screen colour                10
                                                   Default setting                25
Voice alerts                        11
                                                   Video playback                 25
Auto Mute                           11
                                                   Video playback using
City button & Smart Filter settings 11            Aguri Fusion PC video software 25
Brightness control                  12            Flicker – adjust Hz rate       28
On/Off/Volume control               12            G-sensor shock/impact sensor   28
Speed unit - KMH/MPH                12            GMT - GPS auto update time     28
Speed limit                         12            WDR – Wide Dynamic Range       29
GPS Clock                           13            Technical specification -
Changing the language               13            DVR dash cam                   29
Factory reset                       13            Disposal of Old Electrical
Updating the speed trap database                   & Electronic Equipment         30
and system software using a PC      13            Warranty31
Updating your Fusion speed trap
database and system software
using a Mac                         14
Copyright
Copyright @2016 Aguri Limited. All rights reserved.
Product specifications and features are for reference only and are subject to change without prior
notice.
Declaration
This User Manual is published by Aguri Limited without any warranty. Improvement and changes
to this User Manual necessitated by typographical errors, inaccuracies of current information, or
improvements to programs and/or equipment, may be made by Aguri Limited any time and without
notice. Such changes will, however, be incorporated into new editions of this User Manual.
                                             EN • 2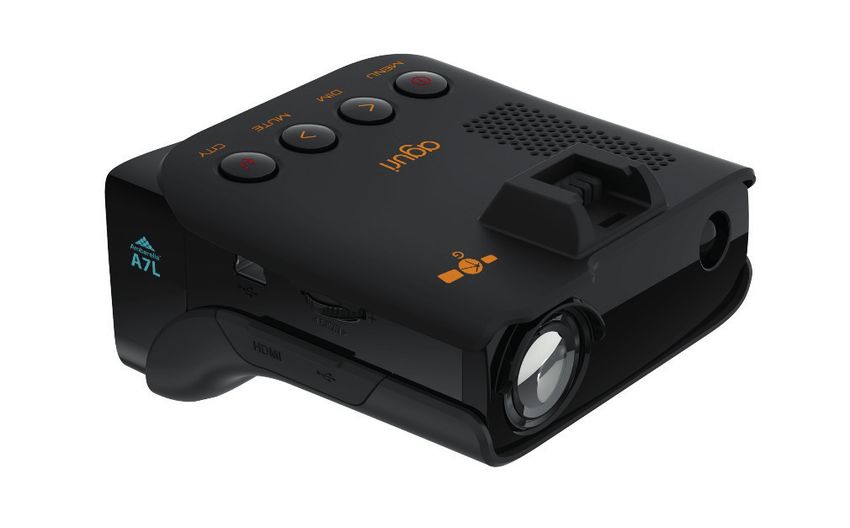
Product overview

1
                                                                           4

                                                                           5

3

2
                                                                           8

6                                                                          12

7
                             9                   10        11

1.   Windscreen bracket                     10. Down arrow button. Press to turn
2.   Menu button                                DVR microphone on and off. Use to
                                                scroll down through menu options.
3.   Dim button
                                            11. Up arrow button. Press to manually
4.   Mute button                                turn off DVR LCD. Use to scroll up
5.   City button – use to switch Smart          through DVR menu options.
     Filter modes to reduce false alerts.   12. Mode button. Press and hold to
6.   Micro SD card slot for use with            play video back on the device.
     DVR Dash cam.                          13. Alternative 12V Mini USB power
7.   Speed trap detection OLED                  connection point.
8.   DVR dash cam 1.5” colour LCD
9.   Rec button. Press to manually start
     and stop recording. Press and hold
     to enter DVR dash cam settings
     menu.
                                        EN • 3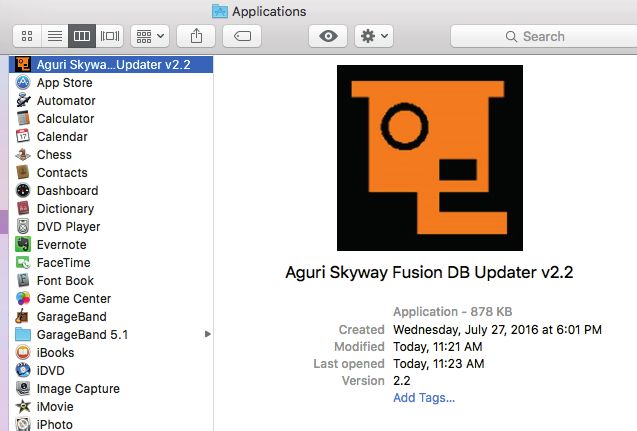
1                  2

                                                                            3
10

                                                                            4
9

                                                                            5

            8                  7              6

1.   Built-in speaker                    8.   Mini HDMI socket. Connect to a
2.   Windscreen bracket mounting slot.        TV to play back video directly from
                                              the device.
3.   Built-in Laser detector
                                         9.   12V Mini USB power connection
4.   Radar detector                           point. Connect the 12V vehicle
5.   DVR dash cam 170 degree wide-            charger supplied here or connect
     angle lens video recorder                mini USB data cable to update
6.   Combination Volume/on/off button         speed trap database and software.

7.   Micro USB data transfer socket.     10. Built-in Ambarella A7L HD video
     To be used for updating the DVR         processor.
     dash cam only. Do not use to
     power the device.

                                     EN • 4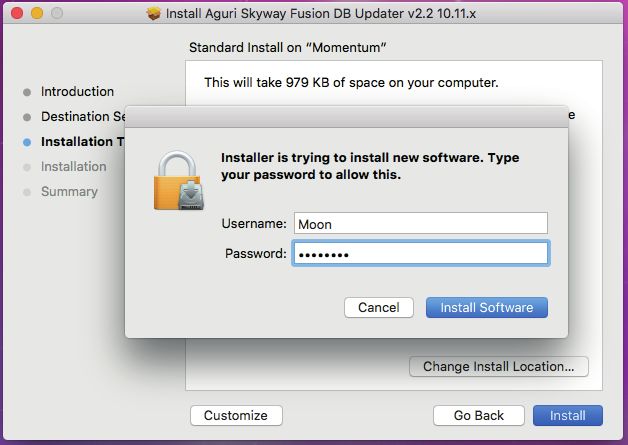
Whats in the box?
1 x Aguri Fusion GTX200
1 x USB data cable
1 x 12V car power connector
1 x 12V ‘hardwire’ power connector
1 x GPS windscreen bracket
1 x User guide

Speed trap detector standby screen
explained

Mute speaker       Smart Filter            GPS status.
status             status                  (a cross will appear over
on or off                                  the GPS icon if there is
                                           no signal)

                                                             GPS Clock

                                                             GPS Date

GPS compass          Your speed                     Your speed
                     indicator graphic

                                  EN • 5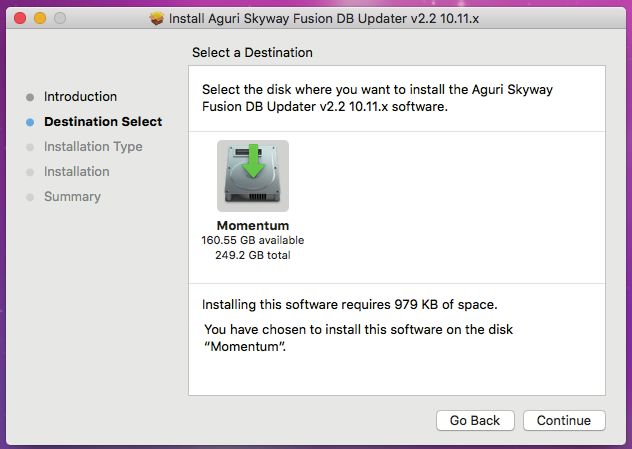
Installation
Attach the windscreen bracket by sliding it in to the slot on the top of the
unit. Find a suitable area off the windscreen to mount the unit where it
has an unobstructed view of the road ahead and a clear view of the sky
so that the GPS windscreen bracket can connect to satellites. If you are
powering from the cigarette lighter socket we recommend mounting it
toward the bottom of the windscreen, just above the dashboard so that it
has a good view of the road ahead, but so that it’s view is not obstructed
by the windscreen wipers. Alternatively, you can mount it at the top
of the windscreen near to the rear view mirror, but this might only be
convenient if you intend to ‘hard wire’ the unit directly to your vehicle’s
electrical system.

 User tip. Remember that you will need to attach the power cable,
 so find a position where this can be done without obstructing
 the vehicle’s controls or becoming a danger to the driver or
 passengers.

Once you have chosen a suitable location, press the suction cup bracket
quite firmly to the glass with the lever in the ‘unlock’ position and then
rotate the lever 90 degrees in to the ‘lock’ position to secure. Finally,
loosen the nut slightly and adjust the bracket so that the unit is in a
horizontal position and then re-tighten.

Connecting to power
Attach the mini USB plug on one end of the power cable to either the
mini USB socket on the side of the unit or the mini USB socket on the
lever of the GPS windscreen bracket depending on which is the most
convenient for your installation. Insert the other end in to an appropriate
cigarette lighter/12V socket in your vehicle.
Please note that you should only use the 12V cigarette lighter
adaptor or the 12V hardwire lead supplied to power the unit. Most
other USB supplies, such as the accessory style USB socket,
sometimes fitted to newer vehicles, will only provide a 5V output
which will be insufficient to power the unit.

                                   EN • 6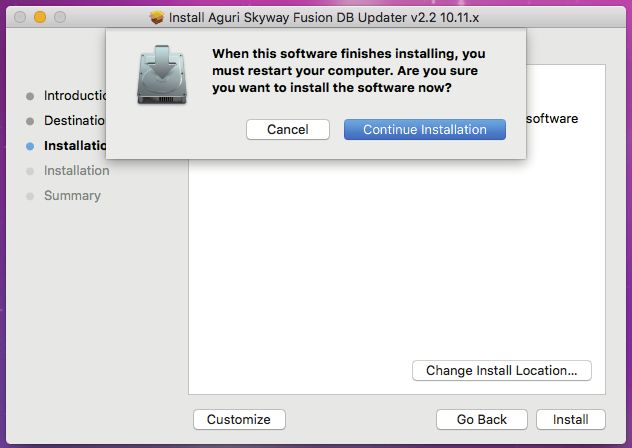
Installation tips
Before mounting your Fusion, clean the area of the windscreen where
you have chosen to mount your unit, with a good quality glass cleaner to
ensure the suction cup bracket makes a good contact.
Remember to mount the unit and install the power cable safely in a
location where it does not interfere with the driver or the controls of the
vehicle.
It is also possible to ‘hard-wire’ your Fusion and hide the power cables,
providing a neater installation. Please contact an auto electrician or your
local car dealer for further details.

General operation
Aguri Fusion combines a GPS, radar, and laser speed trap detector
and a high performance DVR dash cam in one unit. Below you will find
separate set-up instructions for each.

Fusion speed detector settings
We have shipped your Fusion with the user settings, set for optimum
performance in the UK as follows:-
Radar/laser alert settings
X Band - Off
K Band On
Ka Band - Off
Laser - On
GPS alert settings
Speed trap alerts – On
Red light cameras – On
Mobile speed trap locations – On
Smart Filter – 1
AutoMute – On
It is however, possible to change these settings to suit your own
requirements. For further information follow the instructions below.

                                   EN • 7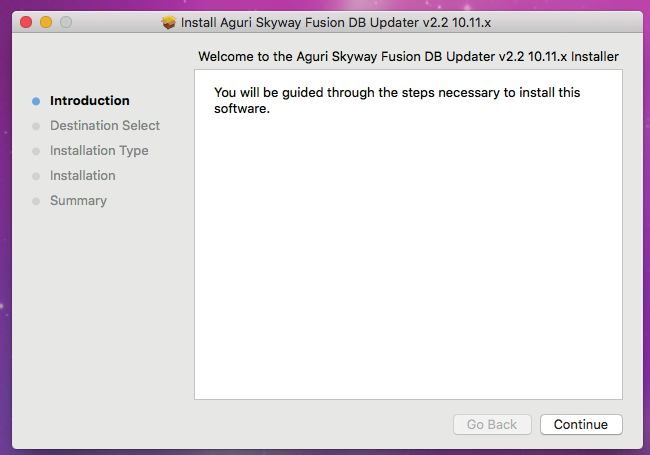
Menu settings
Radar/Laser settings
It is possible to switch individual radar frequencies on and off, to fine tune
Fusion to the country you are driving in.
Enter the menu by pressing the ‘menu’ button. Scroll left or right, using
the ‘Dim’ (+) or ‘Mute’ (-) buttons, until you see the radar frequency you
want to change. Press the ‘City’ button to switch the frequency on or off
and press the ‘Menu’ button to confirm and return to the menu.
The following options are available:-
X Band – On/Off
K Band – On/Off
Ka Band – On/Off
Laser – On/Off

 User tip: We recommend you keep Laser switched on at all times.

Using Fusion around Europe
Below are the radar/laser set-ups we would recommend for a selection
of other countries if you using your Fusion outside of the UK.

Germany/Austria
Radar/laser alert settings
X Band - Off
K Band On
Ka Band - On
Laser - On
GPS alert settings
Speed trap alerts – On
Red light cameras – On
Mobile speed trap locations – On

Spain/Portugal
Radar/laser alert settings
X Band - On

                                    EN • 8
K Band On
Ka Band - On
Laser - On
GPS alert settings
Speed trap alerts – On
Red light cameras – On
Mobile speed trap locations – On

Italy
Radar/laser alert settings
X Band - Off
K Band On
Ka Band - On
Laser - On
GPS alert settings
Speed trap alerts – On
Red light cameras – On
Mobile speed trap locations – On
Warning. Please note that it is illegal to use a GPS/radar/laser
detector in France and the Republic of Ireland.
Please note that it may be illegal to use a radar/laser detector in
Spain and Germany, so please check local laws before using Fusion
in Spain and Germany.

Warning. Whilst we have provided some advice on the use of GPS/
radar/laser detectors above, the laws surrounding the use and
ownership of GPS speed trap detectors and radar/laser speed trap
detectors, varies from country to country. It is the sole responsibility
of the driver to check the local laws of the country they are driving
in or intend to drive in, before using Fusion or any other form of
GPS speed trap detector or radar/laser speed trap detector.

                                   EN • 9
GPS speed trap settings
The GPS speed trap settings, control alerts to the locations stored in the
Speedshield database that is pre-loaded in to your Fusion.
It is possible to individually switch alerts to these locations, on or off, to
suit your personal requirements. The following options are available:-
GPS Speed traps – On/Off
Red Light cameras – On/Off
High Risk Zone locations – On/Off
SPECs average speed cameras – On/Off
Enter the menu by pressing the ‘Menu’ button. Scroll left or right, using
the ‘Dim’ (+) or ‘Mute’ (-) buttons, until you see the speed trap/red light
camera/high risk zone location/SPECs average speed camera setting
you want to change. Press the ‘City’ button to switch the setting on or
off and press the Menu button to confirm and return to the menu.

Quick start
When you power the device on, the unit will go through a start-up
sequence confirming the current status of the unit. The sequence will tell
you which features are on and off. If you do not wish to see this, you can
switch the ‘Quick start’ feature on.
Enter the menu by pressing the ‘Menu’ button. Scroll left or right, using
the ‘Dim’ (+) or ‘Mute’ (-) buttons, until you see ‘Quick start’. Press the
‘City’ button to select or de-select it and press the ‘Menu’ button to
confirm.

Software version
Select ‘I Vers.’ to confirm what version of the operating software is
currently installed on your device.
Enter the menu by pressing the ‘Menu’ button. Scroll left or right, using
the ‘Dim’ (+) or ‘Mute’ (-) buttons, until you see ‘Version’ and press the
‘City’ button. Press the ‘Menu’ button to return to the menu.

Change screen colour
It is possible to choose between three different screen colours, orange,
blue, and ‘All colour’.

                                    EN • 10
Enter the menu by pressing the ‘Menu’ button. Scroll left or right, using
the ‘Dim’ (+) or ‘Mute’ (-) buttons, until you see ‘Orange colour’, ‘Blue
colour’ or ‘All colour’. Press the ‘City’ button to switch between the
colours and then press the ‘Menu’ button to confirm and return to the
menu.
Voice alerts
It is possible to switch the voice alerts on or off.
Enter the menu by pressing the ‘Menu’ button. Scroll left or right, using
the ‘Dim’ (+) or ‘Mute’ (-) buttons, until you see ‘Voice’. Press the ‘City’
button to switch the voice on and off and then press the ‘Menu’ button
to confirm and return to the menu.
Auto Mute
Fusion comes with Auto Mute switched on as standard. When switched
on, the unit will emit an audible alert at your preferred volume each
time it alerts to a speed trap, but after a few seconds will automatically
reduce the volume to a lower level.
Enter the menu by pressing the ‘Menu’ button. Scroll left or right, using
the ‘Dim’ (+) or ‘Mute’ (-) buttons, until you see ‘Auto Mute’. Press the
‘City’ button to switch Auto Mute on or off and press the ‘Menu’ button
to confirm and return to the menu.
City button and Smart Filter settings
There are three Smart Filter settings that can be used to reduce the
amount of ‘False’ radar alerts you may get from other ‘non-police’ radar
sources, such as automatic doors at petrol stations and supermarkets.
Smart Filter 1 – Low filtration
Smart Filter 2 – Medium filtration
Smart Filter 3 – High filtration
The current Smart Filter setting is identified on the OLED display. Press the
‘City’ button once to change the setting.
EN • 11Brightness control
The brightness control button controls the brightness of the speed trap
detection display. You can choose between three levels of brightness.
Bright
Dim
Stealth
Press the ‘Dim’ button once to switch between the different brightness
settings.
On/Off/Volume control
Press and hold the volume control in towards the unit once, to power
your Fusion on and off.
Decrease the volume by pulling and holding the volume control button
towards you.
Increase the volume by pushing and holding the volume control button
away from you.
Speed unit - KMH/MPH
Use this feature to switch between MPH and KMH.
Enter the menu by pressing the ‘Menu’ button. Scroll left or right, using
the ‘Dim’ (+) or ‘Mute’ (-) buttons, until you see MPH or KMH. Press the
‘City’ button to choose MPH or KMH and press the ‘Menu’ button to
select and return to the menu.
Speed limit
Use this feature to set the unit to alert you if you exceed a pre-selected
speed limit.
Enter the menu by pressing the ‘Menu’ button. Scroll left or right, using
the ‘Dim’ (+) or ‘Mute’ (-) buttons, until you see ‘Speed Limit’ and press
the ‘City’ button to select. Use the ‘Dim’ (+) or ‘Mute’ (-) buttons to select
the speed limit you would like to be alerted to and press the ‘Menu’
button to confirm your selection and return to the Menu.
User tip: If you do not want to be alerted to a speed limit, set the
speed limit to ‘Disable’.
EN • 12GPS Clock
Fusion will automatically display the time using GPS based on the GMT
time zone. Use this setting to adjust the time to DST or a different time
zone, depending on your location.
Enter the menu by pressing the ‘Menu’ button. Scroll left or right, using
the ‘Dim’ (+) or ‘Mute’ (-) buttons, until you see ‘GMT’ and press the
‘City’ button to select. Use the ‘Dim’ (+) or ‘Mute’ (-) buttons to add or
deduct hours from GMT as necessary and press the ‘Menu’ button to
save your selection and return to the menu.
Changing the language
Follow these instructions to change the language.
Press the ‘Menu’ button on the top of the unit and use the left or
right arrow buttons to scroll through the menu until you see ‘Change
language’ and press the ‘City’ button. Use the right or left arrow buttons
to scroll through the different language options and press the ‘City’
button to select your preferred language. Press the ‘Menu’ button to
return to the menu and then press the menu button again to return your
Fusion to the normal operation mode.
Factory reset
Use this feature to return the speed trap detector features of your Fusion
to the original factory default settings.
Enter the menu by pressing the ‘Menu’ button. Scroll left or right, using
the ‘Dim’ (+) or ‘Mute’ (-) buttons, until you see ‘Factory Reset’ and press
the ‘City’ button to select it. Use the ‘Dim’ (+) or ‘Mute’ (-) buttons to
choose either ‘OK’ or ‘Cancel’ and press the ‘Menu’ button to select and
return to the menu.
Updating the speed trap database and
system software using a PC
Please note that your Fusion has been delivered with the latest
software and speed trap database already pre-installed, so it will
not be necessary to perform an update immediately.
When an update is required, the speed trap database and software
updater can be found on the CD Rom supplied in the box or can be
EN • 13downloaded from the Software Updates section that can be found at the
bottom of any page on our website
www.aguriworld.co.uk
If you are using the CD Rom, insert it in to your PC and open it so that
you can view the files saved on to it. You will see a copy of the User
manual and a piece of software entitled ‘Aguri Skyway Fusion DB
Updater V(?)’ Left click on the updater and ‘drag’ it from the CD Rom,
on to the Desktop of your computer. Double click on the Aguri Skyway
Fusion DB Updater icon that is now on your desktop and the updater
software will open in a new window.
Next press and hold the Power/Menu button on your Fusion and connect
it to your PC using the Mini USB data cable provided. Once connected,
release the Power/Menu button and wait a couple of seconds until your
Fusion establishes a connection with your PC. If any additional windows
appear, please close them. If your Firewall software asks you if you want
to let the Fusion or the Fusion updater software operate on your PC
please let it do so.
Once Fusion has established a connection, please press the ‘Connect’
button on the Aguri Skyway Fusion DB Updater window. The window will
now display a message ‘Connect to server, please wait’.
User note: The Aguri Skyway Fusion Updater software will only work
if your PC is connected to the internet.
When the server connection has been established the ‘Download’ button
on the Aguri Skyway Fusion DB Updater window will be highlighted.
Press ‘Download’ to start the update. The progress bar will keep you
informed of the status of the update.
The Aguri Skyway Fusion DB Updater window will inform you once the
update is complete and it is safe to unplug your unit.
Updating the speed trap database and
system software using a Mac
Aguri Skyway speed trap database Mac updater is compatible with Mac
OS El Capitan 10.11 and Yosemite 10.10
EN • 141. Double click on the Aguri Skyway Fusion installer to begin
installation
2.
EN • 153.
4.
EN • 165.
6.
EN • 177.
8.
Select “Restart” to reboot your Mac and complete the installation.
9. When your Mac restarts the Aguri Skyway Fusion updater program
will be found in the Application folder.
EN • 1810. Next press and hold the Power/Menu button as you connect your
Fusion to your Mac using the Mini USB data cable provided. Once
connected, release the Power/Menu button and wait a couple of
seconds until the Fusion has established a connection with you Mac.
11. If any additional windows appear, please close them. If your Firewall
software asks you if you want to let the Fusion or the Fusion Updater
software operate on your Mac please let it do so.
12. Once your Fusion has established a connection, please press the
‘Connect’ button on the Skyway Fusion DB Updater window. The
window will now display a message ‘Connect to server, please wait’.
User note: The Aguri Skyway Fusion DB Updater software will
only work if your Mac is connected to the internet.
13. When the server connection has been established the ‘Download’
button on the Aguri Fusion Skyway Updater window will be
highlighted. Press ‘Download’ to start the update. The progress bar
will keep you informed of the status of the update.
14. The Aguri Skyway Fusion DB Updater window will inform you once
the update is complete and it is safe to unplug your Fusion. Your
Fusion will now be up-to-date and ready to use.
If you need any further assistance with the installation of this software or
require more advice on how to use the software please call Aguri Customer
Service 0330 102 5578.
EN • 19Updating the speed trap database using the wireless
Bluetooth function and an Android Smart Phone
or iPhone
It is possible to pair your Fusion GTX200 with a Smart Phone or iPhone
using Bluetooth and update the speed trap database wirelessly rather
than using a PC or Mac.
1. Download the Aguri Updater app from the App Store or Google Play
store and install it on your iPhone or Android Smart Phone. Go to the
Settings menu on your phone and ensure that Bluetooth is switched on
and then open the Aguri Updater app so it is ready to use.
2. Power on your Fusion GTX200 using the 12V cigarette lighter cable or
hard-wire cable supplied. Please note that this wireless updater function
is designed to enable you to update the unit in your vehicle.
3. Press the ‘Menu’ button on top of the unit and then scroll through the
menu using the left or right arrow buttons until you see ‘Bluetooth Mode’
and press the ‘City’ button to select it.
4. Next press the ‘Connect’ button on the Aguri Updater app on your
phone and a window should pop up displaying the message ‘Select
your device’. Press ‘Scan’ to search for your Fusion and then tap on it to
select it once your Fusion has appeared on the screen.
5. The app on your phone will then display a list of countries to
download. Select the name of the country or countries you would like to
update and press the ‘OK’ button. Please note that the more countries
you select, the longer it will take to update the database.
6. Once you have confirmed the country or countries you want to
download, press the ‘Download’ button to proceed. Your Fusion and the
Aguri Updater app installed on your phone will keep you informed of it’s
progress.
7. Once the download is complete, your Fusion will return to the normal
operation mode and the Aguri Updater app will display the message
‘Download successful’. Press the ‘Exit’ button on the app to complete
the download and close it. Your Fusion is now up-to-date and ready to
use.
EN • 20Fusion DVR Dash Cam settings
Resolution
To change the screen resolution, press and hold the ‘Rec’ button on
the front of the unit to enter the DVR menu. Use the up and down
arrow buttons to scroll through the menu until you see ‘Resolution’ and
press the ‘Rec’ button to select. You can choose between the following
different levels of resolution:-
1280 x 720/30F
1280 x 720/60F
1920 x 1080/30F(HDR)
1920 x 1080/30F
Use the up and down arrow buttons to scroll to the resolution you
require and press the ‘Rec’ button to select and return to the menu.
Video quality
To change the Video quality, press and hold the ‘Rec’ button on the front
of the unit to enter the DVR menu. Use the up and down arrow buttons
to scroll through the menu until you see ‘Video quality’ and press the
‘Rec’ button to select. You can choose between the following different
levels of video quality:-
Normal
Fine
Super fine
Use the up and down arrow buttons to scroll to the video quality you
require and press the ‘Rec’ button to select and return to the menu.
Set Video loop time
Use this feature to set how long you would like each video loop to record
for.
To change the Video loop time, press and hold the ‘Rec’ button on the
front of the unit to enter the DVR menu. Use the up and down arrow
buttons to scroll through the menu until you see ‘Record overwrite’ and
press the ‘Rec’ button to select. You can choose between the following
loop times:-
EN • 211 min
2 min
3 min
5 min
Off
Use the up and down arrow buttons to scroll to the video quality you
require and press the ‘Rec’ button to select and return to the menu.
Microphone
Use this feature to switch the microphone and audible recordings on and
off.
Press and hold the ‘Rec’ button on the front of the unit to enter the DVR
menu. Use the up and down arrow buttons to scroll until you see ‘Mic’
and press the ‘Rec’ button to select. Use the up and down arrow buttons
to turn the unit’s built-in microphone on or off and press the ‘Rec’ button
to save your selection and return to the menu.
Time lapse
It is possible to change the recording to a ‘time lapse’ style. Rather
than continuously recording, the dash cam will take a series of still
photographs instead. This can be useful if you want to capture an event
or events over a long period of time as it will not use as much space on
the SD card. Use this setting to switch Time lapse on and to choose
how often you would like the unit to take a still photograph. Choose
between the following options:-
1 sec
5 sec
30 sec
Off
Press and hold the ‘Rec’ button on the front of the unit to enter the DVR
menu. Use the up and down arrow buttons to scroll until you see ‘Time
lapse’ and press the ‘Rec’ button to select. Use the up and down arrow
buttons to scroll through the options and press the ‘Rec’ button to save
and return to the menu.
Language
Use this setting to change the language. Please note that this will only
EN • 22change the language within the dash cam menu and will not change the
language of the speed trap detection features or function.
Press and hold the ‘Rec’ button on the front of the unit to enter the
DVR menu. Use the up and down arrow buttons to scroll until you see
‘Language’ and press the ‘Rec’ button to select. Use the up and down
arrow buttons to scroll through the options and press the ‘Rec’ button to
save your selection and return to the menu.
Car number set
You can add a unique identification number or your vehicles registration
number to the time/date stamp so you can identify that the video
recording relates to you and your vehicle.
Press and hold the ‘Rec’ button on the front of the unit to enter the
DVR menu. Use the up and down arrow buttons to scroll until you see
‘Car number set’ and press the ‘Rec’ button to select. Use the up and
down arrow buttons to adjust the number/letter and then press the
‘Mode’ button to move on to the next character. Repeat until you have
completed your preferred identification number and press the ‘Rec’
button to save and return to the menu.
Format the SD Card
Use this setting to reformat the SD card. Please note that all video
recordings saved to the SD card will automatically be deleted during the
format process.
Press and hold the ‘Rec’ button on the front of the unit to enter the
DVR menu. Use the up and down arrow buttons to scroll until you see
‘Format’ and press the ‘Rec’ button to select. Use the up and down
arrow buttons to select ‘Yes’ or ‘No’ and press the ‘Rec’ button to
select. If you select ‘Yes’ the screen will briefly display the message
‘Processing’ as the unit formats the SD card and then return to the
normal recording view.
Date/time stamp
It is possible to add a date/time stamp to your video recordings. Use this
feature to switch the Date/time stamp on or off.
Press and hold the ‘Rec’ button on the front of the unit to enter the
DVR menu. Use the up and down arrow buttons to scroll until you see
EN • 23‘Stamp’ and press the ‘Rec’ button to select. Use the up and down
arrow buttons to scroll through the options and press the ‘Rec’ button to
save your selection and return to the menu.
Auto LCD off
Use this feature to program the dash cam’s LCD to automatically switch
off after a short amount of time. Choose between the following options:-
Off – select and the LCD will stay on permanently
30 secs – the LCD will switch off after 30 seconds
60 secs – the LCD will switch off after 60 seconds
3 MIN – the LCD will switch off after 3 minutes
Press and hold the ‘Rec’ button on the front of the unit to enter the DVR
menu. Use the up and down arrow buttons to scroll until you see ‘Auto
LCD off’ and press the ‘Rec’ button to select. Use the up and down
arrow buttons to scroll through the options and press the ‘Rec’ button to
save your selection and return to the menu.
Parking Mode
Please note that Parking Mode will only work if the unit is connected to a
permanent 12V feed.
If Parking Mode is switched on, your Fusion GTX200 will automatically
switch to Parking Mode after 5 minutes when the unit senses that your
vehicle is no longer moving. Once in Parking mode, your Fusion will
switch to stand-by mode to save power. If it senses any motion in front
of it or any impact, it will automatically wake up, record for 20 seconds
and then go back to sleep again. When you start the car and begin
driving, your Fusion will switch automatically from Parking mode to the
normal operational mode.
Follow these instructions to switch Parking Mode on or off.
Press the ‘Rec’ button on the front of the unit once to stop the DVR from
recording, then press and hold the ‘Rec’ button to enter the DVR menu.
Use the up or down buttons to scroll through the menu and highlight
‘Parking Mode’ and press the ‘Rec’ button. Use the up or down buttons
to switch the feature on or off and press the ‘Rec’ button to confirm.
Press and hold the ‘Rec’ button to exit the menu.
EN • 24Default setting
Use this feature to return the dash cam to it’s original factory default
settings.
Press and hold the ‘Rec’ button on the front of the unit to enter the
DVR menu. Use the up and down arrow buttons to scroll until you see
‘Default’ and press the ‘Rec’ button to select. Use the up and down
arrow buttons to select ‘Yes’ or ‘No’ and press the ‘Rec’ button to save
and return to the menu.
Video playback
To playback video on the device itself, press the ‘Rec’ button to stop the
current recording and then press and hold the ‘Mode’ button to enter
the play back menu. Use the up and down arrow buttons to highlight
the folder you would like to review. Choose between video files, still
photographs and locked ‘event’ files. Highlight the folder you would like
to review and press the ‘Rec’ button to select. Scroll through the saved
video files using the up and down arrow buttons and press the ‘Rec’
button to open the file you would like to play. Finally, press the ‘Rec’
button to start and stop playing the video file. Use the up and down
arrow buttons to increase and decrease the speed of play back. Press
the ‘Mode’ button to exit video play back and return to the standby DVR
dash cam screen.
If you would like to play back video on your TV, connect a mini HDMI
cable between the HDMI socket on the device and an HDMI input socket
on the TV. Refer to your TV’s user manual to switch to the appropriate
HDMI channel on your TV and then follow the operation instructions
outlined above to play back video on the device itself.
Video playback using Aguri Fusion PC video software
The Aguri Fusion Player software can be found on the CD Rom included
with this device or can be downloaded from the software section of our
website www.aguriworld.co.uk
Insert the CD Rom and double left click on the ‘Aguri Fusion Player
Setup’ icon.
Depending on the version of Windows you have installed on your PC,
you may see the following message:-
EN • 25Select ‘More info’ and then ‘Run anyway’ to continue the installation.
Follow the on-screen instructions to install the video software and
once complete you should see the Aguri Fusion Player icon on your
computer’s desktop.
Using the Aguri Fusion Player
Double left click the Aguri Fusion Player icon on your computer’s
desktop to open and launch the player. Next, remove the micro SD card
from the left hand side of your Fusion and insert in to your PC using a
suitable SD card reader. The Aguri Fusion Player should automatically
detect that the SD card has been inserted in to your computer and will
display the message ‘SD card detected. Do you want to load the DVR
recordings?’ Press ‘OK’ to proceed and the recordings from your SD
card will automatically be loaded and ready to play.
If your PC or the Aguri Fusion Player does not automatically recognise
that the SD card has been inserted in to your PC, or you want to load
your DVR recordings directly from a different folder on your PC, click
‘File’ and then ‘Open files’ and browse your computer as normal to
locate the folder where you previously have saved your DVR video
recordings.
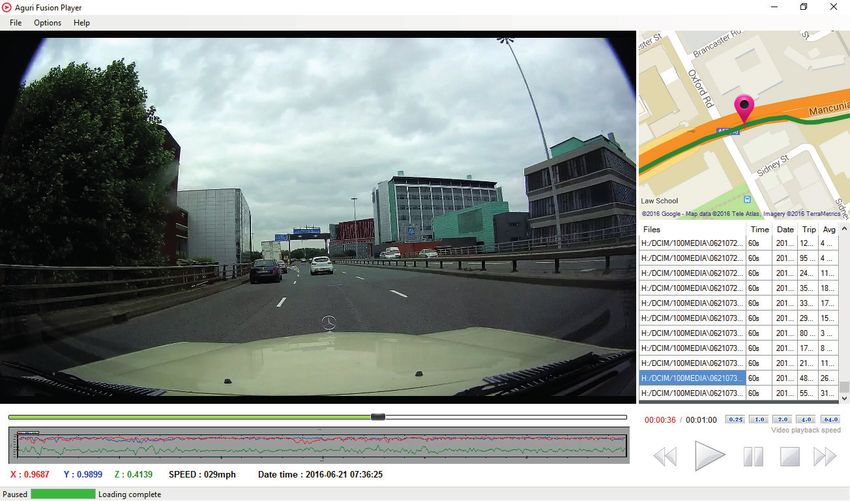
EN • 26Aguri Fusion Player desktop explained
1 2
3
4
5
9 6
8 7
1. Use the ‘File’ button to browse for 5. Adjust the playback speed of your
video recordings saved to your PC. video.
2. Options. Select to change MPH to 6. Rewind, Play, Pause, Stop or
KMH and Kilometers to Miles. Fastfoward your video recording.
3. Map showing your location and 7. Date and time stamp of video.
the journey that corresponds to the 8. Current speed vehicle is travelling
video footage being played. in video.
4. Your video files plus date and time 9. G-Sensor data.
of each recording.
Please note that unfortunately we do not have video software for
Apple Mac at this time. If you have a Mac, we recommend that you
use Quicktime media software or similar to review the video footage
recorded on your Aguri Fusion GTX200.
EN • 27Flicker – adjust Hz rate
If you experience any screen flicker during video playback you can
change the Hz rate.
Press and hold the ‘Rec’ button on the front of the unit to enter the DVR
menu. Use the up and down arrow buttons to scroll until you see ‘Flicker’
and press the ‘Rec’ button to select. Use the up and down arrow buttons
to scroll through the options and press the ‘Rec’ button to save your
selection and return to the menu.
G-sensor
It is possible to adjust the sensitivity of the unit’s built-in G-sensor. The
G-sensor is designed to sense sudden movement or impact such as
hard breaking or a collision. Any video that includes an impact or sudden
movement sensed by the G-sensor is saved and locked so that it will
not be automatically deleted from the SD card. The G-sensor is very
sensitive and is set to ‘Low’ as standard, but you can choose between
the following options.
Off
Low
Medium
High
Press and hold the ‘Rec’ button on the front of the unit to enter the DVR
menu. Use the up and down arrow buttons to scroll until you see ‘G
Sensor Set’ and press the ‘Rec’ button to select. Use the up and down
arrow buttons to scroll through the options and press the ‘Rec’ button to
save your selection and return to the menu.
GMT - GPS auto update time
The date and time on the DVR will automatically be set by GPS to GMT.
It is then possible to adjust the time for DST or for other regions of
Europe.
Press and hold the ‘Rec’ button on the front of the unit to enter the DVR
menu. Use the up and down arrow buttons to scroll until you see ‘GMT
setup’ and press the ‘Rec’ button to select. Use the up and down arrow
buttons to adjust the hour forward or backwards as necessary and press
the ‘Rec’ button to save your selection and return to the menu.
EN • 28WDR – Wide Dynamic Range
The WDR feature helps to improve and enhance the clarity of the video
recording, particularly in dark, over cast or changeable light conditions.
WDR is set to On as standard.
Press and hold the ‘Rec’ button on the front of the unit to enter the DVR
menu. Use the up and down arrow buttons to scroll until you see ‘WDR’
and press the ‘Rec’ button to select. Use the up and down arrow buttons
to select either ‘On’ or ‘Off’ and press the ‘Rec’ button to save your
selection and return to the menu.
Technical specification
DVR dash cam
• 170 degree ultra-wide angle lens.
• Ambarella A7L video processor.
• 1920 x 1080p FULL HD high quality resolution
• Advanced H.264 video compression technology.
• 3 mega pixels
• 1.5 inch high resolution LCD
• Matching IR Light for supplementing light at night.
• Support HDMI high quality video transmission.
• 30 frames per second for smooth video flow.
• WDR function - optimise brightness in dark or overcast conditions
• G-sensor – Auto sense event and lock video file.
• Seamless continuous video recording.
• Automatic video recording function.
• Includes 16GB Micro SD card. Supports up to 64GB Micro SD card.
EN • 29Disposal of Old Electrical & Electronic
Equipment – applicable in the European
Union
If you see this symbol on a product or its packaging,
it indicates that the product should not be treated as
normal household waste. If you see this symbol on any
product or packaging it should be handed over to an
applicable collection point for the recycling of electrical
equipment.
By ensuring that this product is disposed of correctly
you will help prevent a potentially negative impact on the environment.
In addition the recycling of materials will help to conserve natural
resources. For further information about recycling please contact your
local civic office or recycling centre.
EN • 30Warranty
Please note that to receive technical support or service under
warranty, you must first register your unit at www.aguriworld.co.uk
Having a problem with your Aguri Fusion?
Your Aguri Fusion comes with a standard 12 month warranty. To return
your unit under warranty please ship it in suitable protective packaging,
using Special Delivery or an alternative insured delivery service to:-
Warranty Department
Aguri Limited
Unit 2
Praed Road
Manchester
M17 1PQ
Please enclose the following information:
(a) Your name, address and a full description of the problem.
(b) A telephone number where you can be reached during business
hours.
(c) Your units’ serial number.
(d) A copy of your proof of purchase.
Please note that the warranty will be considered void if the product:-
• Has been dropped or otherwise obviously mistreated.
• Has been subjected to heat, moisture or damp conditions.
• Has been opened or dismantled.
• Has been charged or powered with any cable or charger other than
the one supplied.Fusion GTX200 Benutzerhandbuch
Inhalt
Einstellungen der Fusion- Fusion DVR-Dashcam-Einstellungen
Radarfallenerkennung Auflösung51
Produktübersicht Teil 1 33 Videoqualität51
Produktübersicht Teil 2 34 Videoschleifenzeit einstellen 52
Lieferumfang35 Mikrofon 52
Erklärung des Standby-Bildschirms Zeitraffer52
der Radarfallenerkennung 35
Sprache53
Installation36
Einstellung der
Standardeinstellungen der Fusion- Fahrzeugidentifikationsnummer53
Radarfallenerkennung37
Formatieren der SD Karte 54
Einsatz des Fusion in Europa 38
Datums-/Uhrzeitstempel54
Einstellungen der GPS-
Auto-Ausschalten des
Radarfallenerkennung40
LCD-Bildschirms54
Kurzanleitung für die Einstellung 41
Standardeinstellung55
Softwareversion41
Videowiedergabe55
Ändern der Bildschirmfarbe 41
Videowiedergabe mithilfe der Aguri
Sprachwarnungen41 Fusion-Videosoftware für PC 56
Auto Mute (Ton aus) 42 Flimmern - Einstellen der Hertzrate 59
Stadt-Taste und intelligente Beschleunigungssensor
Filtereinstellungen42 Erschütterungs-/Aufprallsensor59
Helligkeitssteuerung42 Greenwich-Zeit - automatische
Lautstärkeregelung mit Ein-/Aus- Zeiteinstellung des GPS 60
Funktion43 WDR – Wide Dynamic Range 60
Geschwindigkeitseinheit Technische Daten
- KMH/MPH 43 - DVR-Dashcam 61
Tempolimit43 Entsorgen von elektrischen und
GPS-Uhr43 elektronischen Altgeräten 62
Rückstellung auf Garantie 63
Werkseinstellungen44
Aktualisierung der Radarfallen-
Datenbank und Systemsoftware
mithilfe eines PCs 44
Aktualisierung der Fusion Radarfallen-
Datenbank und Systemsoftware
mithilfe eines Mac 45
DE • 32Produktübersicht
1
4
5
3
2
8
6 12
7
9 10 11
1. Windschutzscheibenhalterung 10. Taste „Pfeil nach unten“. Drücken
2. Menütaste Sie diese Taste, um das DVR-
Mikrofon ein- oder auszuschalten.
3. Dim-Taste Verwenden Sie diese Taste,
4. Taste „Stummschaltung“ um nach unten durch die
5. Stadt-Taste - Umschaltung Menüoptionen zu blättern.
auf intelligenten Filtermodi zur 11. Taste „Pfeil nach oben“. Drücken
Reduzierung falscher Warnungen. Sie diese Taste, um den LCD-
6. Steckplatz für SD-Speicherkarte für Bildschirm der DVR manuell
den Einsatz mit der DVR Dashcam. auszuschalten. Verwenden Sie
diese Taste, um nach oben durch
7. Radarfallenerkennung OLED die DVR-Menüoptionen zu blättern.
8. 1,5 Zoll Farb-LCD-Bildschirm der 12. Modus-Taste. Drücken und
Dashcam halten Sie diese Taste, um die
9. Aufnahmetaste. Drücken Sie diese Videowiedergabe auf dem Gerät
Taste, um die Aufnahme manuell zu zu starten.
starten oder anzuhalten. Drücken 13. Alternativer 12 V Mini-USB-
und halten Sie diese Taste, um Netzanschlusspunkt.
das Einstellungsmenü der DVR-
Dashcam aufzurufen.
DE • 331 2
3
10
4
9
5
8 7 6
1. Integrierter Lautsprecher 8. Mini-HDMI-Buchse. Ermöglicht die
2. Montageschlitz für die GPS- Verbindung mit einem TV für die
Windschutzscheibenhalterung. Videowiedergabe direkt vom Gerät.
3. Integrierter Laserwarner 9. 12 V Mini-USB-
Netzanschlusspunkt. Verbinden
4. Radarwarner Sie das bereitgestellte 12
5. DVR-Dashcam mit Videorecorder V-Fahrzeug-Ladegerät mit dem
und 170-Grad-Weitwinkelobjektiv Netzanschlusspunkt oder ein
6. Kombitaste Lautstärke/ein/aus Mini-USB-Datenkabel für die
Aktualisierung der Radarfallen-
7. Micro-USB- Datenbank und Software.
Datenübertragungsbuchse.
Ausschließlich für die 10. Integrierter Ambarella A7L HD-
Aktualisierung der DVR- Videoprozessor.
Dashcam. Nicht für die
Spannungsversorgung des
Geräts verwenden.
DE • 34Lieferumfang
1 X Aguri Fusion GTX200
1 x USB-Datenkabel
1 x 12V Fahrzeug-Stromanschluss
1 x 12V Stromanschlusskabel
1 x Windschutzscheibenhalterung
1 x Benutzerhandbuch
Erklärung des Standby-Bildschirms der
Radarfallenerkennung
Lautsprecher Status des GPS-Status (Es wird ein
stumm stellen intelligenten Kreuz über dem GPS-Symbol
ein oder aus Filters angezeigt, wenn kein Signal
vorhanden ist)
GPS-Uhr
GPS-Datum
GPS-Kompass Grafik Ihres Ihre
Geschwindigkeitsanzeigers Geschwindigkeit
DE • 35Installation
Befestigen Sie die Windschutzscheibenhalterung, indem Sie sie in
den Schlitz an der Oberseite des Geräts einschieben. Suchen Sie
einen geeigneten Bereich der Windschutzscheibe zur Befestigung
des Geräts, indem es Ihre Sicht auf die voraus liegende Straße nicht
behindert, und über freie Sicht auf den Himmel verfügt, sodass die GPS-
Windschutzscheibenhalterung eine Satellitenverbindung aufbauen kann.
Wenn die Stromversorgung des Geräts über den Zigarettenanzünder
hergestellt wird, empfehlen wir Ihnen eine Montage im unteren Bereich
der Windschutzscheibe, knapp über dem Armaturenbrett, sodass Sie
über eine gute Sicht auf die voraus liegende Straße verfügen, die Sicht
jedoch nicht durch die Scheibenwischer behindert wird. Alternativ
können Sie das Gerät im oberen Windschutzscheibenbereich in der
Nähe des Rückspiegels befestigen, was sich jedoch nur dann empfiehlt,
wenn Sie eine direkte Verdrahtung des Geräts mit dem Bordnetz Ihres
Fahrzeugs beabsichtigen.
Benutzerhinweis. Denken Sie daran, dass Sie das Netzkabel
befestigen müssen. Daher ist es wichtig eine Position zu
finden, in der der Kabelverlauf ohne Beeinträchtigung der
Fahrzeugbedienelemente oder Gefährdung von Fahrer oder
Passagieren erfolgen kann.
Sobald Sie einen geeignete Position gefunden haben, drücken Sie die
Saugnapfhalterung fest an die Windschutzscheibe, wobei sich der Hebel
in der Position „entriegelt“ befindet, und legen Sie anschließend den
Hebel zur Sicherung um 90° in die Position „verriegelt“ um. Lösen Sie
abschließend leicht die Mutter und stellen Sie die Halterung so ein, dass
sich das Gerät in horizontaler Position befindet und ziehen Sie die Mutter
anschließend wieder an.
Spannungsversorgung
Befestigen Sie den Mini-USB-Stecker an einem Ende des Netzkabels
entweder mit der Mini-USB-Buchse an der Geräteseite oder der
Mini-USB-Buchse am Hebel der GPS-Windschutzscheibenhalterung,
je nachdem, welche Lösung für Ihre Installation am geeignetsten ist.
Stecken Sie das andere Ende in einen geeigneten Zigarettenanzünder/12
Steckdose in Ihrem Fahrzeug.
DE • 36Bitte beachten Sie, dass Sie ausschließlich den 12
V-Zigarettenanzünderadapter oder das 12 V-Anschlusskabel für
den Netzanschluss des Geräts verwenden dürfen. Die meisten
anderen USB-Zubehöre, wie z. B. zusätzliche USB-Buchsen, die
manchmal in neueren Fahrzeugen eingesetzt werden, sorgen
lediglich für eine Ausgangsleistung von 5 V, was unzureichend für
eine Stromversorgung des Geräts ist.
Installationstipps
Reinigen Sie den von Ihnen für die Montage des Fusion ausgewählten
Windschutzscheibenbereich vor dessen Montage mit einem
hochwertigen Glasreiniger, sodass ein sicherer Kontakt des Saugnapfes
gewährleistet ist.
Denken Sie daran, sowohl das Gerät als auch Netzkabel in einer
sicheren Position zu montieren, sodass weder der Fahrer noch die
Bedienelemente des Fahrzeugs beeinträchtigt werden.
Für eine sauberere Installation lässt sich Ihr Fusion ebenfalls fest
mit dem Bordnetz Ihres Fahrzeugs verdrahten und die Stromkabel
kaschieren. Bitte wenden Sie sich an einen Fahrzeugelektriker oder Ihren
Autohändler vor Ort für weitere Auskünfte.
Allgemeiner Betrieb
Aguri Fusion vereint ein GPS, Warnsysteme für Radarfallen und Laser-
Geschwindigkeitserkennung sowie eine Hochleistungs-DVR-Dashcam in
einem Gerät. Nachfolgend finden Sie die jeweiligen Anweisungen für die
Einrichtung jeder Funktion.
Einstellungen der Fusion-
Radarfallenerkennung
Ihre Fusion wird ab Werk mit den optimalen Benutzereinstellungen für
Großbritannien ausgeliefert, darunter:-
Radar-/Laser-Warneinstellungen
X Band - Aus
K Band Ein
Ka Band - Aus
Laser - Ein
DE • 37GPS-Warneinstellungen
Radarfallenwarnungen – Ein
Blitzer – Ein
Mobile Radarfallen – Ein
Intelligenter Filter – 1
Automatische Stummschaltung – Ein
Es ist jedoch möglich, diese Einstellungen zu ändern, um sie an Ihre
eigenen Bedürfnisse anzupassen. Folgen Sie den nachstehenden
Anweisungen für weitere Informationen.
Menüeinstellungen
Radar-/Laser-Einstellungen
Es ist möglich, individuelle Radarfrequenzen ein- und auszuschalten, um
Fusion an das jeweilige Land anzupassen.
Rufen Sie das Menü durch Drücken der Menütaste auf. Blättern Sie
mithilfe der Tasten „Dim“ (+) oder „Stumm“ (-) links oder rechts, bis die
Radarfrequenz angezeigt wird, die Sie ändern möchten. Drücken Sie
die Taste „Stadt“, um die Frequenz ein- oder auszuschalten und die
Menütaste zur Auswahlbestätigung und Rückkehr zum Menü.
Folgende Einstellungsoptionen stehen Ihnen zur Verfügung:-
X Band – Ein/Aus
K Band – Ein/Aus
Ka Band – Ein/Aus
Laser – Ein/Aus
Benutzerhinweis: Wir empfehlen, den Laser ständig
eingeschaltet zu lassen.
Einsatz des Fusion in Europa
Nachfolgend die von uns empfohlenen Radar-/Laser-Einstellungen
für eine Auswahl anderer Länder, wenn Sie den Fusion außerhalb von
Großbritannien verwenden.
DE • 38Deutschland/Österreich
Radar-/Laser-Warneinstellungen
X Band - Aus
K Band Ein
Ka Band - Ein
Laser - Ein
GPS-Warneinstellungen
Radarfallenwarnungen – Ein
Blitzer – Ein
Mobile Radarfallen – Ein
Spanien/Portugal
Radar-/Laser-Warneinstellungen
X Band - Ein
K Band Ein
Ka Band - Ein
Laser - Ein
GPS-Warneinstellungen
Radarfallenwarnungen – Ein
Blitzer – Ein
Mobile Radarfallen – Ein
Italien
Radar-/Laser-Warneinstellungen
X Band - Aus
K Band Ein
Ka Band - Ein
Laser - Ein
GPS-Warneinstellungen
Radarfallenwarnungen – Ein
Blitzer – Ein
Mobile Radarfallen – Ein
DE • 39Warnung. Bitte beachten Sie, dass der Einsatz eines GPS-/Radar-/
Laserwarners in Frankreich und der Republik Irland illegal ist.
Bitte beachten Sie, dass es illegal sein kann, einen Radar-/
Laserwarner in Spanien und Deutschland zu verwenden.
Erkundigen Sie sich deshalb nach den lokalen Gesetzen, bevor Sie
den Fusion in Spanien und Deutschland verwenden.
Warnung. Obwohl wir vorab einige Ratschläge über den Einsatz von
GPS-/Radar-/Laserwarnern erteilt haben, gelten landesspezifische
Gesetze über den Einsatz sowie den Besitz von GPS-Radarfallen-
Warnsystemen und Erkennungssystemen für Radar-/Laserfallen.
Es obliegt der alleinigen Verantwortung des Fahrers, die lokalen
Gesetze des zu bereisenden Landes vor dem Einsatz des Fusion
oder irgend eines anderen GPS-Radarfallen-Warnsystems und
Erkennungssystems für Radar-/Laserfallen, zu überprüfen.
Einstellungen der GPS-Radarfallenerkennung
Die Einstellungen der GPS-Radarfallenerkennung ermöglichen die
Ausgabe von Warnungen entsprechend der vorab in Ihrem Fusion
gespeicherten Speedshield-Datenbank.
Es ist möglich, Warnungen in Abhängigkeit Ihrer persönlichen
Bedürfnisse individuell für diese Standorte ein- oder auszuschalten.
Folgende Einstellungsoptionen stehen Ihnen zur Verfügung:-
GPS-Blitzer – Ein/Aus
Rotlichtblitzer – Ein/Aus
Gefahrenzone – Ein/Aus
Section Control – Ein/Aus
Rufen Sie das Menü durch Drücken der Menütaste auf. Blättern Sie
mithilfe der Tasten „Dim“ (+) oder „Stumm“ (-) links oder rechts, bis
die Einstellungen für Radarfallen, Blitzer, Standorte mit hohem Risiko,
DATEN für Kameras zur Messung der Durchschnittsgeschwindigkeit, die
Sie ändern möchten angezeigt werden. Drücken Sie die Taste „Stadt“,
um die Einstellung ein- oder auszuschalten und die Menütaste zur
Auswahlbestätigung und Rückkehr zum Menü.
DE • 40Schnellstart
Wenn Sie das Gerät einschalten, durchläuft es eine Startsequenz,
die Ihnen den aktuellen Status des Geräts bestätigt. Diese Sequenz
informiert Sie darüber, welche Funktionen ein- und ausgeschaltet sind.
Sie können die Schnellstart-Funktion aktivieren, wenn Sie wünschen,
dass diese Sequenz nicht angezeigt wird.
Rufen Sie das Menü durch Drücken der Menütaste auf. Blättern Sie
mithilfe der Tasten „Dim“ (+) oder „Stumm“ (-) links oder rechts, bis
„Schnellstart“ angezeigt wird. Drücken Sie die Taste „Stadt“, um diese
Funktion zu aktivieren oder deaktivieren und anschließend die Menütaste
zur Bestätigung.
Softwareversion
Wählen Sie „I Vers.“, um das aktuell auf Ihrem Gerät installierte
Betriebssystem zu bestätigen.
Rufen Sie das Menü durch Drücken der Menütaste auf. Blättern Sie
mithilfe der Tasten „Dim“ (+) oder „Stumm“ (-) links oder rechts, bis
„Version“ angezeigt wird und drücken Sie die Taste „Stadt“. Drücken Sie
die Menütaste, um zum Menü zurückzukehren.
Ändern der Bildschirmfarbe
Es ist möglich, zwischen drei verschiedenen Bildschirmfarben
auszuwählen: orange, blau und „Alle Farben“.
Rufen Sie das Menü durch Drücken der Menütaste auf. Blättern Sie
mithilfe der Tasten „Dim“ (+) oder „Stumm“ (-) links oder rechts, bis
„Orangefarben“, „Blau“ oder „Alle Farben“ angezeigt wird. Drücken
Sie die Taste „Stadt“, um zwischen den Farben umzuschalten und die
Menütaste zur Auswahlbestätigung und Rückkehr zum Menü.
Sprachwarnungen
Es ist möglich, die Sprachausgabe ein- und auszuschalten.
Rufen Sie das Menü durch Drücken der Menütaste auf. Blättern
Sie mithilfe der Tasten „Dim“ (+) oder „Stumm“ (-) links oder rechts,
bis „Stimme“ angezeigt wird. Drücken Sie die Taste „Stadt“, um
die Sprachausgabe ein- bzw. auszuschalten und anschließend die
Menütaste zur Bestätigung und Rückkehr zum Menü.
DE • 41Auto Mute (Ton aus)
Fusion wird standardmäßig mit eingeschalteter automatischer
Stummschaltung geliefert. Wenn das Gerät eingeschaltet wird, ertönt
ein hörbarer Alarm in der von Ihnen bevorzugten Lautstärke jedes Mal,
wenn Sie vor einer Radarfalle gewarnt werden; nach einigen Sekunden
verringert sich die Lautstärke automatisch auf eine niedrigere Stufe.
Rufen Sie das Menü durch Drücken der Menütaste auf. Blättern Sie
mithilfe der Tasten „Dim“ (+) oder „Stumm“ (-) links oder rechts, bis
„Automatische Stummschaltung“ angezeigt wird. Drücken Sie die Taste
„Stadt“, um die Automatische Stummschaltung ein- oder auszuschalten
und die Menütaste zur Auswahlbestätigung und Rückkehr zum Menü.
Stadt-Taste und intelligente Filtereinstellungen
Es existieren drei intelligente Filtereinstellungen, die für eine Reduzierung
der Frequenz von „Fehlerhaften“ Alarmen, die Sie möglicherweise von
anderen Quellen, die nicht im Zusammenhang mit der Polizei stehen,
erhalten, darunter automatische Türen an Tankstellen und Supermärkten.
Intelligenter Filter 1 – Geringe Filterung
Intelligenter Filter 2 – Mittlere Filterung
Intelligenter Filter 3 – Hohe Filterung
Der aktuell eingestellte Intelligente Filter wird auf dem OLED-Bildschirm
angezeigt. Drücken Sie die Taste „Stadt“ einmal, um die Einstellung zu
ändern.
Helligkeitsregelung
Die Taste zur Helligkeitsregelung steuert die Helligkeit der Anzeige
für die Radarfallenerkennung. Sie haben die Wahl zwischen drei
unterschiedlichen Helligkeitsstufen.
Hell
Dunkel
Stealth
Drücken Sie die Taste „Dunkel“ einmal, um zwischen den verschiedenen
Helligkeitsstufen umzuschalten.
DE • 42Lautstärkeregelung mit Ein-/Aus-Funktion
Drücken und halten Sie den Lautstärkeregler einmal in Geräterichtung,
um Ihren Fusion ein- oder auszuschalten.
Sie können die Lautstärke verringern, indem Sie den Lautstärkeregler in
Ihre Richtung ziehen und halten.
Umgekehrt kann die Lautstärke erhöht werden, indem die Taste von
Ihnen fort gedrückt wird.
Geschwindigkeitseinheit - KMH/MPH
Verwenden Sie diese Funktion zum Umschalten zwischen MPH und
KMH.
Rufen Sie das Menü durch Drücken der Menütaste auf. Blättern Sie
mithilfe der Tasten „Dim“ (+) oder „Stumm“ (-) links oder rechts, bis
MPH oder KMH angezeigt wird. Drücken Sie die Taste „Stadt“, um MPH
oder KMH zu wählen und die Menütaste zur Auswahlbestätigung und
Rückkehr zum Menü.
Tempolimit
Mithilfe dieser Funktion können Sie das Gerät so einstellen, dass Sie bei
Überschreiten eines vorab eingestellten Tempolimits gewarnt werden.
Rufen Sie das Menü durch Drücken der Menütaste auf. Blättern Sie
mithilfe der Tasten „Dim“ (+) oder „Stumm“ (-) links oder rechts, bis
„Tempolimit“ angezeigt wird und drücken Sie die Taste „Stadt“ zur
Auswahl. Verwenden Sie die Tasten „Dim“ (+) oder „Stumm“ (-) zur
Einstellung des Tempolimits, bei dem Sie gewarnt werden möchten und
drücken Sie die Menütaste zur Auswahlbestätigung und Rückkehr zum
Menü.
Benutzerhinweis: Sollten Sie keine Warnung bei Überschreiten
eines Tempolimits wünschen, stellen Sie die Funktion
„Tempolimit“ auf „Deaktivieren“.
GPS-Uhr
Ihr Fusion zeigt automatisch die Zeit an, indem es GPS-Daten auf Basis
der GMT-Zeitzone heranzieht. Verwenden Sie diese Einstellungen, um in
Abhängigkeit Ihres Standorts die Sommerzeit oder eine andere Zeitzone
einzustellen.
DE • 43You can also read