Foldable e-bike - User manual | Manuale d'uso - Ducati Urban e-Mobility
←
→
Page content transcription
If your browser does not render page correctly, please read the page content below
foldable e-bike

User manual | Manuale d'uso
Index

English            01
Italiano           37
English

                            foldable e-bike

              User and maintenance manual
  Before using the bicycle, it must be properly and correctly assembled and
 checked in all its parts.Any assembly damage or incorrect maintenance are
                           not covered by the warranty.
For more information, technical support and assistance, contact your dealer or
                 visit the website www.ducatiurbanemobility.it

                                      01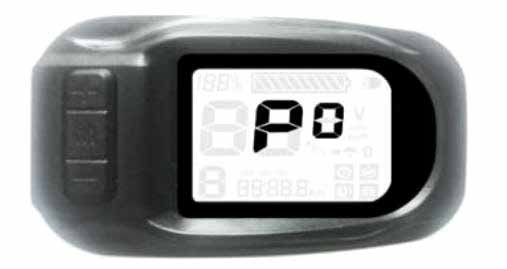
Contents

 1.   Preface
 2.   Safety warning
 3.   Packing list
4.    Description of the bicycle (epac)
 5.   Lifting and carrying
 6.   Startup
 7.   Quick start
8.    LCD Display
 9.   Display setting instructions
10.   Maintenance instructions
11.   Connections diagram
12.   Troubleshooting
13.   Battery (Warnings)
14.   Technical specifications
15.   Warranty terms

                02
1. Preface
Overview
This manual is an integral and essential part of the pedal-assisted bicycle (EPAC) and
must be provided to the user.
Before the first operation of the bicycle, it is essential that users read, understand and
strictly comply with the following provisions.
The manufacturer shall not be liable for damage to persons and/or property or to the
pedal-assisted bicycle if it is used incorrectly in a way that does not comply with the
instructions given.
With a view to ongoing technological development, the manufacturer reserves the right
to modify the pedal-assisted bicycle (EPAC) without prior notice, without this manual
being automatically updated.
We recommend visiting the website www.ducatiurbanemobility.com where any updates
or changes to this manual will be uploaded.
Support Service
If you experience any problems or have any requests for clarification, please do not
hesitate to contact the Support Service of your authorised Ducati Urban e-Mobility
dealer, which can provide skilled and specialised personnel, specific equipment and
original spare parts.
Graphical form of safety warnings
The following graphic symbols will be used to identify the safety messages in this
manual. Their function is to attract the reader/user's attention to ensure the correct and
safe use of the pedal-assisted bicycle.

      ATTENTION

Pay attention
Highlights rules of conduct to be complied with in order to avoid damaging the pedal-
assisted bicycle and/or the occurrence of dangerous situations.

        DANGER

Residual risks
This highlights the presence of hazards that cause residual risks to which the user must
pay attention in order to avoid injury or damage to property.

Legal note on use
Always respect the traffic code and traffic-related rules and regulations that are
applicable to cyclists in the country of circulation.

                                             03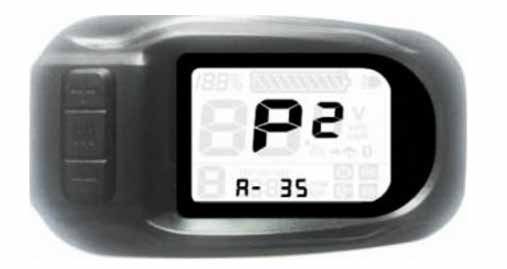
2. Safety warning
General safety rules

      ATTENTION

Use of the pedal-assisted bicycle
Each user must read this user and maintenance manual before first using the bicycle; in
particular the chapter on safety instructions.

      ATTENTION

Risks associated with the use of the pedal-assisted bicycle
Despite the use of safety devices, to ensure the safe use of the pedal-assisted bicycle,
you must take note of all the accident prevention instructions in this manual.
Always stay focused while riding your bicycle and do not underestimate the residual risks
associated with using the pedal-assisted bicycle.
Even if you are already familiar with the use of pedal-assisted bicycles, you must follow
the instructions given here, as well as the general precautions to be observed when riding
a motorised bicycle.

Responsibility
The User must use the pedal-assisted bicycle with the utmost diligence and in full
compliance with the traffic code and all relevant regulations cycling in force in the
country of circulation.

The User must also keep the pedal-assisted bicycle clean perfectly efficient and
maintained, diligently carry out the safety checks that fall under their competence,
as described in the warnings and recommendations section, as well as keep all
documentation relating to the pedal-assisted bicycle maintenance.

The User must carefully assess the atmospheric conditions that could make it dangerous
to use the pedal-assisted bicycle. To this end, we recommend moderating the speed and
keep an adequate braking distance in the event of riding in adverse weather conditions
and / or intense traffic.

                                             04
Warnings for users
- It is prohibited to ride with a passenger.
- Do not consume alcohol or drugs before riding the pedal-assisted bicycle.
- This model of pedal-assisted bicycle is designed and built to be used outdoors, on
  public roads or cycle paths.
- Do not attempt to force the pedal-assisted bicycle to perform to a higher standard than
  that which it has been designed for.
- Never ride the pedal-assisted bicycle with parts removed.
- Avoid uneven surfaces and obstacles.
- Drive with both hands on the handlebar.
- Replace worn and/or damaged parts, check that the guards are working correctly before
  use.

Notes on maintenance
All maintenance operations must take place with the battery disconnected.
During each maintenance phase, operators must be equipped with the necessary
accident prevention equipment.
The tools used for maintenance must be suitable and of good quality.
Do not use petrol or flammable solvents such as detergents, but always use non-
flammable and non-toxic solvents.
Limit the use of compressed air as much as possible (max. 2 bar) and protect yourself
with goggles with side shields.
Never use a naked flame as a means of illumination when proceeding with operations of
verification or maintenance.
After any maintenance or adjustment procedure, make sure that no tools or foreign
bodies remain between the moving parts of the pedal-assisted bicycle.

       ATTENTION

Original spare parts
Use only original Ducati Urban e-Mobility spare parts.
The manufacturer shall not be held liable for damage or loss of functionality caused by
the use of non-original accessories and parts.

                                               05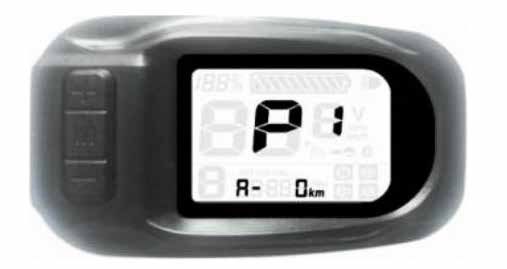
Other provisions
The first thing to do when starting to use the bicycle is to check the presence and
integrity of the guards and the operation of the safety devices.
If you find any defect, do not use the pedal-assisted bicycle!

         DANGER

Guards
Therefore, it is strictly forbidden to modify or remove the battery and chain guards, etc.,
as well as the warning and identification plates.

Warehouse storage
In the event that the pedal-assisted bicycle is required to be stored for long periods of
inactivity, the following operations must be carried out:
- Repair it in a dry and well-ventilated place.
- Carry out general cleaning of the pedal-assisted bicycle.
- Remove the battery from its seat.
- Leave the bicycle on the kickstand.
- Protect exposed electrical contacts with antioxidant products.
- Grease all surfaces not protected by paints or anti-corrosion treatments.

                                              06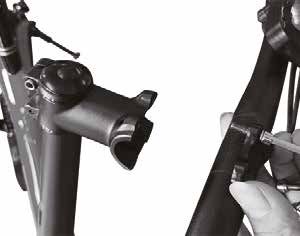
3. Packing list

- Bike frame body
- Seat + seat post
- Charger
- Rear reflector light
- Allen wrench (4mm)
- Front fender
- Rear fender
- 2 battery lock keys

                               07
4. Description of the bicycle (epac)
6
display
5
1 4
3
21
20 2
19 7
18
8
17
16
15 14 13 12 11 22 10 9
1. Saddle
2. Bike frame folder
3. Stem folder
4. Safe lock
5. Handlebar
6. Brake lever
7. Front light
8. Front fork
9. Disc brake
10. Front fender (to be assembled, provided in the box)
11. Chain wheel
12. Chain wheel protection wheel
13. Support wheel
14. Pedal
15. Kickstand
16. Rear derailleur
17. Motor
18. Rear fender (to be assembled, provided in the box)
19. Seat post clamp
20. Seat post
21. Rear reflector light (to be assembled, provided in the box)
22. Serial number
08Terms of use
The pedal-assisted bicycle has been designed and built to be ridden outdoors, on public
roads and cycle paths, but always on asphalted surfaces.
Any modification of the state of construction can compromise the safety and stability of
the pedal-assisted bicycle and can lead to an accident.
Other types of use, or use beyond the range of the intended use, do not correspond to
the use intended by the manufacturer and therefore the manufacturer can no longer be
held liable for any resulting damage.
Battery life, and therefore the estimated mileage in km, can vary considerably depending
on the type of use and external influences; please consider the following particularly
influential factors: user weight, pedalling frequency, assistance level selected on the
display, average speed, tread thickness and wear, slope and road surface, weather
conditions.
Usage environment
The pedal-assisted bicycle can be used outdoors, in the absence of adverse weather
conditions (rain, hail, snow, strong wind, etc.).
Maximum allowed temperature: + 40°C
Minimum allowed temperature: + 0°C
Maximum allowed humidity: 80%
The usage environment must have a flat, compact asphalted surface, free of roughness,
potholes or depressions, and free of obstacles and oil stains. In addition, the place of
use must be illuminated, either by the sun or by artificial lights, so as to ensure correct
visibility of the route and the controls of the pedal-assisted bicycle (300 to 500 lux
recommended).
ATTENTION
Prohibited usage environments
The pedal-assisted bicycle must not be used:
in areas subject to fire or explosion hazards; in environments with a corrosive and/or
chemically active atmosphere;in poorly lit environments; on land with a slope greater
than 10%; on uneven, unpaved terrain.
09Improper uses and contraindications
The actions described below, which obviously cannot cover the entire range of potential
possibilities of "misuse" of the pedal-assisted bicycle, are to be considered absolutely
prohibited.
ATTENTION
Prohibited operations
Performing prohibited operations invalidates the warranty.
The manufacturer declines all responsibility for any damage to persons and things
deriving from the execution of prohibited operations.
DANGER
It is strictly prohibited to:
Ride your pedal-assisted bicycle for purposes other than those for which it was built, i.e.
for carrying passengers.
Ride your pedal-assisted bicycle in areas where there is a danger of explosions.
Ride your pedal-assisted bicycle in adverse weather conditions (pouring rain, hail, snow,
strong wind, etc.).
Carry a passenger.
Ride your pedal-assisted bicycle under the influence of alcohol or drugs.
Ride your pedal-assisted bicycle if your weight is greater than the permitted weight.
Charge the battery in an environment that is too hot or insufficiently ventilated.
Cover the battery while it is charging.
Smoke or use open flames near the charging area.
Transit through or stop on surfaces with a gradient greater than 10% or uneven surfaces
(unpaved, with holes, depressions, obstacles, etc.).
Perform any maintenance with the battery connected.
Use non-original spare parts.
Insert the limbs or fingers between the moving parts of the bicycle.
It is absolutely prohibited to raise the seat post beyond the limit of 10 cm in order to
avoid fractures to the frame.
105. Strolling and carrying
DANGER
Crushing and impact
During lifting, it is necessary to operate with extreme caution in order to avoid damage to
people and things.
The manufacturer is not liable for breakages due to the lifting and/or transport of the
pedal-assisted bicycle after delivery.
The weight of the pedal-assisted bicycle is around 21 kg, lifting by two adult people is
advised.
Transport
To ensure a high level of safety during transport in vans, it is necessary to prevent the
pedal-assisted bicycle from moving around. This is achieved by resting it on the stand
and tying it up with straps or anchor cables in good condition.
In this regard, the attachment devices must be installed in such a way that they do not
damage the frame and other parts of the bicycle.
116. Startup
Charging the battery
Before using the bicycle for the first time, it is necessary to charge the battery for at least
4-6 hours, until charging is complete, using the supplied battery charger.
The bicycle is powered by a 36V lithium-ion battery.
The average charging time is around 4-6 hours. The batteries are of the lithium type.
To extend the life of the battery as much as possible, a full charge every thirty days is
recommended, even if the bicycle is not used.
We recommend charging the battery with its special battery charger after each use of the
pedal-assisted bicycle.
During charging, the red light in the charger is illuminated, when charging is complete,
the red light goes out, and the green light comes on.
Charging option one: open the Charging option two: extract the
rubber cap on the charging port battery and charge it without
and charge. having to move the bike around.
12Uninstall & Install battery
1. Power off the vehicle, unlock 2. When installing battery, lock
the battery, then pull out the the battery with key and take
battery box with the lifting the key away, press battery
handle as shown in picture handle to be flat,and unfold
shows. the bike frame.
DANGER
Precautions during charging
Always connect the plug to the battery and then the power plug to the mains.
When recharging is complete, always disconnect the plug from the mains first and then
the plug from the battery.
Always fully charge the battery.
Always use original power supplies.
Do not leave the battery charging for more than 16 hours.
Always recharge in a ventilated area.
Do not recharge the battery in environments that are too hot.
Do not recharge the battery near flammable liquids.
Do not cover the battery in any way while it is charging.
If the battery gives off a bad smell, immediately unplug it from the power supply and
ventilate the room, do not touch the battery.
Keep the battery in a cool, dry place when you are not using it.
13Put on the road
Before using the pedal assisted bicycle, to ensure the efficient “putting on the road”
of the product, it is advisable to carefully check each part and provide for adequate
adjustment intervention of the relative mechanical components, directly or with the
support of specialized operators, e.g. adjustment and tightening of the handlebars and
stem, adjustment and tightening of the saddle and seat post, adjustment of the brakes,
adjustment of the gearbox, tire pressure check, chain and gears lubrication, correct
tightening of the fixing screws check and general check of all parts. It is recommended
that the putting on the road services be carried out by qualified personnel.
Wheels
Check the tyre inflation pressure, referring to the values on the tyre shoulder. Check
the state of wear of the rubber: there must be no cuts, cracks, foreign bodies, abnormal
swellings, exposed canvas and other damages.
Brake system
Check the operation of the brakes with a low-speed braking test (max. 6 km/h) in an
obstacle-free zone, first with the rear brake and then with the front brake.
ATTENTION
Check with negative results
In the event that defects of any kind are found during the preliminary checks and even a
single check has negative results, do not ride the pedal-assisted bicycle.
Activate all measures immediately to make a proper adjustment, and if necessary,
contact the Support Service.
147. Quick start
Unfold the bike
1. Hold the vehicle body, unfold 2. As shown in picture, lock the
the frame. folder clamp tightly, please finish
step 3) and 4) before locking the
clamp.
3. If the fastener shows as picture, 4.If the fastener shows as picture,
need press it down to release the then can operate step 2) to lock
convex piece. the frame.
15Unfold the stem
1. Hold the bike body and turn the 2. Fasten the folding wrench
stem upright to ensure that the directly in the direction of the
stem is seamlessly connected to stem.
the underside.
Security
button
3. Slightly shake the stem and 4. When folding the stem, you
check if the security buckle is fully need to press the security buckle
buckled. and then open the folding wrench.
16Mount handlebar
1. Use the M4 Allen Key to loosen the screw of the ahead stem, and take off
the clamp.
2. Carefully place the clamp on the 3. Check handlebars for strength
middle of handlebar, then tighten and correct position before ride.
the screws by M4 Allen Key.
17Seat post assembling
1. Loosen the seat post clamp , 2. Adjust the screw ,tighten the
keep the bike steady, insert the clamp, then press the saddle at
seat post in the frame. full tilt to ensure the seat post
locked tight enough and doesn't
rotate or move up and down.
Adjustment of saddle height
Safety height
limit line
1. When you need to adjust the 2. The saddle height mustn't
height of the saddle, first loosen exceed the minimum insert safety
the seat post clamp, then move height limit line.
the seat post to the preferred
height , tighten the seat post
clamp.
18Unfold and Fold the pedals
1. Hold the vehicle body and 2. Press the pedal towards the
unfold the pedals. crank, and fold it up.
Power on operation
1. Charge the battery before your
first ride.
Note: When charging is completed,
please cover the plug to avoid the
water intake of the charging port.
198. LCD Display
battery charge
percentage battery level
front light ON
+ button speed
M button
- button
pedal-assist icons
mode / level
Button functions:
Button M : multifunctional button, long press for 3 seconds to switch ON/OFF the bike;
short press to switch the display of single trip mileage, total mileage and running time.
Button + : long press for 3 seconds to turn on/off the front light.
Button + : short press to increase speed mode.
Button - : short press to decrease speed mode.
The battery indicator is full when the battery of your pedal-assisted bicycle is fully
charged. The battery indicator drops in level as the pedal-assisted bicycle is used. The
battery indicator may fluctuate in the charge level depending on the use of the pedal-
assisted bicycle, for example, if you are on a gradient, the battery indicator level may drop
rapidly as you consume much more of the battery power of your pedal-assisted bicycle.
To ensure optimal use and maintenance of the battery, it is recommended to fully
charge the battery after each use.
20Icons' meaning:
Indicates that the front light is on
Indicates that the brake is working
Indicates that the throttle is not working or not working properly
Indicates that the motor is not working or not working properly
Indicates that the controller is not working or not working properly
Switch among single trip mileage, total mileage and
running time
219. Display setting instruction
1. Press + and - at same time for 3s into Setting interface P0.
2. Restore factory setting: Press + for about 30s in P0 and it will automatically exit Setting
Mode.
3. Km/Mile switch:
A. Press M button and switch P0 to P1
B. In P1, press +/- to switch Km/Mile. 0=Km, 1=Mile
C. Press +&- at same time to exit Setting Mode. Or automatically exit Setting Mode after 15s.
224. Adjust speed slightly:
A. Press M button and switch P0 to P2
P2 can only adjust the speed shown in display slightly, it could not change the real speed.
B. Press +/- to change the data. The proper setting is 15.6 for 16inch wheels, 18.5 for 20inch
wheels. The bigger data is, the higher is the speed in display(will not change real speed).
2310. Maintenance instructions
All maintenance operations must be performed with the system switched off, the
battery disconnected and the bicycle resting on the stand.
After each routine maintenance operation, a check on the perfect functioning of all
controls is advised.
This manual does not go into detail about disassembly and non-routine maintenance, as
these operations must always be carried out exclusively by the Support Service staff of
your authorised Ducati Urban e-Mobility dealer.
The Support Service is able to provide all the information you will need and answer all
your requests regarding the perfectcare and maintenance of your pedal-assisted bicycle.
ATTENTION
Check with negative results
• If even a single check has a negative result, do not ride the pedal-assisted bicycle.
• Immediately take all measures to perform a suitable repair and if necessary, contact the
Support Service of your dealer.
Washing
Cleaning the pedal-assisted bicycle is not only a matter of decorum but also makes it
possible to immediately detect any defect in the bicycle.
In order not to damage or impair the operation of the various components, especially
the electrical parts, cleaning must be carried out while taking certain precautions. It is
absolutely forbidden to direct pressurised water jets towards the electrical parts, the
motor, the display and the battery, for which sponge washing is recommended.
Before starting the pedal-assisted bicycle, dry completely with a cloth or paper, being
careful not to scratch the painted components. Avoid using compressed air, especially
at close range and high pressure. Check that there is no residual moisture left on the
electrical components.
Chain lubrication
It is important to lubricate the chain regularly, to avoid excessive wear and to prolong its
life.
1. Clean the entire length of the chain links with a rag.
2. Spray all chain links with a special lubricant spray for transmission chains.
24Checking the parts
The supporting frame of the pedal-assisted bicycle and the welds must be free of visible
defects such as: cracks, deformations, incisions, corrosion, etc.
Make sure that all the bolts and pedals of the pedal-assisted bicycle are properly
tightened.
Check the condition and attachment of the battery, the electrical cable sleeves must be
in good condition, and the terminals must be well tightened and not corroded.
Check the battery charge status using the indicator on the handlebar display.
For proper use of the battery in your EPAC vehicle, we recommend that you always
charge the battery after each use of the bicycle.
Using the inflation valve on the rims, check the inflation pressure of the tyres using
a compressor and a pressure gauge gun or a workshop pump.
Check the condition of the tread, the rim and the attachment of the rims to the
hubs. If you need to replace the tyres, contact the Support Service or a qualified
tyre dealer.
The brakes must be adjusted in such a way as to ensure effective braking, and
at the same time the control levers must have a range sufficient for modulating
braking: in other words, the brakes must be neither too loose nor too tight.
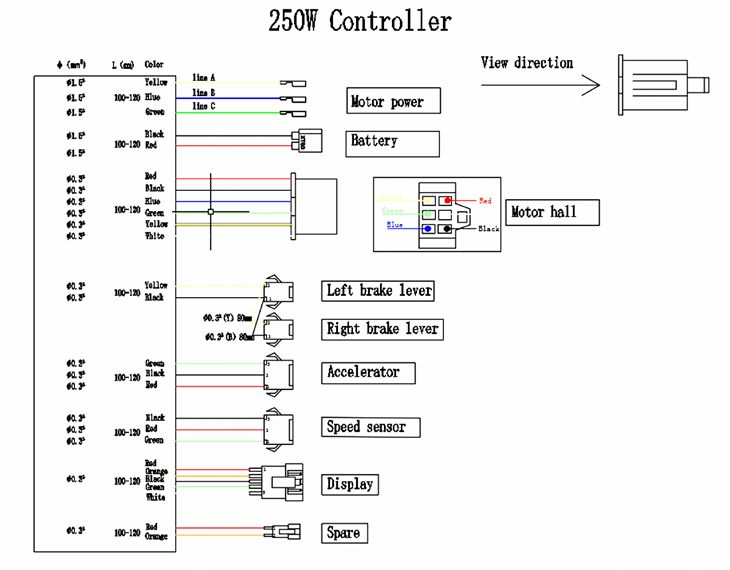
2511. Connections diagram
2612. Troubleshooting
Display Indicator Reasons Solutions
Indicates that the brake is engaged /
Brake Press brake lever some times to let it
Brake lever does not return to normal position
return. Replace with new brake lever
Without accelerator /
Accelerator cable, accelerator or connector
Replace with new cable, accelerator
is broken/damaged
Accelerator fault
Connectors between accelerator and
Reconnect well
controller are not well connected
Motor is not working Replace with new motor
Cables or connector is broken/damaged Replace with new cable
Motor fault
Motor hall cable is not connected well
Reconnect well
or connected wrong
Controller fault Controller is broken Replace with new controller
2713. Battery (Warnings)
Battery indicator
The battery indicator is full when the battery of your pedal-assisted bicycle is fully
charged. The battery indicator drops in level as the pedal-assisted bicycle is used. The
battery indicator may fluctuate in the charge level depending on the use of the pedal-
assisted bicycle, for example, if you are on a gradient, the battery indicator level may drop
rapidly as you consume much more of the battery power of your pedal-assisted bicycle.
To ensure optimal use and maintenance of the battery, it is recommended to fully charge
the battery after each use.
Make sure that the pedal-assisted bicycle, charger and charging port are dry.
When the pedal-assisted bicycle is fully charged, the LED light on the charger changes
from red (charging) to green (charging completed).
Use only the original charger. Other chargers may damage the device and pose other
potential risks.
The pedal-assisted bicycle should not be charged for extended periods. Overcharging
reduces battery life and may cause other potential risks.
Charge the pedal-assisted bicycle in a dry environment away from flammable materials
(e.g. materials that could explode into flames), preferably at an internal temperature of
15-25°C, but never below 0°C or above + 45°C.
Do not charge in direct sunlight or near a fire.
Do not charge the pedal-assisted bicycle immediately after use. Let the pedal-assisted
bicycle cool down for one hour before charging.
Never leave the pedal-assisted bicycle unattended while charging. Thermal risk! Never
connect the DC charging socket with metal objects.
Read the charging and storage sections above to ensure you maintain and handle the
battery properly. Keep the pedal-assisted bicycle away from open flames or other heat
sources to prevent the battery from overheating. Do not leave the pedal-assisted bicycle
exposed to freezing temperatures. Both excessive heat and cold can drain the battery.
Avoid completely discharging the battery.
It is best to recharge the battery while there is still some charge left. This prolongs the
life of the battery. When the charge is too low, it is not possible to drive normally. This
may lead to the rider losing control or falling off.
Make sure the battery is charged at regular intervals, even if you do not use thepedal-
assisted bicycle for an extended period. This prevents damage to the battery caused by
low voltage over an extended period.
28Battery precautions:
The battery is made up of lithium-ion cells and chemical elements that are hazardous
to health and the environment. Do not use the pedal-assisted bicycle if it emits odours,
substances or excessive heat. Do not dispose of the pedal-assisted bicycle or battery with
household waste.The end user is responsible for disposing of electrical and electronic
equipment and batteries in compliance with all applicable regulations.
What to avoid:
Opening the battery or taking it apart, hitting, throwing or puncturing the battery or
sticking objects on the battery. Touching any substances leaking from the battery, as it
contains hazardous substances. Letting children or pets touch the battery.
Over-charging, over-discharging or short-circuiting the battery. Immersing or exposing
the battery to water or other liquid. Exposing the battery to excessive heat or cold.
Exposing the battery to an environment containing explosive gases or flames.
Leaving the battery in rain or direct sunlight or in a hot car in direct sunlight.
Reassembling or refitting the battery.
Carrying or storing the battery together with metal objects such as hairpins, necklaces,
etc. Driving the pedal-assisted bicycle while charging.
Using any charger other than the original.
2914. Technical specifications
General information
Tires 20 "X 2.125" with reflective band
Rims magnesium, 6-spoke
Brakes mechanical disc
Shifter SHIMANO 6 gear
Fork magnesium
Chainset chainring 44T - 6 pinions (14-16-18-21-24-28T)
Pedals plastic, resealable
Frame magnesium, foldable
Max speed 25 km/h
Seat comfort model
Seat tube aluminum
Handlebar aluminum, foldable
Grips rubber
Fender plastic
Kickstand rear, side model
Rear rack not included
Max load 110kg
Electrical system
Lights LED front
LCD with assistance levels, ON / OFF lights,
Display
odometer with related functions
Motor 36V, 250W, IP54, rear
SAMSUNG 36V, 10.5Ah, 378Wh integrated into the frame
Battery
and removable
Charger input: 100-240V, 50-60Hz ,2.5A / output: 42V, 2.0A
Charging time 4/5 hours
up to 50 km, this figure depends on: level of assistance used, weight of the
Autonomy cyclist, muscle power applied when pedaling, tire pressure, road slope, number
of stops and restarts
Dimensions and Weights
Weight battery 2.06kg
Weight w/o battery 18.47kg
Weight tot. 20.53kg
E-bike dimensions 1510 x 580 x 1070mm
Pack dimensions 830 x 420 x 620mm
30ATTENTION
Permitted speed
The maximum speed allowed by law is 25 km/h.
Any interventions not authorised by the manufacturer on the control unit shall mean that
the manufacturer cannot be held liable for any damage caused to persons and/or things;
moreover, the warranty on the purchased product shall be invalidated.
The control unit has been programmed not to allow changes to the maximum speed
parameter.
DANGER
Risk of injury
Maintain a speed and conduct appropriate to your abilities, never use the pedal-assisted
bicycle above 25 km/h as you could cause serious damage and injury to yourself or other
people.
31CAUTION
Disposing of electrical or electronic devices at the end of their life (applicable in
all countries of the European Union and in other European systems with separate
collection systems)
This symbol on the product or on the packaging indicates that the
product should not be considered as normal household waste, but
should instead be taken to an appropriate collection point for the
recycling of electrical and electronic equipment (WEEE).
By ensuring this product is disposed of correctly, you will help
prevent potential negative consequences for the environment and
human health which could otherwise be caused by inappropriate
disposal. Recycling of materials helps to conserve natural resources.
For more detailed information about the recycling of this product,
you can contact your local waste disposal service or the outlet where
you purchased it.
In any case it is necessary to dispose of the product according to the
regulations in force in the country of purchase.
Specifically, consumers must not dispose of WEEE as municipal waste, but must dispose
of this type of waste separately, in two possible ways:
1) At municipal collection centres, directly or via the collection services of municipal
companies, where these are available.
2) At sales outlets selling new electrical and electronic equipment.
Here, very small WEEE can be left free of charge (with the longest side less than 25 cm),
while larger ones can be left on a 1-on-1 basis, i.e. you can leave the old product when a
new one with the same function is purchased.
Should you dispose of electrical or electronic equipment in an illegal manner, the
penalties provided for by current legislation on environmental protection may be applied
(valid only for Italy).
If WEEE contains batteries or accumulators, these must be removed and disposed of via
specific separate waste collection.
32CAUTION
Disposal of dead batteries (applicable in all countries of the European Union and in
other European systems with separate collection system)
This symbol on the product or packaging indicates that the battery
pack should not be considered normal household waste. On some
types of batteries, this symbol may be used in combination with a
chemical symbol.
The chemical symbols for mercury (Hg) or lead (Pb) are added if
the battery contains more than 0.0005% mercury or 0.004% lead.
By ensuring that battery packs are disposed of correctly, you will help prevent potential
negative consequences for the environment and health which could otherwise be
caused by inappropriate waste handling. Material recycling will help to conserve natural
resources. Where for safety, performance or data protection reasons, products require
a fixed connection to an internal battery/cell, this must only be replaced by qualified
service personnel.
At the end of its life, deliver the product to a collection point suitable for the disposal
of electrical and electronic equipment, this will ensure that the battery inside is also
disposed of correctly.
For more detailed information about the disposal of the dead battery or the product, you
can contact your local waste disposal service or the outlet where you purchased it.
In any case it is necessary to dispose of the product according to the regulations in force in
the country of purchase.
3315. Warranty terms
All products are covered by the "Legal Guarantee of conformity" in compliance with the
Directive 2011/83/EU.
The Legal Guarantee is reserved for consumers. It therefore applies only to users who
have made a purchase for purposes unrelated to any entrepreneurial, commercial, craft or
professional activity carried out.
For those who have purchased the Products and who do not have the quality of
consumers, the guarantee for defects of the thing sold, the guarantee for the lack of
promised and essential quality and the other guarantees provided by the civil code with
the relative terms, forfeiture and limitations will be applied.
The Seller (and, therefore, as regards the purchase of the Products, the Retailer who
sold the Product to the user) is liable to the consumer for any lack of conformity
existing at the time of delivery of the product and that occurs within two years from the
aforementioned delivery date. The lack of conformity must be reported to the seller,
under penalty of forfeiture of the guarantee, within two months from the date on which
it was discovered.
Unless proven otherwise, it is assumed that the lack of conformity that occurs within six
months of delivery of the product already existed on that date, unless this assumption is
incompatible with the nature of the product or with the nature of the lack of conformity.
Starting from the seventh month following delivery of the product, it will be the burden
of the consumer to prove that the lack of conformity already existed upon delivery of the
same.
In order to take advantage of the Legal Guarantee, the purchaser must first provide
proof of the purchase and delivery dates of the goods. Therefore, it is advisable for the
purchaser to keep all documents that can certify the purchase and delivery dates (for
example: receipt, invoice, order confirmation e-mail).
Any defects or malfunctions caused by accidental events and/or attributable to the
Purchaser's responsibility or by use of the Product that does not comply with its intended
use and/or as provided in the technical documentation enclosed with the Product, or due
to failure to adjust the mechanical parts, natural wear and tear of materials that are worn
out easily or caused by assembly errors, lack of maintenance and/or use of the same not
in compliance with the instructions
For example, the following are to be considered excluded from the Legal Guarantee
relevant to the Products:
- damage caused by impacts, accidental falls or collisions, punctures;
- damage caused by use, exposure or storage in an unsuitable environment (e.g.:
presence of rain and/or mud, exposure to humidity or excessive heat, contact with sand
or other substances);
- damage caused by failure to adjust due to “putting on the road” and/or maintenance of
mechanical parts (mechanical disc brake, handlebar, tires, etc.);
34- incorrect installation and/or incorrect assembly of parts and/or components, except
when installation and/or assembly has been carried out by the seller or under his
responsibility and/or they have been carried out by the consumer but the error in the
installation and/or assembly is attributable to a lack of installation instructions;
- the natural wear and tear of consumable materials: mechanical disc brake (e.g. pads,
callipers, disc, cables), tires, platforms, gaskets, bearings, led lights and bulbs, kickstand,
knobs, mudguards, rubber parts (platform), wiring cable connectors, grilles and
stickers, etc.;
- improper maintenance and/or improper use of the Product battery;
- tampering with and/or forcing parts of the Product;
- incorrect or inadequate maintenance or alteration of the Product;
- improper use of the Product (e.g.: excess load, use in competitions and/or for
commercial or rental activities);
- maintenance, repairs and/or technical interventions on the Product carried out by
unauthorised third parties;
- damage to the Products resulting from transport, if carried out by the Purchaser;
- damage and/or defects resulting from the use of non-original parts.
In the event that a purchased Product, during the validity period of the Legal Guarantee,
manifests what could be a lack of conformity, the Purchaser must contact the seller;
the latter will promptly reply to the communication of the alleged lack of conformity,
indicating the specific procedure to be followed, also taking into account the category to
which the Product belongs and/or the defect reported.
35Declaration of Conformity
M.T. Distribution S.r.l.
Address: Via Bargellino 10, 40112 Calderara di Reno (BO), Italy
This declaration of conformity is issued under the sole responsibility of the Manufacturer
Product Brand Ducati
Product Model MG-20
Description of product Electric Bike
Rating Product: DC 36V, 250W
Is in conformity with the requirements of the council Directives on the approximation of
the laws of the Member States relating
EU Council Directive 2014/30/EU Electromagnetic Compatibility
EU MD 2006/42/EC
Test Standards :
EN 15194: 2017
EN 55014-1: 2017
EN 61000-3-2: 2014
EN 61000-3-3: 2013
EN 55014-2: 2015
Factory name: ONEBOT CYCLES Sp.zo.o
Factory address: Prologis Park Wrocław 1, building DC 1 A, Magazynowa 1
street, 55-040 Bielany Wroclawskie, Poland
Date: 07/01/2020
Technical file available from EU headquarter
Declaration Place: Bologna, Italy
First name and surname: Alessandro Summa
Position: CEO
MT DISTRIBUTION S.R.L
Via Bargellino 10, 40112, Calderara di Reno (BO), Italy
Authorized person: Alessandro Summa
Position: CEO
Alessandro Summa
NOTE:
This declaration of conformity is only applicable to Electric Bike sold in
countries that follow the CE marking directives.
36Italiano
foldable e-bike
Manuale d'uso e manutenzione
Prima di utilizzare la bicicletta, questa deve essere montata in modo corretto e
controllata in tutte le sue parti. Eventuali danni dovuti ad un montaggio o una
manutenzione errata non sono coperti dalla garanzia.
Per ulteriori informazioni o per richiedere un supporto tecnico e assistenza, con-
tattare il rivenditore, oppure visitare il sito web www.ducatiurbanemobility.it
Per i ricambi vai al sito www.urbanemobility.com
37Indice
1. Introduzione
2. Avvertenze sulla sicurezza
3. Contenuto della confezione
4. Descrizione della bicicletta (epac)
5. Sollevamento e trasporto
6. Messa in strada
7. Assemblaggio
8. Display LCD
9. Configurazione del display
10. Istruzioni per la manutenzione
11. Diagramma delle connessioni
12. Risoluzione dei problemi
13. Batteria (Avvertenze)
14. Specifiche tecniche
15. Termini di garanzia
381. Introduzione
Panoramica
Il presente manuale è parte integrante ed essenziale della bicicletta a pedalata assistita
(EPAC) e deve essere sempre fornito all'utente.
Prima del primo utilizzo della bicicletta, è essenziale che gli utenti leggano, comprendano
e rispettino rigorosamente le seguenti disposizioni.
Il produttore non è responsabile di danni a persone e/o cose o alla bicicletta a pedalata
assistita, se questa viene utilizzata in modo errato e non conforme alle istruzioni fornite.
In vista del continuo sviluppo tecnologico, il produttore si riserva il diritto di modificare
la bicicletta a pedalata assistita (EPAC) senza preavviso, senza che questo manuale sia
automaticamente aggiornato.
Si raccomanda di accedere al sito web www.ducatiurbanemobility.it dove saranno
pubblicati eventuali aggiornamenti o modifiche al presente manuale.
Servizio assistenza
Per qualsiasi problema o chiarimento, non esitare a contattare il Servizio Assistenza del
distributore autorizzato Ducati Urban e-Mobility, che metterà a disposizione personale
competente e specializzato, attrezzature specifiche e ricambi originali.
Forma grafica delle avvertenze di sicurezza
I seguenti simboli grafici saranno utilizzati per identificare i messaggi di sicurezza
nel presente manuale. La loro funzione è quella di attirare l'attenzione del lettore/
dell'utente, al fine di garantire un uso corretto e sicuro della bicicletta a pedalata
assistita.
ATTENZIONE
Prestare attenzione
Evidenzia le regole da rispettare per evitare di danneggiare la bicicletta a pedalata
assistita e/o impedire il verificarsi di situazioni pericolose.
PERICOLO
Rischi residui
Evidenzia la presenza di pericoli che causano rischi residui ai quali l'utente deve prestare
attenzione per evitare lesioni o danni materiali.
Nota legale sull’utilizzo
Rispettare sempre il codice della strada e le norme in materia ciclistica vigenti nel paese
di circolazione.
392. Avvertenze sulla sicurezza
Regole generali per la sicurezza
ATTENZIONE
Uso della bicicletta a pedalata assistita
Ogni utente deve leggere il presente manuale d'uso e manutenzione prima di usare la
bicicletta per la prima volta, in particolare il capitolo sulle istruzioni di sicurezza.
ATTENZIONE
Nonostante l'uso di dispositivi di sicurezza, per garantire un uso sicuro della bicicletta a
pedalata assistita è necessario prendere nota di tutte le istruzioni di prevenzione degli
incidenti contenute nel presente manuale.
Rimanere sempre concentrati durante l'uso della bicicletta a pedalata assistita e non
sottovalutare i rischi residui che ne derivano.
Anche se si dispone già di una certa familiarità con l'uso delle biciclette a pedalata
assistita, si raccomanda di seguire sempre le istruzioni riportate nel presente, oltre alle
precauzioni generali da osservare quando si guida un velocipede.
Responsabilità
Il conducente ha l’obbligo di usare la bicicletta a pedalata assistita con la massima
diligenza e nel pieno rispetto del codice della strada e di tutte le norme in materia
ciclistica vigenti nel paese di circolazione.
Il conducente ha altresì obbligo di mantenere pulito ed in perfetto stato di efficienza e di
manutenzione la bicicletta a pedalata assistita, di eseguire diligentemente i controlli di
sicurezza di sua competenza, come descritti nella sezione avvertenze e raccomandazioni,
oltre che a conservare tutta la documentazione relativa alla manutenzione della bicicletta
a pedalata assistita.
Il Conducente deve valutare attentamente le condizioni atmosferiche che potrebbero
rendere pericoloso l’utilizzo della bicicletta a pedalata assistita. A tal fine, si consiglia di
moderare la velocità e di mantenere una adeguata distanza di frenata nel caso in cui si
trovi in condizioni climatiche avverse e/o in caso di circolazione intensa.
40Avvertenze per gli utenti
- È vietato viaggiare con un passeggero.
- Non consumare alcool o droghe prima di utilizzare la bicicletta a pedalata assistita.
- Questo modello di bicicletta a pedalata assistita è progettato e costruito per essere
utilizzato all'aperto, su strade pubbliche o piste ciclabili.
- Non forzare la bicicletta a pedalata assistita per raggiungere prestazioni superiori a
quelle per cui è stata progettata.
- Non utilizzare mai la bicicletta a pedalata assistita se sono state rimosse delle parti.
- Evitare le superfici irregolari e gli ostacoli.
- Condurre la bicicletta mantenendo entrambe le mani sul manubrio.
- Sostituire le parti usurate e/o danneggiate e controllare che le protezioni funzionino
correttamente prima dell'uso.
Note per la manutenzione
Tutte le operazioni di manutenzione devono essere effettuate con la batteria scollegata.
Durante ogni fase di manutenzione, gli operatori devono essere dotati dell'attrezzatura
necessaria per prevenire eventuali incidenti.
Gli strumenti utilizzati per la manutenzione devono essere adatti e di buona qualità.
Non usare benzina o solventi infiammabili, come ad esempio i detergenti, e utilizzare solo
solventi non infiammabili e non tossici.
Limitare il più possibile l'uso di aria compressa (massimo 2 bar) e proteggersi con occhiali
con schermi laterali.
Non utilizzare fiamme libere come mezzo di illuminazione quando si eseguono operazioni
di verifica o di manutenzione.
Dopo qualsiasi intervento di manutenzione o regolazione, assicurarsi che non rimangano
attrezzi o corpi estranei tra le parti mobili della bicicletta a pedalata assistita.
ATTENZIONE
Ricambi originali
Utilizzare solo ricambi originali o compatibili approvati Ducati Urban e-Mobility.
Il produttore non è responsabile di danni o perdite di funzionalità causati dall'uso di
accessori e parti non originali.
41Altre disposizioni
La prima cosa da fare quando si inizia a usare la bicicletta è controllare la presenza e
l'integrità delle protezioni e il funzionamento dei dispositivi di sicurezza.
Se si riscontrano dei difetti, non utilizzare la bicicletta a pedalata assistita!
PERICOLO
Guards
È severamente vietato modificare o rimuovere le protezioni della batteria, della catena,
ecc.,così come le targhette di avvertimento e di identificazione.
Magazzino di stoccaggio
Nel caso in cui la bicicletta a pedalata assistita debba essere conservata per lunghi periodi
di inattività, è necessario effettuare le seguenti operazioni:
- Metterla al riparo in un luogo asciutto e ben ventilato.
- Effettuare la pulizia generale della bicicletta a pedalata assistita.
- Rimuovere la batteria dall'alloggiamento.
- Lasciare la bicicletta sul cavalletto.
- Proteggere i contatti elettrici esposti con prodotti antiossidanti.
- Ingrassare tutte le superfici non protette con vernici o trattamenti anticorrosione.
423. Contenuto della confezione
- Corpo del telaio della bicicletta
- Sella + canotto sella
- Caricabatterie
- Luce catarifrangente posteriore
- Chiave a brugola (4 mm)
- Parafango anteriore
- Parafango posteriore
- n°2 chiavi serratura batteria
434. Descrizione della bicicletta (epac)
6
display
5
1 4
3
21
20 2
19 7
18
8
17
16
15 14 13 12 11 22 10 9
1. Sella
2. Leva per ripiegare il telaio della bicicletta
3. Leva per piegare l'asta del manubrio
4. Blocco di sicurezza
5. Manubrio
6. Leva del freno
7. Luce anteriore
8. Forcella anteriore
9. Freno a disco
10. Parafango anteriore (da assemblare, fornito nella confezione)
11. Puleggia della catena
12. Ruota di protezione della puleggia della catena
13. Ruota di supporto
14. Pedale
15. Cavalletto
16. Cambio posteriore
17. Motore
18. Parafango posteriore (da assemblare, fornito nella confezione)
19. Morsetto di bloccaggio del reggisella
20. Canotto sella
21. Luce catarifrangente posteriore (da assemblare, fornita nella confezione)
22. Numero seriale
44Condizioni di utilizzo
La bicicletta a pedalata assistita è stata progettata e costruita per essere utilizzata
all'aperto, su strade pubbliche e piste ciclabili, ma sempre su superfici asfaltate.
Qualsiasi modifica dello stato di costruzione può compromettere la sicurezza e la stabilità
della bicicletta a pedalata assistita e può provocare un incidente.
Altri tipi di utilizzo, o un uso al di fuori della portata indicata, non corrispondono all'uso
previsto dal produttore e, pertanto, il produttore non sarà ritenuto responsabile per
eventuali danni che ne derivano.
La durata della batteria, e quindi l'autonomia stimata in km, può variare notevolmente
a seconda del tipo di utilizzo e delle influenze esterne. Si prega pertanto di considerare
i seguenti fattori, che sono particolarmente influenti: peso dell'utente, frequenza di
pedalata, livello di assistenza selezionato sul display, velocità media, spessore e usura del
battistrada, pendenza e superficie stradale, condizioni atmosferiche.
Ambiente di utilizzo
La bicicletta a pedalata assistita può essere utilizzata all'aperto, in assenza di condizioni
climatiche avverse (pioggia, grandine, neve, vento forte, ecc.).
Temperatura massima consentita: + 40°C
Temperatura minima consentita: + 0°C
Umidità massima consentita: 80%
L'ambiente di utilizzo deve avere una superficie asfaltata piatta e compatta, senza
rugosità, buche o depressioni e senza ostacoli e macchie d'olio. Inoltre, il luogo di utilizzo
deve essere illuminato, sia dal sole che da luci artificiali, in modo da garantire una corretta
visibilità del percorso e dei comandi della bicicletta a pedalata assistita (si raccomanda
un'illuminazione compresa tra 300 e 500 lux).
ATTENZIONE
Ambienti di utilizzo vietati
La bicicletta a pedalata assistita non deve essere usata:
in aree soggette a rischi di incendio o esplosione; in ambienti con un'atmosfera corrosiva
e/o chimicamente attiva; in ambienti scarsamente illuminati; su terreni con una pendenza
superiore al 10%; su terreni irregolari e non asfaltati.
45Usi impropri e controindicazioni
Le azioni descritte di seguito, che ovviamente non coprono l'intera gamma di possibili "usi
impropri" della bicicletta a pedalata assistita, sono da considerarsi assolutamente vietate.
ATTENZIONE
Operazioni vietate
L'esecuzione di operazioni vietate invalida la garanzia.
Il produttore declina ogni responsabilità per eventuali danni a persone e cose derivanti
dall'esecuzione di operazioni vietate.
PERICOLO
È severamente vietato:
Usare la bicicletta a pedalata assistita per scopi diversi da quelli per cui è stata costruita,
cioè per trasportare passeggeri.
Usare la bicicletta a pedalata assistita in zone che presentano un rischio di esplosione.
Usare la bicicletta a pedalata assistita in condizioni climatiche avverse (pioggia battente,
grandine, neve, vento forte, ecc.).
Trasportare un passeggero.
Usare la bicicletta a pedalata assistita sotto l'influenza di alcol o droghe.
Usare la bicicletta a pedalata assistita quando il proprio peso è superiore a quello
consentito.
Caricare la batteria in un ambiente troppo caldo o non sufficientemente ventilato.
Coprire la batteria durante la carica.
Non fumare o utilizzare fiamme vive nell'ambiente di carica.
Transitare o fermarsi su superfici con una pendenza superiore al 10% o superfici irregolari
(non asfaltate, con buche, depressioni, ostacoli, ecc.).
Eseguire qualsiasi intervento di manutenzione con la batteria collegata. Utilizzare pezzi di
ricambio non originali.
Inserire gli arti o le dita tra le parti mobili della bicicletta.
È assolutamente vietato alzare il reggisella oltre il limite di 10 cm per evitare di rompere il
telaio.
465. Sollevamento e trasporto
PERICOLO
Schiacciamento e impatto
Durante il sollevamento, è necessario prestare la massima attenzione per evitare di
causare eventuali danni a persone e cose.
Il produttore non è responsabile di eventuali rotture dovute al sollevamento e/o al
trasporto della bicicletta a pedalata assistita dopo la consegna.
Il peso della bicicletta a pedalata assistita è di circa 21 kg, per cui si consiglia il
sollevamento da parte di due persone adulte.
Trasporto
Per garantire la massima sicurezza durante il trasporto nei furgoni, è necessario evitare
che la bicicletta a pedalata assistita si sposti. Per fare ciò, appoggiarla sul supporto e
legarla con cinghie o cavi di ancoraggio in buone condizioni.
A tal fine, i dispositivi di fissaggio devono essere installati in modo tale da non
danneggiare il telaio e altre parti della bicicletta.
476. Messa in strada
Ricarica della batteria
Prima di utilizzare la bicicletta per la prima volta, è necessario caricare completamente la
batteria per almeno 4-6 ore, utilizzando il caricabatterie in dotazione.
La bicicletta è alimentata da una batteria agli ioni di litio da 36V.
Il tempo medio di ricarica è di circa 4-6 ore. Le batterie sono del tipo al litio.
Per prolungare il più possibile la vita della batteria, si raccomanda di effettuare una carica
completa ogni trenta giorni, anche se la bicicletta non viene utilizzata.
Si raccomanda, inoltre, di caricare la batteria con l'apposito caricabatterie dopo ogni
utilizzo della bicicletta a pedalata assistita.
Durante la carica, la luce rossa del caricatore si accende; una volta completata la carica,
la luce rossa si spegne e si accende la luce verde.
Opzione di carica 1: aprire il tappo Opzione di carica 2: caricare la
di gomma della porta di ricarica e batteria rimuovendola dalla
caricare. bicicletta; utilizzare le chiavi
in dotazioni per sbloccarla, ed
estrarre la batteria.
E' possibile ricaricare la batteria in
modo diretto utilizzando il carica
batterie in dotazione.
48Disinstallare e installare la batteria
1. Spegnere il veicolo, sbloccare 2. Per installare la batteria,
la batteria, quindi estrarre bloccare la batteria con la
la scatola della batteria chiave e togliere la chiave,
afferrando la maniglia di abbassare completamente la
sollevamento, come raffigurato maniglia della batteria e aprire
nell'immagine. il telaio della bicicletta.
PERICOLO
Precauzioni durante la carica
Collegare sempre prima la spina alla batteria e poi la spina di alimentazione alla rete
elettrica.
Una volta completata la carica, scollegare sempre prima la spina dalla rete e poi la spina
dalla batteria.
Caricare sempre completamente la batteria.
Usare sempre alimentatori originali.
Non lasciare la batteria in carica per più di 16 ore.
Effettuare sempre la ricarica in una zona ventilata.
Non ricaricare la batteria in ambienti troppo caldi.
Non ricaricare la batteria in prossimità di liquidi infiammabili.
Non coprire in alcun modo la batteria mentre è in carica.
Se la batteria emette un cattivo odore, scollegarla immediatamente dall'alimentazione e
ventilare l'ambiente, senza toccare la batteria.
Conservare la batteria in un luogo fresco e asciutto in caso di inutilizzo.
49Messa in strada
Prima di utilizzare la bicicletta a pedalata assistita, per garantire una efficiente messa su
strada del prodotto, si consiglia di controllare attentamente ogni parte e provvedere ad
adeguato intervento di regolazione delle relative componenti meccaniche, direttamente
od avvalendosi del supporto di operatori specializzati, si vedano: regolazione e serraggio
manubrio ed attacco manubrio, regolazione e serraggio sella e reggisella, regolazione
freni, regolazione cambio, verifica pressione pneumatici, lubrificazione catena ed
ingranaggi, verifica corretto serraggio viti di fissaggio e controllo generale che tutte le
parti siano in ordine. Si consigli a di eseguire la messa in strada da personale qualificato.
Ruote
Controllare la pressione di gonfiaggio dei pneumatici, facendo riferimento ai valori
riportati sulla spalla di ciascun pneumatico. Controllare lo stato di usura della gomma:
non devono esserci tagli, crepe, corpi estranei, rigonfiamenti anomali, tele esposte e altri
danni.
Sistema frenante
Controllare il funzionamento dei freni eseguendo una prova di frenata a bassa velocità
(massimo 6 km/h) in una zona priva di ostacoli, utilizzando prima il freno posteriore e poi
quello anteriore.
ATTENZIONE
Controllo con risultati negativi
Nel caso in cui si riscontrino difetti di qualsiasi tipo durante i controlli preliminari e anche
un solo controllo abbia risultati negativi, non utilizzare la bicicletta a pedalata assistita.
Attuare immediatamente tutte le misure necessarie per eseguire una regolazione
adeguata e, se necessario, contattare il Servizio Assistenza.
507. Assemblaggio
Apertura della bicicletta
1. Afferrare il corpo del veicolo e 2. Come illustrato nell'immagine,
aprire il telaio. bloccare saldamente il morsetto
di fissaggio di apertura; eseguire
completamente i passaggi 3) e 4)
prima di bloccare il morsetto.
3. Se l'elemento di fissaggio si 4. Se l'elemento di fissaggio si
presenta come nell'immagine, è presenta come nell'immagine, è
necessario premerlo verso il basso possibile eseguire il passaggio 2)
per liberare il pezzo convesso. per bloccare il telaio.
51Apertura dell'asta del manubrio
1. Afferrare il corpo della bicicletta 2. Stringere la leva di chiusura,
e ruotare l'asta del manubrio per spingendola verso l'asta del
portarla in posizione verticale, manubrio.
assicurandosi che l'asta del
manubrio sia collegata saldamente
alla parte inferiore.
Pulsante di
sicurezza
3. Scuotere leggermente l'asta 4. Durante l'apertura dell'asta del
del manubrio e verificare che il manubrio, è necessario dapprima
gancio di sicurezza si agganci premere il perno di sicurezza e
completamente. poi aprire la leva di sicurezza e poi
aprire la chiave di chiusura.
52Montaggio del manubrio
1. Utilizzare la chiave a brugola in dotazione per allentare le viti dell’attacco
manubrio anteriore e rimuovere il morsetto.
2. Posizionare con cura il morsetto 3. Controllare il manubrio se
sul centro del manubrio e utilizzare posizionato e serrato in modo
la chiave in dotazione per stringere corretto prima di mettersi in
le viti strada.
53You can also read