Nokia N97 mini User Guide - 9217193 Issue 1.0
←
→
Page content transcription
If your browser does not render page correctly, please read the page content below
Nokia N97 mini User Guide

                            9217193
                            Issue 1.0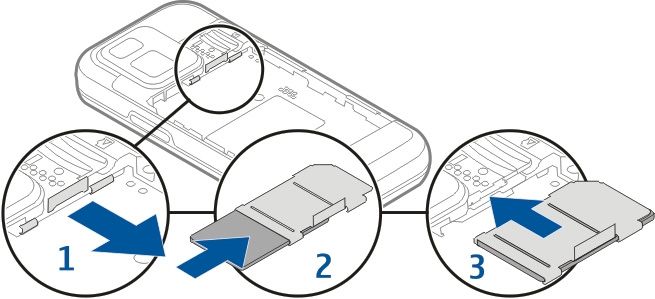
Contents                               Headset                                                   15
                                       Touch screen actions                                      16
                                       Write text                                                17
Safety                            4    Lock the keys and touch screen                            20
About your device                 4    Transfer content                                          20
Office applications               5    Profiles                                                  20
Network services                  5
Shared memory                     5    Your device                                               22
ActiveSync                        5    Home screen                                               22
Magnets and magnetic fields       5    Display indicators                                        23

Find help                         6    Make calls                                                25
Support                           6    Proximity sensor                                          25
In-device help                    6    Voice calls                                               25
Extended user guide               6    Internet calls                                            25
Do more with your device          7
Update device software            7    Contacts (phonebook)                                      27
Access codes                      8    Save and edit names and numbers                           27
Remote lock                       8
Prolong battery life              8    Messaging                                                 28
                                       Write and send messages                                   28
Get started                       10
Keys and parts (front)            10   Connectivity                                              29
Keys and parts (back)             10   Wireless LAN                                              29
Keys and parts (sides)            11   Bluetooth connectivity                                    30
Keys and parts (top)              11
Insert the SIM card and battery   11   Internet                                                  32
Memory card                       12   Browse the web                                            32
Antenna locations                 13
                                       Maps                                                      33
Switch the device on and off      14
                                       About Maps                                                33
Charge the battery                14

2                                                                 © 2009 Nokia. All rights reserved.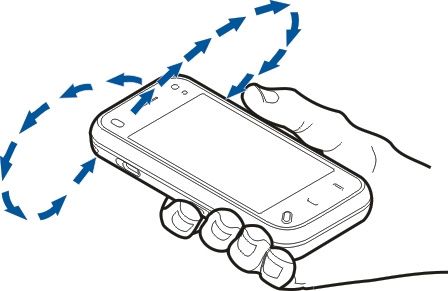
Use Maps with the compass                 33   Additional safety information        45
Calibrate compass                         34   Small children                       45
                                               Operating environment                45
Camera                                    35   Medical devices                      45
Image capture                             35   Vehicles                             46
                                               Potentially explosive environments   46
Photos                                    37   Emergency calls                      46
About Photos                              37   Certification information (SAR)      46
View images and videos                    37
                                               Limited Warranty                     47
Music                                     39
Play a song or a podcast                  39   Index                                49
FM radio                                  40

Videos                                    41
Download and view video clips             41

Green tips                                42
Save energy                               42
Recycle                                   42
Save paper                                42
Learn more                                42

Accessories                               43

Battery                                   43
Battery and charger information           43
Nokia battery authentication guidelines   44

Taking care of your device                45
Recycle                                   45

© 2009 Nokia. All rights reserved.                                                   3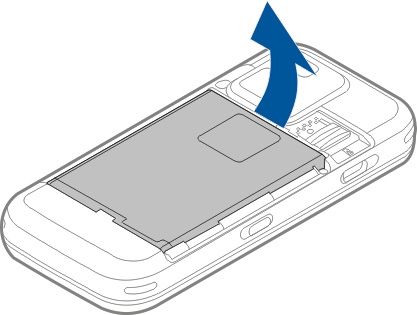
Safety                                                           ACCESSORIES AND BATTERIES
                                                                         Use only approved accessories and batteries. Do
Read these simple guidelines. Not following them may be                  not connect incompatible products.
dangerous or illegal. Read the complete user guide for further
information.
                                                                 WATER-RESISTANCE
SWITCH ON SAFELY
                                                                         Your device is not water-resistant. Keep it dry.
        Do not switch the device on when wireless phone
        use is prohibited or when it may cause interference
        or danger.
                                                                 About your device
ROAD SAFETY COMES FIRST
                                                                 The wireless device described in this guide is approved for
        Obey all local laws. Always keep your hands free to      use on the (E)GSM 850, 900, 1800,1900, and UMTS 900, 1900,
        operate the vehicle while driving. Your first            2100 networks. Contact your service provider for more
        consideration while driving should be road safety.       information about networks.

INTERFERENCE                                                     Your device supports several connectivity methods and like
                                                                 computers may be exposed to viruses and other harmful
        All wireless devices may be susceptible to
                                                                 content. Exercise caution with messages, connectivity
        interference, which could affect performance.
                                                                 requests, browsing, and downloads. Only install and use
                                                                 services and software from trustworthy sources that offer
                                                                 adequate security and protection, such as applications that
SWITCH OFF IN RESTRICTED AREAS                                   are Symbian Signed or have passed the Java Verified™ testing.
        Follow any restrictions. Switch the device off in        Consider installing antivirus and other security software on
        aircraft, near medical equipment, fuel, chemicals,       your device and any connected computer.
        or blasting areas.
                                                                 Your device may have preinstalled bookmarks and links for
                                                                 third-party internet sites and may allow you to access third-
QUALIFIED SERVICE
                                                                 party sites. These are not affiliated with Nokia, and Nokia
         Only qualified personnel may install or repair this     does not endorse or assume liability for them. If you access
         product.                                                such sites, take precautions for security or content.

4                                                                                            © 2009 Nokia. All rights reserved.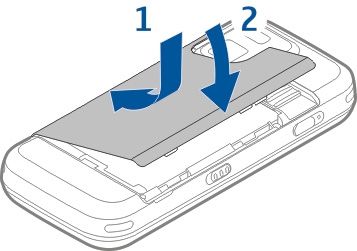
Warning:                                                          arrangements with your service provider to use them.
To use any features in this device, other than the alarm clock,   Network services involve transmission of data. Check with
the device must be switched on. Do not switch the device on       your service provider for details about fees in your home
when wireless device use may cause interference or danger.        network and when roaming on other networks. Your service
                                                                  provider can explain what charges will apply. Some networks
                                                                  may have limitations that affect how you can use some
When using this device, obey all laws and respect local           features of this device requiring network support such as
customs, privacy and legitimate rights of others, including       support for specific technologies like WAP 2.0 protocols (HTTP
copyrights. Copyright protection may prevent some images,         and SSL) that run on TCP/IP protocols and language-
music, and other content from being copied, modified, or          dependent characters.
transferred.
                                                                  Your service provider may have requested that certain
Make back-up copies or keep a written record of all important     features be disabled or not activated in your device. If so,
information stored in your device.                                these features will not appear on your device menu. Your
                                                                  device may also have customized items such as menu names,
When connecting to any other device, read its user guide for      menu order, and icons.
detailed safety instructions. Do not connect incompatible
products.                                                         Shared memory
The images in this guide may differ from your device display.     The following features in this device may share memory:
                                                                  multimedia messaging (MMS), e-mail application, instant
Refer to the user guide for other important information about     messaging. Use of one or more of these features may reduce
your device.                                                      the memory available for the remaining features. If your
                                                                  device displays a message that the memory is full, delete
Office applications                                               some of the information stored in the shared memory.
The office applications support common features of Microsoft
Word, PowerPoint, and Excel (Microsoft Office 2000, XP, and       ActiveSync
2003). Not all file formats are supported.                        Use of the Mail for Exchange is limited to over-the-air
                                                                  synchronisation of PIM information between the Nokia
Network services                                                  device and the authorised Microsoft Exchange server.
To use the device you must have service from a wireless
service provider. Some features are not available on all          Magnets and magnetic fields
networks; other features may require that you make specific       Keep your device away from magnets or magnetic fields.

© 2009 Nokia. All rights reserved.                                                                                            5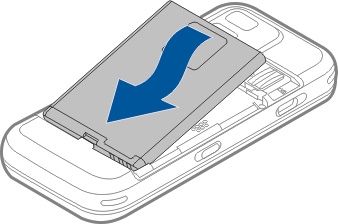
Find help                                                         To open help texts from the main menu, select Menu >
                                                                  Applications > Help and the application for which you want
                                                                  to read instructions.
Support
When you want to learn more about how to use your product         When an application is open, to access the help text for the
or you are unsure how your device should function, see the        current view, select Options > Help.
support pages at www.nokia.com/support or your local
Nokia website, www.nokia.mobi/support (with a mobile              When you are reading the instructions, to change the size of
device), the Help application in the device, or the user guide.   the help text, select Options > Decrease font size or
                                                                  Increase font size.
If this does not resolve your issue, do one of the following:
                                                                  You may find links to related topics at the end of the help text.
•   Restart the device: switch off the device, and remove the     If you select an underlined word, a short explanation is
    battery. After about a minute, replace the battery, and       displayed.
    switch on the device.
•   Restore the original factory settings as explained in the     Help texts use the following indicators:
    user guide. Your documents and files will be deleted in
    the reset, so back up your data first.                                Link to a related help topic.
                                                                          Link to the application being discussed.
•   Update your device software regularly for optimum
    performance and possible new features, as explained in
    the user guide.                                               When you are reading the instructions, to switch between
                                                                  help texts and the application that is open in the background,
If your issue remains unsolved, contact Nokia for repair          select Options > Show open apps. and the desired
options. See www.nokia.com.hk/repair. Before sending your         application.
device for repair, always back up the data in your device.

In-device help                                                    Extended user guide
Your device contains instructions to help to use the              An extended version of this user guide is available on the
applications in your device.                                      product support pages of the Nokia website. Some
                                                                  applications or functions are explained only in the extended
                                                                  user guide. This is explained in the relevant sections. The
                                                                  extended user guide also contains a troubleshooting section.

6                                                                                               © 2009 Nokia. All rights reserved.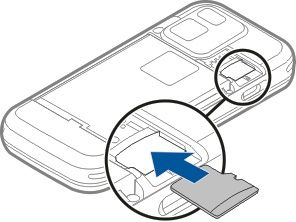
Do more with your device                                         To download the available updates, select     . To unmark
There are various applications provided by Nokia and third       specific updates that you do not want to download, select the
party software developers, that help you do more with your       updates from the list.
device. To find and download applications, visit the Ovi Store
at store.ovi.com. These applications are explained in the        To view information on an update, select the update and
guides that are available on the product support pages at           .
www.nokia.com/support or your local Nokia website.
                                                                 To view the status of previous updates, select     .
Update device software
                                                                 Select Options and from the following:
Software updates over the air
Select Menu > Applications > SW update.                          Update via PC — Update your device using a PC. This option
                                                                 replaces the Start update option when updates are only
With Software update (network service), you can check if         available using the Nokia Software Updater PC application.
there are updates available for your device software or
applications, and download them to your device.                  View update history — View the status of previous updates.
                                                                 Settings — Change the settings, such as the default access
Downloading software updates may involve the transmission        point used for downloading updates.
of large amounts of data (network service).                      Disclaimer — View the Nokia licence agreement.
Make sure that the device battery has enough power, or
connect the charger before starting the update.                  Software updates using your PC
                                                                 Nokia Software Updater is a PC application that enables you
Warning:                                                         to update your device software. To update your device
If you install a software update, you cannot use the device,     software, you need a compatible PC, broadband internet
even to make emergency calls, until the installation is          access, and a compatible USB data cable to connect your
completed and the device is restarted. Be sure to back up data   device to the PC.
before accepting installation of an update.
                                                                 To get more information, to check the release notes for the
                                                                 latest software versions, and to download the Nokia Software
After updating your device software or applications using        Updater application, see www.nokia.com.hk/
Software update, the instructions related to the updated         softwareupdate or your local Nokia website.
applications in the user guide or the helps may no longer be
up to date.                                                      To update the device software, do the following:

© 2009 Nokia. All rights reserved.                                                                                          7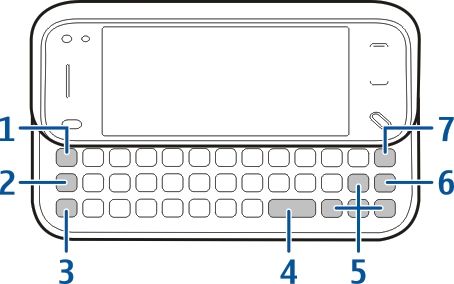
1   Download and install the Nokia Software Updater                 personal data in your device may be deleted. For more
    application to your PC.                                         information, contact a Nokia Care point or your device dealer.
2   Connect your device to the PC using a USB data cable, and       Personal Unblocking Key (PUK) code and PUK2 code — These
    select PC Suite mode.                                           codes (8 digits) are required to change a blocked PIN code or
3   Open the Nokia Software Updater application. The Nokia          PIN2 code, respectively. If the codes are not supplied with the
    Software Updater application guides you to back up your         SIM card, contact the operator whose SIM card is in your
    files, update the software, and restore your files.             device.
                                                                    UPUK code — This code (8 digits) is required to change a
Access codes                                                        blocked UPIN code. If the code is not supplied with the USIM
If you forget any of the access codes, contact your service         card, contact the operator whose USIM card is in your device.
provider.
                                                                    Remote lock
Personal identification number (PIN) code — This code               To prevent unauthorised use of your device, you can lock your
protects your SIM card against unauthorised use. The PIN            device and memory card remotely using a text message. You
code (4 to 8 digits) is usually supplied with the SIM card. After   must define the text message, and to lock your device, send
three consecutive incorrect PIN code entries, the code is           the text message to your device. To unlock your device, you
blocked, and you need the PUK code to unblock it.                   need the lock code.
UPIN code — This code may be supplied with the USIM card.
The USIM card is an enhanced version of the SIM card and is         To enable remote locking, and to define the text message,
supported by UMTS mobile phones.                                    select Menu > Settings and Phone > Phone mgmt. >
                                                                    Security settings > Phone and SIM card > Remote phone
PIN2 code — This code (4 to 8 digits) is supplied with some
                                                                    locking > Enabled. Tap the text input field to enter the text
SIM cards, and is required to access some functions in your
                                                                    message content (5-20 characters), select    , and verify the
device.
                                                                    message. Enter the lock code.
Lock code (also known as security code) — The lock code
helps you to protect your device against unauthorised use.          Prolong battery life
The preset code is 12345. You can create and change the code,
                                                                    Many features in your device increase the demand on battery
and set the device to request the code. Keep the new code           power and reduce the battery lifetime. To save battery
secret and in a safe place separate from your device. If you        power, note the following:
forget the code and your device is locked, your device will
require service. Additional charges may apply, and all the          •   Features that use Bluetooth technology, or allowing such
                                                                        features to run in the background while using other

8                                                                                                © 2009 Nokia. All rights reserved.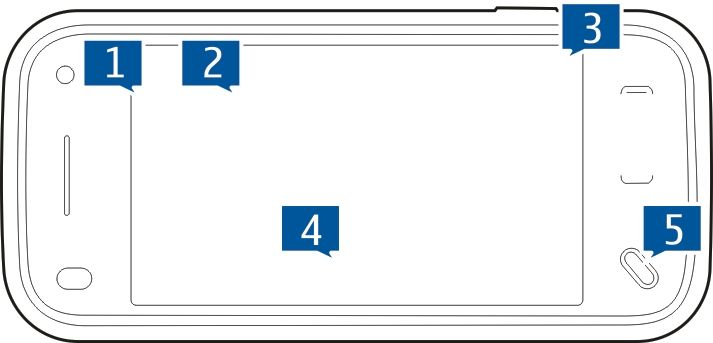
features, increase the demand on battery power.              •   The backlight of the display increases the demand on
    Deactivate Bluetooth technology when you do not need             battery power. In the display settings, you can change
    it.                                                              the length of the time-out period after which the
•   Features that use wireless LAN (WLAN), or allowing such          backlight is switched off. Select Menu > Settings and
    features to run in the background while using other              Phone > Display > Light time-out. To adjust the light
    features, increase the demand on battery power. WLAN             sensor that observes lighting conditions and adjusts the
    on your Nokia device deactivates when you are not trying         display brightness, in the display settings, select Light
    to connect, not connected to an access point, or not             sensor.
    scanning for available networks. To further reduce           •   Leaving applications running in the background
    battery consumption, you can specify that your device            increases the demand on battery power. To close the
    does not scan, or scans less often, for available networks       applications you are not using, if they are not responding,
    in the background.                                               select Options > Show open apps., and go to the
•   If you have set Packet data connection to When                   application using the menu key. Press and hold the menu
    available in connection settings, and there is no packet         key to open the application, and select Options > Exit.
    data coverage (GPRS), the device periodically tries to
    establish a packet data connection. To prolong the
    operating time of your device, select Packet data
    connection > When needed.
•   The Maps application downloads new map information
    when you scroll to new areas on the map, which
    increases the demand on battery power. You can prevent
    the automatic download of new maps.
•   If the signal strength of the cellular network varies much
    in your area, your device must scan for the available
    network repeatedly. This increases the demand on
    battery power.
    If the network mode is set to dual mode in the network
    settings, the device searches for the 3G network. You can
    set the device to use only the GSM network. To use only
    the GSM network, select Menu > Settings and
    Connectivity > Network > Network mode > GSM.

© 2009 Nokia. All rights reserved.                                                                                            9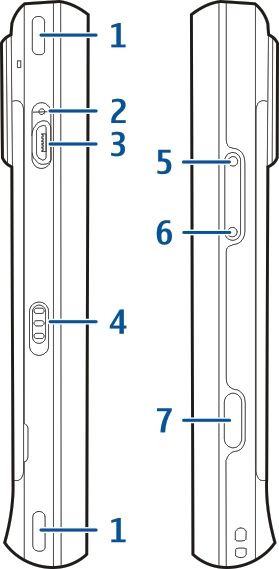
Get started

Note: The surface of this device does not contain nickel in
the platings. The surface of this device contains stainless
steel.

Keys and parts (front)                                        Do not cover the area above the touch screen, for example,
                                                              with protective film or tape.

                                                              Keys and parts (back)

1    Proximity sensor
                                                              1   Camera flash
2    Earpiece
                                                              2   Camera lens
3    Touch screen
4    Menu key
5    Call key
6    Secondary camera lens
7    Light sensor
8    End key

10                                                                                       © 2009 Nokia. All rights reserved.
Keys and parts (sides)
1 Power key
2 Nokia AV connector (3.5 mm)
Insert the SIM card and battery
Follow the instructions carefully, to avoid damaging the back
cover.
Safe removal. Always switch the device off and disconnect the
charger before removing the battery.
1 Remove the back cover by lifting it from the bottom end
of the device.
1 Stereo speaker
2 Charging indicator light
3 Micro USB connector
4 Lock switch 2 If the battery is inserted, lift the battery in the direction
5 Volume up/Zoom in key of the arrow to remove it.
6 Volume down/Zoom out key
7 Capture key
Keys and parts (top)
© 2009 Nokia. All rights reserved. 113 Pull out the SIM card holder, and insert the SIM card.
Ensure that the gold-coloured contact area on the card is
facing down and that the bevelled corner on the card is
facing the bevelled corner on the holder. Push the SIM
card holder back in.
Memory card
Use only compatible microSD cards approved by Nokia for use
with this device. Nokia uses approved industry standards for
4 Align the contacts of the battery with the corresponding memory cards, but some brands may not be fully compatible
connectors on the battery compartment, and insert the with this device. Incompatible cards may damage the card
battery in the direction of the arrow. and the device and corrupt data stored on the card.
Insert the memory card
A memory card may be already inserted in the device. If not,
do the following:
1 Remove the back cover of the device.
5 To replace the back cover, direct the top locking catches
toward their slots, and press down until the cover locks
into place.
12 © 2009 Nokia. All rights reserved.2 Insert a compatible memory card in the slot. Ensure that 5 Pull out the memory card. If the device is switched on,
the contact area on the card is facing down and towards select OK.
the slot. 6 Replace the back cover. Ensure that the cover is properly
closed.
Antenna locations
Your device may have internal and external antennas. Avoid
touching the antenna area unnecessarily while the antenna
is transmitting or receiving. Contact with antennas affects the
communication quality and may cause a higher power level
during operation and may reduce the battery life.
3 Push the card in. You can hear a click when the card locks
into place.
4 Replace the back cover. Keep the device facing down
when replacing the cover. Ensure that the cover is
properly closed.
Remove the memory card
Important: Do not remove the memory card during an
operation when the card is being accessed. Doing so may
damage the memory card and the device, and corrupt data
stored on the card.
1 Before you remove the card, press the power key, and
select Remove memory card. All applications are closed.
2 When Removing memory card will close all open
applications. Remove anyway? is displayed, select
Yes.
3 When Remove memory card and press 'OK' is
displayed, remove the back cover of the device.
4 Press the memory card to release it from the slot.
© 2009 Nokia. All rights reserved. 13Switch the device on and off Charge the battery
To switch on the device: Your battery has been partially charged at the factory. There
may not be a need to charge the battery in advance. If the
1 Press and hold the power key. device indicates a low charge, do the following:
Regular charging
1 Connect the charger to a wall outlet.
2 Connect the charger to the device. The charging indicator
light next to the USB connector is lit when the battery is
being charged.
3 When the device indicates a full charge, disconnect the
charger from the device, then from the wall outlet.
You do not need to charge the battery for a specific length of
time, and you can use the device while it is charging. If the
2 If the device asks for a PIN code or lock code, enter it, and battery is completely discharged, it may take several minutes
select OK. The preset lock code is 12345. If you forget the before the charging indicator appears on the display or
code and your device is locked, your device will require before any calls can be made.
service and additional charges may apply. For more
information, contact a Nokia Care point or your device Tip: Disconnect the charger from the wall outlet when the
dealer. charger is not in use. A charger that is connected to the outlet
consumes power even when it is not connected to the device.
To switch off the device, press the power key briefly, and
select Switch off!.
14 © 2009 Nokia. All rights reserved.USB charging
You can use USB charging when a wall outlet is not available.
With USB charging, you can also transfer data while charging
the device.
1 Connect a compatible USB device to your device using a
compatible USB cable.
The efficiency of USB charging varies significantly. In
some cases, it may take a very long time for charging to
start and the device to start functioning.
2 If your device is switched on, you can select from the
available USB mode options on the display of the device.
Headset
You can connect a compatible headset or compatible
headphones to your device. You may need to select the cable
mode.
Some headsets come in two parts, a remote control unit and
headphones. A remote control unit has a microphone and
keys to answer or end a phone call, adjust the volume, and
play music or video files. To use the headphones with a
remote control unit, connect the unit to the Nokia AV
Connector in the device, then connect the headphones to the Warning:
unit. When you use the headset, your ability to hear outside
sounds may be affected. Do not use the headset where it can
endanger your safety.
Do not connect products that create an output signal as this
may cause damage to the device. Do not connect any voltage
source to the Nokia AV Connector.
© 2009 Nokia. All rights reserved. 15When connecting any external device or any headset, other item, select Options or, if available, select an icon from
than those approved by Nokia for use with this device, to the a toolbar.
Nokia AV Connector, pay special attention to volume levels.
Select
Touch screen actions
Use the touch screen with your finger or with a stylus (if In this user documentation, to open applications or items by
available). tapping them once or twice, you "select" them. If you need
to select several items in a sequence, the display texts to
Important: Use only a stylus approved by Nokia for use with select are separated by arrows.
this device. Using any other stylus may invalidate any
warranty applying to the device and may damage the touch Example: To select Options > Help, tap Options, and then
screen. Avoid scratching the touch screen. Never use an actual tap Help.
pen or pencil or other sharp objects to write on the touch
screen.
Drag
Tap and double-tap
To drag, place your finger on the screen, and slide it across
To open an application or other element on the touch screen, the screen.
you normally tap it with your finger. However, to open the
following items, you must tap them twice. Example: To scroll up or down on a web page, drag the page
with your finger.
• List items in an application, such as the Drafts folder in
the Messaging application.
• Files in a file list, for example, an image in the Captured Swipe
folder in the Photos application.
To swipe, slide your finger quickly left or right on the screen.
Tip: When you open a list view, the first item is already
highlighted. To open the highlighted item, tap it once.
If you tap a file or similar item once, it is not opened, it
becomes highlighted. To see the options available for the
16 © 2009 Nokia. All rights reserved.Flick handwriting recognition modes allow you to write characters
directly on the screen.
To flick, place your finger on the screen, slide it quickly across
the screen, then quickly lift your finger. The content of the To activate text input mode, tap any text input field.
screen will continue scrolling with the speed and direction it In the text input view, to switch between the available text
had at the moment of release. To select an item from a input modes, tap , and select the desired input mode.
scrolling list and to stop the movement, tap the item. In your
device, flicking is available in Music player. The input methods and languages supported by the
handwriting recognition vary by region.
Scroll
Keyboard input
To scroll up or down in lists that have a scroll bar, drag the Keyboard
slider of the scroll bar.
In some list views, you can place your finger on a list item and
drag up or down.
Tip: To view a brief description of an icon, place your finger
on the icon. Descriptions are not available for all icons.
Touch screen backlight
To turn the screen backlight on, unlock the screen and keys,
if necessary, and press the menu key.
Write text
You can enter text in different modes. The full keyboard
works as a traditional keyboard, and the on-screen
Your device has a full keyboard. To open the keyboard, push
alphanumeric keypad mode allow you to tap characters. The
the touch screen up. In all applications, the screen rotates
© 2009 Nokia. All rights reserved. 17automatically from portrait to landscape when you open the
keyboard. 6 Enter key
7 Backspace key. To erase a character, press the
backspace key. To erase several characters, press and
hold the backspace key.
Insert letters not shown on the keyboard
It is possible to insert variations of letters, for example, letters
with accents. To insert á, press and hold the sym key, and
simultaneously press the A key repeatedly, until the desired
character is displayed. The order and availability of letters
depends on the selected writing language.
1 Sym key. To insert special characters not shown on the Write text
keyboard, press the sym key once, and select the desired The input methods provided in the device may vary according
character from the table. to different sales markets.
2 Function key. To insert special characters printed at the
top of keys, press the function key, and then press the Keyboard
corresponding alphabet key, or press and hold the
Your device has a full keyboard. The most common
alphabet key only. To enter several special characters in
punctuation marks can be found from the keypad. To enter
a row, press the function key twice quickly, and then
the most common punctuation marks, use the keyboard, or
press the desired alphabet keys. To return to normal
press the sym key.
mode, press the function key once.
3 Shift key. To change between uppercase and lowercase Some characters (for example, some punctuation marks and
modes, press the shift key twice. To enter a single other symbols) are marked in orange on the keys. To insert a
uppercase letter in lowercase mode, or a single character marked in orange, press the function key and
lowercase letter in uppercase mode, press the shift key then the key that has the desired character. When you press
once, and then the desired alphabet key. the function key, is displayed.
4 Space key
5 Arrow keys. To move up, down, left, or right, use the
arrow keys.
18 © 2009 Nokia. All rights reserved.To insert a number, press and then the key with the To enter a special character, press and hold , and then press
number. To lock the function key and insert only numbers, another key repeatedly until the desired character is
press twice. is displayed. displayed.
Changing the writing language allows you to access different
To erase a character, press . To erase several characters, characters. For example, if you are writing text in Chinese and
press and hold . want to use Latin characters to add a name, select
Options > Input options > Writing language and the
To insert characters and symbols that are not shown on the writing language that allows you to use Latin characters.
keyboard, press the sym key.
Switch input methods
To use other keys (for example, "A" or "O") to insert a
character, press and hold the sym key, then press the other To switch input methods, press and hold , and press the
key repeatedly, until the desired character is displayed. space key repeatedly until the symbol for the desired input
method is displayed.
To switch between the different character cases, press .
is displayed. The selected case is indicated by ,
, or . Find items
When a search field is available in the application, you can
use the search field to search for a name, file, or application.
Copy and paste text
1 To select letters and words, press and hold while 1 To search for an item, enter text in the search field. The
scrolling. device will immediately start to search and filter the
2 To copy, cut, and paste the text, select Options > Editing entries matching to the text you input. The more texts
options and the desired option. you input, the more accurate the search result will be.
When entering text, use the input methods included in
Change the writing language your device. The current input method indicator will be
shown in the search field near the magnifier icon.
When writing text, you can change the writing language.
Select Options > Input options > Writing language and 2 After finding your needed item, press the scroll key to
the desired writing language. open it.
© 2009 Nokia. All rights reserved. 19Lock the keys and touch screen Transfer content for the first time
When the device or keypad is locked, calls may be possible to 1 To retrieve data from the other device for the first time,
the official emergency number programmed into your on your device, select Menu > Settings >
device. Connectivity > Data transfer > Phone switch.
2 Select the connection type you want to use to transfer
To lock or unlock the touch screen and the keys, slide the lock the data. Both devices must support the selected
switch on the side of the device. connection type.
3 If you select Bluetooth connectivity as the connection
When the touch screen and keys are locked, the touch screen type, connect the two devices. To have your device search
is turned off and the keys are inactive. for devices with Bluetooth connectivity, select
Continue. Select the device from which you want to
To modify settings for automatic screen and key locking, transfer content. You are asked to enter a code on your
select Menu > Settings and Phone > Phone mgmt. > device. Enter a code (1-16 digits), and select OK. Enter the
Auto. keyguard. same code on the other device, and select OK. The devices
are now paired.
Some earlier Nokia devices may not have the Switch
Transfer content application. In this case, the Switch application is sent to
You can use the Switch application to copy content such as the other device as a message. To install the Switch
phone numbers, addresses, calendar items, and images from application on the other device, open the message, and
your previous Nokia device to your device. follow the instructions on the display.
The type of content that can be transferred depends on the 4 On your device, select the content you want to transfer
model of the device from which you want to transfer content. from the other device.
If that device supports synchronisation, you can also When the transfer has started, you can cancel it and
synchronise data between the devices. Your device notifies continue later.
you if the other device is not compatible.
Content is transferred from the memory of the other device
If the other device cannot be switched on without a SIM card, to the corresponding location in your device. The transfer
you can insert your SIM card in it. When your device is time depends on the amount of data to be transferred.
switched on without a SIM card, the Offline profile is
automatically activated, and transfer can be done. Profiles
Select Menu > Settings and Profiles.
20 © 2009 Nokia. All rights reserved.You can use profiles to set and customise the ringing tones, message alert tones, and other tones for different events, environments, or caller groups. The name of the selected profile is displayed at the top of the home screen. To change a profile, scroll to the profile, and select Options > Activate. To personalise a profile, scroll to the profile, and select Options > Personalise. Select the setting you want to change. To set the profile to be active until a certain time within the next 24 hours, scroll to the profile, select Options > Timed, and set the time. When the time expires, the profile changes back to the previously active non-timed profile. When the profile is timed, is displayed in the home screen. The Offline profile cannot be timed. To create a new profile, select Options > Create new. © 2009 Nokia. All rights reserved. 21
Your device                                                     To open the main menu, press the menu key (5).

Home screen                                                     To hide and show content, swipe the home screen with your
About the home screen                                           finger.
In the home screen, you can quickly access your most
frequently used applications, control applications, such as
                                                                Add items to the home screen
the music player, view your favourite contacts, and view at a
glance if you have missed calls or new messages.
                                                                To add an item to the home screen, select Options > Edit
                                                                content > Options > Add content, and select the item from
                                                                the list.
                                                                Using widgets may involve the transmission of large amounts
                                                                of data (network service).

                                                                To move an item, select Options > Edit content, select the
                                                                desired item, and drag and drop it to a new location.

                                                                Remove an item from the home screen
Interactive home screen elements
                                                                Select Options > Edit content and the item to be removed.
To open the clock application, tap the clock (1).
                                                                Select Options > Remove > Done.
To open calendar or change profiles in the home screen, tap
the date or the profile name (2).                               Music player in the home screen
                                                                You can use the music player from the home screen. To
To view or change connectivity settings (    ), to see the      activate the music player controls, select Options > Edit
available wireless LANs if WLAN scanning is enabled, or to      content > Options > Add content > Music player.
view the missed events, tap the top right corner (3).
                                                                Go to Music appears in the home screen.
To make a phone call, select     (4).

22                                                                                          © 2009 Nokia. All rights reserved.
To open the music player, tap Go to Music, and select the A timed profile is active.
items you want to listen to. The touch screen and keys are locked.
The music player control keys, and, if available, the title of A clock alarm is active.
the song, artist, and album art are displayed when a song is Your device is connected to a network via wireless
played. LAN or UMTS (network service) and ready for an
internet call.
Favourite contacts in the home screen A compatible headset is connected to the device.
You can add several contacts directly to the home screen, and A compatible TV out cable is connected to the device.
quickly make calls or send messages to the contacts, view the
contacts' web feeds, or access the contact information and A data call is active (network service).
settings. A GPRS packet data connection is active (network
service). indicates that the connection is on hold
1 To add your favourite contacts to the home screen, select
and that a connection is available.
Options > Edit content > Options > Add content >
Favourite contacts. A packet data connection is active in a part of the
network that supports EGPRS (network service).
A row of icons is displayed in the home screen.
indicates that the connection is on hold and that a
2 Select any of the icons ( ) and a contact from Contacts. connection is available. The icons indicate that EGPRS
is available in the network, but your device is not
Display indicators necessarily using an EGPRS connection to transfer
data.
The device is being used in a GSM network (network
service). A UMTS packet data connection is active (network
The device is being used in a UMTS network (network service). indicates that the connection is
service). suspended and that a connection is being
You have one or more unread messages in the Inbox established.
folder in Messaging. High-speed downlink packet access (HSDPA) is
You have received new e-mail in the remote mailbox. supported and active (network service). indicates
There are messages waiting to be sent in the Outbox that the connection is suspended and that a
folder. connection is being established.
You have missed calls.
The ringing type is set to Silent.
© 2009 Nokia. All rights reserved. 23You have set the device to scan for wireless LANs, and
a wireless LAN is available (network service).
A wireless LAN connection is active in a network that
uses encryption.
A wireless LAN connection is active in a network that
does not use encryption.
Bluetooth connectivity is activated.
Data is being transmitted using Bluetooth
connectivity. When the indicator is blinking, your
device is trying to connect with another device.
A USB connection is active.
Synchronisation is in progress.
GPS is active.
24 © 2009 Nokia. All rights reserved.Make calls 2 Scroll to the desired name. Or, tap the search field to enter
the first letters or characters of the name, and scroll to
Proximity sensor the name.
Your device has a proximity sensor. To prevent accidental 3 To call the contact, press the call key. If you have saved
selections, the touch screen is disabled automatically during several numbers for a contact, select the desired number
calls when you place the device next to your ear. from the list, and press the call key.
Internet calls
About internet calls
With the internet call network service, you can make and
receive calls over the internet. Internet call services may
support calls between computers, between mobile phones,
Do not cover the proximity sensor, for example, with and between a VoIP device and a traditional telephone. For
protective film or tape. availability and costs, contact your internet call service
provider.
Voice calls
1 In the home screen, select or Dialler to open the To make or receive an internet call, you must be in the service
dialler, and enter the phone number, including the area area of a wireless LAN (WLAN) or have a packet data (GPRS)
code. To remove a number, select C. connection in a UMTS network, and be connected to an
internet call service.
For international calls, select * twice for the + character
(which replaces the international access code), and enter Your device may offer you an installation widget, to install
the country code, area code (omit the leading zero if internet call services.
necessary), and phone number.
2 To make the call, press the call key. Log into an internet call service
3 To end the call (or to cancel the call attempt), press the When an internet call service has been installed, a tab for the
end key. service is displayed in the contacts list.
Pressing the end key always ends a call, even if another
application is active. To log into a service, select Menu > Contacts, the service,
and Options > Log in.
1 To make a call from the contacts list, select Menu >
Contacts.
© 2009 Nokia. All rights reserved. 25To add contacts as service contacts to the friends list manually To set an internet call service as the default service, select
or from the contacts list, select Options > New contact. Default service > Yes . When you press the call key to call a
number, your device makes an internet call using the default
service if the service is connected. You can set only one
Make internet calls service at a time as the default service.
To call a contact when you are logged into a service, tap the To edit the service destination, select Service connectivity.
contact in the friends list, and select .
To make an internet call in the home screen, select , enter
the number, and select Options > Call > Internet call.
To make an internet call to an internet call address, in the
home screen, select and Options > Open keyboard.
Enter the address, and select .
Internet communication settings
Select Menu > Settings and Connectivity > Admin.
settings > Net settings.
To view and edit the settings for a service, select the internet
call provider setting.
To remove a service from your service list, select Options >
Delete service.
Internet call service settings
Select Menu > Contacts, open a service tab, and select
Options > Settings.
26 © 2009 Nokia. All rights reserved.Contacts (phonebook) To open Contacts, select Menu > Contacts. You can save and update contact information, such as phone numbers, home addresses, or e-mail addresses of your contacts. You can add a personal ringing tone or a thumbnail image to a contact. You can also create contact groups, which allow you to send text messages or e-mail to many recipients at the same time. Save and edit names and numbers 1 To add a new contact to the contacts list, tap . 2 Tap a field to enter the information in the field. To close the text input, select . Fill in the fields that you want, and select Done. To edit contacts, select a contact and Options > Edit. © 2009 Nokia. All rights reserved. 27
Messaging                                                              To send an audio or e-mail message, select Options >
                                                                       Create message, and the relevant option.
Write and send messages                                            2   To select recipients or groups from the contacts list,
Select Menu > Messaging.                                               select    from the toolbar; Or to enter the number or e-
                                                                       mail manually, tap the To field.
Important: Exercise caution when opening messages.
                                                                   3   In the Subject field, enter the subject of the e-mail or
Messages may contain malicious software or otherwise be
                                                                       multimedia message. If the Subject field is not visible,
harmful to your device or PC.
                                                                       select Options > Message header fields to change the
Before you can create a multimedia message or write an e-              fields that are visible.
mail, you must have the correct connection settings defined.       4   To write the message, tap the message field.
                                                                   5   To add an object to a message or e-mail, select and the
The wireless network may limit the size of MMS messages. If
                                                                       relevant type of content.
the inserted picture exceeds this limit, the device may make
it smaller so that it can be sent by MMS.                              The message type may change to multimedia message
                                                                       based on the inserted content.
Only devices that have compatible features can receive and         6   To send the message or e-mail, select        , or press the
display multimedia messages. The appearance of a message               call key.
may vary depending on the receiving device.
                                                                   Your device supports text messages beyond the limit for a
Check the size limit of e-mail messages with your service          single message. Longer messages are sent as two or more
provider. If you attempt to send an e-mail message that            messages. Your service provider may charge accordingly.
exceeds the size limit of the e-mail server, the message is left   Characters with accents, other marks, or some language
in the Outbox folder, and the device attempts to resend it         options take more space, and limit the number of characters
periodically. Sending an e-mail requires a data connection,        that can be sent in a single message.
and continuous attempts to resend the e-mail may incur
charges from your service provider. In the Outbox folder, you
can delete such a message or move it to the Drafts folder.
Messaging requires network services.
1    To send a text or a multimedia message, select New
     message.

28                                                                                              © 2009 Nokia. All rights reserved.
Connectivity About WLAN
To use a wireless LAN (WLAN) connection, it must be available
At Nokia, we understand how important it is that your mobile in the location, and your device must be connected to the
phone or device operates reliably and that your personal WLAN. Some WLANs are protected, and you need an access
content is saved safely. key from the service provider to connect to them.
Any information from an unknown or unreliable source, via There might be some restrictions for WLAN use in some
Bluetooth connectivity, multimedia message, or cable, may countries. Check with your local authorities for more
harm your PC, mobile phone, or device. You may protect your information.
mobile phone or device from damage and keep it secured by
following simple measures: Features that use WLAN, or that are allowed to run in the
background while using other features, increase the demand
• Always keep Bluetooth connectivity closed unless you on battery power and reduce the battery life.
want your phone or device to be visible to others.
Important: Always enable one of the available encryption
• Always be alert when receiving information from an methods to increase the security of your wireless LAN
unknown or untrustworthy source. connection. Using encryption reduces the risk of
• Do not download or install any applications that may unauthorised access to your data.
include software harmful to your phone or device.
• Always download and install applications or content WLAN wizard
from trusted or well-known sources, such as Nokia Select Menu > Settings and Connectivity > Wireless LAN.
Software Market, where good protection is provided
against viruses and other harmful software. The WLAN wizard helps you to connect to a wireless LAN
(WLAN) and manage your WLAN connections.
Your device offers several options to connect to the internet
or to another compatible device or PC. If the search finds WLANs, to create an internet access point
(IAP) for a connection and start the web browser using this
Wireless LAN IAP, select the connection and Start web browsing.
Your device can detect and connect to wireless local area
networks (WLAN). Using a WLAN, you can connect your device If you select a secured WLAN, you are asked to enter the
to the internet and compatible devices that have WLAN relevant password. To connect to a hidden network, you must
support. enter the correct network name (service set identifier, SSID).
© 2009 Nokia. All rights reserved. 29If you already have the web browser running using the Distribution Profile (A2DP). To ensure interoperability
currently active WLAN connection, to return to the web between other devices supporting Bluetooth technology, use
browser, select Continue web browsing. Nokia approved accessories for this model. Check with the
manufacturers of other devices to determine their
To end the active connection, select the connection and compatibility with this device.
Disconnect WLAN.
Features using Bluetooth technology increase the demand on
battery power and reduce the battery life.
Bluetooth connectivity
About Bluetooth connectivity When the device is locked, only connections to authorised
devices are possible.
With Bluetooth connectivity, you can make a wireless
connection to other compatible devices, such as mobile
Settings
phones, computers, headsets, and car kits.
Select Menu > Settings and Connectivity > Bluetooth.
You can use the connection to send images, video clips, music
and sound clips, and notes, transfer files from your When you open the application for the first time, you are
compatible PC, and print images with a compatible printer. asked to define a name for your device. You can change the
name later.
Since devices with Bluetooth wireless technology
communicate using radio waves, they do not need to be in Select from the following:
direct line-of-sight. However, they must be within 10 metres Bluetooth — Turn Bluetooth connectivity on or off.
(33 feet) of each other, although the connection may be My phone's visibility — To allow your device to be found
subject to interference from obstructions such as walls or by other devices with Bluetooth wireless technology, select
from other electronic devices. Shown to all. To set a time period after which the visibility
This device is compliant with Bluetooth Specification 2.0 + is set from shown to hidden, select Set visibility period. To
EDR supporting the following profiles: Dial-Up Networking hide your device from other devices, select Hidden.
(DUN), Object Push Profile (OPP), File Transfer Profile (FTP), My phone's name — Edit the name shown to other devices
Hands Free Profile (HFP), Headset Profile (HSP), Basic Imaging with Bluetooth wireless technology.
Profile (BIP), Remote SIM Access Profile (SimAP), Device Remote SIM mode — Enable or disable another device, such
Identification Profile (DI), Phonebook Access Profile (PBAP), as a compatible car kit accessory, to use the SIM card in your
Generic Audio/Video Distribution Profile (GAVDP), Audio/ device to connect to the network.
Video Remote Control Profile (AVRCP), Advanced Audio
30 © 2009 Nokia. All rights reserved.Send data using Bluetooth connectivity
Several Bluetooth connections can be active at a time. For
example, if you are connected to a compatible headset, you
can also transfer files to another compatible device at the
same time.
1 Open the application where the item you want to send is
stored.
2 Tap an item, and select Options > Send > Via
Bluetooth.
Devices with Bluetooth wireless technology that are
within range are displayed. Device icons are as follows:
computer
phone
audio or video device
other device
To interrupt the search, select Stop.
3 Select the device with which you want to connect.
4 If the other device requires pairing before data can be
transmitted, a tone sounds, and you are asked to enter a
passcode. The same passcode must be entered in both
devices.
When the connection is established, Sending data is
displayed.
Tip: When searching for devices, some devices may show
only the unique address (device address). To find the unique
address of your device, enter *#2820#.
© 2009 Nokia. All rights reserved. 31Internet To browse web pages with graphics disabled, to save
memory and increase the page loading speed, select
The XHTML browser in this device supports the Unicode Options > Settings > Page > Load content > Text only.
encoding format.
To refresh the content of the web page, select Options >
If the web page is unreadable or not supported and garbage Web page options > Reload.
code is found while browsing, you can try to select Menu >
Web and Options > Settings > Page > Default encoding, To save the current web page as a bookmark, select
and select a corresponding encoding. Options > Web page options > Save as bookmark.
To browse the web, you need to have an internet access point To view snapshots of the web pages you have visited during
configured in your device. Using the web browser requires the current browsing session, select Back (available if
network support. History list is activated in the browser settings and the
current web page is not the first web page you visit).
Browse the web
Select Menu > Web. To prevent or allow the automatic opening of multiple
windows, select Options > Web page options > Block
To browse the web, select Go to web address from the pop-ups or Allow pop-ups.
toolbar, and enter a web address.
To zoom in on a web page, double-tap the display.
By default, the browser is in full screen mode. To exit full
screen mode, select the arrow icon in the bottom right corner. Tip: To send the browser to the background without exiting
the application or connection, press the end key once.
Some web pages may contain material, such as graphics or
video clips, that requires a large amount of memory to view.
If your device runs out of memory while loading such a web
page, insert a memory card. Otherwise, the video clips are
not displayed.
32 © 2009 Nokia. All rights reserved.Maps When you have an active data connection and browse the
map on the display, a new map is automatically downloaded,
if you browse to an area not covered by the maps that have
1. Time for GPS connection varies substantially depending already been downloaded. You can also use the Nokia Map
on use environment from a few seconds to tens of Loader PC software to download maps. To install Nokia Map
minutes. Loader to a compatible PC, visit www.nokia.com.hk/maps.
2. GPS of this device is not for professional navigation and
positioning. GPS connection time may take tens of Tip: To avoid data transfer costs, you can also use Maps
minutes which might also be affected by weather, use without an internet connection, and browse the maps that
environment and other condition of use. GPS should only are saved in your device or memory card, if available in your
be used as a navigation aid and should not be used for device.
emergency or task which requires more precise Note: Downloading content such as maps, satellite images,
positioning. voice files, guides or traffic information may involve
3. Maps availability depends on the laws of each transmission of large amounts of data (network service).
country/region (e.g. maps may not be available due to Almost all digital cartography is inaccurate and incomplete
legal restrictions of countries/regions). Nokia disclaims to some extent. Never rely solely on the cartography that you
any and all warranty with respect to the availability of download for use in this device.
maps, including its accuracy, correctness and update.
Use Maps with the compass
About Maps Select Menu > Maps.
Select Menu > Maps.
When the compass in your device is enabled, the circle around
With Maps, you can see your current location on the map, the compass is green, and the map view rotates
browse maps of different cities and countries, search for automatically according to the direction to which the top of
places, plan routes from one location to another, save the device is pointing.
locations, and send them to compatible devices. You can also
purchase traffic information and navigation services, if To enable the compass, select Options > Tools > Turn
available for your country or region. compass on. When the compass is not in use, the circle
around the compass is white, and the map view does not
When you use Maps for the first time, you may need to select rotate automatically.
an internet access point for downloading maps.
© 2009 Nokia. All rights reserved. 33Calibrate compass
The compass has limited accuracy. Electromagnetic fields,
metal objects, or other external circumstances may also
affect the accuracy of the compass. The compass should
always be properly calibrated.
To calibrate the compass, do the following:
Rotate the device around all axes in a continuous movement
until the calibration indicator changes its colour to green
. If the indicator is yellow , the accuracy of the compass
is low. If the indicator is red , the compass is not calibrated.
34 © 2009 Nokia. All rights reserved.Camera Capture images with secondary camera
To capture an image, select . Do not move the device
Your device supports an image capture resolution of before the image is saved and the final image displayed.
2592x1944 pixels (5 megapixels). The image resolution in
this guide may appear different.
To zoom in or out when capturing an image, use the zoom
To ensure good quality photos, wipe the camera lens slider.
carefully with a cleaning cloth.
Image capture To leave the camera open in the background and use other
Capture images applications, press the menu key. To return to the camera,
When capturing an image, note the following: press and hold the capture key.
• Use both hands to keep the camera still.
Location information
• The quality of a digitally zoomed image is lower than that
of a non-zoomed image. You can automatically add capture location information to
the file details of the captured material. For example, in the
• The camera goes into battery saving mode if there are no Photos application, you can then view the location where an
actions for about a minute. To continue capturing image was captured.
images, select Continue.
• Keep a safe distance when using the flash. Do not use the Select Menu > Applications > Camera.
flash on people or animals at close range. Do not cover
the flash while taking a picture. Add location information to all captured material
Select Options > Settings > Show GPS info > On. The
To capture an image with the main camera, do the following: location information is available only for images captured
with the main camera.
1 To switch from video mode to image mode, if necessary,
select > .
2 To capture an image, press the capture key. Do not move It may take several minutes to obtain the coordinates of your
the device before the image is saved and the final image location. The availability and quality of GPS signals may be
displayed. affected by your location, buildings, natural obstacles, and
weather conditions. If you share a file that includes location
information, also the location information is shared, and your
© 2009 Nokia. All rights reserved. 35location may be visible to third parties viewing the file. The
device requires network services to acquire location
information.
Location information indicators:
— Location information unavailable. GPS stays active in
the background for several minutes. If a satellite connection
is made and the indicator changes to within that time, all
the images captured and video clips recorded during that
time are tagged based on the received GPS positioning
information.
— Location information is available. Location information
is added to the file details.
Files with location information are indicated with in the
Photos application.
36 © 2009 Nokia. All rights reserved.Photos
About Photos
Select Menu > Photos and from the following:
Captured — View all the images and video clips you have
captured.
Months — View images and video clips categorised by the
month they were captured. Applicable only for content
captured or recorded with your device.
Albums — View the default albums and the ones you have
created.
Tags — View the tags you have created for each item.
Downloads — View items and video clips downloaded from
the web, received as a multimedia or e-mail message, saved
on a memory card, or copied to phone memory from a
memory card or other sources.
Share online — Post your images or video clips to the web.
Images and video clips can also be sent to you from a
compatible device. To be able to view a received image or
View images and videos video clip in Photos, you must first save it.
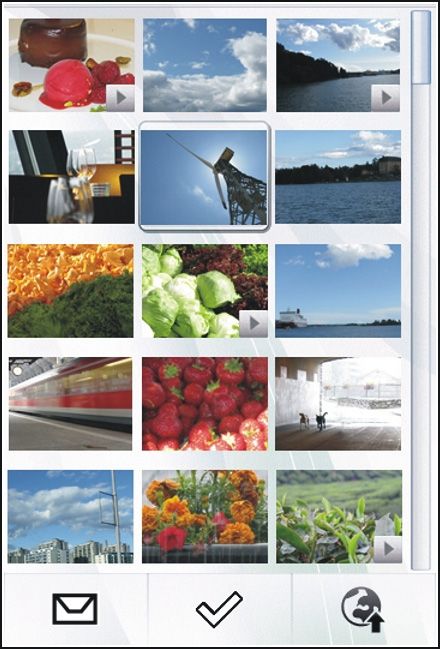
Select Menu > Photos.
The images and video clip files are ordered by date and time.
The number of files is displayed. To browse the files, swipe
up or down.
To open a file, select the file. To view the toolbar, tap the
image. To zoom in the image, use the zoom slider. The
zooming ratio is not stored permanently.
© 2009 Nokia. All rights reserved. 37You can also read