ISeq 100 Sequencing System Guide - Illumina
←
→
Page content transcription
If your browser does not render page correctly, please read the page content below
iSeq 100
Sequencing System Guide

Document # 1000000036024 v05                                   ILLUMINA PROPRIETARY
March 2019
For Research Use Only. Not for use in diagnostic procedures.
iSeq 100 Sequencing System Guide

   This document and its contents are proprietary to Illumina, Inc. and its affiliates ("Illumina"), and are intended solely for
   the contractual use of its customer in connection with the use of the product(s) described herein and for no other
   purpose. This document and its contents shall not be used or distributed for any other purpose and/or otherwise
   communicated, disclosed, or reproduced in any way whatsoever without the prior written consent of Illumina. Illumina
   does not convey any license under its patent, trademark, copyright, or common-law rights nor similar rights of any third
   parties by this document.
   The instructions in this document must be strictly and explicitly followed by qualified and properly trained personnel in
   order to ensure the proper and safe use of the product(s) described herein. All of the contents of this document must be
   fully read and understood prior to using such product(s).
   FAILURE TO COMPLETELY READ AND EXPLICITLY FOLLOW ALL OF THE INSTRUCTIONS CONTAINED HEREIN MAY
   RESULT IN DAMAGE TO THE PRODUCT(S), INJURY TO PERSONS, INCLUDING TO USERS OR OTHERS, AND DAMAGE
   TO OTHER PROPERTY, AND WILL VOID ANY WARRANTY APPLICABLE TO THE PRODUCT(S).
   ILLUMINA DOES NOT ASSUME ANY LIABILITY ARISING OUT OF THE IMPROPER USE OF THE PRODUCT(S)
   DESCRIBED HEREIN (INCLUDING PARTS THEREOF OR SOFTWARE).
   © 2019 Illumina, Inc. All rights reserved.
   All trademarks are the property of Illumina, Inc. or their respective owners. For specific trademark information, see
   www.illumina.com/company/legal.html.

Document # 1000000036024 v05                                                                                                       ii
For Research Use Only. Not for use in diagnostic procedures.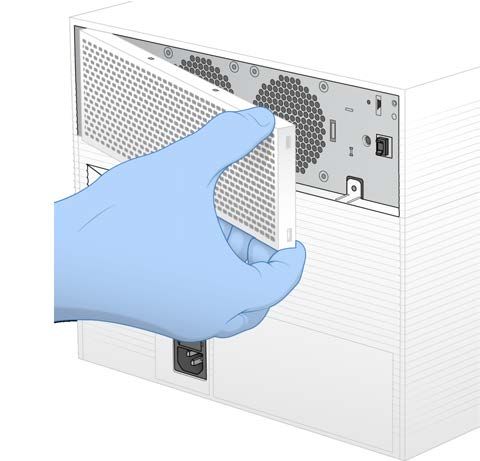
iSeq 100 Sequencing System Guide

   Revision History
     Document                  Date     Description of Change

     Document #                March    Updated software descriptions to iSeq Control Software v1.4:
     1000000036024 v05         2019     • Updated instructions on configuring system settings, including moving
                                           and renaming some user interface elements.
                                        • Added descriptions of %Clusters PF and %Occupancy metrics, which
                                           appear on the Sequencing screen.
                                        • Allowed mapped network drive locations for the sample sheets and
                                           output folders.
                                        • Indicated that the software automatically renames sample sheets to
                                           SampleSheet.csv.
                                        Added links to the following pages:
                                        • The iSeq 100 System Sample Sheet Template for Manual Mode.
                                        • The bcl2fast Conversion Software support pages.
                                        Added volumes of 1 nM 100% PhiX and AmpliSeq Library PLUS for
                                        Illumina libraries to prepare.
                                        Added instruction to move the reference genomes repository for Local
                                        Run Manager to a location other than drive C when restoring to system
                                        factory settings.
                                        Increased the maximum recommended cycles for Index Read 1 and
                                        Index Read 2 to 10 cycles each.
                                        Increased the number of cycles the cartridge supports to 322.
                                        Referenced the Cluster Density Optimization Guide (document #
                                        1000000071511) for detailed information on optimizing loading
                                        concentration.
                                        Clarified that a cartridge being thawed in a water bath must be stored at
                                        -25°C to -15°C for at least one day before thawing.
                                        Corrected AmpliSeq for Illumina Library PLUS to AmpliSeq Library PLUS
                                        for Illumina.

     Document #               October   Added recommended loading concentrations and dilution instructions for
     1000000036024 v04         2018     Nextera DNA Flex for Enrichment, TruSeq DNA Nano, and TruSeq DNA
                                        PCR-Free libraries.
                                        Added information on using a normalization method that does not result
                                        in single-stranded libraries.
                                        Added descriptions of the two run modes, Local Run Manager and
                                        Manual.
                                        Added a 5% PhiX spike-in option and defined the purpose of each spike-
                                        in percentage.
                                        Added the following steps:
                                        • Switching to the sbsadmin operating system account when installing
                                          the control software, analysis modules, and other software.
                                        • Power cycling the instrument when restoring to factory settings.
                                        Referenced Illumina Adapter Sequences (document # 1000000002694)
                                        to determine Index 2 (i5) orientations for a sample sheet.
                                        Clarified the following points:
                                        • Cartridges must be used immediately after thawing.
                                        • The loading concentrations listed for Nextera DNA Flex and Nextera
                                          Flex for Enrichment libraries are not applicable to other Nextera library
                                          types.
                                        • SureCell WTA 3′is not a compatible library.

Document # 1000000036024 v05                                                                                          iii
For Research Use Only. Not for use in diagnostic procedures.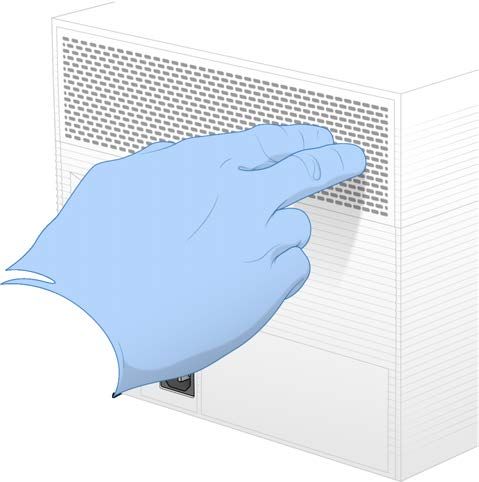
iSeq 100 Sequencing System Guide

     Document                  Date     Description of Change

     Document #               August    Updated software descriptions to iSeq Control Software v1.3:
     1000000036024 v03         2018     • Added configuration instructions for Universal Copy Service.
                                        • Renamed the Network Configuration tab to Network Access.
                                        • Added instructions on opening Local Run Manager from the control
                                          software.
                                        Updated the default output folder location to D:\SequencingRuns.
                                        Added instructions on connecting the system to a proxy server.
                                        Added requirement to specify a UNC path for output folder and sample
                                        sheet locations on the network.
                                        Indicated the unique requirements for configuring an output folder
                                        location on an internal drive, external drive, or network location.
                                        Made instructions on creating a sample sheet for Manual mode the first
                                        step of run setup.
                                        Corrected instructions on using the system suite installation wizard.
                                        Corrected the description of output thumbnail files.

     Document #                June     Updated tubes used for diluting libraries to Fisher Scientific catalog #
     1000000036024 v02         2018     14-222-158 or equivalent low-bind tubes.
                                        Added a section describing the regional availability of Advanced
                                        Exchange.
                                        Clarified that libraries diluted to the loading concentration must be
                                        sequenced that day.
                                        Clarified that the reagent cartridge must be removed from the box for
                                        thawing.

     Document #                May      Updated software descriptions to iSeq Control Software v1.2:
     1000000036024 v01         2018     • Added option to browse to a downloaded software installer from the
                                          control software.
                                        • Added instructions for saving thumbnails.
                                        • Moved network settings to the Network Configuration tab.
                                        • Increased maximum uses of reusable test components to 36 and noted
                                          that the remaining number of uses appear onscreen.
                                        Updated Local Run Manager information:
                                        • Added steps for opening Local Run Manager and setting up the run.
                                        • Added RNA Amplicon as a preinstalled analysis module, and
                                          DNA Enrichment and Resequencing as other supported modules.
                                        • Updated documentation references to Local Run Manager Software
                                          Guide (document #1000000002702) .
                                        Updated cartridge thawing instructions:
                                        • Added a room-temperature thawing option.
                                        • Provided more detailed water bath instructions, including storing before
                                          thawing.
                                        Updated instructions on preparing libraries for sequencing:
                                        • Updated the Nextera DNA Flex loading concentration to 200 pM.
                                        • Added starting loading concentration for unlisted library types.
                                        • Added information on the %Occupied metric.
                                        • Increased volume of 1 nM PhiX for a spike-in to 50 µl.
                                        Updated Illumina catalog numbers for:
                                        • iSeq 100 Spare Drip Tray Pad to 20023927.
                                        • iSeq 100 Spare Air Filter to 20023928.
                                        Updated pipette and pipette tip recommendations.

Document # 1000000036024 v05                                                                                         iv
For Research Use Only. Not for use in diagnostic procedures.
iSeq 100 Sequencing System Guide

     Document                  Date      Description of Change

     Document #                May       Added the following miscellaneous instructions:
     1000000036024 v01         2018      • Performing validation runs.
                                         • Creating a sample sheet when sequencing in Manual mode.
                                         • Minimizing the control software to access other applications.
                                         Added the following steps to the system check procedure:
                                         • Unloading and storing reusable test components.
                                         • Cleaning visible debris from the reusable test flow cell.
                                         Reorganized the following content to improve continuity:
                                         • Merged instructions for performing a PhiX-only run with the standard
                                           sequencing instructions.
                                         • Merged flow cell preparation instructions with library dilution
                                           instructions.
                                         • Consolidated PhiX spike-in instructions.
                                         • Moved information on number of cycles in a read.
                                         • Moved Real-Time Analysis and renamed to Sequencing Output.
                                         Simplified the error messages workflow diagram.
                                         Removed information on Tablet and Desktop modes. The operating
                                         system runs in Desktop mode by default and Tablet mode is not
                                         necessary.
                                         Removed requirement to complete and return a decontamination
                                         certificate for advanced exchange.
                                         Corrected average run size to 2 GB.

     Document #               February   Initial release.
     1000000036024 v00         2018

Document # 1000000036024 v05                                                                                      v
For Research Use Only. Not for use in diagnostic procedures.
Table of Contents
Chapter 1 Overview 1
Introduction 1
Additional Resources 2
Instrument Components 3
iSeq 100 i1 Reagent 7
Chapter 2 Getting Started 11
First Time Setup 11
Minimize the Control Software 11
Run Settings 12
Instrument Customization 14
Network Setup 15
User-Supplied Consumables and Equipment 17
Chapter 3 Sequencing 19
Introduction 19
Thaw the Bagged Cartridge 20
Prepare the Flow Cell and Libraries 21
Load Consumables Into the Cartridge 23
Set Up a Sequencing Run (Local Run Manager) 24
Set Up a Sequencing Run (Manual Mode) 27
Chapter 4 Maintenance 31
Clear Hard Drive Space 31
Software Updates 31
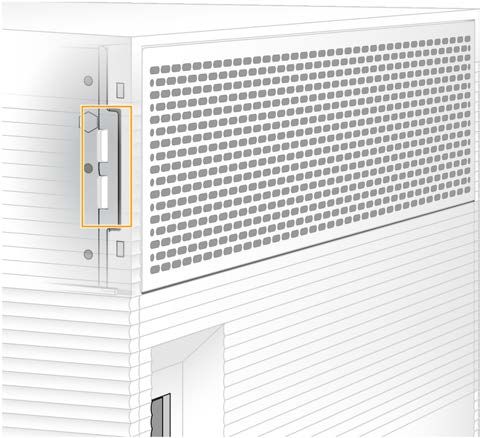
Replace the Air Filter 32
Relocate the Instrument 34
Software Restriction Policies 35
Appendix A Sequencing Output 38
Real-Time Analysis Overview 38
Real-Time Analysis Workflow 40
Appendix B Troubleshooting 44
Error Message Resolution 44
Cancel a Started Run 45
Power Cycle the Instrument 45
Perform a System Check 46
Leak Mitigation 48
Restore to Factory Settings 50
Appendix C Advanced Exchange 52
Document # 1000000036024 v05 vi
For Research Use Only. Not for use in diagnostic procedures.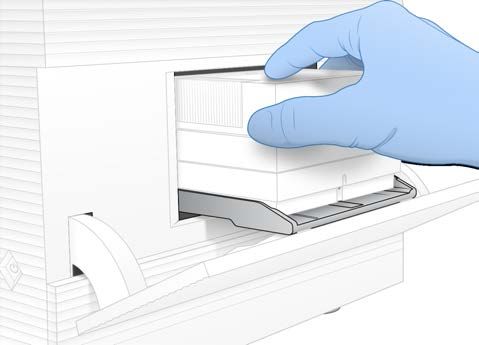
iSeq 100 Sequencing System Guide

       Exchanging the iSeq 100 System                          52
       Receive a Replacement System                            52
       Prepare the Original System for Return                  52
       Return the Original System                              55

       Index                                                   59

       Technical Assistance                                    65

Document # 1000000036024 v05                                        vii
For Research Use Only. Not for use in diagnostic procedures.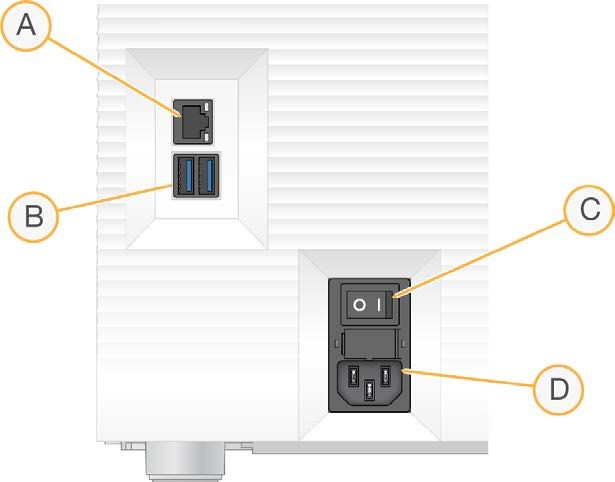
Chapter 1 Overview
Introduction 1
Additional Resources 2
Instrument Components 3
iSeq 100 i1 Reagent 7
Introduction
The Illumina ® iSeq™ 100 Sequencing System provides a targeted approach to next-generation sequencing
(NGS). This applications-focused system packages Illumina sequencing technology into a cost-effective
desktop instrument.
Features
u Accessibility and reliability—The iSeq 100 System has a small footprint and is easy to install and use.
Fluidics and imaging components are built into the consumable, simplifying instrument maintenance.
u Single-step consumable loading—A single-use cartridge is prefilled with all reagents required for a run.
Library and a sensor-equipped flow cell load directly into the cartridge, which is then loaded onto the
instrument. Integrated identification enables accurate tracking.
u iSeq 100 System software—A suite of integrated software controls instrument operations, processes
images, and generates base calls. This suite features on-instrument data analysis and data transfer tools
for external analysis.
u On-instrument analysis—Local Run Manager inputs sample information and then analyzes run data
using the analysis module specified for the run. The software includes a suite of analysis modules.
u Cloud-based analysis—The sequencing workflow is integrated with BaseSpace Sequence Hub, the
Illumina cloud computing environment for run monitoring, data analysis, storage, and collaboration.
Output files are streamed in real time to BaseSpace Sequence Hub for analysis.
Sample to Analysis
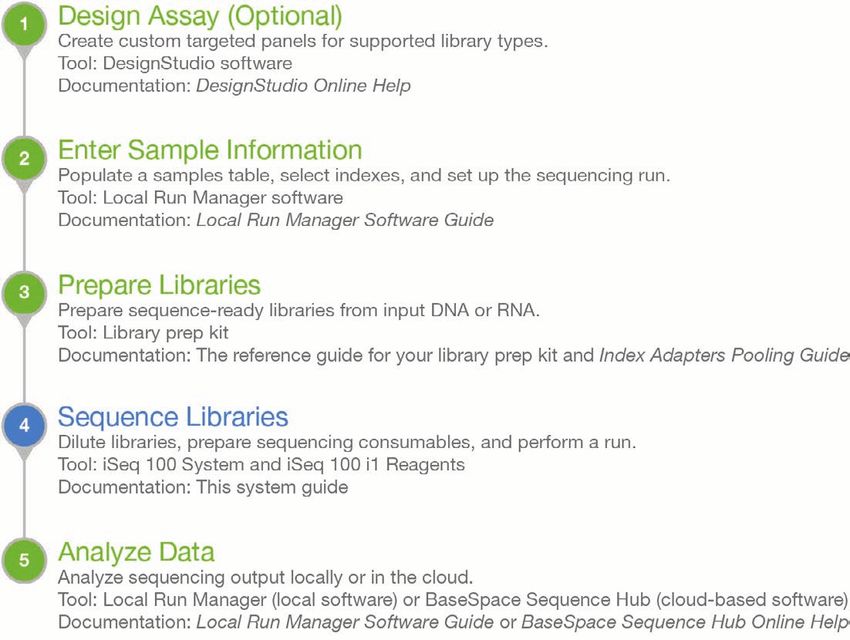
The following diagram illustrates the complete sequencing workflow, from experimental design to analyzing
data. Tools and documentation are included with each step. This guide covers the sequence libraries step.
For other documentation, visit support.illumina.com.
Document # 1000000036024 v05 1
For Research Use Only. Not for use in diagnostic procedures.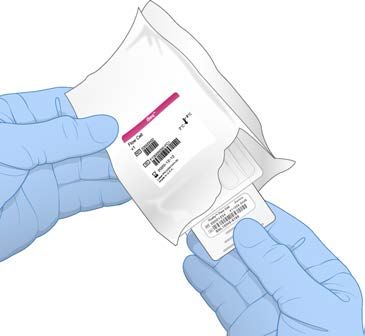
iSeq 100 Sequencing System Guide

   Figure 1 Sample to Analysis Workflow

Additional Resources
The iSeq 100 Sequencing System support pages on the Illumina website provide additional system
resources. These resources include software, training, compatible products, and the following
documentation. Always check support pages for the latest versions.

 Resource                          Description
 Custom Protocol Selector          A tool for generating end-to-end instructions tailored to your library prep method, run
                                   parameters, and analysis method, with options to refine the level of detail.
 iSeq 100 Sequencing System        Provides instructions for instrument installation and initiating first time setup.
 Setup Poster (document #
 1000000035963)
 iSeq 100 Sequencing System Site   Provides specifications for laboratory space, electrical requirements, and environmental
 Prep Guide (document #            and network considerations.
 1000000035337)
 iSeq 100 Sequencing System        Provides information about operational safety considerations, compliance statements,
 Safety and Compliance Guide       and instrument labeling.
 (document # 1000000035336)
 RFID Reader Compliance Guide      Provides information about the RFID reader in the instrument, including compliance
 (document # 1000000002699)        certifications and safety considerations.

Document # 1000000036024 v05                                                                                                  2
For Research Use Only. Not for use in diagnostic procedures.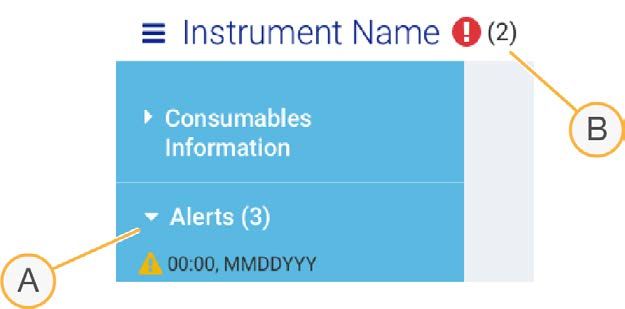
iSeq 100 Sequencing System Guide

Instrument Components
iSeq 100 Sequencing System comprises a power button, monitor, status bar, consumables compartment,
and drip tray.

    Figure 2 External System Components

    A Power button—Controls instrument power and indicates whether the system is on (glows), off (dark), or off
      but with AC power (pulses).
    B Touch-screen monitor—Enables on-instrument configuration and setup using the control software interface.
    C Status bar—Indicates system status as ready to sequence (green), processing (blue), or needs attention
      (orange).
    D Consumables compartment—Contains consumables during a run.
    E Drip tray door—Provides access to the drip tray, which catches leaked fluids.

Power and Auxiliary Connections
You can move the instrument to access USB ports and other rear panel components.
The back of the instrument has the switch and inlet that controls power to the instrument, and an Ethernet
port for an optional Ethernet connection. Two USB ports provide the option to connect a mouse and
keyboard, or to upload and download data using a portable device.

        NOTE
        Connecting the system to a keyboard and mouse overrides the onscreen keyboard.

Document # 1000000036024 v05                                                                                      3
For Research Use Only. Not for use in diagnostic procedures.
iSeq 100 Sequencing System Guide
Figure 3 Rear Panel Components
A Ethernet port—Optional Ethernet cable connection.
B USB ports—Two ports for connecting auxiliary components.
C Toggle switch—Turns instrument power on and off.
D AC power inlet—Power cord connection.
Consumables Compartment
The consumables compartment contains the cartridge for a sequencing run.
Figure 4 Loaded Consumables Compartment
A Cartridge—Contains the flow cell, library, and reagents, and collects used reagents during the run.
B Tray—Holds the cartridge during sequencing.
C Door—Opens to a 60 degree angle to provide access to the consumables compartment.
The software opens and closes the compartment door and positions the cartridge for imaging. The door
opens down from hinges toward the base of the instrument. Do not place objects on the open door, which is
not designed for use as a shelf.
Reusable Test Flow Cell and Cartridge
The instrument ships with the iSeq 100 Reusable Test Flow Cell and iSeq 100 Reusable Test Cartridge to use
for system checks.
Document # 1000000036024 v05 4
For Research Use Only. Not for use in diagnostic procedures.iSeq 100 Sequencing System Guide
u Store in the original packaging at room temperature.
u Reuse up to 36 times or for 5 years from the date of manufacture, whichever comes first.
u During a system check, the software displays the remaining number of uses.
u Replace expired reusable test components with the iSeq 100 System Test Kit.
Figure 5 Reusable Test Components
A Reusable test flow cell
B Reusable test cartridge
The reusable test components look similar to the sequencing components provided in iSeq 100 i1 Reagent,
and the loading orientations are the same. However, the test cartridge does not have a library reservoir and
neither test component has the chemistry needed for a run.
System Software
The system software suite includes integrated applications that perform sequencing runs and on-instrument
analysis.
u iSeq Control Software—Controls instrument operations and provides an interface for configuring the
system, setting up a sequencing run, and monitoring run statistics as sequencing progresses.
u Local Run Manager—Defines run parameters and the analysis method before sequencing. After
sequencing, on-instrument data analysis begins automatically.
u The system is shipped with the DNA Amplicon, RNA Amplicon, and Generate FASTQ analysis
modules installed.
u The system also supports the DNA Enrichment and Resequencing analysis modules, which are
available on the Local Run Manager support pages.
u For more information on Local Run Manager and the analysis modules, see the Local Run Manager
Software Guide (document # 1000000002702).
u Real-Time Analysis (RTA2)—Performs image analysis and base calling during the run. For more
information, see Sequencing Output on page 38.
u Universal Copy Service—Copies sequencing output files from the run folder to BaseSpace Sequence
Hub (if applicable) and the output folder, where you can access them.
Real-Time Analysis and Universal Copy Service run background processes only. Local Run Manager and the
control software can require user input.
Document # 1000000036024 v05 5
For Research Use Only. Not for use in diagnostic procedures.iSeq 100 Sequencing System Guide
System Information
The control software menu has an About section where you can view Illumina contact information and the
following system information:
u Serial number
u Computer name and IP address
u Recipe fragment version
u Run count
Notifications and Alerts
An icon appears next to the instrument name to indicate notifications. Select the icon to view a list of the
notifications, which include warnings and errors.
u Warnings require attention, but do not stop a run or require action other than acknowledgment.
u Errors require action before starting or proceeding with a run.
A panel on the left side of run setup screens displays alerts specific to cartridge loading and pre-run checks.
Figure 6 Onscreen Locations
A Run setup alerts
B Other notifications
Process Management
The Process Management screen displays hard drive (drive D) space and run status, identifying each run by
name, ID, and date. The screen is automatically refreshed every three minutes.
The Status column indicates whether a run is progressing or complete, based on the processing of BCL files.
For each run, Process Management also displays the status of background processes Universal Copy
Service, BaseSpace Sequence Hub, and Local Run Manager.
Nonapplicable processes do not appear on the screen. For example, if a run is not connected to BaseSpace
Sequence Hub, Process Management does not display the BaseSpace status for that run.
u To troubleshoot status issues, see Process Management Status on page 44.
u To delete runs and clear space, see Clear Hard Drive Space on page 31.
Status of Universal Copy Service
Universal Copy Service shows the status of files being copied to the output folder:
u In Progress—Universal Copy Service is copying files to the output folder.
Document # 1000000036024 v05 6
For Research Use Only. Not for use in diagnostic procedures.iSeq 100 Sequencing System Guide
u Complete—Universal Copy Services successfully copied all files to the output folder.
Status of BaseSpace Sequence Hub
BaseSpace Sequence Hub shows the upload status:
u In Progress—The control software is uploading files to BaseSpace Sequence Hub.
u Complete—All files are successfully uploaded to BaseSpace Sequence Hub.
Status of Local Run Manager
Local Run Manager shows the analysis status in control software:
u Not Started—The analysis is queued to start or Local Run Manager is waiting for Real-Time Analysis to
finish.
u In Progress—Local Run Manager is analyzing files. Check the Local Run Manager software for a more
detailed status.
u Stopped—The analysis has stopped, but is incomplete.
u Complete—Local Run Manager has successfully completed the analysis.
For more information on analysis status, check the Local Run Manager software.
iSeq 100 i1 Reagent
Performing a run on the iSeq 100 System requires one single-use iSeq 100 i1 Reagent kit. The kit is available
in one size (300-cycle) and two bundles:
u Single—Includes consumables for one run.
u Four-pack—Includes consumables for four runs.
Contents and Storage
The iSeq 100 i1 Reagent kit provides the cartridge and flow cell for sequencing. When you receive the kit:
u Do not open the white foil packaging until instructed to do so during the cartridge thawing and flow cell
preparation procedures. The cartridge is thawed in the bag.
u Promptly store components at the indicated temperatures to ensure proper performance.
u Store cartridges so that the package labels face up.
u Store cartridges for at least one day before thawing in a water bath.
Table 1 Kit Components
Bundle Consumable Quantity Storage Temperature
Single Cartridge 1 -25°C to -15°C
Flow cell 1 2°C to 8°C*
Four-pack Cartridge 4 -25°C to -15°C
Flow cell 4 2°C to 8°C*
*Shipped at room temperature.
Both consumables have identifiers for tracking and ensuring compatibility. The cartridge uses
radio-frequency identification (RFID). The flow cell uses an electrical interface: electrically erasable
programmable read-only memory (EEPROM).
Document # 1000000036024 v05 7
For Research Use Only. Not for use in diagnostic procedures.iSeq 100 Sequencing System Guide
Flow Cell
The iSeq 100 i1 Flow Cell is a patterned, single-lane flow cell built over a complementary metal oxide
semiconductor (CMOS) optical sensor. A plastic cartridge encases the glass-based flow cell. Raised grip
points on the plastic ensure safe handling.
A Grip points
B CMOS sensor (top)
C Imaging area
D Gasket (one of two)
E CMOS sensor (bottom)
F Electrical interface
Millions of nanowells cover the surface of the flow cell. Clusters are generated in the nanowells, from which the
sequencing reaction is then performed. The ordered arrangement of the nanowells increases output reads
and data. During sequencing, the CMOS sensor captures images for analysis.
Cartridge
The iSeq 100 i1 Cartridge is prefilled with clustering, sequencing, paired-end, and indexing reagents. A
foil-sealed reservoir is reserved for libraries, and a slot on the front is reserved for the flow cell. Illuminator light
reaches the flow cell through an access window on top of the cartridge.
A Access window
B Flow cell slot
C Library reservoir
Document # 1000000036024 v05 8
For Research Use Only. Not for use in diagnostic procedures.iSeq 100 Sequencing System Guide
The cartridge holds all consumables for a run: reagents, library, and flow cell. The library and flow cell are
loaded into the thawed cartridge, which is then loaded onto the instrument. After the run begins, reagents
and library are automatically transferred from the cartridge to the flow cell.
An underside reservoir collects used reagents. The cartridge also contains pumps, valves, and all other
fluidics for the system. Because the cartridge is discarded after a run, instrument washes are not necessary.
Supported Number of Cycles
The 300-cycle label on the cartridge indicates how many cycles are analyzed, not how many cycles are
performed. The flow cell is compatible with any number of cycles and any read type.
The cartridge provides sufficient reagent for up to 322 cycles of sequencing. The 322 cycles include 151
cycles each for Read 1 and Read 2, plus up to 10 cycles each for Index 1 and Index 2. For information on
how many cycles to sequence, see Recommended Number of Cycles on page 19.
Symbol Descriptions
The following table describes the symbols on the consumable or consumable packaging.
Symbol Description
The date the consumable expires. For best results, use the consumable before this date.
Indicates the manufacturer (Illumina).
The date when the consumable was manufactured.
The intended use is Research Use Only (RUO).
Indicates the part number so that the consumable can be identified.*
Indicates the batch code to identify the batch or lot that the consumable was
manufactured in.*
Document # 1000000036024 v05 9
For Research Use Only. Not for use in diagnostic procedures.iSeq 100 Sequencing System Guide
Symbol Description
Indicates that caution is necessary.
Indicates a health hazard.
Storage temperature range in degrees Celsius. Store the consumable within the indicated
range.
* REF identifies the individual component, while LOT identifies the lot or batch the component belongs to.
Document # 1000000036024 v05 10
For Research Use Only. Not for use in diagnostic procedures.Chapter 2 Getting Started
First Time Setup 11
Minimize the Control Software 11
Run Settings 12
Instrument Customization 14
Network Setup 15
User-Supplied Consumables and Equipment 17
First Time Setup
The first time the system is turned on, the control software is launched with a series of screens to guide you
through first time setup. First time setup includes performing a system check to confirm instrument
performance and configuring system settings.
If you want to modify system settings after first time setup, select the System Settings command in the control
software. The command opens the Settings, Network Access, and Customization tabs, where you can
access all control software settings and Windows network settings.
Operating System Accounts
The Windows operating system has two accounts: administrator (sbsadmin) and user (sbsuser).
The administrator account is intended for IT use, system updates, and installing the control software, Local
Run Manager analysis modules, and other software. Perform all other functions, including sequencing, from
the user account.
Password Requirements
The operating system requires a password change for both accounts (sbsadmin and sbsuser) at the first
logon. Update each password every 180 days, when prompted.
Table 2 Default Password Policies
Policy Setting
Enforce password history Five passwords remembered
Lockout threshold Ten invalid logon attempts
Minimum password length Ten characters
Password must meet complexity requirements Disabled
Store passwords using reversible encryption Disabled
Validation Runs
Optionally perform a validation run before sequencing experimental libraries for the first time. A validation run
sequences 100% PhiX, which functions as a control library, to confirm system operation. For instructions, see
Sequencing on page 19.
Minimize the Control Software
Minimize the control software to access other applications. For example, to browse to the output folder in File
Explorer or find a sample sheet.
1 Swipe up on the touch screen to open the Windows taskbar.
Document # 1000000036024 v05 11
For Research Use Only. Not for use in diagnostic procedures.iSeq 100 Sequencing System Guide
2 Select the iSeq 100 System icon or another application.
The control software is minimized.
3 [Optional] Attach a keyboard and mouse to the instrument to facilitate navigation and typing outside of
the control software.
4 To maximize the control software, swipe up and select iSeq 100 System.
Run Settings
Configure options for run setup, run monitoring, and data analysis on the Settings tab in System Settings. This
tab displays recommended express settings, which you can apply by selecting the express setup option.
Alternatively, select the manual setup option to customize the settings.
Choosing express settings applies the following settings and sends InterOp files, log files, instrument
performance data, and run data to BaseSpace Sequence Hub:
u Illumina Proactive Support—Facilitate troubleshooting and detect potential failures, allowing proactive
maintenance and maximizing instrument uptime. Turning on Illumina Proactive Support sends instrument
performance data (not sequencing data) to BaseSpace Sequence Hub. For more information, see the
Illumina Proactive Technical Note (document # 1000000052503).
u Local Run Manager—Use the Local Run Manager software to create runs and analyze run data for a
simple, streamlined workflow. Separate sample sheets and analysis applications are not needed.
u Remote Run Monitoring—Use BaseSpace Sequence Hub for remote run monitoring.
u Run Analysis, Collaboration, and Storage—Use BaseSpace Sequence Hub to store and analyze run data
and collaborate with colleagues.
NOTE
Local Run Manager automatically starts analysis when the run is complete. However, you can also analyze
data in BaseSpace Sequence Hub.
Apply Express Settings
Express setup replaces the current run settings with recommended run settings and localized settings for
BaseSpace Sequence Hub. These settings require an internet connection and a BaseSpace Sequence Hub
account. For account setup instructions, see the BaseSpace Sequence Hub Online Help (document #
1000000009008).
1 On the control software menu, select System Settings.
2 On the Settings tab, select Use Express Settings.
3 In the Set Region list, select the geographic location where the system resides or the location closest to
where the system resides.
This setting ensures that data are stored in the appropriate location for BaseSpace Sequence Hub.
4 If you have an Enterprise subscription, in the Enter Private Domain field, enter the domain name
(URL) used for single sign-on to BaseSpace Sequence Hub.
For example: https://yourlab.basespace.illumina.com.
5 Select Next.
6 Review the settings. To modify a setting:
a Select Edit to open the setting.
Document # 1000000036024 v05 12
For Research Use Only. Not for use in diagnostic procedures.iSeq 100 Sequencing System Guide
b Modify the setting as needed, and then select Next.
c Select Next to continue through any subsequent screens.
On the Settings Review screen, a green checkmark indicates enabled settings.
7 Select Save.
8 To close System Settings, select Exit.
Manually Configure Settings
Manual setup guides you through each screen on the Settings tab to configure run settings, which have the
following requirements:
u Turning on Illumina Proactive Support and BaseSpace Sequence Hub requires an internet connection.
BaseSpace Sequence Hub also requires an account. For account setup instructions, see the BaseSpace
Sequence Hub Online Help (document # 1000000009008).
u Using BaseSpace Sequence Hub for data analysis when the system is configured for Manual mode
requires a sample sheet. For details, see Sample Sheet Requirements on page 14.
1 On the control software menu, select System Settings.
2 Select Set Up Manually.
3 Choose whether to enable to the Illumina Proactive Support service:
u To turn it on, select the Turn on Illumina Proactive Support checkbox.
u To turn it off, deselect the Turn on Illumina Proactive Support checkbox.
The service sends instrument performance data, such as temperature and run time, to Illumina. These
data help Illumina detect potential failures and facilitate troubleshooting. Run data are not sent. For more
information, see the Illumina Proactive Technical Note (document # 1000000052503).
4 Select Next.
5 Choose whether to connect runs to BaseSpace Sequence Hub:
u To connect runs, select one of the following checkboxes:
u Turn on run monitoring from anywhere only—Use BaseSpace Sequence Hub for remote
monitoring.
u Turn on run analysis, collaboration, and storage also—Use BaseSpace Sequence Hub for remote
monitoring and analysis.
u To disconnect runs, deselect the Turn on run monitoring from anywhere only and Turn on run
analysis, collaboration, and storage also checkboxes.
When connected, the control software sends InterOp and log files to BaseSpace Sequence Hub. The run
analysis, collaboration, and storage option also sends run data.
6 In the Set Region list, select the geographic location where the system resides or the location closest to
where the system resides.
This setting ensures that data are stored in the appropriate location for BaseSpace Sequence Hub.
7 If you have an Enterprise subscription, in the Enter Private Domain field, enter the domain name
(URL) used for single sign-on to BaseSpace Sequence Hub.
For example: https://yourlab.basespace.illumina.com.
8 Select Next.
Document # 1000000036024 v05 13
For Research Use Only. Not for use in diagnostic procedures.iSeq 100 Sequencing System Guide
9 Choose whether to integrate the control software with Local Run Manager:
u To create runs and analyze data in Local Run Manager, select Use Local Run Manager.
u To create runs in the control software and analyze data in another application, select Use Manual
Mode.
Local Run Manager provides the most streamlined workflow, but it is not a feature of the control software.
It is integrated software for recording samples for sequencing, creating runs, and analyzing data. Before
sequencing, review the Local Run Manager Software Guide (document # 1000000002702).
10 Select Next.
11 Review the settings. To modify a setting:
a Select Edit to open the setting.
b Modify the setting as needed, and then select Next.
c Select Next to continue through any subsequent screens.
On the Settings Review screen, a green checkmark indicates enabled settings.
12 Select Save.
13 To close System Settings, select Exit.
Sample Sheet Requirements
When the system is configured for Manual mode and you are analyzing data in BaseSpace Sequence Hub,
each run requires a sample sheet. Create a sample sheet by editing the iSeq 100 System Sample Sheet
Template for Manual Mode , then importing it into the control software during run setup. After import, the
software automatically renames the sample sheet to SampleSheet.csv.
Download the sample sheet template from the iSeq 100 Sequencing System support pages: iSeq 100
System Sample Sheet Template for Manual Mode.
CAUTION
Enter the Index 2 (i5) adapter sequences in the correct orientation for the iSeq 100 Sequencing System. For
index orientation, see Illumina Adapter Sequences (document # 1000000002694).
A sample sheet is also required when the system is configured for Local Run Manager mode. However, Local
Run Manager creates the sample sheet for you and saves it to the appropriate location. For all other
circumstances, a sample sheet is optional.
Instrument Customization
Name your instrument and configure settings for audio, thumbnail images, and software updates on the
Customization tab in System Settings.
Name the Instrument
1 On the control software menu, select System Settings.
2 Select the Customization tab.
3 In the Instrument Nickname field, enter a preferred name for the instrument.
The name appears along the top of each screen.
4 Select Save.
5 To close System Settings, select Exit.
Document # 1000000036024 v05 14
For Research Use Only. Not for use in diagnostic procedures.iSeq 100 Sequencing System Guide
Turn Audio On or Off
1 On the control software menu, select System Settings.
2 Select the Customization tab.
3 Choose whether to mute the system:
u To turn off the audio, select Off.
u To turn on the audio, select On.
4 Select Save.
5 To close System Settings, select Exit.
Save Thumbnails
1 On the control software menu, select System Settings.
2 Select the Customization tab.
3 Choose whether to save thumbnail images:
u To save all thumbnails, select the Save all thumbnail images checkbox.
u To save no thumbnails, deselect the Save all thumbnail images checkbox.
Saving thumbnail images helps with troubleshooting, but minimally increases run size. By default, all
thumbnail images are saved.
4 Select Save.
5 To close System Settings, select Exit.
Configure Software Updates
The system can automatically check for and download software updates for you to install, or you can check
manually. For more information, see Software Updates on page 31.
1 On the control software menu, select System Settings.
2 Select the Customization tab.
3 Choose whether the system automatically checks for software updates:
u To check automatically, select the Autocheck for software updates checkbox.
u To check manually, deselect the Autocheck for software updates checkbox.
Autocheck requires an internet connection.
4 Select Save.
5 To close System Settings, select Exit.
Network Setup
Operating the system and transferring data requires only a WiFi or Ethernet connection with the default
network settings. These settings do not need updating unless your organization has custom network
requirements. If it does, consult your IT representative for help changing the default network settings.
The iSeq 100 Sequencing System Site Prep Guide (document # 1000000035337) provides guidelines on
network settings and control computer security.
Document # 1000000036024 v05 15
For Research Use Only. Not for use in diagnostic procedures.iSeq 100 Sequencing System Guide
Specify the Output Folder Location
Universal Copy Service copies sequencing output files from the run folder to BaseSpace Sequence Hub
(when applicable) and the output folder, where you can access them.
An output folder is required unless the system is configured for run monitoring, analysis, collaboration, and
storage using BaseSpace Sequence Hub. If an output folder location is not specified, Universal Copy Service
copies files to D:\SequencingRuns.
1 On the control software menu, select System Settings.
2 Select the Network Access tab.
3 In the Output Folder field, enter a default location for the output folder or select Browse to navigate to a
location.
u Internal drive—Enter an existing location on drive D. Drive C lacks sufficient space.
u External drive—Enter the location of a USB drive connected to the instrument.
u Network location—Enter a network location.
You can change the default location on a per-run basis.
4 Proceed as follows.
u If you specified an internal or external drive location, select Save and then Exit to save the location
and close System Settings.
u If you specified a network location, continue through steps 5–8 to connect Universal Copy Service to
an account that has access to the specified location.
5 Under Universal Copy Service, select an account type:
u Local System Account—The output folder resides in a directory that is accessible with a local
account, which has access to most local locations.
u Network Account—The output folder resides in a directory that requires logon credentials.
This setting applies to the default output folder location and any location specified during run setup.
6 If you selected Network Account, enter the user name and password for the account.
7 Select Save.
8 To close System Settings, select Exit.
Connect to the Internet
Configure a WiFi or Ethernet internet connection in Windows Network & Internet settings, which you can open
from the control software. The default Ethernet connection transfers data more reliably.
1 On the control software menu, select System Settings.
2 Select the Network Access tab.
3 Select Network Configuration, which minimizes the control software and opens Windows Network
& Internet settings.
4 Configure a WiFi or Ethernet connection.
u If configuring WiFi, change the adapter option to Wi-Fi.
u For detailed configuration instructions, see the Windows 10 help on the Microsoft website.
5 When configuration is complete, close Windows settings and maximize the control software.
6 On the Network Access tab, select Save.
7 To close System Settings, select Exit.
Document # 1000000036024 v05 16
For Research Use Only. Not for use in diagnostic procedures.iSeq 100 Sequencing System Guide
Connect to a Proxy Server
1 Minimize the control software.
2 From Windows Start, open the Run dialog box.
3 Type cmd, and then select OK.
4 Type the following command:
C:\windows\System32\bitsadmin.exe /Util /SetIEProxy LocalSystem Manual_
proxy http://: NULL
5 Replace http://: with your proxy server address and proxy port,
and NULL with any bypasses.
6 Press Enter to run the command.
7 Power cycle the instrument. For instructions, see Power Cycle the Instrument on page 45.
User-Supplied Consumables and Equipment
The following user-supplied consumables and equipment are used for sequencing, maintenance, and
troubleshooting.
Consumables for Sequencing
Consumable Supplier Purpose
Disposable gloves, powder-free General lab supplier General purpose.
iSeq 100 i1 Reagent Illumina, catalog #: Provides the reagents and flow cell for
• 20021533 (single) a run.
• 20021534 (four-pack)
Microtubes, 1.5 ml Fisher Scientific, catalog # 14-222- Diluting libraries to the loading
158, or equivalent low-bind tubes concentration.
Paper towels General lab supplier Drying the cartridge after a water bath.
Pipette tips, 20 µl General lab supplier Diluting and loading libraries.
Pipette tips, 100 µl General lab supplier Diluting and loading libraries.
Resuspension Buffer (RSB) Illumina, provided with library prep kits Diluting libraries to the loading
concentration.
[Optional] 10 mM Tris-HCl, pH 8.5 General lab supplier Substitute for RSB to dilute libraries to
the loading concentration.
[Optional] PhiX Control v3 Illumina, catalog # FC-110-3001 Performing a PhiX-only run or spiking
in a PhiX control.
Consumables for Maintenance and Troubleshooting
Consumable Supplier Purpose
Bleach wipes, 10% VWR, catalog # 16200-218, or Decontaminating the instrument and
equivalent cleaning work surfaces.
Disposable gloves, powder-free General lab supplier General purpose.
Document # 1000000036024 v05 17
For Research Use Only. Not for use in diagnostic procedures.iSeq 100 Sequencing System Guide
Consumable Supplier Purpose
iSeq 100 i1 Spare Drip Tray Pad¹ Illumina, catalog # 20023927 Lining the drip tray to absorb any
leaked fluids.
iSeq 100 i1 Spare Air Filter¹ Illumina, catalog # 20023928 Replacing the air filter every six
months.
iSeq 100 System Test Kit² Illumina, catalog # 20024141 Performing a system check.
Isopropyl alcohol wipes, 70% VWR, catalog # 95041-714, or Cleaning the instrument and reusable
equivalent test flow cell.
Lab tissue, low-lint VWR, catalog # 21905-026, or Drying the drip tray and reusable test
equivalent flow cell.
Paper towels General lab supplier Drying fluid around the instrument.
[Optional] Bleach solution, 10% VWR, catalog # 16003-740 (32 oz), Cleaning work surfaces after
16003-742 (16 oz), or equivalent decontamination.
[Optional] Ethanol wipes, 70% Fisher Scientific, catalog # 19-037- Substitute for isopropyl alcohol wipes
876, or equivalent to clean the instrument and reusable
test flow cell.
¹ The instrument ships with one installed and one spare. When not under warranty, replacements are user-supplied. Keep packaged until use.
² Replaces the reusable test components shipped with the instrument when they expire after 5 years or 36 uses.
Equipment
Item Source Purpose
Freezer, -25°C to -15°C General lab supplier Storing the cartridge.
Ice bucket General lab supplier Setting aside libraries.
Pipette, 10 µl General lab supplier Diluting libraries to the loading
concentration.
Pipette, 20 µl General lab supplier Diluting libraries to the loading
concentration.
Pipette, 100 µl General lab supplier Diluting libraries to the loading
concentration.
Refrigerator, 2°C to 8°C General lab supplier Storing the flow cell.
[Optional] Keyboard General lab supplier Supplementing the onscreen
keyboard.
[Optional] Mouse General lab supplier Supplementing the touch screen
interface.
[Optional] Water bath General lab supplier Thawing the cartridge.
Document # 1000000036024 v05 18
For Research Use Only. Not for use in diagnostic procedures.Chapter 3 Sequencing
Introduction 19
Thaw the Bagged Cartridge 20
Prepare the Flow Cell and Libraries 21
Load Consumables Into the Cartridge 23
Set Up a Sequencing Run (Local Run Manager) 24
Set Up a Sequencing Run (Manual Mode) 27
Introduction
Cluster generation, sequencing, and analysis comprise sequencing on the iSeq 100 Sequencing System.
Each step occurs automatically during a sequencing run. Depending on system configuration, further analysis
is performed off-instrument after the run is complete.
u Cluster generation—Library is automatically denatured into single strands and further diluted onboard the
instrument. During cluster generation, single DNA molecules are bound to the surface of the flow cell and
amplified to form clusters.
u Sequencing—Clusters are imaged using one-dye chemistry, which uses one fluorescent label and two
imaging cycles to encode data for the four nucleotides. The first imaging cycle detects adenine (A) and
thymine (T). A chemistry cycle then cleaves the dye from A and simultaneously adds a similar dye to
cytosine (C). The second imaging cycle detects C and T. After the second imaging cycle, Real-Time
Analysis software performs base calling, filtering, and quality scoring. This process is repeated for each
cycle of sequencing. For more information on one-dye chemistry, see Base Calling on page 41.
u Analysis—As the run progresses, the control software automatically transfers base call files (*.bcl) to the
specified output folder for data analysis. The method of data analysis depends on application and system
configuration.
Loading Volume and Concentration
Loading volume is 20 µl. Loading concentration varies by library type.
Library Type Loading Concentration (pM)
100% PhiX 60
AmpliSeq Library PLUS for Illumina 50
Nextera DNA Flex 200
Nextera Flex for Enrichment 100
TruSeq DNA Nano 100
TruSeq DNA PCR-Free 100
For other library types, Illumina recommends 50 pM as a starting loading concentration. Optimize this
concentration over subsequent runs to identify a loading concentration that consistently yields data that
meets specifications.
Loading concentrations that are too high or too low result in suboptimal clustering and run metrics. For more
information, see the Cluster Optimization Overview Guide (document # 1000000071511).
Recommended Number of Cycles
For each read, entering a minimum of 26 cycles and a maximum of 151 cycles helps ensure data quality. The
exact number of cycles depends on your experiment.
Document # 1000000036024 v05 19
For Research Use Only. Not for use in diagnostic procedures.iSeq 100 Sequencing System Guide
The minimum and maximum cycle numbers include an extra cycle. Always add one cycle to the desired read
length to correct the effects of phasing and prephasing. Read length is the number of sequencing cycles in
Read 1 and Read 2, which excludes extra cycles and index cycles.
Example run setup:
u For a read length of 36 (single-read), enter 37 in the Read 1 field.
u For a read length of 150 per read (paired-end), enter 151 in the Read 1 field, and 151 in the Read 2 field.
Best Practices
u When handling reagents and other chemicals, wear safety glasses, a lab coat, and powder-free gloves.
Switch gloves when prompted to prevent cross-contamination.
u Make sure that you have the required consumables and equipment before starting a protocol. See User-
Supplied Consumables and Equipment on page 17.
u Follow the protocols in the order shown, using the specified volumes, temperatures, and durations.
u Unless a stopping point is specified, proceed immediately to the next step.
Thaw the Bagged Cartridge
1 If you are thawing the cartridge in a water bath, store the cartridge at -25°C to -15°C for at least 1 day
before thawing.
A water bath is the fastest of three thaw methods, which are described in step 5.
CAUTION
Thawing a cartridge in a water bath directly from shipment, when it has been stored on dry ice, can
adversely affect cartridge performance.
2 Put on a new pair of powder-free gloves.
3 Remove the cartridge from -25°C to -15°C storage.
4 If the cartridge is boxed, remove it from the box but do not open the white foil bag.
5 Thaw the bagged cartridge using one of the following methods. Use immediately after thawing, without
refreezing or otherwise storing.
Document # 1000000036024 v05 20
For Research Use Only. Not for use in diagnostic procedures.iSeq 100 Sequencing System Guide
Method Thaw Time Instruction
20°C to 25°C water bath 6 hours, not exceeding • Use 6 L (1.5 gal) water per cartridge.
18 hours • Set a temperature-controlled water bath to 25°C or mix
hot and cold water to achieve 20°C to 25°C.
• Face the bag label up, submerge the cartridge completely,
and apply ~2 kg (4.5 lbs) weight to prevent floating.
• Do not stack cartridges in the water bath unless it is
temperature-controlled.
2°C to 8°C refrigerator 36 hours, not Position the cartridge so that the label faces up and air can
exceeding 72 hours circulate on all sides, including the bottom.
Room-temperature air 9 hours, not exceeding Position the cartridge so that the label faces up and air can
(20°C to 25°C) 18 hours circulate on all sides, including the bottom.
6 If wet from a water bath, dry with paper towels.
Prepare the Flow Cell and Libraries
Before loading the flow cell and libraries into the cartridge, bring the flow cell to room temperature, dilute
libraries, and optionally spike in PhiX. Libraries are denatured automatically onboard the instrument.
The following dilution instructions apply to supported Illumina libraries that are double-stranded. Always
perform a quality control analysis, optimize the loading concentration for your library, and use a normalization
method that generates double-strand libraries. Bead-based normalization that generates single-stranded
libraries is not compatible with onboard denaturation.
Dilute Library to 1 nM
1 Prepare the flow cell as follows.
a Remove a new flow cell from 2°C to 8°C storage.
b Set aside the unopened package at room temperature for 10–15 minutes to prevent condensation.
Preparing the flow cell now ensures that it reaches room temperature on time.
2 Remove Resuspension Buffer (RSB) from -25°C to -15°C storage. Alternatively, use 10 mM Tris-HCl,
pH 8.5 in place of RSB.
3 [Optional] Remove 10 nM PhiX stock from -25°C to -15°C storage.
PhiX is needed only for an optional spike-in or a PhiX-only run.
4 Thaw RSB and optional PhiX at room temperature for 10 minutes.
5 Using RSB as diluent, prepare the applicable volume of 1 nM library in a low-bind microtube:
Library Type Volume of 1 nM Library to Prepare (µl)
100% PhiX (for a PhiX-only run) 8
AmpliSeq Library PLUS for Illumina 7
Nextera DNA Flex 25
Nextera Flex for Enrichment 12
TruSeq DNA Nano 12
TruSeq DNA PCR-Free 12
Diluting libraries in low-bind microtubes is critical to successful sequencing.
6 Vortex briefly, and then centrifuge at 280 × g for 1 minute.
Document # 1000000036024 v05 21
For Research Use Only. Not for use in diagnostic procedures.iSeq 100 Sequencing System Guide
7 [Optional] Store 1 nM library at -25°C to -15°C for up to 1 month.
Dilute 1 nM Library to Loading Concentration
1 Combine the following volumes in a low-bind microtube to prepare 100 µl library diluted to the
appropriate loading concentration:
Loading Concentration 1 nM Library Volume RSB Volume
Library Type*
(pM) (µl) (µl)
100% PhiX 60 6 94
AmpliSeq Library PLUS for Illumina 50 5 95
Nextera DNA Flex 200 20 80
Nextera Flex for Enrichment 100 10 90
TruSeq DNA Nano 100 10 90
TruSeq DNA PCR-Free 100 10 90
* For unlisted library types, including other Nextera libraries, start with a loading concentration of 50 pM and optimize over subsequent runs.
This table provides example loading concentrations. The iSeq 100 System is compatible with all Illumina
library prep kits except SureCell WTA 3′
, but the optimal loading concentration can vary.
2 Vortex briefly, and then centrifuge at 280 × g for 1 minute.
3 Set aside diluted library on ice for sequencing.
Sequence libraries diluted to the loading concentration the same day they are diluted.
4 If you are not adding PhiX or are performing a PhiX-only run, skip the next section and proceed to Load
Consumables Into the Cartridge on page 23.
Add a PhiX Control (Optional)
PhiX is a small, ready-to-use Illumina library with balanced nucleotide representation. Adding a 2% PhiX
spike-in to your library provides additional metrics. For low-diversity libraries, a 5% spike-in is recommended
to increase base diversity.
NOTE
A spike-in as low as 1% is effective for providing additional metrics, but makes pipetting difficult.
1 Combine the following volumes in a low-bind microtube to prepare 50 µl 1 nM PhiX:
u 10 nM PhiX (5 µl)
u RSB (45 µl)
2 Vortex briefly, and then centrifuge at 280 × g for 1 minute.
3 [Optional] Store 1 nM PhiX at -25°C to -15°C for up to 1 month.
4 Combine the following volumes in a low-bind microtube to dilute PhiX to the same loading concentration
as the library, for example:
PhiX Loading Concentration (pM) 1 nM PhiX Volume (µl) RSB Volume (µl)
50 5 95
100 10 90
200 20 80
Document # 1000000036024 v05 22
For Research Use Only. Not for use in diagnostic procedures.iSeq 100 Sequencing System Guide
5 Combine PhiX and library:
u For a 2% spike-in, add 2 µl diluted PhiX to 100 µl diluted library.
u For a 5% spike-in, add 5 µl diluted PhiX to 100 µl diluted library.
Actual PhiX percentage varies depending on library quality and quantity.
6 Vortex briefly, and then centrifuge at 280 × g for 1 minute.
7 Set aside the library with PhiX spike-in on ice.
Load Consumables Into the Cartridge
1 [Optional] To see an instructional video on cartridge preparation and loading, select Sequence.
2 Open the cartridge bag from the notches.
3 Avoiding the access window on top of the cartridge, remove the cartridge from the bag. Discard the bag.
4 Invert the cartridge five times to mix reagents.
Internal components can rattle during inversion, which is normal.
5 Tap the cartridge (label facing up) on the bench or other hard surface five times to ensure reagent
aspiration.
Load Library
1 Using a new pipette tip, pierce the Library reservoir and push the foil to the edges to enlarge the hole.
2 Discard the pipette tip to prevent contamination.
3 Add 20 µl diluted library to the bottom of the reservoir. Avoid touching the foil.
Load the Flow Cell
1 Open the white foil package from the notches. Use within 24 hours of opening.
Document # 1000000036024 v05 23
For Research Use Only. Not for use in diagnostic procedures.iSeq 100 Sequencing System Guide
2 Pull the flow cell out of the package.
Touch only the plastic when handling the flow cell. Avoid touching the electrical interface, CMOS sensor,
glass, and gaskets on either side of the glass.
3 Hold the flow cell by the grip points with the label facing up.
4 Insert the flow cell into the slot on the front of the cartridge.
An audible click indicates that the flow cell is in place. When properly loaded, the grip protrudes from the
cartridge and the glass is visible from the access window.
A Loading the flow cell
B Loaded flow cell
5 Dispose of the packaging as follows.
a Remove the clamshell case from the foil package.
b Remove the desiccant from the clamshell case.
c Recycle the clamshell case, and discard the foil package and desiccant.
6 Proceed depending on whether the system is integrated with Local Run Manager:
u If using Local Run Manager, follow Set Up a Sequencing Run (Local Run Manager) on page 24.
u If not using Local Run Manager, follow Set Up a Sequencing Run (Manual Mode) on page 27.
Set Up a Sequencing Run (Local Run Manager)
Setting up a run using Local Run Manager entails creating and saving the run in Local Run Manager, then
returning to the control software to load consumables and select the run. Data are saved to the specified
output folder for analysis, which Local Run Manager performs automatically when the run is complete.
1 Open Local Run Manager locally on the instrument monitor or remotely from another computer:
Document # 1000000036024 v05 24
For Research Use Only. Not for use in diagnostic procedures.iSeq 100 Sequencing System Guide
Access Open Local Run Manager
Local From the control software menu, select Local Run Manager, and then select Open Local Run
Manager.
Remote From the control software menu, select About to obtain the system IP address.
From a computer on the same network as the instrument, open Local Run Manager in Chromium.
Use the system IP address to connect.
2 If Chromium appears blank on the instrument monitor, power cycle the instrument and restart run setup.
See Power Cycle the Instrument on page 45 for instructions.
3 In Local Run Manager, create and save the run.
u See the Local Run Manager Software Guide (document # 1000000002702) for instructions.
u Set up a PhiX-only run to be non-indexed.
Local Run Manager automatically sends saved runs to the control software.
4 In the control software, select Sequence.
The software opens the door at an angle, ejects the tray, and initiates the series of run setup screens.
5 [Optional] Select Help to view an onscreen prompt.
Help prompts appear on each screen to provide supplementary guidance.
Load the Cartridge Onto the Instrument
1 Make sure that the cartridge is thawed and contains the flow cell and diluted library.
2 Place the cartridge onto the tray so that the access window faces up and the flow cell is inside the
instrument. Do not push the cartridge or tray into the instrument.
3 Select Close Door to retract the cartridge and close the door.
A panel appears on the left side of the screen to show information from the scanned consumables.
Sign In to BaseSpace Sequence Hub
The BaseSpace Sequence Hub screen appears when the system is configured for Run Monitoring or Run
Monitoring and Storage.
1 To disconnect the current run from BaseSpace Sequence Hub, select Skip BaseSpace Sequence Hub
Sign In.
Instrument performance data are still sent to Illumina.
2 To change connectivity for the current run, select a Configuration option:
u Run Monitoring Only—Send only InterOp files to BaseSpace Sequence Hub to allow remote
monitoring.
u Run Monitoring and Storage—Send run data to BaseSpace Sequence Hub to allow remote
monitoring and analysis.
Document # 1000000036024 v05 25
For Research Use Only. Not for use in diagnostic procedures.You can also read