User's Guide MIDI Edition - MUSITEK
←
→
Page content transcription
If your browser does not render page correctly, please read the page content below
MIDI Edition

                                             User’s Guide

SmartScore 64 by Musitek | www.musitek.com                      Windows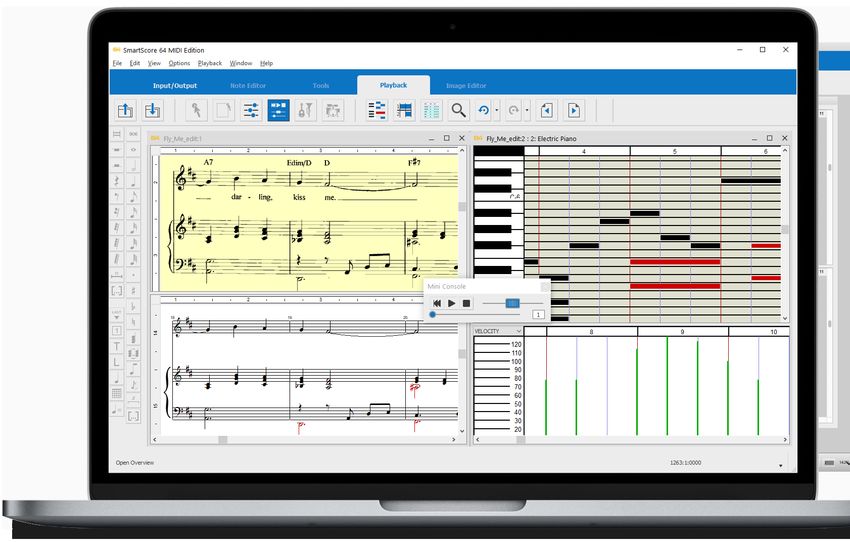
User Guide SmartScore 64 MIDI Windows
Inhaltsverzeichnis
Table of Contents                                                            3
Registration, Support and Contact                                            5
Introduction & Tips                                                          6
                    SmartScore Editions & Serialization                      6
                    Install the correct edition                              6
SmartScore 64 User Guide and other aids                                      6
Welcome7

                                                                    User manual version 1.2 (January 2021)
                    SmartScore 64 MIDI Edition                               7
Getting started                                                              8
                    The Task Window                                          8
                    Global and Local Program Preferences                     9
                    Setting up your scanner                                 10
Scanning music scores                                                       12
                    Pay attention when scanning pages                       12
                    Start scanning                                          13
                    SmartScore’s Scanning Interface                         13
                    Scanning multiple pages                                 14
                    Saving scanned files and converting PDF files           15
Recognition15
                    The Begin Recognition Window                            15
                    Recognition Options                                     17
                    The Recognition Process                                 18
                    Processing PDF files                                    19
Image Editor                                                                20
                    Working with the Image Editor in SmartScore             20
                    Functions of the Image Editor toolbar                   21
                    Useful Image Editor tricks                              22
Note Editor (ENF - TIF view panes)                                          25
                    Display formats                                         26
                    Navigating inside the document                          28
                    Tabs, Toolbars and their functions                      29
Editing notation symbols                                                    31
                    Selecting symbols                                       31
                    Editing Notes (Selecting/Inserting/Deleting)            33
                    Deleting notation symbols                               33
                    Changing notation symbols                               36
                    Repositioning symbols using NUDGE mode                  37
                    Inserting notes and voices                              38
                    Articulations, dots, ties and accidentals               39
                    Working with Grace Notes                                41
                    Articulations over a range of notes                     41
                    Multi-measure rests                                     43
                    Inserting Tempo markings                                44
                    Inserting Expressions                                   45
                    Repeats, jumps and endings                              46
                    Rehearsal and orientation markings                      49
The Properties tool                                                         50
                    This tool reveals practically everything!               50
                    SmartScore’s Secret Weapon: The Properties Tool         51
Cut, Copy, Paste and Duplicate                                              52
Parts & Instruments                                                         54
                    Working with Instruments (Playback Console)             54
                    Re-linking parts (optimized scores)                     55
Controlling the layout                                                      57
                    Apply spacing changes made in one system to all systems 58
                    Reformatting your score                                 59
Playback                                                                    60
                    Setting up MIDI Playback                                60
                    Transport Controls                                      60
                    The Mini-console                                        61
                    SmartScore’s Playback Console                           62
                    More Playback Options                                   63
                    The Playback Toolbar                                    65
                    Drums and Percussion                                    66
The MIDI Editor                                                             69
                    Viewing an active ENF document in the MIDI Editor       70
                    Using the MIDI Editor                                   71
                    The Piano Roll View                                     75
                    Working in the Piano Roll environment                   76
                    MIDI Overview                                           80
                    Major features of the MIDI Overview                     81
                    The MIDI Event List                                     82
                    Major features of the Event List                        83
Supported File Formats                                                      84
Try to learn these keyboard shortcuts. It will make your work easier.       86
Tips and Troubleshooting                                                    89
                    Alternative Scanning Methods                            89
                    Troubleshooting90
Index95
                                                                            95

                                                     © SmartScore® is a registered trade mark of Musitek®, Ojai, CA USA.
                                                                        International rights secured.

                                                                                  Musitek
                                                                            413 W. Matilija St.
                                                                           Ojai, CA 93023, USA
                                                                           www.musitek.com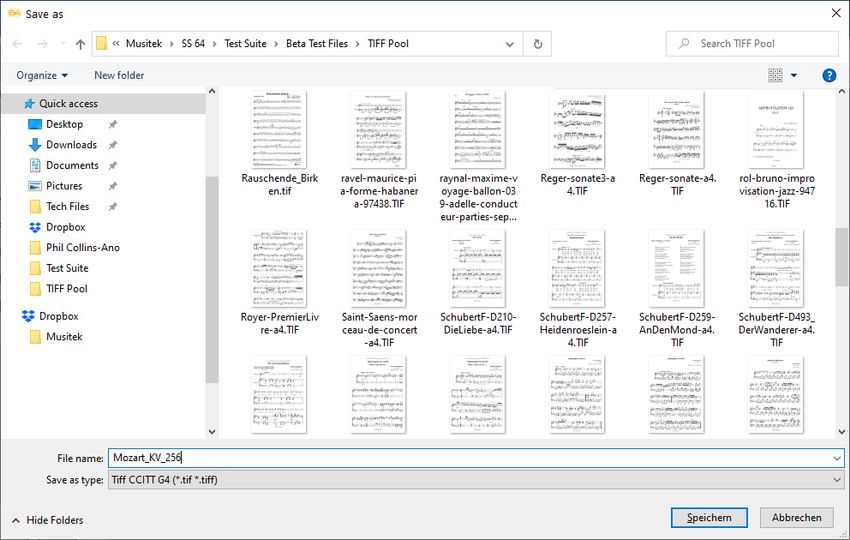
QRG E2021-1.2                                                                                                  Table of Contents

Table of Contents
Registration, Support and Contact                  5    Note Editor (ENF - TIF view panes)                                25
Introduction & Tips                                6       Display formats                                                26
    SmartScore Editions & Serialization            6       Navigating inside the document                                 28
    Install the correct edition                    6       Tabs, Toolbars and their functions                             29

SmartScore 64 User Guide and other aids            6    Editing notation symbols                                          31
                                                            Selecting symbols                                              31
Welcome7
                                                            Editing Notes (Selecting/Inserting/Deleting)                   33
   SmartScore 64 MIDI Edition 7
                                                            Deleting notation symbols                                      33
Getting started                                     8      Changing notation symbols                                      36
   The Task Window                                  8      Repositioning symbols using NUDGE mode                         37
   Global and Local Program Preferences             9      Inserting notes and voices                                     38
   Setting up your scanner                         10      Articulations, dots, ties and accidentals                      39
Scanning music scores                              12      Working with Grace Notes                                       41
   Pay attention when scanning pages               12      Articulations over a range of notes                            41
   Start scanning                                  13      Multi-measure rests                                            43
   SmartScore’s Scanning Interface                 13      Inserting Tempo markings                                       44
   Scanning multiple pages                         14      Inserting Expressions                                          45
   Saving scanned files and converting PDF files   15      Repeats, jumps and endings                                     46
Recognition15                                              Rehearsal and orientation markings                             49
   The Begin Recognition Window 15                      The Properties tool                                               50
   Recognition Options          17                         This tool reveals practically everything!                      50
   The Recognition Process      18                         SmartScore’s Secret Weapon: The Properties Tool                51
   Processing PDF files         19                      Cut, Copy, Paste and Duplicate                                    52
Image Editor                                       20   Parts & Instruments                                               54
   Working with the Image Editor in SmartScore     20      Working with Instruments (Playback Console)                    54
   Functions of the Image Editor toolbar           21      Re-linking parts (optimized scores)                            55
   Useful Image Editor tricks                      22

SmartScore 64 MIDI Windows                                                                                                    3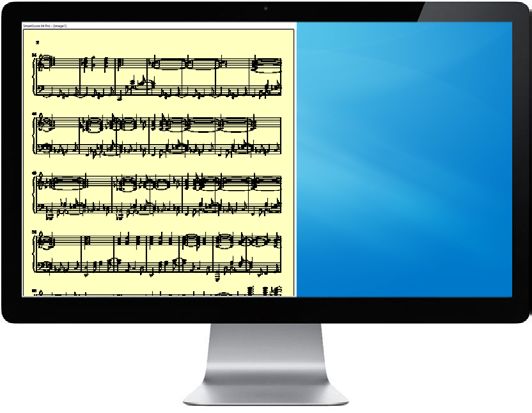
Table of Contents                                                                                        QRG E2021-1.2

Controlling the layout                                       57   Supported File Formats                          84
   Apply spacing changes made in one system to all systems   58   Keyboard shortcuts                              86
   Reformatting your score                                   59
                                                                   Tips and Troubleshooting        89
Playback                                                     60      Alternative Scanning Methods 89
   Setting up MIDI Playback                                  60      Troubleshooting90
   Transport Controls                                        60
                                                                   Index95
   The Mini-console                                          61
   SmartScore’s Playback Console                             62
   More Playback Options                                     63
   The Playback Toolbar                                      65
   Drums and Percussion                                      66
The MIDI Editor                                              69
   Viewing an active ENF document in the MIDI Editor         70
   Using the MIDI Editor                                     71
   The Piano Roll View                                       75
   Working in the Piano Roll environment                     76
   MIDI Overview                                             80
   Major features of the MIDI Overview                       81
   The MIDI Event List                                       82
   Major features of the Event List                          83

Musitek
413 W. Matilija St.
Ojai, CA 93023
United States of America
www.musitek.com

4                                                                                            SmartScore 64 MIDI Windows
QRG E2021-1.2                                                                                                                      Registration, Support & Contact

Registration, Support and Contact
Product Registration                                                                Tech Support & Contact & Support Info

Copies of SmartScore 64®, are licensed to individuals directly by the               Due to the limited number of live bodies present
publisher, Musitek® of Ojai, CA. Institutional seat licenses are available          at Musitek, we ask that technical issues be handled
at significant discounts under special arrangement with Musitek.                    primarily by e-mail. In nearly every case, we will
Individual licenses can be transferred to other individuals provided the            ask for your original .TIF and or .ENF files anyway.
original holder contacts Customer Service and authorizes the transfer;              In the interest of time and convenience, please attach your problem
whereupon, by agreement, the original holder of the license will be                 files along with a (not too) detailed description and send to the address
disallowed from using the software.                                                 below. Of course, we will try to catch your tech support phone calls
                                                                                    whenever possible.
Additionally, current members of a school, church or non-profit are
entitled to personalized licenses at a significant discount provided an             In additon to in-house support, there is a very active and helpful Smart-
active member of that institution is a registered owner of SmartScore 64.           Score forum on-line populated by experienced users and administrators.
Interested parties should contact Musitek customer service.                         The URL for the forum is:
                                                                                    https://bsmartscoreusertechresources.runboard.com/
Licensing and End User License Agreement (EULA) details are found in
the product packaging as well as in the software installation sequence              Musitek Contact Info
itself.
                                                                                    Customer Service: 805-646-8051
                                                                                    			admin@musitek.com
Limits on number of installations
                                                                                    Tech Support: 805-646-5841
Each license holder is allowed up to 5 installations on any computer                			tech@musitek.com
regardless of platform (Mac, Windows or Linux)*                                     			           (phone support 10AM-2PM Pacifc Time M-F)

                                                                                    Web:    		             www.musitek.com
* In cases where a qualified user exceeds the installation limit, a simple e-mail
   or telephone call to Customer Service will initiate a reset of the counter to    FAX: 			               805-646-8099
   zero. Musitek reserves to right to withhold resetting the installation counter
   if fraud is expected.
                                                                                    A reminder ...

                                                                                    Don’t forget to attach your originating .TIF and/or .ENF files when
                                                                                    contacting Tech Support. We’ll get right back to you. Thank you !

SmartScore 64 MIDI Windows                                                                                                                                      5
Introduction & Tips                                                                                                                      QRG E2021-1.2

Introduction & Tips                                                         SmartScore 64 User Guide and other aids
SmartScore Editions & Serialization                                         User Guide
                                                                            SmartScore 64 MIDI Edition for Windows
SmartScore comes in 5 flavors or editions. You can tell which edition
you own from the first characters of your Customer ID and serial            Use the table of contents and/or the Index to locate a topic of interest.
number:                                                                     This publication is not intended for bedside reading unless you believe it
                                                                            will help put you to sleep...
Customer IDs:

•   (1) Download 				Fxxxxxxx

•   (2) Manual 				                           Exxxxxxx
                                                                            Other helpful resources
Serials:

•   SmartScore 64 Professional Edition        DZD-xxxx-xxxx-xxxx            We have some helpful videos located on our website at:
                                                                            http://www.musitek.com/videos.html
•   SmartScore 64 Songbook Edition 		         SZD-xxxx-xxxx-xxxx

•   SmartScore 64 Guitar Edition		            GZD-xxxx-xxxx-xxxx

•   SmartScore 64 Piano Edition		             PZD-xxxx-xxxx-xxxx            And don’t forget about our Online Forum at:
                                                                            https://bsmartscoreusertechresources.runboard.com/
•   SmartScore 64 MIDI Edition		              MZD-xxxx-xxxx-xxxx

Install the correct edition

When installing from a DVD, you will be asked to identify the edition you
purchased. Be sure you know which edition you own when installing.

On first run, SmartScore will ask for your ID and serial number. This
process is required to validate your ownership. Once validated, you will
not be asked again unless you change computers. The software will not
validate with an incorrect serial number.

6                                                                                                                           SmartScore 64 MIDI Windows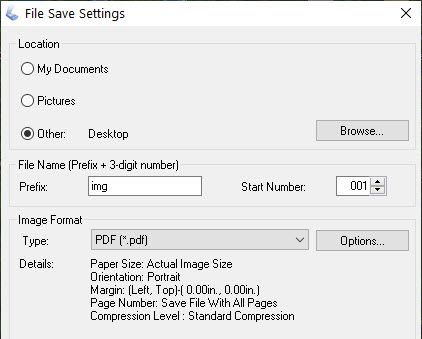
QRG E2021-1.2                                                                                                                                                      Welcome

Welcome
SmartScore 64 MIDI Edition

Scan & play! Sheet music to MIDI in seconds.

Scan multiple pages of printed sheet music or process any PDF file and
watch as it reconstructs on-screen in seconds, ready for playback, and
transposition. Simultaneously view and edit MIDI data in both notation
& familiar Piano Roll, Overview and Event list format. Updating is auto-
matic. Export MIDI files to other programs, including Apple® Garage-
Band®, Acid®, Cubase®, Cakewalk®, Logic® or other MIDI-based
software. Most notation symbols including key and time signatures are
written to the MIDI file.

But it’s not all work. It’s also fun to use. So let’s get started...

                                                    Workspace Tabs

                                                    Access and control your scanner directly. Import and recognize music images downloaded as PDF or TIF.
                                !
                        BLACK       BLACK   BLACK

 Input
                        BLUE        BLUE    BLUE

                                                    The MIDI edition will process a maximum of 4 parts grouped into systems.
                        GREY        GREY    GREY

                                            BLACK

                                                    Playback tools include full-featured console (and mini console) for selecting instruments, sound fonts, volume and
 Playback
                                            BLUE

                                                    balance. Add a groove to playback with SmartScore’s automatic drum track feature.
                                            GREY

                        BLACK       BLACK

                                                    Notation editing tools allow for inserting and deleting recognized symbols or for creating new
 Note Editor
                        BLUE        BLUE

                                                    score documents.
                        GREY        GREY

                                    BLACK

 MIDI Editor                                        Full MIDI Editor with Piano Roll, Track Overview and Event List views.
                                    BLUE

                                    GREY

                                    BLACK

 Output                                             Export finished files as MP3 or standard MIDI files.
                                    BLUE

                                    GREY

SmartScore 64 MIDI Windows                                                                                                                                               7
Getting Started                                                                                                                             QRG E2021-1.2

Getting started

The Task Window
This window appears immediately after SmartScore 64 starts. It displays the most important for beginning your work. It can be disabled at any time.

Each function can also be activated at any time using the corresponding commands in the File menu. The start window can be opened with the keyboard
command Ctrl + Shift + T or with the menu command, File > Task Window.

Shortcut:
                                                                                              Access & control scanner
    Ctrl    ñ        T
                                                                                              Defaults: 300 dpi /
                                                                                              Greyscale / Save to PDF
Opens the Task Window (if hidden).

What’s inside the Task Window?

•    Open the last-saved SmartScore (ENF) file.                                                                              Begin Recognition

•    Locate and control your scanner directly.                                                                               Load multi-page music
                                                                                                                             images, re-sort or remove
•    Browse for files that SmartScore can open.                                                                              pages.
•    Begin the Recognition process.

•    Open and edit scanned / PDF images prior
     to recognition.

•
                                                                                                                             File browser
     Create blank music score from preset
                                                                                                                             Open SmartScore (ENF),
     templates.                                                                                                              PDF or TIFF files.
•    Import MIDI files for playback or conver-
     sion to standard music notation.

•    To upgrade your MIDI Edition online                                   Image Editor
     click here.                                                           Open PDF or image files prior to
                                                                           recognition (Very important for
                                                                           removing covers and front-matter.)

8                                                                                                                              SmartScore 64 MIDI Windows
QRG E2021-1.2                                                                                                                            Program Presets

Global and Local Program Preferences

           Global Preferences that apply to all documents are found under Edit > Program Preferences. Preferences that apply to the current
           document are found under Edit > Document Preferences. The English version of SmartScore is preset to U.S. Letter page size (8.5 x 11“).
           Portrait orientation.

                                  Page Formatting and Printing Defaults.

                                  1. From the EDIT menu, select Program Preferences.
                                  2. Select Page Type & Printing.
                                  3. Choose the page type and orientation you wish to set as a default (e.g. Legal or A4)
  Program Preferences
  Click on a heading to reveal
  settings and attributes in
  that category that you can
  change, if you wish to.

SmartScore 64 MIDI Windows                                                                                                                            9
Program Presets                                                                                                                                       QRG E2021-1.2

Units of Measure

1. From the Units and Zoom category, you can control whether to choose inches or cm.                                        Inches or cm...

Setting up your scanner

Scanning from inside SmartScore
It’s preferable to allow SmartScore to control your scanner. The scanning interface will automatically detect print size and set the optimum resolution.

Using your scanner’s software for scanning
If necessary, you can scan outside of SmartScore using the software that installed with your scanner.

Basic defaults:

•    Scan at 300 to 400 dpi. NOTE: Higher resolutions DOES NOT necessarily equate to higher accuracy !

•    NOTE: Full orchestral and miniature scores may need to be scanned in at 400-600 dpi.

•    Scan in grayscale (not color or black & white)

•    Scan multiple pages and save to PDF (Larger scores should be broken up into bite-sized sections of no more than 50 pages).

10                                                                                                                                        SmartScore 64 MIDI Windows
QRG E2021-1.2                                                                                                                                  Setting up your scanner

Getting it right ...

Check these items if any issues occur when you are scanning your music:

1. Is the scanner connected and turned on?
2. Does your scanner work with other applications and/or the software it was installed with?
3. Is the “WIA” driver installed? Older “TWAIN” drivers may be incompatible with SmartScore.

Connecting SmartScore to your scanner

1. From the File menu, choose: Scan music > Select Scanner.
2. In the Select Source dialog box, look for your scanner’s name or model. This will be the scanner’s “driver”.
3. Push “OK” to select your WIA driver.

                                                         What should you look for?
                                                         If your scanner is not shown in the Select Scanner window, then a WIA driver
                                                         for your scanner was not installed or it is not supported by your operating
                                                         system. Visit your scanner manufacturer’s website then download and install
                                                         the WIA driver for your scanner model.

                                                       Alternative Scanning Methods?
                                                       SmartScore will process PDF files downloaded from the Internet. Select File > Open
                                                       then browse to the PDF file saved to your computer. It will automatically be convert-
                                                       ed to SmartScore’s preferred format, TIF. We recommend processing only scanned
                                                       TIFs and PDFs. We don’t recommend capturing music scores using cell phone cam-
                                                       eras or video scanning devices. Flatbed scanners work best.

                                                       More about alternative Scanning Methods on Page 89.

SmartScore 64 MIDI Windows                                                                                                                                         11
Scanning music QRG E2021-1.2
Scanning music scores
Pay attention when scanning pages
Good scanning technique is essential for getting the best recognition accuracy from SmartScore.
Place the first page in the scanner. Make sure that the area containing the music itself lies within the borders of the scanning area (white margins can be
outside the glass). Keep the page as square to the glass as possible. Do not scan double or multiple pages in one pass since SmartScore turns each pass
into a page. Avoid scanning in handwritten manuscripts... the results will probably create more problems than it’s worth.
Good dog. Bad dog.
Center the image area of the music onto the glass, keeping the page as square as possible.
Avoid skewing the page. NOTE: Don’t worry if there is some twisting. You can de-skew later in the Image Editor.
Do not allow any part of the music to be cut off. SmartScore needs to see everything on the page !
If scanning from a book, avoid light leaking onto the image. MAKE SURE you apply plenty of pressure onto the spine.
Don’t scan in multi-page sheets. Scan one page per pass.
Don’t waste a lot of time trying to process handwritten manuscripts.
12 SmartScore 64 MIDI WindowsQRG E2021-1.2 Scanning music
Start scanning BL
BL
GR
Once the first page is properly positioned...
a) Click on the Scan Music button in the SmartScore Task Window or ...
b) Click the Scan button from the toolbar in the Input/Output tab or ...
Resolution (DPI)
c) From the main menu, select File> Scan Music>Acquire. Auto-resolution allows
SmartScore to determine
the optimum resolution for
each page. Turn off “Au-
Define a bounding box to-resolution” if necessary.
SmartScore’s Scanning Interface (300 dpi is nominal.)
The bounding box defines
the area that will be scanned.
The Scan dialog box will immediately open and a low- Leave some room on all sides
resolution image should quickly appear in the preview pane. of the image.
SmartScore’s scanning interface controls your scanner’s
settings. By default, Automatic Resolution is selected. This
allows SmartScore to choose the optimum resolution for
each page. If you wish to set resolution manually, uncheck
Resolution and enter your desired setting, e.g. 300 dpi.
1. Once previewed, user your cursor to drag a box around the
image of the music leaving about 1/4“ of white on all sides.
2. Uncheck Auto-Resolution if you wish to set DPI manually.
3. Click on Final Scan to begin scanning the first page.
4. If you wish to review the scan again, push Preview.
Should a dialog box appear, Scanning resolution is too low/too
Final Scan
high - Reset / Ignore, it is most likely due to variations in staff line
widths which may have confused SmartScore's auto-resolution Click to initiate scanning
for the previewed page.
algorithm. If so, you would normally choose Reset and manually
You will have the opportu-
set the resolution to 300 dpi.
nity to scan the next page.
SmartScore 64 MIDI Windows 13Scanning music QRG E2021-1.2
Scanning multiple pages
SmartScore allows you to scan and recognize multiple music pages. When finished, all scanned pages are grouped into a multi-page file format (CCITT
Group 3 TIF format). Following recognition, each scanned page becomes a page in SmartScore’s .ENF file format.
Scanning successive pages ...
1. After scanning the first page, you will be prompted to place the
next page into the scanner. Click Next Page after
2. Click the Next Page button. Continue this process for all each page of your score is
scanned until ....
remaining pages.
Once you’ve scanned the
When you have scanned all the pages of your score... last page of the score, click
Finish. If you wish to inter-
rupt the scanning process,
1. Click the Finish. click Cancel.
2. You will be prompted to Save As and Begin Recognition or
Open Pages in Image Editor.
NOTE: We always recommend you open your scanned music in We always recommend
SmartScore’s Image Editor. This will allow you to fine-tune darkness/ you open your scanned
lightness of greyscale images using the Thresholding tool. You will music in SmartScore’s Im-
age Editor. This will allow
also be able to De-skew, Crop, Draw, Erase and Cut and paste the
you to fine-tune
images prior to Recognition. darkness/lightness of
greyscale images using
the Thresholding tool.
You will also be able to
Processing PDF files... De-skew, Crop, Draw,
If you've downloaded PDF files from the Internet or saved your scanned music sheets as PDF, then you can move directly to Erase and Cut & paste
Recognition. Select File > Open, browse to your PDF file location and double-click on the filename. The PDF file will automatically objects inside the images
prior to recognizing the
convert to multi-page TIF and open in SmartScore's Image Editor for previewing, editing and recognition. Or simply push the
scan.
Recognition button in the Input / Output toolbar. For more information on processing PDF files see Page 19.
See Page 20 for more information on working with the Image Editor.
14 SmartScore 64 MIDI WindowsQRG E2021-1.2 Recognition
Saving scanned files and converting PDF files BL
BL
Filename GR
In SmartScore, you’re always working with two files: the scanned Enter a name and Save the
file (TIF or PDF) and the recognized file (ENF). If you click on the converted .TIF file. When
button Save and start recognition after scanning or a PDF con- recognition begins, the name
version or if you call up the save function in the image editor, you you give will be assigned to the
resulting SmartScore .ENF file.
can save your note templates in the TIF graphic file format.
!
BLACK
BLUE
Recognition
GREY
TIFF CCITT G4
This is the preferred file type.
The Begin Recognition Window Other file types may not be
able to save multiple pages
The Begin Recognition window will open after the last page or have the same high level of
is scanned or whenever you activate the following ... lossless compression.
a) Click the Recognition button in the Task Window.
b) Click the Recognition button in the Input / Output toolbar.
c) Select File > Recognize from the main menu.
Scanning Outside of SmartScore
In some cases, whether with an older scanner or one without a WIA driver, SmartScore's scanning interface may not be available. If so, simply use the software that
installed with your scanner or use an 3rd party imaging app to scan in your music. Be sure to follow these guidelines:
1. Look for scanner “Settings” (sometimes called “Advanced”, “Details”, “More”, etc.)
2. Resolution = 300 dpi (As a rule, this will be the optimum resolution. Scores with smaller print can be scanned at 400-600 dpi).
3. Image Type = Greyscale (sometimes referred to as “Text” or “Document”. Never scan in “Color” or “Black & White”.
4. Format = PDF (most scanners will not save multiple pages as a multi-page .TIF file).
5. Carefully scan in all your pages. You should be prompted to scan “next page” until you are finished. Then select “Finished”.
See Page 19 for more information on PDF recognition.
SmartScore 64 MIDI Windows 15Recognition QRG E2021-1.2
Once pages are scanned and saved, you can now begin the recognition process. Recognition is activated after scanning or from inside the Image Editor,
pages are automatically loaded into the Begin Recognition window.
Preview and Options List of pages Add Files to List...
The Preview tab allows you to view each All pages contained in your TIF or PDF file appear, in If you find one or two pages were mis-
scanned page prior to recognition. order, inside the list of pages window pane. Individual scanned, you can easily remove and
The Options tab includes various preset pa- pages can be added, removed, reordered, and re-saved replace the bad pages with good. Simply
rameters that may assist in recognition. into a highly-compressed CCITT 3 TIF file format. Remove, Add and Move pages up or down.
Reorder pages
Select one or more pages
and press the Move Up or
Move Down button.
Re-save list of pages
Recombine selected TIF-
pages into a single, multi-
page, highly-compressed
image file (CCITT Group 3
FAX format).
!
BLACK
BLUE
GREY
Begin Recognition
Click to begin the Recognition
process on pages shown in
Recognition Options
the List of Pages.
The most common and useful options are pre-selected.
Normally, you can simply accept the pre-selected defaults.
16 SmartScore 64 MIDI WindowsQRG E2021-1.2 Recognition
Recognition Options
You may or may not want to recognize specific elements in your scanned score. The Options tab in the Begin Recognition window contains a list of those
elements; some of which are selected and some which are ignored by default. In general, selected default should simply be accepted.
1
1 Tuplet numeral
1
2 Pedal markings
3 Bowings
2 4 Hymnal Fonts (stubby flagged notes)
2 2 2
2 2 Ossias
5
3
3
4 4
5
NOTE: If you need more recognition options, check the Musitek website for upgrades.
SmartScore 64 MIDI Windows 17Recognition QRG E2021-1.2 The Recognition Process 1. Ensure all pages of your score are loaded in proper order. Re-order list of pages, if necessary with Move Up or Move Down buttons. NOTE: Once pages are recognized and a SmartScore .ENF file is created, you will not be able reorder pages or append one file to another. 2. Select or change default Recognition Options. 3. Click Begin Recognition button. 4. Wait for the recognition function to complete. It shouldn’t take more than a few seconds for each page. 5. Following recognition, a System Report will appear. We recommend you check the number of parts in Largest System Found before continuing to the ENF editor. NOTE: While you are able to reconnect “broken” systems in the editor, you will not be able to break a system up into smaller ones. 6. If System Report looks good, select the default button, Open SmartScore File. If not, Open Image Editor will allow you to make changes to the image (such as erasing lines that mistakenly connect one system to another or using the Line Draw tool to reconnect broken system brackets). After that, you can re-recognize again. Open Super System will allow you confirm the correct number of parts were recognized and nothing more. 7. In the Unify Score window, we recommend you accept the default, Based on Topmost Staff line. NOTE: If yours is an orchestral score with “optimized” system (disappearing/reappearing parts), we suggest un-checking the Unify Key Signatures. 18 SmartScore 64 MIDI Windows
QRG E2021-1.2                                                                                           Processing PDF files

Processing PDF files
                                                                                                                    !
                                                                                                                      BLACK        BL

                                                                                                                      BLUE         BL

                                                                                                                      GREY         GR

The Internet provides access to vast quantities of printed sheet music in PDF format
ready to download and recognize using SmartScore. Processing a PDF file is simple ...

                                                                                                BLACK

1. Select File > Open and browse to the location of the PDF file you wish to work on.
                                                                                                BLUE

                                                                                                GREY

2. Double-click on the PDF filename. It will immediately begin converting to .TIF.
3. Following conversion, all score pages will open in SmartScore’s Image Editor.                BLACK

4. Check the quality of the image. Use the Thresholding tool to darken or lighten the
                                                                                                BLUE

                                                                                                GREY

   scanned image. You can preview the change before saving the change.

                                                                                            !
                                                                                                BLACK

5. Push the Begin Recognition button in the Input/Output toolbar (or select
                                                                                                BLUE

                                                                                                GREY

   File > Recognition from the main menu). The Recognition window will open and all
   converted pages will appear in the list of pages. Push Begin Recognition.

      What if the PDF fails to recognize?
      a) Check that the number of pages in the list of pages does not exceed 50 pages.
      b) Check that the PDF is greyscale or bitmap, not color.
      c) If you get a warning that the PDF is password-protected, try printing it out and
      then scanning the pages in.

SmartScore 64 MIDI Windows                                                                                                    19
Image Editor QRG E2021-1.2
Image Editor
Working with the Image Editor in SmartScore
When you open a .PDF file or a scanned or saved .TIF file in SmartScore, it will automatically appear in the Image Editor as a black and white image. If the
image file is multi-page, the first page always shows first. Use the paging buttons to step through each page as necessary. The Image Editor can be used
to correct imperfections that may affect recognition such as skewed/tilted pages, missing system brackets and removal of black masses due to light
leakage. The image editor can also be launched from inside the Task Window at program startup.
Edit Menu
Basic functions available in the
Image Editor are listed and
activated here.
Toolbar
!
BLACK
Here are tools such as the Selector,
BLUE
GREY
Skew corrector, Page delete, Line draw
Recognition and Erase tools.
Remember that the image you see
in the Image Editor is just that, an
image. Before you can do anything
with the music itself, the image
must be processed by SmartScore’s
recognition engine.
This Manual was written and designed for Musitek by DocJoeLin, Germany (2019 - January 2021).
20 SmartScore 64 MIDI WindowsQRG E2021-1.2 Image Editor
Functions of the Image Editor toolbar
1 2 3 4 5 6 7 8 9 10 11 12 13 14 15 16 17
1 Open and Save files. 9 Skew correction: Drag a line across a horizontal staff line to
straighten pages that are crooked. This improves accuracy (see
2 Scan: Activate connected scanner.
Page 23).
3 Begin Recognition: When you are satisfied with the edited image, 10 Invert image: Reverses scans that may appear white on black.
push here to start the recognition process.
11 Delete page: Click to delete the displayed page (see Page 23).
4 Zoom: Zoom in and out of image.
12 Draw tool: Create a line by free-drawing with the mouse.
5 Paging buttons: Page forward or page back.
13 Line tool: Create a straight line. See Line thickness and Erase.
6 Rotate page: Use to correct upside down or sideways pages.
14 Line thickness: Select the thickness of the line, free draw or
7 Selector tool: Use to select an area to be deleted (such as large
eraser.
black masses) or to copy and paste a portion of the music image
(see Page 22). 15 Eraser: Click to turn free draw or line draw tool into an eraser.
8 Cropping tool: Use to define a region of the image for cropping 16 Thresholding tool: If your image file was scanned in greyscale
which will remove everything outside the cropping frame (see (and it should be), this tool will let you fine-tune the balance
Page 22). between lightness and darkness of the image (see Page 24).
17 Undo / Redo: Undo or redo prior action or several prior actions.
Click on the selector box to the right of the icon to reverse multiple
actions.
SmartScore 64 MIDI Windows 21Image Editor QRG E2021-1.2
Useful Image Editor tricks
Good recognition is always starts with a good image. Here are some hints that may help give better results ...
1 Delete unnecessary elements that aren’t necessary DEL
BLACK
BLUE
SmartScore will pick up most everything on the page. You may GREY
want to remove text fragments, graphic elements, handwritten
notes or stubborn artifacts prior to recognition.
1. Click on the Selector tool button..
2. Click and drag a box around the area in question.
3. Hit the Delete button on your keyboard to erase whatever is
inside the bounding box.
2 Crop the image to reveal only the music
Often light can leak onto the side of a scanned page and appear
as a dark mass. Leaks can affect recognition quality. Using the
Crop tool can quickly eliminate such noise.
NOTE:
Cropping will change the resulting page size after recognition. That
is easily corrected later in Page Setup by selecting Center on Page.
1. Click on the Selector tool button..
2. Once selected, click the Crop tool button.
BLACK BLACK
BLUE BLUE
GREY GREY
22 SmartScore 64 MIDI WindowsQRG E2021-1.2 Image Editor
3 Correcting skewed pages
It’s not always easy to get pages squared up in the scanner.
There’s no need to rescan a crooked page when you can easily
straighten it in the Image Editor prior to recognition ...
1. Click on the De-skew tool.
2. Click and drag the red alignment line along any horizontal
staff line.
3. SmartScore will calculate the skew angle and correct it
automatically.
BLACK
BLUE
GREY
4 Delete pages not containing music
PDF scores downloaded from the Internet often include cover /
title pages, front matter, table of contents, etc. These pages
should be deleted in the Image Editor prior to recognition.
1. Once opened in the Image Editor, navigate to the first page
that does not contain music. BLACK
BLUE
2. Click the Delete page button.
GREY
3. Click the Page forward button and delete front matter and other
non-essential pages until the first page of music appears.
SmartScore 64 MIDI Windows 23Image Editor QRG E2021-1.2
5 Rotate pages 90° or 180°
Music is often published in Landscape format and must be scanned
with the head of the page along the side of the glass. This is not a
problem since you can rotate the page in the Image Editor.
1. Click the Left rotate or Right rotate, button to rotate each
page so that it becomes right-side-up. If the page was
scanned upside-down, click either rotate button twice to
rotate the page 180°.
BLACK BLACK
BLUE BLUE
GREY GREY
6 Thresholding tool BLACK
BLUE
If your score was scanned in grayscale (and hopefully it was),
GREY
you will be able to adjust it’s relative lightness / darkness to
achieve a nice balance of solid black symbols against a stark
white background.
NOTE: Thickness counts for good recognition accuracy !
1. In the Thresholding window, drag the slider a bit and push
Preview.
2. Examine the notation and compare. Repeat until you see a nice
balance between thick black lines against solid white back-
ground.
3. Once satisfied, click OK.
It’s not always necessary to apply thresholding. It’s useful only
if the original scan is particularly weak or too dark.
24 SmartScore 64 MIDI WindowsQRG E2021-1.2 Note Editor (ENF - TIF panes)
Note Editor (ENF - TIF view panes)
Following recognition, two panes appear. The top half in yellow displays the original scanned page (TIF pane). The bottom half in white displays
SmartScore’s recognized version (ENF pane). Under normal conditions, they should appear nearly identical. If not, that’s where the editor comes in.
Use your mouse wheel or the scroller along the right side to move up and down the page. Select the Zoom tool to move in and out of each view.
Tabbed Views Mini-console
Main Menu Each of these five tabs are organized based on Contains playback transport
Common functions are usage: File management / Notation editing / controls as well as spring-loaded
accessible from the menu Special tools / Playback / Image Editor. scrubber and positioning slider.
bar including custom
functions.
Notation Symbols
The most commonly-used
symbols are permanently
displayed on top of this
stack. “Last selected” TIF pane
symbols appear at the The original scanned page.
bottom of stack.
Open Symbol Selector
Click either of these buttons
to open the main Symbol
Selection window where all
symbols are organized into
groups by category. ENF pane
SmartScore’s recreation
after recognition.
Window Shade control
Pull the window shade up
or down to reveal more or
less of either pane.
SmartScore 64 MIDI Windows 25Note Editor (ENF - TIF panes) QRG E2021-1.2
Display formats
In SmartScore, you can arrange the arrangement of the TIF view (image template) and ENF view (recognition result) in the way that best suits your way
of working. The program is also extremely flexible when it comes to displaying the individual note pages within these views.
Choose how corresponding ENF and TIF panes behave
You can arrange the TIF and ENF views horizontally or vertically.
• The menu selection: Window > Split Screen allows you to dis-
play panes in either in Horizontal view or Vertical view.
Also, you can view a small area of the original scan corresponding
to your mouse position in the ENF pane:
• The menu selection: Window > Scan View Window > Show
displays a small, floating window of the area in the original
scan that corresponds to where your mouse is positioned in
the ENF pane. The floating Scan View window is resizable
and both views responds to Zoom control.
Another option is to remove the TIF view from the
program window and display it in a separate window
on a second monitor.
26 SmartScore 64 MIDI WindowsQRG E2021-1.2 Note Editor (ENF - TIF panes)
Arranging various page views
1 2 3
To the right in the status bar at the bottom of SmartScore’s window
are four buttons that will change how pages will be displayed:
• Horizontal view 1
• Vertical view 2
• Double page view 3
• Long view 4
4
The menu commands for these views can also be found here:
View > View Mode.
Show only ENF or only TIF pane Long View
You can choose to show only one pane by going This is a page-less, seamless view of the
to the menu selection: Window > View Window > entire score in linear format.
ENF only or TIF only .
SmartScore 64 MIDI Windows 27Noteneditor (TIFF/ENF-Ansicht) QRG E2021-1.2
Navigating inside the document
SmartScore offers various ways to navigate in and around ENF documents ...
Scrolling and moving
• Drag the scroller tab along the right side of the window up or down. TIF and ENF panes are synchronous and move together.
• Use the wheel of your mouse to move up and down.
• Use the Hand drag tool. The button is located in the Note Editor toolbar.
BLACK
BLUE
GREY
Zooming in and out
BLACK
•
BLUE
Select the Zoom tool button found in the Note Editor and Playback toolbars. Right click = zoom in. Left click = zoom out.
GREY
• With the zoom tool selected, zoom in and out by holding down the Ctrl button and rolling your mouse wheel up or down. BLACK
Ctrl
BLUE
•
GREY
To the far right of the status bar at the bottom of the window you will find another zoom command.
Jump to Measure / Page / Score part
•
BLACK BLACK
Use the Page forward / Page back buttons found in the toolbar of each tabbed view. BLUE
GREY
BLUE
GREY
• Click on either of the Part or Page selectors found in the status bar. The Go To dialog box
appears. Choose the measure you wish to jump to or select Page and choose a page then
press OK.
You can also use the keyboard shortcut CTRL + G to open the dialog box or use the menu
command View> Go To.
28 SmartScore 64 MIDI WindowsQRG E2021-1.2 Tabs & Toolbars
Tabs, Toolbars and their functions
Buttons that activate certain functions are organized into one of five activity tabs: File management (Input/Output), Editing (Note Editor), Advanced tools
(Tools), Playback and the Image Editor.
Note Editor toolbar
1 2 3 4 5 6 7
1 Properties tool: When activated, the Properties tool can be used 5 Contrapuntal voice colors: This button activates and deactivates
to investigate and change playback properties of many symbols contrapuntal voiceline colors (black, red, blue and green).
that are clicked on. It also activates staff & system spacing tabs
6 Voice Override: Occasionally, contrapuntal voices of one color or
(see Page 50).
another need to be reassigned to another color (voice).
2 Selector tool: The Selector tool is used to grab and highlight
7 Undo / Redo: Undo / Redo last edit action or with the action
objects by a dragging around them. Dragging over a range of
history list, you can undo/redo multiple actions by clicking and
measures with right-mouse down = Select temporary play
dragging to select any number of prior actions.
range.
3 Insert mode: When activated, symbols will drop wherever you
right click inside any active staff line (see Page 33).
4 Delete mode: When activated, right clicking on any object in the
active staff line will be deleted (see Page 33).
SmartScore 64 MIDI Windows 29Tabs & Toolbars QRG E2021-1.2
Tools toolbar (unique to Tools tab)
1 2 3 4
1 Unify key and time signatures: Activate this function if you want 3 Automatic beaming: When activated, this function will automati-
key and/or time signatures to become unified throughout the cally attempt to beam notes with values less than a quarter note
score. You can choose to unify based on the topmost staff line of into acceptable groupings.
each system or the first measure of the first system (helpful for
orchestral scores). 4 Tile Windows: Arranges all open documents in vertically split win-
dows so that they are visible at the same time.
2 Automatic spacing: When activated, this function will automati-
cally arrange notes and rests within the measure you are working
with. Symbols will become properly spaced based on the duration
value of each symbol in the measure (referred to as “pagination”).
NOTE: This tool may cause consternation. Use with caution.
Score Properties
Right-clicking inside any
active staff line will open
the Score Properties win-
dow containing a number
of important tools for
controlling and format-
ting the score.
BLACK
BLUE
GREY
30 SmartScore 64 MIDI WindowsQRG E2021-1.2 Editing the notation
Editing notation symbols
Inserting, changing and deleting notation symbols is probably the most important part of editing a SmartScore document. Since you’ll be starting off
with a lot music already on the page, it will be just as important to CHANGE an existing symbol as it is to insert one. Clicking on an existing symbol in
the score will change that symbol to the one you have just selected (it appears on your cursor). Here are the two methods of selecting notation symbols:
Selecting symbols
Choose the symbol you wish to edit. Quick-select (Ctrl + click) is the easiest method. Or you can pick any one of all possible symbols from the Symbol
Selection window.
1 Symbol palette and Symbol Selection window 2 Quick-Select (Ctrl + click)
• The most commonly-used symbols (notes and rests) are Unlike most notation programs that start with nothing, SmartScore
permanently displayed in two vertical columns (Symbols starts with A LOT of symbols on the page. The fastest way to select
palette). any symbol for editing is to use the Quick-Select method:
• To access all possible symbols, click the Open Symbol Hold the Ctrl button down and click on ANY symbol you wish to
Selection window button. Symbols will appear grouped select. The cursor will become that object then you’re ready to edit.
into basic categories for easy identification. You can now insert the symbol anywhere. You can even change an
object belonging to the same class (e.g. change a quarter note to a
16th note) simply by clicking on it.
Ctrl
F1
Function keys (F1 to F12)
You can also use the function keys on your computer F2
Whenever you select a symbol from the Symbol keyboard to open the Symbol Selection window and
Selector tool, it will temporarily appear in this column to switch between the different Symbol sections. ..
at the bottom of the palette. Six of the Last Used See next page and Page 86 for a complete list of .
symbols will stack up and rotate as they’re used. keyboard shortcuts.
F12
SmartScore 64 MIDI Windows 31Editing the notation QRG E2021-1.2
3 Keyboard Shortcuts 4 Quick-keys Map
(Left hand position)
Here are the most import and
keyboard shortcuts. Hold your index
finger over the “C” key and your hand
becomes perfectly positioned:
Shift: Nudge mode
Z: Cluster (chord) mode
X: Delete mode
C: Insert mode
Ctrl + click: Quick-Select
+ +
ESC Properties Tool Click Quick-Select (Ctrl + Click) Only Nudge Mode
1-9 Note Values 1-3 #, b, Natural 1-8 Rests
NOTE: Probably the most useful T Triplet 9 Playback Console R Rubato
of all the keyboard shortcuts is Y Glue / Unglue Selected Voices Q Zoom H Reposition
Quick-Select (Ctrl + left click). U Unify Key, Time, Clef Y Redo V Velocities
I Barline (Insert / Delete) A Auto-spacing , Crescendo Hairpin
Clicking on any existing symbol O Select Tool / Lasso G Go to Page / Measure . Decrescendo Hairpin
(note, rest, key signature, clef) will P Dynamic / piano L Part Linking
select that symbol for editing and A Beam Direction Toggle Z Undo
the cursor will display the newly- S Stem Direction Toggle
D Dot (Insert / Delete)
selected symbol. F Change Half-beam Direction
...
G Delete Selected Articulations Symbol Selection Window
H Split Selected Clusters Notes (F1), Accidentals (F2),
L Swap Noteheads Rests (F3), Dynamics (F4),
Z Single / Cluster Articulations (F5), Tempo (F6),
Complete list X Delete Mode Caps Lock Active Staff Tuplets (F7), Text & Tools (F8),
Lock
See Page 86 for a complete C Insert Mode Key Signatures (F9), Time Signatures
list of keyboard shortcuts. V Tie (Insert / Delete) Space Play / Pause (F10), Clefs (F11), Balines &
B Beam Selected Notes , Rewind Repeats (F12)
32 SmartScore 64 MIDI WindowsQRG E2021-1.2 Editing the notation
Editing Notes (Selecting/Inserting/Deleting)
1. When you select a symbol, either with the Quick--Select method or from the Symbols Selection window, Insert mode is automatically
BLACK
BLUE
activated.
GREY
2. Automatic spacing is on by default. If not, we recommend it be activated prior to editing notes. BLACK
BLUE
BLACK
BLUE
3. To enter the selected symbol, simply position your cursor where you wan to drop the symbol
GREY GREY
BLACK BLACK
BLUE BLUE
GREY GREY
Colored measure?
Measures highlighted with a color (default = yellow) indicate
that there MAY be a rhythmic error somewhere in the measure.
Colored measures may be turned off and on in the menu,
View > Show > Error measure.
Deleting notation symbols
Deleting a single symbol is easily done by activating the Delete mode (hitting the “X” key on your keyboard).
1 How to delete any symbol
1. Press the X key on your keyboard to enter Delete mode. Or you can
BLACK
BLUE
click on the “Delete” button from the toolbar.
GREY
2. Position the arrow of the cursor over the object you wish to delete.
It will highlight in color. Left-click to delete the highlighted object.
SmartScore 64 MIDI Windows 33Editing the notation QRG E2021-1.2
2 Deleting specific symbols
1. You may need to delete a specific symbol and not anything nearby.
BLACK
BLUE
GREY
2. Select a symbol (Quick-Select or Symbol Selector). In this case, a
tenuto symbol needs to be deleted from a note head.
3. Click on the note head associated with the tenuto. Only the tenuto is
removed and not the note itself.
3 Delete a range of symbols using the Selector tool
1. Activate the Selector button from the toolbar or simply hit the O key. With your mouse, click and drag a box around the objects you wish
to delete. Selected objects will highlight in color. Hit the Delete key on your keyboard. All selected symbols will be removed.
A single click on any object can also be selected with the Selector tool.
BLACK
Del
BLUE
GREY
4 Delete multiple articulation symbols at once.
1. It may be difficult to select only certain articulations without highlighting notes and rests nearby. Here’s how ...
2. Hit the O key and drag a box roughly around the area containing articulations you wish to delete (such as slurs and hairpins).
3. Now hit the G key. Or you may select this menu item: Edit > Special > Delete Selected Articulations.
34 SmartScore 64 MIDI WindowsQRG E2021-1.2 Editing the notation
5 Selecting content from measures (partial content or all content) in measures and systems
1. Activate the Selector tool (“O” key). The Selector button is also found in the Note Editor toolbar.
2. To select specific symbols inside measures, LEFT-drag you mouse around the symbols you wish to delete. Symbols will highlight green.
You can shift the pitch of the selected notes (Shift + drag) or delete highlighted symbols with the Del key.
3. To remove ALL content from many measures, RIGHT-drag your mouse button and drag a frame inside multiple measures in a staff or multiple staves
of a system. When selected measures will turn blue. Push the Del key on your keyboard to delete.
Selector tool + LEFT-drag selects a specific Selector tool + RIGHT-drag selects ALL
BLACK
group of symbols within one or more BLACK
symbols within highlighted measures for
measures for the purpose of pitch-shifting the purpose of deleting. Partially-selected
BLUE BLUE
GREY GREY
(Shift+drag) or for deleting (Del key). measures will highlight blue and ALL
Highlighted symbols will turn green. symbols inside highlighted measures will
be removed with the Del key.
Removing LOTS of content at once
If you need to remove a large part of the score, the best method is to switch your view to Continuous View
(VIEW > View Mode > Long View). Or pick the continuous long view icon located at the far right of the status bar
along the bottom edge of the ENF view window. Zooming out will give you a bird’s eye view of the entire score.
SmartScore 64 MIDI Windows 35Editing the notation QRG E2021-1.2
Changing notation symbols
You can easily change the value of any existing symbol (note, rest, tempo or dynamic marking) by locating the same symbol then selecting
BLACK
BLUE
a different value. Once the cursor registers the new value, the symbol in place will inherit the new value when it is clicked on.
GREY
1 Changing the value of a given symbol
1. Quick-Select: The easiest way to change the value of a symbol is to locate a similar symbol nearby with the correct value. Quick-select the symbol
by holding down the Ctrl button and clicking on it. Your cursor will immediately inherit the symbol and it’s value. Then simply click on the symbol to be
changed. For example, Quick-select a half note. Notice the cursor inherits the symbol and its value. Then click on a nearby quarter note. The quarter
note immediately becomes a half note.
Ctrl
2. Of course you can always activate the Selector Tool and choose a new symbol and value.
BLACK BLACK
BLUE BLUE
GREY GREY
Shift
2 Changing note pitches
1. Hold the Shift key down (Nudge mode). Green control handles will appear.
2. Click inside the note head and drag to up or down to change its pitch (see
also Page 37).
36 SmartScore 64 MIDI WindowsQRG E2021-1.2 Editing the notation
3 Changing pitches of a group of notes
1. Choose the Selector tool (or hit the O key).
2. Click and drag a region around the notes you wish to shift pitches.
3. Hold down the Shift key (Nudge mode).
4. Click and drag ganged notes up or down to a new pitch. NOTE: This is not the usual method for transposition. See Transposition on Page 55.
BLACK
BLUE
Shift
GREY
The Nudge tool is found in the
Text & Tools category inside
Symbols Selection window.
Repositioning symbols using NUDGE mode Shift
Shifting symbols horizontally or vertically is done in Nudge mode. Hold the Shift key down and notice that most objects will appear with green control
“handles”. Drag note heads to change pitch up or down. Drag handles of other objects to move horizontally.
Tuplet angle Slur (legato) curve
Text controls Note stem length
Bar line drag
Horizontal
Repositioning
Note Pitch
Note head Beam angle
pitch shift
Hairpin positioning and angle controls Horizontal repositioning
SmartScore 64 MIDI Windows 37Editing the notation QRG E2021-1.2
Inserting notes and voices
We put as much engineering effort in SmartScore’s notation editor as we did building the Recognition module. Music is rich in its
BLACK
BLUE
complexity and therefore, any notation editor worth its salt must be able to cope with that complexity as well as with its exceptions.
GREY
1 Creating chord clusters
1. To add multiple note heads to an existing note stem, hit the Z key on
BLACK
BLUE
your keyboard.
GREY
2. Your cursor will show a double-note glyph and arrow. Position the pointer
over the existing note stem and click onto a line or space to insert the note
head.
3. Hit the X key and you will be able to delete single note heads from the cluster.
2 Adding another voice (Contrapuntal voices)
1. Select the note or rest you wish to insert as another voice.
BLACK
BLUE
GREY
2. Position your cursor exactly under or over the note or rest that corresponds
to the same beat (time slice) that they both will share.
3. The existing note will highlight PURPLE indicating notes are now synced.
4. Be sure that the stem direction of the new note is pointed in the opposite
direction as the original. BLACK BLACK
• Insert with left click = Note stem points in same direction as cursor.
BLUE BLUE
GREY GREY
• Insert with right-click = Note stem will insert in opposite direction as cursor.
Contrapuntal voice colors
The primary voice color is black and the
secondary voice color is red, etc. Voice
Swapping a note stem number and color can be changed using
You can easily change the stem direction of any note by the Voice Color button or suppressed
positioning your cursor over the note until it highlights then using the Voice Visibility button.
hit the S key on your keyboard. Or select from the menu:
Edit > Special > Swap stem direction).
38 SmartScore 64 MIDI WindowsQRG E2021-1.2 Editing the notation
Articulations, dots, ties and accidentals
BLACK
BLUE
GREY
1 Dots of Prolongation
1. Press the D key on your keyboard to activate a single dot.
2. Position your cursor over a note head you wish to attach a dot to.
The note will highlight in color, then click. Entering multiple dotted notes
Select your note value from the Notes category in the Symbols
3. To delete a dot, simply hit the X key and click on the note head again. Selection window. Then select the “dot” symbol located nearby.
Notes will insert with dots attached wherever you click.
2 Accidentals
1. The easiest way to select an accidental is to Ctrl + click (Quick-Select)
BLACK
BLUE
GREY
on any accidental you find nearby. Otherwise, you can hold the Ctrl
button down and hit the numerals 1, 2, or 3 on your keyboard.
2. Position your cursor over the note head you wish to attach an
accidental to and left-click.
Ctrl 1 Ctrl 2 Ctrl 3
3 Inserting individual articulations
1. Select the required articulation from the Symbol Selection window.
BLACK
BLUE
GREY
2. Click on the note head to attach the articulation near the note head
itself.
3. Click on the lower part of the note stem to attach the articulation to
the tip of the note stem.
Where you click matters
Clicking near the tip of the note stem attaches the articulation there. Clicking on the note head attaches it near there.
SmartScore 64 MIDI Windows 39Editing the notation QRG E2021-1.2
BLACK
4 Assigning an articulation to many notes at once
BLUE
GREY
1. Choose the Selector tool from the toolbar or simply hit the O key on
your keyboard.
2. If you see the articulation you want nearby, Ctrl + click on it. Otherwise,
choose and articulation from the Symbols Selection window.
BLACK
BLUE
3. Hit the C key on your keyboard or select Insert mode button from the GREY
toolbar.
4. Position your cursor over any of the highlighted notes and click. Your
selected articulation will attach to all highlighted notes.
To de-select a highlighted region, simply left-click outside of the active staff line.
5 Inserting Ties
1. The V key on your keyboard activates the Tie symbol.
BLACK
BLUE
GREY
2. Left-click on the first note head of a tied pair of note heads. A tie will
connect two adjacent notes of the same pitch.
3. The default shape of the arc depends on whether the note heads are
above or below the center staff line. To insert a tie with the opposite arc
shape, left-click.
Single tie / Multiple tie
If you need to insert a single tie (and ignore other notes in the same cluster)
you can find the single tie symbol in the Notes category of Symbols Selection
window.
40 SmartScore 64 MIDI WindowsQRG E2021-1.2 Editing the notation
Working with Grace Notes
Grace notes are a kind of ornament that precede and “lean into” the note that immediately follows. SmartScore 64 supports two types of grace notes:
the appoggiatura (with a slur mark) and the acciaccatura (with a slash mark). Grace notes can appear signally or joined together in a beam group.
• An appoggiatura sounds before the beat. It is heard before its ornamented note which plays precisely on the beat.
• An acciaccatura sounds on the beat. It’s ornamented note will be heard slightly after the beat. Acciaccaturas are
more accentuated than appoggiaturas.
1. To insert a grace note, open the NOTES sub-menu in the Symbol Locator
NOTE: Acciaccaturas will not sound if placed before the first note of a
tool and select either the appoggiatura icon (with a slur mark) or the
measure. If you wish to insert a grace note before the first note, it must
acciaccatura icon (with a slash mark). be an appoggiatura in order to be heard.
2. Choose a duration to be applied to the grace note by selecting an
appropriate note value. You must choose between an eighth and BLACK
thirty-second note. + or
BLUE
GREY
3. Click anywhere in the staff to insert.
4. You may insert more than one grace note. To beam multiple grace notes
together, activate the Selector Tool (Arrow or Esc key), draw a box so they
highlight then hit the “B” key.
Articulations over a range of notes
IMPORTANT
Certain articulations as well as tempo and dynamic markings are meant to be applied over a range of If the frame is dragged from top to
several notes. These include slurs (legatos), Crescendo/Decrescendo hairpins and dynamic markings. bottom, the symbol appears above the
notes. When dragging from bottom to
top, it appears below.
1 Slurs (Legatos)
BLACK BLACK
BLUE BLUE
GREY GREY
SmartScore 64 MIDI Windows 41You can also read