Vivado Design Suite User Guide - Release Notes, Installation, and Licensing UG973 (v2018.2) July 23, 2018 - Xilinx
←
→
Page content transcription
If your browser does not render page correctly, please read the page content below
Vivado Design Suite
User Guide

Release Notes, Installation,
and Licensing

UG973 (v2018.2) July 23, 2018
Revision History
The following table shows the revision history for this document.

                         Section                                    Revision Summary
                                     07/23/2018 Version 2018.2
Architecture Support                              Added new Architecture Support.
                                     06/06/2018 Version 2018.2
What’s New                                        Added What’s New details for the 2018.2 release.
Download Verification                             Added the Download Verification new section.
                                     04/12/2018 Version 2018.1
Intellectual Property (IP)                        Added new Intellectual Property updates.
                                     04/04/2018 Version 2018.1
What’s New                                        Added What's New details for the 2018.1 release.
Compatible Third-Party Tools                      Added latest version numbers for the Third-Party Tools
                                                  updates.
Checking Required Libraries                       Added the Checking Required Libraries new section.

Vivado Design Suite 2018.2 Release Notes                                        Send Feedback
                                                                                                           2
UG973 (v2018.2) July 23, 2018              www.xilinx.com
Table of Contents
       Chapter 1: Release Notes 2018.2
          What’s New . . . . . . . . . . . . . . . . . . . . . . . . . . . . . . . . . . . . . . . . . . . . . . . . . . . . . . . . . . . . . . . . . . . . . . 5
          Important Information . . . . . . . . . . . . . . . . . . . . . . . . . . . . . . . . . . . . . . . . . . . . . . . . . . . . . . . . . . . . . 8
          Known Issues . . . . . . . . . . . . . . . . . . . . . . . . . . . . . . . . . . . . . . . . . . . . . . . . . . . . . . . . . . . . . . . . . . . . 10

       Chapter 2: Architecture Support and Requirements
          Operating Systems . . . . . . . . . . . . . . . . . . . . . . . . . . . . . . . . . . . . . . . . . . . . . . . . . . . . . . . . . . . . . . . .       11
          Architectures . . . . . . . . . . . . . . . . . . . . . . . . . . . . . . . . . . . . . . . . . . . . . . . . . . . . . . . . . . . . . . . . . . . .   12
          Compatible Third-Party Tools . . . . . . . . . . . . . . . . . . . . . . . . . . . . . . . . . . . . . . . . . . . . . . . . . . . . . . .              13
          System Requirements . . . . . . . . . . . . . . . . . . . . . . . . . . . . . . . . . . . . . . . . . . . . . . . . . . . . . . . . . . . . .           14

       Chapter 3: Download and Installation
          Downloading the Vivado Design Suite Tools . . . . . . . . . . . . . . . . . . . . . . . . . . . . . . . . . . . . . . . . . . .                         16
          Download Verification. . . . . . . . . . . . . . . . . . . . . . . . . . . . . . . . . . . . . . . . . . . . . . . . . . . . . . . . . . . . .          17
          Installing the Vivado Design Suite Tools . . . . . . . . . . . . . . . . . . . . . . . . . . . . . . . . . . . . . . . . . . . . . .                    24
          Installing Cable Drivers . . . . . . . . . . . . . . . . . . . . . . . . . . . . . . . . . . . . . . . . . . . . . . . . . . . . . . . . . . . .        30
          Installing Windows Driver . . . . . . . . . . . . . . . . . . . . . . . . . . . . . . . . . . . . . . . . . . . . . . . . . . . . . . . . . .           30
          Uninstalling Cable Drivers . . . . . . . . . . . . . . . . . . . . . . . . . . . . . . . . . . . . . . . . . . . . . . . . . . . . . . . . . .          30
          Installing Linux Driver . . . . . . . . . . . . . . . . . . . . . . . . . . . . . . . . . . . . . . . . . . . . . . . . . . . . . . . . . . . . .       30
          Uninstalling Linux Driver . . . . . . . . . . . . . . . . . . . . . . . . . . . . . . . . . . . . . . . . . . . . . . . . . . . . . . . . . . .         31
          Adding Additional Tools and Devices . . . . . . . . . . . . . . . . . . . . . . . . . . . . . . . . . . . . . . . . . . . . . . . . .                   31
          Network Installations . . . . . . . . . . . . . . . . . . . . . . . . . . . . . . . . . . . . . . . . . . . . . . . . . . . . . . . . . . . . .         32
          Batch Mode Installation Flow . . . . . . . . . . . . . . . . . . . . . . . . . . . . . . . . . . . . . . . . . . . . . . . . . . . . . . .              34
          Obtaining Quarterly Releases . . . . . . . . . . . . . . . . . . . . . . . . . . . . . . . . . . . . . . . . . . . . . . . . . . . . . . .              37
          Uninstalling the Vivado Design Suite Tool . . . . . . . . . . . . . . . . . . . . . . . . . . . . . . . . . . . . . . . . . . . . .                     38
          Checking Required Libraries . . . . . . . . . . . . . . . . . . . . . . . . . . . . . . . . . . . . . . . . . . . . . . . . . . . . . . . .             39

       Chapter 4: WebTalk
          WebTalk Participation . . . . . . . . . . . . . . . . . . . . . . . . . . . . . . . . . . . . . . . . . . . . . . . . . . . . . . . . . . . . .         40
          Setting WebTalk Install Preference . . . . . . . . . . . . . . . . . . . . . . . . . . . . . . . . . . . . . . . . . . . . . . . . . .                  41
          Setting WebTalk User Preferences . . . . . . . . . . . . . . . . . . . . . . . . . . . . . . . . . . . . . . . . . . . . . . . . . . .                  42
          Checking WebTalk Install and User Preferences . . . . . . . . . . . . . . . . . . . . . . . . . . . . . . . . . . . . . . . .                           43
          Types of Data Collected . . . . . . . . . . . . . . . . . . . . . . . . . . . . . . . . . . . . . . . . . . . . . . . . . . . . . . . . . . . .         43

Vivado Design Suite 2018.2 Release Notes                                                                                       Send Feedback
                                                                                                                                                                  3
UG973 (v2018.2) July 23, 2018                                    www.xilinx.com
Transmission of Data . . . . . . . . . . . . . . . . . . . . . . . . . . . . . . . . . . . . . . . . . . . . . . . . . . . . . . . . . . . . . . 44

       Chapter 5: Obtaining and Managing a License
          Licensing Overview . . . . . . . . . . . . . . . . . . . . . . . . . . . . . . . . . . . . . . . . . . . . . . . . . . . . . . . . . . . . . . .         45
          Generating/Installing Certificate-Based Licenses . . . . . . . . . . . . . . . . . . . . . . . . . . . . . . . . . . . . . . .                           46
          Managing Licenses On Your Machine. . . . . . . . . . . . . . . . . . . . . . . . . . . . . . . . . . . . . . . . . . . . . . . . .                       52
          Using the Xilinx Product Licensing Site. . . . . . . . . . . . . . . . . . . . . . . . . . . . . . . . . . . . . . . . . . . . . . . .                   54

       Chapter 6: Older Release Notes
          Release Notes 2018.1 . . . . . . . . . . . . . . . . . . . . . . . . . . . . . . . . . . . . . . . . . . . . . . . . . . . . . . . . . . . . . 67
          Important Information . . . . . . . . . . . . . . . . . . . . . . . . . . . . . . . . . . . . . . . . . . . . . . . . . . . . . . . . . . . . 76
          Known Issues . . . . . . . . . . . . . . . . . . . . . . . . . . . . . . . . . . . . . . . . . . . . . . . . . . . . . . . . . . . . . . . . . . . . 78

       Appendix A: Additional Resources and Legal Notices
          Xilinx Resources . . . . . . . . . . . . . . . . . . . . . . . . . . . . . . . . . . . . . . . . . . . . . . . . . . . . . . . . . . . . . . . . . .     79
          Solution Centers. . . . . . . . . . . . . . . . . . . . . . . . . . . . . . . . . . . . . . . . . . . . . . . . . . . . . . . . . . . . . . . . . .      79
          Documentation Navigator and Design Hubs . . . . . . . . . . . . . . . . . . . . . . . . . . . . . . . . . . . . . . . . . . .                            79
          Licenses and End User License Agreements . . . . . . . . . . . . . . . . . . . . . . . . . . . . . . . . . . . . . . . . . . . .                         80
          Registered Guest Resources . . . . . . . . . . . . . . . . . . . . . . . . . . . . . . . . . . . . . . . . . . . . . . . . . . . . . . . .               80
          References . . . . . . . . . . . . . . . . . . . . . . . . . . . . . . . . . . . . . . . . . . . . . . . . . . . . . . . . . . . . . . . . . . . . . .   80
          Training Resources. . . . . . . . . . . . . . . . . . . . . . . . . . . . . . . . . . . . . . . . . . . . . . . . . . . . . . . . . . . . . . . .        81
          Please Read: Important Legal Notices . . . . . . . . . . . . . . . . . . . . . . . . . . . . . . . . . . . . . . . . . . . . . . . .                     81

Vivado Design Suite 2018.2 Release Notes                                                                                        Send Feedback
                                                                                                                                                                   4
UG973 (v2018.2) July 23, 2018                                     www.xilinx.com
Chapter 1

Release Notes 2018.2

       What’s New
       Vivado ® 2018.2 introduces the new production device support. Vivado 2018.2 also has
       additional ease of use improvements to ensure you can increase your overall efficiency and
       get your products to market faster.

       The following devices and features are also updated in this release.

       Device Support
       This release of Vivado introduces the following device related changes.

       The following devices are in production:

       •   Zynq UltraScale+ RFSoC:

           °   XCZU21DR (-1, -2, -2LE)

           °   XCZU25DR (-1, -2, -2LE)

           °   XCZU27DR (-1, -2, -2LE)

           °   XCZU28DR (-1, -2, -2LE)

           °   XCZU29DR (-1, -2, -2LE)
       •   XA Zynq UltraScale+ MPSoC:

           °   XAZU4EV (-1, -1L, -1Q)

           °   XAZU5EV (-1, -1L, -1Q)
       •   Defense-Grade Zynq UltraScale+ MPSoCs:

           °   XQZU5EG (-1M)

           °   XQZU5EV (-1M)
       •   Spartan-7

           °   XC7S6 (-1, -2, -1L)

           °   XC7S15 (-1, -2, -1L)

Vivado Design Suite 2018.2 Release Notes                                      Send Feedback
                                                                                                5
UG973 (v2018.2) July 23, 2018              www.xilinx.com
Chapter 1: Release Notes 2018.2

       •   Artix-7

           °   XC7A25T (-3)

           °   XC7A12T (-3)

       The following devices are enabled in Vivado WebPack:

       •   Spartan-7:

           °   XC7S6

           °   XC7S15
       •   XA Zynq UltraScale+ MPSoC:

           °   XAZU4EV

           °   XAZU5EV

       Vivado Tools
       System Generator for DSP
       •   Supported MATLAB Versions: R2017a, R2017b and R2018a.
       •   Support for Zynq UltraScale+ RFSoC production devices.

       Vivado HLS
       •   New Schedule Viewer accessible from the Analysis Perspective to graphically display
           dependencies of operations and control steps.
       •   Overall faster processing of source code embedded directives (pragmas).
       •   Redesigned dataflow directive checks to help guide toward optimal solution.
       •   Performance enhancements with both higher clock rates (+4% on average) and
           reduced design latency with 10% less clock cycles for design completion.
       •   Five additional math.h optimized functions for fixed-point data types (pow, abs, sincos,
           acos, and asin).
       •   Co-simulation waveforms are enhanced to clearly display DATAFLOW transactions.
       •   New DRCs added to the Vivado HLS GUI DRC tab to expedite timing closure and
           strengthen pragma checks.

       Model Composer
       •   Supported MATLAB Versions: R2017a, R2017b and R2018a.

Vivado Design Suite 2018.2 Release Notes                                     Send Feedback
                                                                                                  6
UG973 (v2018.2) July 23, 2018              www.xilinx.com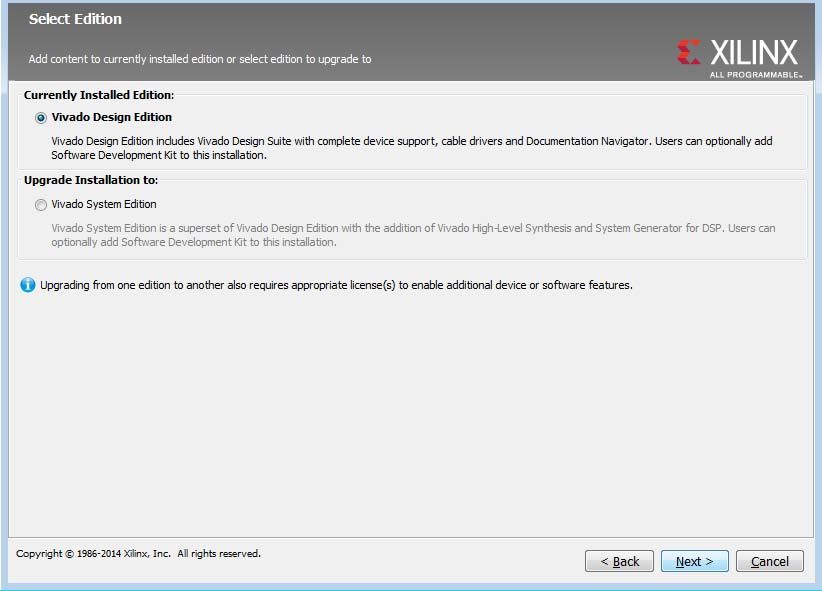
Chapter 1: Release Notes 2018.2

       •   New Color Detection Example: Color Detection algorithm to segment yellow traffic
           signs in input video stream, demonstrates how to use blocks from Model Composer
           library and how to import additional Xilinx-optimized reVISION xfOpenCV function to
           build a synthesizable design.
       •   Overflow Detection for Fixed-Point Data Types: Data Type Conversion block
           supports detection of Saturation and Wrap on Overflows for Fixed-point data type
           conversions in the design.
       •   Enhancements to C/C++ Function Import: Ease-of-use enhancements and Block GUI
           improvements make it easier to create and use Custom Blocks in your design through
           the C/C++ Function Import feature.
       •   Linear Algebra Block: New optimized QR Inverse block added into the Model
           Composer Linear Algebra library that contains the Hermitian, Matrix Multiply,
           Submatrix and Transpose blocks.

       Simulation Flows and Verification IP
       •   xsim.ini file now contains all the pre-compiled IP library mappings.

       Implementation
       •   Placement now includes replication by default to improve delays on high fanout nets.
           The -fanout_opt option is no longer needed and the -no_fanout_opt option is
           used to disable placer replication.

       Hierarchical Design Flows
       •   Tandem Configuration

           °   Xilinx PCIe IP for UltraScale+ devices supports Reconfigurable Stage Twos. When
               using the Tandem PCIe with Field Updates feature, users can select any compatible
               (i.e. implemented in context with the current stage 1 image) stage 2 bitstream to
               complete the initial configuration of the device. These stage 2 bitstreams are
               formatted as partial bitstreams and can therefore be used to dynamically
               reconfigure the user application while the PCIe link remains active. See PG213 for
               more information.
       •   Partial Reconfiguration

           °   Zynq-7000 devices with a single-core processor (Z-7007S, Z-7012S, Z-7014S) are
               now supported.

Vivado Design Suite 2018.2 Release Notes                                    Send Feedback
                                                                                                  7
UG973 (v2018.2) July 23, 2018              www.xilinx.com
Chapter 1: Release Notes 2018.2

       Xilinx Embedded Software and Tools
       •   Linux

           °   Non-secure partial bitstream support without Device Tree Overlay (DTO) through
               FPGA Manager.

           °   SDFEC Device Driver (public release).
       •   Secure Library Enhancements

           °   Enhanced Key Revocation with User eFuses.

           °   RSA 3072bit key support.

           °   Xilinx Secure Library (XilSecure) now supports decryption, commanded from Uboot,
               for Bootgen images encrypted with the device key.
       •   PetaLinux

           °   Ultra96 BSP (public release).

       Important Information
       Licensing
       The Vivado 2017.3 and beyond releases introduces the following changes in licensing that
       are listed below:

       •   Starting with Vivado 2017.3, activation licensing is no longer supported. Existing
           activation licenses have been replaced with certificate based license that can be
           accessed from www.xilinx.com/getlicense.
       •   Flexera version for license management tool has been upgraded to 11.14.1. Vivado
           2017.3 is the last release that will support Solaris operating system for Flex license
           management tools. Xilinx will continue to support Window and Linux operating
           systems for Flex license management tools.
       •   Anyone using floating license will require to upgrade licensing utilities to Flex 11.14.1.
           These new licensing utilities are available on download page of www.xilinx.com.
       •   Please note that Flex version upgrade does not affect valid license files, in other words,
           existing valid license files will work just fine with Vivado 2017.3 release after you
           upgrade licensing utilities.

Vivado Design Suite 2018.2 Release Notes                                       Send Feedback
                                                                                                    8
UG973 (v2018.2) July 23, 2018              www.xilinx.com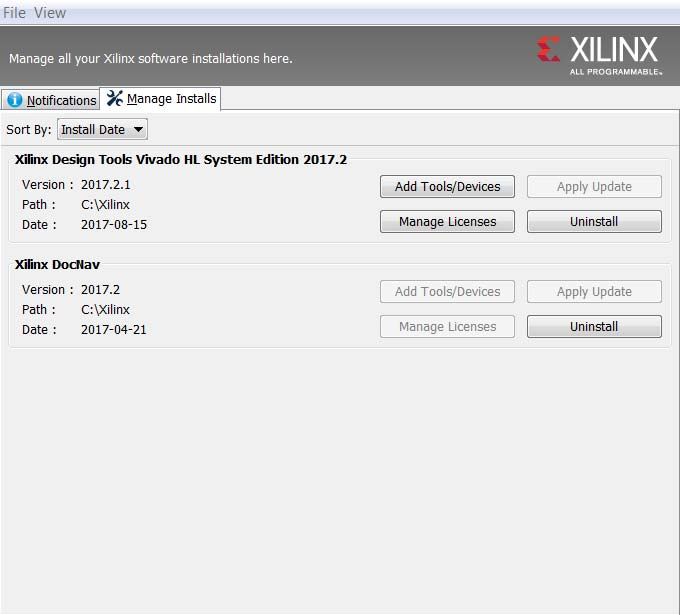
Chapter 1: Release Notes 2018.2

       Vivado Naming Conventions
       The following are the required naming conventions when working with the Vivado Design
       Suite. Failing to follow these naming conventions might introduce potential risk to the
       design or the tool, and cause unpredictable behavior in the design flow.

       •   Source files names must start with a letter (A-Z, a-z) and must contain only
           alphanumeric characters (A-Z, a-z, 0-9) and underscores (_).
       •   Output files names must start with a letter (A-Z, a-z) and must contain only
           alphanumeric characters (A-Z, a-z, 0-9) and underscores (_).
       •   Project names must start with a letter (A-Z, a-z) and must contain only alphanumeric
           characters (A-Z, a-z, 0-9) and underscores (_).
       •   Project directory names must start with a letter (A-Z, a-z) and should contain only
           alphanumeric characters (A-Z, a-z, 0-9), tilde (~) and underscores (_).

       CAUTION! The Windows operating system has a 260 character limit for path lengths which can affect
       the Vivado tools. To avoid this issue, use the shortest possible names and directory locations when
       creating projects, defining IP or managed IP projects, or creating block designs.

       The following characters are not supported for project, file, or directory names:

       •   !#$%^&*()`;?,[]{}'"|
       •   tab (\t)
       •   return (\r)
       •   new line (\n)
       •   / or \ (As part of the directory or file name rather than as a path delimiter)

       The following character is not supported for directory names:

       •   . (dot as terminal character)

       The following character is not supported for file or project names:

       •   @
       Note: In the Vivado IDE, the @ character is not supported for new file or project names. The Vivado
       IDE does allow an existing file on disk that uses the @ character to be added to a project. The Vivado
       IDE can open a project that includes the @ character in the project name. Using the Tcl Console, you
       can create a project with a name that contains the @ character.

       IMPORTANT: Spaces in directory and file names are supported by the Windows operating system.
       However, you should avoid using spaces in order to preserve portability of the project or files between
       the Windows and Linux operating systems.

Vivado Design Suite 2018.2 Release Notes                                              Send Feedback
                                                                                                             9
UG973 (v2018.2) July 23, 2018                 www.xilinx.com
Chapter 1: Release Notes 2018.2

       The Vivado Design Suite supports the use of forward slashes (/) as path delimiters for both
       Windows and Linux platforms. Backslashes (\) are allowed as path delimiters on the
       Windows platform only.

       Any characters not explicitly mentioned above are not supported for project, file, or
       directory names.

       Vivado Design Suite Documentation Update
       In the 2018.2 Vivado Design Suite Documentation release, not all documentation will be
       available at first customer ship. Use the Update Catalog button in DocNav to stay
       up-to-date with the 2018.2 documentation suite.

       Known Issues
       Vivado Design Suite Tools Known Issues can be found at Answer Record 70860.

Vivado Design Suite 2018.2 Release Notes                                     Send Feedback
                                                                                                10
UG973 (v2018.2) July 23, 2018              www.xilinx.com
Chapter 2
Architecture Support and Requirements
Operating Systems
Xilinx ® supports the following operating systems on x86 and x86-64 processor
architectures.
Microsoft Windows Support
• Windows 7 SP1 Professional (64-bit), English/Japanese.
• Windows 10.0 Fall Creators update (version 1709), 10.0 Version 1803 (64-bit),
English/Japanese.
Linux Support
• Red Hat Enterprise Workstation/Server 7.2, 7.3, and 7.4 (64-bit)
• Red Hat Enterprise Workstation 6.6, 6.7, 6.8, and 6.9 (64-bit)
• SUSE Linux Enterprise 11.4 and 12.3 (64-bit)
• CentOS 7.2, 7.3, and 7.4 (64-bit)
• CentOS 6.7, 6.8, and 6.9 (64-bit)
• Ubuntu Linux 16.04.3 LTS (64-bit)
Note: Please refer to PetaLinux Tools Documentation: Reference Guide (UG1144) [Ref 22] for more
information on Installation Requirements for supported Operating Systems with PetaLinux.
Vivado Design Suite 2018.2 Release Notes Send Feedback
11
UG973 (v2018.2) July 23, 2018 www.xilinx.comChapter 2: Architecture Support and Requirements
Architectures
The following table lists architecture support for commercial products in the Vivado Design
Suite WebPACK™ tool versus all other Vivado Design Suite editions. For non-commercial
support all Xilinx Automotive devices are supported in the Vivado Design Suite WebPACK
tool when available as production devices in the tools.
Table 2-1: Architecture Support
Vivado WebPACK Tool Vivado Design Suite
(All Other Editions)
Zynq® Device Zynq-7000 SoC Device Zynq-7000 SoC Device
• XC7Z010, XC7Z015, XC7Z020, • All
XC7Z030, XC7Z007S, XC7Z012S, and
XC7Z014S
Zynq® UltraScale ™ + UltraScale+ MPSoC UltraScale+ MPSoC
MPSoC • XCZU2EG, XCZU2CG, XCZU3EG, • All
XCZU3CG XCZU4EG, XCZU4CG,
XCZU4EV, XCZU5EG, XCZU5CG,
XCZU5EV, XCZU7EV, XCZU7EG, and
XCZU7CG
Zynq® UltraScale+™ Zynq® UltraScale+™ RFSoC Zynq® UltraScale+™ RFSoC
RFSoC • None • All
Virtex® FPGA Virtex-7 FPGA Virtex-7 FPGA
• None • All
Virtex UltraScale ™ FPGA Virtex UltraScale FPGA
• None • All
Virtex UltraScale+ FPGA
• All
Kintex® FPGA Kintex-7 FPGA Kintex-7 FPGA
• XC7K70T, XC7K160T • All
Kintex UltraScale ™ FPGA Kintex UltraScale FPGA
• XCKU025, XCKU035 • All
Kintex UltraScale+ FPGA Kintex UltraScale+ FPGA
• XCKU3P. XCKU5P • All
Artix ® FPGA Artix-7 FPGA Artix-7 FPGA
• XC7A12T, XC7A15T, XC7A25T, • All
XC7A35T, XC7A50T, XC7A75T,
XC7A100T, XC7A200T
Spartan ®-7 Spartan-7 Spartan-7
• XC7S6, XC7S15 • All
• XC7S25, XC7S50
• XC7S75, XC7S100
Vivado Design Suite 2018.2 Release Notes Send Feedback
12
UG973 (v2018.2) July 23, 2018 www.xilinx.comChapter 2: Architecture Support and Requirements
Compatible Third-Party Tools
Table 2-2: Compatible Third-Party Tools
Third-Party Tool Red Hat Red Hat SUSE Windows-7/10 Windows-7/10 Ubuntu
Linux Linux-64 Linux 32-bit 64-bit
Simulation
Mentor Graphic ModelSim
Yes Yes Yes Yes Yes N/A
SE/DE/PE (10.6c)
Mentor Graphics Questa
Yes Yes Yes Yes Yes N/A
Advanced Simulator(10.6c)
Cadence Incisive Enterprise
Yes Yes Yes N/A N/A N/A
Simulator (IES) (15.20.042)
Cadence Xcelium Parallel
Yes Yes Yes N/A N/A N/A
Simulator (17.10.005)
Synopsys VCS and VCS MX
Yes Yes Yes N/A N/A N/A
(N-2017.12)
The MathWorks MATLAB®
and Simulink® (R2017a, Yes Yes No N/A Yes No
R2017b, and R2018a)
Aldec Active-HDL (10.4a)(1) N/A N/A N/A Yes Yes N/A
Aldec Riviera-PRO
Yes Yes Yes Yes Yes N/A
(2017.10 )
Synthesis(2)
Synopsys Synplify/Synplify
Yes Yes Yes Yes Yes N/A
Pro (M-2017.03-SP1)(3)
Mentor Graphics Precision
Yes Yes Yes Yes Yes N/A
RTL/Plus (2016.1)
Equivalence Checking
Cadence Encounter
Yes Yes Yes N/A N/A N/A
Conformal (9.1) (4)
OneSpin 360 (2016_12) Yes Yes Yes N/A N/A N/A
Notes:
1. Support for Aldec simulators is offered by Aldec.
2. Most Vivado IP can only be synthesized by Vivado synthesis, because the RTL source can include encrypted files.
To use this IP in a third-party synthesis flow, the synthesized netlist can be exported from the Vivado tool in a
suitable format for use in the third-party synthesis project.
3. Contact Synopsys for availability of Synplify Overlay or Service Pack.
4. Cadence Encounter Conformal Support is for RTL2Gate using Synopsys Synplify only.
IMPORTANT: The versions listed in Table 2-2 are the minimum required versions to use with the Vivado
tools. Previous versions are not tested.
Vivado Design Suite 2018.2 Release Notes Send Feedback
13
UG973 (v2018.2) July 23, 2018 www.xilinx.comChapter 2: Architecture Support and Requirements
System Requirements
This section provides information on system memory requirements, cable installation, and
other requirements and recommendations.
The lab exercises require the installation of MATLAB 2014a (or later) and Vivado Design
Suite 2014.2 (or later).
System Memory Recommendations
For memory recommendations for the Vivado Design Suite tools, see: System Memory
Requirements.
Operating Systems and Available Memory
The Microsoft Windows and Linux operating system (OS) architectures have limitations on
the maximum memory available to a Xilinx program. Users targeting the largest devices and
most complex designs might encounter this limitation. The Vivado Design Suite has
optimized memory and enabled support for applications to increase RAM memory
available to Xilinx tools.
Cable Installation Requirements
Platform Cable USB II is a high-performance cable that enables Xilinx design tools to
program and configure target hardware.
Note: The Xilinx Parallel Cable IV is no longer supported for debugging or programming.
RECOMMENDED: To install Platform Cable USB II, a system must have at least a USB 1.1 port. For
maximum performance, Xilinx recommends using Platform Cable USB II with a USB 2.0 port.
Vivado Design Suite 2018.2 Release Notes Send Feedback
14
UG973 (v2018.2) July 23, 2018 www.xilinx.comChapter 2: Architecture Support and Requirements
The cable is officially supported on the 64-bit versions of the following operating systems:
Windows-7, Windows-10, Red Hat Linux Enterprise, and SUSE Linux Enterprise 12.
Additional platform specific notes are as follows:
• Root privileges are required.
• SUSE Linux Enterprise 11: The fxload software package is required to ensure correct
Platform Cable USB II operation. The fxload package is not automatically installed on
SUSE Linux Enterprise 11 distributions, and must be installed by the user or System
Administrator.
For additional information regarding Xilinx cables, see the following documents:
• Platform Cable USB II Data Sheet (DS593) [Ref 13]
Equipment and Permissions
The following table lists related equipment, permissions, and network connections.
Table 2-3: Equipment and Permissions Requirements
Item Requirement
Directory permissions Write permissions must exist for all directories containing design files to be
edited.
Monitor 16-bit color VGA with a minimum recommended resolution of 1024 by 768
pixels.
Ports To program devices, you must have an available parallel or USB port
appropriate for your Xilinx programming cable. Specifications for ports are
listed in the documentation for your cable.
Note: Installation of the cable driver software requires Windows-10. If
you are not using one of these operating systems, the cables might not
work properly.
Note: X Servers/ Remote Desktop Servers, such as Exceed, ReflectionX, and XWin32, are not
supported.
Network Time Synchronization
When design files are located on a network machine, other than the machine with the
installed software, the clock settings of both machines must be set the same. These times
must be synchronized on a regular basis for continued proper functioning of the software.
Vivado Design Suite 2018.2 Release Notes Send Feedback
15
UG973 (v2018.2) July 23, 2018 www.xilinx.comChapter 3
Download and Installation
This guide explains how to download and install the Vivado® Design Suite tools, which
includes the Vivado Integrated Design Environment (IDE), High Level Synthesis tool, and
System Generator for DSP and Model Composer.
Downloading the Vivado Design Suite Tools
Xilinx ® Design Tools users have multiple choices for download and installation.
Xilinx introduced Vivado Lab Edition, which features a dedicated and streamlined
environment for programming and debugging devices in lab settings.
TIP: No license is required to use Vivado Lab Edition tools.
For users wishing to install one of the full Vivado Editions, there are three choices.
Vivado Design Suite - HLx Editions:
• WebPack and Editions: Web installer for windows
• WebPack and Editions: Web installer for Linux
• All OS Single File Download
All Editions and download options are available on the Xilinx website: Downloads
For the optimum download experience:
• Allow pop-ups from https://www.o-ms.com/.
• Set security settings to allow for secure and non-secure items to be displayed on the
same page.
To download a full Edition of the Vivado Design Suite:
1. Select the Vivado Design Tools tab in the web page.
2. Under the Version heading, click the version of the tools you want to download.
3. Click the link for the installer you want to download.
Vivado Design Suite 2018.2 Release Notes Send Feedback
16
UG973 (v2018.2) July 23, 2018 www.xilinx.comChapter 3: Download and Installation
To download the Vivado Lab Edition tools, go to the Vivado Design Tools tab, select a
version of 2017.1 or newer, and download the file associated with the Vivado Lab Edition.
Note: The Full Edition installers work only on 64-bit machines.
Download Verification
Digest, Signature and Public Key are provided on download page for the purpose of
download verification.
Download verification allows users to prove the authenticity and integrity of downloaded
file with fair degree of certainty. Authentication validates that downloaded file was created
by the signee, in this case signee is Xilinx Inc. In other words, it shows that downloaded file
is not forged by a third party. Integrity validates that contents of downloaded file are not
tampered by third party. In summary, download verification allows users to validate if
downloaded file indeed is prepared by Xilinx and if the contents of the downloaded file
have been altered or not.
RECOMMENDED: Download verification step is completely optional but highly recommended – users
can skip following steps to install the tools, right after downloading it from downloads page on Xilinx
website.
Note: The download verification does not apply to Windows based downloads. Windows
executables are signed with Extended Validation Code Signing Certificates. Microsoft’s
SmartScreen® Application Reputation filter will produced warnings for downloaded files that have
been tampered in any way.
There are two ways users can verify the authenticity and integrity of downloaded file. Please
pick one or both of the following methods to ensure the authenticity and integrity of
downloaded file.
1. Verifying the Signature
2. Verifying the Digest.
For both of the above methods, users are required to download, import and trust the public
key.
Download, Import and Trust Xilinx Public Key
Download Xilinx Public Key
Xilinx public key can be downloaded from download page on Xilinx website. The key name
for Xilinx public key is - xilinx-master-signing-key.asc.
Vivado Design Suite 2018.2 Release Notes Send Feedback
17
UG973 (v2018.2) July 23, 2018 www.xilinx.comChapter 3: Download and Installation
X-Ref Target - Figure 3-1
Figure 3-1: Digest, Signature, and Public Key on Download Page
Import Public Key with GPG
After the Xilinx public key is downloaded, the next step is to import the public key with GPG.
You can use following command to import Xilinx’s public key.
gpg --import ./xilinx-master-signing-key.asc
The output of successfully import key should look like below.
X-Ref Target - Figure 3-2
Figure 3-2: Import Public Key
Trust Xilinx Public Key
Once you have confirmed that you have downloaded and imported the legitimate Xilinx
public key, you can now set the trust level to “ultimate”. This will allow verification of the key
signed by Xilinx.
Vivado Design Suite 2018.2 Release Notes Send Feedback
18
UG973 (v2018.2) July 23, 2018 www.xilinx.comChapter 3: Download and Installation
1. Use following command to first list the public keys:
gpg --list-keys
X-Ref Target - Figure 3-3
Figure 3-3: List Keys
2. Use the following command to specify the key that needs to be edited.
gpg --edit-key 0x85D4B4BB1D692FDB
X-Ref Target - Figure 3-4
Figure 3-4: Edit Keys
3. Use the following command to set the trust level for the legitimate key.
trust
Vivado Design Suite 2018.2 Release Notes Send Feedback
19
UG973 (v2018.2) July 23, 2018 www.xilinx.comChapter 3: Download and Installation
X-Ref Target - Figure 3-5
Figure 3-5: Trust Keys
4. Enter 5 at the prompt.
Vivado Design Suite 2018.2 Release Notes Send Feedback
20
UG973 (v2018.2) July 23, 2018 www.xilinx.comChapter 3: Download and Installation
X-Ref Target - Figure 3-6
Figure 3-6: Set Ultimate Trust for the Key
Now that you have downloaded, imported and trusted the Xilinx public key – you can
ensure the authenticity and integrity of the downloaded file by verifying the signature or
verifying the digest. Please note that you can pick one or both of methods to ensure the
authenticity and integrity of downloaded file.
Verifying the Signature
In order to verify the downloaded file that matches its signature, you need to download the
signature file from download page on Xilinx website.
Once the signature file has been downloaded and stored, you can run following command
to verify the signature.
gpg -v --verify Xilinx_Vivado_SDK_Web_2018.2_0410_1926_Lin64.bin.sig
Xilinx_Vivado_SDK_Web_2018.2_0410_1926_Lin64.bin
Vivado Design Suite 2018.2 Release Notes Send Feedback
21
UG973 (v2018.2) July 23, 2018 www.xilinx.comChapter 3: Download and Installation
X-Ref Target - Figure 3-7
Figure 3-7: Signature Verification
Verifying Digest
This is an alternative verification method to ensure the authenticity and integrity of
downloaded file. This method uses the “digest” or “hash values” which is the output of
various cryptographic hash functions. In order to verify the downloaded file using digest,
you need to download the digest file from download page on Xilinx website. The current
digest file support MD5, SHA1, SHA256, SHA512 hashing algorithms.
Once the digest file has been downloaded and stored, you need to first authenticate the
digest file to make sure that it is indeed coming from Xilinx Inc.
Authenticate Digest File
Run the following command to verify the signature that ensures that digest file is indeed
coming from Xilinx Inc.
gpg -v --verify Xilinx_Vivado_SDK_Web_2018.2_0410_1926_Lin64.bin.digests
Vivado Design Suite 2018.2 Release Notes Send Feedback
22
UG973 (v2018.2) July 23, 2018 www.xilinx.comChapter 3: Download and Installation
X-Ref Target - Figure 3-8
Figure 3-8: Authenticate Digest File
Now after the authentication is done, you can verify the digest either by using hashing
executable or by using OpenSSL.
Using Hashing Executable
You can run following command to verify the digest using hashing executable – sha256.
Please note you can use other hashing executable as well such as md5sum, sha1sum,
sha512sum.
sha256sum -c Xilinx_Vivado_SDK_Web_2018.2_0410_1926_Lin64.bin.digests
X-Ref Target - Figure 3-9
Figure 3-9: Verify Using Hashing Executable
Vivado Design Suite 2018.2 Release Notes Send Feedback
23
UG973 (v2018.2) July 23, 2018 www.xilinx.comChapter 3: Download and Installation
Using OpenSSL
You can also verify the digest using OpenSSL – run following command to verify the digest
using OpenSSL. Output of the command is a computed hash value that you need to
compare to the contents of digest file.
openssl dgst -sha256 Xilinx_Vivado_SDK_Web_2018.2_0410_1926_Lin64.bin
X-Ref Target - Figure 3-10
Figure 3-10: Verify Using OpenSSL
Installing the Vivado Design Suite Tools
This section explains the installation process for all platforms for the Vivado Design Suite.
Installation Preparation
IMPORTANT: Before starting installation the follow steps must be completed:
• Check the links in Important Information section in Chapter 1 for any installation issues
pertaining to your system or configuration.
• Make sure your system meets the requirements described in Chapter 2, Architecture
Support and Requirements.
• Disable anti-virus software to reduce installation time.
• Close all open programs before you begin installation.
• The Vivado Design Suite installer does not set global environment variables, such as
XILINX, on Windows.
Lab Edition, Full Product Download, or DVD
If you downloaded the Lab Edition or full product installation, decompress the file and run
xsetup (for Linux) or xsetup.exe (for Windows) to launch the installation. If you received
a DVD, which only contains the full Edition products, launch xsetup(.exe) directly.
RECOMMENDED: Xilinx recommends the use of 7-zip or WinZip (v.15.0 or newer) to decompress the
downloaded tar.gz file.
Vivado Design Suite 2018.2 Release Notes Send Feedback
24
UG973 (v2018.2) July 23, 2018 www.xilinx.comChapter 3: Download and Installation
Lightweight Installer Download
If you downloaded the lightweight installer, launch the downloaded file. You are prompted
to log in and use your regular Xilinx login credentials to continue with the installation
process.
After entering your login credentials, you can select between a traditional web-based
installation or a full install image download.
• The Download and Install Now choice allows you to select specific tools and device
families on following screens, downloads only the files required to install those
selections, and then installs them for you.
• The Download Full Image requires you to select a download destination and to
choose whether you want a Windows only, Linux only, or an install that supports both
operating systems. There are no further options to choose with the Download Full
Image selection, and installation needs to be done separately by running the xsetup
application from the download directory.
Note: Lab Edition is not supported through a lightweight installer. You may download the single-file
download image for Lab Edition.
Vivado Design Suite 2018.2 Release Notes Send Feedback
25
UG973 (v2018.2) July 23, 2018 www.xilinx.comChapter 3: Download and Installation
X-Ref Target - Figure 3-11
Figure 3-11: Vivado Design Suite Installation - Select Installation Source
Connectivity
The installer connects to the internet through the system proxy settings in Windows. These
settings can be found under Control Panel > Network and Internet > Internet Options.
For Linux users, the installer uses Firefox browser proxy settings (when explicitly set) to
determine connectivity.
X-Ref Target - Figure 3-12
Figure 3-12: Vivado Design Suite Installation - Connectivity
Vivado Design Suite 2018.2 Release Notes Send Feedback
26
UG973 (v2018.2) July 23, 2018 www.xilinx.comChapter 3: Download and Installation
If there are connectivity issues, verify the following:
1. If you are using alternate proxy settings to the ones referred to, select the Manual
Proxy Configuration option to specify the settings.
‘
X-Ref Target - Figure 3-13
Figure 3-13: Vivado Design Suite Installation - Change Proxy Settings
2. Check if your company firewall requires a proxy authentication with a username and
password. If so, select the Manual Proxy Configuration option in the dialog box above.
3. For Linux users, if either the Use System settings or the Auto detect settings option is
selected in the Firefox browser, you must manually set the proxy in installer.
License Agreements
Carefully read the license agreements before continuing with the installation. If you do not
agree to the terms and conditions, cancel the installation and contact Xilinx.
Edition Selection
Select the edition or standalone tool that is required. You can also install the Xilinx Software
Development Kit (XSDK) as part of the Vivado WebPACK, System and Design editions.
Vivado Design Suite 2018.2 Release Notes Send Feedback
27
UG973 (v2018.2) July 23, 2018 www.xilinx.comChapter 3: Download and Installation
X-Ref Target - Figure 3-14
Figure 3-14: Vivado Design Suite Installation - Select Products
Vivado WebPACK and Design edition users will also be able to upgrade to a higher edition
post installation. See Adding Additional Tools and Devices, page 31 for more details.
Vivado Design Suite 2018.2 Release Notes Send Feedback
28
UG973 (v2018.2) July 23, 2018 www.xilinx.comChapter 3: Download and Installation
Tools, Devices, and Options
Customize the installation by choosing the design tools, device families and installation
options. Selecting only what you need helps to minimize the time taken to download and
install the product. You will be able to add to this installation later by clicking Add Design
Tools or Devices from either the operating system Start Menu or the Vivado > Help menu.
X-Ref Target - Figure 3-15
Figure 3-15: Vivado Design Suite Installation - Vivado System Edition
Shortcuts and File Associations
You can customize the creation of the program group entries (Start Menu) and the creation
of desktop shortcuts. Optionally, you can also create file associations to launch Vivado
project files directly with this version of Vivado. The shortcut creation and file association
options can be applied to the current user or all users.
Vivado Design Suite 2018.2 Release Notes Send Feedback
29
UG973 (v2018.2) July 23, 2018 www.xilinx.comChapter 3: Download and Installation
Installing Cable Drivers
On Windows, Install Cable Drivers is an optional selection in the installer.
For Linux, because root or sudo access is required to install drivers, this option has been
removed from the Linux installer beginning in Vivado 2015.4. The general Vivado installer
can now be run on Linux without root or sudo privileges. To install cable drivers on Linux,
there is now a script that must be run as root or sudo post installation.
Script Location: /data/xicom/cable_drivers/lin64/install_script/install_drivers/
Script Name: install_drivers
Installing Windows Driver
Run the following commands in an Administrator command prompt. Note, set or replace
%VIVADO_INSTALL_DIR% with the location of your install directory. Replace %log_dir% with
the location of the log directory. Note if %log_dir% is not specified a file named
install_drivers_wrapper.log will be placed under %VIVADO_INSTALL_DIR%.
cd %VIVADO_INSTALL_DIR%\data\xicom\cable_drivers\nt64
install_drivers_wrapper.bat %log_dir% %log_dir%
Uninstalling Cable Drivers
On Windows, to uninstall cable drivers run the following commands in an Administrator
command prompt. Note, set or replace %VIVADO_INSTALL_DIR% with the location of your
install directory.
cd %VIVADO_INSTALL_DIR%\data\xicom\cable_drivers\nt64
wdreg -inf %cd%\xusbdrvr.inf uninstall
net stop XilinxPC4Driver
del %WINDIR%\system32\drivers\windrvr6.sys
del %WINDIR%\system32\drivers\xusb*.sys
del %WINDIR%\system32\drivers\xpc4drvr.sys
Installing Linux Driver
For Linux, because root or sudo access is required to install drivers, this option has been
removed from the Linux installer beginning in Vivado 2015.4. The general Vivado installer
Vivado Design Suite 2018.2 Release Notes Send Feedback
30
UG973 (v2018.2) July 23, 2018 www.xilinx.comChapter 3: Download and Installation
can now be run on Linux without root or sudo privileges. To install cable drivers on Linux,
there is now a script that must be run as root or sudo post installation.
Run these commands as root. Note replace ${vivado_install_dir} with the location
of your vivado install location.
${vivado_install_dir}/data/xicom/cable_drivers/lin64/install_script/install_drivers
/install_drivers
Uninstalling Linux Driver
Run these commands as root:
rm -f /etc/udev/rules.d/52-xilinx-digilent-usb.rules
rm -f /etc/udev/rules.d/52-xilinx-ftdi-usb.rules
rm -f /etc/udev/rules.d/52-xilinx-pcusb.rules
Adding Additional Tools and Devices
You can incrementally add additional tools, devices or even upgrade Vivado editions
post-install. This is useful for users that have chosen to install a subset of devices and/or
tools.
To add new tools or devices:
• Start Menu > Xilinx Design Tools > Vivado > Add Design Tools or
Devices.
• Launch Vivado > Help > Add Design Tools or Devices.
If you have installed the Vivado WebPACK or Design Edition, you are presented with the
option to upgrade the edition.
Vivado Design Suite 2018.2 Release Notes Send Feedback
31
UG973 (v2018.2) July 23, 2018 www.xilinx.comChapter 3: Download and Installation
X-Ref Target - Figure 3-16
Figure 3-16: Vivado Design Suite Installation - Select Edition
Based on the above selection, you are presented with all available tools and devices that
can be added to the current installation.
You can also add tools or devices from the Xilinx Information Center (XIC). See the
Obtaining Quarterly Releases section for using this flow.
Network Installations
Installing to a network location provides a way for client machines to access the design
tools by pointing to it on the network drive. To run the design tools on the network, the
client machines must be set up correctly to ensure the environment variables, registry, and
program groups all point to the network. The following sections describe the procedure for
network setups.
Vivado Design Suite 2018.2 Release Notes Send Feedback
32
UG973 (v2018.2) July 23, 2018 www.xilinx.comChapter 3: Download and Installation
Linux Clients
You must source settings32.(c)sh or settings64.(c)sh (whichever is appropriate
for your operating system) from the area in which the design tools are installed. This sets up
the environment to point to this installed location.
To run the design tools from a remotely installed location, run an X Windows display
manager, and include a DISPLAY environment variable. Define DISPLAY as the name of
your display. DISPLAY is typically unix:0.0. For example, the following syntax allows you
to run the tools on the host named bigben and to display the graphics on the local monitor
of the machine called mynode.
setenv DISPLAY mynode:0.0
xhost = bigbenPC Clients
Microsoft Windows Clients
1. Install design tools to a PC network server. Make sure your users know the location of
the design tools and have access to the installation directory, and they have
Administrator privileges for the following steps.
2. From the local client machine, browse to the following directory:
network_install_location\.xinstall\Vivado_ and run the
program networkShortcutSetup.exe.
Running this program sets up the Windows settings batch files and Program Group or
Desktop shortcuts to run the Xilinx tools from the remote location.
3. From the client machine, launch the Vivado Design Suite tools by clicking the Program
Group or Desktop shortcuts, or by running the applications on the network drive.
Installing to a Mounted Network Drive
Xilinx design tools are designed to be installed in a directory under ROOT (typically
C:\Xilinx). The installer normally presents this option when installing to a local driver.
To work around this issue, either specify a UNC path (for example,
\\network_loc\Xilinx\) or define your target installation directory as \Xilinx under
the network mount point (For example: N:\Xilinx).
Windows 7 default security levels do not allow you to select remote mapped drives. To
install Xilinx Design Tools on remote mapped drives, you must change your account control
settings using the following steps:
1. Open the Windows Control Panel, from the Windows Start menu, and select ‘User
Accounts’. If your Control Panel Uses ‘Category View’, click ‘User Accounts’ on two
successive screens
2. Click ‘Change User Account Control settings’ and allow the program to make changes.
Vivado Design Suite 2018.2 Release Notes Send Feedback
33
UG973 (v2018.2) July 23, 2018 www.xilinx.comChapter 3: Download and Installation
3. Click and slide the slide-bar down to the second to lowest setting (as seen in the
following figure).
4. Click OK.
X-Ref Target - Figure 3-17
Figure 3-17: Vivado Design Suite Installation - User Account Control Settings
RECOMMENDED: Xilinx recommends that you revisit this procedure to restore your settings to their
previous state after installation.
Note: You are not able to browse to the remote mapped drives using the Xilinx installer. You need
to manually type in your installation path which contains a mapped network drive.
Batch Mode Installation Flow
Beginning in Vivado 2015.1, the installer can be run as an unattended batch process. To run
unattended, a standard Edition and install location must be specified or a configuration file
must be present which tells the installer the install location and which of the tools, devices
and options you wish to install.
Vivado Design Suite 2018.2 Release Notes Send Feedback
34
UG973 (v2018.2) July 23, 2018 www.xilinx.comChapter 3: Download and Installation
The installer has a mode in which it can generate a reference option file for you based on
common configurations, which you can further edit to customize your installation.
RECOMMENDED: It is recommended that you generate this reference for each new quarterly release, so
that new devices, tools, options or other changes will be accounted for in your options file.
To begin using batch mode, open a command shell and change to the directory where you
have stored your extracted installer.
Note: For Windows, open the command window with administrator privileges and run the
xsetup.bat file, found in the \bin directory, and not xsetup.exe with the options below.
Generate Configuration File
Run: xsetup -b ConfigGen
This will put you in an interactive mode where you will see the following menu. Choose an
edition from the list given below.
1. Vivado HL WebPACK
2. Vivado HL Design Edition
3. Vivado HL System Edition
4. Documentation Navigator (Standalone)
After you select an edition, you will be prompted for a location/filename for your
configuration file and the interactive mode will exit.
Below is a sample of a WebPACK configuration file:
#### Vivado WebPACK Install Configuration ####
Edition=Vivado WebPACK
Destination=C:\Xilinx
Modules=Vivado:1,Vivado High Level Synthesis:0,Software Development
Kit:0,DocNav:0,Artix-7,Kintex-7,Zynq-7000:1
#### Shortcut creation ####
CreateProgramGroupShortcuts=1
CreateShortcutsForAllUsers=0
ProgramGroupFolder=Xilinx Design Tools
CreateDesktopShortcuts=1
CreateFileAssociation=1
#### Post install tasks ####
## Post install tasks can be configured as shown below.
InstallOptions=Configure WebTalk:1,Install and Initialize Trusted Storage
Licensing:1,Generating installed device list:1,Install VC++ runtime libraries for
64-bit OS:1,Install Cable Drivers:0,Acquire or Manage a License Key:0,run:xic:1
Basically, each option in the configuration file matches a corresponding option in the GUI.
A value of 1 means that option is selected, a value of 0 means the option is unselected.
Vivado Design Suite 2018.2 Release Notes Send Feedback
35
UG973 (v2018.2) July 23, 2018 www.xilinx.comChapter 3: Download and Installation
Run the Installer
Now that you have edited your configuration file to reflect your installation preferences,
you are ready to run the installer. As part of the installer command-line, you will need to
indicate your acceptance of the Xilinx and Third Party license agreements, and confirm you
understand the WebTalk Terms and Conditions.
Xilinx End-User License Agreement (EULA)
• Xilinx End-User License Agreement
Third Party End-User License Agreement (EULA)
• Third Party End-User License Agreement
WebTalk Terms and Conditions
By indicating I AGREE, I also confirm that I have read Section 13 of the terms and
conditions above concerning WebTalk and have been afforded the opportunity to read
the WebTalk FAQ posted at Xilinx Design Tools Webtalk. I understand that I am able to
disable WebTalk later if certain criteria described in Section 13(c) apply. If they don't
apply, I can disable WebTalk by uninstalling the Software or using the Software on a
machine not connected to the internet. If I fail to satisfy the applicable criteria or if I fail
to take the applicable steps to prevent such transmission of information, I agree to allow
Xilinx to collect the information described in Section 13(a) for the purposes described in
Section 13(b).
There is a command-line switch, -a or --agree for you to indicate your agreement to each
of the above. If one of the above is left out of the list, or the agree switch is not specified,
the installer will exit with an error and will not install.
Example Command Lines
This is an example of the command line for a typical new installation using a configuration
file.
xsetup --agree XilinxEULA,3rdPartyEULA,WebTalkTerms --batch Install --config
install_config.txt
If you wish to use one of Xilinx’s default Edition configurations, you do not have to specify
the --config option, but since the destination directory is included in the configuration
file, you will be required to specify this on the command-line.
xsetup --agree 3rdPartyEULA,WebTalkTerms,XilinxEULA --batch Install --edition
"Vivado System Edition" --location "C:\Xilinx"
The above command will utilize the default configuration options for the edition specified.
To see the default configuration options, use the –b ConfigGen mode as described
Vivado Design Suite 2018.2 Release Notes Send Feedback
36
UG973 (v2018.2) July 23, 2018 www.xilinx.comChapter 3: Download and Installation
above.The batch mode of the Vivado installer can also perform uninstallation and upgrades
(adding additional tools and devices). For the full list of the options in the installer batch
mode run xsetup -h or xsetup --help.
Obtaining Quarterly Releases
Xilinx releases quarterly versions of the Vivado Design Suite tools throughout the year. Each
quarterly version contains device support updates, new features and bug fixes. The
following sections describe how to obtain updates through the Xilinx Information Center.
Xilinx Information Center
Xilinx Information Center (XIC) is the next generation replacement of XilinxNotify. This
functionality resides in the task bar (Windows) and periodically checks for new releases and
updates from Xilinx. Users can view and dismiss notifications as well as update installations.
In addition, XIC now includes a cockpit from which you can manage all of your Xilinx tool
installations. Update, check licenses or uninstall all from the new Manage Installs tab as
shown in Figure 3-18.
Vivado Design Suite 2018.2 Release Notes Send Feedback
37
UG973 (v2018.2) July 23, 2018 www.xilinx.comChapter 3: Download and Installation
X-Ref Target - Figure 3-18
Figure 3-18: Xilinx Information Center (XIC)
Uninstalling the Vivado Design Suite Tool
Before uninstalling, make sure to have moved any project files you want to keep outside
your Xilinx installation directory structure, or they are deleted.
Note: Xilinx Documentation Navigator is not removed during uninstallation. It is intended to be a
standalone application common to multiple versions of Xilinx tools. You need to uninstall it
separately if it is no longer required.
Uninstallation
Before uninstalling, make sure to have moved any project files you want to keep outside
your Xilinx installation directory structure, or they will be deleted. See below for
information on uninstalling Documentation Navigator and Xilinx Information Center.
Vivado Design Suite 2018.2 Release Notes Send Feedback
38
UG973 (v2018.2) July 23, 2018 www.xilinx.comChapter 3: Download and Installation
Uninstalling Documentation Navigator
Xilinx Documentation Navigator will not be removed during uninstallation. It is intended to
be a standalone application common to multiple versions of Xilinx tools. If it is no longer
required, you will need to uninstall separately either from the Start Menu program group
entry ‘Uninstall DocNav’ or through the corresponding entry in the ‘Uninstall or change a
program’ control panel option (for Windows).
Uninstalling Xilinx Information Center
Xilinx Information Center will not be removed during uninstallation. It is intended to be a
standalone application common to multiple versions of Xilinx tools. If it is no longer
required, you will need to uninstall separately through the corresponding entry in the
‘Uninstall or change a program’ control panel option (for Windows).
Uninstalling on Microsoft Windows
To uninstall any Xilinx product, select the Uninstall item from that product’s Start Menu
folder. For instance, to uninstall Vivado Design Suite: Edition, select Start > All Programs >
Xilinx Design Tools > Vivado 2018.2 > Uninstall.
If you do not have a program group entry, use the command line option to uninstall:
\.xinstall\Vivado_2018.2\ xsetup.exe –uninstall
Alternatively, use the corresponding entry in the Uninstall or change a program control
panel option (for Windows).
Uninstalling on Linux
To uninstall the Vivado Design Suite tool product, launch the uninstaller from the launcher
menu: select Applications > Xilinx Design Tools > Vivado 2018.2 > Uninstall.
Checking Required Libraries
There may be a requirement to install dependent libraries for certain Linux operating
systems. Please refer to Answer Record 66184 on the Xilinx website on how to check which
libraries are required to run Vivado tools on Linux.
Vivado Design Suite 2018.2 Release Notes Send Feedback
39
UG973 (v2018.2) July 23, 2018 www.xilinx.comChapter 4
WebTalk
The WebTalk feature helps Xilinx® understand how you use Xilinx FPGA devices, software,
and intellectual property (IP). The information collected and transmitted by WebTalk allows
Xilinx to improve the features most important to you as part of our ongoing effort to
provide products that meet your current and future needs. When enabled, WebTalk
provides information on your use of the Vivado Design Suite tools, SDK, and Petalinux.
WebTalk Participation
Your participation in WebTalk is voluntary except when a paid license is not found.
In these cases, WebTalk data collection and transmission always occurs, regardless of your
preference settings. For all other cases, data is not transmitted if you disable WebTalk.
The following table summarizes WebTalk behavior for data transmission to Xilinx from your
post-route design, based on your Xilinx license, WebTalk install preference, and user
preference settings.
Table 4-1: WebTalk Behavior for Bitstream Generation or Route Design Flow
WebTalk User
WebTalk Install
License Preference Selected Preference Send WebTalk Data to
Selected as Xilinx
as “Enabled” “Enabled”
WebPACK X X Yes
Edition License No X No
Edition License Yes No No
Edition License Yes Yes Yes
Note: If the device is a WebPACK device, the Tools first look for a WebPACK license.
Vivado Design Suite 2018.2 Release Notes Send Feedback
40
UG973 (v2018.2) July 23, 2018 www.xilinx.comChapter 4: WebTalk
Setting WebTalk Install Preference
You can enable or disable WebTalk globally during or after installation as described below.
During installation you can enable or disable WebTalk installation options by checking or
unchecking the Enable WebTalk to send software, IP and device usage statistics to
Xilinx (Always enabled for WebPACK license) checkbox.
X-Ref Target - Figure 4-1
Figure 4-1: WebTalk Install Options
You can enable or disable WebTalk installation options using the Tcl command
config_webtalk:
config_webtalk -install on|off
• on turns WebTalk on for the installation.
• off turns WebTalk off for the installation.
Vivado Design Suite 2018.2 Release Notes Send Feedback
41
UG973 (v2018.2) July 23, 2018 www.xilinx.comChapter 4: WebTalk
Install settings are saved in the following location:
• Windows 7 and 10: /vivado/data/webtalk/webtalksettings
• Linux: /vivado/data/webtalk/webtalksettings
Note: You need administrator privileges to write to the install location.
Setting WebTalk User Preferences
You can enable or disable WebTalk user options by selecting Tools > Settings. In the
Settings dialog box, click the WebTalk category as shown in the following figure.
X-Ref Target - Figure 4-2
Figure 4-2: WebTalk User Preferences
After installation, you can enable or disable WebTalk user options using the
config_webtalk Tcl command:
config_webtalk -user on|off
Vivado Design Suite 2018.2 Release Notes Send Feedback
42
UG973 (v2018.2) July 23, 2018 www.xilinx.comChapter 4: WebTalk
• on turns WebTalk on for the current user.
• off turns WebTalk off for the current user.
User settings are saved in the following location:
• Windows 10 or earlier:
%APPDATA%\Xilinx\Common\\webtalk
where:
%APPDATA% is:
C:\Users\\AppData\Roaming
• Linux:
%APPDATA%/.Xilinx/Common//webtalk
where:
%APPDATA% is:
/home/
Checking WebTalk Install and User Preferences
You can also use the config_webtalk Tcl command to check the current status of
WebTalk settings. The command line option -info reports the values for the install setting
and the user setting:
config_webtalk -info
Types of Data Collected
WebTalk does not collect your design netlist or any other proprietary information that can
be used to reverse engineer your design. The data Xilinx collects through WebTalk includes:
• Software version
• Platform information (for example, operating system, speed and number of processors,
and main memory)
• Unique project ID
• Authorization code
Vivado Design Suite 2018.2 Release Notes Send Feedback
43
UG973 (v2018.2) July 23, 2018 www.xilinx.comYou can also read