IDRAC9 Security Configuration Guide - Dell
←
→
Page content transcription
If your browser does not render page correctly, please read the page content below
iDRAC9 Security Configuration Guide

April 2021
Rev. A01
Notes, cautions, and warnings

     NOTE: A NOTE indicates important information that helps you make better use of your product.

     CAUTION: A CAUTION indicates either potential damage to hardware or loss of data and tells you how to avoid
     the problem.

     WARNING: A WARNING indicates a potential for property damage, personal injury, or death.

© 2020 2021 Dell Inc. or its subsidiaries. All rights reserved. Dell, EMC, and other trademarks are trademarks of Dell Inc. or its subsidiaries.
Other trademarks may be trademarks of their respective owners.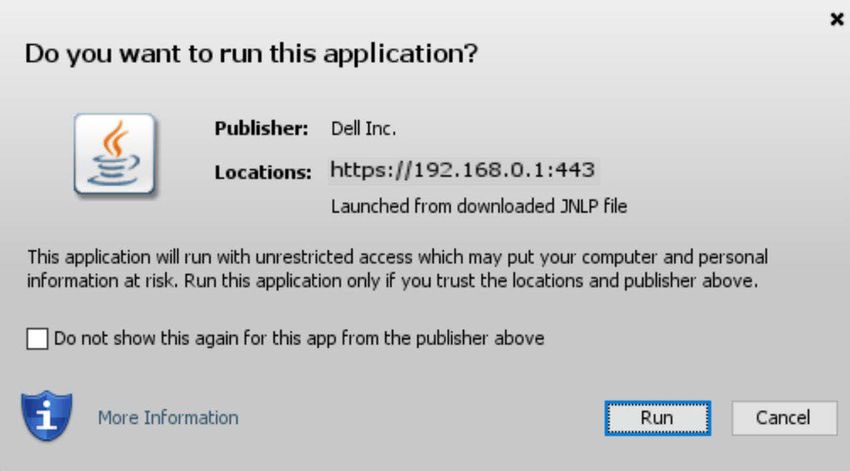
Contents

Chapter 1: Overview...................................................................................................................... 6

Chapter 2: Built in iDRAC and PowerEdge Security....................................................................... 7
  Silicon based Root-of-Trust.............................................................................................................................................. 7
  Cryptographically Verified Trusted Booting .................................................................................................................8
  SELinux.................................................................................................................................................................................. 8
  Signed Firmware Updates ................................................................................................................................................ 8
  Non-Root Support...............................................................................................................................................................9
  iDRAC Credential Vault...................................................................................................................................................... 9
  BIOS Recovery and Hardware Root of Trust (RoT)................................................................................................... 9
  Live Scanning........................................................................................................................................................................9

Chapter 3: Securely Configuring iDRAC Web Server.................................................................... 10
  Webserver Information..................................................................................................................................................... 10
  Enabling HTTPS Redirection........................................................................................................................................... 10
  Configuring TLS Protocol................................................................................................................................................. 11
  Configuring Encryption Strength.................................................................................................................................... 11
  Configuring Cipher Suite Selection................................................................................................................................ 11
  Setting Cipher Suite Selection using the iDRAC GUI................................................................................................ 12

Chapter 4: Securely Using TLS/SSL Certificate........................................................................... 13

Chapter 5: Federal Information Processing Standards (FIPS)...................................................... 15
  Enabling FIPS Mode using iDRAC Web Interface...................................................................................................... 15

Chapter 6: Secure Shell (SSH).....................................................................................................16
  SSH Cryptography Configuration.................................................................................................................................. 16
  Supported SSH Cryptography Schemes...................................................................................................................... 16
  Using Public Key Authentication for SSH.................................................................................................................... 17

Chapter 7: Network Security Configuration................................................................................. 19
  Dedicated NIC and Shared LOM................................................................................................................................... 20
  OS to iDRAC Pass-through............................................................................................................................................ 20
  VLAN Usage........................................................................................................................................................................ 21
  IP Blocking........................................................................................................................................................................... 21
  IP Range Filtering...............................................................................................................................................................21
  Auto-discovery....................................................................................................................................................................21
  Auto Config..........................................................................................................................................................................21
  iDRAC USB Interfaces......................................................................................................................................................22
  Configuring iDRAC Direct USB Connection Using the Webserver....................................................................... 22

Chapter 8: Interfaces and Protocols to Access iDRAC................................................................. 24

                                                                                                                                                               Contents                    3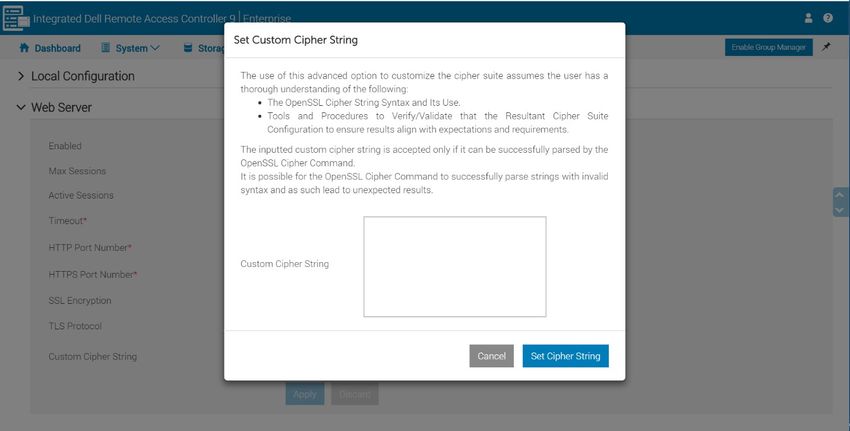
Chapter 9: iDRAC Port Configuration.......................................................................................... 26
      Security Recommendations for Interfaces, Protocols, and Services................................................................... 28
      Disabling IPMI over LAN using Web Interface........................................................................................................... 28
      Disabling Serial Over LAN using Web Interface......................................................................................................... 28
      Configuring Services using Web Interface..................................................................................................................28

    Chapter 10: IPMI and SNMP Security Best Practices................................................................... 29
      SNMP Security Best Practices:.....................................................................................................................................29
      IPMI Security Best Practices:........................................................................................................................................ 29
      Secure NTP........................................................................................................................................................................ 30
      Redfish Session Login Authentication..........................................................................................................................32

    Chapter 11: Secure Enterprise Key Manager (SEKM) Security..................................................... 33
      Create or Change SEKM Security Keys.......................................................................................................................33

    Chapter 12: iDRAC9 Group Manager............................................................................................ 35
      Group Manager Enable/Disable..................................................................................................................................... 35
      Group Manager Single Sign-On..................................................................................................................................... 35
      Group Manager Networking........................................................................................................................................... 36
      Group Manager Security Best Practices..................................................................................................................... 36

    Chapter 13: Virtual Console and Virtual Media Security................................................................37
      Java vConsole Security....................................................................................................................................................37

    Chapter 14: VNC Security............................................................................................................ 39
      Setting up VNC Viewer with SSL Encryption............................................................................................................ 39

    Chapter 15: User Configuration and Access Control.................................................................... 40
      Configuring Local Users...................................................................................................................................................40
      Disabling Access to Modify iDRAC Configuration Settings on Host System...................................................... 41
      iDRAC User Roles and Privileges....................................................................................................................................41
      Recommended Characters in Usernames and Passwords...................................................................................... 42
      Password Policy.................................................................................................................................................................43
      Secure Default Password................................................................................................................................................ 43
      Changing the Default Login Password using Web Interface.................................................................................. 43
      Force Change of Password (FCP)................................................................................................................................44
      Simple 2-Factor Authentication (Simple 2FA)........................................................................................................... 44
      RSA SecurID Two Factor Authentication (2FA) iDRAC9 Datacenter.................................................................. 44
      Active Directory.................................................................................................................................................................45
      LDAP.....................................................................................................................................................................................46
      Customizable Security Banner....................................................................................................................................... 46

    Chapter 16: System Lockdown Mode........................................................................................... 47

    Chapter 17: Securely Configuring BIOS System Security............................................................. 49

    Chapter 18: Secure Boot Configuration....................................................................................... 52

4   Contents
Chapter 19: Securely Erasing Data...............................................................................................53

Chapter 20: LCD Panel................................................................................................................ 55

Chapter 21: Server Inventory, Lifecycle Log, Server Profiles, and Licenses Import and Export.... 56
  Configuring Lifecycle Controller Logs Export using Web Interface and HTTPS............................................... 56
  Using HTTPS with a Proxy Securely............................................................................................................................ 57

Chapter 22: Security Events Lifecycle Log.................................................................................. 58

Chapter 23: Default Configuration Values.................................................................................... 61

Chapter 24: Network Vulnerability Scanning............................................................................... 64

Chapter 25: Security Licensing ...................................................................................................67

Chapter 26: Best Practices......................................................................................................... 69

Chapter 27: Appendix - Whitepapers........................................................................................... 70

                                                                                                                                        Contents                5
1
                                                                                                        Overview
Dell EMC PowerEdge servers have featured robust security for several generations, including the innovation of using silicon-
based data security. As a key management component in Dell EMC PowerEdge servers, the integrated Dell Remote Access
Controller (iDRAC) offers industry-leading security features that adhere to and are certified against well-known NIST standards,
Common Criteria, and FIPS-140-2.
For more information about iDRAC's certifications and standards see the white paper - Managing Web Server Certificates on
iDRAC .
The iDRAC development team focuses on providing best in class server management capabilities and ensures that these can
be exercised to meet a user's security requirements. The purpose of this document is to describe the security features offered
by iDRAC9 that can be configured by the end user and provide the recommended settings and procedures that are required to
maximize the security posture of the system.
The intended audience for this document includes system administrators who are responsible for maintaining and deploying
servers and ensuring that network and infrastructure security best practices are followed.
    NOTE: The information in this publication is provided "as-is." Dell Technologies makes no representations or
    warranties of any kind with respect to the information in this publication, and specifically disclaims implied
    warranties of merchantability or fitness for a particular purpose. In no event shall Dell Technologies, its
    affiliates or suppliers, be liable for any damages whatsoever arising from or related to the information contained
    herein or actions that you decide to take based thereon, including any direct, indirect, incidental, consequential,
    loss of business profits or special damages, even if Dell Technologies, its affiliates or suppliers have been
    advised of the possibility of such damages.
The Security Configuration Guide intends to be a reference. The guidance is provided based on a diverse set of installed systems
and may not represent the actual risk/guidance to your local installation and individual environment. It is recommended that all
users determine the applicability of this information to their individual environments and take appropriate actions. All aspects of
this Security Configuration Guide are subject to change without notice and on a case-by-case basis. Your use of the information
contained in this document or materials linked herein is at your own risk. Dell reserves the right to change or update this
document in its sole discretion and without notice at any time.

6       Overview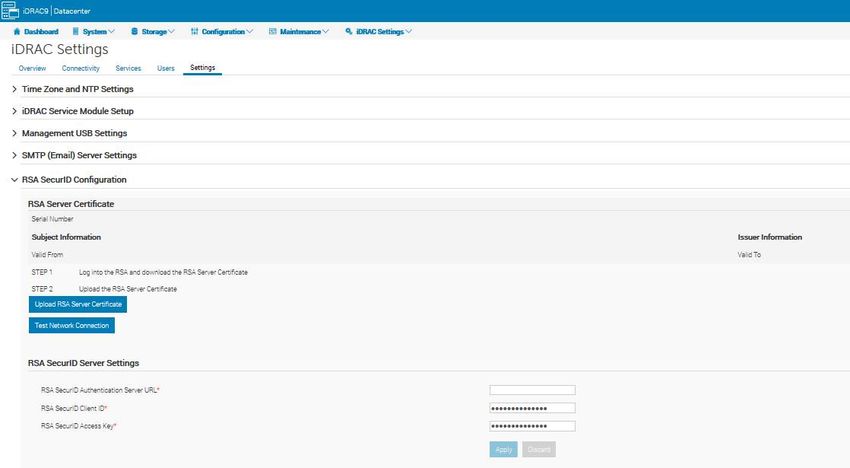
2
                  Built in iDRAC and PowerEdge Security
The iDRAC boot process uses its own independent silicon-based Root-of-Trust that verifies the iDRAC firmware image. The
iDRAC Root-of-Trust also provides a critical trust anchor for authenticating the signatures of Dell EMC firmware update
packages (DUPs).

Topics:
•   Silicon based Root-of-Trust
•   Cryptographically Verified Trusted Booting
•   SELinux
•   Signed Firmware Updates
•   Non-Root Support
•   iDRAC Credential Vault
•   BIOS Recovery and Hardware Root of Trust (RoT)
•   Live Scanning

Silicon based Root-of-Trust
14th generation PowerEdge servers (both Intel or AMD-based) now use an immutable, silicon-based Root-of Trust to
cryptographically attest to the integrity of BIOS and iDRAC firmware. This Root-of-trust is based on one-time programmable,
read-only public keys that provide protection against malware tampering. The BIOS boot process leverages Intel Boot Guard
technology or AMD Root-of-Trust technology which verifies that the digital signature of the cryptographic hash of the boot
image matches the signature that is stored in silicon by Dell EMC as part of the manufacturing process. As part of the
manufacturing process, a failure to verify the boot image results in a shutdown of the server, user notification in the Lifecycle
Controller Log, and the BIOS recovery process can then be initiated by the user. If Boot Guard validates the boot image

                                                                              Built in iDRAC and PowerEdge Security                 7
successfully, the rest of the BIOS modules are validated by using a chain of trust procedure until control is handed off to the OS
or hypervisor.
1. Let us look at the chain of trust in more detail. Each BIOS module contains a hash of the next module in the chain. The
key modules in BIOS are the IBB (Initial Boot Block), SEC (Security), PEI (Pre-EFI Initialization), MRC (Memory Reference
Code), DXE (Driver Execution Environment), and BDS (Boot Device Selection). If Intel Boot Guard authenticates the IBB
(Initial Boot Block), then the IBB validates SEC+PEI before handing control to it. SEC+PEI then validates PEI+MRC which
further validates the DXE+BDS modules. At this point, control is handed over to UEFI Secure Boot as explained in later
sections. Similarly, for Dell EMC PowerEdge servers based on AMD EPYC, AMD Secure Root-of-Trust technology ensures
that servers boot only from trusted firmware images.
2. Also, AMD Secure Run Technology is designed to encrypt main memory, keeping it private from malicious intruders having
access to the hardware. No application modifications are needed to use this feature, and the security processor never
exposes the encryption keys outside of the processor.
Cryptographically Verified Trusted Booting
One of the most critical aspects of server security is ensuring that the boot process can be verified as secure. This process
provides a trusted anchor for all subsequent operations such as booting an OS or updating firmware. The iDRAC boot process
is verified using a silicon-based Root-of-Trust to meet recommendations in NIST SP 800-147B ("BIOS Protection Guidelines for
Servers") and NIST SP 800-155 ("BIOS Integrity Measurement Guidelines").
SELinux
SELinux is based on defense-in-depth design, with multiple layers of protection and functionality to help secure this critical
system component. SELinux is a core Linux security technology that is merged in the standard Linux kernel. SELinux has
been gaining adoption within many Linux distributions. Red Hat Enterprise Linux (RHEL) was one of the first adopters other
Linux users followed. SELinux is now maintained in the core Linux kernel by a dedicated group including Red Hat, Network
Associates, Secure Computing Corporation, Tresys Technology, among others. This security technology uses a method referred
to as Mandatory Access Control. This method enables you to specify all the privileges that internal processes must complete
their tasks and limits the access to only those tasks. This is important because most attempts to hack a system involve trying to
make processes do things that are outside of the original design
Dell EMC wrote comprehensive security policies in SELinux for every task that runs on the iDRAC and then ran comprehensive
tests to ensure that no features were broken in the process. SELinux operates at the core kernel level on the iDRAC and cannot
be disabled or modified by the users. SELinux adds a mitigation factor that prevents many programming flaws from being further
exploited to gain elevated access to the system. Moreover, SELinux logs security messages when an attack is detected. These
log messages indicate when and how an attacker tried to break into the system. These logs are available through SupportAssist
to users enrolled in this feature. Till a future release of iDRAC, these logs are available in the Lifecycle Controller Logs.
Signed Firmware Updates
Enhanced firmware authentication is embedded within many third-party devices which provide signature validation using their
own Root-of-Trust mechanisms. This prevents the possible use of a compromised third-party update tool from being used to
load malicious firmware into, for example, a NIC or storage drive (and bypassing the use of signed Dell EMC update packages).
Many of the third-party PCIe and storage devices that are shipped with PowerEdge servers use a hardware Root-of-Trust to
validate their respective firmware updates.
PowerEdge servers have used digital signatures on firmware updates for several generations to assure that only authentic
firmware is running on the server platform. We digitally sign all our firmware packages using SHA-256 hashing with 2048-bit
RSA encryption for the signature for all key server components including firmware for iDRAC, BIOS, PERC, I/O adapters and
LOMs, PSUs, storage drives, CPLD, and backplane controllers. iDRAC scans firmware updates and compares their signatures
to what is expected using the silicon-based Root-of-Trust; any firmware package that fails validation is aborted and an error
message is logged into the Lifecycle Controller Log (LCL) to alert IT administrators.
If any firmware in any device is suspected of malicious tampering, IT administrators can rollback many of the platform firmware
images to a prior trusted version stored in iDRAC. We keep two versions of device firmware on the server - the existing
production version ("N") and a prior trusted version ("N-1").
8 Built in iDRAC and PowerEdge SecurityNon-Root Support
iDRAC9 firmware ensures that all internal processes running inside iDRAC run with the least-required privileges, a core security
concept. This approach provides protection against programming flaws, intrusion attempts, and malware. This protection
ensures that the process of a system that might get attacked cannot access files or hardware that are outside the scope
of that process. For example, the process that provides Virtual KVM support should not be able to change fan speeds. Running
these two processes as different users helps protect the system by preventing attacks from propagating from one process to
another.
iDRAC Credential Vault
The iDRAC service processor provides a secure storage memory that protects various sensitive data such as iDRAC user
credentials and private keys for default self-signed TLS/SSL certificates. Another example of silicon-based security, this
memory is encrypted with a unique immutable root key that is programmed into each iDRAC chip at the time of manufacture.
This protects against physical attacks where the attacker desolders (removes) the chip to attempt to gain access to the data.
BIOS Recovery and Hardware Root of Trust (RoT)
For PowerEdge server, it is mandatory to recover from corrupted or damaged BIOS image which may have resulted from
malicious modification of data, power surges damaging files, or any other unforeseeable events. An alternate reserve of BIOS
image would be necessary to recover BIOS in order to bring the PowerEdge server back to functional mode from unbootable
mode. This alternative/recovery BIOS is stored in a 2 nd serial peripheral interface (SPI) (MUX'ed with primary BIOS SPI).
The recovery sequence can be initiated through any of the following approaches with iDRAC as the main orchestrator of the
BIOS recovery task:
1. Auto recovery of BIOS primary image / recovery image - BIOS image is recovered automatically during the host boot
process after the BIOS corruption is detected by Intelboot Guard or by BIOS itself.
2. Forced recovery of BIOS Primary/recovery image - User initiates an out-of-band (OOB) request to update BIOS either
because they have a new updated BIOS or BIOS fails to boot or crashes.
3. Primary BIOS ROM update - The single Primary ROM is split into Data ROM and Code ROM. iDRAC has full access/
control over Code ROM. It switches MUX to access Code ROM whenever needed.
4. BIOS Hardware Root of Trust (RoT) - Feature is available in severs with model number RX5X, CX5XX, and TX5X. During
every host boot (only cold boot or A/C cycle, not during warm reboot), iDRAC ensues that RoT is performed. RoT runs
automatically and user cannot initiate it using any interfaces. This iDRAC boot first policy verifies host BIOS ROM contents
on every AC cycle and host DC cycle. This process ensures secure boot of BIOS and further secures the host boot process.
Live Scanning
BIOS live scanning verifies the integrity and authenticity of the BIOS image in the BIOS primary ROM when the host is powered
ON but not in POST.
NOTE:
● This feature requires iDRAC Datacenter license.
● A user must have Debug privilege for operating this feature.
iDRAC performs verification of immutable sections of BIOS image automatically at the following scenarios:
● At AC power cycle/Cold boot
● On a schedule determined by user
● On demand (initiated by user)
Successful result of live scanning is logged to Lifecycle Controller Log (LCL). Failure result is logged to both LCL and system
event logs (SEL).
Built in iDRAC and PowerEdge Security 93
Securely Configuring iDRAC Web Server
One of the most widely used interfaces that is offered in iDRAC is the web server which supports remote RACADM, Redfish,
WS-Man, and iDRAC GUI communication. The web server includes various configurable security settings to meet user security
requirements such as HTTPS redirection, encryption strength, TLS protocol, and filtering the available TLS cipher suites. Below
are the recommended configurations to maximize security for iDRAC’s webserver.
● Redirecting all HTTP requests to HTTPS
● Configure TLS 1.2
● Enable 256-bit encryption strength
● Limit cipher suites to strongest available
● Use CA Signed TLS/ SSL Certificates
● Enable Simple Certificate Enrollment Protocol (SCEP)
Topics:
• Webserver Information
• Enabling HTTPS Redirection
• Configuring TLS Protocol
• Configuring Encryption Strength
• Configuring Cipher Suite Selection
• Setting Cipher Suite Selection using the iDRAC GUI
Webserver Information
The following information is available and read-only to the end user without authentication. This is useful to identify and
provision a server within a datacenter. If this information must be protected, it is recommended to follow the Best Practices
listed in the Appendix.
● Service Tag
● Host Name
● Firmware Version
● MAC Address
● Server Model
● Server Generation
● Manufacturer Name
● Product License
Certain URIs and files on the iDRAC are available unauthenticated. These are required for loading the GUI login page and for
discovery of Redfish endpoints.
● /restgui/ - These contain Javascripts, CSS files, and font files required for the iDRAC GUI. These are static by nature and do
not contain any information specific to the system.
● /software/ - These contain downloadable applications that are required to launch virtual console. These are precompiled
binaries and do not contain any information specific to the system.
Enabling HTTPS Redirection
HTTP to HTTPS redirection redirects webserver communication from HTTP port (default is 80) to HTTPS port (default is 443).
This ensures that only secure encrypted connections are established when clients connect to iDRAC using remote RACADM,
Redfish, WS-Man, or iDRAC GUI. HTTPS redirection is enabled by default.
NOTE: This setting does not affect established connections. A user must have Configure iDRAC privilege to enable or
disable HTTPS redirection and the user must log out and log in to iDRAC for this setting to take effect. When you disable
10 Securely Configuring iDRAC Web Serverthis feature, a warning message is displayed, and an event is recorded in the Lifecycle Controller log file when this feature is
enabled or disabled.
Use the following RACADM command to enable HTTP to HTTPS redirection, in case it has been disabled:
racadm set iDRAC.Webserver.HttpsRedirection Enabled
Configuring TLS Protocol
iDRAC offers three TLS protocol versions for secure webserver connections. TLS 1.2 is the most secure configuration and
should be used whenever possible. TLS 1.0 is discouraged and is available only for backward compatibility.
NOTE: TLS 1.0 is removed from iDRAC firmware 4.40.00.00 and beyond.
By default, iDRAC is configured to use TLS 1.1 and higher. You can configure iDRAC to use any of the following:
● TLS 1.0 and higher (old firmware)
● TLS 1.1 and higher
● TLS 1.2 only
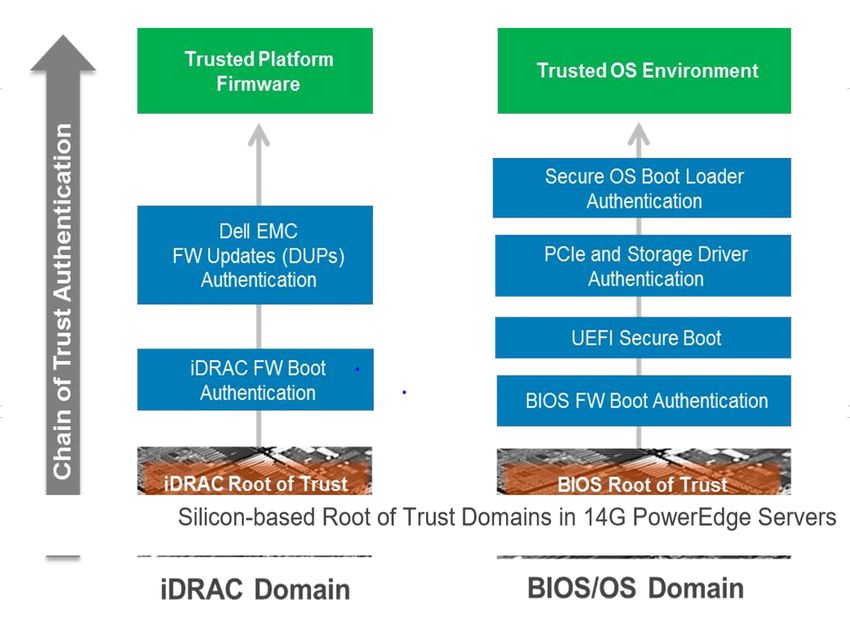
To configure TLS protocol to TLS 1.2:
1. Go to iDRAC Settings > Services.
2. Click the Services tab and then click Web Server.
3. In the TLS Protocol drop-down, select TLS 1.2 version and click Apply.
Configuring Encryption Strength
iDRAC offers four encryption strength configurations. By default, iDRAC is configured to use an encryption strength of 128-bit
or higher. The recommended secure configuration is 256-bit or higher.
● Auto negotiate
● 128-bit or higher
● 168-bit or higher
● 256-bit or higher
To configure Web Server Encryption to 256-bit or higher
1. Go to iDRAC Settings > Services.
2. Click the Services tab and then click Web Server.
3. In the SSL Encryption drop-down, select 256-bit or higher and click Apply.
Configuring Cipher Suite Selection
Cipher Suite Selection can be used to limit the ciphers that are offered by iDRAC’s webserver for client communications
allowing the user to determine how secure the connection should be. It provides another level of filtering for the
effective in-use TLS Cipher Suite. These settings can be configured through iDRAC web interface and RACADM command-
line interface. While there are no weak ciphers suites enabled on iDRAC, the most secure available in iDRAC is
TLS_ECDHE_RSA_WITH_AES_256_GCM_SHA384 and all others can be removed using this feature to maximize security. The
cipherlist format is defined in the OpenSSL documentation as referenced here: https://www.openssl.org/docs/man1.0.2/apps/
ciphers.html
CAUTION: Using OpenSSL Cipher Command to parse strings with invalid syntax may lead to unexpected errors.
NOTE: This is an advanced security option. Before you configure this option, ensure that you have thorough knowledge of
the following:
● The OpenSSL Cipher String Syntax and its use
● Tools and Procedures to validate the resultant Cipher Suite Configuration to ensure that the results align with the
expectations and requirements
Securely Configuring iDRAC Web Server 11NOTE: For more information about cipher strings, see www.openssl.org/docs/man1.0.2/man1/cipher. Setting Cipher Suite Selection using the iDRAC GUI To set ciphers in iDRAC GUI go to iDRAC Setting > Services > Web Server . If you would like to block more than one cipher use a colon, space, or comma as a separator. 12 Securely Configuring iDRAC Web Server
4
                           Securely Using TLS/SSL Certificate
The iDRAC web server uses an TLS/SSL certificate to establish and maintain secure communications with remote clients. Web
browsers and command-line utilities, such as RACADM and WS-Man, use this TLS/SSL certificate for server authentication and
establishing an encrypted connection.
There are several options available to secure the network connection using an TLS/SSL certificate. iDRAC’s web server has
a self-signed TLS/SSL certificate by default. The self-signed certificate can be replaced with a custom certificate, a custom
signing certificate, or a certificate signed by a well-known Certificate Authority (CA). Whichever method is chosen, once iDRAC
is configured and the TLS/SSL certificate is installed on the management stations, TLS/SSL enabled clients can access iDRAC
securely and without certificate warnings.
For more information, see the white paper - Managing Web Server Certificates on iDRAC.
Certificate upload can be automated by using Redfish (ImportSSLCertificate action) (or RACADM (sslcertupload command)
scripts. For details, refer to:
● iDRAC9 Redfish API Documentation - api-marketplace.dell.comhttps://api-marketplace.dell.com/#/overview-doc/
  2978/6818
● iDRAC9 RACADM CLI Guide - https://www.dell.com/support/home/en-in/product-support/product/idrac9-lifecycle-
  controller-v4.x-series/docs

Table 1. TLS/SSL Certificate Analysis
Certificate        Description                                    Advantages                    Disadvantages

Self-Signed        This certificate is auto generated and self-   ● Do not have to maintain a   ● The certificate for each
TLS/SSL            signed by the iDRAC. Each iDRAC has a            Certificate Authority.        iDRAC must be added
Certificate        unique self-signed certificate by default.     ● Certificates are auto         to the trusted certificates
                                                                    generated by the iDRAC.       store on each management
                                                                                                  station. (Every iDRAC is its
                                                                                                  own Certificate Authority
                                                                                                  which must be trusted.)

CA Signed TLS/     A certificate signing request (CSR) is         ● Can use a commercial        ● Must either purchase
SSL Certificate    generated and submitted to your in-house         Certificate authority.        commercial certificates
with common        Certificate Authority or by a third-party        Can use a commercial          or maintain your own
Public/Private     Certificate Authority such as VeriSign,          Certificate authority.        Certificate Authority
key pair           Thawte, Go Daddy, etc. for signing.            ● If a commercial CA is       ● Each iDRAC has same
                                                                    used, it is likely to be      public/private key pair
                                                                    already trusted on your       unless user can manage
                                                                    management stations and       multiple key pairs.
                                                                    can be trusted for all
                                                                    iDRACs.

CA Signed TLS/     A certificate signing request (CSR) is         ● Can use a commercial          ● Must either purchase
SSL Certificate    generated by iDRAC and submitted to              Certificate authority.          commercial certificates
                   your in-house Certificate Authority or by      ● Only must trust one             or maintain your own
                   a third-party Certificate Authority such         Certificate Authority for all   Certificate Authority.
                   as VeriSign, Thawte, Go Daddy, etc. for          iDRAC. If a commercial CA ● A CSR must be generated
                   signing.                                         is used, it is likely to be     and submitted for every
                                                                    already trusted on your         iDRAC.
                                                                    management stations.
                                                                  ● Each iDRAC has a unique
                                                                    public/private key.

Custom Signing     The certificate is auto generated and          ● Only must trust one         ● Must maintain your own
TLS/SSL            signed using a signing certificate that is       Certificate Authority for     Certificate Authority.
Certificate        uploaded from your in-house Certificate          all iDRAC. It is
(CSC)              Authority.                                       possible your in-house
                                                                    Certificate Authority is

                                                                                 Securely Using TLS/SSL Certificate           13
Table 1. TLS/SSL Certificate Analysis (continued)
Certificate Description Advantages Disadvantages
already trusted on your
management stations.
● Certificates are auto
generated by the iDRAC.
Refer to the white paper on Managing Web Server Certificates on iDRAC:https://downloads.dell.com/solutions/general-
solution-resources/White%20Papers/Managing%20Web%20Server%20Certificates%20on%20iDRAC.pdf
14 Securely Using TLS/SSL Certificate5
Federal Information Processing Standards
(FIPS)
FIPS is a system security standard that United States government agencies and contractors must use. Starting from version
2.40.40.40, iDRAC supports enabling FIPS mode. iDRAC supports FIPS 140-2 certification operation modes. Enabling FIPS
mode results in iDRAC using a certified FIPS module for cryptographic functionality. Because both the FIPS module and
iDRAC’s default crypto mechanisms provide strong security, enabling FIPS is only recommended as a security configuration in
environments that require adherence to this standard, but can be securely enabled in other environments as well.
The NIST certificate is located at https://csrc.nist.gov/projects. And to refer to the security policy, click https://csrc.nist.gov/
CSRC/media.
Topics:
• Enabling FIPS Mode using iDRAC Web Interface
Enabling FIPS Mode using iDRAC Web Interface
1. On the iDRAC web interface, go to iDRAC Settings > Connectivity > Network > Network Settings > Advanced
Network Settings
2. In FIPS Mode, select Enabled and click Apply.
3. A message appears prompting you to confirm the change. Click OK.
iDRAC restarts in FIPS mode. Wait for at least 60 seconds before you reconnect to iDRAC.
4. Install a trusted certificate for iDRAC.
NOTE: The default TLS/SSL certificate is not allowed in FIPS mode and a user needs to configure iDRAC to use one of the
other certificate methods found in the section “Securely Using SSL and TLS/SSL Certificate.”
NOTE: Some iDRAC interfaces, such as the standards-compliant implementations of IPMI and SNMP, do not support
FIPS-compliance.
NOTE: When enabling FIPS mode, ensure that you are following your FIPS operational policies.
CAUTION: Enabling FIPS mode resets iDRAC to factory-default settings. If you want to restore the settings,
back up the server configuration profile (SCP) before you enable FIPS mode and restore the SCP after iDRAC
restarts.
NOTE: If you reinstall or upgrade iDRAC firmware, FIPS mode gets disabled.
Federal Information Processing Standards (FIPS) 156
Secure Shell (SSH)
SSH or Secure Shell is a cryptographic network protocol for operating network services securely over an unsecured network.
Typical applications include remote command-line, login, and remote command execution. On iDRAC, SSH can be used to run
RACADM commands. It provides the same capabilities as the legacy telnet console (deprecated in iDRAC9 4.40.00.00) using an
encrypted transport layer for higher security. The SSH service is enabled by default on iDRAC.
The security settings that are recommended for SSH are:.
● Enable PKI
● Do not use DSA keys
● Enable only elliptic curve key exchanges
● Enable only ciphers with 256-bit key strength or higher
Topics:
• SSH Cryptography Configuration
• Supported SSH Cryptography Schemes
• Using Public Key Authentication for SSH
SSH Cryptography Configuration
iDRAC provides user control over the cryptographic settings for the SSH daemon such that the user can determine the ideal
settings for their environment. The control given to the user is not a relaxation of the settings in any manner. Instead, the
feature allows the user the ability to modify the value set for each option to achieve a narrower and stringent cryptographic
policy. In other words, the user can only remove values from the options but is not able to add any values other than those that
have been defined/allowed in the default value-set.
The cryptographic policies are configured using the following options:
● Ciphers — Ciphers
● Host-Key-Algorithms — HostKeyAlgorithms
● Key-Exchange Algorithms — KeyExchangeAlgorithms
● MACs — MACs
Typically, the values for each of these options are set to prudent settings that reflect the best security practices that cater to
a wide variety of environments. As such the iDRAC default settings for these options are the same as those ascribed by the
SSH package open-source community. These settings can be configured using RACADM command-line interface. See iDRAC
RACADM CLI User’s Guide.
Supported SSH Cryptography Schemes
To communicate with iDRAC using SSH protocol, it supports multiple cryptography schemes that are listed in the following
table.
Table 2. Table 2. SSH cryptography schemes
Scheme Type Algorithms
Asymmetric Cryptography
Public Key rsa-sha2-512
rsa-sha2-256
ssh-rsa
ecdsa-sha2-nistp256
16 Secure Shell (SSH)Table 2. Table 2. SSH cryptography schemes (continued)
Scheme Type Algorithms
ssh-ed25519
Symmetric Cryptography
Key Exchange curve25519-sha256
curve25519-sha256@libssh.org
ecdh-sha2-nistp256
ecdh-sha2-nistp384
ecdh-sha2-nistp521
diffie-hellman-group-exchange-sha256
diffie-hellman-group16-sha512
diffie-hellman-group18-sha512
diffie-hellman-group14-sha256
Encryption chacha20-poly1305@openssh.com
aes128-ctr
aes192-ctr
aes256-ctr
aes128-gcm@openssh.com
aes256-gcm@openssh.com
MAC umac-128-etm@openssh.com
hmac-sha2-256-etm@openssh.com
hmac-sha2-512-etm@openssh.com
hmac-sha1-etm@openssh.com
umac-128@openssh.com
hmac-sha2-256
hmac-sha2-512
hmac-sha1
Compression None
Using Public Key Authentication for SSH
iDRAC supports Public Key Authentication (PKA) over SSH. This is a licensed feature. When the PKA over SSH is set up
and used correctly, you must enter the username while logging into iDRAC. This is useful for setting up automated scripts
that perform various functions. The uploaded keys must be in RFC 4716 or OpenSSH format. Else, you must convert the
keys into that format. In any scenario, a pair of private and public keys must be generated on the management station.
The public key is uploaded to iDRAC local user, and private key is used by the SSH client to establish the trust relationship
between the management station and iDRAC. Public Key Authentication is recommended as a security feature because it
cryptographically verifies authentication and eliminates the need for password credentials. To achieve the highest level of
security, it is recommended to generate an RSA key with a 4096-bit key size which is the maximum that is supported on iDRAC.
You can generate the public or private key pair using:
● PuTTY Key Generator application for clients running Windows
● ssh-keygen CLI for clients running Linux.
The public key can be uploaded using iDRAC Web interface or RACADM command-line interface.
Secure Shell (SSH) 17CAUTION: This privilege is reserved for users who are members of the Administrator user group on iDRAC.
However, users in the Custom user group can be assigned this privilege. A user with this privilege can modify
any user’s configuration. This includes creation or deletion of any user, SSH Key management for users, and so
on. For these reasons, assign this privilege carefully.
18 Secure Shell (SSH)7
Network Security Configuration
iDRAC provides optional networking interfaces that can be used for connection and management. As a security best practice, it
is recommended to disable networking interfaces that are unused.
The following configurations are recommended for network security:
● iDRAC Nic Select – Dedicated
● iDRAC VLAN – enabled
● USB Management Port — Disabled
● iDRAC Managed: USB SCP — Disabled
● Pass-through State — Disabled
● Pass-through Mode — USB NIC
● IP Blocking Enabled
● IP Filtering Enabled
● Auto Discovery Disabled or if Auto Discovery is necessary set to DNS
Table 3. Table 3. Network Configurations from Web Interface and RACADM
Feature iDRAC Web Interface RACADM
Nic iDRAC Settings > Connectivity > Network > Network Settings > NIC racadm set idrac.nic.selection 1
Selection Selection - Dedicated
VLAN iDRAC Settings > Connectivity > Network > VLAN Settings > Enable racadm set idrac.nic.vlanenable 1
VLAN ID - Enabled
racadm set idrac.nic.vlanID Connectivity > Network > VLAN Settings > VLAN ID - Number>
USB iDRAC Settings > Settings > Management USB Settings - Disabled racadm set
Managem
idrac.usb.PortStatus 0
ent Port
Pass- iDRAC Settings > Connectivity > OS to iDRAC Pass-through - Disabled racadm set idrac.OS-
through BMC.AdminState 0
State
Pass- iDRAC Settings > Connectivity > OS to iDRAC Pass-through - USB NIC racadm set idrac.OS-
through BMC.PTMode 1
Mode
Ip iDRAC Settings > Connectivity > Advanced Network Settings > IP racadm set
Blocking Blocking Enabled – Enabled idrac.IPBlocking.BlockEnable 1
Ip iDRAC Settings > Connectivity > Advanced Network Settings > IP racadm set
Blocking Blocking Fail Count – 3 iDRAC.IPBlocking.FailCount 3
Fail Count
IP iDRAC Settings > Connectivity > Advanced Network Settings > IP racadm set
Blocking Blocking Fail Window – 60 iDRAC.IPBlocking.FailWindow 60
Fail
Window
IP iDRAC Settings > Connectivity > Advanced Network Settings > IP racadm set
Blocking Blocking Penalty Time – 60 iDRAC.IPBlocking.PenaltyTime 60
Penalty
Time
Network Security Configuration 19Table 3. Table 3. Network Configurations from Web Interface and RACADM (continued)
Feature iDRAC Web Interface RACADM
IP Range iDRAC Settings > Connectivity > Advanced Network Settings > IP racadm set
Filtering Ranges > IP Range Enabled - Enabled iDRAC Settings > Connectivity idrac.IPBlocking.RangeEnable 1
> Advanced Network Settings > IP Ranges > IP Range Address –
idrac.IPBlocking.RangeAddr Connectivity > Advanced Network Settings > IP of Management Station>
Ranges > IP Range Subnet –
racadm set
idrac.IPBlocking.RangeMask <
Management Subnet Mask>
Auto iDRAC Settings > Connectivity > Network > iDRAC Auto Discovery > racadm set
Discovery Auto Discovery – Disabled idrac.autodiscovery.EnableIPChan
geAnnounce 0
Topics:
• Dedicated NIC and Shared LOM
• OS to iDRAC Pass-through
• VLAN Usage
• IP Blocking
• IP Range Filtering
• Auto-discovery
• Auto Config
• iDRAC USB Interfaces
• Configuring iDRAC Direct USB Connection Using the Webserver
Dedicated NIC and Shared LOM
The most secure network connection is the iDRAC's Dedicated NIC because it can be connected to a network that is physically
separated from the production network. This physically segregates the iDRAC management traffic from the production network
traffic.
If use of the iDRAC's Dedicated NIC is not feasible for any reason, the iDRAC can be run in Shared LOM mode with a VLAN
enabled. But the iDRAC's management traffic is sent across the same wire as the production network. Alternatively, if the use
of a VLAN is not possible while in Shared LOM mode, access to the iDRAC must be secured using strong passwords and other
security measures described in this document.
OS to iDRAC Pass-through
In servers that have Network Daughter Card (NDC) or embedded LAN On Motherboard (LOM) devices, you can enable the
OS to iDRAC Pass-through feature. This feature provides a high-speed bi-directional in-band communication between iDRAC
and the host operating system through a shared LOM, a dedicated NIC, or through the USB NIC. The OS-BMC lom-p2p (i.e.,
"LOM-PT") interface uses the OS-to-BMC passthrough capability of the Shared NDC or LOM hardware. This feature only must
be enabled if the iDRAC is in Shared LOM mode and the external switch does not support "hairpin" mode. When the iDRAC has
LOM-PT enabled, traffic between the server and iDRAC is not sent externally to the network.
The OS-BMC usb-p2p (i.e. "USB-NIC") interface uses hardware on the server motherboard to enable point-to-point
connectivity between the server and the iDRAC. This interface can be used to isolate host-to iDRAC traffic from external
networks. If server to iDRAC connectivity is needed, USB-NIC is a preferred secure method because it can be used in
combination with iDRAC’s dedicated NIC. However, as a security best practice, unused interfaces should be disabled if they
are not needed. Disable USB-NIC if host-to-iDRAC communication is not needed and iDRAC Service Module (iSM) software is
not installed on the server.
20 Network Security ConfigurationVLAN Usage
A VLAN can be configured on the iDRAC if iDRAC management traffic must be separated from production traffic. A VLAN is
recommended as a best security practice when iDRAC is in Shared LOM mode or in Dedicated mode to isolate network access
to iDRAC’s management interfaces. Technologies such as VLANs and firewalls help ensure that only authorized users can access
network resources.
IP Blocking
You can use IP blocking to dynamically determine when excessive login failures occur from an IP address and block or prevent
the IP address from logging into the iDRAC9 for a preselected time span. IP blocking includes:
● The number of allowable login failures
● The timeframe in seconds when these failures must occur
● The amount of time, in seconds, when the IP address is prevented from establishing a session after the total allowable
number of failures is exceeded
As consecutive login failures accumulate from a specific IP address, they are tracked by an internal counter. When the user logs
in successfully, the failure history is cleared, and the internal counter is reset. These settings can be edited in the GUI, RACADM,
and Redfish.
Enabling this feature is a recommended security best practice. By automatically detecting potential malicious actions being
performed and preventing unauthorized access to iDRAC through brute force attacks, IP blocking hardens iDRAC network
security resilience.
IP Range Filtering
In addition to IP Blocking, iDRAC offers IP Range filtering options to provide additional security.
● IP filtering limits the IP address range of the clients accessing iDRAC. It compares the IP address of an incoming login to
the specified range and allows iDRAC access only from a management station whose IP address is within the range. All other
login requests are denied.
● Users can specify up to five (5) different IP ranges to allow more granularity for multi-site or global datacenters.
● This feature can be viewed/edited in the GUI, or by RACADM or Redfish.
Auto-discovery
The Auto-discovery feature allows newly installed servers to automatically discover the remote management console that
hosts the provisioning server. The provisioning server provides custom administrative user credentials to iDRAC so that the
un-provisioned server can be discovered and managed from the management console. For more information about provisioning
server, see the Lifecycle Controller Remote Services Quick Start Guide available at www.dell.com/idracmanuals.
Provisioning server works with a static IP address. Auto-discovery feature on the iDRAC is used to find the provisioning server
using DHCP/Unicast DNS/mDNS.
● When iDRAC has the console address, it sends its own service tag, IP address, Redfish port number, Web certificate etc.
● This information is periodically published to consoles.
DHCP, DNS server, or the default DNS hostname discovers the provisioning server. If DNS is specified, the provisioning server
IP is retrieved from DNS and the DHCP settings are not required. If the provisioning server is specified, discovery is skipped so
neither DHCP nor DNS is required.
Because Auto-discovery relies on iDRAC publishing unencrypted information for discovery purposes and should only be required
in initial provisioning, it is recommended as a security best practice that this feature be disabled unless needed. If auto-discovery
is necessary, DNS is the preferred method.
Auto Config
The Auto Config feature configures and provisions all the components in a server in a single operation. These components
include BIOS, iDRAC, and PERC. Auto Config automatically imports a Server Configuration Profile (SCP) XML or JSON file
Network Security Configuration 21containing all configurable parameters. The DHCP server that assigns the IP address also provides the details for accessing the
SCP file.
SCP files are created by configuring a gold configuration server. This configuration is then exported to a shared NFS, CIFS,
HTTP, or HTTPS network location that is accessible by the DHCP server and the iDRAC of the server being configured. The
SCP file name can be based on the Service Tag or model number of the target server or can be given as a generic name. The
DHCP server uses a DHCP server option to specify the SCP file name (optionally), SCP file location, and the user credentials to
access the file location.
NOTE: The user credentials to the network share are sent in plaintext as part of the DHCP response message, so care must
be taken when using this Auto Config on an unsecure network that the credentials cannot be used for anything other than
accessing the network share.
When the iDRAC obtains an IP address from the DHCP server that is configured for Auto Config, iDRAC uses the SCP to
configure the server’s devices. Auto Config is invoked only after the iDRAC gets its IP address from the DHCP server. If it does
not get a response or an IP address from the DHCP server, then Auto Config is not invoked. HTTP and HTTPS file sharing
options are supported for iDRAC firmware 3.00.00.00 or later. Details of the HTTP or HTTPS address must be provided. In
case the proxy is enabled on the server, the user must provide further proxy settings to allow HTTP or HTTPS to transfer
information.
If autoconfig is not needed, it is a recommended security configuration to disable this feature to limit potential attack surface. If
required, auto config should use HTTPS as a security best practice.
To configure Auto Config using iDRAC GUI: iDRAC Settings > Connectivity > iDRAC Auto Config.
iDRAC USB Interfaces
For increased security, you can completely disable USB ports. You also have the option of disabling only the USB ports on the
front. For example, USB ports can be disabled for production use and then temporarily enabled to grant access to a crash cart
for debugging purposes.
iDRAC direct feature allows you to directly connect your laptop or PC USB port to the iDRAC USB port. This allows you to
interact directly with iDRAC interfaces (such as Web interface, RACADM, and WSMAN) for advanced server management and
servicing.
iDRAC Direct is a special USB port that is hardwired to the iDRAC service processor for at-the-server debugging and
management from the front of the server (cold aisle). It allows a user to attach a standard Micro-AB USB cable to this
port and the other end (Type A) to a laptop. A standard web browser can then access iDRAC GUI for extensive debugging
and management of the server. If iDRAC Enterprise license is installed, the user can even access the OS desktop over iDRAC’s
Virtual Console feature. Since normal iDRAC credentials are used for logging in, iDRAC Direct works as a secure “crash cart”
with the additional advantage of extensive hardware management and service diagnostics. This can be an attractive option for
securing physical access to the server in remote locations (host USB ports and VGA outputs can be disabled in this case).
As a security best practice, it is recommended to disable any unused interface including USB Interfaces.
Configuring iDRAC Direct USB Connection Using the
Webserver
To configure the USB port:
1. In the iDRAC Web interface, go to Overview > Hardware > USB Management Port. The Configure USB Management
Port page is displayed.
2. From the USB Management Port Mode drop-down menu, select any of the following options:
● Automatic — USB Port is used by iDRAC or the server’s operating system.
● Standard OS Use — USB port is used by the server OS.
● iDRAC Direct only — USB port is used by iDRAC.
3. From the iDRAC management interface: USB XML Configuration drop-down menu, select options to configure a server by
importing XML configuration files stored on a USB drive:
● Disabled
● Enabled only when server has default credential settings
● Enabled
22 Network Security ConfigurationFor information about the fields, see the iDRAC Online Help.
4. Click Apply to apply the settings.
Network Security Configuration 23You can also read