SECTION 1-6 - Lexus Drivers
←
→
Page content transcription
If your browser does not render page correctly, please read the page content below
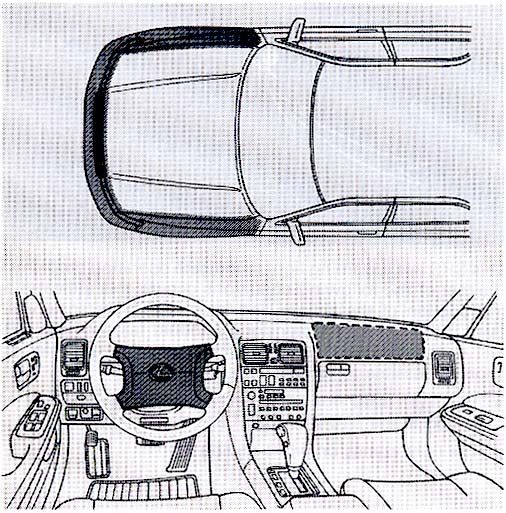
SECTION                                1–6
INSTRUMENTS AND CONTROLS
Comfort adjustment
Front seat . . . . . . . . . . . . . . . . . . . . . . . . . . . . . . . . . . . . . . . . . . . . . . . .   50
Headrests . . . . . . . . . . . . . . . . . . . . . . . . . . . . . . . . . . . . . . . . . . . . . . .      52
Tilt and telescopic steering wheel . . . . . . . . . . . . . . . . . . . . . . . . . . .                     54
Outside rear view mirrors . . . . . . . . . . . . . . . . . . . . . . . . . . . . . . . . . .                57
Inside rear view mirror . . . . . . . . . . . . . . . . . . . . . . . . . . . . . . . . . . . . .            58
Seat belts . . . . . . . . . . . . . . . . . . . . . . . . . . . . . . . . . . . . . . . . . . . . . . . .   59
Supplemental restraint system (SRS) . . . . . . . . . . . . . . . . . . . . . . . .                          67
Child restraint . . . . . . . . . . . . . . . . . . . . . . . . . . . . . . . . . . . . . . . . . . . .      73
Driving position memory system . . . . . . . . . . . . . . . . . . . . . . . . . . . .                       81

                                                                                                                  49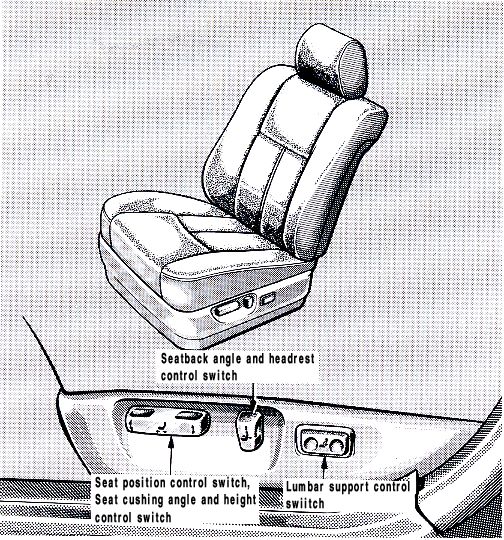
COMFORT ADJUSTMENT

                         FRONT SEAT                                     Adjusting front seats

     Seat adjustment precautions
     Adjust the driver’s seat so that the foot pedals, steering wheel
     and instrument panel controls are within easy reach of the
     driver.
     CAUTION:
     D Do not adjust the seat while the vehicle is moving as the
       seat may unexpectedly move and cause the driver to
       lose control of the vehicle.
     D Be careful not to hit the seat against a passenger,
       luggage or the rear seat.

     NOTICE:
     Do not operate the control switch in more than one
     dimension at a time. It may cause electrical overload.
                                                                                           Seatback angle and headrest
                                                                                           control switch

                                                                                Seat position control switch,   Lumbar support control
                                                                                seat cushion angle and height   switch
                                                                                control switch

50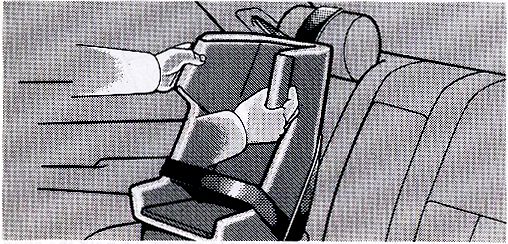
COMFORT ADJUSTMENT

Adjusting seat position                                            Move the control switch in the desired direction.
                                                                   Releasing the switch will stop the seatback in that position.
                                                                   CAUTION:
                                                                   To reduce the risk of sliding under the lap belt during a
                                                                   collision, avoid reclining the seatback any more than
                                                                   needed. The seat belts provide maximum protection when
                                                                   the driver and the passenger are sitting up straight and
                                                                   well back in the seats. If you are reclining, the lap belt may
                                                                   slide past your hips and apply restraint forces directly to
                                                                   the abdomen. Therefore, in the event of a frontal collision,
                                     Control switch                the risk of personal injury may increase with increasing
                                                                   recline of the seatback.

Move the control switch in the desired direction.                  Adjusting seat cushion angle and height
Releasing the switch will stop the seat in that position. Do not
place anything under the seat. It might interfere with the seat
movement.                                                                                 Control
                                                                                          switch

Adjusting seatback angle

                                                                                                               Control switch

                                                                   Move the control switch in the desired direction.
                                              Control switch

                                                                                                                                    51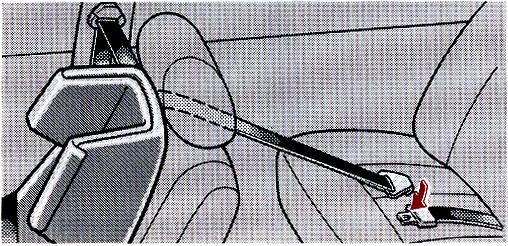
COMFORT ADJUSTMENT

     Releasing the switch will stop the seat cushion in that position.                       HEADRESTS
     Adjusting lumbar support                                            Front seats (manual type)

                                                    Control switch

                                                                                                    Unlock

     Push the control switch on either side.
                                                                         To raise the headrest, pull it up. To lower it, press the lock
     The amount of lumbar support will change as long as the             release button and push the headrest down. To move the
     switch is pushed.                                                   headrest forward, pull on the top.
                                                                         Pulling the top of the headrest forward as far as it can go will
                                                                         return it to the upright position.
                                                                         The headrest is most effective when it is close to your head.
                                                                         Therefore, using a cushion on the seatback is not
                                                                         recommended.
                                                                         CAUTION:
                                                                         D Adjust the top of the headrest so that it is closest to the
                                                                           top of your ears.
                                                                         D After adjusting the headrest, make sure it is locked in
                                                                           position.
                                                                         D Do not drive with the headrests removed.
52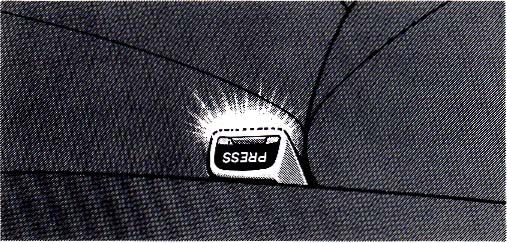
COMFORT ADJUSTMENT

Front seats (power type)                                        Pulling the top of the headrest as far forward as it can go will
                                                                return it to the upright position.
                                                                The headrest is most effective when it is close to your head.
                                                                Therefore, using a cushion on the seatback is not
                                                                recommended.
                                                                CAUTION:
                                                                D Adjust the top of the headrest so that it is closest to the
                                                                  top of your ears.
                                                                D Do not drive with the headrests removed.

                                             Control switch
                                                                Rear seats

Move the control switch in the desired direction.
Releasing the switch will stop the headrest in that position.

                                                                 Unlock

                                                                To raise the headrest, pull it up. To lower it, press the lock
                                                                release button and push the headrest down.

To move the headrest forward, pull on the top.

                                                                                                                                   53
COMFORT ADJUSTMENT

     The headrest is most effective when it is close to your head.   To adjust the tilt of the steering wheel, push the control
     Therefore, using a cushion on the seatback is not               switch upward or downward to set it to the desired
     recommended.                                                    position.
     CAUTION:                                                        CAUTION:
     D Adjust the top of the headrest so that it is closest to the   This adjustment should not be made while the vehicle is
       top of your ears.                                             moving.
     D After adjusting the headrest, make sure it is locked in
       position.                                                     ADJUSTMENT OF TELESCOPIC STEERING COLUMN
     D Do not drive with the headrests removed.

               TILT AND TELESCOPIC
                 STEERING WHEEL
     Power tilt and telescopic type
     ADJUSTMENT OF STEERING WHEEL TILT

                                                                     To adjust the steering column length, push the control
                                                                     switch forward or backward to set the steering wheel to
                                                                     the desired position.
                                                                     CAUTION:
                                                                     This adjustment should not be made while the vehicle is
                                                                     moving.

54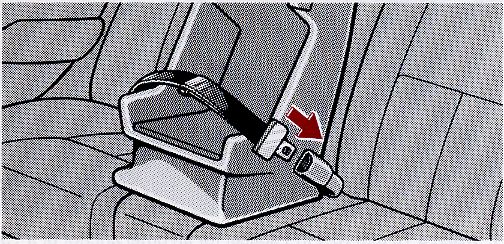
COMFORT ADJUSTMENT

Auto mode                                                         Power tilt and manual telescopic type
When the tilt and telescopic steering wheel auto mode button
on the steering column is set to the “ON” position, the current   ADJUSTMENT OF STEERING WHEEL TILT
position of the steering column becomes the memorized
position.

              On

               Off                                                To adjust the tilt of the steering wheel, push the control
                                                                  switch upward or downward to set it to the desired
                                                                  position.
When the ignition key is removed with the auto mode button set
to the “ON” position, the steering column moves forward away      CAUTION:
from the driver and also tilts up for easy exit and entry.        This adjustment should not be made while the vehicle is
                                                                  moving.
When the key is inserted in the ignition, the steering column
returns to the memorized position. This occurs regardless of
whether the auto mode button is ON or OFF.

                                                                                                                               55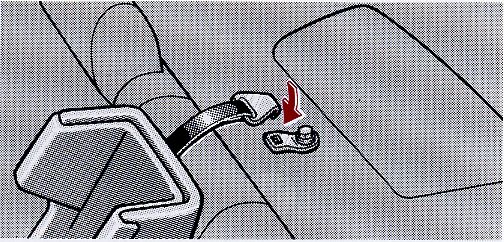
COMFORT ADJUSTMENT

     ADJUSTMENT OF TELESCOPIC STEERING COLUMN

                                                                                     On

                                 Lock
                                                                                       Off

                               Unlock
                                                                       When the ignition key is removed with the auto mode button set
     To adjust the steering column length, push the lock               to the “ON” position, the steering column tilts up for easy exit
     release lever down, push or pull the steering wheel to the        and entry.
     desired position, and pull the lever fully up until a click is    When the key is inserted in the ignition, the steering column
     heard.                                                            returns to the memorized position. This occurs regardless of
                                                                       whether the auto mode button is ON or OFF.
     CAUTION:
     D This adjustment should not be made while the vehicle
       is moving.
     D After adjusting the steering wheel, try moving it up and
       down to make sure it is locked in position.
     Auto mode
     When the tilt steering wheel auto mode button on the steering
     column is set to the “ON” position, the current position of the
     steering column becomes the memorized position.

56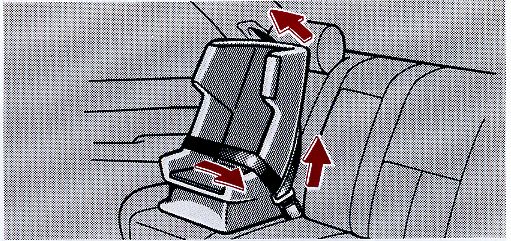
COMFORT ADJUSTMENT

   OUTSIDE REAR VIEW MIRRORS                                       Power rear view mirror control

                                                                                 Control switch

                                                                                                     Master switch

Adjust the mirror so you can just see the side of your             To adjust the power rear view mirror, first place the master
vehicle in the mirror.                                             switch at “R” (right) or “L” (left), and push the control
                                                                   switch on the desired side.
Be careful when judging the size or distance of any object seen
in the outside rear view mirror on the passenger’s side. It is a   If the engine is not running, the key must be in the “ACC”
convex mirror with a curved surface. Any object seen in a          position for operation of the power rear view mirror.
convex mirror will look smaller and farther away than if seen in
a normal flat mirror.                                              NOTICE:
                                                                   If ice should jam the mirror, do not operate the control or
                                                                   scrape the mirror face. Use a spray de-icer to free the
                                                                   mirror.

                                                                                                                                  57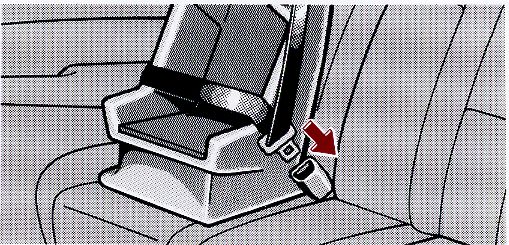
COMFORT ADJUSTMENT

     Folding rear view mirrors                                           INSIDE REAR VIEW MIRROR

     To fold the rear view mirror, push backward.                  The mirror surface is normal when switched to DAY, and
     The rear view mirrors can be folded backward for parking in   appears slightly darker when switched to NIGHT as its
     restricted areas.                                             reflectivity is reduced.
                                                                   While driving at night, switching the inside rear view
                                                                   mirror to NIGHT by pushing the button can reduce the
                                                                   reflection of the headlights of following vehicles.
                                                                   When the ignition key is inserted or removed, the mirror is
                                                                   always in DAY mode.
                                                                   Each time the button is pushed, the mode is switched between
                                                                   DAY and NIGHT.
                                                                   Adjust it before driving so that the rear view is the best.
                                                                   When the outside air temperature is low, switching between
                                                                   DAY and NIGHT may be a little slower.

58
COMFORT ADJUSTMENT
SEAT BELTS CAUTION:
Persons should ride in their seats properly wearing their
seat belts whenever the vehicle is moving. Otherwise,
Seat belt precautions they are much more likely to suffer serious bodily injury
Lexus recommends that the driver and passengers in the in the event of sudden braking or a collision.
vehicle be properly restrained at all times with the seat belts When using the seat belts, observe the following:
provided. Failure to do so could increase the chance of injury
and / or the severity of injury in accidents. D Use the belt for only one person at a time. Do not use
a single belt for two or more people − even children.
Baby or small child. Use a child restraint system which fits
your vehicle. See “Child restraint” for details. D Avoid reclining the seatbacks too much. The seat belts
provide maximum protection when the seatbacks are in
Child. If a child is too large for a child restraint system, the child the upright position. (See “Adjusting seatback angle”.)
should sit in the rear seat and must be restrained using the
D Be careful not to damage the belt webbing or hardware.
vehicle’s seat belts. According to accident statistics, the child
Take care that they do not get caught or pinched in the
is safer when properly restrained in the rear seat than in the
seat or doors.
front seat. Do not allow the child to stand up or kneel on the
seat. If the shoulder belt falls across the child’s neck or face, D Inspect the belt system periodically. Check for cuts,
move the child to the center position and use the center lap fraying, and loose parts. Damaged parts should be
belt. replaced. Do not disassemble or modify the system.
Pregnant woman. Lexus recommends the use of a seat belt. D Keep the belts clean and dry. If they need cleaning, use
Ask your doctor for specific recommendations. The lap belt a mild soap solution or lukewarm water. Never use
should be worn securely and as low as possible over the hips bleach, dye, or abrasive cleaners − they may severely
and not on the waist. weaken the belts.
Injured person. Lexus recommends the use of a seat belt. D Replace the belt assembly if it has been used in a
Depending on the injury, however, first check with your doctor. severe impact. The entire assembly should be replaced
even if damage is not obvious.
59COMFORT ADJUSTMENT
Front seat belt buckle illumination Front seat belts
Opening the driver’s door lights up the driver’s seat belt Adjust the seat as needed and sit up straight and well back
buckle for easy use. The same applies for the front in the seat. To fasten your belt, pull it out of the retractor
passenger’s door and seat belt buckle. and insert the tab into the buckle.
The light remains on for 15 seconds after the door is closed, You will hear a click when the tab locks into the buckle.
but goes off immediately when all doors are locked.
The seat belt length automatically adjusts to your size and the
seat position.
The retractor will lock the belt during a sudden stop or on
impact. It also may lock if you lean forward too quickly. A slow,
easy motion will allow the belt to extend, and you can move
around freely.
When the passenger’s shoulder belt is completely extended
and is then retracted even slightly, the belt is locked in that
position and cannot be extended. This feature is used to hold
the child restraint system securely. (For details, see “Child
restraint” on page 73.) To free the belt again, fully retract the
belt and then pull the belt out once more.
60COMFORT ADJUSTMENT
If the seat belt cannot be pulled out of the retractor, firmly pull
the belt and release it. You will then be able to smoothly pull the Unlock
belt out of the retractor.
CAUTION:
After inserting the tab, make sure that the connection is
secure and the belt is not twisted.
Too high
Keep as low on hip bone
Take up slack as possible Adjust the shoulder anchor position to your size.
(manual type)
To raise the anchor position, push the anchor up. To lower the
anchor position, push the lock release button and slide the
anchor down. After the adjustment, make sure the anchor is
locked in position.
Adjust the position of the lap and shoulder belts. CAUTION:
Always be sure that the belt is positioned across your
Position the lap belt as low as possible on your hips − not on
shoulder, as close to your neck as possible; not on your
your waist, then adjust it to a snug fit by pulling the shoulder
upper arm or neck. Failure to do so could reduce the
portion upward through the latch plate.
amount of protection in an accident and increase the
CAUTION: chance of injury.
D High-positioned lap belts and loose-fitting shoulder
belts both could increase the chance of injury due to
sliding under the lap belt during an accident.
D For your safety, do not place the shoulder belt under
your arm.
61COMFORT ADJUSTMENT
(power type) To release the belt, press the buckle release button and
To adjust the shoulder anchor position, press the upper or allow the belt to retract.
lower part of the control switch located on the door. When the
If the belt does not retract smoothly, pull it out and check for
switch is released, the shoulder anchor will stop at that
kinks or twists. Then make sure that it remains untwisted as it
position.
retracts.
CAUTION:
Always be sure that the belt is positioned across your
shoulder, as close to your neck as possible; not on your
upper arm or neck. Failure to do so could reduce the
amount of protection in an accident and increase the
chance of injury.
62COMFORT ADJUSTMENT
Rear outside seat belts If the seat belt cannot be pulled out of the retractor, firmly pull
the belt and release it. You will then be able to smoothly pull the
belt out of the retractor.
CAUTION:
After inserting the tab, make sure that the connection is
secure and the belt is not twisted.
Too high
Take up slack
Sit up straight and well back in the seat. To fasten your
belt, pull it out of the retractor and insert the tab into the
buckle. Keep as low on hip
bone as possible
You will hear a click when the tab locks into the buckle.
The seat belt length automatically adjusts to your size. Adjust the position of the lap and shoulder belts.
The retractor will lock the belt during a sudden stop or on Position the lap belt as low as possible on your hips − not on
impact. It also may lock if you lean forward too quickly. A slow, your waist, then adjust it to a snug fit by pulling the shoulder
easy motion will allow the belt to extend, and you can move portion upward through the latch plate.
around freely. When the shoulder belt is completely extended
and is then retracted even slightly, the belt is locked in that CAUTION:
position and cannot be extended. This feature is used to hold D High-positioned lap belts and loose − fitting shoulder
the child restraint system securely. (For details, see “Child belts both could increase the chance of injury due to
restraint” on page 73.) sliding under the lap belt during an accident.
To free the belt again, fully retract the belt and then pull the belt D For your safety, do not place the shoulder belt under
out once more. your arm.
63COMFORT ADJUSTMENT
Rear center seat belt
Lengthen
To release the belt, press the buckle release button and
allow the belt to retract.
Sit up straight and well back in the seat. To fasten your
If the belt does not retract smoothly, pull it out and check for
belt, insert the tab into the buckle.
kinks or twists. Then make sure that it remains untwisted as it
retracts. You will hear a click when the tab locks into the buckle.
If the belt is not long enough for you, hold the tab at a right angle
to the belt and pull on the tab.
CAUTION:
After inserting the tab, make sure that the connection is
secure and the belt is not twisted.
64COMFORT ADJUSTMENT
Too high
Adjust to
a snug fit
Keep as low on hip bone
as possible
Remove excess length of the belt and adjust the belt To release the belt, press the buckle release button.
position.
Seat belt extender
To shorten the belt, pull the free end of the belt.
If your seat belt cannot be fastened securely because it is not
Position the lap belt as low as possible on your hips − not on long enough, a personalized seat belt extender is available
your waist, then adjust it to a snug fit. from your Lexus dealer free of charge
CAUTION: Please contact your local Lexus dealer so that the dealer can
High-positioned lap belts could increase the chance of order the proper required length for the extender. Bring the
injury due to sliding under the lap belt during an accident. heaviest coat you expect to wear for proper measurement and
selection of length Additional ordering information is available
at your Lexus dealer.
CAUTION:
When using the seat belt extender, observe the following.
Failure to follow these instructions could result in less
effectiveness of the seat belt restraint system in case of
vehicle accident, increasing the chance of personal injury.
65COMFORT ADJUSTMENT
D Never use the seat belt extender if you can fasten the CAUTION:
seat belt without it. After inserting the tab, make sure that the connection is
D Remember that the extender provided for you may not secure and the seat belt extender is not twisted.
be safe when used on a different vehicle, or for another
person or at a different seating position than the one
originally intended for.
Seat belt
extender
To connect the extender to the seat belt, insert the tab into
the seat belt buckle so that the “PRESS” signs on the
buckle release buttons of the extender and the seat belt
are both facing outward as shown.
You will hear a click when the tab locks into the buckle,
When releasing the seat belt, press on the buckle release
button on the extender, not on the seat belt. This helps prevent
damage to the vehicle interior and extender itself.
When not in use, remove the extender and store in the vehicle
for future use.
66COMFORT ADJUSTMENT
SUPPLEMENTAL RESTRAINT The passenger airbag is activated together with the driver
airbag, even with no passenger in the front seat.
SYSTEM (SRS) The seat belt pretensioners are activated together with the
The Supplemental Restraint System (SRS) consists of airbags, even with no passenger in the front seat.
Airbags and Seat Belt Pretensioners. The combination of
these two systems provides maximum protection to the
driver and front passenger in a severe collision.
This indicator comes on when the ignition key is turned to
the “ACC” or “ON” position. It goes off after about 6
seconds. This means the SRS is operating properly.
Airbags:
The SRS warning light system monitors the front airbag
In response to a severe frontal impact, the airbags inflate
sensors, center airbag sensor assembly, inflators, seat belt
and reduce the likelihood of the driver and passenger’s
pretensioners, warning light, interconnecting wiring and power
heads from directly hitting the steering wheel and
sources.
instrument panel.
Seat belt pretensioners:
In response to a severe frontal impact, the seat belts are
quickly drawn back in by the retractors so that the belts
snugly restrain the driver and front passenger.
67COMFORT ADJUSTMENT
Front airbag sensor Warning light Front airbag sensor
Passenger airbag module
(airbag and inflator)
Center airbag sensor assembly
Steering wheel
pad assembly
(airbag and
inflator)
Seat belt pretensioner
Seat belt pretensioner
The SRS is designed to activate in response to a severe The center airbag sensor assembly consists of a safing sensor
frontal impact within the shaded area shown in the and center airbag sensor. In a severe frontal impact, a front
illustration. airbag sensor and safing sensor, or center airbag sensor and
The SRS does not work in the following cases. safing sensor detect the shock, and the center airbag sensor
assembly triggers the inflators and seat belt pretensioners.
D Impact from the side or rear Then the inflators fill the airbags and the seat belts are quickly
D Vehicle overturn drawn back in by the retractors to help restrain forward motion
of the occupants.
D Frontal collision at low speeds
When the SRS operates, it produces an operating noise and
For your safety, be sure to always wear your seat belts. releases a small amount of smoke-like gas. This gas is
harmless and does not indicate a fire.
68COMFORT ADJUSTMENT
CAUTION:
D The SRS is designed only as a supplement to the
conventional seat belt systems of the driver and front
passenger. The front seat occupants are particularly
susceptible to injury if they do not wear their seat belts;
when sudden braking or a collision occurs, they may be
thrown forward. To obtain maximum protection in an
accident, the driver and all passengers in the vehicle
should always wear their seat belts when driving. For
Far back
instructions and precautions concerning the seat belt
system, see “SEAT BELTS” on page 59.
D A baby or small child who is too small to use a seat belt
should be properly secured in a rear seat using a child
D Do not use a rear-facing child restraint system in the
restraint system.
front seat because the force of the rapid inflation of the
passenger airbag may cause injury to the child. When
using a forward-facing child restraint system in the
front seat, the seat must be moved as far back as
possible. For instructions concerning the installation
of a child restraint system, see “CHILD RESTRAINT” on
page 73.
69COMFORT ADJUSTMENT
D Do not sit on the edge of the seat or lean over the D Do not put objects on or in front of the instrument panel
instrument panel when the vehicle is in use. The airbag that houses the airbag system. They might restrict
inflates with considerable speed and force; you may be inflation or cause personal injury.
severely injured. Sit up straight and well back in the
seat, and use your seat belt. D Do not modify, remove or open any component or
wiring, such as the steering wheel, column cover, front
passenger airbag cover, front passenger airbag, center
airbag sensor assembly, front airbag sensors, or seat
belt assembly. Doing any of these may cause sudden
SRS operation or disable the system, which could
result in personal injuly.
Failure to follow these instructions can result in severe
injuries.
70COMFORT ADJUSTMENT
NOTICE:
Do not perform any of the following changes without
consulting your Lexus dealer. Such changes can
interfere with proper operation of the SRS in some
cases.
D Installation of electronic items such as a mobile
two-way radio or cassette tape player.
D Modifications to the suspension system.
D Repairs made on or near the front fenders, front
console, steering column, steering wheel or
instrument panel near front passenger airbag or seat
belt assembly. This SRS has a warning light to indicate operating problems.
If either of the following conditions occurs, this indicates a
malfunction of the airbags and / or seat belt pretensioners.
Even if the seat belt pretensioners should fail, the seat belt will
operate conventionally. Contact your Lexus dealer as soon as
possible to service the vehicle.
D The light does not come on when the ignition key is turned
to the “ACC” or “ON” position, or remains on.
D The light comes on while driving.
71COMFORT ADJUSTMENT
In the following cases, contact your Lexus dealer as soon as
possible:
D The airbags have been inflated.
D The seat belt pretensioners have been activated.
D The front part of the vehicle (shaded in the illustration) was
involved in an accident not of the extent to cause the SRS
to inflate.
D The pad section of the steering wheel or front passenger
airbag cover (shaded in the illustration) is scratched,
cracked, or otherwise damaged.
NOTICE:
Do not disconnect the battery cables before contacting
your Lexus dealer.
72COMFORT ADJUSTMENT
CHILD RESTRAINT When installing a child restraint system, refer to the
instructions provided by its manufacturer and follow the
directions under the following illustrations.
Child restraint precautions
Lexus strongly urges the use of child restraint system for CAUTION:
children small enough to use it. After installing the child restraint system, make sure it is
secured in place. If it is not restrained securely, it may
The laws of all fifty states in the U.S.A. and Canada now cause injury to the child in the event of a sudden stop or
require the use of a child restraint system. accident.
CAUTION: When not using the child restraint system, keep it secured with
For effective protection in automobile accidents and the seat belt or place it in the trunk or somewhere other than
sudden stops, children must be properly restrained. in the vehicle. This will prevent it injuring passengers in the
Holding a child in your arms is not a substitute for a child event of a sudden stop or accident.
restraint system. In an accident, the child can be crushed
against the windshield, or between you and the vehicle’s
interior if you are unrestrained.
Child restraint system
A child restraint system for a small child or baby must
itself be restrained on the seat with either the lap belt or
the lap portion of the lap / shoulder belt.
The child restraint system should conform to the size of the
child and properly fit the vehicle seat. For greater safety, the
child restraint system should be installed in the rear seat.
According to accident statistics, children are safer when
properly restrained in the rear seat than in the front seat.
73COMFORT ADJUSTMENT
Top strap anchors and locations If your child restraint system does not provide any of the
necessary parts, you can purchase the following items from
your Lexus dealer.
D CRS installation kit (Part No. 04731-22012)
− contains 1 bolt, 3 types of spacer and 1 locking clip.
D Bolt (Part No. 91511-60830)
370 mm 370 mm
(14.5 in.) (14.5 in.)
Your vehicle has anchors for securing the top strap of a child 90
90 mmmm
restraint system. Anchor nuts are welded beneath the sheet (3.5
(3.5in.)
in.) 35 mm
metal to permit installation of an anchor bracket for a child (1.5 in.)
restraint system.
To install an anchor bracket, use an 8 mm x 30 mm x 1.25 mm
coarse thread metric bolt and a 10 mm (0.4 in.) spacer for the
1. Run your fingers across the trim of the filler panel to locate
outer anchors or a 15 mm (0.6 in.) spacer for the center anchor.
the holes underneath it in the positions shown above.
Note that the bolts accompanying many child restraint systems
are not metric. You can damage the anchor nuts on your 2. Make a hole in the covering directly above the hole in the
vehicle if you force bolts with different thread into the anchor filler panel.
nuts.
74COMFORT ADJUSTMENT
Bolt
Anchor bracket
Spacer
3. Remove the seals from the anchors using a screwdriver or 4. Insert a 10 mm (0.4 in.) spacer for an outer anchor or a 15
the like. mm (0.6 in.) spacer for the center anchor, and tighten down the
anchor bracket for your child restraint system with a bolt.
Torque the bolt to 16.5 − 24.7 N.m (1.68 − 2.52 kgf.m, 12.2 −
18.2 ft.lb).
To comply with Canada Motor Vehicle Safety Standards,
vehicles sold in Canada are provided with a bracket set in the
glovebox, designed for use with the center location. If you want
to install the bracket set on either outer anchor, replace the
spacer (Part No. 90560-08061) with one that is 10 mm (0.4 in.)
thick. This can be purchased from your Lexus dealer.
75COMFORT ADJUSTMENT
INSTALLATION ON CENTER REAR SEAT
If your child restraint system requires the use of a top strap,
latch the hook onto the anchor bracket and tighten the top
Fasten the center lap belt over the child restraint system strap.
following the instructions provided by its manufacturer.
CAUTION:
Make sure the belt is tight by pulling its free end while you firmly Push and pull the child restraint system in different
push down the child restraint system. directions to be sure it is secure.
76COMFORT ADJUSTMENT
To remove the child restraint system, press the buckle release Fully extend the shoulder belt to put in the lock mode.
button and unhook the top strap.
INSTALLATION ON OUTER REAR SEAT
Place the shoulder belt between the vehicle seatback and the
child restraint system and allow it to retract. To hold the child
restraint system securely, let the shoulder belt retract as far as
Fasten the lap and shoulder belt over the child restraint system
it will go while firmly pushing down the child restraint system.
following the instructions provided by its manufacturer. Keep
the lap portion of the bell tight.
77COMFORT ADJUSTMENT
If your child restraint system requires the use of a top strap, To remove the child restraint system, press the buckle release
latch the hook onto the anchor bracket and tighten the top button and allow the belt to retract. Unhook the top strap.
strap.
CAUTION:
Make sure that the seat belt is securely locked, and the
child restraint system is secure by pushing and pulling it
in different directions.
78COMFORT ADJUSTMENT
INSTALLATION ON FRONT SEAT
Far back
Fasten the lap and shoulder belt over the child restraint system
following the instructions provided by its manufacturer. Keep
CAUTION: the lap portion of the belt tight.
Do not use a rear-facing child restraint system in the front
seat because the force of the rapid inflation of the
passenger airbag may cause injury to the child. When
using a forward-facing child restraint system, move the
seat as far back as possible.
Fully extend the shoulder belt to put in the lock mode.
79COMFORT ADJUSTMENT
Place the shoulder belt between the vehicle seatback and child CAUTION:
restraint system and allow it to retract. To hold the child Make sure that the seat belt is securely locked, and the
restraint system securely, let the shoulder belt retract as far as child restraint system is secure by pushing and pulling it
it will go while firmly pushing down the child restraint system. in different directions.
If your child restraint system requires the use of a top strap, To remove the child restraint system, press the buckle release
latch the hook onto the tab of the rear center seat belt and button and allow the belt to retract. Unhook the top strap.
tighten the top strap.
80COMFORT ADJUSTMENT
DRIVING POSITION MEMORY 2. While pushing the “SET” button, push button “1” or “2”
until the signal beeps.
SYSTEM The beep sound means that the positions are recorded in the
The micro computer can memorize the position of the driver’s computer’s memory.
seat, the height of the shoulder belt anchor of the driver’s seat
By repeating these two steps and pressing the remaining
belt, and the positions of the tilt and telescopic steering, and
button, the driving position for another driver can be recorded.
outside rear view mirrors. Two different driving position profiles
can be entered into the computer’s memory. To set a new memorized position, select the desired position
and perform step 2. The previous memory will be erased and
Recording a driving position in the computer’s memory can
the new position will be set.
only be done when the ignition key is in the “ON” position and
the shift lever is in the “P” position. To make only slight changes to an already memorized position,
the easiest way is to first activate the memorized position, then
Setting a driving position make the desired changes and perform step 2 above.
1. Adjust the driver’s seat, driver’s shoulder belt anchor,
tilt and telescopic steering and outside rear view mirrors
to the desired position.
81COMFORT ADJUSTMENT
Activating a memorized position If any driving position memory switch is pushed while one of
the memorized driving position profiles is being activated, the
operation will stop.
To activate the system, push the desired button (“1” or “2”)
again.
The driving position memory control system cannot be
operated while the vehicle is moving.
If the vehicle’s battery is disconnected, the computer’s
memory will be erased and the memorized positions will have
to be set again.
CAUTION:
D Do not start the vehicle while the adjustments are being
made.
When you push button “1” or “2”, the driving position will
be automatically adjusted to the position recorded for that D Take care not to select the wrong button, or the seat
button. could strike the rear passenger or hit your body against
the steering wheel. If this happens, you can stop the
Conditions for memorized position activation movement by pressing another driving position
D Ignition key “ON” and shift lever in “P” position memory switch, or depressing the brake pedal.
All parts of the memorized positions can be activated.
However, if the brake pedal is being depressed, the seat
position will not change.
D Key not in ignition switch and within 30 seconds of opening
driver’s door.
The memorized position can be activated, except for the tilt
and telescopic steering. This will be activated when the key
is inserted into the ignition switch.
82You can also read