Site Coordinator Reference Guide
←
→
Page content transcription
If your browser does not render page correctly, please read the page content below
ClinCard at the U:                    Site Coordinator Reference Guide
     How to Login to ClinCard
     1) Please use a compatible internet browser: Chrome is preferred. Internet Explorer isn’t supported.
     2) Go to the link sent in your email. You will use SSO.
        NOTE: The link in the email is the only way to login. DO NOT bookmark the link. DO NOT copy/
        paste the link into an external document then try to login - you will get error messages each time.
     3) Enter your SSO credentials (CaneID and password)
     4) You will be redirected to www.clincard.com

     How to Register a Participant
     1)  Login
     2)  Click Register Participant
     3)  Select the appropriate Study from the drop-down menu
     4)  Enter the required information into the brief form
              a. Study Status - Enrolled is the default - do not change
              b. Subject ID (study’s code name for patient)
              c. Site - University of Miami - do not change
              d. Name – all fields
              e. Social Security Number disabled for most studies and optional for others
              f. Address – address is crosschecked with Google Maps
              g. Date of Birth
              h. Email and mobile number - required for travel or messaging only
     Note: If the Participant has opted to receive payment confirmations or appointment reminders, be sure to select
     the “Enable Email Alerts” and/or “Enable Text Messaging” checkboxes.
     5) Click Register
     6) You will be brought to the “Participant Information” screen where you can assign a card, make a payment,
        schedule an appointment reminder, replace a ClinCard or edit a Participant’s information

          How to Register a Participant in an Additional Study
           1) Locate the existing “Participant Information” page through the “Look Up Participant” menu tab. (If
              you have just enrolled the subject in your first study, you should be on the correct page.)
           2) Click on the last name of the participant to open the subject’s information tab
           3) Click on the Edit Subject option in the list to the right
           4) Click on the Add Study link located under the list of the subject’s current study(ies)
           5) Enter the new Subject ID (this should be specific to your study) and enter or select the Status
           6) Scroll to the bottom of the page and click Save.

Revised April 2021                                                                            Page 1 of 6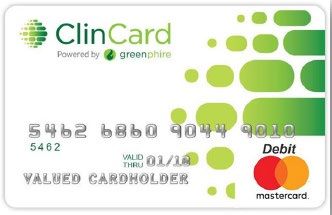
ClinCard at the U: Site Coordinator Reference Guide
How to Look Up a Participant – do this first to verify registration
1) Login
2) Click Look Up Participant
3) Select the appropriate Study from the drop-down menu
4) Enter one of the following pieces of information
a. First name and/or last name
b. Subject ID
c. Participant’s Initials
d. Participant’s email
e. Last four (4) digits of ClinCard
5) Click Search
6) All Results will appear below the “Search Results” header
7) Click (the green/bold) Last Name of the Participant
8) You will be brought to the “Participant Information” screen where you can assign a ClinCard, replace a
ClinCard, make a payment, edit a Participant’s information or schedule an appointment reminder
How to Assign a ClinCard to a Participant:
Once you have selected an existing Participant or registered a new Participant, you will be brought to the
“Participant Information” screen. On the right-hand side of the screen, you will see options that represent all
the actions you can perform on the Participant.
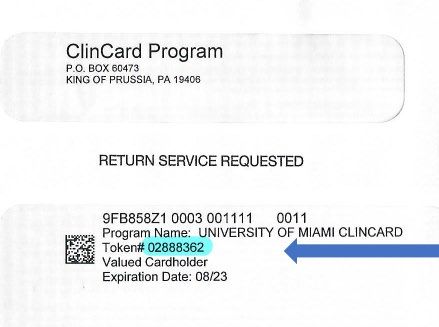
1) Click Assign ClinCard and a pop-up screen will appear
2) In the ‘New Card’ field, enter the 8-digit token number visible through the window of one of the ClinCard
envelopes you received
Note: Do not open the envelope prior to providing to the Participant. The 8-digit token number is different
than the 16-digit card number
3) Click Assign
4) Once the card has successfully been assigned, you will receive a confirmation message at the top of the
“Participant Information” screen
How to Replace a ClinCard:
There’s an option to “Replace ClinCard” if a Participant loses their card. On the right-hand side of the screen:
1) Click Replace ClinCard
2) Follow the steps above for “How to Assign a ClinCard”, using a token number from a new ClinCard
envelope.
Note: The “Replace ClinCard” process will immediately and automatically:
• Inactivate the lost card
• Transfer any available/pending balance to the newly assigned ClinCard.
Do Not reload unused/pending funds.
The process does not charge the Participant for any transfer fees.
Revised April 2021 Page 2 of 6ClinCard at the U: Site Coordinator Reference Guide
How to Make a Site Visit Payment:
Once you have selected an existing Participant or registered a new Participant, you will be brought to the
“Participant Information” screen. On the right-hand side of the screen, you will see options that represent all
the actions you can perform on the Participant.
Please pay AFTER completion of the visit/milestone.
1) Click Request Payment and a pop-up screen will appear
2) Select the visit being paid from the Milestone dropdown menu, e.g., Visit 1, Visit 2, etc. Each preset payment
can be used only once – once used, it will no longer appear in the dropdown menu
3) Add any Notes. Notes are not required for preset payments
4) Click Pay
5) Once the payment has successfully been requested the “Pending Payments” area of the “Participant
Information” screen will reflect the payment. It will also be reflected in your “Recent Activity” in the middle
of the screen
6) Once a payment request has been approved and processed, the amount will be removed from the “Pending
Payments” area and will now be reflected in the “Card Balance” area
7) If the Participant has opted to receive email and/or text messages, the Participant will receive a payment
confirmation communication
Note: If a participant has missed a visit, or if another method of payment was used, select the appropriate
Milestone, then select Missed or N/A, as appropriate, to remove that visit from the Milestone dropdown
menu.
How to Make a Manual Participant Payment
A Manual Payment option can be used if a Milestone is not on the dropdown menu. Manual Payments are
strongly discouraged - all Milestones should be requested to be entered in the dropdown menu. Manual
Payments require external approval.
Once you have selected an existing Participant or registered a new Participant, you will be brought to the
“Participant Information” screen. On the right-hand side of the screen, you will see options that represent all
the actions you can perform on the Participant.
1) Click Request Payment and a pop-up screen will appear
2) Select Miscellaneous Payment from the Milestone dropdown menu
3) Enter the payment value that you want to pay in the “Amount” field
4) Add an appropriate comment in the “Notes” field, e.g., Unscheduled Visit, etc. A comment is required.
5) Click Pay
6) Once the payment has successfully been requested the “Pending Payments” area of the “Participant
Information” screen will reflect the payment. It will also be reflected in your “Recent Activity” in the middle
of the screen
7) Once a payment request has been approved and processed, the amount will be removed from the “Pending
Payments” area and will now be reflected in the “Card Balance” area
8) If the Participant has opted to receive email and/or text messages, the Participant will receive a payment
confirmation communication
Revised April 2021 Page 3 of 6ClinCard at the U: Site Coordinator Reference Guide
How to Make a Reimbursement for Travel and Related Items
Once you have selected an existing Participant or registered a new Participant, you will be brought to the
“Participant Information” screen. On the right-hand side of the screen you will see options that represent all
the actions you can perform on the Participant. Click on Request Reimbursement and you will be brought to a
new page that will give you reimbursement options.
Amounts shown are the maximum that can be loaded without external approval:
a. Drive / Mileage (calculates the appropriate amount to reimburse a participant for miles driven
to/from appointment) - $15
b. Taxi / Rideshare - $30
c. Other Reimbursement - $10
d. Meals / Food - $15
e. Public Transit - $10
f. Hotel / Accommodations (for expenses incurred in getting to screening) - $100
g. Flight (for expenses incurred in getting to screening) - $100
h. Tolls / Parking - $15
1) Enter the required information into the fields that will appear in the pop-up window
2) Click on the “Save” button
3) When you are finished making payment requests click on the “Submit Request” button
Limitations
1) All items but Drive / Mileage are taxable income by default and require a receipt
2) To make an item non-taxable, please upload a receipt or click on the checkbox “Receipt received but unable
to be uploaded”
3) Drive / Mileage can be used only with the automatic mileage calculation from the participant’s home
address to the default UM address of 1611 NW 12th Ave, Miami FL 33136. If a flat amount is to be
reimbursed, use “Other Reimbursement” or request that the study be setup for flat mileage rate
4) Reimbursements that are not in the IRB / ICF are not allowed
5) Amounts listed are the maximum that can be loaded without ORA approval
How to Setup an Appointment Reminder
Once you have selected an existing Participant or registered a new Participant, you will be brought to the
“Participant Information” screen. On the right-hand side of the screen, you will see options that represent all
the actions you can perform on the Participant.
1) Click Schedule Appointment and a pop-up menu will appear
2) Enter the date and time of the Participant’s next appointment
3) Click Schedule
4) The appointment has been stored and will appear at the bottom of the “Participant Information” screen
under the header “Upcoming Appointments”
5) If the Participant has opted to receive email and/or text messages, the Participant will receive a reminder
communication 3 days and 1 day prior to the Participant’s next appointment
Revised April 2021 Page 4 of 6ClinCard at the U: Site Coordinator Reference Guide
How to run self-serve reports
1) Click Reports and a dropdown menu of available reports will appear.
2) Select the desired report. You have access to reports related to your study’s payments and participants.
3) There may be the option of selecting the date range. If yes, select desired dates, then click Apply
4) Results can be exported to Excel (look for the Excel icon)
Logging out
1) When done with needed processes, click Logout at top right
2) You will be logged out of ClinCard, but your login information will still be valid
3) Close all browser tabs to remove login information for security measures
ORA is here to help
Contact Lydia Zantout, lxz327@miami.edu, 305-284-3953 for any questions or concerns. ORA can:
• Enter/edit study and all payment information in drop down menu
• Create/edit user and user access
• Void payment
• Provide enhanced reports that do not include participant personal information
• Answer any questions you have
• Coach you on anything you need
FYI: ORA reviews all ClinCard activity on a regular basis
Lydia Zantout 305-284-3953
Lionel Vera 305-284-4286
Revised April 2021 Page 5 of 6ClinCard at the U: Site Coordinator Reference Guide
ClinCard Cardholder Information
Amount loaded onto the ClinCard is available immediately except for payments requiring approval.
Activation occurs automatically once the first payment is loaded.
The card is valid and can be reloaded until the printed expiration date.
How do I use the ClinCard?
It’s Free:
1) At any establishment (store, restaurant) like a credit card. Swipe at register and select “Credit”.
2) At the store like a debit card with the option to get cash back. Select “Debit” at the register. The debit
option requires a PIN – call MasterCard for PIN: 1-866-952-3795
3) For online purchases like a credit card
4) To get a cash advance/cash out the card at any MasterCard accepting bank.
You must know your available balance and inform the teller of the amount you would like to withdraw.
Tellers are unable to check your balance (see “How to check your balance below”). Present the teller with
your signed ClinCard and a valid government-issued photo ID
When do I pay?
1) At the ATM to get cash - this option requires a PIN– call MasterCard for PIN: 1-866-952-3795.
Cost is $3.00 for domestic withdrawals and $4.00 for international withdrawals
2) When there’s no activity (funds not loaded nor spent) for 6 months. Cost is $4.50 per month, deducted
from the card balance. Call Customer Service 1-866-952-3795 to reverse the charges.
3) When I call customer service to request a replacement card. Cost is $7.00, deducted from the card balance.
4) When I request a paper statement. It’s free to check the balance online.
Can I use my ClinCard at a restaurant?
Yes. Please note that restaurants & fast food establishments automatically preauthorize your card for 20%
over the total bill - ensure that you have enough available on your card to account for this.
Can I use my ClinCard at a gas station?
Yes: take your ClinCard inside to the cashier and ask them to run the card for a specific amount. Otherwise, if
you use the card at the pump, the gas station will preauthorize your card for up to $100 or more. While the
preauthorization is not a charge made to the account, it counts against the available balance. It can then take
several days for the preauthorization amount to be removed.
How do I check my available balance?
1) Call Customer Service 1-866-952-3795 and follow the prompts
2) Login to MyClinCard.com:
Navigate your web browser to www.myclincard.com. Register Account. View Balance
3) Balance Inquiry at ATM - requires PIN. Call MasterCard for PIN: 1-866-952-3795
4) Inquire at your next site visit
What if the amount of the purchase is for more than the balance on my ClinCard?
Be sure to inform the cashier of the specific amount you would like to use, otherwise, the card will be declined
because it will be authorized for an amount higher than the balance.
What should I do if my ClinCard is lost, stolen or damaged?
Notify the study site – they will be able to replace it for you either for free or at a small cost, up to $4.60. This
will deactivate your old card and transfer any remaining balance to your new card.
If you prefer to contact customer service, there is a $7.00 fee and it will take 7-10 days to receive by mail.
Revised April 2021 Page 6 of 6You can also read