Steps to make Raspberry Pi Supercomputer
←
→
Page content transcription
If your browser does not render page correctly, please read the page content below
Return to http://www.soton.ac.uk/~sjc/raspberrypi
View video at: http://www.youtube.com/watch?v=Jq5nrHz9I94

Steps to make Raspberry Pi Supercomputer
Prof Simon Cox
Computational Engineering and Design Research Group
Faculty of Engineering and the Environment
University of Southampton, SO17 1BJ, UK.

V0.2: 8th September 2012
V0.3: 30th November 2012 [Updated with less direct linking to MPICH2 downloads]
V0.4: 9th January 2013 [Updated step 33]
First steps to get machine up

   1. Get image from
      http://www.raspberrypi.org/downloads
      I originally used: 2012-08-16-wheezy-raspbian.zip
      Updated 30/11/12: 2012-10-28-wheezy-raspbian.zip
      My advice is to to check the downloads page on raspberrypi.org and use the latest version.
   2. Use win32 disk imager to put image onto an SD Card (or on a Mac e.g. Disk Utility/ dd)
      http://www.softpedia.com/get/CD-DVD-Tools/Data-CD-DVD-Burning/Win32-Disk-Imager.shtml
      You will use the “Write” option to put the image from the disk to your card
   3. Boot on Pi
   4. Expand image to fill card using the option on screen when you first boot. If you don’t do this on first
      boot, then you need to use
      $ sudo raspi-config
      http://elinux.org/RPi_raspi-config
   5. Log in and change the password
      http://www.simonthepiman.com/beginners_guide_change_my_default_password.php
      $ passwd
   6. Log out and check that you typed it all OK (!)
      $ exit
   7. Log back in again with your new password

Building MPI so we can run code on multiple nodes
   8. Refresh your list of packages in your cache
       $ sudo apt-get update
   9. Just doing this out of habit, but note not doing any more than just getting the list (upgrade is via
       “sudo apt-get upgrade”).
   10. Get Fortran… after all what is scientific programming without Fortran being a possibility?
       $ sudo apt-get install gfortran
   11. Read about MPI on the Pi. This is an excellent post to read just to show you are going to make it by
       the end, but don’t type or get anything just yet- we are going to build everything ourselves:
                                                                                                           1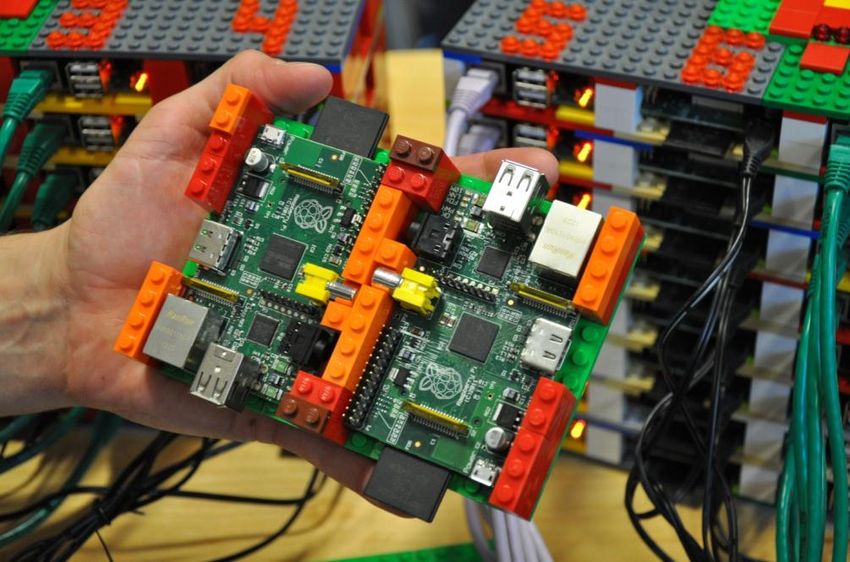
http://westcoastlabs.blogspot.co.uk/2012/06/parallel-processing-on-pi-bramble.html
    Note there are a few things to note here
    a) Since we put Fortran in we are good to go without excluding anything
    b) The packages here are for armel and we need armhf in this case… so we are going to build MPI
        ourselves
12. Read a bit more before you begin:
    http://www.mcs.anl.gov/research/projects/mpich2/documentation/files/mpich2-1.4.1-
    installguide.pdf
    Note: As the version of MPICH2 updates, you are better to go to:
    http://www.mpich.org/documentation/guides/
    and get the latest installer’s Guide.
    We are going to follow the steps from 2.2 (from the Quick Start Section) in the guide.
13. Make a directory to put the sources in
    $ mkdir /home/pi/mpich2
    $ cd ~/mpich2
14. Get MPI sources from Argonne.
      $ wget http://www.mcs.anl.gov/research/projects/mpich2/downloads/tarballs/1.4.1p1/mpich2-1.4.1p1.tar.gz
      [Note that as the MPI source updates, you can navigate to:
      http://www.mpich.org/downloads/ to get the latest stable release version for MPICH2]
15.   Unpack them.
      $ tar xfz mpich2-1.4.1p1.tar.gz
      [Note: You will need to update this as the version of MPICH2 increments]
16.   Make yourself a place to put the compiled stuff – this will also make it easier to figure out what you
      have put in new on your system. Also you may end up building this a few times…
      $ sudo mkdir /home/rpimpi/
      $ sudo mkdir /home/rpimpi/mpich2-install
      [I just chose the “rpimpi” to replace the “you” in the Argonne guide and I did the directory creation
      in two steps]
17.   Make a build directory (so we keep the source directory clean of build things)
       mkdir /home/pi/mpich_build
18.   Change to the BUILD directory
      $ cd /home/pi/mpich_build
19.   Now we are going to configure the build
      $ sudo /home/pi/mpich2/mpich2-1.4.1p1/configure -prefix=/home/rpimpi/mpich2-install
      [Note: You will need to update this as the version of MPICH2 increments]
      Make a cup of tea
20.   Make the files
      $ sudo make
      Make another cup of tea
21.   Install the files
      $ sudo make install
      Make another cup of tea – it will finish…
22.   Add the place that you put the install to your path
      $ export PATH=$PATH:/home/rpimpi/mpich2-install/bin
      Note to permanently put this on the path you will need to edit .profile
      $nano ~/.profile
      … and add at the bottom these two lines:
      # Add MPI to path
                                                                                                           2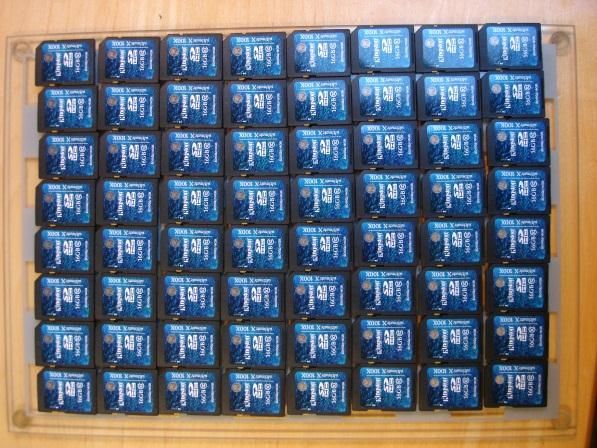
PATH="$PATH:/home/rpimpi/mpich2-install/bin"
  23.   Check whether things did install or not
        $ which mpicc
        $ which mpiexec
  24.   Change directory back to home and create somewhere to do your tests
        $ cd ~
        $ mkdir mpi_testing
        $ cd mpi_testing
  25.   Now we can test whether MPI works for you on a single node
        mpiexec -f machinefile -n  hostname
        where machinefile contains a list of IP addresses (in this case just one) for the machines
        a) Get your IP address
        $ ifconfig
        b) Put this into a single file called machinefile
  26.   $ nano machinefile
        Add this line:
        192.168.1.161
        [or whatever your IP address was]
  27.    If you use
        $ mpiexec -f machinefile –n 1 hostname
        Output is:
        raspberrypi
  28.   Now to run a little C code. In the examples subdirectory of where you built MPI is the famous CPI
        example. You will now use MPI on your Pi to calculate Pi:
        $ cd /home/pi/mpi_testing
        $ mpiexec -f machinefile -n 2 ~/mpich_build/examples/cpi
        Output is
        Process 0 of 2 is on raspberrypi
        Process 1 of 2 is on raspberrypi
        pi is approximately 3.1415926544231318, Error is 0.0000000008333387
        Celebrate if you get this far.

Flash me… once
  29. We now have a master copy of the main node of the machine with all of the installed files for MPI
      in a single place. We now want to clone this card.
  30. Shutdown your Pi very carefully
      $ sudo poweroff
      Remove the SD Card and pop it back into your SD Card writer on your PC/ other device. Use Win32
      disk imager (or on a Mac e.g. Disk Utility/ dd) to put the image FROM your SD Card back TO your
      PC:
      http://www.softpedia.com/get/CD-DVD-Tools/Data-CD-DVD-Burning/Win32-Disk-Imager.shtml
      You will use the “Read” option to put the image from the disk to your card
      Let us call the image “2012-08-16-wheezy-raspbian_backup_mpi_master.img”
  31. Eject the card and put a fresh card into your PC/other device. Use win32 disk imager to put image
      onto an SD Card (or on a Mac e.g. Disk Utility/ dd)
      http://www.softpedia.com/get/CD-DVD-Tools/Data-CD-DVD-Burning/Win32-Disk-Imager.shtml

                                                                                                            3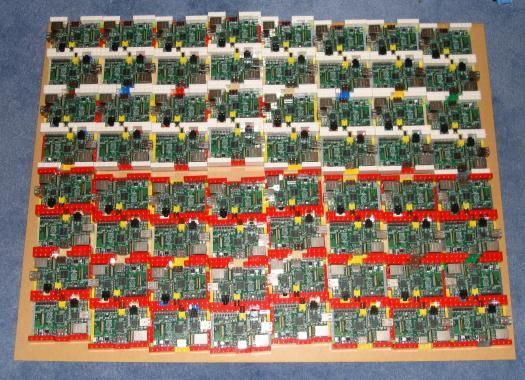
You will use the “Write” option to put the image from the disk to your card and choose the “2012-
      08-16-wheezy-raspbian_backup_mpi_master.img” image you just created.
      [Note that there are probably more efficient ways of doing this – in particular maybe avoid
      expanding the filesystem in step 4 of the first section.]
  32. Put the card into your second Pi and boot this. You should now have two Raspberry Pis on. Unless
      otherwise stated, all the commands below are typed from the Master Pi that you built first.

Using SSH instead of password login between the Pis
  33. Sort out RSA to allow quick log in. This is the best thing to read:
      http://steve.dynedge.co.uk/2012/05/30/logging-into-a-rasberry-pi-using-publicprivate-keys/
      In summary (working on the MASTER Pi node)
      $ cd ~
      $ ssh-keygen -t rsa –C “raspberrypi@raspberrypi”
      This set a default location of /home/pi/.ssh/id_rsa to store the key
      Enter a passphrase e.g. “myfirstpicluster”. If you leave this blank (not such good security) then no
      further typing of passphrases is needed.
      $ cat ~/.ssh/id_rsa.pub | ssh pi@192.168.1.162 "mkdir .ssh;cat >> .ssh/authorized_keys"
  34. If you now log into your other Pi and do
      $ ls –al ~/.ssh
      You should see a file called “authorized_keys” – this is your ticket to ‘no login heaven’ on the nodes
  35. Now let us add the new Pi to the machinefile. (Log into it and get its IP address, as above)
      Working on the Master Raspberry Pi (the first one you built):
      $ nano machinefile
      Make it read
      192.168.1.161
      192.168.1.162
      [or whatever the two IP addresses you have for the machines are]
  36. Now to run a little C code again. In the examples subdirectory of where you built MPI is the famous
      CPI example. First time you will need to enter the passphrase for the key you generated above
      (unless you left it blank) and also the password for the second Pi.
      $ cd /home/pi/mpi_testing
      $ mpiexec -f machinefile -n 2 ~/mpich_build/examples/cpi
      Output is
      Process 0 of 2 is on raspberrypi
      Process 1 of 2 is on raspberrypi
      pi is approximately 3.1415926544231318, Error is 0.0000000008333387
      If you repeat this a second time you won’t need to type any passwords in. Hurray.
      Note that we have NOT changed the hostnames yet (so yes, the above IS running on the two
      machines, but they both have the same hostname at the moment).
  37. If you change the hostname on your second machine (see Appendix 1 “Hostname Script”) and run:
      $ mpiexec -f machinefile -n 2 ~/mpich_build/examples/cpi
      Output:
      Process 0 of 2 is on raspberrypi
      Process 1 of 2 is on iridispi002
      Now you can see each process running on the separate nodes.

        CONGRATULATIONS - YOU HAVE NOW FINISHED BUILDING 2-NODE SUPERCOMPUTER
         IF YOU FOLLOW THE STEPS BELOW, YOU CAN EXPAND THIS TO 64 (or more) nodes
                                                                                                           4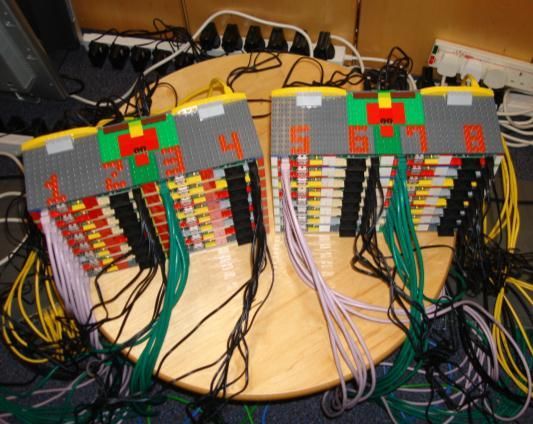
Acknowledgements
Thanks to all of the authors of the posts linked to in this guide and Nico Maas. Thanks to the team in the
lab: Richard Boardman, Steven Johnston, Gereon Kaiping, Neil O’Brien, and Mark Scott. Also to Oz
Parchment and Andy Everett (iSolutions). Thanks to Pavittar Bassi in Finance, who made all the orders for
equipment happen so efficiently. And, of course, Professor Cox’s son James who provided specialist support
on Lego and system testing.
Appendix 1 – Scripts and other things to do
Flash me… one more time (rinse and repeat for each additional node)
1. Power off the worker Pi and eject the card
$ sudo poweroff
We now have a copy of the WORKER nodes of the machine with all of the installed files for MPI in a
single place. We now want to clone this card- as it has the ssh key on it in the right place. Shutdown
your Pi very carefully
$ sudo poweroff
2. Remove the SD Card and pop it back into your SD Card writer on your PC/ other device. Use Win32
disk imager (or on a Mac e.g. Disk Utility/ dd) to put the image FROM your SD Card back to your PC:
http://www.softpedia.com/get/CD-DVD-Tools/Data-CD-DVD-Burning/Win32-Disk-Imager.shtml
You will use the “Read” option to put the image from the disk to your card
Let us call the image “2012-08-16-wheezy-raspbian_backup_mpi_worker.img”
3. Eject the card and put a fresh card into the machine. Use win32 disk imager to put image onto an
SD Card (or on a Mac e.g. Disk Utility/ dd)
http://www.softpedia.com/get/CD-DVD-Tools/Data-CD-DVD-Burning/Win32-Disk-Imager.shtml
You will use the “Write” option to put the image from the disk to your card and choose the “2012-
08-16-wheezy-raspbian_backup_mpi_master.img” image you just created.
[Note that there are probably more efficient ways of doing this – in particular maybe avoid
expanding the filesystem in step 4 of the first section.]
Hostname Script
If you want to rename each machine, you can do it from the Master node using:
ssh pi@192.168.1.162 'sudo echo "iridispi002" | sudo tee /etc/hostname'
ssh pi@192.168.1.163 'sudo echo "iridispi003" | sudo tee /etc/hostname'
ssh pi@192.168.1.164 'sudo echo "iridispi004" | sudo tee /etc/hostname'
etc.
You should then reboot each worker node
If you re-run step (36) above again, you will get:
$ mpiexec -f machinefile -n 2 ~/mpich_build/examples/cpi
Output:
Process 0 of 2 is on raspberrypi
Process 1 of 2 is on iridispi002
pi is approximately 3.1415926544231318, Error is 0.0000000008333387
This shows the master node still called raspberrypi and the first worker called iridispi002
5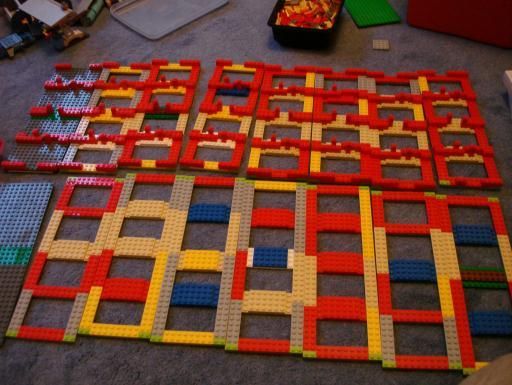
Using Python
There are various Python bindings for MPI. This guide just aims to show how to get ONE of them working.
1. Let us use mpi4py. More info at
http://mpi4py.scipy.org/
http://mpi4py.scipy.org/docs/usrman/index.html
$ sudo apt-get install python-mpi4py
2. We also want to run the demo so let us get the source too
$ cd ~
$ mkdir mpi4py
$ cd mpi4py
$ wget http://mpi4py.googlecode.com/files/mpi4py-1.3.tar.gz
$ tar xfz mpi4py-1.3.tar.gz
$ cd mpi4py-1.3/demo
3. Repeat steps 1 and 2 on each of your other nodes (we did not bake this into the system image)
4. Run an example (on your master node)
$ mpirun.openmpi -np 2 -machinefile /home/pi/mpi_testing/machinefile python helloworld.py
Output is:
Hello, World! I am process 0 of 2 on raspberrypi.
Hello, World! I am process 1 of 2 on iridispi002.
5. $ mpiexec.openmpi -n 4 -machinefile /home/pi/mpi_testing/machinefile python helloworld.py
Output is:
Hello, World! I am process 2 of 4 on raspberrypi.
Hello, World! I am process 3 of 4 on iridispi002.
Hello, World! I am process 1 of 4 on iridispi002.
Hello, World! I am process 0 of 4 on raspberrypi.
6. These are handy to remove things if your attempts to get mpi4py don’t quite pan out
$ sudo apt-get install python-mpi4py
$ sudo apt-get autoremove
Keygen script commands
cat ~/.ssh/id_rsa.pub | ssh pi@192.168.1.161 "cat >> .ssh/authorized_keys"
cat ~/.ssh/id_rsa.pub | ssh pi@192.168.1.162 "cat >> .ssh/authorized_keys"
cat ~/.ssh/id_rsa.pub | ssh pi@192.168.1.163 "cat >> .ssh/authorized_keys"
etc. for sending out the key exchanges if you want to do this again having generated a new key
Getting Pip for Raspberry Pi
1. We can install Pip, which gives us a nice way to set up Python packages (and uninstall them too).
More info is at
6
http://www.pip-installer.org/en/latest/index.html
         http://www.pip-installer.org/en/latest/installing.html

       $ cd ~
       $ mkdir pip_testing
       $ cd pip_testing
    2. A prerequisite for pip is “distribute” so let’s get that first and then install pip. The sudo is because
       the installation of these has to run as root.
       $ curl http://python-distribute.org/distribute_setup.py | sudo python
       $ curl https://raw.github.com/pypa/pip/master/contrib/get-pip.py | sudo python

Notes on making MPI Shared Libraries for Raspberry Pi
MPI libraries can also be built “shared” so that they can be dynamically loaded. This gives a library file that
ends in “.so” etc. not “.a” and we can do that by building those MPI libraries again. This is a repeat of steps
above, but written out again using the suffix “_shared” on the directory names.

    1. Make a directory to put the sources in
       $ mkdir /home/pi/mpich2_shared
       $ cd ~/mpich2_shared
    2. Get MPI sources from Argonne.
         $ wget http://www.mcs.anl.gov/research/projects/mpich2/downloads/tarballs/1.4.1p1/mpich2-1.4.1p1.tar.gz
         [Note that as the MPI source updates, you can navigate to:
         http://www.mpich.org/downloads/ to get the latest stable release version]
    3.   Unpack them.
         $ tar xfz mpich2-1.4.1p1.tar.gz
         [Note: You will need to update this as the version of MPICH2 increments]
    4.   Make yourself a place to put the compiled stuff – this will also make it easier to figure out what you
         have put in new on your system.
         $ sudo mkdir /home/rpimpi_shared/
         $ sudo mkdir /home/rpimpi_shared/mpich2-install_shared
         [I just chose the “rpimpi_shared” to replace the “you” in the Argonne guide and I made the
         directory creation in two steps]
    5.   Make a build directory (so we keep the source directory clean of build things)
         $ mkdir /home/pi/mpich_build_shared
    6.   Change to the BUILD directory
         $ cd /home/pi/mpich_build_shared
    7.   Now we are going to configure the build
         $ sudo /home/pi/mpich2_shared/mpich2-1.4.1p1/configure -prefix=/home/rpimpi_shared/mpich2-install_shared --enable-shared
        [Note: You will need to update this as the version of MPICH2 increments]
    8. Make the files
        $ sudo make
    9. Install the files
        $ sudo make install
    10. Finally add the place that you put the install to your path
        $ export PATH=$PATH:/home/rpimpi_shared/mpich2-install_shared/bin
        Note to permanently put this on the path you will need to edit .profile
        $ nano ~/.profile
        … and add at the bottom these two lines:
        # Add MPI Shared to path
        PATH="$PATH:/home/rpimpi_shared/mpich2-install_shared/bin"

                                                                                                                                    7
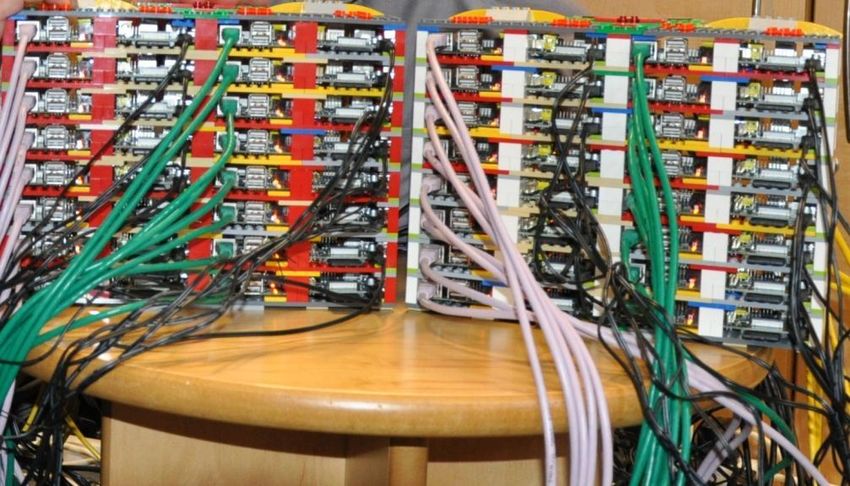
A couple of pictures when it was finished

(Picture Credits below: Glenn Harris 2012)

                                             8
Pictures making it
(Picture Credits below: Simon J Cox 2012)
(Picture Credits: Simon J Cox 2012)
Return to http://www.soton.ac.uk/~sjc/raspberrypi
9You can also read