Intel VTune Amplifier Installation Guide - macOS* (2018 Beta) - Intel Corporation www.intel.com Legal Information - XLsoft
←
→
Page content transcription
If your browser does not render page correctly, please read the page content below
Intel® VTune™ Amplifier
Installation Guide - macOS* (2018
Beta)

Intel Corporation

www.intel.com

Legal Information
Intel® VTune™ Amplifier Installation Guide - macOS* (2018 Beta)

Contents
       Legal Information................................................................................ 3

       Chapter 1: Introduction

       Chapter 2: Prerequisites
             Product Activation and Licensing.................................................................. 5

       Chapter 3: Installation Steps
             Installing with the Intel® VTune™ Amplifier Installer Graphical User Interface.....7
             Installing Intel® VTune™ Amplifier for Use with a Virtual Machine..................... 8
             Intel® VTune™ Amplifier Installation Folders.................................................. 9

       Chapter 4: Post-Installation Steps
             Linux* System Setup for Remote Analysis................................................... 11
             Embedded Linux* System Setup for Remote Analysis....................................13
                    Configuring Wind River* Linux* and Intel® VTune™ Amplifier with the
                       Intel System Studio Integration Layer............................................ 18
                    Configuring Yocto Project* and Intel® VTune™ Amplifier with the Intel
                       System Studio Integration Layer.................................................... 21
                    Configuring Yocto Project* and Intel® VTune™ Amplifier with the
                       Linux* Target Package..................................................................22
             FreeBSD* System Setup........................................................................... 24
             Android* System Setup............................................................................ 25
                    Preparing an Android* Application for Analysis.....................................29
                    Search Directories for Android* Targets.............................................. 30
             Intel® Xeon Phi™ Coprocessor Setup...........................................................30
             Using Intel® VTune™ Amplifier with a Virtual Machine....................................31
                    Enabling Intel® VTune™ Amplifier Analysis on a Parallels* Guest System. 33
             Configuring SSH Access for Remote Collection............................................. 34
             Sampling Drivers..................................................................................... 35
                    Building and Managing the Sampling Drivers....................................... 36

       Chapter 5: Getting Started with Intel® VTune™ Amplifier

       Chapter 6: Uninstalling Intel® VTune™ Amplifier

       Index........................................................................................ 43

   2
Legal Information
No license (express or implied, by estoppel or otherwise) to any intellectual property rights is granted by this
document.
Intel disclaims all express and implied warranties, including without limitation, the implied warranties of
merchantability, fitness for a particular purpose, and non-infringement, as well as any warranty arising from
course of performance, course of dealing, or usage in trade.
This document contains information on products, services and/or processes in development. All information
provided here is subject to change without notice. Contact your Intel representative to obtain the latest
forecast, schedule, specifications and roadmaps.
The products and services described may contain defects or errors which may cause deviations from
published specifications. Current characterized errata are available on request.
Cilk, Intel, the Intel logo, Intel Atom, Intel Core, Intel Inside, Intel NetBurst, Intel SpeedStep, Intel vPro,
Intel Xeon Phi, Intel XScale, Itanium, MMX, Pentium, Thunderbolt, Ultrabook, VTune and Xeon are
trademarks of Intel Corporation in the U.S. and/or other countries.
*Other names and brands may be claimed as the property of others.
© 2017 Intel Corporation
31 Intel® VTune™ Amplifier Installation Guide - macOS* (2018 Beta)
Introduction 1
This document explains how to install and configure Intel® VTune™ Amplifier on a macOS* system. Intel
VTune Amplifier on macOS* can be used to view results collected using VTune Amplifier on a Linux* or
Windows* system. Results cannot be collected on a macOS* system.
To install VTune Amplifier, you can use:
• Graphical user interface (GUI) installer: Presents installation options and allows you to choose product
components.
4Prerequisites 2
The following information is important to consider before beginning to install Intel® VTune™ Amplifier:
• Review the system requirements listed in the Release Notes document. The document can be found online
and in your installation media.
• It is recommended that an administrator account is used to install, change, or uninstall the product. Users
without administrator (or root user) access can install the product, but not all collectors will be available.
• If you will be using Xcode*, make sure that a supported version of Xcode is installed. If you install a new
version of Xcode in the future, you need to reinstall VTune Amplifier.
• You do not need to uninstall previous versions or updates of VTune Amplifier before installing a newer
version. However, if you do not remove older updates before installing a newer version, all product
components that belong to the same major release will be replaced with the latest version for each major
release update.
For example, if you have VTune Amplifier 20xx Update 1 installed and are currently installing VTune
Amplifier 20xx Update 2, the older version will be uninstalled and replaced with the new content for
Update 2. If you are installing the next major release, VTune Amplifier 20xy, your installation of VTune
Amplifier 20xx Update 1 will remain and the new release will be installed beside the old version,
duplicating common files, documentation, samples, and product components.
• If you are installing in a cluster environment, you can install and use multiple versions of the product on
the same system. However, kernel driver usage is limited to a single version of VTune Amplifier. This
means you can have multiple copies of VTune Amplifier installed without the SEP drivers and a single
version of the product with the drivers installed. The latter would be enabled with the advanced types of
analysis using hardware event based sampling analysis data collection.
• The user installing the product should have read and write permissions for the /tmp and /Users/Shared/
Library/Application Support/Intel/Licenses directories.
Product Activation and Licensing
The named-user license provisions in the Intel® end-user license agreement allow Intel VTune™ Amplifier to
be installed on up to three systems. Product licensing checks for the number of systems when it checks for
valid licenses and tracks systems on which the software is installed by the system host identifier. Starting
with Intel VTune Amplifier 2017 Update 2, you can download additional host operating system versions,
Windows*, Linux*, or macOS*, with a valid license for any operating system. For more information about
cross-operating system support, see https://software.intel.com/en-us/articles/intel-vtune-amplifier-intel-
advisor-and-intel-inspector-now-include-cross-os-support.
To install on another system after reaching the limit, an old system host identifier must be released from the
registration system. For more information about releasing an existing system, contact Intel Technical Support
through https://software.intel.com/en-us/support. You can also review the information provided by Intel
Technical Support on the following page: https://software.intel.com/en-us/articles/required-license-upgrade-
for-intel-system-studio-2016-and-intel-parallel-studio-xe-2016.
The end-user license agreement is available in the following locations:
• /Contents/documentation//EULA.rtf
• /Contents/documentation//EULA.txt
NOTE:
If you are updating from the Beta program to the production version of Intel VTune Amplifier, you will
need an updated license.
There are several methods for product activation during installation:
52 Intel® VTune™ Amplifier Installation Guide - macOS* (2018 Beta)
• Activation using a serial number. Internet connection is required for this option.
• Remote activation using a serial number. Use this method when your computer is not connected to the
internet. You must use another computer with internet access to complete activation.
• Activation using a license file.
• Activation using a license server.
6Installation Steps 3
The Intel® VTune™ Amplifier installation package contains all components of the product in a downloadable
file. The installer can be run as an administrator from a GUI.
The Intel Software Manager installs automatically with all Intel Software Development Products on
Windows*, Linux*, and macOS* systems. The Intel Software Manager is a utility that allows users to:
• Download and install updates for your Intel Software Development Products.
• Manage subscription status of installed software.
• Activate serial numbers.
• Find out about the latest news for Intel Software Development Products.
• Intel Software Manager requires an internet connection to connect to a remote server for information and
updates.
Refer to the following site for more information about Intel Software Manager: https://registrationcenter-
ssl.intel.com/Docs/ism.htm
The following sections detail the steps required to install Intel VTune Amplifier.
• Installing with the Installer Graphical User Interface
• Installing for Use with a Virtual Machine
• Installation Folders
Installing with the Intel® VTune™ Amplifier Installer
Graphical User Interface
Use the following steps to launch the installer GUI:
1. Double click the vtune_amplifier_.dmg file to mount the disk image.
2. Double click the Intel VTune Amplifier .app file to start the installation program.
3. Use the information in the installer panels to complete the installation.
The installation process includes the following steps:
• Installation Location and Components
Lists the default installation location and options. Select the components to install and change the default
installation location (optional).
• Prerequisites
Lists all prerequisites that would prevent a fully successful installation. Prerequisites could include
additional requirements, information about setting up drivers, a reminder to restart your system after
installation completes, and so on.
• Activation and Options
• Provides activation options. For more information, see Product Activation and Licensing.
• Install all options or click Customize to select a subset of options.
Click the Install button to begin installation.
• Complete
The Intel VTune Amplifier Getting Started page displays after installation succeeds.
73 Intel® VTune™ Amplifier Installation Guide - macOS* (2018 Beta)
Installing Intel® VTune™ Amplifier for Use with a Virtual
Machine
It is possible to collect data on a virtual machine for analysis with Intel VTune Amplifier. In most cases, VTune
Amplifier is installed on the guest system using the installer user interface . The data collection and analysis
with VTune Amplifier is run on the virtual machine. For KVM and XEN Project*, the analysis is run using
Perf*-based event-based sampling collection. For all other supported VMMs, it is run using the installed
VTune Amplifier drivers. For more information about supported virtual machines, see Using VTune Amplifier
with a Virtual Machine.
TIP:
Intel VTune Amplifier may not run if it is not installed on a non-privileged guest OS. Refer to the
documentation for your VMM to learn how to set up a privileged system.
Enabling Analysis on the Virtual Machine
Additional steps are required to enable performance analysis on the virtual machine.
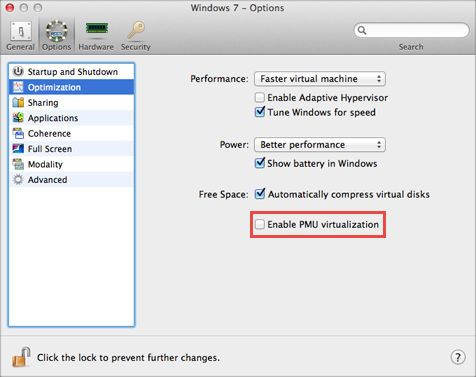
• Enable Parallels* Desktop Analysis
Not all analysis types and data can be collected on a virtual machine. Availability of data depends on which
collectors are virtualized by the virtual machine manager. Additional information is available from Using
VTune Amplifier with a Virtual Machine and from the documentation for your virtual machine manager.
8Installation Steps 3
Intel® VTune™ Amplifier Installation Folders
By default, Intel® VTune™ Amplifier is installed with the following directory structure: /Applications/Intel
VTune Amplifier .app
Frameworks
MacOS
Resources
backend
config
contrib
documentation
frontend
include
message
sdk
storage_snapshot
Where is the release level of your installed product. Having a release-specific directory allows for
the installation of multiple versions of Intel VTune Amplifier on the same system.
94 Intel® VTune™ Amplifier Installation Guide - macOS* (2018 Beta)
Post-Installation Steps 4
The following sections detail the steps required to configure your Intel® VTune™ Amplifier installation.
• Preparing a Target Linux* System for Remote Analysis
• Preparing a Target Embedded Linux* System for Remote Analysis
• Preparing a Target FreeBSD System for Remote Analysis
• Preparing a Target Android System for Remote Analysis
• Preparing an Intel Xeon Phi Coprocessor System for Analysis
• Using Intel VTune Amplifier with a Virtual Machine
• Configuring SSH Access for Remote Collection
The table below details the suggested reading paths based on your analysis needs:
Analyze performance on a remote Linux* system Install the remote collectors and configure SSH
access on a remote Linux system. If the remote
collector installation fails to install the appropriate
sampling drivers, the drivers can be installed
manually.
1. Preparing a Target Linux System for Remote
Analysis
2. Build the Sampling Driver (optional)
3. Configuring SSH Access for Remote Collection
Analyze performance on a remote Android* system Configure the Android device for analysis and
connect via ADB. If the appropriate sampling
drivers are not available, the drivers can be
installed manually. Compile the Android application
for analysis. Specify the project search directories.
1. Preparing a Target Android System for Remote
Analysis
2. Managing the Sampling Driver for Android
Targets (optional)
3. Preparing an Android Application for Analysis
4. Specifying Search Directories for Android
Analyze performance on a FreeBSD* system Install VTune Amplifier collectors and drivers on a
FreeBSD system. A FreeBSD license for Intel®
System Studio is required. For more information,
see Preparing a Target FreeBSD System for Remote
Analysis.
Analyze performance on embedded Linux systems Review the list of supported embedded Linux
systems. Configure the embedded Linux
environment for performance analysis. Begin with
Preparing a Target Embedded Linux* System for
Remote Analysis.
Monitor a virtual machine Review the list of supported virtual machine
managers and analysis type limitations. Configure
the virtual machine for performance analysis. Begin
with Using Intel VTune Amplifier with a Virtual
Machine.
10Post-Installation Steps 4
Linux* System Setup for Remote Analysis
NOTE:
The installation package for macOS* does not contain collectors for a Linux* target. The collectors can
be obtained through the Linux* installation package. Refer to the Intel VTune Amplifier Installation
Guide - Linux* OS for additional configuration details, including information about the sampling and
power drivers.
You can collect data remotely on a remote Linux* system by specifying the system as the analysis target in
Intel® VTune™ Amplifier. VTune Amplifier will automatically install the appropriate collectors on the target
system when you switch away from the Analysis Target tab. Specify a location for the install using the
VTune Amplifier installation directory on the remote system field under the Advanced settings.
If the collectors are not automatically installed or you get an error message, use the following steps to
manually prepare for data collection on a remote Linux system:
1. Install the VTune Amplifier collector on the target system.
2. Set up SSH access to the target system.
3. Set up the analysis target in VTune Amplifier.
NOTE:
The automatic installation on the remote Linux system does not build and install the sampling drivers.
Driverless sampling data collection is based on the Linux Perf* tool functionality, which has a limited
scope of analysis options. To collect advanced hardware event-based sampling data, manually install
the sampling driver.
Installing the VTune Amplifier Collectors on the Target Device Manually
Use the following steps to set up analysis on a target regular or embedded Linux target system.
1. Download and extract the Linux installation package.
2. Copy the required target package archive to the target device using ftp, sftp, or scp. The following
target packages are available:
• /target/linux/vtune_amplifier_target_sep_x86.tgz - provides hardware
event-based sampling collector only (SEP) for x86 systems
• /target/linux/vtune_amplifier_target_sep_x86_64.tgz - provides hardware
event-based sampling collector only (SEP) for 64-bit systems
• /target/linux/vtune_amplifier_target_x86.tgz - provides all VTune
Amplifier collectors for x86 systems
• /target/linux/vtune_amplifier_target_x86_64.tgz - provides all VTune
Amplifier collectors for 64-bit systems
NOTE:
• Use both *_x86 and *_x86_64 packages if you plan to run and analyze 32-bit processes on 64-bit
systems.
• Remote collectors are also available in the .
3. On the target device, unpack the product package to the /opt/intel directory:
target> tar -zxvf .tgz
114 Intel® VTune™ Amplifier Installation Guide - macOS* (2018 Beta)
VTune Amplifier target package is located in the newly created directory /opt/intel/
vtune_amplifier__for_systems..
When collecting data remotely, the VTune Amplifier looks for the collectors on the target device in its default
location: /opt/intel/vtune_amplifier_.. It also temporary stores
performance results on the target system in the /tmp directory. If you installed the target package to a
different location and need to specify another temporary directory, make sure to configure your target
properties in the Analysis Target tab as follows:
• Use the VTune Amplifier installation directory on the remote system option to specify the path to
the VTune Amplifier on the remote system. If default location is used, the path is provided automatically.
• Use the Temporary directory on the remote system option to specify a non-default temporary
directory.
Alternatively, use the-target-install-dir and -target-tmp-dir options from the amplxe-cl command
line.
Building and Installing the Drivers Manually
NOTE:
Building the sampling drivers is only required if the drivers were not built as part of the collector
installation. The installation output should inform you if building the sampling driver is required.
To enable hardware event-based sampling analysis on your target device:
1. Build the sampling driver on the target system.
NOTE:
• Make sure kernel headers correspond to the kernel version running on the device. For details, see
the README.txt file in the sepdk/srcdirectory.
• Make sure compiler version corresponds to the architecture (x86 or x86_64) of the kernel running
on the target system.
• For Advanced Hotspots, General Exploration and Custom event-based sampling analysis types, you
may not need root credentials and installing the sampling driver for systems with kernel 2.6.32 or
higher, which exports CPU PMU programming details over /sys/bus/event_source/
devices/cpu/format file system. Your operating system limits on the maximum amount of files
opened by a process as well as maximum memory mapped to a process address space still apply
and may affect profiling capabilities. These capabilities are based on Linux Perf* functionality and
all its limitations fully apply to the VTune Amplifier as well. For more information, see the Tutorial:
Troubleshooting and Tips topic at https://perf.wiki.kernel.org/index.php/Main_Page.
2. Copy the /sepdk folder to the /opt/intel/vtune_amplifier_ directory
on the target device.
You may choose another directory if this location is not accessible/does not exist or you can mount
those folders via NFS.
3. On the target device, install the drivers.
If the insmod-sep script does not work on the target system due to absence of standard Linux
commands, you may install drivers manually using the Linux OS insmod command directly.
12Post-Installation Steps 4
NOTE:
To build the sampling driver as RPM using build services as Open Build Service (OBS), use the
sepdk.spec file located at the /sepdk/src the directory.
Set up SSH Access
After installing the collectors and ensuring that the appropriate drivers are installed, set up SSH access to the
target system.
Set up Analysis Target
After completing all other configuration steps for the remote Linux system, you can run an analysis using
VTune Amplifier. Before running the first analysis, you must set up the analysis target. For more information,
see "Analysis Target Setup" in the VTune Amplifier online help, available from /
documentation//help.
Embedded Linux* System Setup for Remote Analysis
Use the Intel® VTune™ Amplifier for performance
analysis on Embedded Linux* systems, Wind River*,
Yocto Project*, Tizen*, FreeBSD* and others.
Embedded device performance data can be collected remotely by installing the collectors on the embedded
device and running the analysis from an instance of VTune Amplifier installed on the host system. This is
useful when you want to collect performance information using the VTune Amplifier GUI and the pre-
configured analysis types. Alternatively, hardware-based sampling data can be collected using a command-
line collection tool that can be copied to a host system and viewed in the VTune Amplifier GUI. Use this type
of data collection when space on the embedded device is limited or when only hardware event-based
sampling data is required.
NOTE:
Root access to the operating system kernel is required to install the collectors and drivers required for
performance analysis using VTune Amplifier.
There are two ways to enable performance analysis on an embedded device:
• Using the Intel System Studio integration layer (Wind River* Linux and Yocto Project* only)
• Using the bundled VTune Amplifier installation packages
Using the Intel System Studio Integration Layer
NOTE:
The Intel System Studio integration layer works for embedded systems with Wind River Linux or Yocto
Project installed.
The Intel System Studio integration layer allows the Intel System Studio products to be fully integrated with
a target operating system by building the drivers and corresponding target packages into the operating
system image automatically. Use this option in the case where a platform build engineer has control over the
kernel sources and signature files, but the application engineer does not. The platform build engineer can
integrate the product drivers with the target package and include them in the embedded device image that is
delivered to the application engineer.
134 Intel® VTune™ Amplifier Installation Guide - macOS* (2018 Beta)
1. Install Intel System Install Intel System Studio using the installer GUI.
Studio.
TIP:
If you already have Wind River Linux and Workbench* installed on your
host system, select the Integrate to Wind River* Linux and Wind
River* Workbench checkbox when installing Intel System Studio. If
you install Intel System Studio before installing Wind River Linux and
Workbench, ignore the automatic integration step during installation
and manually integrate after installing Wind River Linux and
Workbench.
2. Install the Intel System 1. Copy the integration layer from the Intel System Studio installation
Studio integration layer. folder to the target operating system development folder.
2. Run the post-installation script: wr-iss-/-setup/
postinst__iss.sh
NOTE:
This step can be completed as part of the Intel System Studio
installation for Wind River Linux system integration. If you already have
Wind River Linux and Workbench installed on your host system, select
the Integrate to Wind River* Linux and Wind River* Workbench
checkbox when installing Intel System Studio. If you install Intel
System Studio before installing Wind River Linux and Workbench,
ignore the automatic integration step during installation and manually
integrate after installing Wind River Linux and Workbench.
14Post-Installation Steps 4
3. Build the recipe that 1. Add the path to the wr-iss- to the bblayers.conf file:
includes the appropriate
BBLAYERS= "\
VTune Amplifier package.
...
/wr-iss-\
...
"
2. Add the VTune Amplifier recipes to conf/local.conf. Possible recipes
include intel-iss-vtune-target for remote command line and GUI
usage mode or intel-iss-vtune-sep-target for command line
hardware event-based sampling analysis. For more information about
these collection methods, see Remote Analysis Workflow for Linux
Systems in the VTune Amplifier help.
NOTE:
This step can be completed when creating a new Wind River Linux
platform project using Wind River Workbench.
4. Build the target Build the target operating system, which will complete the integration of the
operating system. VTune Amplifier collectors and drivers.
5. Flash the operating After flashing the operating system to the target embedded device, ensure
system to the target that the appropriate VTune Amplifier drivers are present. For more
embedded device. information, see Building and Managing the Sampling Driver.
6. Run the analysis on the Depending on the recipe chosen, the analysis is either run from the host
target embedded device. system using an SSH connection or using the SEP commands.
Use the following steps to run the analysis from the host system:
1. Set up a password-less SSH access to the target using RSA keys.
2. Specify your target application and remote system.
Specify your target application and remote system.
3. Choose an analysis type.
4. Configure the analysis type.
5. Run the analysis from the host.
Use the information available in the Sampling Enabling Product User's Guide
to run the SEP commands.
7. View results in the View the collected data on the host.
VTune Amplifier GUI
Examples
Configuring Wind River Linux with the Intel System Studio Integration Layer
Configuring Yocto Project* with the Intel System Studio Integration Layer
Using the Bundled Intel VTune Amplifier Installation Packages
You can build the appropriate drivers and install the VTune Amplifier collectors on your kernel image
manually with a command line. This option requires root access to the configured kernel source.
154 Intel® VTune™ Amplifier Installation Guide - macOS* (2018 Beta)
1. Install Intel System Install Intel System Studio using the installer GUI.
Studio.
2. Copy the target Copy the appropriate target package archive to the target device using ftp,
package to the target sftp, or scp. The following target packages are available from /target/linux32[64]:
• linux32/vtune_amplifier_target_sep_x86.tgz - provides hardware
event-based sampling collector only (SEP) for x86 systems
• linux32/vtune_amplifier_target_x86.tgz - provides all VTune
Amplifier collectors for x86 systems
• linux64/vtune_amplifier_target_sep_x86_64.tgz - provides
hardware event-based sampling collector only (SEP) for 64-bit systems
• linux64/vtune_amplifier_target_x86_64.tgz - provides all VTune
Amplifier collectors for 64-bit systems
16Post-Installation Steps 4
NOTE:
• Use both *_x86 and *_x86_64 packages if you plan to run and
analyze 32-bit processes on 64-bit systems.
• The vtune_amplifier_target_sep_x86.tgz and
vtune_amplifier_target_sep_x86_64.tgz packages do not
support remote data collection using the VTune Amplifier GUI. Use
the linux32/vtune_amplifier_target_x86.tgz or linux64/
vtune_amplifier_target_x86_64.tgz package for remote data
collection support.
• Remote collectors are also available in the
/targets/
system_studio_target.tgz.
3. Extract the package on Extract the package to the /opt/intel directory.
the target embedded
Linux device.
4. [Optional] Build the This option is only required if the drivers were not built as part of the
sampling driver on the collector installation. The installation output should inform you if building the
target (A) or host (B) sampling driver is required.
system.
The drivers are built either on the target system or on the host system,
depending on compiler toolchain availability:
A. If the compiler toolchain is available on the target system:
1. On the target embedded device, build the driver from the /sepdk/src directory using the ./build-driver command.
2. Load the driver into the kernel using the ./insmod-sep command.
B. If the compiler toolchain is not available on the target system:
1. On the host system, cross-build the driver using the driver source from
the target package sepdk/src directory with the ./build-driver
command. Provide the cross-compiler (if necessary) and the target
kernel source tree for the build.
2. Copy the sepdk/src folder to the target system.
3. Load the driver into the kernel using the ./insmod-sep command.
For more information, see Building and Managing the Sampling Driver.
6. Run the analysis on the Depending on the target installation package chosen, the analysis is either
target embedded device. run from the host system using an SSH connection or using the SEP
commands.
Use the following steps to run the analysis from the host system:
1. Set up a password-less SSH access to the target using RSA keys.
2. Specify your target application and remote system.
Specify your target application and remote system.
3. Choose an analysis type.
4. Configure the analysis type.
5. Run the analysis from the host.
174 Intel® VTune™ Amplifier Installation Guide - macOS* (2018 Beta)
Use the information available in the Sampling Enabling Product User's Guide
to run the SEP commands.
7. View results in the View the collected data on the host.
VTune Amplifier GUI
Example
Configuring Yocto Project with Intel VTune Amplifier Target Packages
Configuring Wind River* Linux* and Intel® VTune™ Amplifier with the Intel System Studio
Integration Layer
Intel® VTune™ Amplifier can collect and analyze performance data on embedded Linux* devices running Wind
River* Linux*. This topic provides an example of setting up Intel VTune Amplifier to collect performance data
on an embedded device with Wind River Linux installed using the Intel System Studio integration layer
provided with the product installation files. The process integrates the VTune Amplifier product drivers with
the target package and includes them in the embedded device image. Root access to the kernel is required.
Install the Intel System Studio with the Integration Layer
Prerequisite: Wind River Linux is already installed on the same system on which Intel System Studio will be
installed.
During the Intel System Studio installation, the installer displays an option for integration with Wind River
Linux. Select the checkbox and browse to the location where Wind River Linux is installed. The integration
will be done automatically with your Wind River Linux on your host system as Intel System Studio is
installed.
NOTE:
If you do not have Wind River Linux installed on the host machine, you can ignore the automatic
integration during the installation. You can run the integration manually after you have Wind River
Linux installed. Refer to the instructions available from this article: https://software.intel.com/en-us/
articles/using-intel-system-studio-with-wind-river-linux-build-environment.
Configure the Intel VTune Amplifier Package for the Target System
1. Select File > New > Wind River Linux Platform Project from the Wind River Linux Workbench.
2. Select Platform from the Build type drop-down list and click Next.
3. Give your project a unique name and click Finish.
The Platform Project Configure window opens.
18Post-Installation Steps 4
4. Select the appropriate board type from the Board drop-down list.
5. Click Add Layer... and browse to the Intel System Studio integration layer, which is located in
/wr-iss-. Click Add to close the window and add the layer to the
configuration.
6. Click Rescan Layers on the Platform Project Configure window.
7. When the scan is finished, click Add Template... . The Add Templates window appears.
194 Intel® VTune™ Amplifier Installation Guide - macOS* (2018 Beta)
8. Select the appropriate Intel VTune Amplifier template and click Done. Only one template can be
selected.
• Select intel-iss-vtune-target to support remote data collection from the host system to the
target system.
• Select intel-iss-vtune-sep-target to support native data collection using the sampling enabling
driver command line utility.
TIP:
Type "vtune" at the top of the Add Templates window to filter the list of templates.
9. Click Run Configure to execute the configure command.
10. Click Finish to complete the setup.
NOTE:
If you have an existing Wind River Linux Platform Project, you can add the Intel VTune Amplifier
features manually. Refer to the instructions available from this article: https://software.intel.com/en-
us/articles/using-intel-system-studio-with-wind-river-linux-build-environment.
20Post-Installation Steps 4
Build and Boot the Target System
The VTune Amplifier drivers are built automatically and integrated with your target system image. The VTune
Amplifier components are available from the /opt/intel/ directory on the target system.
Configure and Run Remote Analysis
Use the following steps on the host system to set up and launch the analysis on the embedded device. These
steps assume the intel-iss-vtune-target template was selected.
1. Set up a password-less SSH access to the target using RSA keys.
2. Create a new project.
3. Select the remote Linux (SSH) analysis target and specify the collection details.
4. Configure the analysis type.
5. Start the analysis.
TIP:
You can also launch the performance analysis directly from Wind River Linux Workbench. Select Intel
System Studio > Intel VTune Amplifier > Launch VTune Amplifier to open the VTune Amplifier
GUI. A product icon is also available from the Workbench toolbar.
Configuring Yocto Project* and Intel® VTune™ Amplifier with the Intel System Studio
Integration Layer
Intel® VTune™ Amplifier can collect and analyze performance data on embedded Linux* devices running
Yocto Project*. This topic provides an example of setting up Intel VTune Amplifier to collect performance data
on an embedded device with Yocto Project 1.8 installed using the Intel System Studio integration layer
provided with the product installation files. The process integrates the VTune Amplifier product drivers with
the target package and includes them in the embedded device image. Root access to the kernel is required.
Install the Intel System Studio Integration Layer
Prerequisite: Install Intel System Studio on the host system.
1. Copy the integration layer from the Intel System Studio installation folder to the Yocto Project
development folder. For example:
cp -r /opt/intel/system_studio_2017.0.0/wr-iss-2017 /path/to/poky-fido-10.0.0/
2. Run the post-installation script. For example:
cd /path/to/poky-fido-10.0.0
wr-iss-2017/yp-setup/postinst_yp_iss.sh /opt/intel/system_studio_2017.0.0
214 Intel® VTune™ Amplifier Installation Guide - macOS* (2018 Beta)
Add the Intel VTune Amplifier Recipe
1. Add the path to the wr-iss- to the bblayer.conf file. For example:
vi /path/to/poky-fido-10.0.0/build/conf/bblayers.conf
BBLAYERS = "$HOME/source/poky/wr-iss-2017\"
Your file should look similar to the following:
BBLAYERS ?= " \
$HOME/source/poky/meta \
$HOME/source/poky/meta-poky \
$HOME/source/poky/meta-yocto-bsp \
$HOME/source/poky/meta-intel \
$HOME/source/poky/wr-iss-2017 \
"
2. Add the Intel VTune Amplifier recipe to conf/local.conf. Two recipes are available, intel-iss-
vtune-target and intel-iss-vtune-sep-target. In this example, the intel-iss-vtune-target
is used so the analysis can be run from the VTune Amplifier GUI on the host system.
vi "conf/local.conf"
IMAGE_INSTALL_append = " intel-iss-vtune-target"
NOTE:
You cannot add both intel-iss-vtune-target and intel-iss-vtune-sep-target at the same
time.
Build and Flash the Target Operating System
1. Build the target operating system. For example:
bitbake core-image-sato
2. Flash the operating system to the embedded device.
Configure and Run Remote Analysis
Use the following steps on the host system to set up and launch the analysis on the embedded device:
1. Set up a password-less SSH access to the target using RSA keys.
2. Create a new project.
3. Select the remote Linux (SSH) analysis target and specify the collection details.
4. Configure the analysis type.
5. Start the analysis.
Configuring Yocto Project* and Intel® VTune™ Amplifier with the Linux* Target Package
Intel® VTune™ Amplifier can collect and analyze performance data on embedded Linux* devices running
Yocto Project*. This topic provides an example of setting up Intel VTune Amplifier to collect performance data
on an embedded device using the Linux* target installation files provided in the VTune Amplifier installation
directories. The process manually adds the VTune Amplifier collectors and drivers to the embedded device.
Root access to the kernel is required if you need to build the drivers.
Copy and Extract Target Linux Package
Prerequisite: Install Intel VTune Amplifier on the host system.
1. Copy the target package archive to the target device. The following target packages are available:
22Post-Installation Steps 4
• /target/vtune_amplifier_target_sep_x86.tgz - provides hardware event-
based sampling collector only (SEP) for x86 systems
• /target/vtune_amplifier_target_x86.tgz - provides all VTune Amplifier
collectors for x86 systems
• /target/vtune_amplifier_target_sep_x86_64.tgz - provides hardware event-
based sampling collector only (SEP) for 64-bit systems
• /target/vtune_amplifier_target_x86_64.tgz - provides all VTune Amplifier
collectors for 64-bit systems
For example, the following command copies the vtune_amplifier_target_x86_64.tgz package to
the embedded device using SCP:
> scp -r vtune_amplifier_target_x86_64.tgz root@123.45.67.89:/opt/intel/
2. Extract the file on the target system. For example:
> tar -xvsf vtune_amplifier_target_x86_64.tgz
3. Make sure the sampling driver is available on the target system. The installation output should inform
you if building the sampling driver is required. If it is not, you will need to build the sampling driver and
install it on the target system.
If the compiler toolchain is available on the target embedded system, build the driver on the target
device using the following steps:
a. Open a command prompt and navigate to the /sepdk/src directory. For
example:
> cd /opt/intel/vtune_amplifier_2018.0.0.0/sepdk/src
b. Build the driver using the ./build-driver command. For example:
> ./build-driver -ni \ --kernel-src-dir=/usr/src/kernel/ \ --kernel-version=4.4.3-
yocto-standard \ --make-args="PLATFORM=x64 ARITY=smp"
c. Load the driver into the kernel using the ./insmod-sep command.
If the compiler toolchain is not available on the target embedded system, build the driver on the host
system and install it on the target device using the following steps:
a. Open a command prompt and navigate to the /sepdk/src directory. For
example:
> cd /opt/intel/vtune_amplifier_2018.0.0.0/sepdk/src
b. Cross-build the driver using the using the ./build-driver command. Provide the cross-compiler
(if necessary) and the target kernel source tree for the build. For example:
> mkdir drivers
>./build-driver -ni \
--c-compiler=i586-i586-xxx-linux-gcc \
--kernel-version=4.4.3-yocto-standard \
--kernel-src-dir=/usr/src/kernel/ \
--make-args="PLATFORM=x32 ARITY=smp" \
--install-dir=./drivers
c. Copy the sepdk/src/drivers folder to the target system.
d. Load the driver into the kernel using the ./insmod-sep command.
For more information, see Building and Managing the Sampling Driver.
Configure and Run Remote Analysis
Use the following steps on the host system to set up and launch the analysis on the embedded device:
1. Set up a password-less SSH access to the target using RSA keys.
234 Intel® VTune™ Amplifier Installation Guide - macOS* (2018 Beta)
2. Create a new project.
3. Select the remote Linux (SSH) analysis target and specify the collection details.
4. Configure the analysis type.
5. Start the analysis.
FreeBSD* System Setup
Intel® VTune™ Amplifier allows you to collect
performance data remotely on a FreeBSD* target
system.
Intel® VTune™ Amplifier includes a target package for collecting event-based sampling data on a FreeBSD*
target system either via the remote collection capability or by collecting the results locally on the FreeBSD
system and copying them to a Linux*, Windows*, or macOS* host system. The collected data is then
displayed on a host system that supports the graphical interface.
NOTE:
You need a FreeBSD license to use VTune Amplifier with a FreeBSD target system.
1. Install VTune Amplifier on your Linux, Windows, or macOS host. Refer to the Installation Guide for your
host system for detailed instructions.
2. Install the appropriate sampling drivers on the FreeBSD target system.
3. Collect performance data using one of the following methods. For more information about each of these
methods, see "Remote Analysis Workflow for Linux Systems" in the Intel VTune Amplifier online help..
• Remote analysis from the host system using the VTune Amplifier command line or GUI.
• Native analysis on the target system using the VTune Amplifier command line.
• Native analysis on the target system using the sampling enabling product (SEP) collectors.
4. Review the results on the host system.
Install the Sampling Drivers on FreeBSD
Use the following steps to configure your FreeBSD target system for event-based sampling analysis. Root
privileges are required on the target system to install the VTune Amplifier drivers.
1. Copy the vtune_amplifier__freebsd.tar.gz file to the target system using ftp, sftp, or
scp.
2. Extract the archive to the /opt/intel directory on the target system.
3. Navigate to the following location: /opt/intel/sepdk/modules
4. Run the following commands to build the appropriate drivers:
> make
> make install
5. Run the following command to install the drivers:
> kldload sep pax
Allow non-root users to run an event-based sampling analysis by running the following commands after
installing the drivers:
> chgrp -R /dev/pax
> chgrp -R /dev/sep
Remove the Sampling Drivers from FreeBSD
Run the following command to unload the sampling drivers:
> kldunload sep pax
24Post-Installation Steps 4
Android* System Setup
When using the VTune Amplifier to collect data remotely on a target Android device, make sure to:
• Configure your Android device for analysis.
• Gain adb access to an Android device.
• For hardware event-based sampling, gain a root mode adb access to the Android device.
• Use the pre-installed drivers on the target Android system.
Optionally, do the following:
• Enable Java* analysis.
• To view functions within Android-supplied system libraries, device drivers, or the kernel, get access from
the host development system to the exact version of these binaries with symbols not stripped.
• To view sources within Android-supplied system libraries, device drivers, or the kernel, get access from
the host development system to the sources for these components.
Configuring an Android Device for Analysis
To configure your Android device, do the following:
1. Allow Debug connections to enable adb access:
a. Select Settings > About .
b. Tap Build number seven times to enable the Developer Options tab.
c. Select the Settings > Developer Options and enable the USB debugging option.
NOTE:
Path to the Developer Options may vary depending on the manufacture of your device and system
version.
2. Enable Unknown Sources to install the VTune Amplifier Android package without Google* Play. To do
this, select Settings > Security and enable the Unknown Sources option.
Gaining ADB Access to an Android Device
VTune Amplifier collector for Android requires connectivity to the Android device via adb. Typically Android
devices are connected to the host via USB. If it is difficult or impossible to get adb access to a device over
USB, you may get adb over Ethernet or WiFi. To connect ADB over Ethernet or WiFi, first connect to Ethernet
or connect to a WiFi access point and then do the following:
1. Find the IP Address of the target. The IP address is available in Android for Ethernet via
Settings>Wireless&Networks>Ethernet>IP Address or for Wi-Fi via
Settings>Wireless&Networks>Wi-Fi>>IP Address.
2. Make sure adb is enabled on the target device. If not enabled, go to Terminal App (of your choice) on
the device and type:
> su
> setprop service.adb.tcp.port 5555
> stop adbd
> start adbd
3. Connect adb on the host to the remote device. In the Command Prompt or the Terminal on the host,
type:
> adb connect :5555
254 Intel® VTune™ Amplifier Installation Guide - macOS* (2018 Beta)
Gaining a Root Mode ADB Access to the Android Device
For performance analysis on Android platforms, you typically need a root mode adb access to your device to:
• Install and load drivers needed for hardware event-based sampling.
• Enable the Android device to support Java* analysis.
• Run hardware event-based sampling analysis.
NOTE:
There are several analysis types on Android systems that do NOT require root privileges such as Basic
Hotspots and Perf*-based driverless sampling event-based collection.
Depending on the build, you gain root mode adb access differently:
• User/Production builds : Gaining root mode adb access to a user build of the Android OS is difficult and
different for various devices. Contact your manufacturer for how to do this.
• Engineering builds : Root-mode adb access is the default for engineering builds. Engineering builds of
the Android OS are by their nature not "optimized". Using the VTune Amplifier against an engineering
build is likely to result in VTune Amplifier identifying code to optimize which is already optimized in user
and userdebug builds.
• Userdebug builds : Userdebug builds of the Android OS offer a compromise between good results and
easy-to-run tools. By default, userdebug builds run adb in user mode. VTune Amplifier tools require root
mode access to the device, which you can gain via typing adb root on the host. These instructions are
based on userdebug builds.
Using the Pre-installed Drivers on the Target Android System
For hardware event-based sampling analysis, the VTune Amplifier needs sampling drivers to be installed. On
some versions of Android systems, including most of the Intel supplied reference builds for SDVs, the
following drivers are pre-installed in /lib/modules or /system/lib/modules :
• Hardware event-based analysis collectors:
• socperf2_x.ko
• pax.ko
• sep3_x.ko
• sep4_x.ko
• vtsspp.ko
Typically having pre-installed drivers is more convenient. You can check for pre-installed drivers by typing:
adb shell ls [/lib/modules|/system/lib/modules]
If the drivers are not available or the version does not match requirements, consider:
• Building and Managing the Sampling Drivers
Enabling Java* Analysis
Enabling Java Analysis on Rooted Devices
By default, the VTune Amplifier installs the remote collector on the target rooted Android devices with the --
jitvtuneinfo=src option. To change the Java profiling option for rooted devices, you need to re-install the
remote collector on the target manually using the --jitvtuneinfo=[jit|src|dex|none] option on or .
For example:
On Windows*:
On Linux*:
26Post-Installation Steps 4
VTune Amplifier updates the /data/local.prop file as follows:
1. Basic information about the compiled trace: root@android:/ # cat /data/local.prop
dalvik.vm.extra-opts=-Xjitvtuneinfo:jit
2. Mapping from JIT code to Java source code and basic information about the compiled trace:
root@android:/ # cat /data/local.prop dalvik.vm.extra-opts=-Xjitvtuneinfo:src
3. Mapping from JIT code to DEX code and basic information about the compiled trace: root@android:/
# cat /data/local.prop dalvik.vm.extra-opts=-Xjitvtuneinfo:dex
4. JIT data collection. By default, JIT collection is disabled if you do not supply any options:
root@android:/ # cat /data/local.prop dalvik.vm.extra-opts=-Xjitvtuneinfo:none
Additionally, if your Dalvik JVM supports instruction scheduling, disable it by adding -Xnoscheduling at the
end of dalvik.vm.extra-opts. For example:
root@android:/ # cat /data/local.prop dalvik.vm.extra-opts=-Xjitvtuneinfo:src -
Xnoscheduling
NOTE:
Java analysis currently requires an instrumented Dalvik JVM. Android systems running on the 4th
Generation Intel® Core™ processors or Android systems using ART vs. Dalvik for Java are not
instrumented to support JIT profiling. You do not need to specify --jitvtuneinfo=N.
Enabling Java Analysis for Code Generated with ART* Compiler
To enable a source-level analysis, the VTune Amplifier requires debug information for the analyzed binary
files. By default, the ART compiler does not generate the debug information for Java code. Depending on
your usage scenario, you may choose how to enable generating the debug information with the ART
compiler:
NOTE:
For releases prior to Android 6.0 Marshmallow*, the --generate-debug-info in the examples below
should be replaced with --include-debug-symbols.
To Do This: Do This:
Profile a 3rd party 1. Set the system property dalvik.vm.dex2oat-flags to --
application or system generate-debug-info:
application installed as
an .apk file adb shell setprop dalvik.vm.dex2oat-flags --generate-debug-
info
2. If you use --compiler-filter=interpret-only, set the
optimization level to O2:
adb shell setprop
dalvik.vm.dex2oat-filter O2
3. (Re-)install the application.
adb shell install -r
TheApp.apk
Profile all applications 1. On your host system, open the /build/core/
installed as .apk or .jar dex_preopt_libart.mk file, located in your Android OS directory
files by re-building the structure.
274 Intel® VTune™ Amplifier Installation Guide - macOS* (2018 Beta)
To Do This: Do This:
Android image when pre- 2. Modify the --no-generate-debug-info line to --generate-debug-
optimization for private info and save and close the file.
applications is enabled 3. Rebuild the Android image and flash it to your device.
(LOCAL_DEX_PREOPT:=true 4. If you are using an Android image that is not PIC configured
property set in device.mk) (WITH_DEXPREOPT_PIC:=false property set in device.mk), generate
classes.dex from odex using the patchoat command.
classes.dex should appear in /data/dalvik-cache/x86/
system@app@appname@appname.apk@classes.dex
Profile all applications 1. Set the system property dalvik.vm.dex2oat-flags to --
installed as .apk or .jar generate-debug-info:
files by re-building the
adb shell rm -rf /data/dalvik-cache/x86/
Android image when pre-
system@app@webview@webview.apk@classes.dex
optimization for private
adb shell setprop dalvik.vm.dex2oat-flags --generate-debug-
applications is disabled info
(LOCAL_DEX_PREOPT:=fals
2. Stop and start the adb shell:
e property set in
device.mk) adb shell stop
adb shell start
3. Generate the dex file:
adb shell ls /data/dalvik-cache/x86/
system@app@webview@webview.apk@classes.dex
adb pull /data/dalvik-cache/x86/
system@app@webview@webview.apk@classes.dex
Profile an application Add the compiler option --generate-debug-info followed by -
executed by the dalvikvm Xcompiler-option. Make sure the application has not been compiled yet.
executable
rm –f /data/dalvik-cache/*/*TheApp.jar*
adb shell dalvikvm –Xcompiler-option --include-debug-symbols –cp
TheApp.jar
Profile system and core Set the system property dalvik.vm.image-dex2oat-flags to --
classes generate-debug-info and force recompilation:
adb shell stop
adb shell rm –f /data/dalvik-cache/*/*
adb shell setprop dalvik.vm.dex2oat-flags --generate-debug-info
adb shell setprop dalvik.vm.image-dex2oat-flags --generate-debug-
info
adb shell start
If you run the application before the system classes are compiled, you
should add another compiler option -Ximage-compiler-option --
generate-debug-info:
adb shell rm –f /data/dalvik-cache/*/*
adb shell dalvikvm –Xcompiler-option --generate-debug-info -
Ximage-compiler-option --generate-debug-info –cp TheApp.jar
28Post-Installation Steps 4
To Do This: Do This:
NOTE:
This action is required if
Java core classes get
compiled to the /data/
dalvik-cache/
subdirectory.
Manufacturers may place
them in different
directories. If
manufactures supply the
precompiled boot.oat file
in /system/framework/
x86, Java core classes will
not be resolved because
they cannot be re-
compiled with debug
information.
TIP:
If you are able to see the --generate-debug-info option in the logcat output (adb logcat *:S
dex2oat:I), the compiler uses this option.
Preparing an Android* Application for Analysis
Before starting an analysis with the VTune Amplifier, make sure your Android application is compiled with
required settings:
Compilation Settings
Performance analysis is only useful on binaries that have been optimized and have symbols to attribute
samples to source code. To achieve that:
• Compile your code with release level settings (for example, do not use the /O0 setting on GCC*).
• Do not set APP_OPTIM to debug in your Application.mk as this setting disables optimization (it
uses /O0) when the compiler builds your binary.
• To run performance analysis (Basic Hotspots) on non-rooted devices, make sure to compile your code
setting the debuggable attribute to true in AndroidManifest.xml.
NOTE:
If your application is debuggable (android:debuggable="true"), the default setting will be debug
instead of release. Make sure to override this by setting APP_OPTIM to release.
By default, the Android NDK build process for Android applications using JNI creates a version of your .so
files with symbols.
The binaries with symbols included go to [ApplicationProjectDir]/obj/local/x86.
294 Intel® VTune™ Amplifier Installation Guide - macOS* (2018 Beta)
The stripped binaries installed on the target Android system via the .apk file go to
[ApplicationProjectDir]/libs/x86 . These versions of the binaries cannot be used to find source in the
VTune Amplifier. However, you may collect data on the target system with these stripped binaries and then
later use the binaries with symbols to do analysis (as long as it is an exact match).
When the VTune Amplifier finishes collecting the data, it copies .so files from the device (which have had
their symbols stripped). This allows the very basic functionality of associating samples to assembly code.
Search Directories for Android* Targets
For accurate module resolution and source analysis of your Android* application, make sure to specify search
paths for binary and source files when configuring performance analysis:
• from command line, use the --search-dir/--source-search-dir options; for example:
host>./amplxe-cl --collect advanced-hotspots -r system_wide_r@@@ --search-dir ~/
AndroidOS_repo/out/target/product/ctp_pr1/symbols/
• from GUI, use the Binary/Symbol Search and Source Search dialog boxes
If you have not set the project search directories at the time of collection or import, you will not be able to
open the source code. Only Assembly view will be available for source analysis.
Consider the following when adding search paths:
• By default, the VTune Amplifier pulls many binaries from the target device.
• The Kernel [vmlinux] is one file that does not contain symbols on the target device. Typically it is
located in [AndroidOSBuildDir]/out/target/product/[your target]/linux/kernel/vmlinux.
• Many operating system binaries with symbols are located in either [AndroidOSBuildDir]/out/target/
product/[your target]/symbols, or [AndroidOSBuildDir]/out/target/product/[your
target]/obj.
• Application binaries with symbols are located in [AndroidAppBuildDir]/obj/local/x86.
• Application source files for the C/C++ modules are usually located in [AndroidAppBuildDir]/jni , not
in [AndroidAppBuildDir]/src (where the Java *source files are). Some third-party software in Android
does not provide binaries with symbols. You must contact the third party to get a version of the binaries
with symbols.
• You can see if a binary has symbols by using the file command in Linux and make sure that it says not
stripped.
file MyBinary.ext
MyBinary.ext: ELF 32-bit LSB shared object, Intel 80386, version 1
(SYSV), dynamically linked, not stripped
Intel® Xeon Phi™ Coprocessor Setup
• Build the target application on the host with full optimizations, which is recommended for performance
analysis.
• Windows* OS only: When using an offload or cross compiler, make sure to manually install binary
utilities (Binutils) included in the Intel Xeon Phi installation zip file package. For installation instructions,
please refer to the Intel Compiler documentation.
• Create a user account on the coprocessor. See the Intel MPSS installation document for details.
• For native Intel Xeon Phi application analysis, configure SSH access for remote collection to the Intel Xeon
Phi coprocessor card.
• For native Intel Xeon Phi application analysis, copy the application to the coprocessor card.
For example, on Linux*:
scp matrix.mic mic0:/tmp
On Windows:
pscp matrix.mic mic0:/tmp
30You can also read