COVID-19 Toolkit for Virtual Events - University Special Events University Advancement
←
→
Page content transcription
If your browser does not render page correctly, please read the page content below

COVID-19 Toolkit
       for
 Virtual Events

       University Special Events
       University Advancement

                                 As of June 23, 2020
                Please check back regularly as this
                     toolkit will continue to evolve.
Table of Contents
Virtual Event Checklist………………………………………………………………………………………………………………………………………3
Virtual Event Best Practices……………………………………………………………………………………………………………………………..5
Platforms……………………………………………………………………………………………………………………………………………………………….7
        Zoom Meeting……..………………………………………………………………………………………………………………………………….7
        Zoom Webinar…….………………………………………………………………………………………………………………………………….8
Preparing For Your Virtual Meeting……………………………………………………………………………………………………………….9
        Technology……………………………………………………………………………………………………………………………………………...9
        Background……………………………………………………………………………………………………………………………………….…….9
        Lighting…………………………………………………………………………………………………………………………………………………….9
        Ambient Noise and Distractions………………………………………………………………………………………………………….9
        Event Introductions ………..……………………………………………………………………………..…………….………………….……10
        Additional Tips………………………………………………………………………………………………..……………….………….…….…..10
        Additional Resources……………………………………………………………………………………………………………………………10
Virtual Event Guiding Principles…………………………………………………………………………………………………………….………..11
        Determining the Platform………………..…………………………………………………………………………….………………….....11
        Speaker Preparation……………………………………..……………………………………………………………….……………………..11
        Content……………………………………………………………………………………………………………….………………………….………..11
Sample Run of Show………………………………………………………………………………………….………………………………….…………….12
        Board Meeting………………………………………………………………………………………….…………………………….………………12
        Awards Ceremony………………………………………………………………………………………….……………….…………………..…13
        Panel Discussion………………………………………………………………………………………….…………………….……………………14
Digital Invitations/Registrations………………………………………………………………………………………………………………………15
        iModules…………………………………………………………………………………………………………………………………………………..15
        Paperless Post……………………………………………………………………………………………………………………..…………………15
        Other…………………………………………………………………………………………………………………………………………..……………15
        UA Events Calendar & Attendee Tracking……………….………………………………………………………………………15
Communication……………………………………………………………………………………………………………………………………………………17
        Confirmation email to those who RSVP…………………………………………….………………………………………………17
        Reminder email to those who RSVPed…………………………………………….……………………………………………..…17
        Follow up email to all invitees……………………….…………………………………….………………………………………………18
Virtual Meeting Technical Support and FAQs…………………………………….………………………………………………………..19
        Zoom Meeting Best Security Practices………………………………….…………………………………………………………..19
        Zoom Meeting Tips…………………………………………………………………….………………………………………………………….32
        Troubleshooting Virtual Meeting Common Problems……………………………….…………………………………..34
Downloadable Resources………………………………………………………………………………………….………………………………………37
        Zoom Backgrounds……………………………………………………………………………………………………………………………….37

                                   2
Virtual Event Checklist
Decide on general event logistics
   •    Event Name
   •    Event Date & Time
   •    Event Style (board meeting panel discussion, awards ceremony, etc)
   •    Preferred Platform (Zoom Meeting, Zoom Webinar, etc)
   •    Public or invitation-only?
   •    Will this event be recorded?
Content
   •    Identify the run of show
   •    Create detailed script with virtual transitions
           o Presentation slide changes
   •    Will your event include a PowerPoint presentation?
           o It is recommended to include a visual presentation (title and headshot slides,
               transition slides, etc)
Brand
   •    As always, please abide by the NC State brand guidelines as outlined here.
Identify the following:
   •    Moderator/Technical Support: individuals who will be managing the back-end (presentation
        slides, Q&A, etc)
   •    Host: who will be the “face” of the meeting/event (will address and welcome attendees,
        introduce speakers and special guests, can moderate questions)
   •    Speakers/panelists/special guests will vary on the style of the event
           o Speakers with a certain expertise
           o Board Chairs/Leadership
           o University Leadership
           o Award Winners
Communication Plans
   •    Attendee Communication Plan
           o Invitation
                 § Including RSVP or registration form
           o Event link with instructions and reminder

                                            3
§ Special event verbiage – i.e. if the meeting/event is recorded, if all attendees
                   will be muted, how to submit questions
                § Consider a virtual concierge phone number in case of technical difficulties
          o Follow Up Communication
                § Option to send recorded meeting/event with survey to attendees
                § Option to send recorded meeting/event to those who were unable to attend
   •   Speaker/Special Guest Communication Plan
          o Special invitations for speakers to be a part of the meeting/event
          o Request title, headshot and short bio for use
          o Share general program/run of show and provide specific topics and timing for
             speaking portions
          o Invite to dress rehearsal, if applicable
          o Send event link with special instructions
Rehearsals
   •   Set up dress rehearsal on the platform that you will be using
   •   Practice transitions, slide changes, on & off camera changes and run through script to ensure
       flow works for the platform
   •   Invite hosts/cohosts, moderator, speakers (if applicable) and additional colleagues to view
       from the attendee side
   •   Work out any potential lighting/background issues
   •   Technology plans – test in areas with the best internet access
Meeting/Event Add-Ons
   •   At minimum, it is suggested to have a still screen image for the beginning and closing of your
       meeting/event
   •   What audio other than speaker content do you want included? (i.e. music for the beginning
       of the meeting/event, applause, etc)
   •   Logos for registration or meeting/event platform
   •   What event features would you like to have enabled?
         o Chat
         o Q&As
         o Polls
         o Breakout rooms
   •   Special backgrounds for speakers available
Post Meeting/Event
   •   Schedule a post-meeting/event debrief with colleagues

                                          4
•   Gather final attendee list
  •   Record any attendee/participant details (i.e. polls, questions, etc)
  •   Record attendee list where applicable
  •   Send survey and recorded meeting/event

Virtual Event Best Practices
Virtual Event Programming
  •   Virtual events should be shorter, more tightly-scripted than in-person events

  •   Abide by the NC State brand guidelines as outlined here

  •   Work hard to make your event interactive
        o Breakout sessions
        o Icebreakers
        o Games
        o Polls
        o Screen sharing

  •   Bigger emphasis on variety of presentation: speaker view, panel, supporting slides, photos,
      music

  •   Keep in mind varying degrees of familiarity and comfort with your digital platform by guests

  •   Provide attendee instructions at the start of the meeting; how to ask questions, ways to
      participate, etc.

  •   Chat function during an awards ceremony can build excitement and a sense of
      “being there” to honor the awardees

  •   Ensure presenter backgrounds and surrounding areas are free of distracting clutter,
      signs, photos or other unprofessional backdrops

  •   Always have a back-up host in case of connectivity issues

  •   Prep speakers for how to handle technical difficulties during a live event

  •   Keep speaking segments to no more than 5-7minutes at a time

                                           5
• Utilize a text group or another form of communication outside of the platform you
     are using to communicate with internal hosts and those who have roles in the virtual
     event

   •   Turn off your computer notifications if you are a host or panelist

   •   If you are switching between speakers in active speaker mode, the camera view will
       not switch until the panelist/host begins speaking

   •   Polls are a good way to engage attendees at the beginning of the event/meeting as
       they are waiting for it to begin

Virtual Event Security
   • Turn on Your Waiting Room

   • Do not Use Personal Meeting ID for Public Meetings

   • Require a Password to Join

   • Only Allow Registered or Domain Verified Users

   • Lock Your Meeting

   • Control Screen Sharing

   • Disable Private Chat

   • Turn Off Annotation

   • Mute Participants

   • Make Someone a Co-Host

   • Disable Local Recording

   • Disable Cloud Recording for Zoom Rooms

                                            6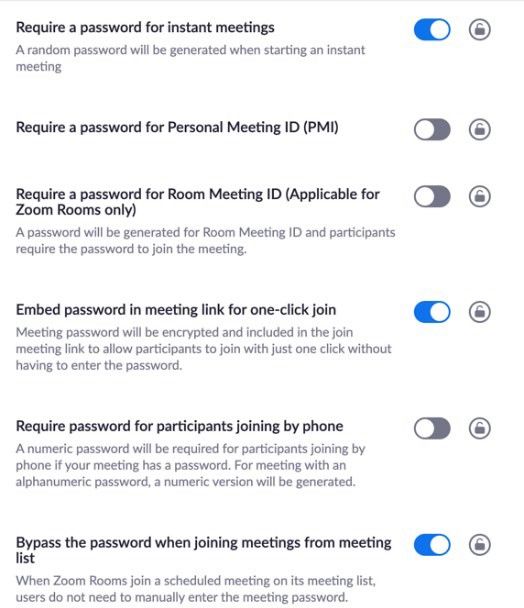
Platforms
Zoom Meeting
Zoom Meetings are designed to be a collaborative event with all participants being able to screen
share, turn on/off their video and audio, and see who else is in attendance.
Suggested use:
Ideal for hosting more interactive sessions where you’ll want to have audience participation or
break your session into smaller groups. Great for internal use and limited external use with familiar
attendees.
Maximum of 300 attendees
Features
https://support.zoom.us/hc/en-us/articles/115005474943-Meeting-and-Webinar- Comparison
   •   All participants can video share
   •   All participants can mute/unmute their own audio
   •   Host can set all participants to mute upon entry to the meeting
   •   Participant list is visible to all attendees
   •   Attendees have the ability to change their visible name
   •   File transfer features
   •   Polling
   •   Livestream to Facebook and YouTube
   •   Breakout rooms https://support.zoom.us/hc/en-us/articles/206476093-Getting-Started-
       with-Breakout-Rooms
   •   Waiting room
   •   Meeting features do not include: email reminders, Q&A, practice sessions
Best Practices
   •   Enable waiting room feature
   •   Mute all attendees upon entry
   •   Require password to join
   •   Enable multiple hosts to ensure continued connectivity
   •   Enable host-only record option https://support.zoom.us/hc/en-us/articles/204101699-
       Recording-without-the-Host

If you are recording content it is important to let your attendees know at the beginning of your
webinar. Confirm recording and reuse intention with your panelists prior to the webinar.

                                              7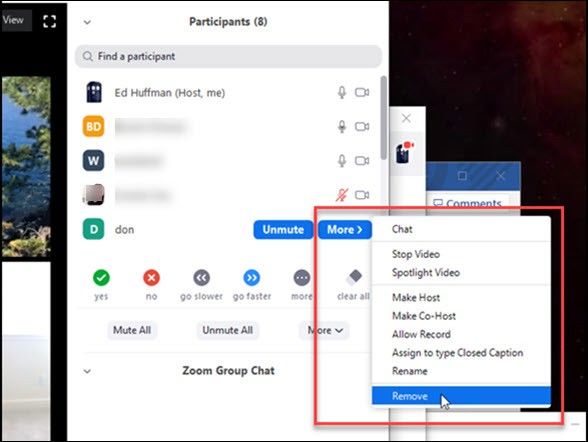
Check your space: lighting, sound, background, etc.

Zoom Webinar
Zoom Webinars are designed so that the host and any designated panelists can share their video,
audio and screen. Webinars allow view-only attendees. They have the ability to interact via Q&A,
chat, and answering polling questions. The host can also unmute the attendees. NC State has one
license for Zoom Webinars that is available for use. Contact learntech@ncsu.edu to set-up your
webinar.
Maximum of 500 attendees
Features
https://support.zoom.us/hc/en-us/articles/115005474943-Meeting-and-Webinar- Comparison
   •   Attendees join in listen-only mode. Only the Host and panelists can mute/unmute their own
       audio
   •   Participant list is only visible to Host and panelists
   •   Q&A
   •   Polling
   •   Livestream to Facebook and YouTube
   •   Practice sessions available
   •   Webinar features do not include: meeting reactions, file transfer, waiting room, breakout
       rooms
Best Practices
   •   Require password to join
   •   Enable multiple hosts to ensure continued connectivity
   •   Enable Host only record option https://support.zoom.us/hc/en-us/articles/204101699-
       Recording-without-the-Host
If you are recording content it is important to let your attendees know at the beginning of your
webinar. Confirm recording and reuse intention with your panelists prior to the webinar.
Check your space: lighting, sound, background, etc.

                                             8
Preparing For Your Virtual Event
Technology
   •   Ensure you have a reliable internet connection.
   •   If your connection is unreliable, call into the meeting using a phone, rather than using your
       computer’s built-in audio.
   •   For best connectivity, hardwire your internet connection.
   •   Familiarize yourself with the software and practice using it before your event. Use good
       quality microphone and headphones.
   •   Provide an email or phone number of a person attendees can contact if they have if issues
       joining the event.
   •   If you utilize breakout sessions, ensure one host remains in the main room to troubleshoot
       any issues.
   •   Confirm and edit how your name appears to others.
Changing your name in Zoom:
Open the Zoom application
Select “Settings” in the top right corner
Profile > Edit My Profile
Login using your Unity ID username and password
Select “Edit” next to your name.
Changing your screen name in a specific Zoom meeting:
While in a Zoom meeting select “Participants” at the bottom of the window
When the Participants window appears, click “Rename”
Enter your new name in the “New Screen Name” filed, then select “OK”

Background
   •   Backgrounds should be clear of distractions.
   •   Abide by the NC State brand guidelines as outlined here.
   •   If using a virtual background, ensure it is appropriate and will not distract others.

Lighting
   •   Lighting should come from in front of you to ensure others can see you.
   •   Avoid bright lights, as you will appear washed out.

Ambient Noise and Distractions
   •   Ensure you are in a quiet area where you are unlikely to be interrupted.
   •   Avoid outside environments where wind, cars, etc. may produce background noise.

                                            9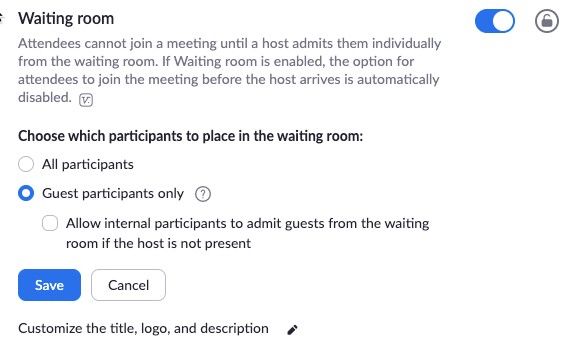
•   Avoid participating in loud activities such as typing and eating during meetings.
   •   Mute your microphone when you are not speaking.
   •   Avoid side conversations with others.

Event Introductions
When opening a virtual event, ensure attendees understand the layout and expectations. Your
opening comments should include information about microphone muting and Q&A directives. If you
are recording the event, ensure attendees are aware. The example below can be used as an outline:
“Welcome everyone! We are glad you are able to attend our meeting today. We ask that you
mute your microphone during our meeting to minimize background noise. This meeting will be
recorded, and we plan to send a copy to everyone after our session. Lastly, there will be a Q&A
section as the end of our presentation. Please direct questions to “First Name, Last Name”
using the chat feature.”

Additional Tips
   •   Look at the camera, rather than your screen.
   •   Use gestures and mannerisms you would typically use in person, such as nodding your head
       to illustrate you are listening.
   •   Wear business attire during your event; solid colored clothing is best.

Additional Resources
https://delta.ncsu.edu/learning-technology/learning-management-systems/zoom-at-nc-state/
https://livetraining.zoom.us/rec/play/ucYoIumtq243G9fAswSDUPArW9W-
eKis1Cga8_EPmk7mAnFQMAevZ7IQZefBr9eLpOtBNxuUZZ4WFxrQ?continueMode=true&_x_zm_rtai
d=yy0UsZ4aQ-2VF4Ctrxg9hQ.1586307928164.ae198283bdefdd7f179e937ff264f1df&_x_zm_rhtaid=839

                                          10
Virtual Event Guiding Principles
Determining the platform
Key considerations:
• Very important to be able to maintain the brand (guests will expect this to be an NC State
event)
• Remember personal touches that could make guests feel like they are there in person
• Multiple host capabilities will ensure the event will continue if there are internet connectivity
issues
• Recording capabilities
• Consider what functions you might need:
• Break out session rooms
• File sharing capabilities
• Registration platform
• Chat controls
Speaker & leadership preparation
• Follow your department’s typical briefing protocol. It may include:
o Briefing and/or bios
o Prepare list of attendees
o Submit research request from Advancement Services, if needed
o Pull bios for notable attendees for senior leadership in advance
Content
• Always consider the audience when preparing content
• Content should be relevant, engaging and timely
• Put careful consideration into what you want the guests to take away
• Abide by the NC State brand guidelines as outlined here.
11Sample Run of Show Guides
Sample Run of Show: Board Meeting
Timeline Role Message
Welcome, instructions on how to
mute/unmute and participate in Q&A (this
person should hold the master
0 min Moderator/Technical Support (1 min) powerpoint/screen share)
1 min Host/Emcee/Board Chair (2 mins) Welcome, opening remarks
Use title slides when the speaker is
introduced, transition to supportin slides
with split screen or speaker view (1 person
3 min Speaker 1 (5-7 mins) on screen - no slides)
Host/Emcee to review questions from
audience and ask the speaker using the
10 min Q&A with Speaker 1 (3-5 mins) Q&A or chat functions
Panel Presentation (10 mins of Host/Emcee to moderate, panel view in the
presentation and 5 mins audience platform, questions through Q&A. Run time
15 min Q&A) depends on panel size and content.
Host/Emcee to review questions and ask
Speaker 2 (7-10 mins) - could be the speaker using the Q&A or chat
30 min keynote or main speaker functions
Host/Emcee to review questions form
audience and ask the speaker using the
40 min Q&A with Speaker 1 (5-7 mins) Q&A or chat functions
Options: breakouts in Zoom Meeting
or open discussion, Speaker 3,
Clsoing remarks by host/emcee/chair
**suggested wrap up within the 1-hour
47 min timeframe
12Sample Run of Show: Awards Ceremony
Timeline Role Message
Welcome, make attendees aware that they
are muted and that their videos will not be
shown and instruct how to participate in
congratulating winners in chat function (this
person should hold the master
0 min Moderator/Technical Support (1 min) powerpoint/screen share)
Welcome, opening remarks, show general
ceremony branding in slide and have a split
screen, introduce special guest 1 (campus
1 min Host/Emcee (2 mins) leadership/donor/etc.)
Use title slides when the speaker is
introduced, transition to supporting slides
with split screen or speaker view (1 person
on screen - no slides)
3 min Ceremony Special Guest 1 (2-3 mins)
Host/Emcee thanks Special Guest 1 and
begins awards presentations. Introduces
Award Winner 1 and reveals slide with AW1
6 min Host/Emcee (2-3 mins) photos and info
Split screen with AW1's slide as AW1 says
9 min Award Winner 1 (1-2 mins) short remarks
Host/Emcee thanks AW1 and continues
award presentations. Introduces Award
Winner 2 and reveals slide with AW2
11 min Host/Emcee (1-2 mins) photos and info
Split screen with AW2's slide as AW2 says
13 min Award Winner 2 (1-2 mins) short remarks
Host/Emcee thanks AW2 and continues
award presentations. Introduces Award
Winner 3 and reveals slide with AW3
15 min Host/Emcee (1-2 mins) photos and info
Split screen with AW3's slide as AW3 says
17 min Award Winner 3 (1-2 mins) short remarks
13Host/Emcee thanks AW3 and introduces
Special Guest 2 (campus leadership, donor,
19 min Host/Emcee (1-2 mins) etc)
Use title slides when the speaker is
introduced, transition to supporting slides
with split screen or speaker view (1 person
21 min Ceremony Special Guest 2 (2-3 mins) on screen - no slides)
Host/Emcee thanks Special Guest 2.
Reintroduces the award winners as a group
with slide of all photos and asks for final
24 min Host/Emcee (3-5 mins) congratulations.
Closes program and reminds guests that
Host/Emcee (1-2 mins) **suggested recorded ceremony will be available (if
29 min wrap up within the 1-hour timeframe applicable)
Sample Run of Show: Panel Discussion
Timeline Role Message
Welcome, instructions on how to
mute/unmute and participate in Q&A (this
person should hold the master
0 min Moderator/Technical Support (1 min) powerpoint/screen share)
1 min Moderator/Technical Support (1 min) Introduce host
Welcome, opening remarks, introduce
2 min Host (3-5 mins) panelists, set up conversation
7 min Panel Discussion (30 mins) Panel view in platform
Moderator to review questions form
audience and ask the speaker using the
37 min Q&A with Panelists (10 mins) Q&A or chat functions
Host (3-5 mins) **suggested wrap up
47 min within the 1-hour timeframe Closing Remarks
14Digital Invitations/Registrations
iModules
• Work with Advancement Services to create a registration page
• Link can be used in your branded invitation
• Abide by the NC State brand guidelines as outlined here.
Paperless Post
• Option for low/no cost
• Templates available or can upload design
• Abide by the NC State brand guidelines as outlined here.
• Master invitee list can be bulk uploaded or individually added
• Track invite opens, engagement, etc.
• Looks like a printed invitation
Others
• Eventbrite
• Social Media
• Post Virtual event link inviting followers to share & “attend” event
• Direct email invites
• Some of the online webinar/video conference platforms may have an event
invite/registration option
UA Events Calendar & Attendee Tracking
UA Calendar event creation & “virtual” location
• Submit event with “Virtual” at the end of the event name
• Make sure to list the location as “Virtual”
• See below for detailed instructions
15Adding a Virtual Event to the UA Events Calendar
It is important that we continue to identify events that are being held virtually. The mechanism we
will use to identify UA Calendar events as virtual is to submit the event location as “Virtual”. All
events that are being held in the virtual space should use this identifier. “Virtual” should also be
included at the end of the event name, for additional clarity.
When creating a new event, enter “Virtual” at the end of the Event Name and in the Event Location
field.
Updating the Location of an existing event to Virtual
If the event already exists on the UA Event Calendar, please reach out to specialevents@ncsu.edu
to make the edit for you.
Tracking responses and attendees
Same process as in-person events – submit RSVP list and final attendee lists to the Google folder
16Communication
Confirmation Email to those who RSVP
• Once you receive your RSVPs through whatever invitation portal you choose to use, send
your attendees a confirmation email.
• In this email, include the name of the meeting, date, time and link to the virtual meeting.
• If your virtual meeting is password protected, make sure guests have the password in
advance of call. Zoom automatically generates a meeting password.
• Only provide the link or access via email to your attendees.
• Do not share your meeting link directly on social media or websites.
• If you post the link more widely, “Zoombombers” are more likely to crash your meeting.
“Zoombombers” are hackers who intrude into people’s virtual meetings.
Example: Confirmation Email
Subject: Event Registration Confirmation
Email Body:
Hi attendee,
Thank you for registering for
Date: June 15, 2020
Time: 1:00pm – 3:00pm EST
A reminder detailing the event logistics will be emailed to you the day prior to . If you
have any questions, please email specialevents@ncsu.edu.
You can cancel at any time by replying to this email.
Reminder Email to those who RSVPed
Send a reminder email out the day before the meeting. Include date, time and if need be an updated
link.
Example: Reminder Email
Subject: Reminder: Event Registration
Email Body:
Hi all,
This is a reminder that “Event Name” will be taking place tomorrow, June 15, 2020 at 1:00pm.
Zoom Link:
Call-in Number:
Should you need assistance at any time during this event, please contact our concierge service at
or .
We look forward to seeing you tomorrow.
17Follow Up Email to all invitees
If your meeting was recorded, send out a follow up email to attendees. Thank attendees for
attending your meeting and speakers for their time, include the link to the recording and any
materials.
Example: Follow Up Email
Hi all,
Thank you to all who attended the “Event Name” meeting this afternoon. It was wonderful to see all
of you and to be able to catch up and discuss xxxxxx.
For those of you who weren’t able to join today, below is the link to the video recording of the
meeting and a copy of the Zoom chat.
Link to meeting: *This should be your unique link*
Link to Chat: *This should be your unique link*
18Virtual Meeting Technical Support and FAQs
Zoom Meeting Best Security Practices
Turn on Your Waiting Room
One of the best ways to secure your meeting is to turn on Zoom’s Waiting Room feature. Some
Zoom users, like those in education, will have this feature turned on by default. This feature provides
a virtual waiting room for your attendees and allows you to admit individual meeting participants
into your meeting at your discretion.
Sign in to the Zoom web portal as an administrator with the privilege to edit account settings.
In the navigation menu, click Account Management then Account Settings.
Navigate to the Waiting Room option on the Meeting tab and verify that the setting is enabled.
Note: If the setting is disabled, click the Status toggle to enable it. If a verification dialog displays,
choose Turn On to verify the change.
Select who you want to admit to the waiting room.
All participants: All participants joining your meeting will be admitted to the waiting room.
Guest participants only: Only participants who are not on your Zoom account or are not logged in
will be admitted to the waiting room. If not logged in, they will have an option to log in.
Note: If Guest participants only is enabled, you can also enable the option to allow internal
participants (users on the account), to admit guests from the waiting room if the host is not in the
meeting.
(Optional) If you want to make this setting mandatory for all users in your account, click the lock
icon, and then click Lock to confirm the setting.
19Don’t Use Personal Meeting ID for Public Meetings
Your Personal Meeting ID (PMI) is the default meeting that launches when you start and ad hoc
meeting. Your PMI doesn’t change unless you change it yourself, which makes it very useful if people
need a way to reach you. But for public meetings, you should always schedule new meetings with
randomly generated meeting IDs. That way, only invited attendees will know how to join your
meeting. You can also turn off your PMI when starting an instant meeting in your profile settings.
Require a Password to Join
Enabling password settings for your account
Sign in to the Zoom web portal as an admin with the privilege to edit account settings.
In the navigation panel, click Account Management then Account Settings.
Navigate to the Meeting tab and verify that the password settings that you would like to use for
your account are enabled.
If the setting is disabled, click the Status toggle to enable it. If a verification dialog displays, choose
Turn On to verify the change.
(Optional) If you want to make this setting mandatory for all users in your account, click the lock
icon, and then click Lock to confirm the setting.
Editing a password for a meeting
By default, meetings are assigned a random password. You can update the password to one of your
choosing.
Sign in to the Zoom web portal and navigate to Meetings.
Click the topic of the meeting you would like to update the password for.
20Click Edit this Meeting.
Under Meeting Options, edit the password.
Click Save.
Editing a password for a webinar
By default, webinars are assigned a random password. You can update the password to one of your
choosing.
Sign in to the Zoom web portal and navigate to Webinars.
Click the topic of the webinar you would like to update the password for.
Click Edit this Webinar.
Under Webinar Options, edit the password.
Click Save.
Only Allow Registered or Domain Verified Users
Zoom can also give you peace of mind by letting you know exactly who will be attending your
meeting. When scheduling a meeting, you can require attendees to register with their e-mail, name,
21and custom questions. You can even customize your registration page with a banner and logo. By
default, Zoom also restricts participants to those who are logged into Zoom, and you can even
restrict it to Zoom users whose email address uses a certain domain.
Sign in to the Zoom web portal and click Meetings. You will be able to see the list of your scheduled
meetings here. You can either schedule a new meeting or edit an existing meeting. Then check the
"Registration: Required" box.
After scheduling the meeting, the Branding and Invite Attendees sections will appear. In the
Branding section, you can customize your registration page with a banner and logo. In the Invite
Attendees section, You can find your meeting link and the list of registrants. You can also set the
type of registration for the meeting.
Manage Attendees
In this section you can generate a list of registrants for the particular meeting. Here you can also
copy the invitation that was emailed to the registrant. Clicking on the registrant name will provide
addition info about that person.
Registration Options
Automatic Approval: Anyone who signs up will receive information on how to join.
Manual Approval: Anyone who signs up will need to be approved by the host on the meeting
management page.
22As the host you can opt in or out for email notifications when someone registers. you can also not
allow registration after the scheduled meeting time has passed.
Lock Your Meeting
Once a session has begun, head over to the "Manage Participants" tab, click "More," and choose to
"lock" your meeting as soon as every expected participant has arrived. This will prevent others from
joining even if meeting IDs or access details have been leaked.
Click the ‘Manage Participants’ option at the bottom of the Zoom Meeting window.
A ‘Participants’ panel will open on the right side of the Zoom Meeting window with a list of all
participants in the meeting. Click the ‘More’ button on the bottom right corner of the ‘Participants’
panel.
23Select ‘Lock Meeting’ from the available options in the ‘More’ menu.
Control Screen Sharing
Allowing participants to screen share in a meeting can be a great way to collaborate, but that can
also leave you open to unwanted interruptions during larger meetings. Zoom gives you the ability to
determine if you want
In the host controls, click the arrow next to Share Screen and click Advanced Sharing Options.
Under Who can share? choose Only Host.
Close the window.
Disable Private Chat
In-meeting chat adds another dimension of collaboration to your meetings, creating a place for
questions to be asked and fielded later, or for supplemental resources to be posted. But sometimes
chat can become distracting or unproductive. In those cases, Zoom allows you to disable and enable
chat throughout your meeting.
24Start a meeting or webinar as host.
Click Chat in the Meeting Controls.
At the bottom of the in-meeting Zoom Group Chat window, click More, and then choose an option
for Allow attendees to chat with.
For meetings, the host can allow attendees to chat with everyone or with the host only.
For webinars, the host can allow attendees to chat with no one, with all panelists (including host), or
with all panelists and attendees.
Turn Off Annotation
Like screen sharing and in-meeting chat, annotation can be a great tool when you need it, but it can
also be an opportunity for mischief when you don’t. To avoid unwanted annotation, Zoom allows you
as the meeting host to remove all participants ability to annotate during a screen share. You can
disable this for the entire meeting, or just temporarily.
For your account
Sign in to the Zoom web portal
In the navigation panel, click Account Management then Account Settings.
Click the Meeting tab.
Under Meeting (Basic), verify that Annotation is disabled.
Mute Participants
We’ve all been in meetings where somebody forgets to mute, or their microphone picks up some
background noise that interrupts the meeting. Zoom allows you to solve this problem with a simple
button to mute all participants. For an added layer of security, you can also disable participant’s
ability to unmute themselves. When you’re ready to make the meeting interactive again, you can
simply hit the “Unmute All” button or allow participants to unmute themselves.
25Select Manage Participants
Select Mute All
Make Someone a Co-Host
All the features we’ve covered so far are only accessible to meeting hosts, ensuring that hosts are
the only ones with total control over a meeting. But what if you need a helping hand to manage all
your participants? You can promote a trusted meeting attendee to Co-Host, allowing them many of
the same privileges and control features available to the meeting host themselves.
To enable the co-host feature for your own use:
Sign into the Zoom web portal and click My Meeting Settings (if you are an account administrator)
or Meeting Settings (if you are an account member).
Navigate to the Co-host option on the Meeting tab and verify that the setting is enabled. If the
setting is disabled, click the Status toggle to enable it. If a verification dialog displays, choose Turn
On to verify the change. Note: If the option is grayed out, it has been locked at either the Group or
Account level, and you will need to contact your Zoom administrator.
Using co-host in a meeting
There are two ways that you can make a user a co-host.
In the meeting, the host hovers over the user's video, clicks on the three dots and chooses Make Co-
Host.
26Alternatively, the host can make another participant a co-host through the Participants window.
Click on Manage Participants in the meeting controls at the bottom of the Zoom window.
Hover over the name of the participant who is going to be a co-host, and choose More.
Click Make Co-Host.
Remove Participants
If you follow all the best practices in this guide, you should never find yourself in a meeting with an
unwanted guest. But if you do need to remove an attendee from the meeting at any point, Zoom
makes it easy to kick an unwanted participant out of the meeting. For additional security, you can
also choose to not allow participants to rejoin once they’ve been removed.
To remove a participant from your meeting
Once in your Zoom meeting, click on Manage Participants on the bottom toolbar in the Zoom
meeting window.
Mouse over the participant name you need to remove from your meeting in the Participant list.
Click on the More fly-out menu that appears and select Remove.
Disable Local Recording Account
Sign in to the Zoom web portal as an administrator with the privilege to edit account settings.
Click Account Settings.
In the Recording tab, navigate to the Local Recording option and verify that the setting is disabled.
If the setting is enabled, click the toggle to disable it. If a verification dialog displays, choose Turn
Off to verify the change.
27(Optional) If you want to make this setting mandatory for all users in your account, click the lock
icon, and then click Lock to confirm the setting.
Group Management
Sign in to the Zoom web portal as an administrator with the privilege to edit user groups.
Click Group Management.
Click the name of the group, then click the Settings tab.
In the Recording tab, navigate to the Local Recording option on the Recording tab and verify that
the setting is disabled. If the setting is enabled, click the toggle to disable it. If a verification dialog
displays, choose Turn Off to verify the change.
Note: If the option is grayed out, it has been locked at the account level, and needs to be changed
at that level.
(Optional) If you want to make this setting mandatory for all users in this group, click the lock icon,
and then click Lock to confirm the setting.
User
Sign in to the Zoom web portal and click My Meeting Settings (if you are an account administrator)
or Meeting Settings (if you are an account member).
In the Recording tab, navigate to the Local Recording option and verify that the setting is disabled.
If the setting is enabled, click the toggle to disable it. If a verification dialog displays, choose Turn
Off to verify the change.
Note: If the option is grayed out, it has been locked at either the group or account level, and you will
need to contact your Zoom administrator.
28Disable Cloud Recording for Zoom Rooms Disabling Cloud Recording for All Zoom Rooms
To disable the Cloud Recording feature for all Zoom Rooms of your organization:
Sign in to the Zoom web portal.
Click Account Management > Account Settings.
Navigate to the Cloud Recording option on the Recording tab and verify that the setting is disabled.
If the setting is enabled, click the toggle to disable it. If a verification dialog displays, choose Turn
Off to verify the change.
(Optional) If you want to make this setting mandatory for all users in your account, click the lock
icon, and then click Lock to confirm the setting.
Disabling Cloud Recording for a Specific Zoom Room To disable the Cloud Recording feature
for a Zoom Room:
Sign in to the Zoom web portal.
Click Room Management > Zoom Rooms.
Click on the room name.
Click Edit to view the room settings.
29Click the Meeting Settings tab and click Show More Settings.
Navigate to the Cloud Recording option and verify that the setting is disabled. If the setting is
enabled, click the toggle to disable it. If a verification dialog displays, choose Turn Off to verify the
change.
Note: If the option is grayed out, it has been locked at a higher level in the hierarchy, and you will
need to contact your Zoom administrator.
Disabling Cloud Recording for Instant Meetings for all Zoom Rooms
To disable the Cloud Recording for instant meeting feature for all Zoom Rooms of your
organization:
Sign in to the Zoom web portal.
Click Room Management > Zoom Rooms.
Click Account Settings.
Click the Meeting tab
30Navigate to the Cloud Recording for instant meetings option and verify that the setting is disabled.
If the setting is enabled, click the toggle to disable it. If a verification dialog displays, choose Turn
Off to verify the change.
(Optional) If you want to make this setting mandatory for all users in your account, click the lock
icon, and then click Lock to confirm the setting.
Disabling Automatic Cloud Recording for a Zoom Room
To enable the Automatic Recording feature for all Zoom Rooms of your organization:
Sign in to the Zoom web portal.
Click Account Management > Account Settings.
Navigate to the Automatic Recording section and verify the Record in the cloud option is disabled
on the Recording tab. If the setting is enabled, click the toggle to disable it. If a verification dialog
displays, choose Turn Off to verify the change.
(Optional) If you want to make this setting mandatory for all users in your account, click the lock
icon and then click Lock to confirm the setting.
31Zoom Meeting Tips
Review technical requirements
• Review Zoom’s system requirements and ensure your system meets these recommendations.
Check your network
Check your network
• Check your network speeds using one of the free services available online. Zoom’s system
requirements recommend a minimum of 1.5 Mbps for both upload and download speed. If
necessary, check with your internet service provider.
• Power cycle your modem/router, if possible.
• If you’re on a wireless connection:
• Confirm that you have a strong signal.
• Connect to a 5 GHz network (rather than 2.4 GHz), if possible.
• Limit the number of devices connected to your wireless router.
• Consider switching to a wired connection.
• Ensure that other devices on your network aren’t consuming bandwidth; these could include
cloud-connected security cameras, cloud backup solutions, smart TVs, streaming devices,
smart hubs, gaming devices, or other cloud or internet-connected devices. You can turn them
off, lower the bandwidth they consume by adjusting performance settings, or make other
changes that may improve the amount of bandwidth available for Zoom.
• If you're using a network-wide VPN, consider disabling it.
• Important: Do not disable any necessary devices that help protect or otherwise secure your
network.
Adjust your computer's settings
• Restart your Zoom client.
• Restart your computer.
• Update system drivers, especially network drivers, if necessary.
• Close out of any unneeded programs, especially those that use the internet. This could
include office applications, additional browser tabs, or anything that uses system or network
resources. Closing out of these items will free more system resources for Zoom to use.
• Stop all downloads, uploads, or other unnecessary processes that are using network
resources.
• Ensure that your devices are up to date.
• Ensure that your application(s) are up to date, especially the Zoom client.
• Disconnect from any VPNs you may be using.
32Adjust Zoom settings
• Disable HD Video from your Zoom client:
• While not in a call, click the Home tab.
• Click the gear icon (Settings).
• In the left Navigation pane, click Video.
• Uncheck Enable HD.
• Click X in the top right corner to close the Settings window.
Disable “Touch up my appearance” from your Zoom client:
• While not in a call, click the Home tab.
• Click the gear icon (Settings).
• In the left Navigation pane, click Video.
• Deselect Touch up my appearance.
• Click the X in the top right corner to close the Settings window.
• Mute your audio when not speaking.
• Consider disabling your webcam if it’s not necessary.
33Troubleshooting Virtual Meeting Common Problems
I can't join my meeting
• If you're unable to join a meeting, check these items:
• If you're on a desktop or mobile device, be sure you've installed the Zoom client and that it's
up to date; see What version of Zoom am I running?
• If you've received any of these messages:
• You are on hold: The host has enabled a waiting room; you'll remain on hold until the host
admits you into the meeting room.
• Room connector is not enabled for this meeting: If you are using videoconferencing
equipment to join a meeting hosted by a free Zoom account or an account that doesn't have
the room connector enabled, you will receive this error. Connect to the meeting using a
desktop or mobile device instead.
• Please wait for the host to start this meeting: The Join before host feature is not enabled,
and the host has not yet joined the meeting. Hosts automatically receive email asking them
to join. You will be prompted to join the meeting a short time after the host joins.
• Please enter the meeting password: The meeting requires a password; enter the password
provided by the meeting host. If you do not know the password, contact the meeting host for
assistance.
Note: Certain types of videoconferencing equipment will not allow you to type alphabetical
characters into the Zoom password field. If you are using videoconferencing equipment and the
password contains alphabetical characters, contact the host.
This meeting does not allow phone dial-in: The host may only have allowed VoIP audio. In this case,
if you dial into the general Zoom teleconferencing number and enter the meeting ID, you will hear
the message above and the call will disconnect. You will need to join the meeting with a computer or
a smartphone app.
I've joined my meeting, but no one else is here
• If you've joined a meeting but don't see other participants:
o Confirm with the meeting host that the meeting has begun. If it has, ask for the
meeting ID at the top of the host's Zoom window (for example, Zoom Meeting ID: 123-
456-7890) and compare that to the meeting ID at the top of yours. If they don't match,
you've joined a different meeting. Ask the host for the meeting ID, and join that
meeting .
• If you're the host, ensure that you haven't enabled a waiting room. If you have, you need to
manually admit each participant before they can join your meeting.
34I can't hear or talk to people
• If you're unable to hear or talk to people in a meeting:
• Check the attendee controls at the bottom of your meeting window. If you see the Join Audio
icon on the far left, click it. (If you've already joined your audio, you'll instead see the
mute/unmute icon .)
• To check whether the issue is related to the Zoom program, see:
o How do I join or test my computer audio?
o My Audio Is Not Working On The Zoom Mobile App (iPhone, iPad)
o Where are my audio settings for iOS? (iPhone, iPad)
• If your audio isn't working in the Zoom client outside of the meeting , try troubleshooting the
device itself. For instructions, see Troubleshoot audio and video issues on your computer or
mobile device.
• The host may have allowed only telephone audio. In this case, you will not see the message
"join meeting with computer audio". You may still be able to join the meeting with video or via
phone .
People can't see me
• If you've joined a meeting successfully but others can't see you:
• Make sure your video isn't turned off by checking the Start Video icon in the attendee
controls at the bottom of your meeting window.
• If your video isn't working in the Zoom client outside of the meeting , try troubleshooting the
device itself. For instructions, see Troubleshoot audio and video issues on your computer or
mobile device.
My video is poor quality
• The "Optimize for full screen video clip" setting greatly reduces video quality. Restart the
screen share with that setting unchecked.
• If you are experiencing a problem with the internet or the device itself, see Troubleshoot
audio and video issues on your computer or mobile device.
I can't screenshare a video with sound
• Make sure you've muted unneeded microphones (your device and/or the Zoom meeting
microphone). After you click Share to share your screen, select Share computer sound in the
lower left of the screenshare window.
I can't access my recordings, I accidentally deleted a recording, or I can't record
• If your meeting is missing from the recorded meetings list in the Zoom client (for example, as
35a result of pressing Delete in the Zoom client for a recorded meeting), you may be able to
find the recording on your device in its Zoom recordings folder.
• To see where your Zoom recordings are stored, see the "Change location for Recording"
section of Local recording . Recordings will be named in the
• format double_click_to_convert_01.zoom. When you find the .zoom file you are
• looking for, double-click it.
• Note: Pressing Delete in the Zoom client removes the recording from the recorded meetings
list in Zoom, but not from the device itself.
• Only current hosts can record a meeting. If you can't record, check to see whether you're the
host by clicking the Participants icon in the attendee controls at the bottom of your
meeting window; if you aren't the host, you can ask the host to record the meeting.
• For more about recording Zoom meetings, see Create and store recordings of Zoom
meetings.
36Downloadable Resources
Zoom Backgrounds
Other options available for download at: https://dasa-ncstate.smugmug.com/ZOOM-Backgrounds
37You can also read