EN - Incubator microscope for live cell imaging - User manual zenCELL owl
←
→
Page content transcription
If your browser does not render page correctly, please read the page content below
Incubator microscope
for live cell imaging
zenCELL owl

 User manual
 zenCELL owl
                                        EN

               www.zencellowl.com
                                    1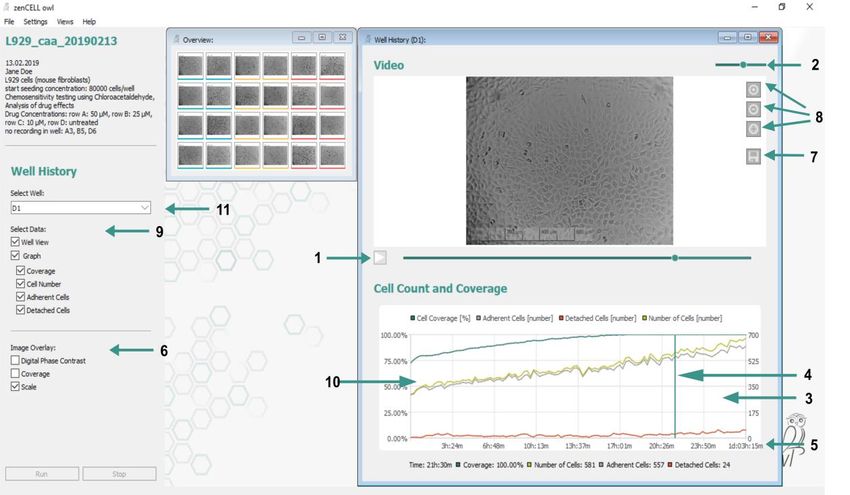
Table of Contents
TABLE OF CONTENTS ................................................................................................................................ 2

NOTES ON THE USER MANUAL ............................................................................................................... 3

SAFETY .......................................................................................................................................................... 5

INFORMATION ABOUT THE DEVICE ........................................................................................................ 7

SHIPMENT AND STORAGE ...................................................................................................................... 11

COMMISSIONING ....................................................................................................................................... 12

CARE AND CLEANING .............................................................................................................................. 12

OPERATION OF THE ZENCELL OWL ..................................................................................................... 13

MAINTENANCE AND REPAIR .................................................................................................................. 28

DISPOSAL ................................................................................................................................................... 29

LICENSE INFORMATION........................................................................................................................... 30

                                                    www.zencellowl.com
                                                                                                                                                                 2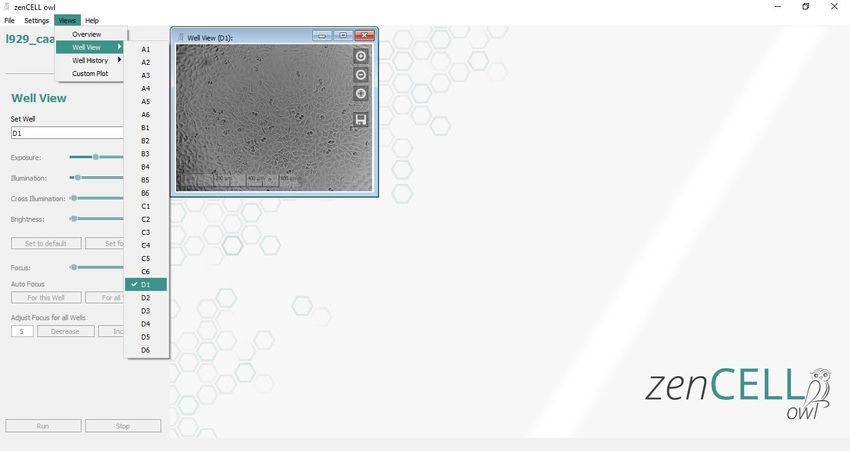
Notes on the user manual

            Warning of electrical voltage
            This symbol indicates that electrical hazards pose a danger to life and health
            of persons.

            Warning
            The signal word indicates a hazard with a medium level of risk which, if not
            avoided, may result in death or serious injury.

            Attention
            The signal word indicates a hazard with a low level of risk which, if not
            avoided, may result in minor or moderate injury.

            Note
            The signal word indicates important information (such as property damage),
            but not hazards.

            Protective gear
            Notes with this symbol indicate that your personal protective equipment is to
            be worn. Wear safety goggles, gloves, protective clothing and safety shoes.

                       www.zencellowl.com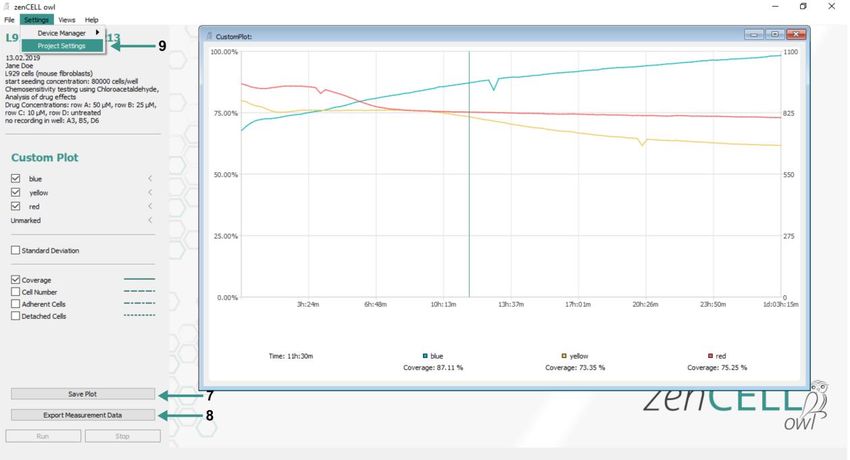
Legal notice

This publication replaces all previous versions. No part of this publication may be reproduced in any
form without the written permission of InnoME GmbH or processed, duplicated or distributed using
electronic systems. Reserve technical changes. All rights reserved.

Design changes in the interest of ongoing product improvement and shape and color changes
reserved. The scope of delivery may digger from product images. This document has been prepared
with due care. InnoME GmbH assumes no liability for any errors or omissions. The determination of
valid measurement results, conclusions and measures derived therefrom are solely the responsibility
of the user. InnoME GmbH does not guarantee the correctness oft he measured values or
measurement results. Furthermore, InnoME GmbH assumes no liability for errors or damage resulting
from the use oft he measured values.

© InnoME GmbH

Warranty and liability

The device complies with the essential health and safety requirements of the relevant EU regulations
and has been repeatedly tested at the factory for proper function. When claiming the warranty, the
device number must be stated (see back of the device). Failure to follow manufacturer's instructions,
regulatory requirements, or unauthorized modifications to the equipment, or unauthorized replacement
of any part of the equipment, may significantly affect the electrical safety of this product and may void
the warranty. Any liability, property damage or personal injury resulting from the device being used
contrary to the instructions in this operating manual is excluded. Technical design and design changes
due to continuous development and product improvement are reserved at any time without prior
notice. For damages that result from improper use, no liability is assumed. Warranty claims then
expire as well.

                                  www.zencellowl.com
                                                                                                        4
Safety

Please read this manual carefully before putting the device into operation and using it and
always keep it in the immediate vicinity of the place of installation or on the device!

                     Warning
                     Read all safety instructions and instructions.
                     Failure to follow the safety instructions and instructions may result in electric
                     shock, fire and/ or serious injury.
                     Retain all safety instructions and instructions for the future.
                     This device may be used by children 14 years old and over, and by persons
                     with reduced physical, sensory or mental capabilities, or lack of experience
                     and knowledge, if they have been supervised or instructed in the safe use of
                     the device and understand the hazards arising therefrom. Children are not
                     allowed to play with the device. Cleaning and user maintenance must not be
                     performed by children without supervision.

   •   Do not operate the device in potentially explosive areas.
   •   Do not operate the device in an aggressive atmosphere.
   •   The device is not a toy. Keep children and animals away.
   •   Never immerse the device completely in liquid.
   •   Protect the device from direct sunlight.
   •   Do not remove safety signs, stickers or labels from the device. Keep all safety signs,
       stickers and labels in a readable condition.
   •   Do not open the device with a tool.
   •   Observe the storage and operating instructions (see chapter Technical data).
   •   If it can be assumed that the device can no longer be operated without danger, it must be
       taken out of operation and secured against being restarted.
   •   The customer/ user may not make any changes or repairs. For maintenance or repair, the
       unit must be returned to the manufacturer or to a location specified by the manufacturer.
   •   The safety of the user may be impaired by the device if it has visible damage, is no longer
       working as prescribed or has been stored in unsuitable conditions. In case of doubt, the
       device should always be sent to the manufacturer or a body appointed by the manufacturer
       for inspection, maintenance or repair.

                                www.zencellowl.com
                                                                                                         5
Intended use
Only use the device for the microscopy of biological samples and for continuous monitoring of them.
Any further use and the utilization of the measurement results of the device are the responsibility of
the user. To use the device as intended, use only accessories approved by InnoME or parts tested by
InnoME.

Improper use
Do not use the device in potentially explosive atmospheres, with hazardous substances or in
contaminated areas. InnoME assumes no liability for damage resulting from improper use. Warranty
claims expire in this case. Unauthorized structural changes and attachments or conversions to the
device are prohibited.

Staff training
The use of the device is reserved for technically trained personnel. Respective persons must also
have read and understood the operating instructions, in particular the Safety chapter.

Residual risks

                      Protective gear
                      Wear protective equipment such as gloves, eye protection and protective
                      clothing. Depending on which other products, substances or chemicals you
                      use, further protective measures are necessary. Pay particular attention to
                      the respective safety data sheets for chemicals before using them.

                      Warning
                      Do not leave the packaging material careless. It could become a dangerous
                      toy for children.

                      Warning
                      The device is not a toy and does not belong in the hands of children.

                      Warning
                      This device may pose a hazard if it is used improperly or not as intended by
                      unauthorized persons! Note the personnel qualification.

                      Note
                      To avoid damaging the unit, do not expose it to extreme temperatures.

                                 www.zencellowl.com
                                                                                                     6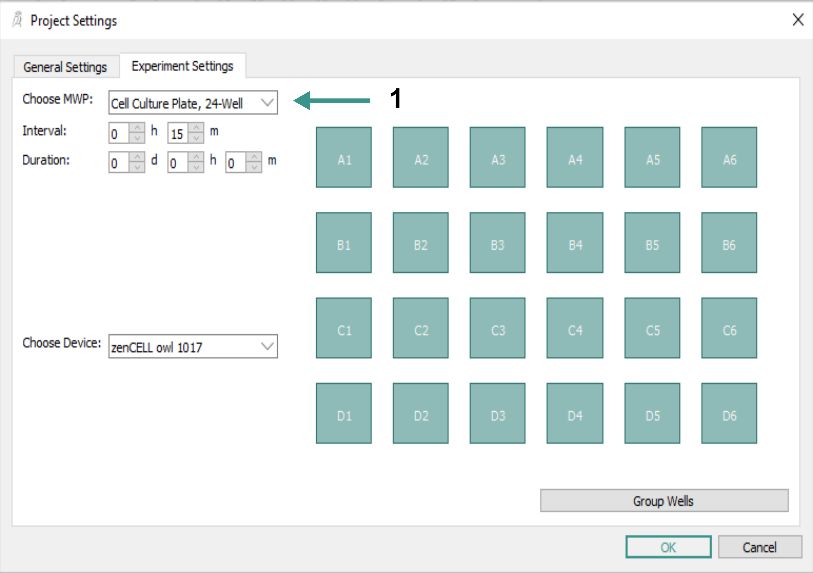
Information about the device

Device Description

The zenCell owl is a live cell imaging device. It is a real-time incubator microscope system. Inside, 24
mini-microscope enable a new simultaneous observation of your cell cultures. Take advantage of your
own incubator and your laboratory computer. Install the free software*, connect the zenCell owl via
USB 3.0 and it is ready for use. There is no need for an additional power supply. Create a new Project
in the Software, put the cells in their defined conditions and monitor them live from outside on your
computer screen. The zenCell owl creates images of your cell cultures in a frequency of your choice
and analyses them for cell coverage and cell number. Different microscopic techniques, like
Brightfield, Darkfield and even Digital Phase Contrast are available. You can sort and graph your
acquired dataset in the zenCell owl’s software or export the dataset and use alternative means at any
time, easing the workload of organizing your Data for a Scientific study.

The small footprint, about the size of a standard cell culture plate, leaves you enough space in the
incubator for your other cell culture ware or more systems. This allows you to use it in parallel with
other experiments at the same time. The housing is completely closed and sterilizable with
Isopropanol or other common medias for wipe cleaning.

Benefit from a wide range of possible applications and monitor your cells continually.

    •    Application examples:
    •    Documentation and analysis of cell growth
    •    Comparison and analysis of extracellular conditions (e.g. glucose concentration, pH value or
         different mediums)
    •    Continiously determining cell confluence in 24 spots
    •    Analysing effects of component on cell cultures (e.g. cytotoxicity or biocompatibility)
    •    Migration or Scratch assays
    •    Stem cell observation

*You can download the zenCELL owl software from https://zencellowl.com/en/software-en/

                                  www.zencellowl.com
                                                                                                         7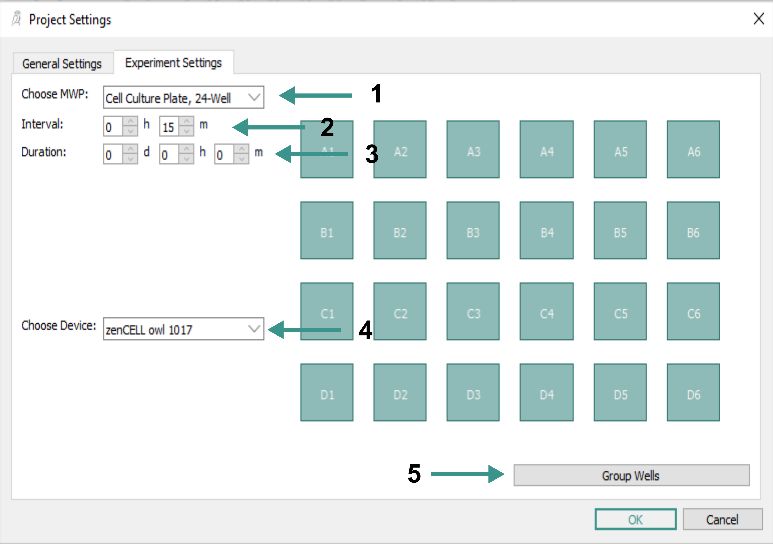
Device representation

Isometric view

                                        Legend:
                               1        1       zenCELL owl
                                        2      Magnetic adapter frame
                                               for fixing cell culture
                                               vessels
                                        3      Shown: 24-cavity plate,
                                               not included

    2                              3

                        www.zencellowl.com
                                                                         8
Legend:
                                                              4      USB-C socket for data
                                                                     exchange and power
                                                                     supply

                              4

Rear view

Connectors & switches

The device can be connected to a computer via the USB-C socket (4) with the supplied USB cable.
Only when using a USB cable tested by InnoME, the device is guaranteed to function properly. The
device is controlled exclusively via the USB-C interface and a connected computer using the zenCELL
owl software.

                                  www.zencellowl.com
                                                                                                  9
Technical data

                                              General technical data
System Requirements                                           Windows® 7,8 or 10 (32/64 Bit, 2,5 GHz 4
                                                              cores, 8 GB RAM)
Interface (power supply, data exchange)                       1x USB 3.0
Magnification                                                 10 x
Field of view                                                 1,2 mm x 0,9 mm
Image Resolution                                              5 MP
Display resolution per microscope                             2592 x 1944
Software incl. Algorithm                                      Cell coverage
                                                              Cell number (fibroblasts)
Measuring rate / Adjustable recording interval                5 min.* – 24 h.
Image capture                                                 30 s for 24 wells
Export Formats                                                Picture: PNG, BMP, JPEG/JPG
                                                              Dataset: CSV
Light Source                                                  LED
Camera                                                        5 MP CMOS
Optical Filters                                               No Filters
Operating Temperature                                         20°C - 45°C
Humidity -operation                                           20% - 95% rel.
Storage Temperature                                           0°C - 50°C
Protection                                                    IP62
Sterilizable                                                  Isopropanol
                                                              Ethanol
Dimension (H x W x D)                                         105 mm x 180 mm x 180 mm
Weight                                                        1050 g
Warrenty                                                      1 year

* If the minimum system requirement is exceeded, 10 minutes should not be undershot as the smallest adjustable recording
interval.

                                        www.zencellowl.com
                                                                                                                           10
Shipment and Storage
Note
If you store or transport the device improperly, the device may be damaged.
Observe the information on transport and storage of the device.
Shipment
When transporting the device, use a suitable container to protect the device against external
influences. The original packaging is a suitable transport container. Make sure that the zenCELL owl is
not exposed to improper mechanical loads.
Storage
• Dry, protected from frost and heat
• Not in contact with hazardous substances
• In a place protected from dust and sunshine
• If necessary, protect it from dust with a cover
• Storage temperature 0 ... +50 ° C
Delivery
zenCELL owl x1
USB-cabel x1
Magnetic adapter * x1
* among others for Eppendorf 24 cavity plate
Check if the delivery is complete and undamaged. If the shipment shows shipping damage or
components are missing, please contact our service (see page 23).
Warning
Do not operate a damaged device as this may cause injury.
www.zencellowl.com
11Commissioning
The power supply and data exchange take place via the USB-C interface. Only use an InnoME-tested
USB cable for commissioning. Only an InnoME-tested USB cable guarantees safe and error-free
operation of the device. InnoME assumes no liability for damage resulting from unchecked
replacement parts.
Warning
Only connect the device to a terminal that meets the system requirements in
the chapter "Technical data". Do not apply overvoltage, otherwise the device
may be irreparably damaged.
First use
Please carefully remove the zenCELL owl from the packaging and check that the device and
accessories are intact. Connect the zenCELL owl to your computer with the enclosed USB cable. A
first initialization of the 24-channel microscope is performed. After successful initialization, the status
LEDs will indicate that the device is ready for use by briefly flashing the status LEDs. On the computer,
the zenCELL owl is recognized as a camera in the device manager.
Install the zenCELL owl program on your end device that meets the system requirements from the
"Technical Data" chapter. This can be downloaded at https://zencellowl.com/en/software-en/. Make
sure that the installation directory does not contain special characters except for underscores,
hyphens and spaces.
Use
Connect the zenCELL owl to your computer with the enclosed USB cable. After a successful
initialization, the green status LED lights to indicate that the device is ready.
When the device is used in an incubator, make sure to place it there at least two hours before the
start of an experiment. This serves to compensate differences in temperatures thus ensures stable
processes.
Insert the appropriate magnetic adapter frame with your cell culture vessel and start the software on
your computer.
Care and cleaning
• The device is dust and splash-proofed according to the IP62 standard and can be cleaned and
sterilized using a spray-wiping process.
• Do not use a brush with hard bristles or other hard objects for cleaning.
• Use a soft cloth or a soft sponge to prevent scratches.
• Do not apply too much pressure and do not use caustic or abrasive cleaners.
• The device is suitable for cleaning with medical cleaning alcohol.
• Apply the disinfectant specifically to the surface to be disinfected.
• Immediately wipe off after applying the disinfectant.
• Pay attention to a complete wetting of the device.
• Alternatively, the disinfectant can be applied directly to a dry cloth to completely wet the device.
www.zencellowl.com
12Operation of the zenCELL owl
File menu
The File menu item includes actions such as creating or loading projects and templates. Likewise, a
long-term observation of a sample can be started and stopped.
www.zencellowl.com
131 Create a new project
In order to guarantee the assignability of your recorded and generated data, a project path can be
set via the menu item New Project as well as a project name and a description can be added. An
assistant will guide you through the most important settings. You can also do this manually at a
later time in the menu> Settings> Project Settings.
2 Load project
Experiments already carried out can also be considered retrospectively. For this select the menu
item Load project. A file dialog will appear, allowing you to navigate to the desired project. Select
the zenCell owl file and click Open.
3 Save template and load
The menu item Save Template allows you to save the settings you have made and thus makes it
easier to repeat experiments under the same conditions. The last used camera settings as well as
settings for the experiment are saved.
To load the settings, click on Load Template and select the desired experiment template in the
file dialog box.
4 Start experiment and stop
Run/Stop experiment can be used to start and stop a long-term observation/experiment. While
the experiment is running, all captured images are saved in the project folder and the algorithms
for the degree of coverage and the cell count are executed. All related information is saved, and a
.csv file is created, which stores the percentage of coverage for each image. While the experiment
is running, this file must be closed.
If no settings have been made, an image acquisition of all 24 wells will be started at an interval of
10 min.
www.zencellowl.com
14Menu Settings
5 Device manager
The device manager lists all zenCELL owl devices connected to the computer. Click on a
zenCELL owl to select it and set it active.
6 Project settings
Project settings allow you to manually change project settings. See also in detail on page 17.
www.zencellowl.com
15Menu View
In the View menu, windows such as Overview, Well View and Well History can be opened and
closed. In the Well View and Well History menu, only the wells set as active are listed. All open
windows are checked in the View menu.
www.zencellowl.com
16Help menu
7 Check for updates
Here a software update can be carried out. You will be automatically redirected to the associated
link.
8 Support
If you have additional questions, click Support. You will receive the latest version of the operating
instructions. The forwarding to the associated link is automatic.
www.zencellowl.com
17Project settings
Project settings allow you to make manual settings for your project at any time.
General Settings
1 Project name
The project name guarantees the
1 assignability of your recorded and generated
2 data by creating a project folder at the
3
specified project path.
2 Project path
The project path can easily be set via a file
dialog box. It may not contain special
characters or spaces. Pelase use only
characters [a-z] or numbers [0-9].
3 Description
A description allows further clarification for
the project to be created.
You reach the item General Settings via the menu item Settings > Project Settings or you follow the
Wizard via File > New Project.
www.zencellowl.com
18Experiment settings
1 Camera avtivation
The zenCELL owl is equipped with
24 cameras that can be individually
activated and deactivated in the
experiment settings. Deactivated
cameras will not be activated during
the experiment. Simply selecting the
camera controls their activity.
A preselection is already made by the
setting of the cell culture vessel,
which can continue to be customized
individually.
2 Interval
The interval is given in minutes and
indicates the time span in which a
new image acquisition of all activated
wells is started.
3 Duration
Set the duration of your experiment..
4 Device selection
Select the device to use the zenCELL
owl with which the experiment is to
be performed. All zenCELL owl
devices connected to the computer
are listed in the device selection.
www.zencellowl.com
195 Grouping of wells
You can colorize Wells and group
them together to further illustrate the
experiment.
The item Experiment Settings can be reached via the menu item Settings> Project Settings or you
can follow the Wizard via File > New project.
Grouping of the wells
1 Grouping of wells
Select the wells to mark, set a color
using the combo box and click Add
Group. The previously selected wells
are now given a frame in the set color.
2 Ungroup
Ungroup can be used to override any
grouping you have made or to undo
individual wells from their grouping.
The item Group Wells can be reached via the menu item Settings > Project Settings> Experiment
Setting or you can follow the Wizzard via File > New Project.
www.zencellowl.com
20Overview
The overview window shows an overview of all available cameras of the selected zenCELL owl
device. If groupings have been made via the project settings, the wells are marked in color, as shown
in the following figure. Within the well, the last recorded image is displayed.
1 Updating / Save
If the view is to be updated, either the Refresh overview - Button or the Save overview - Button
can be made. Refresh will take current pictures of all enabled cameras and refresh the overview.
When saving, however, the user will be asked to choose a directory and the recorded images will
be archived.
2 Simple click
A simple click in a well opens the corresponding Well View window.
3 Double click
A double-click opens the Well History window.
2-3
1
www.zencellowl.com
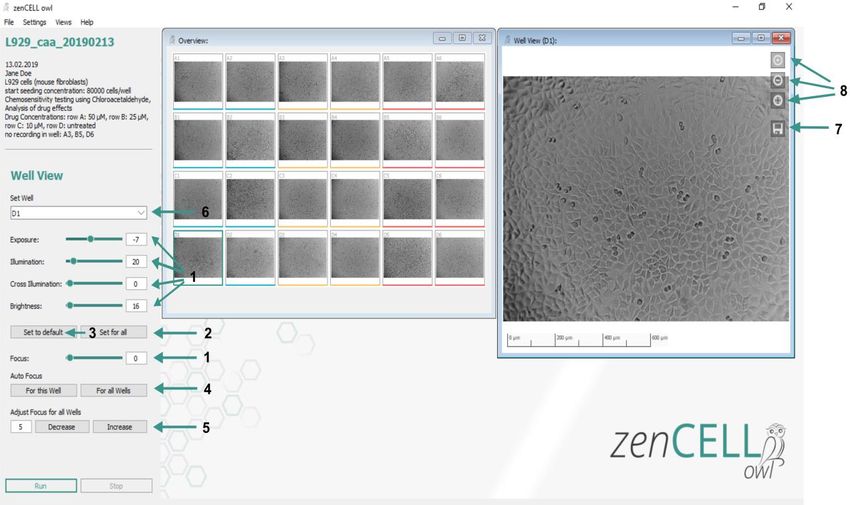
21Well View
The Well View window provides a detailed view of the selected well. If the experiment is inactive, the
live image of the active camera will be displayed. As soon as the experiment is set active, the setting
options in the setup area are deactivated and the detail view shows the last saved image of the
corresponding camera. When loading an already completed project while using the same zenCELL
owl that was used for this project, the device will be automatically chosen. In this case the Well View
window will show the live camera image. If any other or no device is connected, the Well View window
shows the last image recorded in this project.
1 Camera settings
Using the setup area, it is possible to flexibly set fine adjustments such as lighting, exposure,
brightness and focus via sliders with the mouse. In addition, by left-clicking on the corresponding
slider, the value can then be set in steps using the left and right arrows of the keyboard.
2 Save settings
If you have set the camera to the desired configuration, you can transfer it to the other cameras by
clicking the Set for all-Button. Merely the focus settings will not be applied to the other cameras.
3 Reset to default settings
To reset the configuration to the default, you can click the on Set to default-Button.
4 Autofocus
Clicking on the For this Well-Button the focus for the selected well will be set automatically.
Respectively clicking on the For all Wells - Button to all automaticyally focus each well.
5 Focus adjustment
The Set to default-Button as well as Set for all-Button do not affect the focus settings. If you
want to raise or lower the focal plane equally for all wells, this can be done by pressing the
Decrease-Button and Increase-Button respectively. Simply enter the desired decrease /increase
index and click on the appropriate button. The focal plane can be shifted by 1023 steps.
6 Change well
If the Well View window is to be changed, you can do this by clicking on the desired well in the
Overview window or by left-clicking on the Well View window and selecting the desired well via the
combo box. The well can also be changed via the View > Well View menu. Only one Well View
window can be displayed at a time.
www.zencellowl.com
227 Image export
Export possibility of the desired image. A file dialog box sets the location and name.
8 Zoom buttons
Using these buttons, the image can be zoomed in and zoomed out with the digital zoom. Note that
this is not an optical zoom. The picture quality is retained.
www.zencellowl.com
23Well History
The Well History window is the summary of the experiment at the current time.
1 Lapse video
All pictures stored up to this time are put together to a time-lapse video. The experiment can be
played in fast motion using the Play button.
2 Playback speed
The playback speed can be adjusted via the slider.
3 Graph with the algorithm results
Below the time-lapse video, the results of the selected algorithms are graphically displayed.
4 Data cursor
The marker in the graph indicates the value of the algorithm associated with the displayed image.
5 Data values
The values corresponding to the data cursor are listed below the graph. The point in time is also
stated. When the mous pointer is moved over the graph the values correspond to it.
6 Image Overlay
It can be used to control whether the digital phase contrast, the degree of coverage and/or the
scale should be shown in the image. A tick activates the corresponding overlay.
7 Image export
Export possibility of the desired image. A file dialog box sets the location and name. The image is
saved with the respectively selected overlays.
8 Zoom buttons
Using the buttons, the image can be zoomed in and zoomed out with the digital zoom.
9 Select data
Here the detail view of the Well History window is set. By activating the checkbox the display of
images or graphs can be switched on and off. There is the possibility to switch on three different
graphs. These include the cell coverage (the corresponding percentage can be read from the left
axis), the number of living cells and the number of detached cells (the number can be read off the
right axis).
www.zencellowl.com
2410 Graph export
The graph can be exported as a PNG file by right-clicking on it and choosing Save Plot. By right-
clicking on the graph and choosing Export Measurement Data a .csv file will be generated. Both
export options only contain the data activated in the graph.
11 Change well
The desired well can be selected in the current Well History display via the combo box. Further
Well History windows can be opened via the View > Well History menu or by double-clicking in
the desired Well in the Overview window.
www.zencellowl.com
25Custom Plot
The “Custom Plot” is a simultaneous overview of all graphs, which enables an easy comparison of
the grouped measurement curves.
1 Grouped Wells
If groupings were made before, means of the marked wells are calculated and visualized in the
“Custom Plot”
2 Selection and deselection of individual measurements
You can select or deselect individual measurements from groupings by setting checkmarks, this way
the measurements of their means can be included.
3 Renaming the groupings
By double clicking the groupings’ name, you can choose an individual name for this grouping.
4 Ungrouped wells
Wells, which do not belong to any grouping, can be selected under unmarked.
5 Standard deviation
You can select or deselect the standard deviation by setting a checkmark.
6 Selection of graphs
By setting a corresponding checkmark you can choose to visualize between following calculations:
cell coverage, cell count, detached and/or attached cells.
www.zencellowl.com
267 Save Plot Button
Use the Save Plot button to save the custom plot as an image.
8 Export Measurement Data Button
If a pre-set is chosen for desired wells, their data can be saved as a .csv file by using the “Export
Measurement Data” button. This data can be opened with any calculation programme of choice.
9 Change pre-set groupings
You can later change the groupings of the wells under the menu item Settings >Project Settings>
Experiment Settings.
www.zencellowl.com
27Maintenance and repair
In case of a defect, please contact info@zencellowl.com.
www.zencellowl.com
www.zencellowl.com
28Disposal
The crossed-out wheeled bin symbol on a WEEE indicates that it should not
be disposed of with household waste at the end of its life. For your free return
collection points for WEEE are available near you. The addresses can be
obtained from your city or local government. Separate collection of WEEE is
designed to enable the reuse and recycling of WEEE, and to avoid adverse
effects on the environment and human health from the disposal of potentially
hazardous substances contained in the appliances.
The WEEE registration number of InnoME is: DE 43441295.
You are responsible for the deletion of personal data that may be present on
the waste equipment to be disposed of.
www.zencellowl.com
29License information
Pillow Library:
The Python Imaging Library (PIL) is
Copyright © 1997-2011 by Secret Labs AB
Copyright © 1995-2011 by Fredrik Lundh
Pillow is the friendly PIL fork. It is
Copyright © 2010-2018 by Alex Clark and contributors
Like PIL, Pillow is licensed under the open source PIL Software License:
By obtaining, using, and/or copying this software and/or its associated documentation, you agree that
you have read, understood, and will comply with the following terms and conditions:
Permission to use, copy, modify, and distribute this software and its associated documentation for any
purpose and without fee is hereby granted, provided that the above copyright notice appears in all
copies, and that both that copyright notice and this permission notice appear in supporting
documentation, and that the name of Secret Labs AB or the author not be used in advertising or
publicity pertaining to distribution of the software without specific, written prior permission.
SECRET LABS AB AND THE AUTHOR DISCLAIMS ALL WARRANTIES WITH REGARD TO THIS
SOFTWARE, INCLUDING ALL IMPLIED WARRANTIES OF MERCHANTABILITY AND FITNESS. IN
NO EVENT SHALL SECRET LABS AB OR THE AUTHOR BE LIABLE FOR ANY SPECIAL,
INDIRECT OR CONSEQUENTIAL DAMAGES OR ANY DAMAGES WHATSOEVER RESULTING
FROM LOSS OF USE, DATA OR PROFITS, WHETHER IN AN ACTION OF CONTRACT,
NEGLIGENCE OR OTHER TORTIOUS ACTION, ARISING OUT OF OR IN CONNECTION WITH
THE USE OR PERFORMANCE OF THIS SOFTWARE
www.zencellowl.com
30InnoME GmbH - In der Tütenbeke 36 - D-32339 Espelkamp
Tel. +49 (89) 215 377 00 - info@innome.de
www.zencellowl.comYou can also read