Sparkle Activity Guide - Our play workers have put together this guide with some activity ideas for you to try with your children/young people ...
←
→
Page content transcription
If your browser does not render page correctly, please read the page content below
Sparkle Activity Guide

Our play workers have put together this guide with
   some activity ideas for you to try with your
              children/young people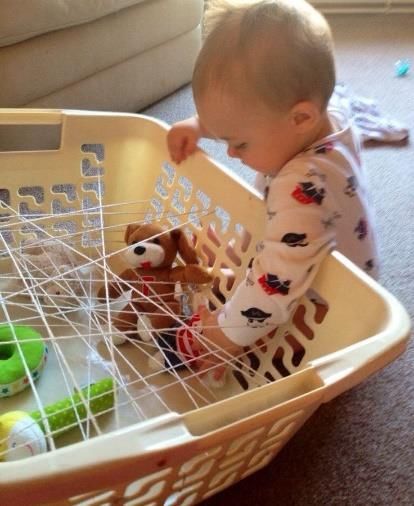
1
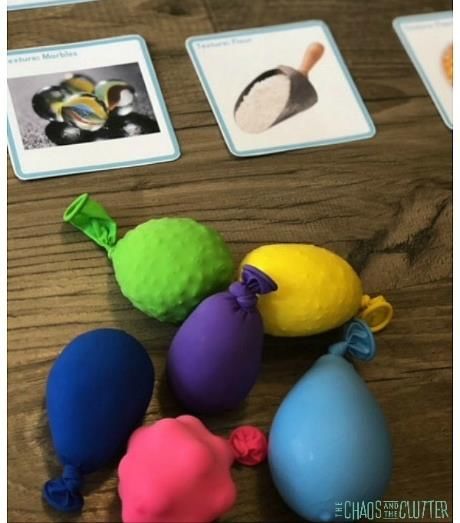
Textured balloons for tactile sensory play
What do I need?
Colourful balloons
Rice
Flour
Oats
Popcorn seeds
Sand
Hair gel/washing up liquid
Funnel
What do I do?
Step 1: Using the funnel, pour your chosen contents into each balloon.
Step 2: Tie the balloons and let the children squash and squeeze the balloons
BE MINDFUL: If your child is prone to putting items in their mouth, chewing or
biting items, make sure the items that you use inside of the balloons are edible.
If your child is not prone to this, you can use other items including marbles to
put inside the balloons to enhance their sensory experience.
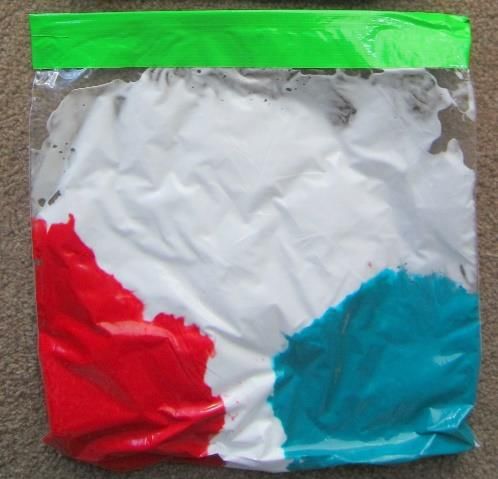
Shaving foam and paint sensory bags
What do I need?
Shaving foam
Colourful paint
Clear re-sealable bags
Tape
What do I do?
Step 1: Squirt shaving foam and some paint into a clear, re-sealable bag.
Step 2: Seal the bag and tape the seal to ensure nothing escapes.
Step 3: Let the children squish the bags and watch the contents mix together.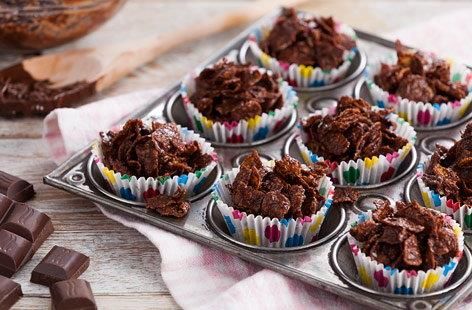
2 Glittery calm down bottles: What do I need? Clear bottle Glitter Liquid glue Funnel Glitter glue (optional) Hot glue gun or tape What do I do? Step 1: Pour your chosen glitter into a clear bottle using a funnel Step 2: Add clear glue on top of the glitter Step 3: Add glitter glue (optional) Step 4: Now all of the ingredients are inside, seal the cap. Step 5: Using either a hot glue gun or a lot of tape, securely seal the cap of the bottle. Step 6: The bottle is complete and the children can shake the bottle and watch the glitter inside. Sensory bottle: What do I need? Clear bottle Buttons Sequins/pom poms Glitter Clear hair gel What do I do? Step 1: Fill the clear bottle with your choice of different buttons, glitter and sequins
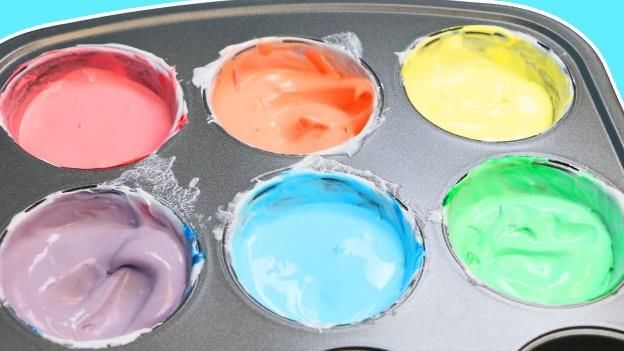
3 Step 2: Fill the bottle with clear hair gel (If you are not able to access hair gel, try water instead!) Step 3: Seal the bottle using either a hot glue gun or a lot of tape to ensure it is secure DIY edible painting What do I need? Natural yoghurt Food colouring Bowls Spoons Basting brush or paint brush What do I do? Step 1: Put the natural yoghurt and food colouring into a bowl Step 2: Mix it all up in a bowl Step: Paint! Sensory monster or character bags: What do I need? Clear re-sealable bags Clear hair gel Googly eyes Thick black felt pen/sharpie Duct tape What do I do? Step 1: Draw a monster or a chosen character on the front of a clear re- sealable bag Step 2: Place clear hair gel and googly eyes inside of the bags Step 3: Seal the bag with duct tape (to a surface if possible)
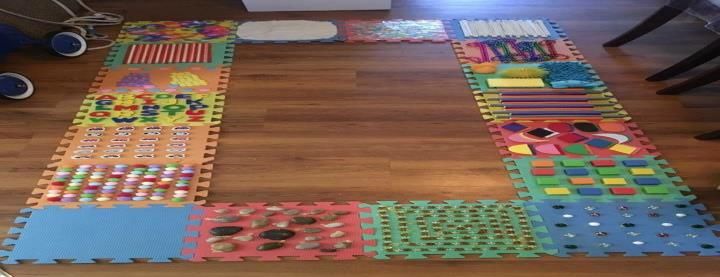
4 Step 4: Let the children move the eyes around inside of the bag to give the monster/character some eyes Sensory letter or number bags: What do I need? Clear re-sealable bags Clear hair gel Magnetic letters and/or numbers Duct tape What do I do? Step 1: Place clear hair gel inside of the clear re-sealable bag Step 2: Add magnetic numbers and/or letters Step 3: Seal the bag reinforcing with duct tape to make sure the bag doesn’t leak Sensory path (using foam tiles) PINTEREST: https://hadido.com/pp/education/12-creative-sensory-walk- activities-for/472526185899

5 Washing basket problem solving: What do I need? Large plastic washing basket String Various chosen items (including bottle, toys) What do I do? Step 1: Place different items inside of the washing basket Step 2: Weave string in and out of the holes towards the top of the washing basket (making the gaps different sizes) Step 3: The aim is for the child to work out which gaps are big enough for them to reach inside of the basket and collect the different items from inside Numeracy car parking game: What do I need? Small toy cars Cardboard box Thick black felt pen/sharpie White labels What do I do? Step 1: Place numbers 1-10 or 1-20 on stickers. Place the numbers on top of the cars Step 2: Cut the top off the cardboard box Step 3: Draw a car park inside of the box (ensuring there are enough spaces for each car)
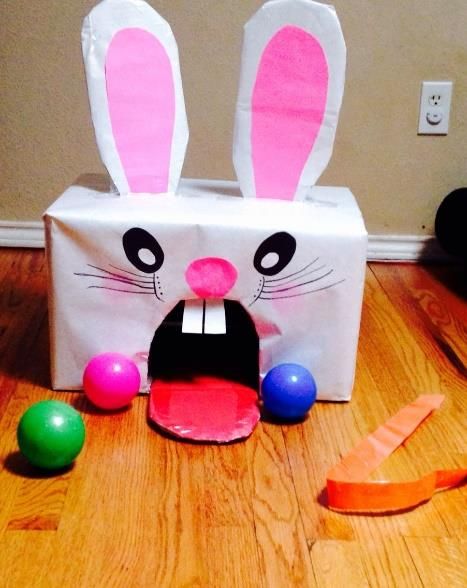
6 Step 4: Write the numbers for each car in the spaces Step 5: The aim of the game is for the children to drive each car into the correct car parking spaces Car ramps: What do I need? Cardboard Small toy cars Thick black felt pen/sharpie What do I do? Step 1: Turn long strips of cardboard into car park ramps by simply drawing road dashes down the middle Step 2: Lean them up against a step, wall or sofa Step 3: Let the children put the cars at the top of the ramp and watch which car gets to the bottom first Rabbit ball game: What do I need? Cardboard box Paper Glue Sticky tape Felt pens Paint Scissors Ball pit balls/plastic coloured balls (X6) Any form of sport stick (hockey stick, golf club, tennis racket) What do I do? Step 1: Cut an arch into the side of a cardboard box, cutting from the bottom to halfway up the box
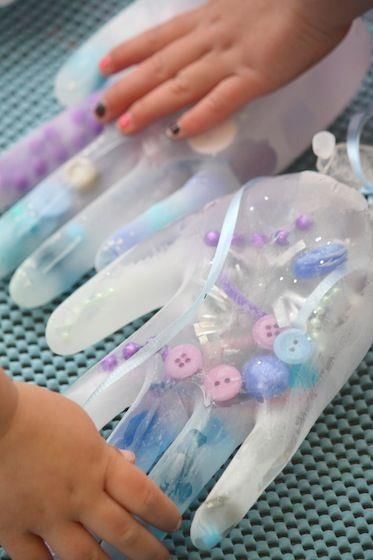
7 Step 2: Paint the box, draw or paint red circles either side of the arch for red cheeks, draw or paint eyes and a nose above the arch Step 3: Make white rabbit teeth out of the white paper and stick to the top of the arch Step 4: Paint tall ears for the rabbit and stick to the top of the box Step 5: The aim is for the children to hit the balls into the open arch of the rabbit’s mouth Cup bowling game (Outdoors or indoors!) What do I need? Plastic cups Plastic ball/soft ball Thick black felt pen/sharpie What do I do? Step 1: Write numbers 1 – 10 on the plastic cups Step 2: Stack the cups up into the shape of a pyramid Step 3: Throw the ball at the cups and see how many the children can knock down Melting Elsa’s frozen hands: What do I need?
8 Clear latex gloves Buttons (Pink, purple, blue) Beads (Pink, purple, blue) Plastic crystals Ribbon (Blue, pink, purple, white) Curling ribbon Twist ties Access to water Table salt (in shakers) Small spoons or scoops (if required) Baking sheet Spoons Bowl or plastic tub What do I do? Step 1: Fill the gloves with the different treasures (buttons, beads, ribbon etc) Step 2: Fill the gloves with water and securely tighten with a twist tie. Add some curling ribbon if required. Step 3: Place the hands on a baking sheet and set in the freezer over-night Step 4: Remove the gloves from the freezer and let the child(ren) inspect how icy and cold the hands are Step 5: Remove the hands from the latex gloves. Run them under a light flow of very cold tap water. Step 6: Use scissors to cut away the latex and slowly slide the gloves off the hands – Make sure you are gentle so the fingers do not snap! Step 7: Place them inside a tub or a bowl and let those hands melt. Let the children dig for the treasures if wanted.
9
Cornflake cakes:
What do I need?
50g butter
100g milk or dark
chocolate (broken into
chunks)
3 tbsp golden syrup
100g cornflakes
Large bowl
Saucepan/microwave bowl
Muffin tray
Cupcake cases
Wooden spoon
What do I do?
Step 1: Weigh out the ingredients. Put the butter, chocolate and golden syrup
into a saucepan or microwave bowl (Children)
Step 2: Put 100g of cornflakes into a large bowl
Step 3: Melt the weighed butter, chocolate and syrup over a low heat or briefly
in a microwave (depending on the age and capability of the child, decide
whether they can do this or whether the adult needs to complete this step)
Step 4: Stir the ingredients together gently using a wooden spoon.
Step 5: Spoon the mixture into 12 cupcake cases on a muffin tray
Step 6: Place in the fridge to set
Step 7: Remove and enjoy!10 Ice cream in a bag What do I need? Small re-sealable bags Large re-sealable bags Ice cubes Sticky tape 6 tbsp rock salt 300ml semi-skimmed milk 1 tbsp caster sugar ¼ tsp vanilla extract 150ml cream (if wanted) Ice cream sauce Hundreds and thousands What do I do? Step 1: Pour the milk (and cream if wanted), sugar and vanilla extract into a small re-sealable bag (Double the bag up). Step 2: Close and secure the bag with sticky tape to ensure it is securely shut. Step 3: Tip ice and salt into the large re-sealable bag and place the smaller bags inside of the large one and seal well Step 4: Shake and move the bags for 10-15 minutes while the milk starts to freeze. Gently throw the bag from hand to hand or take turns shaking it – wear gloves to keep your hands warm! Step 5: Carefully remove the ice-cream bag, open, scoop into bowls and sprinkle with hundreds and thousands and sauce!
11 Attention bucket What do I do? If no bucket is available, other items can be used in its place, for example: Washing bowl Stocking Hat Cardboard box All items inside of the bucket are for the parents use only. Make sure the children know that it is YOUR bucket and they are not allowed to touch it or its contents. It does not have to be expensive. Any wind-up toys or exciting toys (flashy or noisy) that you have in the house can be used! Useful links: FACEBOOK: Gina Davies Autism Centre (For videos and ideas) Overview of what to do! https://best- practice.middletownautism.com/approaches-of-intervention/attention-autism/
12
Paint with Ice
What do I need?
Food colouring
Ice cube tray
Craft sticks
Paper
Plastic wrap (optional)
What do I do?
1. Help your child pour a couple of drops of food colouring into the ice cube
tray. Let them count out how many cubes of each colour they wants.
2. When they are done filling up the tray, have them put a craft stick into
the middle of each paint cube. The sticks should be able to stand up on
their own, but if they won't stay up, try covering the tray in plastic wrap.
Then poke the sticks through the wrap for extra stability.
3. Have them carefully place the ice cube tray in the freezer, and let it sit
until the paint is frozen solid.
4. When the paint cubes are frozen, it's time to paint! Ask your child to
choose a colour, and help them to pop the chosen paint cube out of the
tray.
5. They can hold the craft stick and swirl the frozen paint cube over paper.
As it melts, it'll leave a lovely trail of paint. Encourage them to use
several different cubes to create their masterpiece.
6. As they paints, discuss the process of freezing. What happened to the
paint when they put it in the freezer? What's happening to the paint
when it's exposed to the warm air and paper? What does the paint feel
like as it melts?
Ice paint is also a great tool in teaching your child about colour mixing. Freeze
only yellow and red paint cubes, and let your child discover what results from
using those colours together. As they melt, the paints will magically mix into
orange!
Caution: This craft is quite messy, so be sure to cover your work space.13
Underwater I spy alphabet bottle
What do I need?
Empty water or plastic soda bottle
(best to use one without ridges)
Alphabet beads from the craft store
Glitter
Sequins or any tiny sparkly things
Corn syrup
Water
Sheet of paper
Highlighter
Glue gun (optional)
What do I do?
1. Write the alphabet from A-Z on a sheet of paper. Have your child lay all
the beads from A-Z on the table. Check that they have all 26 letters and
then drop them into the empty bottle.
2. Have your child drop in sequins. Help your child sprinkle some glitter
inside.
3. Fill half the bottle with water and the other half with corn syrup. The
corn syrup slows down the motion of the contents and helps the glitter
not to stick together.
4. You can hot glue the lid onto the bottle so little hands don't spill.
5. Shake it up and watch the pretty water! How many letters can your child
spy? Using the alphabet paper you wrote, have her highlight each letter
she can find. Can she also spot the letters in her name? Have fun shaking!
Ice Block Treasure Hunt
What do I need?14
Plastic container or bowl
Water
Small toys: plastic animals
or dinosaurs, tops, rubber
balls, shells, coins (for
older children), etc.
Optional: ice cube tray,
food colouring and water
to make coloured ice
Warm water, spray
bottles, paintbrushes, salt,
a hammer - anything that
you or your child may think of that could be used to get the toys
out of the ice block
What do I do?
Step 1: (Optional) Make and freeze ice cubes using the food colouring and
water
Step 2: Fill the plastic container with about an inch of water. Add three
or four toys and some ice cubes and freeze.
Step 3: When the first layer is frozen solid, add more water and a few
more toys and ice cubes. Repeat this process until your container is full
and you have a solid block of ice. It may take a couple of days to create
your ice block
Step 4: Remove the ice block from the plastic container.
Step 5: Give the kids some of the supplies for excavating the toys from
of the ice. I started by giving them spray bottles, paintbrushes, spoons
and water. I waited a while to give them the salt and saved the hammer
for last.
Step 6: Let your kids have fun exploring and experimenting with the ice
block and tools. They'll enjoy the process of discovering and digging out
their treasures.
Take extra care if you choose to allow your children to use a hammer,
especially if you are doing this project with more than one child. Another
note-- we broke a couple of necklaces and a few other items that were
made of harder, less flexible plastic. There's a chance that some of the
small toys could get broken, so be sure to use toys that you and your child
won’t miss. Happy exploring!15 Homemade musical instruments There are lots of different musical instruments that you can make with young children, and creating them can be just as much fun as playing with them. Ideas include shakers (e.g. fill plastic bottles with rice or dried beans), rattles (e.g. thread buttons or beads onto some string), drums (e.g. use wooden spoons to beat on plastic tubs) and chimes (hang up some bottle tops or shells). Sensory Work Station The sensory work station involves the planning of various station based sensory activities/ items to be set out around the room for children to engage with. Ideas for such stations involves using toys or items that would meet the children’s sensory needs. These can be as follows: - Ice - Colouring pencils - Lego - Moulding foam - Rice/ corn flakes / Pasta / Rice crispies - Any kind of breakfast cereal - Playdough / salt dough - Gym ball
16

  -   Swing
  -   Trampette / Mini trampoline
  -   Custard
  -   Squirty cream
  -   Tin fruit
  -   Water
  -   Shaving foam
  -   Slime
  -   Plastic alphabets/ numbers
  -   Oats
  -   Feathers
  -   Resistance band – would require another person to this activity

                           Links for even more fun!

Bubble Wrap Stomp Painting
https://www.messforless.net/bubble-wrap-stomp-painting/#_a5y_p=2158234

Bouncy ball art
https://crayonboxchronicles.com/2013/09/04/bouncy-ball-art/

Bubble Foam Sensory Activity
https://busytoddler.com/2015/11/bubble-foam/

Sensory trays
https://mamasgeeky.com/2015/09/sensory-play-with-wunderbox-portable-
sensory-bins

Cookie cutter bird feeder
www.prettyprudent.com/cookie-cutter-bird-feeder

Non-toxic and edible Playdough
17
PINTEREST: https://www.survivingateacherssalary.com/diy-edible-homemade-
play-dough-recipe-with-koolaid-rainbow-colors/
Home-made kinetic sand
PINTEREST: https://eatingrichly.com/kinetic-sand-reciple/
Two-ingredient moon sand
PINTEREST: https://littlelearningclub.com/2-ingredient-moon-sand-recipe/
More useful links:
https://theimaginationtree.com
Creative arts and craft activities for the very youngest
https://toytheater.com/
Educational online games
https://www.dkfindout.com/uk/?fbclid=lwAR2wJdpSJSelTf4do6aPhff9A3tAkt
nmpaxqZbkgudD49l71ep8-sjXmrac
Activities and quizzes
https://www.twinkl.co.uk
A month of free access or parents for printouts to help with primary resources
https://www.bbc.co.uk/cbeebies/radio
Listening activities for the younger ones
https://naturedetectives.woodlandtrust.org.uk/naturedetectives/
A lot of these can be done in a garden
https://www.oxfordowl.co.uk/for-home/
Lots of free resources for primary age children18 https://crestawards.org Science awards you can complete from home https://www.bighistoryproject.com/home Aimed at secondary age children https://world-geography-games.com/world.html Geography gaming! https://www.bbc.co.uk/cbbc/joinin/about-blue-peter-badges Blue Peter Badges https://www.facebook.com/artfulparent/ Free art activities https://blockly.ames Learn computer games https://scratch.mit.edu/explore/projects/games/ Creative computer programming https://www.natgeokids.com/uk/ Activities and quizzes for younger kids https://www.duolingo.com Learn languages for free, web or app https://khanacademy.org Especially good for maths and computing for all ages. https://www.bbc.co.uk/learning/coursesearch/ Lots of information regarding loads of different subjects.
19

                   Check out these cool educational videos:

https://thekidsshouldseethis.com
Wide range of cool educational videos

https://thecrashcourse.com
You tube videos on many subjects

You can also use the Kids channel for younger children
https://m.youtube.com/user/crashcoursekids

https://ed.ted.com
Engaging Educational videos
You can also read