T SERIES OPERATION MANUAL - ADAM Audio
←
→
Page content transcription
If your browser does not render page correctly, please read the page content below
T     SERIES   OPERATION MANUAL

T5V      T7V

CONGRATULATIONS!

...on the purchase of your new ADAM Audio T Series monitors. Your T Series monitors
are the culmination of two decades of research into advanced transducer, waveguide,
amplification, DSP and loudspeaker cabinet technologies. The result is a professional
reference monitor featuring rock-solid imaging, an eminently wide sweet spot, superi-
or transient response, extended frequency response, and unmasked clarity and detail
across the audio spectrum. With dimensions small enough to allow placement in
virtually any size room, your T Series monitors are a reliable reference for music
production, video post-production and radio broadcast studios, and should provide you
with many years of dependable use and accurate performance.

This manual will help you to connect, install and start using your speakers, and explain
how to adjust them to best suit your working environment. It will also explain how to
solve the most commonly occurring problems that users encounter when trying to install
new monitors. Manufacturer contact information and a full technical specification are
also included for reference purposes.

Nevertheless, if you encounter problems you can‘t solve, or have questions this manual
doesn‘t provide answers to, please either contact your local dealer, or email our
Berlin-based support team at support@adam-audio.de. We pride ourselves on remaining
approachable and helpful to our customers at all times. We wish you many years of
happy listening with your new T Series monitors.

The Team at ADAM Audio

1                                                                 T SERIES MANUAL [ENGLISH]
CONTENTS

		                                                                     Page

    CONGRATULATIONS!                                                       1

    CONTENTS                                                               2

1. IMPORTANT SAFETY INSTRUCTIONS                                           3

2. INTRODUCING T SERIES                                                    5

3. OPTIMAL PLACEMENT OF YOUR MONITORS                                      7

4. REAR-PANEL FEATURES                                                    11

5. AUDIO CONNECTIONS AND LEVEL SETTINGS                                   12

6. USING THE HF AND LF SWITCHES ON THE REAR PANEL                         14

7. TROUBLESHOOTING                                                        16

8. MAINTENANCE                                                            17

9. SHIPPING                                                               17

10. ENVIRONMENTAL INFORMATION                                             18

11. EU DECLARATION OF CONFORMITY                                          18

12. WARRANTY TERMS                                                        19

13. TECHNICAL DATA                                                        20

2                                                   T SERIES MANUAL [ENGLISH]
1. IMPORTANT SAFETY INSTRUCTIONS
Please read the following safety instructions before setting up your system. Keep the
instructions for further reference. Please heed the warnings and follow the instructions.
Caution
Risk of electrical shock
Do not open
Risque de shock electrique
Ne pas ouvrier
CAUTION: TO REDUCE THE RISK OF FIRE OR ELECTRIC SHOCK,
DO NOT REMOVE BACK COVER OR ANY OTHER PART.
NO USER-SERVICABLE PARTS INSIDE.
DO NOT EXPOSE THIS EQUIPMENT TO RAIN OR MOISTURE.
REFER SERVICING TO QUALIFIED PERSONNEL.
Caution: To reduce the risk of electric shock, do not open the loudspeaker. There
are no user-serviceable parts inside. Refer servicing to qualified service personnel.
This product, as well as all attached extension cords, must be terminated with an
earth ground three-conductor AC mains power cord like the one supplied with the
product. To prevent shock hazard, all three components must always be used.
Never replace any fuse with a value or type other than those specified. Never bypass
any fuse.
Ensure that the specified voltage matches the voltage of the power supply you use.
If this is not the case do not connect the loudspeakers to a power source! Please
contact your local dealer or national distributor.
Always switch off your entire system before connecting or disconnecting any cables,
or when cleaning any components.
To completely disconnect from AC mains, unplug the power supply from the power
socket. The monitor should be installed near the mains connection and it should be
easy to access the socket and disconnect the device if necessary.
Protect the power cord from being walked on or pinched particularly at plugs,
sockets, and the point where it exits from the apparatus.
Unplug this apparatus during lightning storms or when unused for long periods of
time. Always keep electrical equipment out of the reach of children.
Do not expose this product to rain or moisture, never wet the inside with any liquid
and never pour or spill liquids directly onto this unit. Please do not put any objects
filled with liquids [e.g. vases, etc.] onto the speaker.
Use only with stands, tripods or brackets specified by the manufacturer, or sold
with the apparatus. When moving the loudspeakers on a trolley, avoid injuries; take
care and do not over-balance the trolley.
3 T SERIES MANUAL [ENGLISH]The speakers must be positioned on a solid surface or a stand.
Always use fully checked cables. Defective cables can harm your speakers. They are
a common source for any kind of noise, hum, crackling etc.
Never use flammable or combustible chemicals for cleaning audio components.
Install in accordance with the manufacturer‘s instructions.
Never expose this product to extremely high or low temperatures. Never operate
this product in an explosive atmosphere.
High SPLs may damage your hearing! Please do not get close to the loudspeakers
when using them at high volumes.
Please note that the diaphragms emit a magnetic field. Please keep magnetically
sensitive items at least 0.5 m away from the speaker.
Assure free airflow behind the speakers to maintain sufficient cooling by keeping a
distance of at least 100 mm [4″] to the wall.
No naked flame sources, such as lit candles, should be placed on the speaker.
Do not use this apparatus near water.
Use a dry cloth for cleaning.
Do not install near any heat sources such as radiators, hot air vents, stoves, or
other equipment [including amplifiers] that produces heat.
Do not disconnect the earth wire in an earthed plug. An earthed plug has live and
neutral prongs, plus a third prong for grounding purposes which is included for
your safety. If the provided plug does not fit into your socket, consult an electrician
to have your socket replaced.
Only use attachments/accessories specified by the manufacturer.
Refer all servicing to qualified service personnel. Servicing is required when the
apparatus has been damaged in any way, for example if the power-supply cord or
plug is damaged, liquid has been spilled or objects have fallen into the apparatus,
or if the apparatus has been exposed to rain or moisture, does not operate normally,
or has been dropped.
4 T SERIES MANUAL [ENGLISH]2. INTRODUCING T SERIES REVOLUTIONARY TWEETER DESIGN Since its launch in 1999, Berlin-based ADAM Audio has fast gained international prominence and respect as a manufacturer of reliable and highly accurate reference monitors. This reputation and performance has led to ADAM Audio monitors being used by engineers in top recording studios around the world. A key component yielding the monitors’ stellar performance is ADAM Audio’s innovative, proprietary X-ART tweeter used in all their high-frequency drivers, including the T Series’ new U-ART 1.9” tweeter. Made of a high-tech polyimide film used in thermal blankets on spacecraft and satellites, the U-ART tweeter’s diaphragm provides pristine and extended high-frequency response up to 25 kHz. But it’s the tweeter’s revolutionary folded design that’s one of the key elements responsible for the T Series’ outperformance compared to other reference monitors in its class. Unlike a conventional dome or cone tweeter that uses a piston action to move air and reproduce sound, the U-ART tweeter uses a pleated membrane that alternately draws air into its folds and squeezes it out as the folds respectively expand apart and press together in response to inputted audio signals. This design produces four times as much air movement as does a piston-based design, creating higher sound pressure levels [SPLs] with lower distortion. On a practical level, the U-ART tweeter lets you hear pristine details in your mixes with far greater clarity that, along with the tweeter’s superior off-axis performance, help you make better decisions in the creative process that will translate faithfully to other playback systems. What’s more, you can listen at louder levels than with conventional monitors without suffering listening fatigue. ADVANCED WAVEGUIDE, WOOFER, AMPLIFIERS, CROSSOVERS AND CABINETS The U-ART tweeter is fitted to a new, precision waveguide that provides highly uniform dispersion of high frequencies. The result is an incredibly wide sweet spot that frees you from being glued to a rigid mix position while working. The T Series’ all- new polypropylene woofer and the cabinet’s rear-firing bass-reflex port together provide ultra-smooth, highly accurate midrange and extended bass response. New Class D amplifiers and power supplies are custom-matched to the tweeter and woofer for optimal performance: The U-ART tweeter is powered by a 20 W amp, 5 T SERIES MANUAL [ENGLISH]
while a 50 W amp serves the woofer. The new Class D amps, in combination with the
U-ART’s powerful 4:1 velocity transfer ratio [the tweeter’s ability to move air four times
as much as other designs], let you listen at very loud levels without listening fatigue.
DSP-controlled driver crossovers ensure there are no holes at the crossover frequency
between drivers—when mixing, what you hear is what you get. This precision is comple-
mented by the T Series’ all-new beveled cabinets, which minimize diffraction to produce
superior imaging that lets you hear the discrete placement of panned tracks in the
stereo field with pinpoint accuracy.

VERSATILE CONNECTIONS AND CONTROLS
On the rear side of each T Series monitor, a sturdy metal backplate is home to a
comprehensive assortment of controls and analog input connections that adapt
your monitors to virtually any professional system:

→ A balanced XLR connector and unbalanced RCA jack allow connection to professio-
    nal mixers and I/O boxes using +4 dBu or -10 dBV nominal operating levels.

→ Each monitor has its own level control, which is especially useful to balance output
    levels between left and right monitors when they’re used in an asymmetric control
    room.

→ Two 3-way switches respectively adjust the monitors’ high- and low-frequency
    responses ±2 dB or select flat response, adapting the monitors to any room’s
    acoustic signature.

→ The T5V and T7V can automatically accept AC voltages ranging from 100 to 240 V, at
    50/60 Hz — simply activate the power switch for each monitor and go!

Please see Section 3 of this manual for an illustrated key to the T Series’ rear-panel
connections and controls. Optimal use of rear-panel connections and controls is
explained in greater detail in Sections 4 and 5 of this manual.

6                                                                  T SERIES MANUAL [ENGLISH]
3. OPTIMAL PLACEMENT OF YOUR MONITORS The T Series monitors’ small footprints allow placement anywhere in your room, no matter how small. However, you’ll get the very best sound out of your monitors by placing them at optimal positions in your room. T Series monitors incorporate a nearfield design and should be placed on speaker stands, a console bridge or a desktop in relatively close proximity to [ideally about three feet from] your mix position. Such placement ensures that the sound you hear coming directly from the monitors will be louder than that which is indirectly arriving at your ears after reflecting off your room’s walls, floor and ceiling. By placing the monitors close to your mix position [and following other guidelines discussed next], your T Series monitors will provide an accurate reference of your mix, untainted by reverberation, tonal colorations and phase cancellations caused by your room. Other considerations are equally important. If your control room is not symmetrical at one end [such as in a space with an alcove off to one side], you’ll get the most balanced frequency response from left and right monitors if you set them up at the other, symmetrical end of the room [see Fig. 1]. Fig. 1 7 T SERIES MANUAL [ENGLISH]
Ideally, you’ll want your monitors pointing down the length of the room so that the rear
wall is as far away from your mix position as possible [see Fig. 2]; this will make the
direct sound emanating from your monitors much louder than the sound bouncing off
the back wall, thereby minimizing peaky-sounding comb filtering and preventing your
T Series monitors’ precise imaging from being changed.

Fig. 2

To avoid introducing unwanted boosts and dips in bass-frequency response, avoid
placing each monitor so that its woofer is an equal distance from two or more nearby
boundaries [for example, front and side walls, or a wall and floor]. The monitors will
have the same bass response if you place them in mirror images with respect to nearby
walls; that is, the left monitor should be the same distance from the left wall as the
right monitor is from the right wall, and both monitors should be the same distance
from the front wall that’s behind them [see Fig. 3]. For the flattest bass response, each
monitor should be placed at least 16 inches from the nearest wall.

Fig. 3

8                                                                  T SERIES MANUAL [ENGLISH]
The monitors’ tweeters should be at ear level when you’re sitting at your mix position.
If this isn’t feasible, angle the monitors up or down so that the tweeters are aiming at
your ears [see Fig. 4]; we recommend sitting your T Series monitors on isolated speaker
stands that can be adjusted to modify the tilt angle of your cabinets so that the tweeters
are aiming at your ears. The speaker stands should “decouple,” or acoustically isolate,
the cabinets from the shelves, tabletop or console bridge they are placed on, thereby
preventing muddy-sounding upper-bass resonances that would change the T Series
monitors’ balanced bass response.

Fig. 4

In order to have the tweeters aimed at your ears, you’ll also need to toe-in the monitors
so that they form an equilateral triangle with your ears when you’re seated at your mix
position [see Figs. 1, 2 and 3]. With this setup, facing the centerline between left and
right monitors as you mix, you should notice a rock-solid phantom center image, pinpoint
localization of panned tracks, excellent high-frequency detail, clear midrange and an
even bass response.

9                                                                  T SERIES MANUAL [ENGLISH]
[1]
[2]
[3]
[4]
[5]
[7]
[6]
[8] [9]
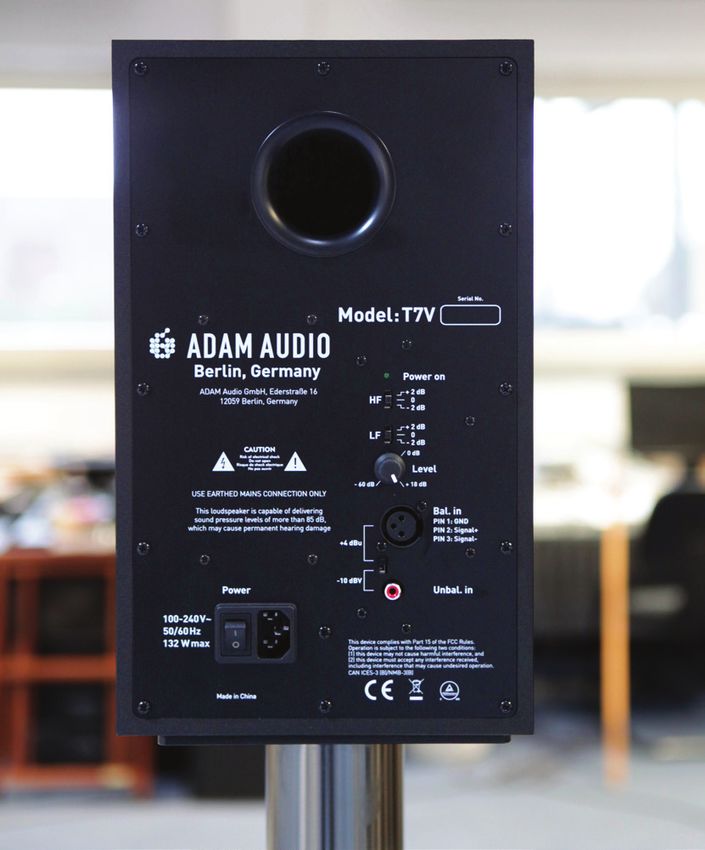
10 T SERIES MANUAL [ENGLISH]4. REAR-PANEL FEATURES
[1] BASS-REFLEX PORT – The bass-reflex port works together with the monitor’s woofer
to produce flat and extended bass response.
[2] HF SWITCH – Use this switch to boost or cut the monitor’s high-frequency response
by 2 dB. The “0” setting maintains flat response.
[3] LF SWITCH – Use this switch to boost or cut the monitor’s low-frequency response
by 2 dB. The “0” setting maintains flat response.
[4] LEVEL KNOB – Turn this knob clockwise to increase the monitor’s volume, or
counterclockwise to decrease its volume. The “0 dB” setting will be optimal in
most situations.
[5] BAL. IN CONNECTOR – Use this XLR connector to input balanced audio with nominal
+4 dBu level.
[6] UNBAL. IN CONNECTOR – Use this RCA connector to input unbalanced audio with
nominal -10 dBV level.
[7] +4 dBu/-10 dBV SWITCH – Set this switch to the “+4 dBu” position when inputting
audio using the Bal. in [XLR] connector. Set the switch to the “-10 dBV” position
when inputting audio using the Unbal. in [RCA] connector.
[8] POWER SWITCH – Set this switch to the ON position to apply power to the monitor.
An associated green LED will light when the monitor is turned on.
[9] POWER CONNECTOR – Use this standard three-prong IEC AC power receptacle to
connect the detachable AC cord to the monitor.
11 T SERIES MANUAL [ENGLISH]5. AUDIO CONNECTIONS AND
LEVEL SETTINGS
Your T Series monitors need no external amplification, thanks to their built-in amplifiers.
The monitors can be directly connected to mixing consoles and both balanced and
unbalanced I/O boxes for DAWs. And because T Series monitors automatically accept
AC mains voltages ranging from 100 to 240 V, at 50/60 Hz, you don’t have to fuss with
selecting a correct voltage switch setting for safe operation.
On the rear panel of your T Series monitor, an XLR connector and RCA jack respectively
accept balanced +4 dBu and unbalanced -10 dBV nominal input levels. The XLR
connector’s wiring follows the industry standard convention: Pin 1 is ground, Pin 2 is
positive [hot] and Pin 3 is negative [cold]. A 2-way switch selects which connector—XLR
or RCA—receives the input signal.
To begin using your T Series monitors, follow these simple steps:
→ Before making any connections to your T Series monitors, make sure the power
switch for each monitor is turned off and each monitor’s Level control knob is set to
its “0 dB” setting. Also make sure the equipment you will connect to your monitors is
turned off and its output-level controls, if any, are turned all the way down.
→ If you’ll be sending balanced +4 dBu analog audio from your mixer, I/O box or other
equipment to your T Series monitors, use the monitors’ respective XLR connectors
and set their +4 dBu/-10 dBV switches to the +4 dBu setting.
→ If you’ll be sending unbalanced -10 dBV analog audio from your mixer, I/O box or
other equipment to your T Series monitors, use the monitors’ respective RCA
connectors and set their +4 dBu/-10 dBV switches to the -10 dBV setting.
→ After all connections are made to your T Series monitors, turn on the equipment
feeding them.
→ Flip the power switch for each of your T Series monitors to the ON position.
→ Set the output level controls, if any, on the equipment feeding your monitors to their
nominal level or to where you normally set them.
12 T SERIES MANUAL [ENGLISH]→ While playing audio, fine-tune the Level control knob setting on each monitor to
attain the listening volume you desire. If your monitors are placed properly in a
symmetrical room [see Section 2 of this manual], the settings for the Level control
knobs on both monitors should be the same to achieve equal playback volume and
balanced imaging.
→ All pro audio monitors require some burn-in time to reach their optimal performance.
Please play complex program material through your T Series monitors for at least
eight hours before using them on a critical project.
→ At the end of each session, turn off your T Series monitors before powering down
any equipment connected to them.
13 T SERIES MANUAL [ENGLISH]6. USING THE HF AND LF SWITCHES ON THE REAR PANEL On the rear panel for each T Series monitor, two 3-way switches labeled “LF” and “HF” boost or cut the monitor’s respective high- and low-frequency responses by 2 dB. Each switch also provides a neutral middle position, labeled “0,” that produces flat response in their frequency range. If you’ve placed your T Series monitors optimally [see Section 2 of this manual], you’ll probably find that your T Series monitors sound the most balanced with both switches set to the “0” [flat] position. A brief review of how room acoustics can affect loudspeaker performance will help you get the most out of using your T Series monitors’ LF and HF switches: Sound bouncing off bare walls and, typically to a lesser extent, the ceiling in your control room can create very short echoes that distort imaging and phase response back at your mix position. Properly treating your room with acoustic foam or high- density fiberglass sound panels reduces or prevents these problems by absorbing the sound, rather than reflecting it back to your mix position. However, foam and fiberglass sound panels absorb mostly high, midrange and—depending on the material used and its thickness—upper-bass frequencies. [The thicker the material, the lower the extension of frequencies that are absorbed, with high-density fiberglass absorbing frequencies roughly a full octave lower than open-cell foam for the same thickness. For example, both 2”-thick fiberglass wall panels and 4”-thick acoustic foam typically absorb sound effectively down to around 250 Hz.] Because these materials absorb sound most effectively in the treble range, a room heavily treated with acoustic foam or fiberglass sound panels can make any loudspeaker’s playback of high frequencies sound muffled. To restore clarity and detail, your T Series monitors provide a HF switch setting that boosts high-frequency response 2 dB. Another acoustic phenomenon to keep in mind when placing your monitors in your room is the boundary effect. The closer you place a loudspeaker to a room boundary — a wall, floor or ceiling — the more bass frequencies will be acoustically boosted. To preserve your T Series monitors’ flat frequency response, it’s important to nullify the boundary effect by placing them at least 16 inches away from any wall. This is also important in order to prevent physical interference by the wall behind the monitors with the cabinets’ rear-firing bass reflex ports. If ergonomics require you place your T Series monitors close to a wall, setting the LF switch on the rear panel to the “-2 dB” setting will cut the bass response an equal amount and help restore flat spectral balance. 14 T SERIES MANUAL [ENGLISH]
Follow these basic guidelines for using the LF switch to change your T Series monitors’
bass response:

→ If your room’s layout dictates you must place your T Series monitors closer than
     16 inches away from a wall, try setting the LF switch to the “-2 dB” position to
     compensate for such placement naturally boosting bass frequencies.

→ If you wish to listen to your T Series monitors with exaggerated bass response, set
     the LF switch to the “+2 dB” position.

Follow these basic guidelines for using the HF switch to change your T Series monitors’
high-frequency response:

→ If your room is heavily treated with absorptive acoustic materials such as foam or
     fiberglass wall panels, you may notice that high frequencies are being acoustically
     attenuated, resulting in a dull sound. In this case, try setting your T Series monitor’s
     HF switch to its “+2 dB” position to restore high-frequency detail.

→ In an especially live, bright-sounding room, you may prefer setting the HF switch to
     its “-2 dB” setting to compensate for the room’s acoustics.

15                                                                   T SERIES MANUAL [ENGLISH]
7. TROUBLESHOOTING
Should you experience problems with your monitors, for example loss of signal, unwanted
interference or noise, it‘s worth running through the following basic checks before
contacting the team here at ADAM Audio or our local representatives.
→ In the event that your speakers are producing no signal, or only a distorted signal:
a] Consider where the problem is. If all of your speakers are exhibiting the same lack
of signal or distorted signal, it‘s more likely that the problem lies with the audio
source. If, on the other hand, only a single loudspeaker is affected, the problem is
more likely to lie with that specific speaker.
b] Check your wiring and cables, if possible swapping them for others that you know
are working without any problems. If you only have a pair of cables, see if the fault
changes speakers when you swap the cables over. If so, the problem is likely to be
found in the cable.
c] Check your signal source, connecting the speakers as directly as possible to the
source. Could the fault lie with another component, for example a mixer or processor
which is usually connected before the speakers in the signal path?
→ In the event that your speakers are producing a signal, but it is affected by occasional
unwanted noise, such as buzzing, humming or crackling:
a] Check cables, as above, swapping them or replacing them where possible, and see if
the fault is also affected.
b] Check that there are no sources of electromagnetic interference close to the speakers
that could be causing problems [mobile phones, wireless routers, power supplies,
electrical motors or heaters, and so on].
If none of the above can be identified as the source of the problem, your speakers may
be defective, in which case contact ADAM Audio or the local representative/distributor
[see www.adam-audio.com for a list].
16 T SERIES MANUAL [ENGLISH]8. MAINTENANCE
→ Please switch off your monitors before cleaning them.
→ Please be aware that the speaker drivers generate a significant electromagnetic
field. Magnetically sensitive items should be kept at a distance of at least half a
meter [20 inches].
→ Please ensure that no liquids enter the cabinet. Wet cloths should not be used for
cleaning, and cleaning fluids should not be sprayed near the loudspeakers.
→ Flammable or acidic chemicals should not be used for cleaning either.
→ If at all possible, do not touch the loudspeaker cones [they may be dusted lightly,
using a very soft brush].
→ We recommend a lint-free, damp [not wet] cloth for general cleaning.
9. SHIPPING
We recommend that you keep your loudspeaker packaging if at all possible, in case your
monitors ever need to be sent for repair. It is extremely difficult to protect your loudspeakers
so that they can be shipped without damage if the original packaging is not available.
We cannot accept responsibility for damages arising due to improper packaging being
used when the loudspeakers are in transit.
17 T SERIES MANUAL [ENGLISH]10. ENVIRONMENTAL INFORMATION All ADAM Audio products comply with international directives on the Restriction of Hazardous Substances [RoHS] in electrical/electronic equipment and the disposal of Waste Electrical/Electronic Equipment [WEEE]. We hope you won‘t be throwing your T Series speakers away for many years – but when the time eventually comes, please consult your local authorities for further information on how to safely dispose of them. 11. EU DECLARATION OF CONFORMITY We, ADAM Audio GmbH whose registered office is situated at Rudower Chaussee 50, 12489 Berlin, Germany, declare under our sole responsibility that the products: T5V and T7V comply with the EU Electro-Magnetic Compatibility [EMC] Directive 89/336/EEC, in pursuance of which the following standards have been applied: EN 55032 incl. EN 61000-3-2/3, EN 55103-2 and complies with the EU General Product Safety 2001/95/EC, in pursuance of which the following standard has been applied: DIN EN60065 7th.ED/A1/A2 This declaration attests that the manufacturing process quality control and product documentation accord with the need to assure continued compliance. The attention of the user is drawn to any special measures regarding the use of this equipment that may be detailed in the owner’s manual. Christian Hellinger Managing Director ADAM Audio GmbH 18 T SERIES MANUAL [ENGLISH]
12. WARRANTY TERMS

→ This warranty complements any national/regional law obligations of dealers or national
     distributors and does not affect your statutory rights as a customer.

→ Neither other transportation, nor any other costs, nor any risk for removal, transportation
     and installation of products is covered by this warranty.

→ Products whose serial number have been altered, deleted, removed or made illegible
     are excluded from this warranty.

→ The regular warranty lasts two years and is valid from the date of purchase. For a
     product registration via www.adam-audio.com/en/my-adam the beneficiary is given an
     additional three-year guarantee [36 months] on the registered products.

→ The warranty will not be applicable in cases other than defects in materials and/or
     workmanship at the time of purchase and will not be applicable:

     a] for damages caused by incorrect installation, connection or packing,

     b] for damages caused by any use other than correct use described in the user manual,

     c] for damages caused by faulty or unsuitable ancillary equipment,

     d] if repairs or modifications have been executed by an unauthorized person,

     e] for damages caused by accidents, lightning, water, fire heat, public disturbances or
        any other cause beyond the reasonable control of ADAM Audio.

How To Claim Repairs Under Warranty

Should service be required, please contact the ADAM Audio dealer where the product
was purchased.

If the equipment is being used outside the country of purchase, the international
shipping costs have to be paid for by the owner of the product.

Service may be supplied by your ADAM Audio national distributor in the country of
residence. In this case, the service costs have to be paid for by the owner of the
product, whereas the costs for parts to be repaired or replaced are free of charge.
Please visit our website at www.adam-audio.com to obtain the contact details for
your local distributor.

To validate your warranty, you will need a copy of your original sales invoice with the
date of purchase.

19                                                                     T SERIES MANUAL [ENGLISH]
13. TECHNICAL DATA
T5V T7V
Tweeter U-ART U-ART
Velocity transfer ratio 4:1 4:1
Equivalent diaphragm ø 48 mm / 1.9“ 48 mm / 1.9“
Woofer Polypropylene cone Polypropylene cone
Woofer diaphragm ø 127 mm / 5“ 178 mm / 7“
Built-in amplifiers 2 [Class D] 2 [Class D]
Tweeter channel 20 W 20 W
Woofer channel 50 W 50 W
Input Sensitivity Switchable +4 dBu / -10 dBV Switchable +4 dBu / -10 dBV
Frequency range 45 Hz – 25 kHz 39 Hz – 25 kHz
Max. peak SPL at 1 m per pair 106 dB SPL 110 dB SPL
Crossover frequency 3 kHz 2.6 kHz
User controls Gain, Room EQ Gain, Room EQ
Inputs XLR, RCA XLR, RCA
Weight 5,7 kg / 12.6 lb 7.1 kg / 15.7 lbs
298 x 179 x 297 mm 347 x 210 x 293 mm
Height x Width x Depth
[11.7 x 7 x 11.7“] [13.7 x 8.3 x 11.5”]
100 – 240 VAC +/- 10 % 50/60 Hz 100 – 240 VAC +/- 10 % 50/60 Hz
AC Input Voltage
132 W max 132 W max
20 T SERIES MANUAL [ENGLISH]ADAM AUDIO GMBH ADAM AUDIO UK
BERLIN, GERMANY EMAIL: UK-INFO@ADAM-AUDIO.COM
T +49 30-863 00 97-0 ADAM AUDIO USA INC.
F +49 30-863 00 97-7 EMAIL: USA-INFO@ADAM-AUDIO.COM
INFO@ADAM-AUDIO.COM
T SERIES Manual © ADAM Audio GmbH 2018
While every effort has been made to ensure the accuracy of the information
supplied herein, ADAM Audio GmbH cannot be held responsible for any errors
or omissions.
WWW.ADAM-AUDIO.COM
V02/18You can also read