HydraFacial MD Elite User Guide
←
→
Page content transcription
If your browser does not render page correctly, please read the page content below
™   ™
HydraFacial MD Elite

       User Guide

                            P/N 1900036-A
                            Rev. 2/18/2020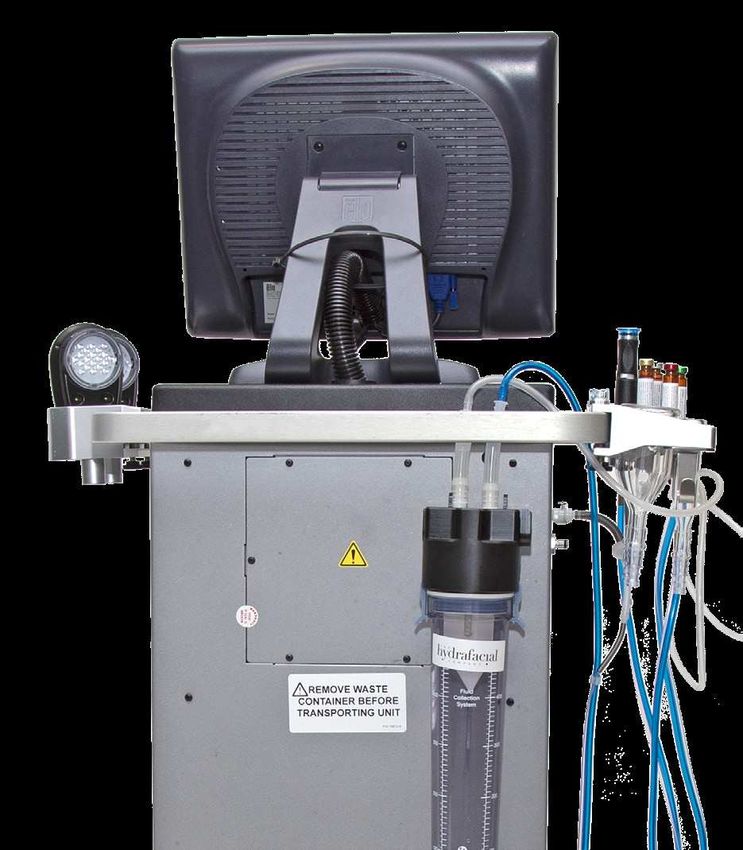
HYDRAFACIAL MD™ Elite™                                                                                             User Guide      EN      HYDRAFACIAL MD™ Elite™                               User Guide   EN

Copyright © 2020 Edge Systems LLC. All rights reserved.
                                                                                                                                           Contents
Terms and Conditions of Use
HydraFacial™, HydraFacial MD™, Vortex-Fusion™, HydroPeel™, Britenol™, HydraFacial MD CTGF™, UV Smart™, and My Life,                        Before You Start
My Time, My Skin™ are trademarks of Edge Systems LLC that are registered in the United States. This product and its use are covered        4        Introduction
by one or more U.S. and International patents. Patent info: hydrafacialco.com/patents. These intellectual property rights (IPR’s) remain   5        Technical Specifications
the exclusive property of Edge Systems LLC or its licensors.                                                                               5        Environmental Conditions
                                                                                                                                           6        Safety Information
Contact Info
                                                                                                                                           Getting Started
       Edge Systems LLC
       2277 Redondo Ave.                                                                                                                   9        Unpacking
       Signal Hill, CA 90755 USA                                                                                                           10       System Components
       (800) 603-4996 • (562) 597-0102                                                                                                     12       Set–Up
       contact@hydrafacial.com
       hydrafacial.com
                                                                                                                                           Operating Instructions
                                                                                                                                           14       On, Off, and Standby/Sleep Modes
                                                                                                                                           15       Touchscreen
                                                                                                                                           17       Perform Treatment
E C Rep Ltd
5 Fitzwilliam Square East,                                                                                                                 Cleaning and Maintenance
Dublin 2, D02 R744, Ireland
                                                                                                                                           17       Manifold and Tubing
Tel: +353 1 2 544 944
                                                                                                                                           18       HydraFacial™ Handpiece
Email: info@ecrep.ie
                                                                                                                                           19       Waste Canister
Responsible Person in the United Kingdom                                                                                                   19       Touchscreen
E C Rep Ltd                                                                                                                                19       Removable Front Door
Healthcare Education Centre,                                                                                                               19       Skin Imaging Camera (Sold separately)
Portland Street, Southport, PR8 1HU, UK
Tel: +44 7970 544 944
Email: info@ecrep.ie                                                                                                                       20       Troubleshooting
                                                                                                                                           21       Limited Warranty

2460

                                                                   2                                                                                                                        3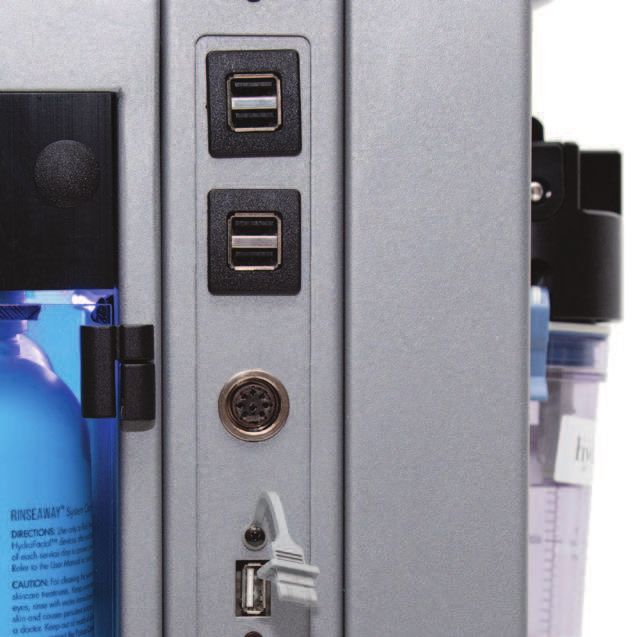
HYDRAFACIAL MD™ Elite™ User Guide EN HYDRAFACIAL MD™ Elite™ User Guide EN
Introduction Technical Specifications
Congratulations on your purchase of the HydraFacial MD™ Elite™ System. You can have the utmost confidence in this leading edge Parameter Specification 220–240 VAC Specification 110–120 VAC
system designed in the USA by Edge Systems LLC. The HydraFacial System is a modular system which may include other modes of
70290-03-01 70143-03-01
operation not available in the EEA. Separate User Guides are provided for all optional modalities.
Voltage 220–240 VAC, 50/60 Hz, 8A 100–120 VAC, 50/60 Hz, 8A
The System is intended to be used in clinics, hospitals, doctor’s offices, and aesthetic practices by trained and licensed practitioners, Power Consumption 142 watts, maximum 142 watts, maximum
such as dermatologists, facial plastic surgeons, physicians, and aesthetic professionals – in accordance with their licensing scope Mode of Operation Continuous Continuous
and applicable national/local requirements. Audio Volume Under 70 dB Sound Pressure Level at 1 meter Under 70 dB Sound Pressure Level at 1 meter
Visual Indicators LCD display with system messages LCD display with system messages
Intended Use
Instrument Maker/Model Edge Systems LLC / HydraFacial MD Elite Edge Systems LLC / HydraFacial MD Elite
The System is intended to abrade (exfoliate) the upper layers of the skin.
Dimensions 122 cm/48 in (H) x 46 cm/18 in (W) x 41 cm/16 in (D) 122 cm/48 in (H) x 46 cm/18 in (W) x 41 cm/16 in (D)
Indication (related to the use of the device in the European Economic Area (EEA):
Weight 39 kg (85 lbs) 39 kg (85 lbs)
• Mild to moderate acne, i.e. acne vulgaris, comedonal acne (blackheads and whiteheads).
Operating Altitude Maximum of 2000 m Maximum of 2000 m
• Superficial acne scarring.
System Controls Touchscreen monitor, buttons, switches Touchscreen monitor, buttons, switches
Interconnects Custom cables Custom cables
Contraindications
Ingress of Fluids Not protected against the ingress of fluid. IPX0 Not protected against the ingress of fluid. IPX0
It is intended for external use on intact skin only, subject to the following contraindications and warnings:
Flammability Equipment not suitable for use in the presence of flammable Equipment not suitable for use in the presence of flammable
• Do not use over active acne, such as severe, inflammatory acne. anesthetic mixture with air or with oxygen or with nitrous oxide. anesthetic mixture with air or with oxygen or with nitrous oxide.
• Do not use over active infection or open wounds (e.g., herpes simplex, excoriations, or open acne cysts). Electrical Conformity This medical equipment has passed all required testing for This medical equipment has passed all required testing for
• Do not use on client with autoimmune or communicable disease. electric shock, fire and mechanical hazards in accordance electric shock, fire and mechanical hazards in accordance with
with IEC 60601–1, IEC/EN 60601–1. IEC 60601–1, IEC/EN 60601–1.
• Do not use on client with cold sores or fever blisters without pre-medication.
Electrical Shock Protection – Classification Class I Class I
• Do not use over abnormal, unidentified facial growth or mark.
Electrical Shock Protection – Degree Type BF Equipment Type BF Equipment
Side Effects Product Life The Console is a non-sterile, durable good. The System The Console is a non-sterile, durable good. The System
warranty runs for a period of one (1) year from the date of warranty runs for a period of one (1) year from the date of
Client may experience temporary irritation, tightness, or redness at the treatment area. This usually dissipates within 72 hours
installation of the System to the original Customer. installation of the System to the original Customer.
depending on skin sensitivity.
Applied Part The Handpiece is the client applied part The Handpiece is the client applied part
Separation From Power Mains Power switch on rear panel provides full separation from Power switch on rear panel provides full separation from
Warnings
power mains. power mains.
• Not recommended for severe acne scarring. Fuse Slow-blow fuse. 250V 8A Slow-blow fuse. 250V 8A
• If the skin becomes irritated beyond normal, discontinue the treatment and seek medical advice.
• Do not use within the orbital area or over any body orifice, such as over the eyelids. Eyes should be closed during the procedure
and covered with protective eyewear. Sterile eye rinse solution should be available in case products accidentally get in the eyes.
• This System is not intended to be used on infants, children, pregnant or lactating women because it has not been evaluated for this Environmental Conditions
group of users.
Parameter Specification
• The above have been assessed and supported by clinical evaluation in accordance to Medical Device Directive 93/42/EEC
Temperature: Normal (–20o to 60o C)
Annex X. The device complies with the applicable Essential Requirements in Annex I. The HydraFacial MD™ Elite™ is a Class IIa
For Shipping & Storage Relative Humidity: 10—90% RH
medical device in the EEA; GMDN Code 11177. Atmospheric Pressure: 500—1060 hPa
Temperature: Normal (10o to 40o C)
System Specifications: Operating Conditions
Relative Humidity: 30—75% RH
• Unit Size: 122 cm/48 in (H) x 46 cm/18 in (W) x 41 cm/16 in (D)
• Unit Weight: 39 kg (85 lbs)
• Electrical:
220 –240VAC, 50/60Hz, 8A 70290-03-01
100 –120VAC, 50/60Hz, 8A 70143-03-01
4 5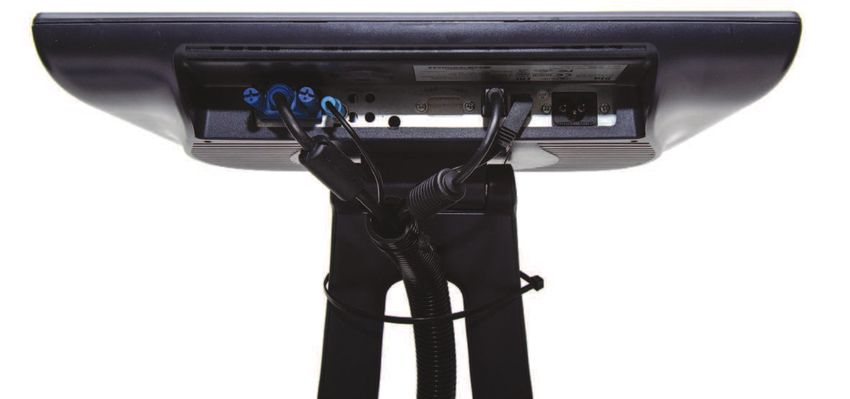
HYDRAFACIAL MD™ Elite™ User Guide EN HYDRAFACIAL MD™ Elite™ User Guide EN
Safety Information Safety Guidelines
Product Marking Symbols Caution and Marking Symbols 1. Ensure that all operators of the HydraFacial MD™ Elite™ System are trained and licensed as required by local/national
Symbol Description Symbol Description regulations. Do not operate the unit before being trained. For any questions regarding training, contact Edge Systems LLC or your
local distributor.
Attention: Refer to accompanying documentation. Calls attention to a procedure, practice, or condition that
could possibly cause bodily injury or death. 2. Be sure to read the User Guide thoroughly before setting up the System. If you experience mechanical and/or electrical difficulties
with your unit, contact your local distributor.
Separate collection for electronic. 3. Always do a client consultation to determine if the client is a candidate for the procedure. Follow contraindications and warnings
Calls attention to a procedure, practice, or condition that
could possibly cause damage to equipment or permanent loss as pre-determination for procedure.
of data.
4. Always use clean, unused tips for each procedure. Keep tips in original packaging until ready to use.
Type BF Applied Part. Defibrillation proof.
Reusing tips could result in skin infection.
Do Not Re-use
5. Do not use contaminated skin solutions.
Direct Current Reusing contaminated skin solution could result in skin infection, and will void all warranties. Partially used skin solution
bottles must be capped and stored in accordance with instructions on product label.It is recommended not to use skin solutions
Manufactured By
that exceed the "Best Used By" date. If you observe any abnormality with your products, please contact Edge Systems LLC or your
local distributor.
Alternating Current
Date of Manufacture 6. Removing contact lenses prior to procedure is recommended.
7. The client should have a minimum sunscreen SPF 30 applied after the procedure and should use sunscreen on an ongoing basis.
ON (Power)
Conformité Européenne 8. Each client’s skin conditions and sensitivity are different. Always begin treatment conservatively. Do a sensitivity test on the neck
2460
by the earlobe first, and increase or decrease the vacuum level as appropriate. Lower vacuum level is recommended for thin,
OFF (Power)
fragile skin. Skin conditions requiring more aggressive vacuum level are at operator’s discretion. Follow recommended protocols
and cautiously consider skin types.
Catalogue Number
STANDBY (Power)
9. Empty the waste canister after each service according to your waste handling protocol and local/national regulations. Follow
the System cleaning instructions in this guide to clean your System and handpiece.
Consult Instructions For Use 10. Keep the System in accordance to recommended environmental conditions. Liquid should only be suctioned through
Serial Number
the HydraFacial handpiece.
Fuse 11. Always use solution when performing abrasion. Performing the treatment without skin solutions could result in discomfort to
Lot Number the client.
Pushing Prohibited 12. The System is not spill proof. Avoid spillage of any liquid on the System.
European Representative
13. The System is not intended to be used in conjunction with any other System, medicine or technology and should only be used
in accordance with these Instructions for Use.
Certified by CSA Group
14. Use of non-approved skin solutions will void the warranty and may clog the System.
Medical Device
Connect to supply mains with protective earth (ground) 15. Do not let the waste canister overfill. If this happens, a built-in float device will occlude the vacuum opening and skin solution
flow through the handpiece will cease.
Note: Always remove the waste canister before transporting the unit.
Keep Dry Unique Device Identifier
16. Do not attempt to lift the unit alone or move over uneven or damaged flooring.
6 7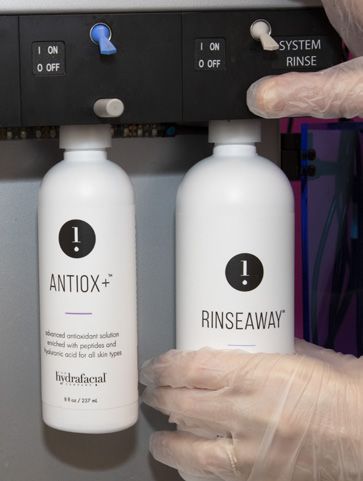
HYDRAFACIAL MD™ Elite™                                                                                                 User Guide    EN       HYDRAFACIAL MD™ Elite™                                                                                           User Guide      EN

17. Wearing gloves is recommended when performing all treatments, system cleaning and preventive maintenance activities.
                                                                                                                                              Unpacking
18.               Device cannot be serviced or maintained while in use.                                                                       Inspect the Shipping Carton
                                                                                                                                              Your System was shipped in a custom foam insulated box that has been tested to UPS standards. If the shipping carton is damaged,
19.              Unauthorized user modifications will void warranty. Edge Systems LLC will not be responsible for any injuries sustained
                                                                                                                                              inspect the contents for visible damage such as dents, scratches or any other obvious signs of damage. If the System is damaged,
      due to unauthorized System modifications or use of parts not specified by Edge Systems LLC. Systems returned to Edge Systems LLC
                                                                                                                                              notify Edge Systems LLC or your local distributor and they will assist you in the repair or replacement of your System.
      with unsafe modifications will be returned to their original operating condition at the customer’s expense.
                                                                                                                                              Do not return your unit without first contacting your distributor and receiving an RMA (Return Material Authorization) number.
20.               DO NOT suction liquids through the dry port located on the side of the unit. This will damage the System and void the
      warranty.                                                                                                                               Unpack the unit, accessories and all documents. Retain the original packaging in case you need to ship the System for any reason.
                                                                                                                                              Verify that all appropriate items have been received.
21.             Use of this equipment adjacent to or stacked with other equipment should be avoided because it could result in
      improper operation. If such use is necessary, this equipment and the other equipment should be observed to verify that they are
                                                                                                                                                        The unit is large and heavy and should not be lifted alone.
      operating normally.

22.             If this System does cause interference, which can be determined by turning the System off and on, the interference can        Package Contents
      be possibly corrected by one or more of the following measures:
                                                                                                                                              • Console Unit
      • Relocate the System with respect to the receiver.                                                                                     • Plastic Cartridge Handpiece Assembly
      • Move the System away from the receiver.                                                                                               • Tool Holder
      • Plug the System into a different electrical outlet so that the System and receiver are on different branch circuits.                  • Puncture Tool
                                                                                                                                              • Waste Canister Assembly
23. Use of accessories, transducers and cables other than those specified or provided by Edge Systems LLC could result in increased
      electromagnetic emissions or decreased electromagnetic immunity of this equipment and result in improper operation.                     • Cleaning Caps, 5-Pack
                                                                                                                                              • HydraFacial Power Cord (Region Specific)
      Note: The emissions characteristics of this equipment make it suitable for use in industrial areas and hospitals (CISPR 11 Class A).
      If it is used in a residential environment (for which CISPR 11 Class B is normally required), this equipment might not offer adequate
      protection to radio-frequency communication services. The user might need to take mitigation measures, such as relocating or
      reorienting the equipment.

        Emissions Standard                  Test Method
        EN 606061-1-2: 2015                 CISPR 11:2015 +A1:2016
        IEC 60601-1-2:2014                  EN 61000-3-2:2014
                                            EN 61000-3-3:2013
        Immunity Standard                   Test Method
        EN 60601-1-2:2015                   IEC 61000-4-2:2008
        IEC 60601-1-2:2014                  IEC 61000-4-3:2010
                                            IEC 61000-4-4:2012
                                            IEC 61000-4-5:2014
                                            IEC 61000-4-6:2013
                                            IEC 61000-4-8:2009
                                            IEC 61000-4-11:2004
                                            ISO 7637-2

24.             Portable RF communications equipment should be used no closer than 15 cm/6 in to any part of the HydraFacial
      System, including cables specified by Edge Systems LLC. Otherwise, degradation of the performance of this equipment could
      result.

25.             To prevent electric shock, do not remove the instrument cover. There are no user serviceable parts inside. Routine
      maintenance or cleaning of internal parts is not necessary. Avoid the use of cleaning agents or chemicals on the instrument. Some
      chemicals may damage plastic parts or lettering. Any external cleaning should be done with a clean, dry or slightly damp cloth.

                                                                      8                                                                                                                                         9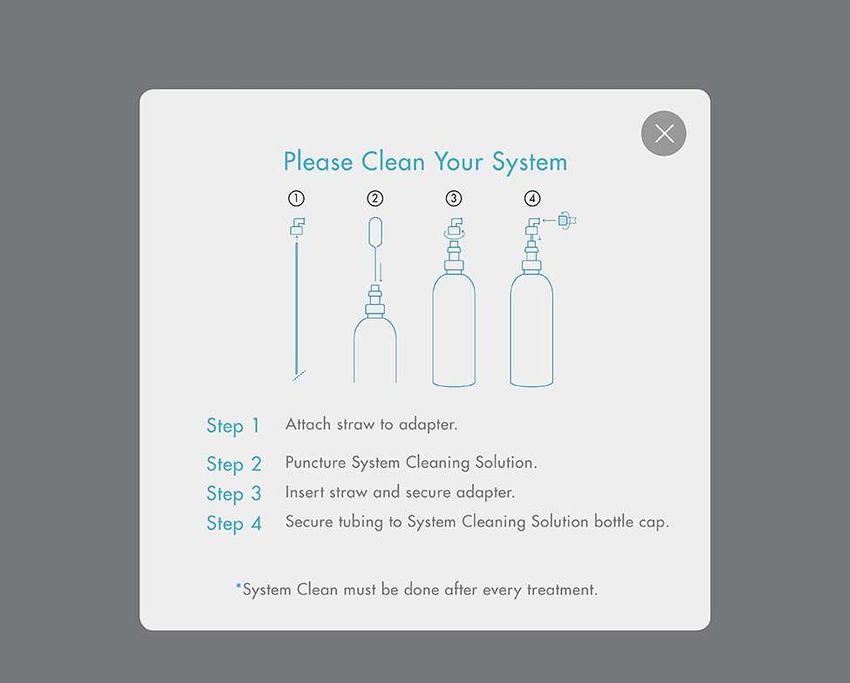
HYDRAFACIAL MD™ Elite™                                                                                              User Guide   EN   HYDRAFACIAL MD™ Elite™                                                                  User Guide   EN

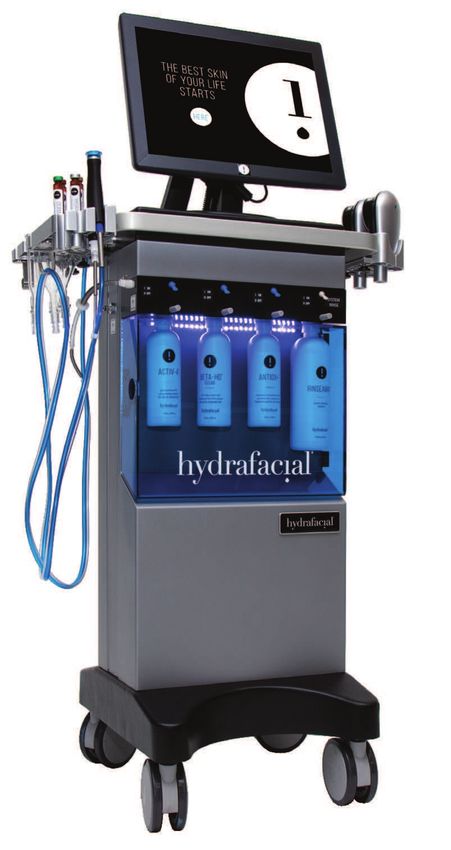
System Components

                                                                                                     Touchscreen
                       Port for Waste Canister
                       (Rear of the Unit)                                                                                                                                                  USB 5V 1A
                                                                                                                                                                                           (Power only, no data)

                       Accessory Rail                                                                 Illuminated
                                                                                                    Power Switch

                                                                                                                                                                                           Skin Imaging Camera Connector
                                                                                                      Side Panel:
                                                                                                                                                                                           (Not available in all countries)
                                                                                                         USB Port
                       Dry Port
                                                                                                                                                                                           USB with data (5V 500 mA)
                                                                                                                                                                                           For Backing up Skin Imagin Data
                                                                                                                                                                                           and/or Restoring Data.

                       Coupling Fitting for
                       HydraFacial Handpiece

                                                                                                 Toggle Switches
                                                                                                    for Solutions
                       Manifold Buttons for
                       Solution Bottles
                                                                                                      Removable
                                                                                                     Acrylic Door

                       Pick-Up Tubes for
                       Skin Solution and
                       System Cleaning
                                                                                                          Wheels
                       Solution Bottles
                                                                                                   (Front Wheels                                           Only install accessories
                                                                                                     with Brakes)                                          on two sides of handrail

                                                                                                                                                           Only use the back
                                                                                                                                                           of handrail to move
                                                                                                                                                           the device

                                                                                     AC Connector (Not Used)

                                      VGA Cable
                (Port can only be used to connect VGA                        DC Barrel Connector
                cable from inside HydraFacial Device                         (3.5mm)
                to the HydraFacial Device Monitor)

                                                                    USB Type A Cable
                                                                    (Port can only be used to connect USB Type
                                                                    A Cable from inside HydraFacial Device
                       3.5 mm Jack Audio Cable                      to the HydraFacial Device Monitor)

                          Note: The ports and cables can only be used for connections as specified
                          and cannot be used for other types of connection.

                                                              10                                                                                                                      11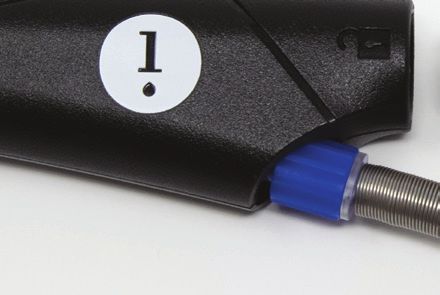
HYDRAFACIAL MD™ Elite™                                                                                                    User Guide     EN   HYDRAFACIAL MD™ Elite™                                                                                                 User Guide       EN

Set-Up                                                                                                                                        6.   To remove the cartridge and insert skin solution vials (sold separately), twist the cartridge until the arrow aligns with the unlock
                                                                                                                                                   symbol, then pull the cartridge straight out. Then insert the vial into the handpiece. Push firmly until it snaps into place.
Tool Holder
                                                                                                                                                   Note: Keep all the toggle switches off while using vials.
1.   Loosen thumbscrews first.
                                                                                                                                              7.   Turn the flow control valve toward the “+” sign to increase the serum flow or towards the “–” sign to decrease the flow.
2.   Attach the tool holder, top first onto the accessory rail.
3.   Tighten the thumbscrews to lock the handpiece holder in place.

Waste Canister
                                                                                                                                              HydroPeel Tip
1.   Secure waste canister shelf to the back of the System.
                                                                                                                                              1.   Align the HydroPeel tip and attach it to the handpiece.
2.   Attach the waste canister lid and secure the clamps.
3.   Insert the tube on the lid into the waste canister port on the back of the unit.
4.   Make sure the waste canister sits securely on the ledge. Use a Phillips screwdriver to install the ledge.
     Note: Always remove the waste canister before transporting the unit.
                                                                                                                                                           Caution: Avoid dropping or damaging the disposable tip prior to treatment. Disposable tips suspected of being
                                                                                                                                                           damaged should be discarded and replaced. Damaged tips may cause scratches or discomfort to the client.

                                                                                                                                                           Single use only.

HydraFacial Handpiece
1.   Connect the blue twist lock (Return Line) to the blue connector on the bottom of the handpiece and secure by twisting thumb tight.
     Do not overtighten.
2.   Connect the clear twist lock (Supply Line) to the cartridge and secure it by twisting the lock only thumb tight. To prevent the lock
     from breaking, do not overtighten the twist lock.
3.   Plug the small tube attached to the handpiece into coupling fitting in the System.
                                                                                                                                              Skin Solution Bottles (Sold separately)
4.   Connect the large tube attached to the handpiece into the waste canister.
                                                                                                                                              1.   Open the front door. Remove the cap of the skin solution bottle and use the puncture tool to pierce the seal inside the bottle.

                                                                                                                                              2.   Press and hold each manifold button as you insert each bottle into the manifold, and then release the button.
                                                                                                                                                   Note: The Rinseaway™ System Cleaning Solution should be installed in the manifold with the gray toggle switch labeled
                                                                                                                                                   “SYSTEM RINSE”.

5.   Insert the cartridge into the handpiece. Align the arrow on the cartridge with the unlock symbol on the handpiece.
     Push firmly until it snaps into place, then twist the cartridge up until the arrow aligns with the lock symbol.
     Note: If the cartridge is difficult to insert, drizzle a small amount of water into the cartridge to lubricate it, and try again.

                                                                       12                                                                                                                                          13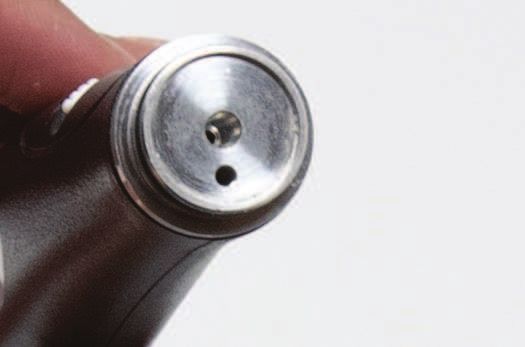
HYDRAFACIAL MD™ Elite™                                                                                                 User Guide    EN   HYDRAFACIAL MD™ Elite™                                                                                             User Guide      EN

3.   The toggle switches control which skin solution bottle is being used. When a switch is in the ON position, fluid will be drawn
                                                                                                                                          Touchscreen
     from that bottle. When switched to the OFF position, no fluid will be drawn from the corresponding bottle.
                                                                                                                                          This section shows how to operate the touchscreen and navigate the pages. The user interface is designed to be intuitve and
     Note: Always keep the “SYSTEM RINSE” toggle switch (gray) off while performing procedures.
                                                                                                                                          consistent on each page, therefore, only some pages will be shown below as an example. The touchscreen has been preset for
                                                                                                                                          optimal performance with the HydraFacial program. Thus, you cannot and will not need to adjust the monitor.

                                                                                                                                          1.   Access each page by lightly tapping the buttons displayed with your fingertip, not fingernail. If the touchscreen does not respond,
                                                                                                                                               verify that you have actually pressed on the button and did not miss it.

                                                                                                                                               Note: There may be a slight delay when you press the touchscreen; do not press repeatedly if it does not respond immediately.

                                                                                                                                          Navigating the System
Skin Imaging Camera (Not available in all countries)
                                                                                                                                                                                          Start-Up Page
1.   Attach the tool holder, top first, onto the accessory rail. Tighten the thumbscrews to lock the tool holder in place.
                                                                                                                                                                                          Touch the button to goto the Home Page.
2.   Insert the cable end connector from the camera into the port located on the right side of the unit. Push in and twist until
     it is completely locked.

3.   Place the camera on the tool holder when not in use.

On, Off, and Standby/Sleep Modes                                                                                                                                                          Home Page
Turn ON the System                                                                                                                                                                         • Access Protocols
1.   Verify the switch on the power entry module located on the back of the unit is in the OFF ( O ) position.                                                                             • Access Optional Modalites
     Connect the power cord to the power entry module and connect the plug into a grounded wall outlet.                                                                                    • Access System Cleaning instructions
                                                                                                                                                                                           • Return to Home Page
2.   Switch the power entry module switch to the ON ( I ) position.
                                                                                                                                                                                           • Adjust Volume
3.   The Illuminated Power Switch will light up blue.                                                                                                                                      • Access System Settings

4.   Press the blue Illuminated Power Switch. The System should begin its boot up cycle at this point.                                                                                     • Access Patient Information

                                                                                                                                                                                          HydraFacial Protocol Menu
Standby/Sleep Mode
                                                                                                                                                                                          Select desired Protocol.
1.   Press the Illuminated Power Switch and a “System Cleaning Reminder” will appear on the screen.
2.   If you have not cleaned the skin solution stations, press NO and the System Cleaning Protocol Page will appear.
     Note: You must clean the skin solution stations before you can turn the System off or switch to the standby mode. Always turn
     to the Standby/Sleep mode at the end of each day.

3.   If you have cleaned the skin solution stations, press YES and the System will go into standby mode.

Turn OFF the System
1.   Follow the above steps to switch the System into Standby/Sleep Mode. Then switch the power entry module switch on the back
     of the unit to the OFF position, and the System is completely shut off.

                                                                     14                                                                                                                                      15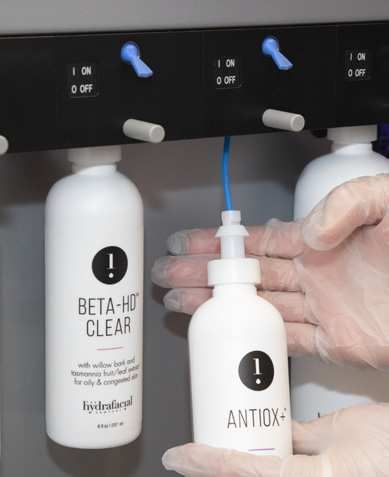
HYDRAFACIAL MD™ Elite™                                                                    User Guide      EN      HYDRAFACIAL MD™ Elite™                                                                                            User Guide     EN

                         Protocol Page                                                                            Perform Treatment
                         • Protocol Menu                                                                          Wearing gloves is recommended when performing all treatments.
                         • Next/Previous Step
                                                                                                                  1.   Cleanse customer’s face.
                         • Turn On/Off Vacuum
                                                                                                                  2.   Place a tip on handpiece.
                         • Adjust Vacuum
                         • Suggested Patterns                                                                     3.   Turn on the skin solution.

                                                                                                                  4.   Place tip against skin to occlude and dab skin solution on face.
                                                                                                                       To exfoliate, do overlapping strokes from the center of face outwards.
                         Pop-Up Windows
                                                                                                                       Make two passes.
                         If you see a pop-up window, follow the on-screen instruction and press the appropriate
                         button.

                                                                                                                  Manifold and Tubing
                                                                                                                  Wearing gloves is recommended when performing all cleaning and maintenance activities.

                                                                                                                  After Each Service
                                                                                                                  1.   After each procedure, run the “System cleaning process”. Start by switching all the blue toggle switches down to the OFF
                         Cleaning Your System
                                                                                                                       position, and switch only the gray toggle switch “SYSTEM RINSE” up to the ON position.
                         In-procedure cleaning: A pop-up window will prompt you to run a quick system-
                         cleaning. Press the "START" button to begin cleaning.

                                                                                                                  2.   Make sure that the Rinseaway™ System Cleaning Solution is properly installed.

                                                                                                                  3.   Turn the flow control valve all the way over to the “+” sign and attach the cleaning cap to the handpiece.

                         System Cleaning
                         Access the System Cleaning page from the Home Page and follow the steps indicated
                         on the screen. Use the Vacuum Control button to start the cleaning process.
    VACUUM CONTROLS
                                                                                                                                      Cleaning
                                                                                                                                      cap

                                                                                                                  4.   Make sure that the Rinseaway System Cleaning Solution is properly installed. Switch the toggle switch to “ON”.
                                                                                                                       Note: Only use HydraFacial Rinseaway System Cleaning Solution to properly clean the handpiece.

                                                                                                                  5.   Turn the vacuum on and set to 26. Let the cleaning process run for 20–30 seconds.

                                                                                                                  6.   When completed, be sure to switch the toggle switch to “OFF” and return the flow control to the recommended setting.

                                                                                                                  Weekly Cleaning
                                                                                                                  1.   Use the Rinseaway solution on each individual skin solution station to prevent/remove any clogging. Follow the above instructions
                                                                                                                       to clean/flush your System.

                                           16                                                                                                                                        17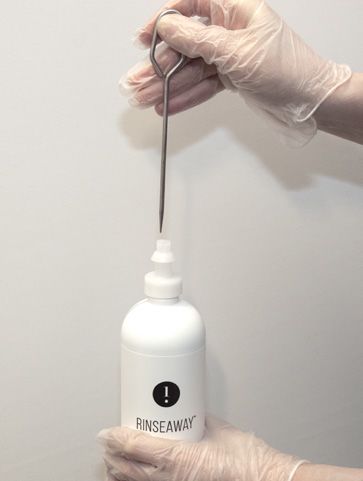
HYDRAFACIAL MD™ Elite™                                                                                              User Guide       EN   HYDRAFACIAL MD™ Elite™                                                                                           User Guide       EN

HydraFacial Handpiece                                                                                                                     Waste Canister
The HydraFacial™ handpiece tubing chambers must be cleaned and disinfected using the cleaning brush.                                      After Each Service
                                                                                                                                          1.   Empty waste on the back of the unit. DO NOT let the waste canister fill above 450 mL.
1.   Make sure flow control is fully open. Detach the handpiece from all tubing. Gently twist the knobs counter-clockwise to detach
                                                                                                                                          Daily
     each tube from the handpiece.
                                                                                                                                          1.   Wash and wipe/spray germacide over waste canister and lid.
                                                                                                                                               Note: Always remove the waste canister before transporting the unit.

                                                                                                                                          Touchscreen
2.   Insert the cleaning brush into the vacuum (smaller opening) on the face of the handpiece Push it in gently all the way, while        As Needed
     rotating in either direction. Repeat with the opening on the back with the blue twist lock connector.
                                                                                                                                                     The surface of touchscreen may be cleaned as needed to remove any residue or dust.

                                                                                                                                          1.   Apply window or glass cleaner on a non-scratching microfiber cloth and wipe the touchscreen. Do not apply the cleaner directly
                                                                           Vacuum                                                              on the touchscreen. Avoid getting liquids inside the touchscreen.
                                                                           opening

                                                                                                                                               Note: Do not use any type of alcohol or strong solvent, as well as thinner, benzene, abrasive cleaners, or compressed air,
                                                             Face of the handpiece
                                                                                                                                               as it may damage the touchscreen surface.

                                              Note: Barbicide is a recommended
                                              disinfectant (follow Barbicide's                                                            Removable Front Door
                                              iInstructions for use). Isopropyl
                                                                                                                                          As Needed
                                              alcoholis not suitable as a disinfectant.
                                                                                                                                          The surface of removable front door may be cleaned as needed.
3.   Wash the brush bristles in soapy water between each handpiece opening insertion to clean off debris.
                                                                                                                                          1.   Apply any plastic cleaner (available at your nearest hardware store, i.e., Novus Plastic Clean & Shine) and use a non-scratching
                                                                                                                                               cloth or paper towel to wipe it clean. Do not use any type of alcohol or any strong solvent.
4.   When the brush cleaning is completed, make sure all the blue toggle switches are in the 'OFF' position. Turn the grey 'SYSTEM
     RINSE' toggle switch up to the 'ON' position and set the vacuum setting to 26. Press on the cleaning cap and flush through the
     handpiece and tubing for 1 minute.                                                                                                   Skin Imaging Camera                   (Sold separately.)

5.   Use one Barbicide wipe to clean the entire outer surface of the Handpiece, removing all visible soil. Use a second Barbicide         1.   Clean the chin rest with an alcohol wipe after each use.
     wipe to thoroughly wet the surface of the Handpiece and ensure the Handpiece remains visibly wet for 2 minutes.

                                                                         18                                                                                                                                 19
HYDRAFACIAL MD™ Elite™ User Guide EN HYDRAFACIAL MD™ Elite™ User Guide EN
Troubleshooting Limited Warranty
Problem Possible Cause Solution Form of Product Warranty
Make sure power cord is properly connected to back of the unit and to a working wall LIMITED WARRANTY (HydraFacial™ System)
Power cord
outlet.
What Is Covered:
No Power Unplug unit from main wall outlet. Use a small flat head screwdriver to remove the fuse
Fuses holder box located in between the ON/OFF switch and power cord, and check that fuses The warranty for the HydraFacial™ System (the “System”) covers defects in material or workmanship in the System.
are in good working conditions (not blown).
Who Is Covered:
If the main power is ON and the touchscreen is blank, press the power button located on
Blank screen/No video signal
the right hand side of touchscreen. Check video cable connection in the rear. This limited warranty applies and extends only to the original Customer purchasing the System from Edge Systems LLC in the country
Touchscreen where the sale occurred. This limited warranty is non-transferable and non-assignable by the original Customer. Edge Systems LLC
No image, or inverted image on the screen
Call your local distributor for assistance. shall have no obligations under this limited warranty in the event that an original Customer attempts an unpermitted assignment of the
Screen does not respond to touch
original Customer’s rights under this limited warranty. Notwithstanding the foregoing, Edge Systems LLC agrees to extend the benefits
Toggle switch Make sure the switch is on.
of this limited warranty to a leasing company providing financing to the original Customer for the System, provided that the System
Empty bottle Make sure your skin solution bottle is not empty.
is leased back to and operated by the original Customer and any such leasing company has no greater rights than the original
Make sure that your HydraFacial handpiece is properly connected to the side of the
Customer.
Improper connection skin solution station block, and to the waste canister. Also, make sure that the lid is firmly
attached to the waste canister.
How Long:
Low or No Fluid Make sure the tip is firmly installed onto the handpiece. Angled tips should face downwards
Tip is improperly installed
in order to facilitate flow.
The System warranty runs for a period of one (1) year from the date of installation of the System to the original Customer.
Flow
We will provide any replacement part for the balance of the original warranty period.
What Edge Systems LLC Will Do:
Make sure the flow control valve on the handpiece is open. To increase
Flow control valve is closed
fluid flow, turn the flow control valve towards the + sign. For the System, Edge Systems LLC will, within the applicable warranty period, at Edge Systems LLC's sole discretion, repair or replace
any defects in the System without any costs to the Customer for parts or labor (except as specifically stated).
Leak in the line Check lines for any kinks or leaks.
What Is Not Covered:
Too many solution stations are on Make sure you only have a maximum of two skin solution stations on the ON position.
This warranty does not cover any equipment which has been damaged by accident, misuse, abuse, or modification, or which
has been used in violation of the System instructions or for any purpose other than one for which it was manufactured, or caused
If using only one station at a time, turn current station off and try another station. If this
corrects the problem please check on the previous station that internal bottle seal is by unauthorized repair or use of unauthorized parts, including, without limitation, damage to the System arising from use of skin
Faulty station
completely broken and pick up assembly (metal portion) is fully submerged. Repuncture solutions or tips purchased or otherwise obtained from a non Edge Systems LLC approved supplier. This warranty does not cover
bottle if needed. freight damage; or any damage caused by acts of god or third parties not within the control of Edge Systems LLC, such as damage
Make sure that you are holding the handpiece correctly and not working against gravity or caused by power surges or lightning. This warranty does not cover the costs of installation, adjustment of user controls, initial technical
Operator technique
blocking the tubing.
adjustment (set-up) and routine user required maintenance. This warranty does not extend to any System machinery, appliances or
Low or No Fluid
Do not let the waste canister fill above 450 mL. If the canister becomes overfull, a built-in
Flow property of the customer used in conjunction with or connected to the System. This warranty is the exclusive remedy against Edge
Waste canister is full float will occlude the vacuum opening and skin solution flow through the handpiece will
cease. Empty the waste canister after each service. Systems LLC and no other remedy (including but not limited to incidental or consequential damages for injury to person or property,
lost profits, lost sales or any other incidental or consequential loss) shall be available. This warranty is in lieu of any other warranty,
Clogging Flush all stations thoroughly. Make sure the System is cleaned after each service.
express or implied, including but not limited to any implied warranty of merchantability or fitness for a particular purpose.
Any representations or promises inconsistent with or in addition to this limited warranty are unauthorized and shall not be binding
Make sure that the gray cartridge is properly inserted into the upon Edge Systems LLC. Please note that some states do not allow limitations on how long an implied warranty lasts or do not allow
Cartridge is loose handpiece. The arrow on the cartridge should line up with the lock
symbol. the exclusion or limitation of incidental or consequential damages, so the above limitations may not apply to you.
How To Obtain Service:
To obtain Service under this warranty, the Customer must contact Edge Systems Technical Support team within the warranty period.
Make sure the flow control valve on the handpiece is not opened Edge Systems LLC can be reached by telephone (toll free) at (800) 603-4996 or (562) 597-0102. While under warranty, Edge
Too Much Fluid
Flow control valve is opened too far too far. The default setting for the flow control valve is 50% open. Systems LLC will arrange for shipping and cover shipping charges should the System need repair.
Flow
To decrease fluid flow, turn the flow control valve towards the – sign.
20 21HYDRAFACIAL MD™ Elite™ User Guide EN
Edge Systems LLC
2277 Redondo Ave.
Signal Hill, CA 90755 USA
(800) 603-4996 • (562) 597-0102
hydrafacial.com
Designed in California, USA
22 23You can also read


