Tagging Things: An incomplete guide to affixing radio transmitters to a variety of animals - Please send any additional information, new methods ...
←
→
Page content transcription
If your browser does not render page correctly, please read the page content below
Tagging Things:
An incomplete guide to affixing radio transmitters
            to a variety of animals.

Please send any additional information, new methods, edits, or comments to
                        motus@birdscanada.org.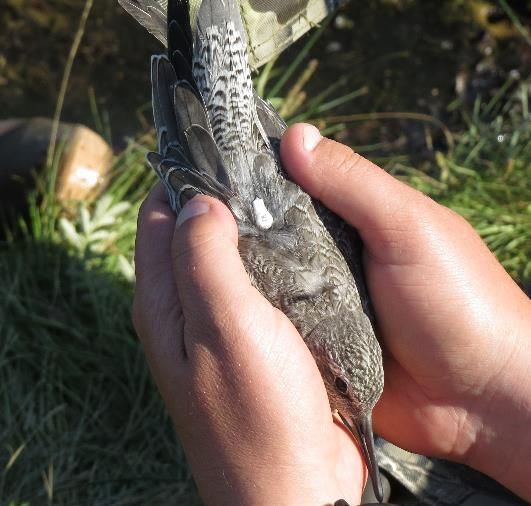
Edited by:

 Stuart A. Mackenzie1, David Bell1,2, Zoe Crysler1, Alexandra Anderson3,
            Jenny Smetzer4, Diana Hamilton5, and Rick Gray6.
              1.  Bird Studies Canada. P.O. 160, 115 Front Rd. Port Rowan, ON N0E 1M0
                 2. Acadia University, 15 University Avenue, Wolfville, NS B4P 2R6
               3. Trent University, 1600 West Bank Drive, Peterborough, ON K9L 0G2
        4.   University of Massachusetts Amherst, 300 Massachusetts Ave., Amherst, MA 01003
                  5. Mount Allison University, 62 York St., Sackville, NB E4L 1E2
                6. Biodiversity Research Institute, 276 Canco Rd., Portland, ME 04103

Photos: Stu Mackenzie, Peter Paton, Liam McGuire, Tianna Burke, Grace Pitman, Brock
                              Fenton and Sheri Waring.

                            ÉBAUCHE
  Cette version est une ébauche. Une fois le document finalisé, il
               sera traduit et disponible en français.

                                                                                              2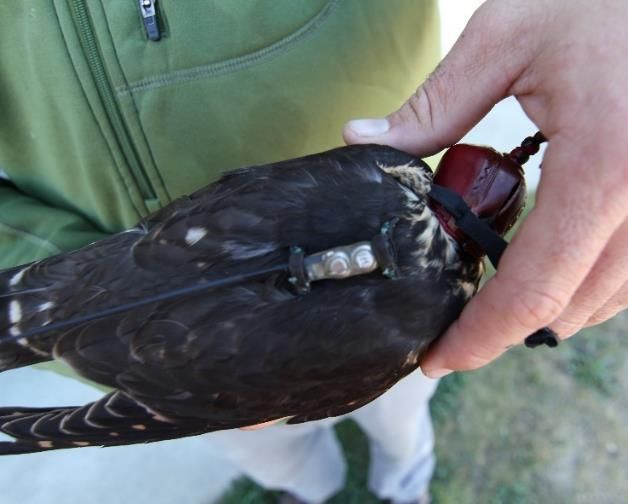
Contents
Introduction ......................................................................................................................... 4
   Permits and Authorizations ............................................................................................. 5
Figure – 8 Leg Loop Harness.............................................................................................. 6
Streby Harness Method ..................................................................................................... 10
Shorebird Glue Method..................................................................................................... 11
Bat Glue Method ............................................................................................................... 13
Suture and Glue Attachment ............................................................................................. 14
Raptors .............................................................................................................................. 16
   Raptor Backpack Harness ............................................................................................. 16
   Raptor Trail Mount (Merlin example) .......................................................................... 24
Literature Cited: ................................................................................................................ 27

                                                                                                                                       3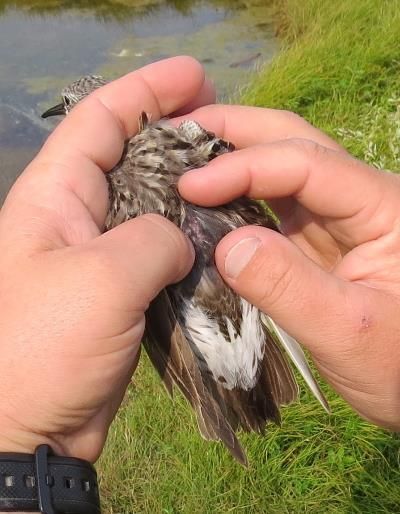
Introduction

        Methods for radio transmitter attachment vary considerably among species, tag
design, and researchers, but here we attempt to summarize the most common methods
across a variety of taxa. Researchers are encouraged to investigate attachment methods
independently and seek advice and training from personnel experienced in that method.
This is a continual work in progress, so please send any additional information, new
methods, edits, or comments to motus@birdscanada.org.
        In accordance with published literature on appropriate tag/body weight ratio, the
combined tag and harness should weigh less than 3-5% of the individual’s mass so as not
to harm the bird (Murray & Fuller 2000; Fair et al., 2010, but see Barron et al. 2010).
        There is admittedly conflicting evidence regarding the impacts of tracking devices
on birds (Calvo & Furness 1992). In a recent meta-analysis, Barron et al. (2010) reported
overall negative effects of transmitter devices on bird nest success and productivity,
clutch size, offspring quality, body condition, foraging behaviours, energetic expenditure,
and survival. However, effects appear to be species-specific; negative effects seem most
pronounced in non-passerines, and studies examining passerines indicate minimal or no
negative impacts.
        The limited studies that directly assess the impacts of transmitters on passerines
mostly take place during the breeding period and indicate no or negligible impacts on
foraging time (Brigham 1989), stress levels after 48 hours (Suedkamp Wells et al. 2003),
clutch size or nest survival (Hill et al. 1999), brooding or provisioning rates of nestlings
(Neudorf & Pitcher 1997), overwinter survival (Blackburn et al. 2016), and no effect on
fledgling survival, body condition, maneuverability, or range use (Naef-Daenzer et al.
2001). When transmitter effect was assessed during the energetically costly molt period,
Gow et al. (2011) found no effect on parental care behavior or nesting success, and found
improved physical condition in molting tagged Wood Thrush (Hylocichla mustelina)
compared to untagged birds. In Savannah Sparrows (Passerculus sandwichensis),
transmitters did not affect body condition of adults or juveniles during the post-breeding
pre-migratory period (Rae et al. 2009). When migration is assessed in Passerines, there
appears to be no effect on the return rates of adults or juveniles (Anich et al. 2009), or
mass loss after migration (Powell et al. 1998).

       ** add paragraph on negative effects in non-passerines and suggest that
researchers be aware of the risks associated with tagging or specific tag design
recommendations for these groups**

  ** NOTE: Altering outer tag covering or antenna length may affect tag
       performance including frequency and strength of signal **
                                                                                          4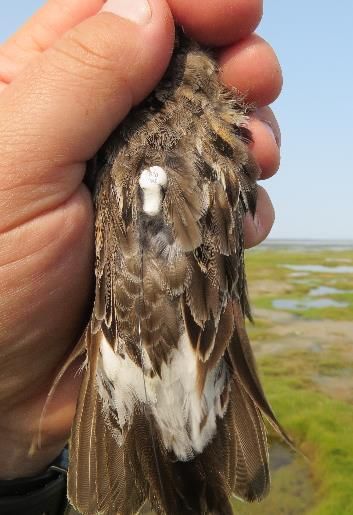
Permits and Authorizations

            In most jurisdictions the use of any auxiliary marker must be reviewed and
     approved by the provincial, state, and or federal governments prior to implementation. In
     almost all cases, auxiliary markers must be used in conjunction with metal bands, which
     uniquely identify each individual. These activities require a permit, and may also require
     approval from an accredited Animal Care Committee. In North America these
     authorizations are managed by the Bird Banding Office in Canada or the Bird Banding
     Laboratory in the U.S.. Please contact the Bird Banding Office or the Bird Banding
     Laboratory for more information.

     Table 1. Summary of basic attachment methods

                           Harness                       Glue                        Suture
Preparation       Must be constructed in       No special prep             Need to prep work area,
                  advance (preferable if                                   get all materials ready
                  loop size is known) or on                                (more specifics required)
                  site
Handing Time      Shortest bird handling       Longer handling time        Longest bird handling
                  time (~1min)                 while glue dries (~5min)    time (~5-10min)
Manpower          Single-person                Two people                  Two people

Limitations       Size constraints (loop       No size constraints, larger Mainly for larger birds
and sizing        size), can’t use on many     birds may be able to        which cannot take
                  non-passerines               remove it, however          harnesses and may pull
                                                                           off glued tags

Lifespan          Long tag retention           Tag retention variable      Tag retention variable

Bird health       Limited skin contact, bird   Possibility of skin         Possibility of physical
considerations    wears harness and tag for    abrasion/burning/tearing    harm during and post
                  a longer time period.                                    procedure i.e. hematomas
                                                                           (?) and infection
Taxonomic         Can be useful for species    Species that do not         Species that physically
Considerations    that physically remove       remove/damage tags or       remove tags and cannot
(expand)          tags; species that molt      molt feathers during        wear a harness; species
                  feathers during study        study period                that molt feathers during
                  period.                                                  study period

                                                                                              5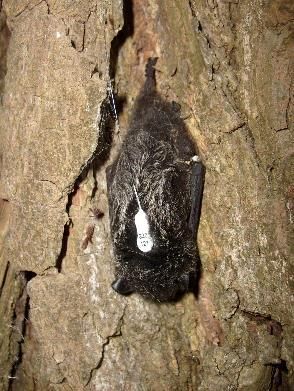
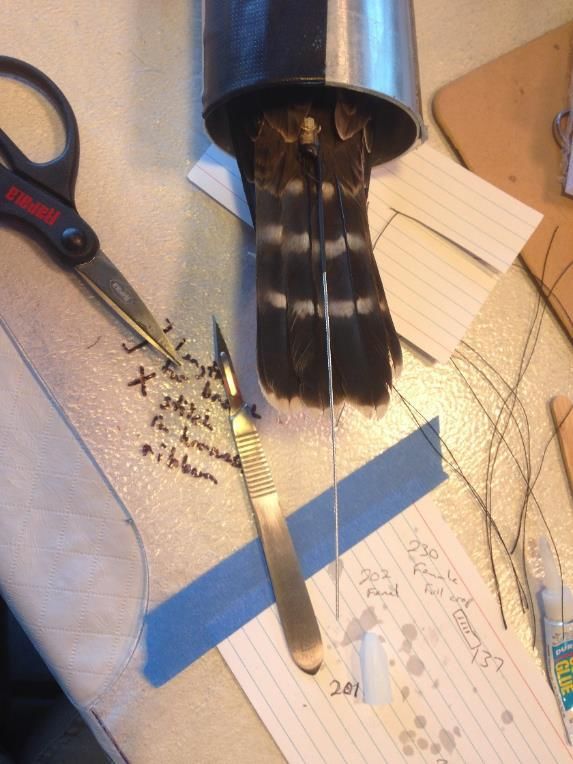
Harness Methods
Figure – 8 Leg Loop Harness
Radio transmitters can be attached using a figure-8 leg loop harness method
(Rappole and Tipton 1991). In a comparison of three attachment methods (harness, glued
backpack, and tail-mount) on European Starlings, Woolnough et al. (2004) found the
harness to be the most reliable in terms of attachment duration. All three methods showed
initial behavior effects (pecking at tag), which ceased within a few days. There was no
difference in body condition or activity once birds adjusted to the attachment.
Application of radio tags with figure-8 loop harness generally can be completed within
one minute and birds showing any sign of stress or injury are released without banding or
radio-tagging.
Materials: 1mm elastic thread; e.g. Sewing essentials elastic thread (best for smaller
birds, or those with high seasonal fluctuations in weight/fat loads) or 1mm “Stretch
Magic” thread; Super glue; e.g. LePage ultra gel super glue, or or Loctite control gel (gel
is often easier to work with than liquid glue); scissors, ruler, permanent marker
1. Determine leg loop size for your species
You can use Rappole and Tipton (1991) and Naef-Daenzer (2007) as a starting
guide:
Create test tags with multiple sizes to test on a bird
Have multiple sizes available during tagging
Keep records of mass and size of bird for each leg loop size for future reference
6
Harnesses should be snug, but not too tight (reduces perching abilities) or too
loose (tag is more likely to fall off prematurely)
Table of example sizes for commonly-tagged species. Full table with sizing for 35+
species available here.
If you have information on figure-8 harness sizes for species not listed (with species, size,
weight and sample size), please contact us and we can update the spreadsheet!
Species Harness Size (mm) Sample Size Bird Weight (g)
Red-eyed Vireo 39-42 100+ 15-20
Bank Swallow 32-34 50+ 10-13
Swainson's Thrush 48-52 100+ 25-36
Blackpoll Warbler 33-36 200+ 10-22
2. Cut lengths of elastic thread to specified measurements using guide below (not to
scale). Mark thread with permanent marker where it will be glued to harness (black
sections below)
Black: 4mm or width of transmitter gluing sit - glued to harness
Blue: leg loop size eg. BLPW 33-36 mm depending on fat condition. Glue centre of
elastic thread to tag. Ensure glue and elastic are on the opposite side of the TagID or
label,. Gel glue allows for easier handling and setting of the elastic.
3. Glue outside ends of the elastic thread to the tag to form a “figure-8”. Gluing the
central portion to the top and then one side lower than the other helps keep the
antenna straight on the bird and minimizes twisting (shown in figure)
©Dominic Cormier
4. Place a small drop of glue on top of thread and spread it around to cover the threads
for added security
7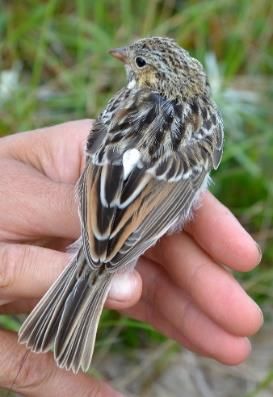
Add figure letters in relation to text

                                         8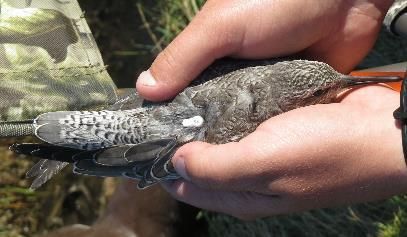
5. When glue is dry affix tag to bird:
   a) Measure harness again to make sure it did not get malformed during gluing – this
      is most easily done by stretching the harness (until the slack is gone, but don’t
      stretch it beyond taut) between two pencils along a ruler, see photo:

    b) Activate tag and record tag number.
    c) Bring the first leg loop over the foot and over/around the thigh to rest the
       transmitter on the lower back. The antenna should be hanging off the bird’s rump
       and the elastic threads should be on the bottom, resting on the bird (number side
       up, figures a-d below).
    d) While gently holding the tag in place, bend the free leg and slip the second leg-
       loop from back to front over the bird’s knee and past its foot (e). The leg loop
       should now be loosely around the second leg.
    e) While still holding the tag in place to keep the first leg loop secure, slide the
       second leg loop up and over the thigh (straightening the leg a bit often helps),
       keeping the tag centered on the back (f). A crochet hook can help with this step,
       and with removing a tag if necessary.
    f) Ensure that the first leg loop is still in place.
    g) It is critical that leg loops are over the thighs to ensure the tag won’t slide off.

      Rappole JH, Tipton AR. 1991. New harness design for attachment
      of radio transmitters to small passerines. J. Field Ornithol. 62, 335-
      337.

                                                                                          9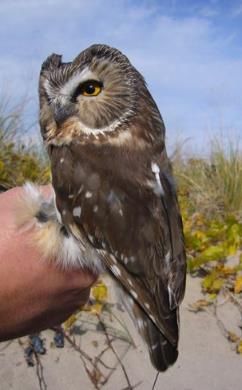
Replace or supplement diagram above with on ehere -
   http://mncoopunit.cfans.umn.edu/files/2015/02/Streby-et-al.-Harness-Design-and-
   Transmitter-Attachment.pdf

     a                           b                            c

     d                           e                        f

6. Before releasing: check that feet are able to perch, wings are free, and double check
   that harness is around each thigh by blowing feathers out of the way
7. You should not be able to pull the tag back down and over the bird’s rump or flip the
   tag over, but it should be loose enough that the thread is not being stretched.
8. Release the bird very low to the ground, in case it refuses to fly. On occasion,
   passerines may appear to refuse to fly, but will resume normal behavior after some
   time passes, or when the tag is removed.

Streby Harness Method
An alternative method widely used for transmitters, geolocators and gps tags is the Streby
methods described in detail here - http://mncoopunit.cfans.umn.edu/files/2015/02/Streby-
et-al.-Harness-Design-and-Transmitter-Attachment.pdf

                                                                                       10
Shorebird Glue Method
Materials: Scissors, Poly acrylamide glue; eg. LePage Ultra Gel Control Super Glue.
1. Activate tag and record tag number!
2. One person holds the bird and parts the feathers near the rump.
One option is to hold the bird with the head towards you, the bird’s legs dangling
between the ring and middle fingers, and the thumb and pointer finger holding the
wings and parting the feathers. Ensure shorebirds legs are free to dangle to prevent
capture myopathy.
3. The second person trims the feathers with small scissors to expose a patch of skin the
size of the transmitter. The tag should be applied just above the preen gland on
shorebirds (see fig by Warnock and Warnock 1993)
4. Add glue to cover the base of the tag and place tag on the skin patch. Gently hold the
tag on the bird and ensure the antenna is leading straight down the tail. Place thumb
over the tag to secure it in place until the glue dries – it is useful to test the glue
beforehand to know roughly how long it takes to dry.
5. Gently tug on the transmitter to ensure the tag is firmly attached and surrounding
feathers are not attached to the tag.
6. After releasing the bird, watch for several minutes to ensure it can fly unhindered.
Note: for large and round radio transmitters, a small piece of mesh can be attached
beforehand to assist in affixing it to the bird. See -
http://northofthegrid.com/2016/04/21/attaching-nanotags-a-grad-student-perspective/
(Expand)
©R. Holberton
Warnock J, Warnock S. 1993. Attachment of radio-
transmitters to sandpipers: review and methods. Wader
Study Group Bulletin. 70: 28-30
1112
Bat Glue Method

Materials: Scissors, Surgical glue (SkinBond), Ostomy Glue, or Suture.
1. Activate tag and record tag number!
2. Trim a small patch of fur between the scapulae using trimming scissors and disinfect
3. Apply a thin coat of surgical glue to tag
4. Apply a thin layer of glue to the exposed patch of skin and apply tag
5. Wrap surrounding hair over the tag, allowing the antenna to trail straight behind the
   bat
6. Hold tag gently to bat for ~5 minutes to ensure glue sets
7. Disinfect all tools and materials used according to WNS decontamination guidelines
   (https://www.whitenosesyndrome.org/sites/default/files/resource/national_wns_revis
   e_final_6.25.12.pdf) before handling another bat

                                                                                      13
Suture and Glue Attachment
** If suturing tags to the birds, ensure that the tag tubes through which the sutures are
run, are as small as possible so birds are not able to slip beak through tubing.
Materials
Ethicon Prolene, size 4-0, taper point, 3/8 circle, 30”. Expired (non-sterile) less
expensive
Q-tips and isopropyl alcohol
Needle drivers (2), scissors (1) – ask for donations
Adhesive (Loctite 422, Loctite Gel Epoxy 6 min dry time)
Sharps container
Head cone/pillow/sheet for bird
1. Activate tag and record tag number.
2. Rest bird on pillow with head in cone or covered with a sheet (figure a below)
3. Minimize talking to reduce bird stress and movement
4. Apply alcohol with Q-tip to part the feathers and check the tag position – it may help
to use a toothpick to hold feathers back (b)
5. Use fingers to tent the skin and needle drivers to insert sutures (top and bottom),
check spacing is correct before inserting second stitch (c & d)
6. Run thread through tag
7. Apply glue to the underside of the tag (e)
8. Rest tag on birds back and tie off the thread with a surgeon’s knot and 3 square
knots. The tension on the 1st throw is the most important. Make sure the knots lie flat
(ie. not twisted) (f & g)
9. Apply glue to each knot
10. Hold bird still until all glue is dry
11. Watch bird for several minutes upon release to ensure it can fly and move
unhindered.
a
14a b c
d e f
g hRaptors
Provide overview of raptor attachment techniques.
Parameters for fitting a Diurnal Raptor with transmitter (citation)
Using the body condition index (BCI) of 1 – 5, under most circumstances we
limit selection of a bird to a BCI of ‘3’ or higher. Note when fitting for a
backpack style harness if a bird is a ‘5’ be cautious of amount of slack in the
harness as bird may not be this large the majority of the time.
We tend not to fit birds with full crops, though this is just a personal preference.
Two thoughts behind this (1) a large crop is hard to work around and a tender
area, (2) it is hard to guess how much the crop contents weigh therefore bird
weight is not entirely accurate. Crop index of 0 – 3 we will generally exclude
birds with a crop size of 3.
General appearance of bird – healthy in appearance, no damage to flight feathers,
no compromising injuries old or new
Raptor Backpack Harness
For fitting backpack style tags to the harness we had Lotek add end tubes as the
‘attachment’ (photo to right) details are available upon request. It’s difficult to describe
but we had to do some interesting sewing in order for the unit to sit flat on the birds back.
Over the winter we have talked with folks that have had success relying on a series of
overhand knots combined with stitching the knot so it will not come untied.
Nanotag NTQB-3-2 with added ‘attachment’ of end tubes, for use with backpack style
harness
Materials
2mm neoprene
0.18 (3/16th) inch Teflon ribbon (Bally Ribbon Mills, PA)
15-20lb test Dyneema fishing line (Spiderwire Brand)
(http://www.cabelas.com/product/fishing/fishing-line/super-
lines|/pc/104793480/c/104719680/sc/104612580/spiderwire-174-stealth-fishing-
line/1874266.uts?destination=%2Fcategory%2FSuper-Lines%2F104612580.uts%3FWT.srch%3D1%26WT.tsrc%3DPPC%26rid%3D2
0%26WT.mc_id%3DMICROSOFT%257Cfis_Fishing%252BLine_Super%252B
Lines%257CUSA%26WT.z_mc_id1%3D43700001542333939%26gclid%3DCP
HVnrfrzs0CFUdyNwod9O4Ftg%26gclsrc%3Dds)
Suture needles (http://www.havalon.com/suture-needles-half-curved-102-8.html)
Contact Cement (http://www.homedepot.com/p/DAP-Weldwood-3-fl-oz-
Original-Contact-Cement-00107/100195615)
4” hemostats (smaller the better)
http://www.tedpella.com/dissect_html/hemostats.htm#53081)
Alligator clips (http://www.joann.com/32mm-alligator-
clips/5225602.html?gclid=CIfSpenpzs0CFQIcaQod5PAELw)
Falconers hood fit for species (http://www.mikesfalconry.com/All-Steve-Tait-
Style-Dutch-hoods-p/704a.htm)
Gel super glue (partial to gorilla brand gel super glue)
Sharp scissors
Seam ripper/ stitch puller
Table 2. Approximate dimensions for ribbon length in raptor harnesses for a variety of
Species Teflon Ribbon width (inch) Teflon Ribbon Length (x2)
Merlin .18 (3/16) ~50cm
Harrier .18 (3/16) ~60cm
Peregrine .25 (1/4) ~70cm
Barred owl .25 (1/4) ~70cm
Snowy owl .25 (1/4) ~70cm
Osprey .25 (1/4) ~90cm
Eagle .33, .44, or .55 ~100cm
species.
Caution
Careful with hemostats as excessive twisting, pinching, or pulling can easily
abrade the Teflon ribbon
If you end up having to pull stitches more than once you may need start over with
a new harness as the Teflon ribbon damages easily from picking at it with sharp
instruments
1. Make a harness using Project Snowstorms directions or one similar that has 4
tails; two shoulder tails, and two flank tails. Make sure that at the stitch point each
tail is equal in length, one creates a V (shoulder), and the other a straight bottom
(flank). Ideally the back of the stitching is covered (after stitching) by 2mm
neoprene glued on with contact cement. Allow at least 24 hours for contact
cement to dry, apply pressure (eg. A book), to the glued portion of the harness for
the first few hours to help ensure a strong bond. All stitching knots should be
facing away from the bird. See table below for estimated ribbon lengths by
species.
17* Drawings and design courtesy of project SnowStorm
* Bally ribbon mills in PA is the least expensive place to purchase. They prefer to sell in bulk 25yds per
roll though will sell smaller quantities with an added cut/handling fee. Telonics think sells the 0.18” ribbon
at any length but they tend to be more expensive
182. Feed the tails of the shoulder portion of the harness into the corresponding sides
of the top or front tube on the tag.
3. Feed the tails of the flank portion of the harness into the corresponding sides of
the lower or back tube on the tag.
4. The harness lengths are long enough so they can be fed into the tubes on the tag
prior to placing on the bird.
5. It may be beneficial to place forceps on each of the 4 ribbon ends to prevent them
from coming out while placing on the bird
1 1
2 4
6. Slip the harness ‘attached’ to the tag over the bird’s head and pull wings over the
lower (flank) ribbons.
7. Have the person holding the bird place the center of the harness (neoprene patch)
over and centered on the keel top to bottom and side-to-side. Hold the patch here
until you have made the final clamp of each of the four ribbon ends with the
forceps (step 11).
8. Pull the four tails through the tubes, tightening the tag to the bird’s body. Take
care to avoid the ribbon twisting while pulling it through the tubes. Work the
lower (flank) tails first then the shoulder tails next. With a small raptor like a
merlin or a sharpie you should be able to fit a number 2 pencil (loosely) between
19the tag and the bird from all angles. Note the top (front) may be a slightly looser
fit than the lower (back). Use the forceps to hold the ribbon in place and keep it
from loosening on the bird. Tag should fit in the middle of the birds back and
closely centered between top and bottom of wings
6 7
8 8
9. Using a dull number 2 pencil (or similar object) preen the Teflon ribbon straps
under the feathers so the straps are against the body. A thorough job of preening
the ribbon is important as this will create a fair amount of slack in the harness.
Once a thorough ‘preening’ job has been done remove all the slack (step 8) so the
harness fits well again using the number 2 pencil (pencil test) to create the perfect
fit.
2010. At this point tag should be sitting over the spine and in the middle of the birds
back. The center patch should still be centered on the keel. Shoulder tails should
be equal in length to each other and flank tails should be equal in length to each
other. This is a sure fire means of determining that the tag is aligned perfectly
with the bird. The shoulder tails do not need to be, and probably won’t be, the
same length as the flank tails.
11. Once the paired tails are even, the neoprene patch is centered on the keel, and the
pencil test is adequate, and tag and antenna orientation are correct, clamp the tails
as close to the tag as possible.
12. Once clamps are in place confirm fit is ideal
13. Remove one shoulder clamp and tie an overhand knot in the ribbon incorporating
the ribbon alongside it.
14. Once the overhand knot is against the tag and tight, stitch the knot. Cut excess
thread leaving about 3-4mm of a tail in the thread. Photo sequence shows our
preferred stitching method, others work well too, though we recommend using the
surgeons knot for all finishing knots.
9
10
2112
15. Repeat steps 13 and 14 on other shoulder ribbon.
16. Recheck fit of harness. Center patch on keel, pencil test, and tag/ antenna
orientation.
17. Repeat steps 13 and 14 for flank clamps
18. Recheck fit of harness. Center patch on keel, pencil test, and tag/ antenna
orientation.
Slide a folded 3x5 index card or something similar under tag and stitching to
protect feathers from glue. Glue all knots and thread ends well.
19. Cut Teflon ribbon ends leaving 5 mm of ribbon beyond last stitch. Glue end of
ribbon to help hinder fraying. Allow glue to dry before removing index card.
20. Recheck fit
2213 23
* Image depicts general placement on birds back. Note that harness attachment has changed since this
               photo. Earlier harness attachment was complicated and time consuming.

Raptor Trail Mount (Merlin example)
        We are still trying to determine the best approach for using tail mounted
transmitters on raptors. Literature has shown that there can be lowered survival in
northern goshawks with tail mounted transmitters of ~1.5 % body weight (Reynolds et.
al. 2004). Tailmounts we have deployed have been at or under 1%, and starting this year
we will be lowering our weight allowance more.

         Two methods of mounting the radio-encoded tags to the retrice of a merlin.
1) Traditional 5 minute epoxy or 2) light cured resin (LCR), LCR is preferred as long as
fitting the bird can be done indoors. Even indirect sunlight (UV) will harden LCR within
seconds.
         The position of the bird, ventral or dorsal up is personal preference. We found that
both positions were easy to work in though birds tend to prefer to be held dorsal up. We
also found that using an abba, weight can or just a hood all seem to work well, we tend to
use a hood. We do not recommend using a can in conjunction with a hood. We have
specially ordered tail mount tags with a single groove alonsg underside of tag with two to
four laces included in casing. The groove fits nicely over the feather shaft and the lacing

                                                                                                   24
can help hold the tag in place with the epoxy dries. Note tying lacings can be
considerably difficult.
Using LCR
1. Single out central tail feather for attachment, place 3x5 index card between
chosen retrace and remaining ones.
a. Note: each tag tends to be slightly asymmetrical, we chose the central
retrice that best centers the tag.
2. If using LCR we cut all lacings off of the tag, if using traditional epoxy leave
lacings to temporally hold tag in place while epoxy dries.
3. Place tag along the feather shaft proximal to body (almost touching the pygostyle)
measure how much of feather shaft the tag will sit along then using a scalpel with
a fine point blade trim off barbs on both side of the rachis.
4. Put a bead of LCR along the grove along the underside of the tag and place on
feather shaft in the determined place. Once the tag is in the proper position,
making sure the antenna is correctly lined with the feather, use the UV flash light
to set the LCR.
5. Then using a fine tip on the syringe put a bead of LCR along the side of the
feather shaft and tag essentially building up the bond and surface area between the
tag and feather shaft. Set the LCR with the UV flashlight.
6. Repeat step 5 on the other side of the tag.
7. Within second of using the UV flash light the tag should be firmly secured to the
feather shaft of the bird.
Using 5 minute epoxy
1. Single out central tail feather for attachment, place 3x5 index card between
chosen retrace and remaining ones.
a. Note: each tag tends to be slightly asymmetrical, we chose the central
retrice that best centers the tag.
2. Do not cut lacings, leave lacings to temporally hold tag in place while epoxy dries
3. Place tag along the feather shaft proximal to body (almost touching the Pygostyle)
measure how much of feather shaft the tag will sit along then using a scalpel with
a fine point blade trim off barbs on both side of the rachis.
4. Put a bead of epoxy along the grove along the underside of the tag and place on
feather shaft in the determined place.
5. Tie the lacings and hold tag between fore finger and thumb for the required cure
time (5 minutes).
6. Hold onto the bird for another 5 to 10 minutes to while the tag continues to harden
while ensuring the correct fit and antenna alignment along the feather.
2526
Literature Cited:

Anich, N.M., T.J. Benson, and J.C. Bednarz. 2009. Effect of radio transmitters on return
   rates of Swainson’s Warblers. Journal of Field Ornithology. 80(2): 206-211.
Barron, D.G., J.D. Brawn, and P.J. Weatherhead. 2010. Meta-analysis of transmitter
   effects on avian behaviour and ecology. Methods in Ecology and Evolution. 1(2):
   180-187.
Blackburn, E., M. Burgess, B. Freeman, A. Risely, A. Izang, S. Ivande, C. Hewson, W.
   Cresswell. 2016. An experimental evaluation of the effects of geolocator design and
   attachment method on between-year survival on whinchats Saxicola rubetra. Journal
   of Avian Biology. 47: 1-10
Brigham, R.M. 1989. Effects of radio transmitters on the foraging behavior of Barn
   Swallows. Wilson Bulletin. 101(3): 505-506.
Calvo, B., and R.W. Furness. 1992. A review of the use and the effects of marks and
   devices on birds. Ringing and Migration. 13(3): 129-151.
Fair, J., E. Paul, and J. Jones, Eds. 2010. Guidelines to the Use of Wild Birds in
         Research. Washington, D.C.: Ornithological Council.
Gow, E.A., T.W. Done, and B.J.M. Stutchbury. 2011. Radio-tags have no behavioral of
   physiological effects on a migratory songbird during breeding and molt. Journal of
   Field Ornithology. 82(2): 193-201.
Hill, I.F., B.H. Cresswell, and R.E. Kenward. 1999. Field-testing the suitability of a new
   back-pack harness for radio-tagging passerines. Journal of Avian Biology. 30(2):
   135-142.
Murray, D.L. & Fuller, M.R. 2000. A critical review of the effects of marking on the
   biology of vertebrates. Research Techniques in Animal Ecology: Controversies and
   Consequences (eds L. Boitani & T.K. Fuller), pp. 15–64. Columbia University Press,
   New York.
Naef-Daenzer, B., F. Widmer, and M.Nuber. 2001. A test for effects of radio-tagging on
   survival and movements of small birds. Avian Science. 1(1): 1-15.
Naef-Daenzer, B. 2007. An allometric function to fit leg-loop harnesses to terrestrial
   birds. Journal of Avian Biology 38(3):404 - 407. DOI: 10.1111/j.2007.0908-
   8857.03863.x
Neudorf, D.L., and T.E. Pitcher. 1997. Radio transmitters do not affect nestling feeding
   rates by female Hooded Warblers. Journal of Field Ornithology. 68(1): 64-68.
Powell, L.A., D.G. Krementz, J.D. Lang, and M.J. Conroy. 1998. Effects of radio
   transmitters on migrating Wood Thrushes. Journal of Field Ornithology. 69(2): 306-
   315.
Rae, L.R., G.W. Mitchell, R.A. Mauck, C.G. Guglielmo, and D.R. Norris. 2009. Radio
   transmiters do not affect the body condition of Savannah Sparrows during the fall
   premigratory period. Journal of Field Ornithology. 80(4): 419-426.
Rappole J.H., Tipton A.R. 1991. New harness design for attachment of radio transmitters
   to small passerines. Journal of Field Ornithology. 62: 335-337.
Streby, H.M., T.L. McAllister, G.R. Kram er, S.M. Peterson, J.A. Lehman, and D.E.
   Andersen. 2015. Minimizing marker mass and handling time when attaching radio
   transmitters and geolocators to small songbirds. Condor: Ornithological Applications
   Condor: Ornithological Applications 117:249-255.
                                                                                       27
Suedkamp Wells, K.M., B.E. Washburn, J.J. Millspaugh, M.R. Ryan, and M.W.
Hubbard. 2003. Effects of radio-transmitters on fecal glucocorticoid levels in captive
Dickcissels. The Condor. 105: 805-810.
Warnock J, Warnock S. 1993. Attachment of radio-transmitters to sandpipers: review and
methods. Wader Study Group Bulletin. 70: 28-30
Woolnough, A.P., W.E. Kirkpatrick, T.J. Lowe, and K. Rose. 2004. Comparison of
three techniques for the attachment of radio transmitters to European Starlings.
Journal of Field Ornithology. 75(4): 330-336.
Additional References (not yet integrated):
Townsend, J. M., C. C. Rimmer, and K. P. McFardland. 2012. Radio-transmitters do not
affect seasonal mass change or annual survival of wintering Bicknell’s Thrushes.
Journal of Field Ornithology 83(3):295–301 DOI: 10.1111/j.1557-
9263.2012.00378.x
Pedersen, M. C., P. O. Dunn, and L. A. Whittingham. 2006. Extraterritorial forays are
related to a male ornamental trait in the common yellowthroat. Animal Behaviour
72:479-486 DOI: doi:10.1016/j.anbehav.2006.02.010
Leonard, T. D. P. D. Taylor, and I. G. Warkentin. 2008. Landscape structure and spatial
scale affect space use by songbirds in naturally patchy and harvested boreal
forests. The Condor 110(3):467–481.
Scarpignato, A. L., Harrison, A. L., Newstead, D. J., Niles, L. J., Porter, R. R., van den
Tillaart, M., and P. P. Marra. Field-testing a new miniaturized GPS-Argos
satellite transmitter (3.5 g) on migratory shorebirds. Wader Study 123(3): DOI
10.18194/ws.00046
Kenward. R. E. 1978. Radio Transmitters Tail-Mounted on Hawks. Ornis Scandinavia
9(2): 220-223.
Kenward, R. E. 1985. Raptor Radio-Tracking and Telemetry. ICBP Technical
Publication 5:409-420.
Add -
Journal of Ornithology
January 2016, Volume 157, Issue 1, pp 277–287
Testing an attachment method for solar-
powered tracking devices on a long-
distance migrating shorebird
28 Authors
Authors and affiliations
Ying-Chi ChanEmail author
Maarten Brugge
T. Lee Tibbitts
Anne Dekinga
Ron Porter
Raymond H. G. Klaassen
Theunis Piersma
29You can also read