Get Training Get Tricking Get Creating Get Cooking - The Lockdown Issue - Northern Suburbs Dog Training Club
←
→
Page content transcription
If your browser does not render page correctly, please read the page content below
The Lockdown Issue
  Get Training
  Get Tricking
  Get Creating
  Get Cooking
My aim in putting together this newsletter is to hopefully inspire you to keep
training your dog in as many ways as you can and offer some fun, creative
projects to fill those empty hours and benefit you both. Think outside the
square, Bunnings is open for supplies, they sell cones and items like small
plant pots make great course markers. If you don't have fabric on hand, raid
the closet for garments like old fleece track suits you can cut up. Most of all
stay positive, be happy, laugh a lot and hug your dog as often as possible.
You are never alone when you have a dog.
Stay safe, we'll be back training soon.
Wendy, Harper & Phoenix

Training Your Dog at Home
Being faced with weeks of isolation is no fun for either you or your dog.
It’s important to keep up with your training, so aim to be top of your
class when life gets back to normal.

Continuing training is good for both of you, it keeps your dog focused and
you on point. It’s exercise for both of you as well as being great
interaction between you and your dog.

So Let’s Do Circuit Training……………..
Set up a course in your garden, if you don’t have cones you could use
plant pots, saucers or similar objects.

Write a sign to put at each station, or have your partner call out as you
go round.

You can make the distance between stations as long as you like
depending upon the space you have.

Try timing your circuit, then try and beat it.

Have a competition with your partner to see who can go round the
fastest.

Do the circuit at fast pace.

Have your dog stay at each station whilst you do some star jumps, run
around your dog or do push ups.

Have fun, laugh your way around.
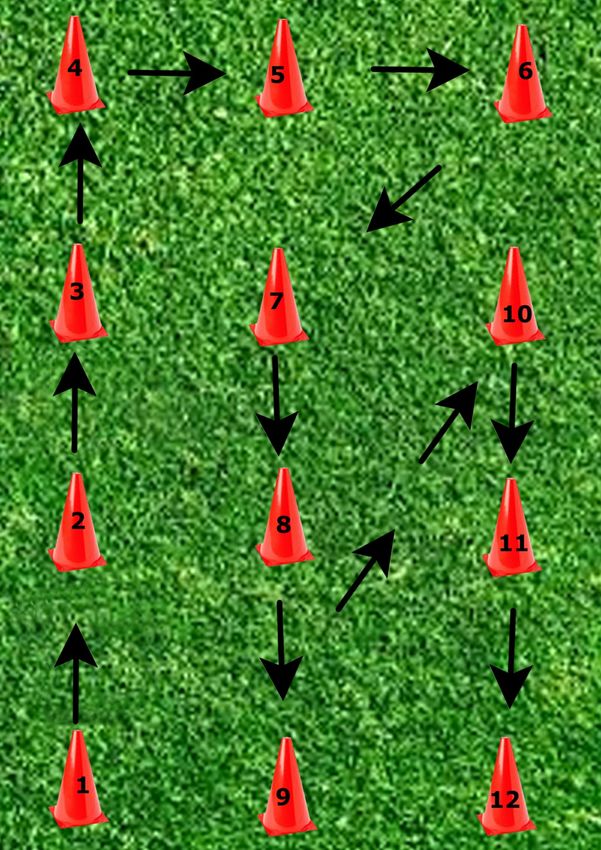
12 Station Circuit
              (On or Off Lead, Done in Heel Position)

1.   The start. Walk up to first station and have your dog sit.

2.   Drop Your Dog.

3.   Stand Your Dog.

4.   270° Left About Turn. ( ¾ of circle turn on spot)

5.   Halt, tell your dog to wait, leave your dog and proceed to
     station 6.

6.   Call your dog and send your dog to heel.

7.   Halt, walk around your dog.

8.   360° right about turn. (Turn circle on spot)

9.   Middle, have your dog sit or drop in middle.

10. Halt, drop your dog, sit your dog, stand your dog.

11. 360° left about turn.

12. Halt, shake paw.

                                       HALT

Remember…
No tugging on lead.
Use treats to position your dog.
Always use your marker word.
Reward at each station.
Talk to your dog as you go
round.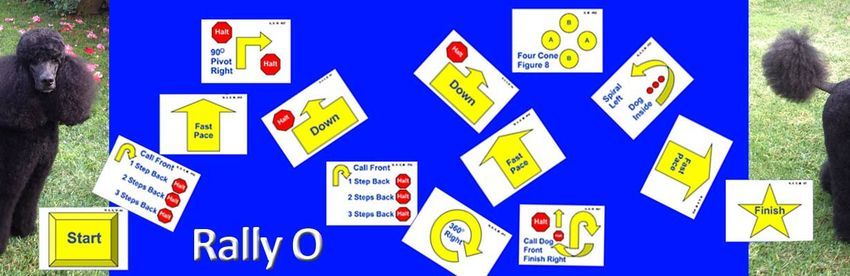
If you enjoyed the circuit it’s time to try

                   RALLY

Unlike formal obedience your dog does not have to show absolute
precision in the training exercises but does have to show enjoyment and
willingness so the exercises are upbeat and fun as you interact with your
dog.
You and your dog follow a course and at each station complete a depicted
exercise such as weaving through cones, 360° turns or going over a
jump. These are just a few of well over seventy different Rally exercises;
courses usually have a minimum of fifteen stations.
Rally O (now know as just Rally) trials are held regularly throughout the
state, quite a few in the Sydney Metro area, since the first trial in 2012.
It has gone on to become a very popular sport as it opens up trialling to
people earlier as your dog does not have to be at the level of CCD to
enter.
There are four different levels of Rally to work through; Novice which is
performed with your dog on lead then Advanced, Excellent and Masters,
all of which are performed off lead. You are encouraged to talk and
encourage your dog whilst on course. Rally is an ideal stepping stone for
those wishing to trial at formal Obedience levels.
The following course is not to scale so you would need to space out the
stations. The signs can be downloaded from the ANKC website.

1 - 2 - 3 - Go
1
Start- Indicates the beginning of the course - timing starts.
Dog does not have to be sitting at start but must be under
effective control.

2
Halt -Down- Whilst heeling, the Handler halts and the
dog sits. The Handler then commands and/or signals the dog
to down, followed by the command to heel forward from the
down position. (Stationary exercise)

3
Spiral Right Dog Outside - This exercise requires three
pylons or posts placed in a straight line with spaces between
them of approximately 2.0 – 2.5 metres. Spiral Right
indicates the Handler must turn to the right when moving
around each pylon or post. This places the dog on the outside
of the turns. The exercise sign is placed near or on the first
pylon or post where the spiral is started.

4
360° Right Turn - Whilst heeling, the team makes a 360°
turn to the Handler’s right. 360° turns are performed as a
tight circle appropriate to the size of the dog but not around
the exercise sign.

5
270° Left Turn- Whilst heeling, the team makes a 270°
turn to the Handler’s left. 270° turns are performed as a tight
circle appropriate to the size of the dog but not around the
exercise sign.

6
Right Turn - Performed as a 90° turn to the right, as in
traditional obedience.

7
Halt - Walk Around Dog- The Handler halts and dog
sits. With the dog sitting in heel position, the Handler
commands and/or signals the dog to stay, then proceeds to
walk around the dog to the left, returning to heel position. The
Handler must pause in heel position before moving forward to
the next station. (Stationary exercise)
8
Left About Turn- Whilst moving with the dog in heel
position, the Handler makes an about turn to the left, Whilst at
the same time, the dog must move around the Handler to the
right and into heel position. The dog does not sit before
moving forward in heel position with the Handler.

9
Serpentine Weave Once - This exercise requires pylons
or posts placed in a straight line with spaces between them of
approximately 2.0 – 2.5 metres. The exercise sign is placed
near or on the first pylon or post where the exercise starts.
Entry into the weaving pattern is with the first pylon or post at
the dog/Handler’s left side. The dog and Handler must
complete the entire exercise by passing the last pylon or post.

10
Fast Pace- Dog and Handler must speed up noticeably.
This must be followed by a normal pace unless it is the last
station on the course.

11
Halt - 1,2 & 3 Steps Forward - The Handler halts and
the dog sits in heel position to begin the exercise. The
Handler takes one step forward and halts with the dog
maintaining heel position. The dog sits when the Handler
halts. This is followed by two steps forward - halt, and three
steps forward - halt, with the dog heeling each time the
Handler moves forward and sitting each time the Handler
halts. (Stationary exercise)

12 Call Front - Finish Right- Halt- Whilst heeling, the
Handler stops forward motion and calls the dog to the front
position (dog sits in front and faces the Handler). The Handler
may take several steps backward as the dog turns and moves
to sit in the front position. Second part is the finish to the right,
where the dog must return to heel position by moving around
the right side of the Handler. Dog must sit in heel position
before moving forward with the Handler. (Stationary exercise)

13
Circle Spin at Heel– The dog to complete a circle spin
away from the heel position and then to return to heel. The
Handler does not stop moving.

14
Finish - Indicates the end of the course - timing stops.
Keep Up Your Training
It is so important, especially for our members with young dogs,
to keep up a training regime

Beginners….

Focus: Used to get your dog focusing on you.
 “Touch” - Hold treat under thumb, palm flat fingers extended. Hold hand out to the
side, wait for dog’s nose to touch your palm (dog must come to your) then give
treat. Cue word “Touch” when nose touches palm “Yes” and treat.

“Spin” - With dog in front hold treat at dog’s nose level then move hand slowly out
and round in a circle either to the right or left. Cue word “Spin” on completion of
circle “Yes” and treat. (Can differentiate between right and left spins e.g. “Spin” and
“Twist”.)

Watch: Used to get your dog’s attention and teach and hold gentle eye
contact.
Hold treat between thumb and fore finger to your nose, slowly lower treat to dog’s
nose the slowly back to your nose then slowly down a second time. Cue word
“Watch” (could use “Watching”, “Looking” or “Eyes” if you prefer). If dog maintains
eye contact “Yes” and treat.

Training Word: Used to tell your dog that you want to train exercises.
Tell your dog “Training” to indicate that you expect their attention as you are about
to commence a training exercise. (Could use “Working”, “School” or “Attention”).
When exercise is finish choose a release word such as “Free”, ”Release” or “Relax” to
indicate that the exercise is over and they are now free to relax next to you but not
to pull, play with the next dog or jump up. If any of these occur repeat training word
and ask for a behaviour such as a sit or a drop.

Marker Word: Used to mark correct performance of a cue.
The marker word is “Yes” uttered in a positive upbeat manner and must be said the
exact moment the correct behaviour is performed. e.g. “Sit” say “Yes” the second
the bottom hits the ground and give a treat. “Yes” marks the behaviour and means a
treat is coming, it is the bridge between the performance and the treat being given.

Holding the Lead:
Lead is held in your right hand to the front of your right hip close to the body;
practise keeping your hand in that position. Your left hand does NOT touch the lead.

Treating:
Treats, cut into tiny pieces should be in a training pouch on your front right side.
Treats are then passed to your left hand and given in line with your side seam. Hand
must be kept close to your leg and not moved forward or out. Remember, where you
hold your hand is where your dog's nose will be!!

Practise these exercises for ten minutes once or twice a day
The Right Cues & Hand Signals are so Important
Hand signals should be made with a flat hand, fingers close together so as to
give the dog the greatest surface area of vision. Give the voice cue once
only at the same time as the hand signal.

Heel
Verbal cue “Heel”
Lead is in your right hand with your left hand resting on the side of your
left thigh, elbow slightly bent. Make a smooth forward movement with your
left hand, fingertips leading, parallel to and between your leg and the dog’s
face, stepping off with your left foot.
Drop
Verbal cue “Drop” or “Down”
Change lead to your left hand. Move your right hand, palm facing and
parallel to your body, across to a position in front of the dog’s face and then
move your hand downwards to point to the ground slightly to the left of your
left foot and in line with your body.
Stand
Verbal cue “Stand”
Pass your left hand in front of the dog’s face with the palm facing towards
the dog, fingers pointing downward keeping your arm straight.
Once your hand has passed the dog’s face bend your elbow and return your
hand to the starting position in front of your left hip. By bending your elbow
your hand is now above the dog’s head as you bring it back in, thus avoiding
giving the dog a double signal.
Stay
Verbal cue “Stay”
Change lead to your left hand. Bring your right hand around and in
towards the dog’s face, fingers pointing left so that the palm is facing the
dog’s nose, but not touching it. Give the verbal cue then return your hand to
the starting position. To leave your dog step off with the right foot. “Wait” is
normally used when doing a recall, “Stay” if you are leaving then returning
to the dog.

Recalls
Verbal cue “Stay” or “Wait”
Dog sitting on you left, bring right hand around flat palm facing dog’s nose.
Give verbal cue, leave on right foot, arms straight with hands together in
front of you, do not look back. At distance turn on spot to face dog, Raise
arms in V above head at the same time call “Come” then bring arms back
down to same position. Dog to come and sit in front, do not bend forward as
dog approaches.
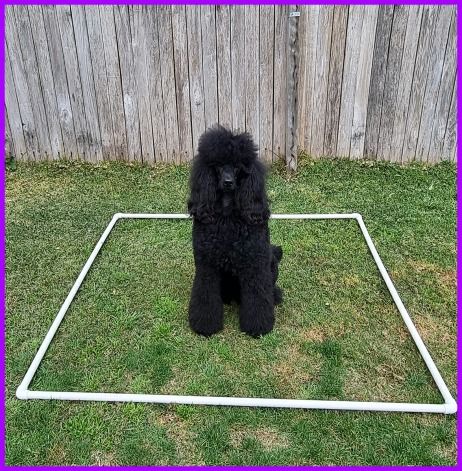
Making and Training
                 The BOX

                                           You will need……

                                           4 x 1500mm Lengths of PVC pipe

                                           4 x Elbow connectors

                                           ( If you don’t want to use connectors you
                                           can thread a piece of string through the
                                           pipes and knot)

This exercise involves sending your dog away from you to a prescribed area (the box)
then to turn around and sit facing you.

As with all new exercises it is important to shape the exercise before naming it.

Some dogs tend to enter the box but sit in one corner rather than in the centre, to
avoid this place a small square of fabric such as a face flannel in the centre of the box
for them to sit on. Once they get used to going to that position it can be removed.

There are different ways of training the box, this is the method that I used.

With your dog next to you stand directly in front of the box, do not step into it
yourself. With a treat lean out and lure your dog forward into the box and around to
face you, have your dog sit then reward.

Repeat process until your dog is happily taking up the position. Now use a voice cue
“Box” or “Go Box” repeating the process. By this point your dog will understand what
you want him to do.

The next step is to stand a metre or so away from the box with your dog beside you,
bring your left hand forward to point the way and at the same time give your voice
cue to drive your dog forward into the box.

It is now a matter of practice, gradually moving further and further away to build up
distance. In a trial situation that would be a distance of 25 metres.

If you don’t want to use a box try a similar exercise using a mat, follow the same
process only have your dog lay down on the mat. This mat exercise is ideal to use in
the house for younger dogs to teach them boundaries, reward your dog for being
calm and remaining on the mat.
Teaching “Middle” This is a great position which is easily trained and has a numerous benefits. �� It brings your dog into a protective and reassuring space at times when you need them close. �� Manages the start of an agility run as the handler can position themselves in a perfect line for the first obstacle then leave the dog in a stay to start the run. �� Works well for free style heeling routines. �� Is a fun trick to show your friends. Stand with your legs apart and your dog standing in front of you. Hold a treat in each hand; with your right hand lure your dog to the right then around behind your back keeping your hand fairly close to your body. As your dog curves around behind you put your left hand between your legs and lure your dog forward through your legs. Treat when in position, head in front of you and front legs in line with yours. Practise this exercise and when your dog becomes familiar and comfortable with the position introduce a sit and a drop. Once proficient at the stationary positions you can teach walking forward and walking backwards with the dog between your legs.
Teaching “Perch”
  Does your dog know that it has back legs and can move them
             independently?………….Probably not.

Perch work is great for teaching your dog rear-end awareness enabling
your dog to do awesome 360° and 270° turns and perfect about turns.

You will need a “perch”. Ideally a perch
should be solid and stable and in relation
to the size of your dog e.g. a block of
wood, a round disc, a sturdy upturned
bowl. It needs to be low enough for your
dog to step on and off and wide enough
for it to comfortably fit both front paws on.

Dogs love perching and once they learn will perch on even a small object.

Start by placing the perch on the ground then as your dog moves
towards it mark and treat. Encourage your dog forward to the perch,
then to place a foot on the perch and finally both feet marking and
treating all the time; jackpot for both feet. Once both feet are up your
dog will quickly learn this position and respond to your “Perch” voice cue.

Once your dog has mastered stepping onto the perch and is confident in
standing on it you can begin to teach moving around. Stand in front of
your dog and hold a treat to its nose and take a small step, either right or
left, the object being to have your dog use his hind legs to move around.
Mark and treat even the slightest movement of the back legs. As your
dog becomes more confident you can take larger steps as you move
around the perch.

                                  The next step is to teach your dog to
                                  rotate with you around the perch in the
                                  heel position. Start by cueing perch then
                                  take your position next to your dog.
                                  Begin with slow small steps marking and
                                  rewarding as you move. Practise moving
                                  right and left marking and rewarding
                                  when your dog is close in to your side.

     Teaching your dog to perch leads to great heel-work and
                        awesome turns.
Trick Training
Did you know that as of January 2020 Trick Dog is now a recognised
discipline with competitions and titles?
There are four levels - Starter - Novice - Intermediate and Advanced.
Each level has different tricks to learn and you can select from the list
which tricks you would have your dog perform. The tricks must be
performed with precision and performed to the standard however you will
be surprised how easy many of the tricks are and how quickly your dog
will learn them, and how many of them you may already know.
There are fifteen different Starter tricks and to enter a competition you
would need to choose six of them to perform.
Starter Tricks
Go Round - Once
Circle Handler - Once
Circle Spin - Once
Leg Weave - Stationary figure of 8
Nose to Hand Touch - 2 touches held for 2 seconds
Follow Target Stick
Step Up - held for 5 seconds
Paw on Hand - held for 2 seconds
Back Up - 1 body length
Send over Jump - from 1 m
Take a Bow - held for 2 seconds
Send Away - from 2 m
Find Straddle - held for 2 seconds
Stationary Hold - held for 2 seconds
Sit Pretty/Paws on Arm - held for 2 secondsSo, let's learn some tricks. Go Round - Once You will need a cone or pole. The trick is, standing at least 0.5 m away, you send your dog out and around the cone, then your dog returns to you. Start by standing directly in front of the cone with your dog on your left, take a treat in you left hand and lure your dog around the cone. Don't forget to mark and reward when he goes around. Repeat several times then progress to moving your left hand forward, without luring, to indicate and give the voice cue "Go Round". Slowly progress to moving back away from the cone sending your dog out and around from a distance. Step Up You will need a step/perch. The trick is, standing at least 1 m away, you send your dog to stand with his front feet on the perch and hold that position for 5 seconds. Start by placing the perch on the ground, any interest your dog shows mark and reward, if he touches the perch mark and reward, lure him onto the perch, as soon as he puts two feet on the perch jackpot. Don't lift his feet yourself. Once he has learnt to step up name the action "Perch" as he progresses step further away and send him to the perch.
Back Up
Your dog will stand in front of you at least 0.5m away and back up at
least one body length.

There are a number of ways to teach this trick however the secret is to
mark as the dog moves backwards not after they have stopped.
With your dog standing in front of you hold a treat in both hands keeping
them low otherwise the dog will sit. Gently push your hands forward and
reward as soon as they move a back foot. Gradually build up distance
making sure the dog backs up straight, you might like to introduce a
channel to practice this maybe a wall on one side and some chairs rowed
up on the other side. Introduce a voice cue "Back" but say only once.
Your dog moves backwards but you remain stationary.

Take a Bow
Your dog will lower his elbows towards the ground whilst his hind
quarters remain elevated and hold for 2 seconds.

This is easier to teach from the side. With the dog standing on your left
hold a treat in a cupped right hand, so they can smell it but not take it.
Slowly lower the treat towards the dog's chest at about a 45° angle
bringing the nose back and down. Mark and reward as soon as the
forelegs are lowed and before they drop completely. You can put your
hand under the stomach or use your leg to act as a barrier to lowering
the hind quarters. Once they understand introduce a voice cue such as
"Bow" or "Curtsy" and build up duration of the movement.
More Fun Tricks to Teach

Figure of 8 - Hold a treat in each hand, dog standing in front of you.
With your right hand close to your leg lure dog around your right leg
then bring left hand between your legs and lure your dog forward and
around left leg then using right hand lure forward between your legs and
back around right leg to repeat figure of 8.

Go Around - Use a cone or similar size object and place in front of you.
Lure your dog around it, “Yes” and reward. Once your dog learns to go
around position yourself progressively further away then send your dog
out and around.

Ring a Bell – Hang a bell from a door handle
at nose height. When your dog touches the bell
“Yes” and treat then once your dog gets the idea
add a voice cue such as “Ring Bell”. Can also be
taught using a desk bell.

Name That Toy - arrange your dog’s favourite toys in a semicircle
around you. Give the toy’s name cue e.g. “Get Rabbit”. When your dog
brings the right toy back to you “Yes” and treat.

Three Cup Game – place three plastic cups
in a row and hide a treat under one. Start
by showing your dog where the treat is then
once they get the hang of it start mixing the
cups around.

Tug for Tricks - hold a tug toy behind your back then cue your dog to
sit in front of you, hold eye contact for ten seconds then “Yes” and play
tug. Repeat with other cues, drop, shake paw, spin: always reward with
yes and a play tug.

Exercising your dog’s mind is as important as exercising their body. We
will be sending out more training tips and tricks for you and your dog
soon.
LOCKDOWN AGILITY TRAINING
Is another 4 weeks of lockdown getting to you?. Are you wondering if you will ever be
able to remember what you and your fur partner need to do when you can go back to
agility training?. Never fear, if you have a bit of space in your front or back yard, a
small verandah or even a garage, you can keep moving forward with just a little bit of
equipment. Yes your very own equipment.

What you can work on and what you will need.

Jumping / Equipment focus / Focus forward / Wrapping / Start Line Stays
– the list here is endless.

Things you can do with just a few jumps. Close set jumps on low height can be used
as cavaletti’s (great for rear end awareness and fitness), as can a ladder laid on the
ground, a couple of jumps set apart (4m to start with) can be used as jump grids,
focus forward / obstacle focus and start line stays (leadouts). Jump grids (even at a
very low height) are great for teaching your dog how to jump and the all important
spacing (where your dog learns where they should land to successfully take off and
complete the next jump and a line of jumps (either straight or curved). Single jump
uprights can be used to teach your dog to wrap jumps, preparing to turn after taking
a jump and jump approaches. This can also be done with a witches hat.

Things you can use:
           A straight ladder
           A witches hat (two would be better)
           Jump upright (non wing or wing) – below I have included some
           instructions on how you can make some jumps with PVC, click and
           collected from your favourite Bunnings store, or there is a great online
           company called Klever Cages, which will post all your items direct to your
           door in no time at all.
           A bag full of your puppies most favourite treats and a tug toy or two.

Weaving.

     There are many ways you can work on your weaving at home. There is lots of
     information on both facebook and even google. But I can hear you saying “I
     don’t have any weavers”. Never fear with just a few bits of equipment and your
     wonderful PVC pipe from Bunnings, you will be set to go.

     Things you will need:
          PVC Pipe (note here – because we are not “fixing” the pipe to the spike,
          you can use your jump bars as weaver poles when you are not using all
          your jumps).
          Cheap screwdrivers
          A measuring tape and some string.
Contacts:
For the slightly more advanced members who may be struggling with your contacts,
lockdown is a great time to go back and proof your dogs contact behaviours. Rear
end awareness is really important for great contacts and that all important contact
criteria. Criteria I hear you say. Well, what I mean here is, do you want a running
contact or a stopped contact. You can have a different criteria on each piece of
contact equipment, but you need to stick to your criteria and only reward correct
criteria. I know from hard lessons, that if you don’t stick to your criteria, then you
will always struggle with contacts if you end up trialing and miss out on those all
important qualifying runs.
Things you will need:
Back steps
A length of board (if you don’t have a piece at home, add this to your
Bunnings click and collect order)
Some bricks or a milk crate or two
More yummy treats……
OK, how can you make a few jumps and what will you need. Yes I have made these!!!
Single Upright
Wing Jump UprightSingle Upright:
For 1 complete jump (including two uprights and a jump bar) you will need
5 x 1m lengths of 20mm PVC Pipe,
2 x 5 way 20mm PVC connectors, and
2 x jump cups.
You can purchase the jumps cups from Klever Cages @$3.11 ea
(https://www.klevercages.com.au), these cups are removable and can
be positioned anywhere along the upright. You can make them, but
please be mindful of your puppies safety by not having any sharp edges
and the jump bar must be able to be dislodged.
To finish them off and make them look pretty, you can add
10 x 20mm PVC end caps. These are placed on all open ends of the PVC pipe.
Apart from the jump cups, everything else I purchased from Bunnings for a total
of just under $48 (including the end caps).
To make them up, take 2 of the 1m lengths of PVC pipe and cut
8 x 250mm lengths. These are placed into the 4 bottom holes of the
two 5 way connectors (push them in nice and hard or you can tap
them in lightly with a rubber mallet). Place a 1m length in the top of
each of the 5 way connectors and then measure from the floor up and
mark the heights of 200, 300, 400, 500 & 600mm from the bottom.
Each height is measured to the top of the bar (ie the top of the bar
sits at the actual height, not the jump cup) and attach a jump cup on
each of the uprights. Add your bar and you have a jump.
Non Wing Fixed Jump
(not pictured – but imagine the non wing jumps we have at the club)
For 1 complete jump (including a jump bar) you will need
5 x 1m lengths of 20mm PVC Pipe,
2 x 4 way 20mm PVC connectors, and
2 x jump cups.
6 x 20mm PVC End Caps (to make it look pretty).
Apart from the jump cups, everything else I purchased from Bunnings
for a total of just over $40 (including the end caps). These are a little harder to
store if you don’t dismantle them.
Take 1 x 1m length of PVC Pipe and cut it into 4 x 250mm lengths. Place these into the
top and bottom holes of the two connectors in the picture above. Place 1 length of pipe
into one hole of each connector (so they are now joined together as one). Place this
on the ground now so its flat, and add a length of PVC pipe into the two vacant holes
in the connectors (these are your jump uprights), add your end caps (to make it look
pretty), measure the heights again and your jump cups. This jump will stand alone and
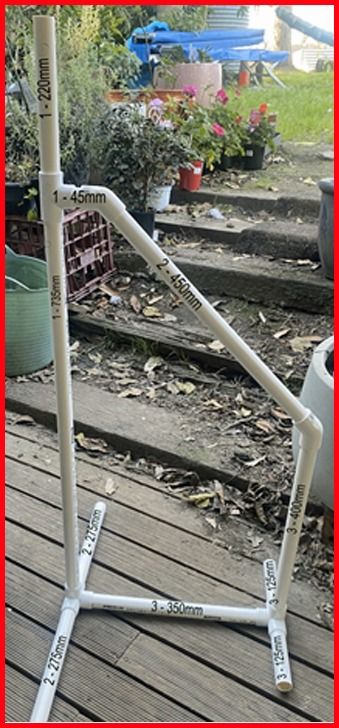
the jump bar should fall when knocked.Winged Jump:
This one is a bit special and took some thinking to get the measurements correct and
to make the most of the lengths of pipe. What you will need:
7 x 1m lengths of 20mm PVC Pipe
4 x 4 way 20mm PVC connectors,
2 x 20mm PVC Tee’s
4 x 20mm PVC Elbow’s 45 degrees and
2 x Jump Cups.
2 x pieces of material / canvas / vinyl
(I used some scrap material I had at home)
Some string or cable ties
10 x 20mm PVC End Caps (to make it look pretty).
Apart from the jump cups, material and string, everything else I purchased from
Bunnings for a total of just under $78 (including the end caps).
Ok, now the fun begins. The picture below has some numbers on it. Some are
measurements and some are the piece of PVC pipe I have cut it from.
#1 - Cut this into 3 lengths. 220mm, 45mm & the remainder should be 735mm.
#2 – Cut this into 3 lengths. 450mm & 2 x 275mm
#3 – Cut this into 4 lengths. 400mm, 350mm & 2 x 125mmNow for assembly. This is for one wing. You will need to do the same for the opposite wing. Take 1 x 4 way connector and place the two 275mm pieces into each straight side (these are the feet), place the 735mm piece in the upright hole, add a tee connector to the top of this piece of pipe and then the 220mm piece into the top of the tee. Ensure you align the part of the two connectors out directly above one another. In the tee, place the small 45mm piece into the empty hole. Now take the other 4 way connector and add the two 125mm pieces into either side of it (outside feet), place the 400mm piece of up upwards in the 4 way connector, place an elbow on top of the 400mm piece of pipe. Add the 450mm piece of pipe into the other end of the elbow and add the other elbow onto the end of this pipe. Place the 350mm piece of pipe into the last hole of the 4 way connector. Now you need to join the two pieces together, by placing the end of the 350mm piece into the last hole of the 4 way connector on the upright and the elbow on the very short 45mm piece of pipe near the to of the upright. Make sure you secure these well (use a rubber mallet if needed). Make them look pretty by adding the end caps onto all open ends of the wing. This will also ensure its quite stable. I have then cut a piece of material similar in shape to the open gap inside the wing, cut some small holes and tied it to the wing with some kitchen string. You can just cut a square and tie or cable tie it to the inside of the wing. Repeat. Just a note: Ensure that you get the same diameter connectors, jump cups and PVC pipes. It comes in 20mm, 25mm and the lists goes on. The jump cups only come in these two sizes, so your pipes and connectors need to match these. The prices quoted are for 20mm diameter. That’s if for the jumps. You are done!!!! Great effort. Weavers: These are quite simple to do and you can use your jump uprights and bars if you have not permanently stuck them together to save some $$$. Weave poles are 60mm apart, so firstly take a piece of string, put a loop in one end and then measure out 11 lots of 60mm and mark it with a texta. This will give you a straight line and the correct spacing for your weave poles. Now I found the easiest way to create weaves, unless you have a welder living with you, is to purchase a number of cheap screwdrivers that fit nicely inside a 20mm piece of PVC pipe. (Hint here, take a piece of pipe with you to ensure it fits inside. I picked these up in Bunnings for $2.05 ea. They have a long shank and a standard handle. Some time ago, I also purchased these, which screw in the ground and make good weave pole bases or jump upright bases, but are a little time consuming to get in and out if you need to move them. All you need to do now is to stick the screwdriver into the ground (straight up and down for upright weaves of course) and then place the PVC pipe over the top of the handle. If you want to use offset weaves, just move every second one out to the right a bit. If the screw driver has a really long shank, it will stay stuck if its placed at an angle also. You have no excuses now, do you?.
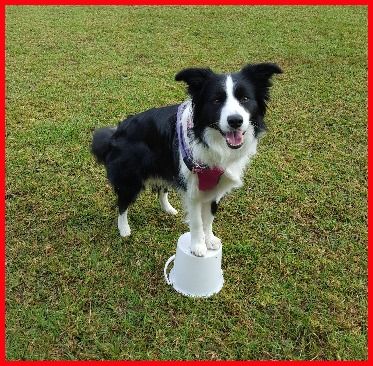
Contact training:

You don’t need expensive contact equipment to work on your contacts whilst in lockdown.
Rear end awareness is important for great stopped contacts and this is easy to do with
some simple ideas around the house.

Stairs and other household items:

Rear end awareness can be obtained by doing pivots, whilst feet are on an object. Here
I have used an upside down pot saucer and behind us is a cushion with a board on top
of it. The cushion is great as it gives them an understanding that things may move under
them and for them to get their balance correct and get them use to the movement.
Stairs are also great as they are taught to keep their feet on one step and to stretch
forward, without moving those feet. This can be then transferred to the contacts.

We then moved to a plank on the ground. This plank I purchased from the local hardware
store and was something they had as an off cut, so it didn’t cost me very much and is
quite solid. I also use a piece of plywood I picked up at “yes you guessed it”, my favourite
place Bunnings. With Caddy, he was getting to the end of the plank when it was raised
at one end and turning into me, removing his back end off the plank, so I starting using
something wider to give him an understanding that he needed to stay on the board.
Once they get used to the plank flat on the ground and are happy to drive to the end,
turn and “perform” tricks etc on it, you can start to lift one end and then both ends. A
chair, milk crates, a couple of bricks or your stairs are great options. You just need to
ensure the plank is secure before they get on it. Here are some pics of Caddy on the
plank on the ground.

                         Getting used to working on the plank!!!
Working on the plank!!!
Driving to the end of the plank and maintaining criteria (back feet remain on plank).
Lastly, for those going to tackle the PVC pipe, you can cut it with a hacksaw, however
I found this little tool is fantastic, easy to use and I don’t loose fingers.
Hehehehe……….. Its called a pipe cutter and they start around $8. Just remember to
get one that fits your pipe size.
Now you have no excuses for not training during lockdown (unless you cannot get to
Bunnings). Stay safe and enjoy the time you have with your puppies.
Jo, Gus, Moose & Caddy.How to Make a Tug Toy
Tugging is one of the best games you
can play with your dog and most dogs,
whether large or small, love to tug.
Fleece tugs are easy to make, gentle on the dog’s mouth and are far
better than rope tugs which can catch between the dog’s teeth.
All you need to make a tug are four strips of fleece material about
5cms x 65cms for a small tug and about 9cms x 100cms for a large one.
You can vary the sizes to suit your dog.
Instructions:
● Place the four strips together and tie
a knot leaving a “tassel” at the end
● Spread the strips in a cross shape
● Fold the top strip towards the bottom
● Fold the bottom strip towards the top
● Fold the right strip towards the left, passing over then under
● Fold the left strip towards the right, passing over then under
● Pull each strip to secure and straighten
● Repeat until you have your desired length
● Leave enough material to tie a knot and leave a “tassel” to match
the other end
Get creative with your tug making, add a ball, faux fur or sheepskin.
Tugging is fun for both you and you dog, it keeps the “game” and focus
with you and is a great reward for good behaviour but remember, tug on
your terms. Teach your dog to give up the tug when the game is over, to
wait to play the game and to release the tug when you ask.Easy Slip Over Collar Bandana
How Cute is This ?
Measure your dog’s neck then raid the closet or visit Vinnies to find a shirt that
has the right collar size.
Cut or unpick the collar then hand sew
around edge.
Job done; fasten around dog’s neck.
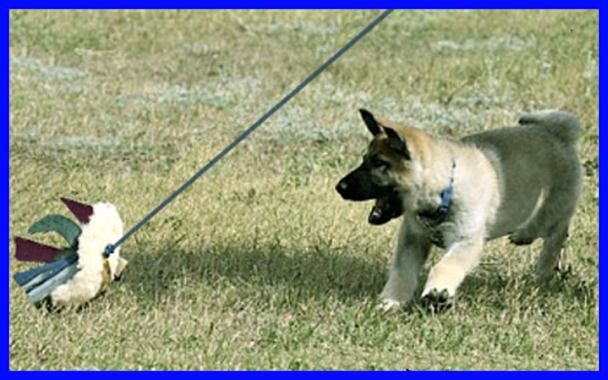
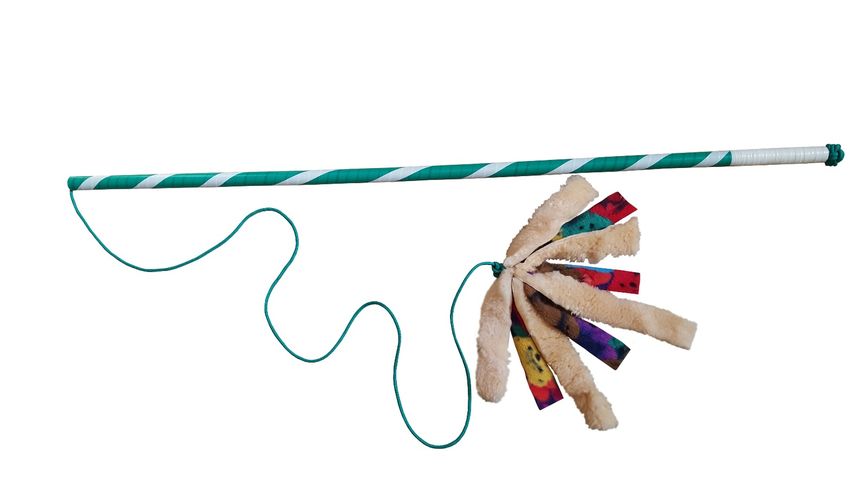
Quick, easy and really CUTEHow to Make a Flirt Pole
A Flirt Pole is like a giant cat toy and is tremendous fun for both you and your dog. It
is a great way to exercise your dog, it builds their chase drive and teaches impulse
control. It brings the game to you.
Use the Flirt Pole as a training tool, have your dog sit or lie down then slowly drag the
lure across the ground, your dog must only chase when you give it the release cue.
As your dog chases the lure around you a quick flick of the wrist will snatch the lure
away to change direction. You must let your dog catch the lure now and again but it
must be taught to release it immediately on cue then you can start again. It is
important to keep the lure at ground level as you do not want to encourage your dog
to jump and twist as they could hurt themselves.
You Will Need :
A length of PVC Pipe
A length of Paracord
Scraps of Fleece or Sheepskin
Electrical Tape (optional)
The length of the tube and cord
depends on the size of the dog.
The pole shown is 110 cms. Tie a
monkey fist knot in one end of the
cord then thread the other end through
the tube and attach to fleece (could also use
an un-stuffed toy}. The pole can be covered in
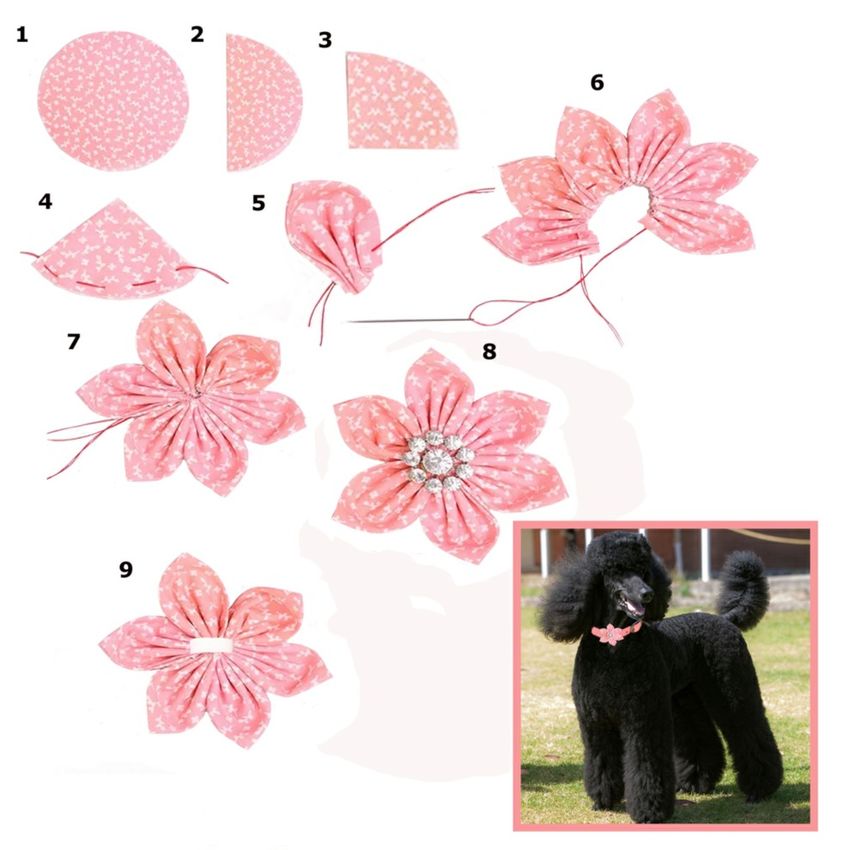
coloured electrical tape or left plain.How to Make a Flower for Your Dog's Collar Step 1: Cut out six circles of fabric. Diameter will determine the size of flower. Step 2: Press the circles in half with the wrong sides together to form a semi-circle. Press in half again to form a quarter. Step 3: Thread a sewing needle with a double thread and knot. Sew across the raw edges with an up and down running stitch. Make sure you get a stitch near the ends and that you go through all layers. Don’t pull the knotted end all the way through but leave at least a 10cm tail. Step 4: Gently pull the thread to gather the petal into shape. Make sure you still have the tail at the end. Step 5: Sew the next five petals the same way until you have a string of them. Step 6: Using the ends of the thread, pull really tight and tie a double knot. Step 7: Sew a bead or button on to form flower centre. Step 8: On other side sew on a loop of elastic sized to fit on to collar.
Don’t throw out those old jeans
Turn them into tug toys !!!!

Cut up jeans removing all
seams then cut each leg panel
into two strips.

                 Place three strips of the
                 fabric together and tie a
                 tight knot leaving about
                 10cm of tails.
                 Plait the three strips
                 together, then tie another
                 tight knot to match the
                 other end.

 Easy and quick to make and your dog will
 love it. One pair of jeans makes two tugs.
How to Make a Bottle Spinner Treat Dispenser
Easy to make and super fun for your dog.
You will need -
2 460mm Safety Cones
20mm PVC Pipe
2 Elbow Joints
3 Plastic Bottles
Cones and PVC pipe I got from Bunnings, bottles from the $2 shop but
you could use ordinary disposable plastic water bottles. Cones are well
worth buying as they are great tools for you to use in both obedience and
agility training.
Cut three lengths of PVC pipe - 2 x 44cm, 1 x 60cm
Cut or drill 25mm holes in both sides of each bottle then thread bottles
onto the 60cm pipe.
Connect the other two pipes with elbow joints and insert into cones.
For small dogs use 300mm cones.
Place a handful of kibble in each bottle. Your dog will quickly learn to
spin the bottles to get the kibble out.How to Make a Fleece Ball
Fleece Balls are great toys for puppies and small to medium size dogs,
especially for indoor games. Treats can also be hidden between the layers
so they can snuffle the ball and the treats will drop out at random.
You will need -
A piece of fleece fabric 20cms x 160cms
A cable tie
Step 1
Fold fabric in half width wise then cut fringes on
either side of fabric about 2cms wide leaving
an uncut line about 1.5cms at centre
Step 2
Starting at fold edge tightly roll up fleece
Step 3
Place cable tie around centre and pull in
as tightly as possible and cut off end of tie
Step 4
Tie and knot several pieces of fringe
from either side to cover cable tie
Step 5
Shake out ball and play with your dogSalmon & Sweet Potato "Brownies"
Ideal for older dogs or if you prefer soft treats
1 x Can of Salmon (around 200grms)
1 x Medium Sweet Potato, (baked in the skin)
2 x Large Eggs
⅓ x Cup of Coconut Flour
Coconut oil to grease the pan
Preheat oven to 175°
In a medium bowl, beat the eggs until fluffy then fold in the coconut flour
and mashed salmon.
Allow the mixture to rest for 10 minutes while the coconut flour absorbs
the mixture.
Remove the sweet potato from it's skin and mash it until it is smooth
then fold mashed sweet potato into mixture.
Grease a 23cm cake pan with coconut oil then press the mix into your
pan.
Bake for 60-70 minutes until the mixture is firm, edges are golden and a
tooth pick comes out clean.
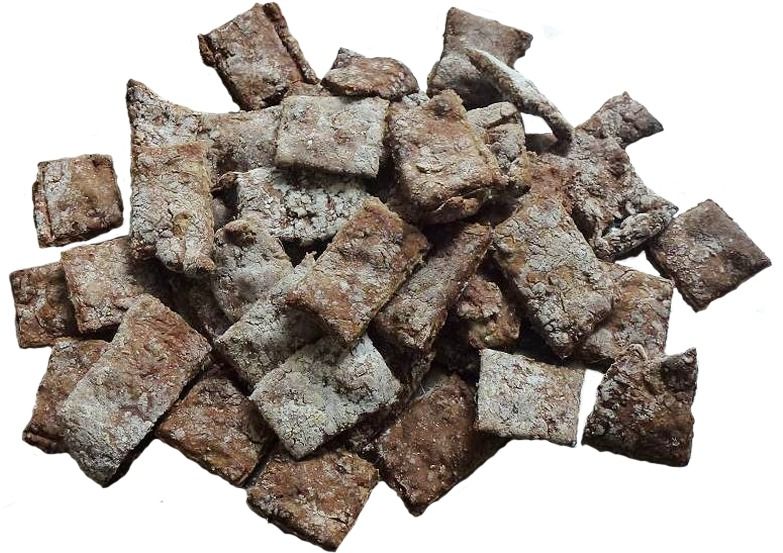
Allow to cool and slice into squares store in fridge or freezeYummy Liver Dog Biscuits
Your dog will go wild for this !!!!
So brace yourself and get blending liver !!
450g x Lambs Liver
2 x Cups of Cornflour
3/4 x Cup of Potato Flour or Semolina
1 x Large Egg
1 x Grated Carrot or a Grated Apple
Splash of Milk if Needed
Cute liver into chunks and place in blender and blend until smooth then
turn out into a mixing bowl. Add grated carrot or grated apple and mix
together. Add cornflour, the semolina or potato flour and mix together
until blended. Add egg, if mixture is too dry you can add a splash of milk.
Roll out and place on a lined baking tray and bake for 15-20 minutes at
180°.
When cool cut into squares and store in fridge in an airtight container.Enjoying Your Lock Down Chocolate ?
Make these safe doggy chocolate
cookies that your pooch will adore.
1½ x Cups Oat Flour
¼ x Cup Peanut Butter
¼ x Cup Carob Powder
½ x Cup Mashed Banana
1 x Egg
1 x Tbsp Coconut Oil (melted)
1 x Ttbsp Maple Syrup
Preheat oven to 150°
Mash banana. Break egg into a bowl and whisk until frothy then add
peanut butter, mashed banana, melted coconut oil and maple syrup
and mix together until blended
Sift oat flour into mixture and stir well.
Sift carob powder into mixture, stir until all ingredients are
combined and knead to form dough.
Turn dough out onto floured work surface and use a floured rolling
pin to roll dough out.
Cut dough into desired shapes using a cookie cutter then place on a
lined baking tray.
Bake for 15 minutes then remove from oven and allow to cool
completely.
Store in airtight container in the refrigerator for 7 to 10 days.You can also read