TOPYX Learning Management System User Guide
←
→
Page content transcription
If your browser does not render page correctly, please read the page content below
TOPYX Learning
    Management System
        User Guide

Developed by the Workforce Training & Coordination (WTC) Team, Bureau of One Stop and Program
Support, Division of Workforce Services, Department of Economic Opportunity (DEO).

All Rights Reserved. April 2021.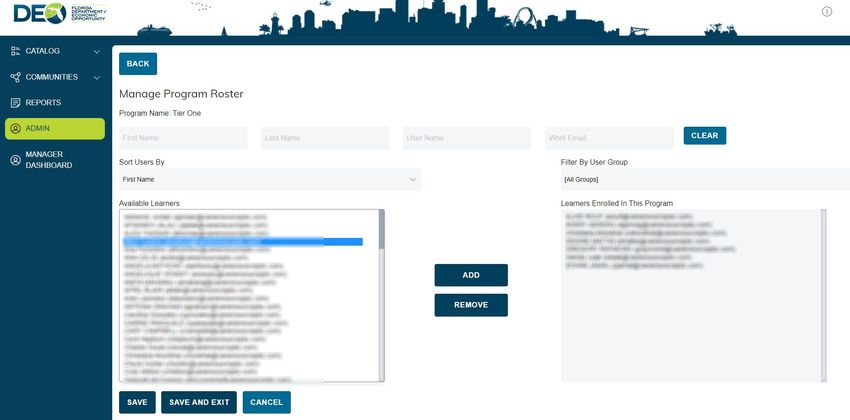
Contents
INTRODUCING THE TOPYX LEARNING MANAGEMENT SYSTEM (LMS) ..................................................3
SECTION ONE: How do I access the TOPYX LMS? ................................................................................4
SECTION TWO: Logging into the TOPYX LMS .......................................................................................6
   Self Creating a Profile in DEO’s One-Stop LMS .................................................................................7
   What could prevent me from registering in the system?..................................................................9
SECTION THREE: Learner View within TOPYX LMS ..............................................................................9
   Help Guide ...................................................................................................................................20
SECTION FOUR: How do I print a training certificate (completion, achievement) using TOPYX? ......... 21
SECTION FIVE: Accessing TOPYX as a Manager ..................................................................................23
SECTION SIX: Instructor/Evaluator View Within the TOPYX LMS .......................................................26
   Uploading Materials to the TOPYX LMS (Instructor/Evaluator) ......................................................27
   What is a “Material?” Materials are the basic component of the TOPYX program. ......................... 28
   What is a “Course”? A Course is a way to organize training Materials. ..........................................28
   What is a “Program”? A Program is a way to organize Courses in the form of a curriculum. ............ 29
   How Do I Upload Training Materials into the TOPYX Program? ......................................................30
   How Do I Update Training Materials in the TOPYX Program? .........................................................36
Registering a Staff Member in Tier One ............................................................................................39

2|Page
INTRODUCING THE TOPYX LEARNING MANAGEMENT SYSTEM (LMS)
Training Local Workforce Development Board (LWDB) staff through a variety of technological
tools as well as in-person is a goal of the Department of Economic Opportunity (DEO). Creating a
workforce training institute to focus on training workforce staff is in Chapter 445, Florida
Statutes. In 2011, DEO launched the use of an online Learning Management System (LMS) with a
focus of developing and launching the Tier I Certificate training program.
In 2012, the Department of Economic Opportunity (DEO) launched an exam to test frontline
staff on associated materials and skills learned during the Tier One training program. During
the early phases of the Tier One program implementation, DEO published materials for use
statewide through the Adobe Connect Learning Management System. Now, DEO has improved
services by launching a new LMS named TOPYX.

                                                              TIER ONE IS A TRAINING PROGRAM FOR
                                                       FRONT-LINE STAFF. THE TRAINING MATERIALS
                                                             FOCUS ON A HOST OF SKILLS, INCLUDING
                                                       COMMUNICATION SKILLS, CUSTOMER SERVICE
                                                        SKILLS, AND JOB SEARCH SKILLS, ETC. FRONT-
The TOPYX LMS offers several benefits:                   LINE STAFF MUST COMPLETE THE MATERIALS
       TOPYX is a tile-based system with               AND PASS THE CERTIFICATE EXAM WITHIN ONE
       one menu (for learners) on the                                                   YEAR OF HIRE.
       screen.    The previous Adobe
       Connect LMS is a linear looking system with multiple menus that can be confusing.
   •   TOPYX allows frontline staff or local managers to register a learner in the system, whereas
       Adobe Connect requires administrators to register learners in the system.
   • TOPYX allows “Instructors” to put training materials in the system, and learners can
       complete those locally uploaded materials.

3|Page
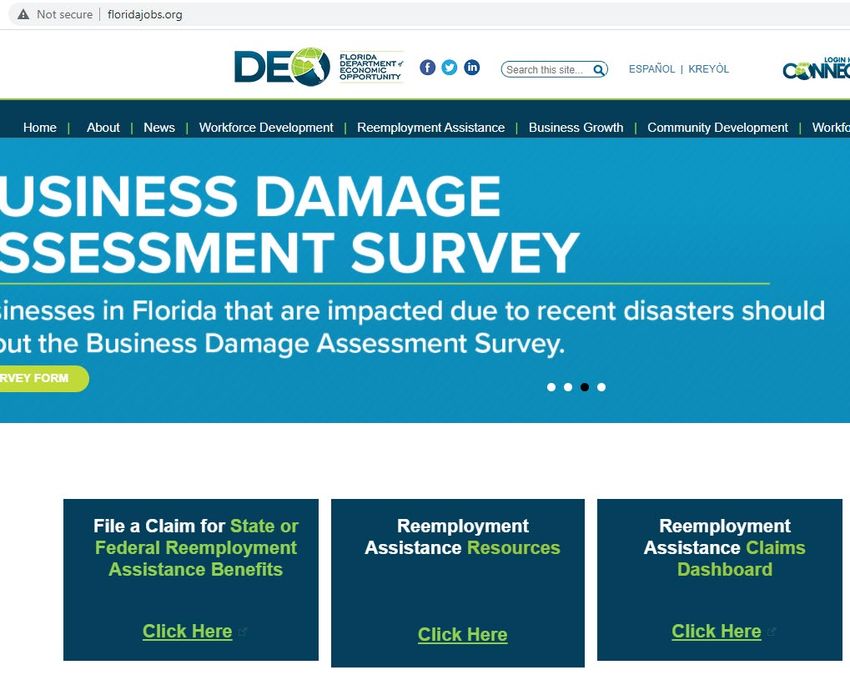
SECTION ONE: How do I access the TOPYX LMS?

TOPYX is an internet-based Learning Management System (LMS) designed to hold DEO’s and
the LWDBs’ training materials to track the progress of all learners. This system allows staff to
complete materials on the internet, maximizing flexibility. To access the TOPYX LMS:
   1. First, go to the DEO’s website at floridajobs.org.

   2. Next, click on Workforce Development.

4|Page
3. Click on the green arrow next to “Professional Development and Training.”

  4. The page will expand. Select “TOPYX” to go directly to the log in screen.

5|Page
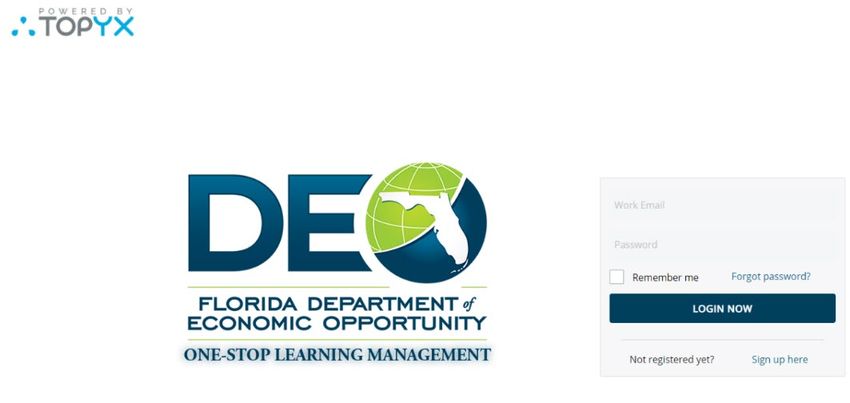
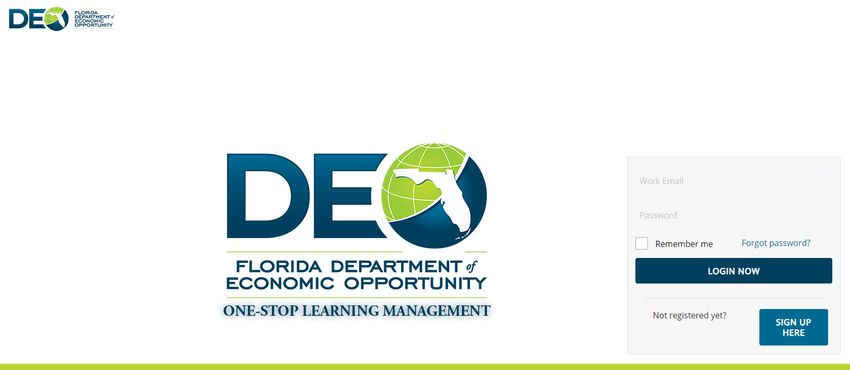
SECTION TWO: Logging into the TOPYX LMS
Step 1: Below is the TOPYX Login screen. The Username is always your work email.

Step 2: The generic password for employees with a profile in TOPYX (employees who migrated
from Adobe Connect) is “Florida1.” Otherwise, new employees (the learner) will create their
own password when they select Sign Up Here. If you have issues with the password or logging
in, please contact us at DEO’s Workforce Training and Coordination Team (WTC) at
WFSTraining@deo.myflorida.com.

Step 3: Click Forgot Password if staff cannot remember their password and needs to reset it.
Staff/Learner will enter their work email address, click the Captcha and continue. The system
will send an auto-generated email with the details to complete the password update process.

6|Page
Step 4: If a new staff member needs to be registered into the system, they can register
themselves by clicking Sign Up Here on the login screen. The Training Coordinator or Point of
Contact (POC) who has a Manager or Evaluator role can also add users to TOPYX.

Self Creating a Profile in DEO’s One-Stop LMS
Creating a profile in the Learning Management System (LMS) requires just a little bit of
information, and those who register can quickly access the training courses.

Step 1: Go to One-Stop Learning Management System’s webpage at
https://https://fldeo.interactyx.com/. Select “Sign up here” under the “LOGIN NOW” button.

7|Page

Step 2: Enter basic profile information. This step includes creating a username and password. In
the “Username/Email” field, enter your professional (work) email address. Your email address
becomes your username. It is important to use your email as your username so that your profile
always remains unique to you.

Step 2 (continued): Finish entering the profile creation form. That is, the “Your Details” screen
above. Enter your organization’s name and select a Local Workforce Development Board (LWDB)
number. If you are not with an LWDB, select the appropriate code: DEO, Contractors,
CareerSource Florida, Florida HIRES or FTI. Indicate that you are not a robot by entering the
Captcha. Finally, select the “Register” button on the bottom of the screen.

8|Page
You have now created a Learner profile within the TOPYX LMS.

What could prevent me from registering in the system?

    Your professional (work) email is already in the TOPYX system associated with an active
    profile. If this holdup occurs, do not create another profile. Return to the “Log in” screen.
    Enter your email address in the “Email” field and then select “Forgot password?” After
    entering your professional email address, the TOPYX system sends you an email providing a
    link to update your password.

        If this process does not work and you cannot get in the system, please email your
        name and email address to WFSTraining@deo.myflorida.com .

SECTION THREE: Learner View within TOPYX LMS

Everyone entered in TOPYX is defaulted to a Learner role at log in. All users with a profile in TOPYX have
a Learner profile. Individuals with other roles such as Manager or Instructor, will have the ability to
select which mode within the system they would like to operate.

This section outlines the basic options available in the Learner mode of TOPYX. Once logged in, you are
at the home page which is associated with your role, in this case, the Learner Home Page.

9|Page
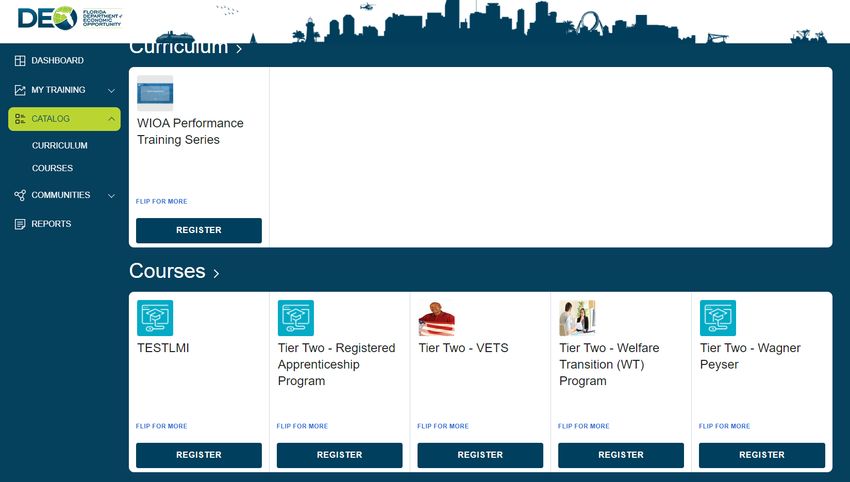
Step 1: Once you have logged in as a Learner, you will automatically be directed to the “Catalog”
screen. If you have more than one role, you will automatically be defaulted to the “Learner” role.
You must actively select the profile icon, see below:

    •   As a Learner, all the classes that you have been registered to complete will be visible on
        the “My Training” screen. To find a course or curriculum to register and complete, select
        “Catalog.” Select either “Curriculum” or “Courses” to see the available materials.

10 | P a g e
Step 2: In the picture below, the staff member has selected “Courses” under the Catalog feature. These are the courses in the “Catalog” which the Learner can select to study. To complete, select Register. Step 3: Select “My Courses” under “My Training” on the left menu. The system will display the training you registered for in the Catalog section. 11 | P a g e
Step 4: To access the training catalog. Select CATALOG on the left menu, and the menu
expands. In the picture below, the staff member has selected COURSES. Learners can select
courses in the CATALOG they would like to complete. To access the course, select REGISTER.

Step 5: Select MY COURSES under MY TRAINING on the left menu. The system will display the
training that the Learner has registered for. The system will also display the training that
leadership (or you with a Manager role) has registered the Learner to complete.

12 | P a g e
There is a menu on the left of the screen for ease of access. The Dashboard is designed to
provide a snapshot of activity and provides easy, convenient access to content all from one
page.

        The Dashboard consists of:
               a. The Profile section: displays general details and the Learner can edit their profile
                  from here.

13 | P a g e
b. If you want to edit your profile, click on the respective pencil icon. You can
change the picture, update details and contact information. The roles
assigned in the system are also listed.
c. The 12-Month Progress racetrack populates based on items:
• The learner has registered to complete, but not yet started
• Are currently in progress but have not completed
• All completed items
14 | P a g ed. Points will be activated later but are similar to a badging reward system and will
be used to track CEUs for maintaining the Florida Certified Workforce
Professional designation.
e. Communities: This section is similar to a forum or posting board to send and
receive messages in real time to user groups associated with your role. Latest
updates and messages can be posted and stored here.
15 | P a g ef. My Training details the progress of recent training including programs (that is,
Tier One), courses (Tier Two, other local trainings, etc.), learning paths and
schedules.
g. Competencies: provides learner reports and printable transcripts.
h. The Activity section tracks login activity and the chart populates registration and
completion history over the last 12 months. Hover over any bar to display the
name of the items for that month.
16 | P a g ei. Announcements from site administrators, Instructors and Managers of Groups
which the learner belongs to will display here.
Catalog: Displays curricula or courses that are available for enrollment. There is a distinction
between curriculum and courses.
• Program are a group of courses defined under one common goal or learning message.
• Courses link together under a common topic to make a curriculum or program. Courses
can also unite materials under a common topic.
• Upon registration into curriculum or courses, the Learner will receive an auto-generated
confirmation via email.
• To access a specific program or courses, the Learner selects Register.
17 | P a g eOnce registered, the screen offers the Start option.
Reports: Here the Learner can see the progress of all content they have enrolled in, view grades
and their report card, and they can download Certificates of Completion, such as Tier Two
courses.
b. Clarification: Tier One is a certificate program designed to achieve the Florida
Certified Workforce Professional designation. Conversely, Tier Two does not
have an associated certification but will have certificates of completion for each
course.
18 | P a g ec. The Reports screen has three tabs:
i. Learner Reports (first tab above): Currently lists group rankings and
points (CEUs) for completed courses and overall site rankings.
ii. Transcript (second tab above): Learners can print certificates and
transcripts in .pdf format and add/upload external data, such as training
certificates or other supportive documentation received from external
sources.
19 | P a g eiii. Leaderboards (third tab above): Coming soon! This screen will rank
learner completion details based on the assigned User Group and will
highlight the ranking order based on number of points achieved.
Help Guide
Every role within TOPYX has an associated Help Guide which is accessed from upper right
corner next to the profile picture. It is unique to whatever role you are logged in at that time.
20 | P a g eSECTION FOUR: How do I print a training certificate (completion, achievement) using TOPYX? Step 1: The Learner must log into the TOPYX system as a Learner by entering their username and password combination. Step 2: The system brings up the My Training screen. In this situation, the Learner was taken to the My Courses screen under My Training. 21 | P a g e
Step 3: Next, select Reports on the left menu.

Step 4: If there is a certificate to print, an arrow will show in the column titled “Download
Certificate.” Click on the down arrow to print the respective certificate.

22 | P a g e
SECTION FIVE: Accessing TOPYX as a Manager
To access TOPYX as a manager, marking manager, instructor or evaluator (the managerial
roles), an administrator has to link the role to the Learner in TOPYX. Remember, each
individual who logs into TOPYX is first logged in as a Learner: staff must change their role using
the personal profile icon on the top right of the screen.

    •   Managers are associated to User Groups by Administrators.
    •   Managers view their reports and reports for learners who are assigned to his/her group.
    •   The Manager role can add users to the LMS, but only to groups to which the Manager is
        assigned.
    •   Managers cannot view and mark a learner’s assignment submissions, but they can see
        the Learner’s final grade.
Marking Managers are a type of Manager. Marking Managers have the same privileges as
Managers. They also have the ability to view and mark the assignment submissions of their
Learners.
Step 1: go to the TOPYX Log-in screen.

Step 2: Log in with your work email and password combination.

23 | P a g e
Step 3: go to the top right of the screen and click the individual icon. Make sure the appropriate leadership role has been selected. If you want to work with individuals, select Manager or Marking Manager. To upload or update materials, select Instructor or Evaluator. Step 4: after logging in to the system, and changing your role to Manager, you, the user, is taken to the Manager Dashboard. 24 | P a g e
Step 5: Clicking on the ADMIN option on the left, the system displays an administrator’s screen. We can
see what managers can do with their role.

Step 6: the Manager can upload and modify instruction materials, as well as manager the human aspect
of the program by managing users.

25 | P a g e
SECTION SIX: Instructor/Evaluator View Within the TOPYX LMS
An instructor is a “teacher” in the TOPYX program. Instructors can do all that learners can do, as
well as
    a. Upload training materials. Instructors can only see the materials they upload to the site
       or the materials an administrator assigns access to the materials.
    b. If the instructor is not associated with a User Group, they will be able to view all user
       grades registered for the Courses and Programs they teach.
    c. Instructors are only able to view materials they upload to the site. If the instructor is
       associated with a User Group, they will only be able to view user grades for their Courses
       and Programs for the users in the User Group.
    d. If the instructor is associated with a User Group, they will only be able to create Courses
       and Programs and videw user grades for their Courses and Programs for the users in the
       User Group.
Evaluator: An evaluator can do everything an instructor can do, well as add learners to the
TOPYX system.
Once logged into the system, the Instructor has to update the role they want to work under.

26 | P a g e
Once the role is updated to Instructor, the staff member is taken to the Instructor Home. This
administrative screen affords the Instructor the ability to create training materials, courses and
curriculum.
Uploading Materials to the TOPYX LMS (Instructor/Evaluator)
TOPYX provides a feature that is unique and new. TOPYX allows staff at DEO to create and
upload training documents and presentations in the LMS. Now, the TOPYX LMS also offers
instructors and evaluators at the LWDBs the ability to upload training documents and
presentations into the TOPYX system.
It is important to note: DEO’s Training and
Coordination Unit will assist regions who want to
upload training into TOPYX to ensure files work and
staff can be assigned the training.
There are three levels of documents and presentations that an instructor, evaluator, and
administrator can upload in the system: Materials, Courses and Program.
27 | P a g eWhat is a “Material?” Materials are the basic component of the TOPYX program. Materials
are uploaded into the TOPYX LMS and then turned into or grouped together to create Courses
and/or Programs. Materials include a host of different file types. For example, you can upload:
a. A Microsoft PowerPoint for staff to use as they study a subject;
b. A Microsoft Word document of PDF staff must review and indicate they understand the
subject;
c. A Captivate file that operates like an interactive video and can be viewed as a primary
training presentation.
d. A Microsoft Excel file being shared with teammates; etc.
What is a “Course”? A Course is a way to organize training Materials.
For example, our Instructor is going to upload Materials on the Welfare Transition (WT)
accountability process. The Instructor uploads the Materials or primary building blocks. For
example:
a. The DEO Administrative Policy 037, Welfare Transition Program Work Penalties and Pre-
Penalty Counseling.
b. A page of links that include Florida Statutes, Florida Administrative Code and
Department of Children and Families (DCF) guidance.
c. Desk guides to help staff navigate the accountability process easily.
d. A PowerPoint which learners can review again should the need arise.
e. A presentation that operates like on-demand training.
28 | P a g eThe instructor may want to include a nod to peripheral materials, such as the Transitional
Childcare, Administrative Policy No. 020 or the Hardship Extensions, Administrative Policy No.
025.
Then, the Instructor goes to the option to create a Course on the Instructor Home page. The
Instructor mouses over Manage Courses and selects the Manage Courses option. The
Instructor organizes the above materials under a course name. The course is published into the
Catalog and learners can register to complete the course by their given deadline.
What is a “Program”? A Program is a way to organize Courses in the form of a curriculum.
Did you notice that a Course brought together and organized several pieces of Materials?
Taking this idea one step further, a Program in TOPYX brings together and organizes a series of
Courses. For example, let’s return to the WT example. The staff member uploads several
documents and presentations. Remember those? Here they are again:
a. The DEO Administrative Policy 037, Welfare Transition Program Work Penalties and Pre-
Penalty Counseling.
b. A page of links that include Florida Statutes, Florida Administrative Code and
Department of Children and Families (DCF) guidance.
c. Desk guides to help staff navigate the accountability process easily.
d. A PowerPoint learners can review again should the need arise.
e. A presentation that operates like on-demand training and includes a quiz.
These Materials above were put together under the Course titled, “Accountability and
Sanctions Process.” The WT program team also has a course that organizes materials about
time limits, work activities, etc. While this is good, the WT team wants to organize all these
courses, set prerequisites, conduct quizes/knowledge checks, etc. The WT team then creates a
29 | P a g eProgram, which organizes the Courses like a “Curriculum.” When the staff member clicks on
the WT Program, they will see all of the Courses associated with that curriculum or program.
How Do I Upload Training Materials into the TOPYX Program?
Training documents are uploaded to the TOPYX system as Materials (i.e., the basic
components), then prepared based on how the materials are going to be used. For example:
a. Staff need to review a document and acknowledge they have read and understand
the information in the document.
b. Staff need to complete training as a stand-alone course focused on compliance or
Continuing Education Units (CEUs). These training materials bundled together are
used to create “Courses.”
c. Staff built several Courses with Materials uploaded into TOPYX and created a
“Program” (or curriculum.) Staff will complete or listen to several Courses that are
threaded together by a common theme.
Step 1: The documents to be uploaded are Microsoft Word, Excel or PowerPoint documents.
Instructors and Evaluators can also upload PDFs. Finally, staff can upload videos or video-like
training into TOPYX.
The first step is to upload the document or presentation into TOPYX as a Material (basic
component). If the region wants to upload an interactive, video-like training, the region can
work with DEO to develop a SCORM-like package.
30 | P a g eStep 2: To go to the training coordinator’s web page in TOPYX, select ADMIN button on the menu on the left side of the screen. Step 3: Click the Manage Materials button. This button/tile should be available for Administrators, Evaluators, Instructors, etc. Step 4: On the Manage Materials page, the user can complete a lot of tasks. In this situation, it is recommended to run a search first to see if the material is already in the system. To do this, enter the name of the materials in the search bar. In this situation, we are looking for the Deferrals training materials for WT staff. 31 | P a g e
Step 5: There are no materials with the “Deferral” title.

Step 6: As a result, we will need to Upload Materials. Materials can be a PowerPoint, Microsoft
Word, Adobe PDF documents, Microsoft Excel spreadsheets, videos, .mp3, etc. This system
allows the instructors, evaluators, and administrators to upload a variety of materials.

32 | P a g e
Step 7: After selecting Upload Materials, the Upload Materials screen will open. In this
example, we are going to upload a file, not a streaming video. Select Upload Files.

Step 8: Select the file you want to put into TOPYX by selecting Browse Files. This browsing step
allows you to look through the computer and network for a file to post in TOPYX.

33 | P a g e
Step 9: Once the file has been selected, the document name is shown just below BROWSE FILES
and START UPLOAD. Select START UPLOAD if it does not start on its own.

Step 10: The files should automatically be processed by the system. Below, you can see the
message, “All files have been successfully uploaded and processed.…”

34 | P a g e
The materials, once loaded into TOPYX, are not available for modification within the actual
system. Rather, when you make a change to the Material, you will have to upload that latest
version to the system. To find the document and finish the process, go to the All Materials
page.

Step 11: Enter part of the title in the search feature and select Search.

35 | P a g e
The results are listed in a table-like fashion. The headers of the table are active and can
organize the information for you. In the table below, the user selected Materials to organize
the materials by name.

How Do I Update Training Materials in the TOPYX Program?
Step 1: Go to the Administrator’s, Instructor’s or Evaluator’s ADMIN screen.

36 | P a g e
Step 2: Select Manage Materials.

Step 3: Search for the name of the materials in the SEARCH feature. Click on the name of the
material item.

37 | P a g e
Step 4: Select Replace Content.

Step 5: Select the Browse button in the Upload Content from Desktop section.

38 | P a g e
Step 6: Find the materials on your computer or network. Then click on the material’s name.
The screen will refresh after the TOPYX system loads the updated materials.

Registering a Staff Member in Tier One
Step 1: Here is a snapshot of the log in screen that you can find at
https://fldeo.interactyx.com/login.aspx.

Step 2: Enter your work email in the first box (username) and your password in the “Password” field.
Click the “LOGIN NOW” button.

39 | P a g e
Step 3: The system has taken this user to the “My Courses” under the “My Training” section of the
user’s menu. The user is logged in as a “Learner.” This can be seen by clicking on the picture of the little
man in the top right corner.

Step 4: Click on the “Role” dropdown to change from “Learner” to “Manager.” You must have
“Manger” or “Instructor” role to register a staff member in a course or program.

40 | P a g e
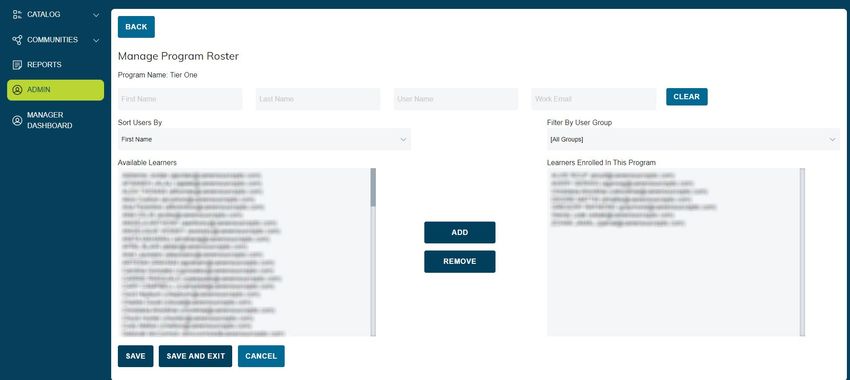
Step 5: The system refreshes to the “Manager Dashboard.” To register a staff member to complete Tier
One, click on “Tier One” under the “Program List” title.

Step 6: Under the “Tier One” program is the ability to register individuals in the “Program Roster.”
Select “Program Roster.”

41 | P a g e
Step 7: A menu will display. Select “Manage Roster.”

Step 8: Find the name under the “Available Learners” by scrolling down or by searching for the
individual using the staff member’s “First Name,” “Last Name,” “User Name,” or “Work Email.”

42 | P a g e
Step 9: Highlight the staff member’s name by clicking on the name. Then, select the “Add” button.

Step 10: Select “SAVE” or “SAVE AND EXIT.” Please do not forget to save or the system will not
remember your changes.

43 | P a g e
The roster will be up to date.

     For questions or assistance in using the TOPYX LMS, contact the Workforce Training &
                 Coordination (WTC) team at wfstraining@deo.myflorida.com.

44 | P a g e
You can also read