UF HEALTH MEDICAL LABORATORIES - Specimen Collection and Test Catalog Gainesville, Florida
←
→
Page content transcription
If your browser does not render page correctly, please read the page content below

UF HEALTH MEDICAL LABORATORIES
                              Gainesville, Florida
                   Specimen Collection and Test Catalog

1
             External: https://UFHealth.org/uf-health-medical-lab-shands-hospital
    Internal: https://bridge.UFHealth.org/policies/suf-specimen-collection-and-test-catalog/
Introduction
The UF Health Medical Laboratories are privileged to serve you and your patients. Our team is composed of
nationally recognized pathologists in a wide variety of specialties and subspecialties along with laboratory staff
licensed in the State of Florida. We strive to provide the highest quality patient care using state-of-the-art
technology, with quick, accurate and professional attention to each patient case in the accredited laboratory
environment. We are open 24 hours a day, seven days a week for routine and emergency laboratory testing.
UF Health Medical Laboratories are licensed and accredited by:
The Centers for Medicare and Medicaid Services (CMS) under the Statutes of the Clinical Laboratory
Improvement Amendments. Our CLIA Numbers are 10D0997531, 10D0665884, 10D0726675,
10D0726677, 10D2116368 and 10D2059622
The College of American Pathologists’ Commission on Laboratory Accreditation. Our CAP laboratory
numbers are 7178590, 1482301, 1482314, 8743573, and 9472595
2
Contact Customer Service at 352-265-0522 with questions about request forms.

                                                             Contents
    Contact Information ................................................................................................. 5
    Notice to Physicians                                                                                                    7
    Reflex Test List                                                                                                      10
    Collection Guidelines ............................................................................................ 14
    Specimen Labels .................................................................................................... 15
    Specimen Rejection ............................................................................................... 16
    Specimen Transport ............................................................................................... 18
    Blood Collection Tubes or Vials ........................................................................... 19
    Blood Collection Supplies ..................................................................................... 20
    Blood Collection Procedures ................................................................................. 21
    Percutaneous Venipuncture Procedure ............................................................. 21
    Arterial Punctures .................................................................................................. 24
    Line Collections ..................................................................................................... 24
    Capillary Punctures ................................................................................................ 25
    Capillary Puncture – Heel Stick                                                                                       25
    Capillary Puncture – Finger Stick                                                                                     26
    Blood Culture Collection ....................................................................................... 27
    Urine Collection Procedures .................................................................................. 29
    Random Urine Collection.................................................................................... 29
    Timed Urine Collection                                                                                                30
    Body Fluid Specimens ........................................................................................... 32
    Stool Specimens..................................................................................................... 33
    Bone Marrow Specimens ....................................................................................... 34
    Sputum Specimens................................................................................................. 34
    Specimen Collection Guide ................................................................................... 35
    Sarstedt Tubes ........................................................................................................ 37
    Order of Collection ................................................................................................ 38
    Departments and Contacts ..................................................................................... 39
    Core Laboratories                                                                                                     39
    Microbiology Laboratory                                                                                               41
    Point of Care .......................................................................................................... 47
    Transfusion Service (Blood Bank) Laboratory                                                                           48
    Cytology Laboratory                                                                                                   49
    Surgical Pathology Laboratory                                                                                         52

3
Hematopathology Laboratory                                                                                         54
Transplant Laboratory                                                                                              57
Clinical Consultants ............................................................................................... 58
Patient Information Sheets for SARS-CoV-2 Assays ............................................ 59

4
Contact Information
We are open 24 hours a day, seven days a week for routine and emergency laboratory testing.
Please feel free to contact us at:

                           Customer Service          352-265-0522

5
Current maps and directions for UF Health Shands Hospital
           collection stations can be located at

                           Shands Hospital
        https://ufhealth.org/uf-health-medical-lab-shands-hospital/maps

                             Medical Plaza
        https://ufhealth.org/uf-health-medical-lab-medical-plaza/maps

      Heart, Vascular and Neuromedicine Hospitals
             https://ufhealth.org/uf-health-medical-lab-hvn/maps

                              Rocky Point
         https://ufhealth.org/uf-health-medical-lab-rocky-point/maps

6
Notice to Physicians
To: Physicians and Clinical Staff, Clinics and Community Physician Offices
From: Kenneth Rand, M.D., Laboratory Medical Director
Mary Reeves, MBA, Administrative Director Clinical Laboratories and Operations
Date: March 29, 2021
UF Health Medical Laboratories are committed to providing excellent laboratory services to you and your patients. In
an effort to comply with federal laws and regulations, our laboratories adopted a Clinical Laboratory Compliance
Program as recommended by the Office of Inspector General (OIG). The OIG Compliance Program Guidance for
Clinical Laboratories recommends that hospital laboratories provide annual notification to their clients on pertinent
topics.
It is the responsibility of the lab to inform all physicians that the OIG takes the position that an individual
who knowingly causes a false claim to be submitted may be subject to sanctions or remedies available
under civil, criminal, and administrative law.
LABORATORY ORDER FORMS
In order to provide excellent patient care we must receive a complete laboratory order. Written laboratory orders
must be legible as laboratory clerks transcribe them.
The order, whether written or electronic via EPIC system, must contain the following information or the
laboratory may be unable to process the specimen properly and in a timely manner. We request your help
in providing compliant orders that contain these critical items.
Legible Signature of ordering Physician, PA, Resident, or APRN. All order forms requesting laboratory
tests must be authenticated by the author. The method used can either be hand written or an electronic
signature. The illegible signature must have a legible printed identity of the signator. Stamp signatures
are NOT acceptable. If signature requirements are not met, the medical necessity for the service
requested and billed can not be substantiated.
The Attending name, ID number, and address. PAs, APRNs, and Residents can order without an Attending
signature, however the Attending Physician's name and number are required for billing purposes and must be
legible.
ICD-10 codes , signs, symptoms, or diagnosis that relate directly to the reason the test(s) are being ordered.
Patient Medical Record number, if patient has a record in our UF Health system.
Patient demographics; patients full name, home address, phone number, and date of birth (DOB).
Insurance and/or Medicare Information.
If the sample was drawn by someone other than Lab staff, the specimen collection information, date
and time must be indicated.
For your convenience, UF Health Medical Laboratories provide laboratory requisitions preprinted with your clinic or
office information and they contain ample space for all patient demographics. UF Health Shands or Faculty Group
Practice clinics can also order Outpatient Laboratory order forms from the Owens & Minor internal inventory. If you
use any other form to submit laboratory orders, all of the necessary information listed above must be included. Please
be advised that if ordering parties do not provide all required diagnosis codes or patient information, your patients’
care may be delayed.
Page 7
MEDICAL NECESSITY FOR OUTPATIENT TESTING
Medicare will only pay for tests that meet the Medicare coverage criteria and are reasonable and necessary to treat
or diagnose an individual patient. The physician is responsible for ordering medically appropriate tests with the
corresponding supporting diagnostic or medical necessity information. Please ensure that the test(s) you order meet
medical necessity. You can refer to the following web sites for the most current national and local Medicare review
policies,

Centers for Medicare and Medicaid Services, www.cms.hhs.gov
Florida Medicare Provider Web site via First Coast Service Options, http://medicare.fcso.com/

ICD-10
You must provide complete diagnosis information for each test you have ordered. Accurate and complete ICD-10
codes are required and necessary for proper billing. Physicians should provide the complete ICD-10 code (s) with
7 digits for the highest level of specificity, as pertinent. If a narrative reason is submitted instead, please provide
enough detail so it can be coded to the highest level of specificity for ICD-10 coding.

ADVANCED BENEFICIARY NOTICE (ABN) FOR OUTPATIENTS
A Medicare beneficiary must be informed when a test does not meet medical necessity, as he/she will be
responsible for payment. This is accomplished via issuing an ABN. The ABN must be discussed with and
signed by the patient before the service is provided to allow enough time for the patient to make an informed
decision about the test(s) ordered.

In the event that lab samples are drawn in a physician's office or clinic, Medical Necessity should be checked by
the location drawing the specimen and necessary ABNs issued prior to the sample collection. ABN forms must
accompany the lab requisition form along with the specimen to the lab for testing.

MEDICARE LABORATORY FEE SCHEDULE
Medicare reimburses laboratory services based upon their published fee schedule. The Medicare laboratory
fee schedule can be found at http://www.cms.hhs.gov/ClinicalLabFeeSched/. Medicaid reimbursement for
laboratory services is equal to or less than the amount of Medicare reimbursement.

ORGAN OR DISEASE RELATED PANELS
Organ or Disease Related Panels should be ordered only if all components are medically necessary. Do not
order full panels and individual components for test names found in those panels for the same specimen draw
on a patient, causing duplicate orders of tests on same sample.

CLINICAL CONSULTANTS CONTACT INFORMATION
Shands Healthcare Clinical Laboratory Medical Directors are available to assist you with laboratory testing
questions, including ordering and interpretation.

Core Laboratory (Chemistry, Hematology, and Coagulation) - Dr. Neil Harris at 265-0680 ext.4-4717 or
Dr. Stacy Beal at ext 4-4952
Microbiology/Virology - Dr. Kenneth Rand at 265-0680 ext.4-4875 or Dr. Stacy Beal ext 4-4952
Blood Bank - Dr. Peter Pelletier at 265-0680 ext 4-0490 or Dr Faisal Mukhtar ext 4-0487
Transplant Laboratory - Dr. Steve Goldstein at 265-0680 ext. 7-2223
Hematopathology - Dr. Robert Seifert at 265-0680 ext.7-2039
Cytology - Dr. Marino Leon at 265-0680 ext. 7-9260
Histology - Dr. Joanna Chaffin at 265-0680 ext. 7-2052
IHC – Dr Sara Falzarano at 265-0680 ext 7-9254
Point of Care – Dr William Winter at 265-0680 ext 4-5540

Page 8
SPECIMEN COLLECTION INFORMATION
A Specimen Collection Manual is available on the Shands laboratory intranet website via the UF Health Shands
Portal at: https://bridge.ufhealth.org/shands-clinical-labs/wp-content/uploads/sites/50/2020/09/Specimen-Collection-And-
Test-Catalog-Version-080420.pdf

This manual includes information regarding collection requirements for all types of specimens, including tissue
and cytology specimens.

REFLEX TESTING INFORMATION
Reflex Tests are additional tests performed according to the established laboratory protocols as standard of
care. They are indicated when initial results meet predetermined criteria, approved by laboratory director,
necessitating a related test which is medically appropriate. They do not require an additional order from the
ordering provider. All reflex tests are billed for.

      Page 9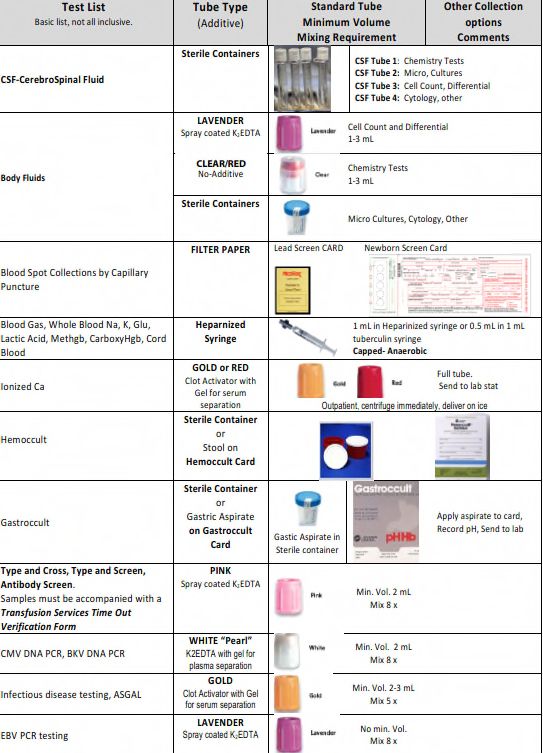
Reflex Test List

  Reflex Tests are additional tests performed according to the established laboratory protocols as standard of
  care. They are indicated when initial results meet predetermined criteria, approved by laboratory director,
  necessitating a related test which is medically appropriate. They do not require an additional order from the
  ordering provider. All reflex tests are billed for. The list below includes reflex tests for UF Health Medical
  Laboratories. Revised 04/07/2021. For questions about specific referral laboratory reflex policies, please
  contact Laboratory Customer Service 352-265-0522.

Initial Test                              Reflex Criteria                                Reflex Test

                                                   Core Laboratory

                                                                                       HIV1/2 Multispot
   HIV antibody- antigen
                                                                            Note: This test replaced Western Blot
          combo                               Positive
                                                                        (reflex to quantitative if Multispot is negative)

        HCV antibody                          Positive                               Reflex to quanitative

       Serum protein                                                   Serum Immunofixation electrophoresis and/or
                                  Suspicious "bands of restricted
       electrophoresis                                                             Immunotyping
                                            mobility"

        Urine protein             Suspicious "Bands of restricted
                                                                            Urine immunofixation electrophoresis
       electrophoresis                       mobility

    First time hepatitis B
                                                                          Hepatitis B surface antigen confirmation
       surface antigen                        Positive

    Hepatitis B core total
                                                                                Hepatitis B core IgM antibody
         antibody                             Positive

      Sickle cell screen                                                         Hemoglobin electrophoresis
                                              Positive

                                  Elevated Collagen Epinephrine            Platelet function confirmation using the
   PFA Platelet Function
                                     closure time (> 190 sec)                      Collagen/ADP cartridge

                                  Positive for Leukocyte Esterase,
      Urinalysis Screen             Nitrite, or WBC> 10, (+ for                             Culture
                                               Bacteria)

   Drug screening test on                                                  Confirmation by liquid chromatography
           urine:                                                        tandem mass spectrometry (reference lab
                                                                                            test):
       Amphetamines                                                                   Amphetamines
          Cocaine                                                                        Cocaine
                                       NICU/34/35/95 only
       Cannabinoids                                                                    Cannabinoids
                                    Positive for any of the drugs
        Barbiturates                                                                    Barbiturates
      Benzodiazapenes                                                                Benzodiazapenes
        Oxycodone                                                                       Oxycodone
        Methadone                                                                       Methadone
          Opiates                                                                         Opiates

         Page 10
T. pallidum EIA
Criteria: positive
Reflex test: RPR
Syphilis screen Positive
If RPR positive: RPR titer
If RPR negative: TPPA
Hepatitis C Antibody Positive Quantitative HCV (if first positive)
If high: reflex Free T4 and TPO
TSH Increased TSH/ Free T4
If low: reflex Free T4 and Total T3
Microbiology
Identification of pathogens, and
Bacterial culture
Positive Susceptibility when applicable
Cryptococcus antigen
Positive Cryptococcus antigen - titer
Identification of yeast and fungi
Fungal culture and
Positive
susceptibility on yeast isolates when applicable
Identification of Mycobacteria
and
susceptibility when applicable
If Acid fast bacteria, or mold/yeast are
AFB culture
Positive recovered on bacterial culture, the appropriate
AFB or Fungus Culture order will be added for
identification and/or susceptibility as applicable.
RPR
Titer and TPPA
Positive (if TPPA not previously positive)
Blood Bank
All test specimens, Required per Regulatory
excluding Type & Agencies (Historical ABORH ABO/Rh Confirmation
Screen specimens is the normal parameter)
*Discrepancy (Forward &
ABO/Rh reverse match is the normal ABO/Rh Resolution
parameter)
Page 11Any or all of the following:
Antibody Identification Panel
Crossmatch
Neutralization
Enzyme Treatment
Type & Screen Antibody Titer
(ABO, Rh & Antibody Antibody Screen - Positive Prewarmed Antibody Panel
Screen) Selected Cell Antibody Panel
Rare Cell Antibody Panel
Differential(Triple)Adsorption
Autologous Adsorption
Chloroquine/AET/DTT Treatment
Phenotyping/Genotyping
*Not Electronic XM Eligible
Additional Packed Cell ABO/Rh, AntibodyScreen, Serologic
(EXM is the normal
Units* XM
parameter)
On-demand Blood Electronic Crossmatch
Electronic Crossmatch
Products Eligible
Any or all of the following:
Poly DAT
IgG DAT
Direct Antiglobulin C3 DAT
Positive
Test (DAT) Elution
Antibody Identification Panel
Antibody Absorption (Warm &/or
Differential)
Mother:
Fetal/Maternal Bleed Screen (Rosette
Rh neg mother or Rh Screen)
Partial-D mother Antibody Identification Panel
RhIg Work Up and Kleinhauer Betke
Rh pos or Rh Unknown Baby:
baby DAT
Choloroquine/AET/DTT/Enzyme (Ficin
or Papain)
Any or all of the following tests:
Clerical & Visual Check
Repeat ABORH on Pre & Post Sample
Repeat Antibody Screen on Pre & Post
Sample
CBC, Hematocrit, Retic Count
Urine Analysis, Blood, RBC,
Patient exhibited certain
Hemosiderin
Transfusion Reaction symptoms or adverse
Poly DAT
Investigation reactions when
IgG DAT
administered blood product
C3 DAT
Haptoglobin
LDH & AST
BUN/Creatinine
Total & Direct Bilirubin
Peripheral blood Smear, morphology
PT, PTT, Fibrinogen, FSP, D-dimer
Page 12Page 13
Collection Guidelines
Proper patient preparation, timing of specimen collection, selection of specimen container type including
preservatives and anticoagulants, specimen transportation and relevant patient clinical data are critical for
successful testing, timely reporting of laboratory results, and proper diagnosis.

Laboratory Order

Orders may be transmitted to the laboratory electronically or in paper format.

Orders should include:
   o 2 patient identifiers: Name and either Shands patient Medical Record number or date of birth
   o Ordering provider Name, ID Number and address
   o Qualified signature (Ordering Physician, PA, APRN and/or Resident)
   o Diagnosis code (ICD10) for each test ordered.
   o Specimen Collection date and time.
 Patient Preparation
 Patient should be instructed of pre-testing requirements prior to arrival at a draw site. These may include
 fasting, special dietary consumption, or other requirements.
 Patient Identification
 Each patient must be identified positively by means of two patient identifiers before collecting a specimen for
 clinical testing. Where available, a Beaker Rover device should be used to positively identify the patient by
 scanning the patient’s ID band. The patient’s identity should be verified by asking the patient to identify him
 or herself whenever it is practical. The identifying label must be attached to the specimen container(s) at the
 time of collection.
 Patient Safety Note: Room number or physical location cannot be used as an identifier.
Registered/Wrist-banded Patients: Compare two identifiers (full patient name and the Shands’facility medical
 record number) on the identification band to another document such as the order form or specimen collection
 label to confirm you have the correct patient.
 Patient Safety Note: For all inpatients, ED patients, and those outpatients having an operative or invasive
 procedure, a wrist band is required. If the patient wrist band is not present or is illegible, contact the primary
 caregiver and have the patient properly identified and wrist band applied before proceeding with specimen
 collection.
Non Wrist-banded Outpatients: Ask the patient their full name and date of birth. Compare two identifiers
 (full patient name and date of birth) to another document such as the order form or specimen collection
 label to confirm you have the correct patient. For patients who are young or incoherent, a family member,
 guardian, nurse or physician may help identify patient.

       Page 14
Specimen Labels
Each primary specimen container (innermost container that actually holds the specimen) must be labeled at the
time of specimen collection in the presence of the patient:
Patient’s first and last name and a second identifier (DOB or medical record number, social security
number, account number or accession number).
A 3rd identifier – Blood Bank ID# along with the completed TIME OUT VERIFICATION FORM
(100030156) for transfusion compatibility testing,
Date and time of collection for specimens. Accurate collection date and time is vital for result review and
proper patient care.
Initials or ID of person collecting the specimen.
Exact anatomical site description for specimens such as body fluids and tissue specimens. Slides may be
accepted with one identifier so long as the secondary container has two identifiers. 2 identifiers are
preferred.
Computer generated labels are recommended. If preprinted labels are not available, handwritten patient
information is acceptable if legible.
Patient Safety Note: Every specimen tube or container must be labeled regardless of size. Place label on the
container, NOT on the LID or COVER to minimize the risk of mis-identification if multiple specimens are
being processed.
Page 15Specimen Rejection
Patient information on the specimen container and order (electronic or paper order) must match. If
discrepancies cannot be resolved, specimen must be recollected.
Routine blood and body fluid specimens that are not labeled properly or do not meet other
acceptability guidelines (inadequate specimen, improper collection, handling or transportation),
will be rejected. The ordering physician/unit is to be notified with request to recollect the
specimen(s).
Corrections on the label or forms may be allowed in certain circumstances (e.g., downtime labels
without a collection time). All errors must be corrected by the personnel involved in the collection.
In certain rare cases when a specimen cannot be recollected due to either the timing of the
specimen collection or the site that the specimen was obtained from (i.e., CSF specimens, tissue
specimen from surgery), the laboratory medical director, pathologist or pathology resident, in
consultation with the ordering physician may authorize testing after the specimen is properly
labeled.
Patient Safety and Quality Note: SUF laboratories reserves the right to reject any specimen not
meeting safety, labeling, collection, transportation, minimum volume or other requirements as
defined in this manual and test catalog.
Examples of unacceptable/rejected specimens include:
o Specimen tube/container with no label
o Two or three tubes with one label wrapping all tubes
o Unlabeled specimens with loose labels in specimen bag
o A container with 2 different patient labels
o Tube with the wrong patient label
o Specimen transportation requirement not met
(i.e., not transported on ice or not protected from light when required)
o Serum/Plasma not separated from cells in timely manner
o Specimen syringes with needles attached
o Quantity of specimen is insufficient (QNS).
o Unacceptable specimens due to contamination, (line draws, collections above IV Lines, stool in urine,
etc.), hemolysis, lipemia, clotting or other unacceptable issue per test specific guideline.
o Wrong tube
Page 16Page 17
Specimen Transport

All diagnostic specimens should be submitted in properly labeled closed containers that are inside a sealed biohazard
bag.
Care should be given to transport all specimens in a manner to prevent contamination of workers, other patients and the
environment.
The hospital pneumatic transport system may be used to transport most specimens within the facility. Follow current
guidelines for system. Ensure that all specimens are transported in a sealed biohazard bag. If any specimen spills during
pneumatic transport, refer to current facility policy and procedure for cleanup and notification of appropriate
departments.
Specimens transported by couriers should be triple packaged. The original container must be leak-tight and inserted into a
secondary bag with preferably absorbing material to absorb accidental spills. The outer packaging (cooler) must be
designated and labeled as biohazard and secured during transport to prevent movement. All operators of motor vehicles
that transport specimens are trained as to the proper transportation rules for the type of hazardous materials they transport.
Safety Note: Needles should be removed from all specimen collection devices before transporting. Specimens received
with intact needles will be rejected.

          Page 18
Blood Collection Tubes or Vials
Blood Specimen Overview
Blood is the most frequent body fluid used for analytical testing. The most common samples of laboratory testing are
whole blood, serum, or plasma. Refer to each test specific specimen requirements in the online test catalog.
Whole blood specimens are usually collected in Lavender and dark green tubes with an anticoagulant and are not
centrifuged or frozen. The whole blood lavender tube is the more common specimen of choice that is used for
hematology tests such as complete blood counts.
Serum is the clear yellowish fluid that is obtained when the blood is allowed to clot and the specimen is separated into its
solid and liquid components. Serum obtained from specimens collected in the Yellow/Gold or Red tubes is the specimen
of choice for many chemistry and virology tests.
Plasma is the clear yellowish fluid that is obtained when blood is collected in an anticoagulant tube and the specimen is
separated into its solid and liquid components. Plasma contains fibrinogen and other clotting factors that are absent from
serum. Plasma obtained from specimens collected in Light Green, Lavender, and Light Blue tubes is the specimen of
choice for many chemistry and coagulation tests.
The preferred collection method is venipuncture using a closed vacuum tube collection method or syringe method. Refer
to Chart 1: UF Health Medical Labs Specimen Collection Guide for general guidelines. Blood should be obtained from a
freely flowing venipuncture performed according to current nursing or laboratory venipuncture procedure.
1. Tubes should be collected in the recommended order based on the test(s) being collected.
CLEAR “Non-additive” tube. NOTE: The RED Plastic serum tubes contain a clot activator that may cause
interference with coagulation testing. Thus use the CLEAR Hemogard tube for discard.
LIGHT BLUE tubes (Sodium Citrate Coagulation tubes). Note: In the event that only light blue top tubes are to be
collected with a butterfly collection system, a “CLEAR TOP” vacutainer tube must be used first to displace the air
in the butterfly set tubing. This is to avoid a short draw fill effect with the blue tube. It is critical that the blue tube is
filled to the proper indicated fill line.
RED, GOLD, RED/BLACK Speckled Serum tubes with or without clot activator, with or
without gel.
GREEN Heparin (Lithium or Sodium) tube with or without gel plasma separator.
LAVENDER, PINK or PEARL top EDTA Tubes GRAY top Glycolytic inhibitor tubes
Other type tubes
3. All tubes should be inverted gently several times in order to mix the blood specimen with any anticoagulant.
4. Adequate volume should be collected for the number and types of tests requested. Minimum blood volumes are
determined for each test. If insufficient volume is collected, call the laboratory before sending to convey the
priority of testing to be performed.
5. Label specimens per protocol.
6. Send specimen(s) immediately to the laboratory. If delay in transporting to the laboratory will occur, the
specimen may require additional processing. Review test specific specimen requirements to identify if the
specimen requires immediate centrifugation, separation of serum/plasma from the red blood cells, refrigeration,
freezing or other special processing.
Blood Collection Safety Notes:
Page 191. Plastic vacutainers and syringes are preferred unless no other options are available.
2. Carefully consider the need for laboratory tests, avoiding unnecessary repetition of tests and the use of standing
orders in efforts to minimize unnecessarily large blood draw volumes. Blood losses from phlebotomy, particularly in
pediatric patients and those with repeat venipunctures, may cause iatrogenic anemia and increase the need for
transfusions.
3. Adverse consequences of excess venipunctures includes: Complications during collection for both the patient and
health care worker; Patient risks associated with transfusions; and increased amounts of hazardous/biological
waste.
Blood Collection Supplies
Collectors of specimens are responsible to assure that collection supplies such as blood collection tubes and collection
devices (e.g. heel lancets, culture swabs and transport media) are stored according to manufacturer’s requirements and
used before the manufacturer expiration date. For newborn screening collection cards, if expiration date is not printed on
the individual cards, another mechanism, such as serial number, may be used for tracking. Basic supply list includes:
1. Blood collection sterile disposable, single-use devices
Needles gauge 21-23 for general patient use
Needles gauge 23-25 for pediatric patient use
Safety-Lok® blood collection (butterfly) sets
Capillary Puncture devices (i.e., Tenderfoot®)
2. Disposable vacutainer needle adapters or syringe and blood transfer device
3. Evacuated tubes or filter paper appropriate for test ordered. (Vacutainers, microtainers, filter paper)
4. Disposable single-use tourniquet (latex-free)
5. Venipuncture site cleansing solution
Sterile alcohol preps is acceptable for most venipuncture procedures and capillary punctures.
Non-alcoholic cleanser should be used when collecting ethanol (alcohol) test specimens.
Chloraprep® swap stick (2% chlorhexidine gluconate in 70% isopropyl alcohol) is required when collecting blood
cultures
6. Disposable gloves
7. Gauze 2x2 squares
8. Dressing (paper tape, coverlet, corban wraps)
9. Waste and sharps containers
10. Patient identification labels
11. Zip lock specimen transport bag
Page 20Blood Collection Procedures
Percutaneous Venipuncture Procedure
1. Identify self to patient.
2. Properly identify the patient using two unique identifiers.
3. Verify test(s) ordered and if there were any special preparation requirements (fasting, diet, timed collections, etc.) If
yes, verify with patient or care giver that the special preparation requirements have been met.
4. Assemble the necessary collection supplies and vacutainer tubes.
5. Position patient. Most patients should be seated or laying in a position so the arm is extended and the wrist is
lower than the elbow. This should allow comfortable access to the antecubital fossa.
6. Wash hands thoroughly and apply clean gloves.
NOTE: All patient blood specimens are to be treated with “Standard Precautions” as it is frequently impossible to
know which specimens might be infectious. Gloves are to be worn when performing a venipuncture.
7. Apply tourniquet to extremity 2 inches proximal to desired site.
8. Select venipuncture site (usually arm veins, Cephalic, Median and Basilic. Refer to figure). A vein with good
circulation will be palpable and should spring back when palpated. Larger veins are generally palpable and not
visible. Surface veins may be visible but not palpable. Choose a vein with a large diameter as not to collapse it.
9. The Cubital Vein is usually the vein of choice. It is the largest and fullest vein and is best anchored by the surrounding
musculature of the arm.
10. The Cephalic Vein is the next largest vein and usually the second best choice.
11. The Basilic Vein is the smaller vein and is not anchored well by the surrounding musculature. If this vein is used, the
phlebotomist must ensure that they anchor the vein well by holding the skin taut just below the needle insertion point.
This vein is close to the brachial artery so there is more risk of hitting an artery. Exercise caution.
Avoid extremities with an A-V shunt or status/post mastectomy.
Avoid areas with extensive scarring.
Avoid sites with hematomas.
Avoid using any site above an IV line.
12. Prep overlying skin with alcohol using a circular motion starting from the center and moving outward. Chloraprep®
may be used if patient is allergic to alcohol. If the venipuncture site is touched, the site must be cleansed again.
13. Insert blood collection tube into holder and onto needle up to the recessed guideline on the Vacutainer® adapter. (or
prepare syringe)
14. Unsheath needle and position the needle with the bevel up and the shaft parallel to the path of the vein.
Page 2115. Hold the patient’s arm using your thumb to draw the skin taught to anchor the vein. Verbally state to patient that the
venipuncture is starting and insert the needle at a 15-30˚ angle and 1/4 to 1/2 inches below the intended entry into the
vein.
16. While securely grasping the vacutainer holder with one hand, use the other hand to push the tube onto the needle
inside the vacutainer. The stopper of the tube must be adequately punctured. If venipuncture is successful, blood
will start to fill the tube.
17. Remove the vacutainer tubes as they fill. The shut-off valve recovers the point, stopping blood flow until the next
tube is inserted.
18. Tubes containing additives should be mixed immediately upon draw by inverting 5-10 times. Avoid vigorous
mixing because it may cause hemolysis and erroneous patient results.
19. To obtain additional specimens, insert the next tube into the holder and repeat steps 7-9. When all tubes are
filled, remove last tube from the holder.
20. After all tubes are collected, fold a gauze pad over the needle and remove the needle in one quick motion and
activate the safety device. Discard into a sharps container.
21. Apply pressure to site with gauze pad. Check patient’s arm to ensure bleeding has stopped. Apply gauze pad secured
lightly with tape to the puncture site. Instruct patient to leave bandage in place for at least 15 minutes.
22. Label all blood tubes in patient’s presence. Record time of draw and collectors Initials or identification code on
each label. Place labeled specimens in biohazard bag.
23. Discard gloves and wash hands.
24. Transport specimens to the laboratory for testing.
Venipuncture Procedure with Needle and Syringe
A syringe and needle set may be used in the venipuncture process instead of the vacutainer holder system outlined in
venipuncture procedure.
1. Perform venipuncture. Pull back on plunger or syringe slowly until sufficient volume of sample is achieved.
2. Remove needle from patient arm and immediately activate the safety feature according to manufacturer instructions
and discard into a sharps container.
3. Attach syringe to a blood transfer device, female luer adapter.
4. Insert vacutainer tubes into the transfer device. Fill to desired level. Remove vacutainer tube and add next. Continue
until all required vacutainer tubes are filled.
Note:
1. Venipunctures should be performed by persons who have been trained and passed competency testing in phlebotomy.
2. Phlebotomist should only attempt a Venipuncture two times. If still unsuccessful, call another phlebotomist
to perform procedure.
3. Patient complications may occur during or immediately after procedure. Refer to this list on the more common
complications and the appropriate response action(s) and care recommended to address or minimize the
complication.
Bruises (Ecchymosis) – Most commonly caused by a leakage of a small amount of blood around the puncture
site. Prevent by keeping patient arm straight and applying pressure to venipuncture site for 3-5 minutes to allow a
platelet plug to form.
Fainting (Syncope) – The patient becomes frightened and the body goes through physical stages of increased
heart rate, dilated blood vessels and blood pools in the tissues followed by slow heart rate. The slower heart rate
Page 22deprives the brain of blood resulting in fainting. If this occurs, withdraw the needle, lower the patient’s head,
apply a wet towel to patient’s forehead and neck.
Hematoma – Caused by a leakage of a large amount of fluid around the puncture site which can cause the area
to swell. This may be caused by the needle going through the vein, the bevel of the needle only partially in the
vein, or failure to apply adequate pressure at end of procedure. If a hematoma occurs, withdraw the needle and
apply direct pressure on puncture site.
Seizures/Convulsions – Caused by the patient’s condition or a reaction to pain or fright caused by the needle.
Remove the needle and protect the patient. Keep the patient from hitting his head or hurting himself. Activate
facility specific medical emergency plan if needed.
Vomiting/Choking – The biggest danger is that the patient may aspirate some vomit. If the patient is sitting, have
him lean forward and use an emesis basin or trash can. If the patient is lying down, turn his head to the side and
provide an emesis basin.
Infection at Venipuncture Site – This is rare but can be caused by not using aseptic technique when
performing a venipuncture. Instruct the patient to keep a bandage on for at least 15 minutes post puncture.
Pain – There is always a little pain associated with a venipuncture. Inform the patient that there will be some
discomfort and communicate to them when the venipuncture will occur to avoid startled reactions. Allowing the
alcohol to dry before puncture will minimize pain.
Reflux of Anticoagulant – If the last tube is not released from the multi-sample needle sleeve before removing the
needle from the arm, it is possible for blood from the collection tube to back flow (reflux) into the patient’s vein.
Some patients have been known to have reactions to additives in tubes, especially EDTA. If this happens, make
sure to keep the patient’s arm in a downward position. If patient is lying down, raise his head or extend his arm
over the edge of the bed.
Nerve Damage – Excessive or blind probing for a vein can lead to permanent damage of a main nerve. If unable to
find vein, begin procedure from the beginning with a new needle. Ask for assistance if still unable to find a vein.
Inadvertent Arterial Puncture – If an artery is punctured, the blood will be bright red in color as compared to the
dark red color of venous blood. If this occurs, apply direct pressure to the puncture site for a minimum of 5 minutes.
Petechiae – Blood which escapes into the epithelium will cause small, non-raised red spots on a patient’s skin. This
usually indicates a coagulation problem that may be due to defective platelets or defective capillary walls. Petechiae
are common in leukemia or patients undergoing chemotherapy. The phlebotomist should be alert to the possibility of
prolonged bleeding in the patient.
Edema – Caused by an abnormal accumulation of fluid in the intercellular spaces of the body resulting in swelling.
Edema is most commonly caused by IV infiltrations. Do not use the edematous arm to prevent specimen
contamination from tissue or IV fluid.
Obesity – Veins may be deep and hard to palpate. Consider the hand or forearm as an alternative venipuncture site.
Ask the patient where the best site to obtain blood is located (many times the patient knows from previous
experiences).
Intravenous Therapy – Venipunctures should never be performed above an IV site. Perform procedure on other
arm. If both arms are unavailable, consult with the nurse in charge of patient for assistance. One alternative is to have
the nurse turn the IV fluid off for 2 to 3 minutes prior to performing a venipuncture OR to perform the venipuncture
below the IV site. In extreme circumstances, perform capillary puncture collection or obtain permission for a
venipuncture on ankle or foot.
Veins Damaged by Burns, Scars or Occluded – These veins are very sensitive and tend to have limited blood
flow or may collapse and should not be used.
Page 23 Post Mastectomy – Surgeons state that it is permissible to draw from the arm on the mastectomy side after 6 months
to 1 year without danger of lymphostasis (a build-up of lymphatic fluid in the lymph glands). If the patient insists that
the physician has told them not to have blood drawn on that side, honor the patient’s request.
Allergies to Antiseptics and/or Adhesives – Some patients may be allergic to alcohol, iodine, band aids or tape. Use
an approved antimicrobial soap to cleanse skin. Paper tape or Coban® wrap may be used to bandage the site.
Collapsed Veins – Using a vacuum tube on a small delicate vein or pulling back on the plunger of a syringe too
quickly may cause a vein to collapse. Consider use of a smaller vacuum tube, a smaller syringe or a butterfly or
consider use of a partial draw tube to enable a successful venipuncture.
Thrombosis – Blood clots at the site of the puncture can reside in blood vessels and can partially block a vein or
artery. An embolus results when a thrombus fragment breaks off and moves through the body. Patients may request
to have blood drawn from a certain arm if they are prone to develop clots in a certain area.
Arterial Punctures
Some tests require arterial blood specimens. Arterial punctures should only be performed by qualified experienced
personnel. Specimens collected in this fashion are collected by non-laboratory personnel such as nursing staff,
anesthesiologists, physicians and Respiratory therapists. Generally, arterial specimens are performed on critically ill
patients, patients during surgery and patients having special invasive procedures.
Refer to facilities policy and procedure for Arterial Puncture guidelines.
Line Collections
Specimens collected in this fashion are collected by non-laboratory personnel such as nursing staff, anesthesiologists,
physicians and Respiratory therapists.
Refer to current facility policies for specific guidelines and procedure for blood specimen collections from lines.
NOTE: Collection of blood for coagulation testing through intravenous lines that have been previously flushed with
heparin should be avoided, if possible. If the blood must be drawn through an indwelling catheter, possible heparin
contamination and specimen dilution should be considered. When obtaining specimens from indwelling lines that may
contain heparin, the line should be flushed with 5 mL of saline and the first 5 mL of blood or 6-times the line volume
(dead space volume of the catheter) be drawn off and discarded before the coagulation tube is filled. For those samples
collected from a normal saline lock (capped off venous port) twice the dead space volume of the catheter and extension
set should be discarded.
Page 24Capillary Punctures
Capillary puncture may be used for obtaining specimens from infants or adults where venipunture is difficult.
Specimens from infants under the age of 6 months are usually collected by heelstick. Patients over the age of 6
months should have capillary puncture procedures by fingerstick.
Capillary specimens may by collected in microtainers which are color coded similar to the vacutainer tubes and sent to
the laboratory for testing. Recommended order of collection for microtainer specimens:
Capillary blood gases
Slides/smears
Lavender EDTA microtainers
Other Additive microtainers (green – heparin)
Serum microtainers ( red/gold )
NOTE: Capillary punctures are not suitable for blood culture testing and most coagulation tests.
Capillary Specimens may be collected on filter paper and sent to lab for testing.
Capillary Specimens may be used immediately for point-of-care testing.
Capillary Puncture – Heel Stick
1. Position the infant with the head slightly elevated.
2. Warm the heel from which blood is to be obtained. A commercial heel warmer may be used.
3. Cleanse the heel with alcohol prep, then dry with a sterile 2x2 as alcohol can influence test results.
4. Using a sterile lancet, puncture the most medial or lateral portion of the plantar surface of the heel, medial to a
line drawn posteriorly from the mid great toe to the heel.
5. Puncture no deeper than 2.4mm (approximately 0.1 inches).
6. Punctures to the posterior curvature of the heel cab cause damage to the bones.
7. Previous puncture sites should be avoided. Avoid bruising the infant’s heel when obtaining blood.
8. Wipe away the first drop of blood with a sterile 2x2 gauze.
9. Allow another large drop of blood to form. Lightly touch the microtainer capillary collection device (or filter
paper) to the LARGE drop of blood. Collect drops of blood into the collection device by gently massaging the
finger. Avoid excessive pressure that may squeeze tissue fluid into the drop of blood. Fill the microtainer tube(s)
as needed.
10. Cap, rotate and invert the microtainer to mix the blood collected.
11. When finished, clean the site and apply pressure with clean gauze to stop the bleeding. Apply an adhesive bandage.
12. Label all specimens per accepted guidelines.
13. Place labeled specimens in zip lock bag and deliver to the laboratory as soon as possible.
Infant Heel Stick Puncture Site: The darkened areas
illustrate the acceptable areas for skin puncture. The little
toe side is the primary area of choice.
Page 25Capillary Puncture – Finger Stick
1. Position the patient so that the hand is easily accessible.
2. Cleanse the fingertip of the 3rd (middle) or 4th (ring) finger with an alcohol prep. Allow the finger to dry
or wipe dry with a sterile 2x2 gauze.
3. Using a sterile lancet, puncture the fingertip in the fleshy part of the finger, slightly to the side of the center
and across (perpendicular to) the grooves of the fingertip. This enables the blood to form as a drop on the
fingertip. If the puncture is parallel to the lines of the fingerprint, the blood will not form as a drop but will
run down the finger making collection difficult.
4. Wipe away the first drop of blood with a sterile 2x2 gauze.
5. Allow another large drop of blood to form. Lightly touch the microtainer capillary collection device (or
filter paper) to the LARGE drop of blood. Collect drops of blood into the collection device by gently
massaging the finger. Avoid excessive pressure that may squeeze tissue fluid into the drop of blood. Fill the
microtainer tube(s) as needed.
6. Cap, rotate and invert the microtainer to mix the blood collected.
7. When finished, clean the site and apply pressure with a clean gauze to stop the bleeding. Apply an adhesive
bandage.
8. Label all specimens per accepted guidelines.
9. Place labeled specimens in zip lock bag and deliver to the laboratory as soon as possible.
PKU Specimen Collection
1. Allow the blood to soak through and completely fill the pre-printed circle on the filter paper.
2. Filter paper should touch only the blood and not the heel or finger.
3. Apply only ONE drop of blood per circle. Do not add blood to a circle already filled or partially filled with
blood.
4. Apply blood to the printed side of the filter paper.
5. Make certain that the blood completely saturates all four (4) circles and is visible from both sides.
6. If the blood flow is diminished, repeat the capillary PUNCTURE to complete the collection.
7. Allow filter paper to air dry for two (2) hours at room temperature. Avoid placing sample on hot
surfaces such as bili-lights or monitors.
8. Forward completed/dry collections to the laboratory as soon as possible.
Page 26Blood Culture Collection
Blood Culture Overview: The detection of microorganisms in a patient’s blood has diagnostic and prognostic
importance. When bacteria multiply at a rate that exceeds the capacity of the reticuloendothelial system to
remove them, bacteremia results. Bacteria enter the blood from extravascular sites via lymphatic vessels. Blood
cultures are essential in the diagnosis and treatment of the etiologic agent of sepsis. Bacterial sepsis constitutes
one of the most serious infectious diseases and therefore, the expeditious detection and identification of blood-
borne bacterial pathogens is one of the most important functions of the diagnostic microbiology laboratory.
Guidelines to achieve this end are described in this procedure.
1. Blood cultures can be obtained by using the venipuncture method. Select venipuncture site.
2. Optimal skin preparation includes cleansing with ChloraPrep®. The venipuncture site should not be
palpated after disinfection unless a sterile glove is used. If you must relocate the vein, apply
ChloraPrep® to fingertip and let dry before touching the puncture site.
3. Remove the cap from culture bottles and clean with ChloraPrep®.
4. Perform venipuncture using a sterile syringe and needle. Pull back on plunger or syringe slowly until
sufficient volume of sample is achieved. To achieve best results, collect 20 mL of blood for an adult
(Minimum 6 mL) and 6 mL of blood for a pediatric (minimum 4 mL). (Sterile butterfly sets may also be used
with a blood transfer device. Fill the Blood culture bottles directly.)
5. Remove needle from patient arm and immediately activate the safety feature according to manufacturer
instructions and discard into a sharps container.
6. Attach syringe to a sterile blood transfer device, female luer adapter.
7. Add 8-10 mL of blood into purple lytic bottle first. (Minimum 3 mL)
8. Add 8-10 mL of blood into gray aerobic culture bottle. (Minimum 3 mL)
Use a pediatric bottle if necessary to replace the gray aerobic bottle. Pediatric bottles are acceptable with
1-3 mL of blood per bottle. (Pediatric bottles can be used for adults that are hard sticks.)
9. Label each blood culture bottle per policy
Label should include complete patient name, medical record number, and date time of collection,
location of venipuncture (i.e., L arm, R hand, etc.) and initials of person collecting the specimen.
Labels should not cover bottom of the bottle.
Labels should not cover or touch the bar code on the bottle’s label.
Labels should run the length of the bottle (from top to bottom).
The patient name should be at the top, and the label should cover the bar code on the bottle
10. Transport blood cultures to Microbiology within an hour of collection time. Blood culture bottles
should not be refrigerated.
Page 27Adult Set Pediatric AFB – Red Fungal – Red
Patients
Gray Top- Aerobic Purple Top-
Lytic Peds Plus Myco F Lytic Myco F Lytic
F Anaerobic F Aerobic F
8-10 mL whole 8-10 mL 1-3 mL of blood 3-5 mL of blood 3-5 mL of blood per
Blood whole Blood per bottle per bottle bottle
No less than 3 ml
per bottle
May pair with
No more than 10 mL Purple Lytic F
per bottle bottle to give
anaerobic result
Page 28Urine Collection Procedures
Random Urine Collection
Urinalysis, urine chemistry tests, drug screens, culture and sensitivities are some of the few tests that may be ordered.
Refer to the test catalog for test specific specimen requirements. Random Urine collection procedures:
Clean Catch Method
Patient is provided with sterile collection cup and two towelettes.
Upon entering bathroom, patient should wash hands with soap and water
Remove lid from cup; taking care NOT to touch the inside of the lid or cup: place lid flat side down on the counter.
Wash the area with one of the towlettes. DO NOT USE SOAP.
WOMEN: Wash the area around the vagina. Wash genital area from front to back. Separate the genital folds (also
known as lips or labia) with your hand. Gently wipe inside the folds with a second towelette.
MEN: Wash the area around the penis. Retract the foreskin, if present, and clean the head of the penis thoroughly with
a packaged towelette.
Starting urinating into the toilet. After the first part of the urine has gone in the toilet: place the cup under the stream.
Catch 50 mL of urine. Remove cup. Finish urinating in the toilet.
Put the lid securely on the cup and wash hands.
Give sample to provider.
Infants
Thoroughly wash the area around the urethra using towelettes.
– FEMALE: Clean from the front to the back on a female infant.
– MALE: Clean from the tip of the penis down on a male infant.
A Special Urine Collection bag will be provided. It is a plastic bag with a sticky strip on one end. It is made to fit
over the infant’s genital area. Open this bag and place it on the infant.
– FEMALES, place the bag over the labia.
– MALES, place the entire penis in the bag and attach the adhesive to the skin.
Put a diaper securely over the bag. For active infants, this procedure may take a couple of attempts – lively infants
can displace the bag.
Check your baby often and remove the bag after the infant has urinated into it.
Drain the urine into a sterile container and give it to the health care provider. Do not touch the inside of the cup or lid.
Urine Specimen Collection and Transport
Urine needs to be collected and transported in the appropriate urine preservative tubes. Collect in sterile urine preservative
tubes via a transfer straw as illustrated in picture.
For Microbiology Culture and Susceptability (C&S): Gray top tube. Shake vigorously; store at room temperature.
For Urinalysis (UA) Tube: Red/Yellow top (speckled top) tube. Mix by inverting 8-10 times; store at room
temperature.
For all other Urine tests including Virology and Cytology: Red top tube; store in refrigerator.
Page 291. Submerge tip of 2. ' Push C&S 3. ' Push UA Preservative 4. Label both filled tubes 5. Dispose of transfer straw
transfer straw in Preservative Tube (cherry red/yellow with patient’s name, in sharps collector.
specimen. Tube (gray top) into top) into transfer straw the date/ time of
the transfer straw. completely. ' Hold in specimen collection
' Hold in position until position until flow stops. ' and any other data
flow stops. ' Remove tube, Remove tube, leaving required by your
leaving transfer straw in transfer straw in specimen institution.
specimen container. ' container. ' Invert UA
Shake tube vigorously. Preservative Tube 8-10
times to mix the sample.
Urine Collection from Foley Catheter
Collect the appropriate urine tubes:
For Microbiology Culture and Susceptability (C&S): Gray top tube. Shake vigorously; store at room temperature.
For Urinalysis (UA) Tube: Red/Yellow top (speckled top) tube. Mix by inverting 8-10 times; store at room
temperature.
For all other Urine tests including Virology and Cytology: /Red top tube; store in refrigerator.
QA Note: Each test must have the appropriate tube type as the type of preservative or lack of preservative is required
for each test as listed above, and cannot be interchanged (i.e., a Culture cannot be performed from the UA tube, etc.)
Timed Urine Collection
Timed urine collections may be for a two (2) or twenty-four (24) hour time period. The normal volume of urine collected
over a 24-hour period ranges from 800-2000 mL. The laboratory supplies the containers to be used for the collections
with the appropriate preservative added. The requesting location should send a message or a request slip to the laboratory
with the name of the patient, the patient location, and the test(s) requested so that the 24-hour urine container can be
prepared.
Collection Container – Obtain gallon jug from clinic or outpatient lab.
Urine Preservatives: Some 24 hour urine tests require a preservative to help stabilize the substance that is to be
measured. The preservative should be added to the sample collection container before the collection begins. Common
Urine Preservatives include:
Refrigeration: Keep urine container in refrigerator or on wet ice throughout the collection time period.
Boric Acid: 4 grams of dry powder or in tablet form added to container before collection begins.
6 N HCL (Hydrochloric Acid): 30 mL added to container before collection begins.
SAFETY NOTE: Some preservatives are caustic and the sample containers should be labeled as such.
Collect specimen into another clean container and carefully pour sample into the 24-hour collection
container.
Page 30Patient Collection Instructions: 24-hour (Timed) Urine
1. When you arise in the morning, empty your bladder into the toilet.
2. Write this date and time on the collection container label along with your full name and date of birth.
3. Collect urine, day and night, for the next 24 hours. Add all urine collected into the 24 hour container. Urine may
be collected in a separate CLEAN container and carefully poured into the 24-hour collection jug.
4. The next morning (24 hours later) collect the last urine specimen. Write the Finish time and date of this last
collection on the container label.
5. Deliver the 24-hour specimen jug and test order to one of the UF Health Shands Medical Laboratory draw
stations. 6. Timed Urine Collection Notes:
– Keep the urine container in the refrigerator during the collection.
– Collect ALL urine during the 24 hour period, or specimen will have to be recollected. (Volume of urine is
measured for testing).
– Some 24-hour urine tests also require a blood specimen. (i.e., creatinine clearance and urea clearance). Please
check with lab assistant when you drop off you urine collection to see if a blood specimen is required.
– Follow same guidelines for a 2- or 12-hour collection. The label and order should match the time period for
what is collected.
– If an aliquot of urine is lost during the collection period, note this variance on the collection label. If the volume lost
is less than 10% of the final volume, the test may be continued. If the volume lost is greater than 10%, the
entire specimen may have to be started over.
– If the total volume of the 24-hour collection is less than 200 mL, the laboratory will request a recollection
unless instructed by the patient’s physician to proceed with testing.
Page 31You can also read