UNPACKING AND ASSEMBLING YOUR BMX BIKE
←
→
Page content transcription
If your browser does not render page correctly, please read the page content below
UNPACKING AND ASSEMBLING YOUR
BMX BIKE
TOOLS NEEDED
1. 10, 13, 15, 17, AND 19MM WRENCHES
2. 15, AND 19MM SOCKETS WITH RACHET AND EXTENSION
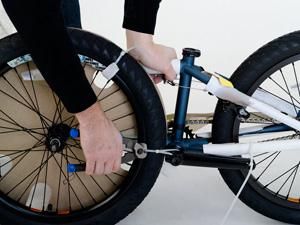
3. 4, 5, AND 6MM HEX WRENCHES
4. FLAT AND PHILLIPS HEAD SCREWDRIVER
5. PEDAL WRENCH
6. CABLE CUTTERS
7. THIRD HAND BRAKE TOOL
Begin by carefully cutting through the cardboard box with a box cutter. Remember to
1. always cut away from yourself. Please be aware of the sharp staples that may have
been used to secure the box as well.
Now remove all content from the box including the small parts box, bike and wheels
2. (may all be attached). Before proceeding, be sure that all parts and material are now
removed from the box.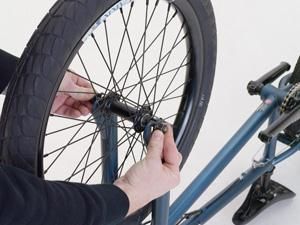
Now that your bike is out of the box, begin removing all of the packing material from the
3.   frame and detaching the wheel and handlebar by cutting all zip ties that may be holding
     parts together. Be very careful not to cut any of the bikes brake cables while doing so.

     Loosen the seat clamp and insert the seat post into the seat tube. If you have bike
     grease apply a small amount to the seat post before inserting it. Make sure that you
     have inserted the seat post past the minimum insertion line (printed or stamped on post
4.   near bottom). Finish by using a hex wrench to tighten the seat post binder. DO NOT
     OVERTIGHTEN. Next, adjust the angle of the seat to the desired position by loosening
     the seat yolk where the seat attaches to the seat post. Adjust the angle, and then re-
     tighten the seat yolk.

     It’s now time to install your handlebar to the stem. Do so by removing the stem bolts and
     faceplate, placing the bar in the stem and re-securing the faceplate to the stem. Be sure
5.
     that your cable routing is suitable and that there are no harsh bends or kinks in the
     cables.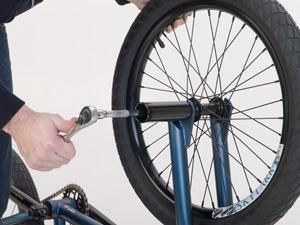
Once the handlebar is loosely placed in the stem, make sure that it is positioned
     symmetrically left to right and is parallel with the fork before tightening the faceplate
     bolts. When tightening the bolts, tighten them alternately and equally to ensure that the
6.   faceplate is equally tight on every side. The gap opening between the faceplate and the
     stem should be equal both on the top and on the bottom. Next, loosen the two bolts on
     the back side of the stem, align the stem and handlebars with the fork and re-tighten the
     two bolts on the back of the stem.

     If your bike has a Gyro follow these steps to install your Gyro cable and adjust your
     brake. If your bike comes with a straight cable, skip to step 8. First start with routing
     your upper Gyro cable under the cross bar of the handle bar. Now note the cable length,
     one side will be longer than the other. The longest cable threads into top plate on the
7.
     bikes non-drive side of the stem. The shorter cable threads into the top plate on the
     bikes drive side of the stem. Next, push the cable knarp (balled end of the cable) into the
     slotted portion of the rotor plate. Repeat this step on the opposing side. Refer to the
     Gyro instructions included with the bike for proper adjustment.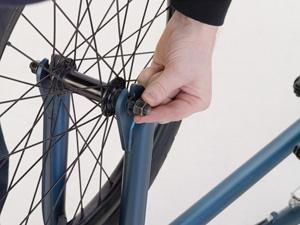
Now you can situate your bike in a comfortable working position. If you have a bike
8.   stand, that’s your best bet. If you do not have a stand you can flip your bike upside down
     resting on the seat and handlebars to finish your build.

     It’s now time to get your wheels ready for installation. Start by pulling the plastic
     protective caps off of the axle if there are any, and identify the correct tread rotation
9.
     direction. If your tire is direction specific, it may be noted on the sidewall of the tire with
     an arrow pointing in the direction the tire should roll.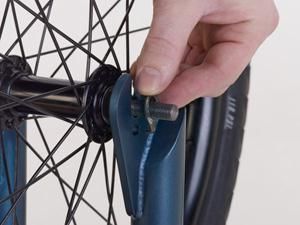
You can now mount the front wheel in the fork. Make sure the dropouts, or the part of
      the fork that the wheel attaches to, is facing forward toward the front of the bike. (If
      your bike comes with pegs, skip to step #11.) To secure the wheel, you’ll need either
10.
      a 15mm wrench or 19mm wrench depending on the axle size. Slip the front axle into
      the fork dropouts. Make sure safety washers are installed properly before tightening the
      front axle nuts.

      If your bike comes with pegs, you’ll want to install these before installing the axel nuts.
      You will need a 15mm or 19mm deep socket and extension. Make sure safety washer
11.   is installed properly on fork dropout before slipping peg onto axel. Slip the peg onto the
      axel. Insert axel nut into end of socket and thread by hand until axel nut is snug.
      Tighten down for safety. Repeat this step for the opposing side and rear peg assembly.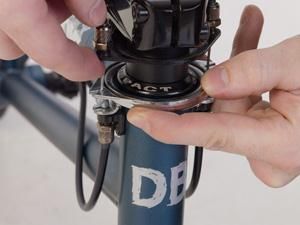
Some bikes may arrive without a front or rear brake cable installed. Use the following
      steps if this applies to your bike. Pull the break lever to the grip exposing the juncture
      where the cable enters the lever. Insert the cable knarp (cable end) into lever and guide
      cable through the designated cable slot on handle. You will also need to align the slot in
12.   the barrel adjuster and the lock ring on the barrel adjuster to insert the cable. Make
      sure the barrel adjuster is then screwed all the way into the lever. Place the end of
      cable housing into the barrel adjuster. If your bike is equipped with a Gyro, route the
      front brake cable through the hollow stem bolt down through the center of the stem and
      fork. Route the cable and housing between the front wheel and the fork blade.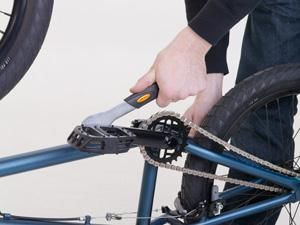
Your brake pads may need adjusting before attaching the cable. To do so, grasp brake
pad with one hand and loosen brake pad bolt. Align pad to be parallel and flush with rim
braking surface and retighten brake pad bolt. You do not want the pad to come into
contact with the tire. Once the brake pads have been adjusted, slide the cable and
housing through the barrel adjuster on the brake. Place a third hand brake tool over the
brake pads to compress the brake caliper. Attach the brake cable to the fastener and
13. secure it using the appropriate wrench. Make sure you do not pull the cable completely
tight. This will allow the brake pads to move away from the rim just slightly when the
third hand tool is removed. Fine tune the tension on the brakes using the barrel
adjusters on the lever and the brake. Using cable cutters, cut off the excess end of the
cable leaving approximately 2” of tail. Crimp a provided end cap onto the cable to keep
it from fraying. Repeat steps12 and 13 to set-up and adjust the rear brakes.
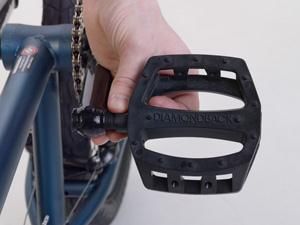
For pedal installation, we recommend applying a small amount of grease to each
pedals thread before installing. STOP!!! VERY IMPORTANT!!! Take the right pedal
14. (this should be indicated by an R on the pedal which can be seen on the end of the
spindle or on the axle depending on the pedal) and thread into the drive side crank arm.
Tighten by turning your 15mm pedal wrench to the right.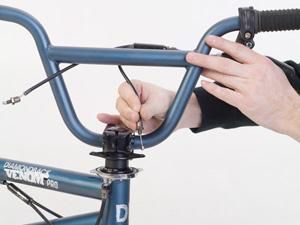
For the non-drive side (or the left side facing forward on bike) take the left pedal (this
       should be indicated by an L on the pedal which can be seen on the end of the spindle
       or on the axle depending on the pedal), and thread into the non-drive side crank arm.
       Tighten by turning your 15mm pedal wrench to the left. Do not force a pedal that will not
       thread on easily or you can cross thread the crank arm which will result in a damaged
       product.

       Now it’s time to inflate your tires and install your reflector’s and chain guard. Each tire
       will have a manufacturer’s recommended PSI on the sidewall. Please follow the
       recommended inflation setting. Using a screwdriver, install the red reflector on the seat
 15.
       post directly underneath the seat facing the rear of the bike. Install the white reflector on
       the handle bar facing forward. Install the chain guard over the chain and chain rings by
       attaching it to the seat tube and chain stay on the drive side of the bike.

       Last step is to go through the entire bike one more time to make sure that every bolt is
       tight, that your wheels are secured in place, that your front and rear brake levers and
 16.
       brakes are secure and functioning properly, and that the handle bars are tight and don’t
       move when you hold the front wheel between your legs and twist them.

*If for any reason, you do not have the proper tools or are not confident to build a bike yourself, we
strongly suggest that you take your bike to a local bike shop for assistance or to have them
assemble it. They may charge you a fee to do so.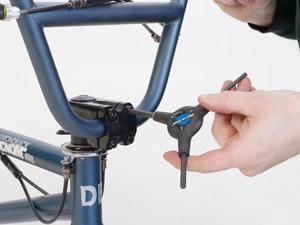
You can also read