DESIGN ACADEMY EINDHOVEN WORKING FROM HOME - USER MANUAL
←
→
Page content transcription
If your browser does not render page correctly, please read the page content below
DESIGN ACADEMY
EINDHOVEN WORKING FROM
HOME - USER MANUAL
March 2020
Dear heads, coordinators, tutors and staff, dear all,

To help you navigate the exceptional circumstances we currently find ourselves in,
we would like to support you in making full use of your DAE account. This manual
explains all about working efficiently from home. It will cover a few handy
applications that are integrated in the Microsoft 365 environment.

In this manual:

   1.   Access to the Microsoft Office 365 portal (email, files, calls)
   2.   Microsoft Teams
   3.   Remote Desktop
   4.   Online meeting platforms
   5.   Questions

We hope that this - working from home manual - will make life easier for you all.

If you experience difficulties configuring the Remote Desktop software or Microsoft
Teams, please contact the ICT Service Desk. If possible, please use email, Monday
to Friday: 09:00 – 16:30. They can be reached by phone between 09:00 - 11:00 and
15:00 - 16:00

E: ictservicedesk@designacademy.nl
T: 040-2393950
1. Access to the Microsoft
Office 365 portal
There are different ways to access your DAE email account. We will discuss three
options that you can use from home. Your log in details where sent to you by HR at
the beginning of your employment at DAE. If you don’t have access to your details
please contact the ICT Service Desk.

1.1 Via your web browser.
The Office 365 portal is available via Windows, Mac and Linux.

Step 1: go to portal.office.com in your browser and enter your DAE email address
and DAE password to log in. The portal has all the functionalities needed for working
efficiently from home including Outlook, OneDrive (personal storage), Teams (see
chapter 2), Word, Excel and your Calendar.

Step 2: Click the nine-dot icon in the top left corner to view all applications. Or go
immediately to the application you need via the main screen.

1.2 Via Remote Desktop
We advise you to work via the portal. Please use Remote Desktop only to access
files on your Q: drive. View chapter 3 for explanation.

1.3 Email, calendar and contact synchronization on mobile devices
With your login details you can log in with your smartphone and/or laptop and view
your DAE email.

Step 1: Go to your email program on your phone or laptop and click ‘Add account’.

Step 2: Choose Exchange, enter your DAE email address and DAE password to log

                                                                                         2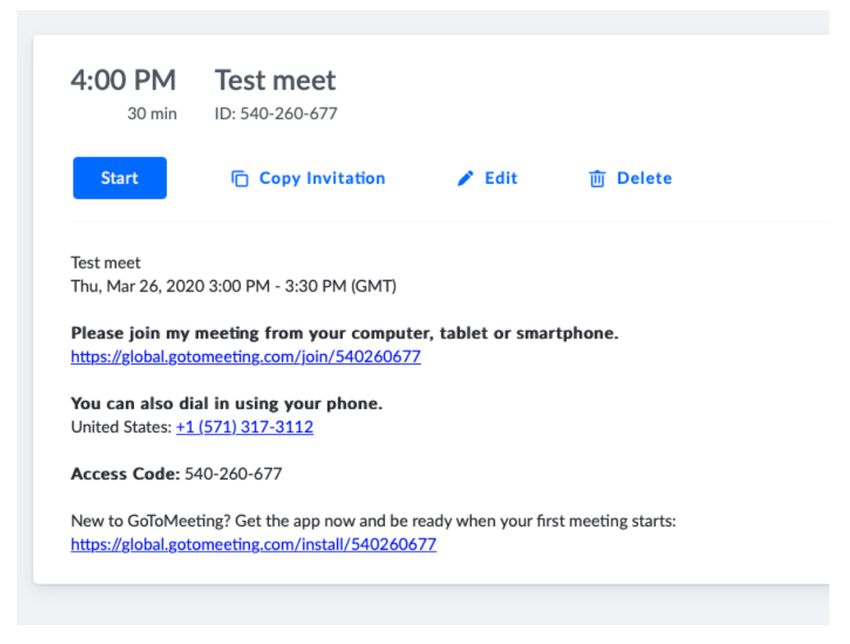
Instructional video for Apple devices:
https://www.youtube.com/watch?v=EbRfoadhzy4

Instructional video for Android devices:
https://www.youtube.com/watch?v=M4UVmOf23Ns

2. Video conferencing via
Microsoft Teams
Microsoft Teams is a unified communication and collaboration platform that
combines workplace chat, video meetings, file storage (including collaboration on
files), and application integration. The service integrates with DAE’s Office 365
subscription and can integrate with non-Microsoft products. This chapter provides
an introduction to video conferencing with Microsoft Teams. Calling via Microsoft
Teams is not possible via the Remote Desktop, please use the app or the portal.

Please note: All other functionalities besides video conferencing will be implemented
and explained at a later time.

2.1 Option 1: The Microsoft Teams app.
You can also download the Microsoft Teams app to your computer for video
conferencing.

Step 1: Go to: https://teams.microsoft.com/downloads.

Step 2: Download the app and start the installer. You will encounter a few security
options (Firewall, Camera, Audio, Desktop settings etc.). Make sure you accept
these.

Step 3: Start the app and log in with your DAE account (enter your DAE email
address and password).

Step 4: When you start the app for the first time, you might encounter an additional
set of security warnings. Make sure you accept these too.

Note for Mac users: If this causes problems on your Mac computer, check the
‘Lock’ icon on the lower left of your settings. This should be set to ‘Open’.

                                                                                       3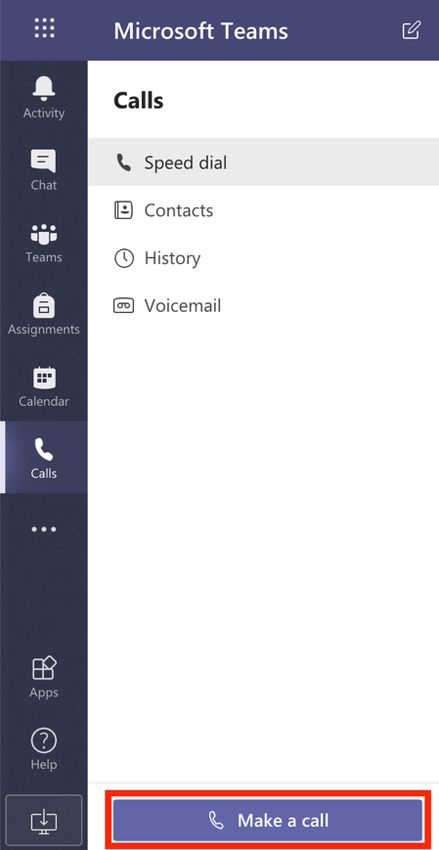
Step 5: Click ‘Calls’

Step 6: Click ‘Make a call’ and enter the name of the colleague you want to call. To
call more than one person, just enter one or more names. There is also the option
for making a video call.

When you make a call, you can choose to:

1: Turn your camera on or off.
2: Turn your microphone on or off.
3: Share your screen with other people in the call.
4: View more options.
5: Chat with people in the call.
6: End the call.

                                                                                   4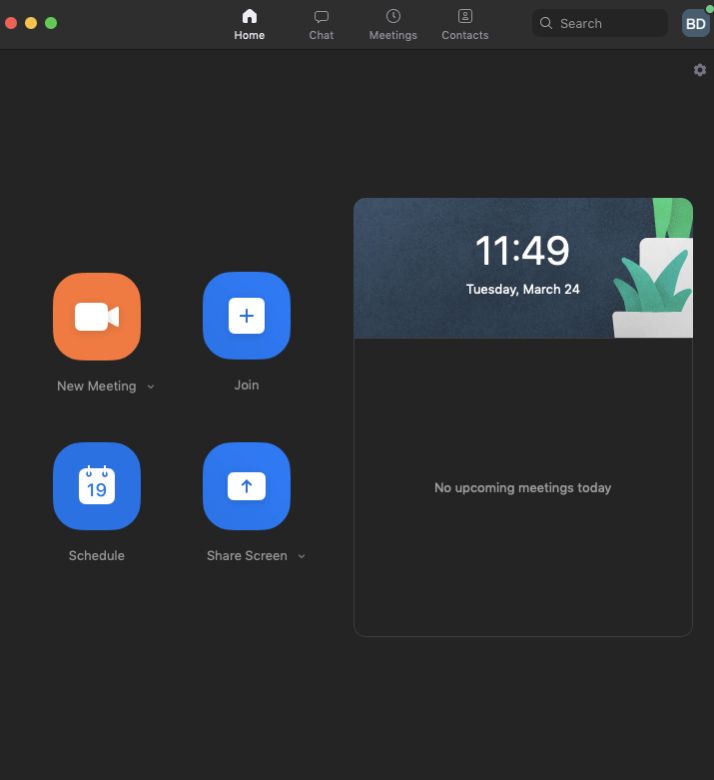
2.2 Option 2: Via your web browser (Office 365 portal available via Apple,
Windows, Linux).

Step 1: go to portal.office.com in your browser and enter your DAE email address
and DAE password to log in.

Step 2: Click ‘Teams’.

Step 3: Click ‘Calls’

Step 4: Click ‘Make a call’ and enter the name of the colleague you want to call. To
call more than one person, just enter one or more names. There is also the option
for making a video call.

3. Remote Desktop (RD)
With Remote Desktop you can access your DAE computer from your home
computer or laptop. Please note, there are different instructions for Windows and
Mac users. Please work via the Office 365 portal and the Microsoft Teams
application. We advise you to only use the RD to access files that are on the Q:
drive.

3.1 Installing Remote Desktop for Windows users.
If you know how to use a Remote Desktop application, this is the information you
need:

Computer: rd.designacademy.nl
Gateway: rdgateway.designacademy.nl
Username: Your DAE email address
Password: Your DAE password

If you are new to Remote Desktop, please see the instructions how to configure the
program “Remote Desktop Connection” below.

Step 1: To find the application, already installed in Windows, you can use the
Search function or find it under ‘Windows Accessories’ in the menu.

To do a search, click on the magnifying glass in the lower left corner, see image
below.

                                                                                     5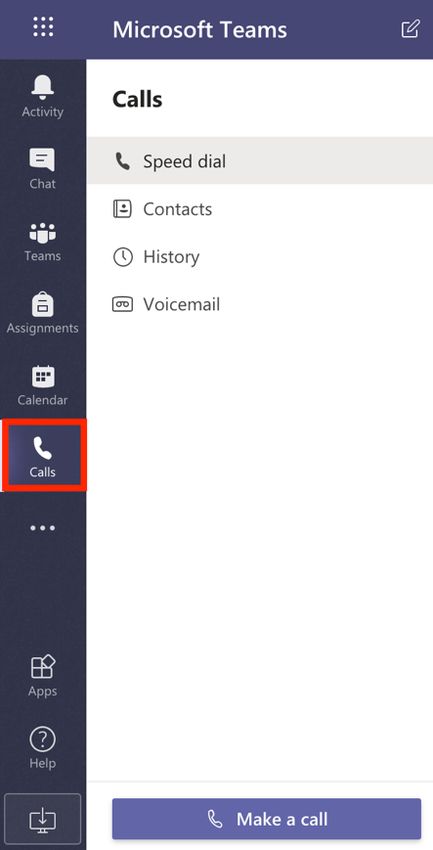
Step 2: In the Search bar that appears, type ‘Remote Desktop Connection’ and
the application will show up and, if you like, you can right-click it and pin it to Start
or the taskbar for quick access.

Step 3: When you start this program, already installed in Windows, you need to click
on the ‘Show Options’ arrow (lower left corner).

Step 4: On the General Tab, enter the computer name: rd.designacademy.nl

Step 5: After that, click on the Advanced Tab, see image below.

                                                                                            6
Step 6: Now, on the Advanced Tab, click on ‘Settings’ under ‘Connect from
anywhere’.

Step 7: In the window that opens, choose ‘Use these RD Gateway server settigs’
and enter the settings as in the picture below.

                                                                             7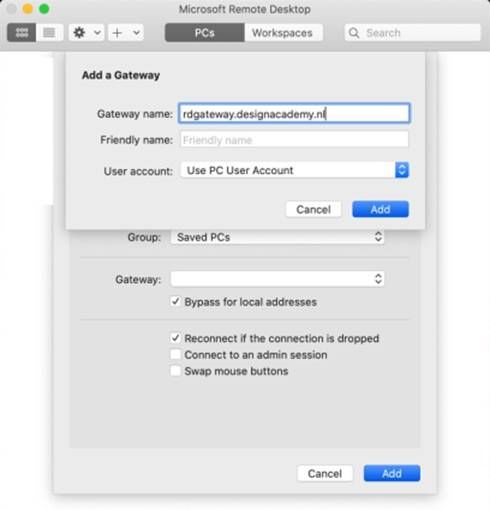
Step 8: Click ‘OK’, you will return to the Advanced Tab.

Step 9: Now click on the General Tab again and enter your Username (DAE email
address) and click ‘Save’.

Step 10: Click on ‘Connect’ and you will be asked for your DAE password.

The Remote Desktop session has now started and when you want to quit, please
click on ‘Start’ and then ‘Log off’.

Please note: When you connect to the new Remote Desktop (RD) it will take some
time to prepare your settings profile, so the first login can take a while. Also, when
starting applications like Outlook, it will take some time to prepare your settings and
this could take a bit longer to start than you are used to. This is the case for every
new server you are automatically redirected to, so please be patient.

3.2 Installing Remote Desktop for Mac users.
If you know how to use a Remote Desktop application, this is the information you
need:

Computer: rd.designacademy.nl
Gateway: rdgateway.designacademy.nl
Username: Your DAE email address
Password: Your DAE password

You will find the instructions on how to configure the program (app) “Microsoft
Remote Desktop 10” below.

Step 1: Please download this from the ‘App Store’ and you will need macOS 10.12
or later.

Step 2: After installation, start the “Microsoft Remote Desktop 10” app and click
on ‘PC’.

Step 3: Now click on the ‘+’ to add a PC (Add PC).

                                                                                          8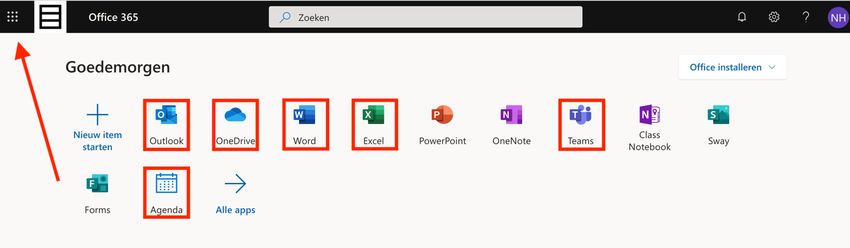
Step 4: Enter rd.designacademy.nl at PC name.

Step 5: If you like, you can enter DAE in the Friendly name section for recognition if
you have more Remote Desktops.

Step 6: Now click on the Gateway box and click on ‘Add Gateway’, then enter
rdgateway.designacademy.nl.

                                                                                         9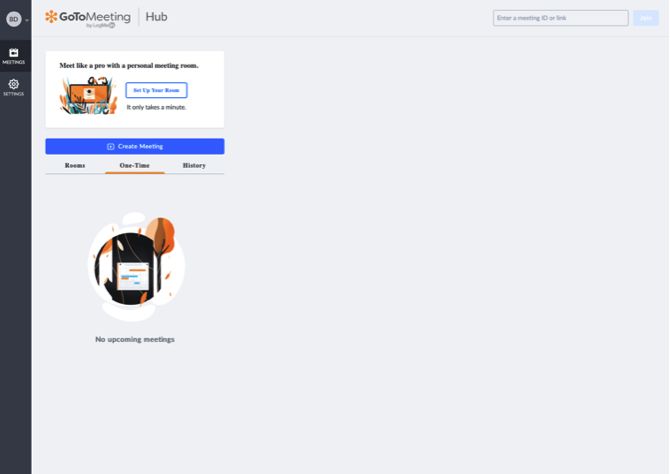
Step 7: Click Add to save the Gateway. Make sure Gateway box now shows
rdgateway.designacademy.nl.

Step 8: Next, click ‘Add’ to save your DAE Remote Desktop PC.

Step 9: Back in the Remote Desktop app, click on the now available ‘Tile’ to
connect.

4. Online meeting platforms
There are four alternative online meeting platforms. It is recommended that you use
Microsoft Teams as much as possible, as this is fully integrated in the Microsoft 365
Office environment and your DAE account. For all other alternatives you need to
already have, or create a personal account.

4.1 Zoom
Zoom is a web-based video conferencing tool with a local, desktop client and a
mobile app that allows users to meet online, with or without video. Zoom users can

                                                                                   10
choose to record sessions, collaborate on projects, and share or annotate on one
another's screens, all with one easy-to-use platform.
Step 1: Go to https://zoom.us/support/download.
Step 2: Download the app and start the installer. You will encounter a few security
options (Firewall, Camera, Audio, Desktop settings etc.). Make sure you accept
these.
When you start the App for the first time, you might encounter another set of
security warnings. Make sure you accept these too. If this causes problems on your
Mac computer, check the Lock icon on the lower left of your settings. This should
be set to “open”.
Step 3: Log in with the ‘Sign In’ button. If you do not have a Zoom account, use the
sign-up link. Follow the sign-up procedure and enter your new account details to log
into the desktop application.
Step 4: Start the desktop app. You will be greeted with the screen pictured below.
From here, you will be able to start and/or join new meetings.
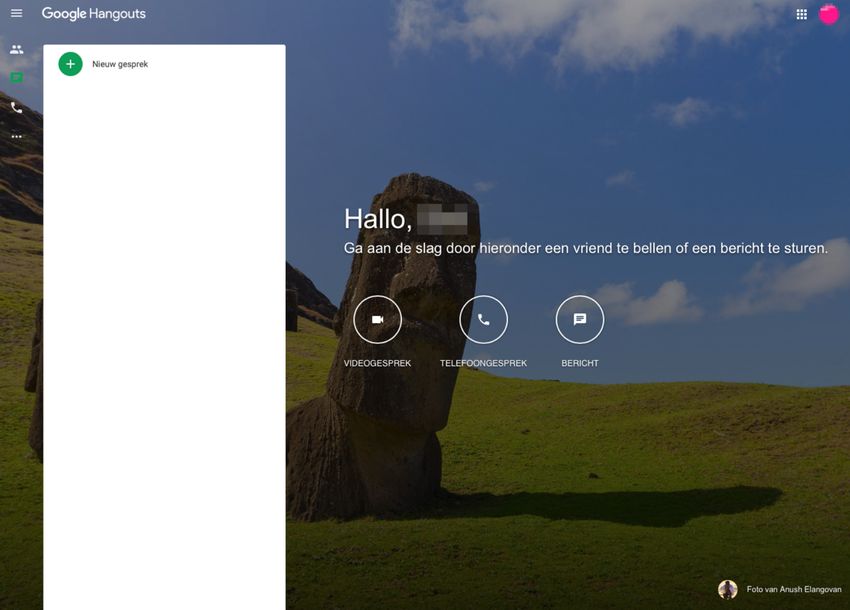
114.2 Google Hangouts
Google Hangouts is a communication software product developed by Google. This
platform is the easiest to use. Please note that this platform works best if the
recipients of the call also have Google accounts.
Step 1: Go to https://www.google.com/talk. Make sure you are signed into a
Google account or sign up for one.
Step 2: You will be greeted with the screen pictured below. From here, you will be
able to start and/or join new meetings.
Step 3: From here, you will be able to initiate video, phone or chat calls. The menu
on the left side of the screen has your contacts, chats, phone calls and invites as
well as your settings.
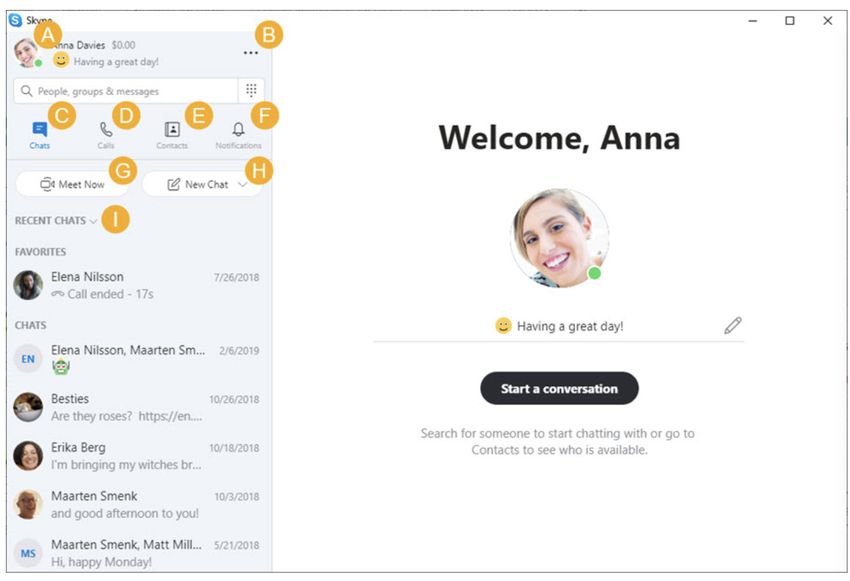
4.3 Skype
Millions of individuals and businesses use Skype to make free video and voice one-
to-one and group calls, instant messages and share files with other people on
Skype. You can use Skype on whatever works best for you – on your mobile,
computer or tablet.
Step 1: Go to https://www.skype.com/en/get-skype/.
12Step 2: Download the app and start the installer. You will encounter a few security
options (Firewall, Camera, Audio, Desktop settings etc.). Make sure you accept
these.
When you start the app for the first time, you might encounter another set of security
warnings. Make sure you accept these too. If this causes problems on your Mac
computer, check the Lock icon on the lower left of your settings. This should be set
to “open”.
Step 3: Run through the install process and set up your account. Make sure you
pick a suitable and easy to recognise Skype Name. People will be able to contact
you based on the email address you used to register your account or your Skype
Name.
Step 4: Start the Skype app. There is an image with the different Skype app
functions and an explanation below.
A. Profile – Access and personalize your settings.
B. More – Access your settings, help and feedback, or sign out of Skype.
C. Chats – Find your chats and favourites quickly.
D. Calls – Make one-to-one or group calls or use the Dialpad to call a mobile or
landline.
E. Contacts – Find your contacts, view who is active, or invite people to Skype.
13F. Notifications – Catch up on reactions, and @mentions, or jump right back into a
conversation.
G. Meet Now – Instantly set up a collaboration space with friends and family, even if
they are not on Skype.
H. New Chat – Start a new one-to-one, group, or private conversation.
I. Sort Chats – Sort your chats by time sent or unread messages.
4.4 GoToMeeting
Step 1: Go to: https://global.gotomeeting.com/.
Step 2: Make sure you are signed in or have registered for an account.
Quick Tour GoToMeeting
You will be greeted with the screen pictured below. Now, you will be able to initiate
video or phone calls. The menu on the left side of the screen houses your contacts,
chats, phone-calls and invites as well as your settings.
Step 1: Click the “Create Meeting” button to start. From here you will be able to enter
your meeting information.
14Step 2: Click ‘Save’ and your meeting will be scheduled. In the next screen you will
be able to invite people directly and/or send them the invitation link by email.
155. Questions
5.1 Contact info
If you have trouble configuring the Remote Desktop software or Microsoft Teams,
you can contact the ICT Service Desk. If possible, please use email.
The ICT Service Desk has the following opening times:
Monday to Friday: 09:00 – 16:30
They are available by phone from 09:00 - 11:00 and 15:00 - 16:00
E: ictservicedesk@designacademy.nl
T: 040-2393950
5.2 Additional instructions
How do I Install Office Apps (e.g. Excel, Word) on my computer?
https://support.office.com/en-us/article/install-office-apps-from- office-365-
dcf2d841-dac7-455b-9a77-fc8f7ee92702
How do I use OneDrive online?
https://support.office.com/en-us/article/upload-files-and-folders- to-onedrive-
a5710114-6aeb-4bf5-a336-dffa7cc0b77a?ui=en- US&rs=en-US&ad=US
16You can also read