WebAdvisor Adjunct Instructor's Guide - Prepared by: Tonia Broome (June 2012)
←
→
Page content transcription
If your browser does not render page correctly, please read the page content below

WebAdvisor

  Adjunct
Instructor’s
   Guide

Prepared by: Tonia Broome
       (June 2012)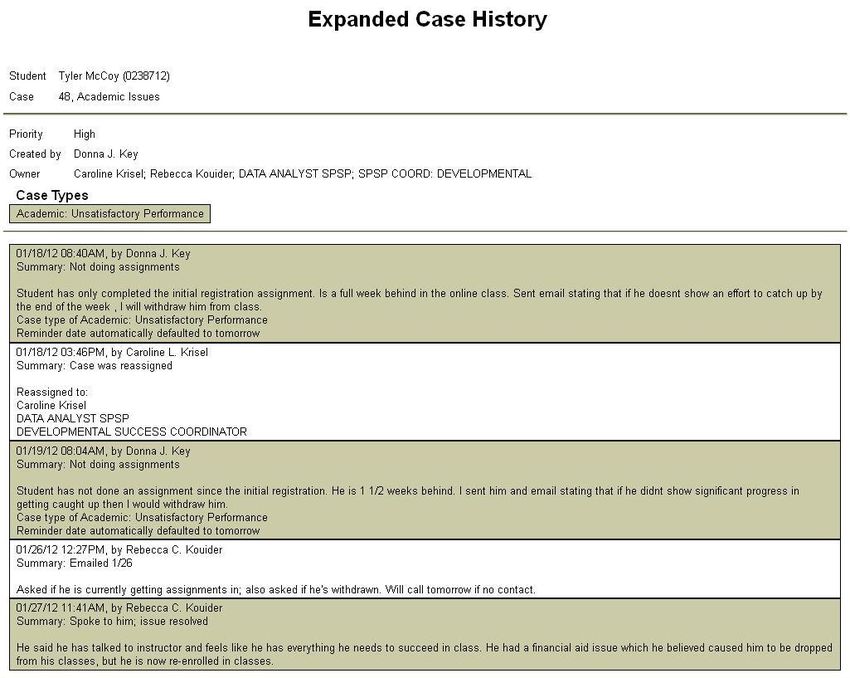
TABLE OF CONTENTS

Logging Into WebAdvisor _______________________ Section 1
Class Roster __________________________________ Section 2
Grading ______________________________________ Section 3
Search for Sections _____________________________ Section 4
My Class Schedule _____________________________ Section 5
Student Profile ________________________________ Section 6
Contribute Retention Information________________ Section 7
Retention Cases for Student_____________________ Section 8
Web Attendance Tracking_______________________Section 9
Logging into WebAdvisor
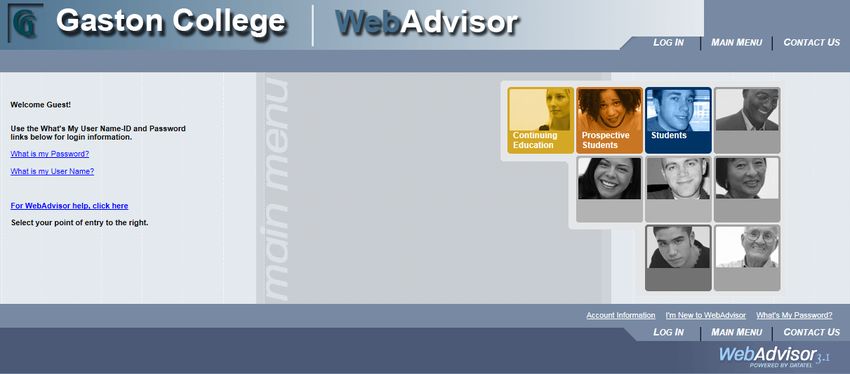
Step1. You can access WebAdvisor by going to www.gaston.edu and clicking on the
WebAdvisor link located in the center of the screen.
Click here to access
WebAdvisor.
Step 2. Once you enter the WebAdvisor program, to access any of the features under the
faculty menu, you must first log-in. Click on the Log In link at the top of the page to enter
the log-in screen.
Click here to log-in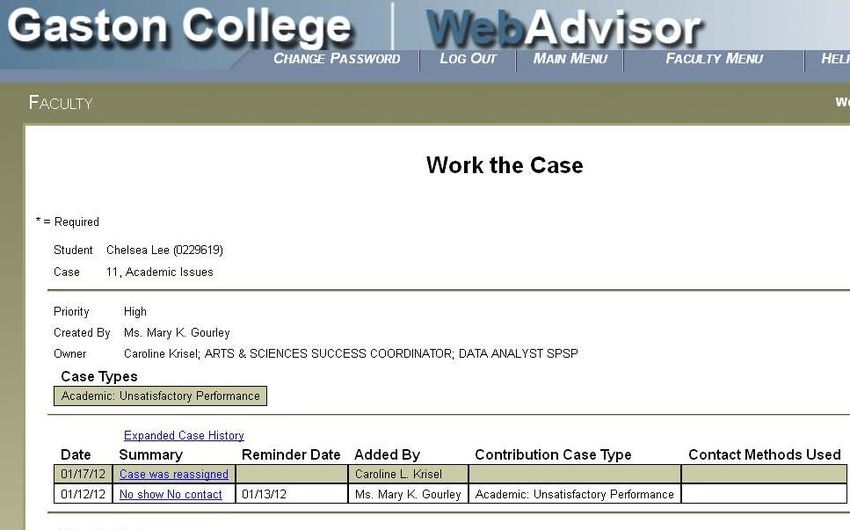
Step 3. Enter your User ID and Password in the boxes indicated on the screen. Your User
ID is your first initial, followed by your middle initial, and then your last name. Your initial
Password is your date of birth in the format of mmddyy. For example: Jane Karen Doe born
on December 6, 1962 would have User ID: jkdoe and Password: 120662. Click on the
Submit button when finished.

                                              Type in your User ID and Password.

Upon your first log-in to WebAdvisor, you will be notified that your password has expired.
You must choose a new password at this time. You cannot change your User ID. Your new
password must be 6 to 9 characters in length and must include at least one letter and at least
one number. Once you change your password you are responsible for maintaining and
remembering it. This password is not stored on the system where it can be retrieved for
you.

Step 4. You will now have access to the Faculty Information Menu.

                                Click here to access the
                                Faculty menu.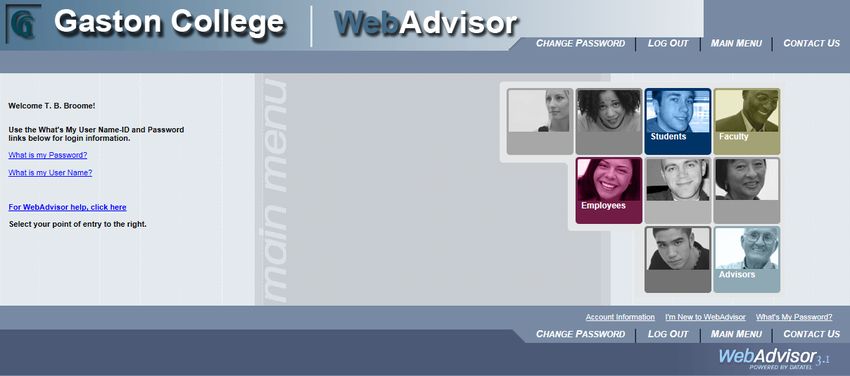
Step 5. The Faculty Information menu will appear. Below is a summary of each of the
menu items and their function.

My Advisees: Gives the faculty member a list of the advisees for a current term and provides a drop-
down menu for each advisee. The drop-down menu provides links to access the student’s transcript,
test scores, current schedule, etc. Adjunct Faculty will not be assigned advisees; therefore, you will
not use this area.
Advisees: Generates a list of the faculty’s assigned advisees for the current term. This list contains
the student’s ID, name, program code, cumulative GPA, attempted credits, and earned credits.
Adjunct Faculty will not be assigned advisees; therefore, you will not use this area.
Class Roster: This link provides a list of the courses a faculty member is teaching during a current
term and generates a class roster for each of those courses. Class rosters may be printed using this
link.
Grading: This link provides a list of the courses a faculty member is teaching during a current term
and generates the spreadsheet where course grades will be entered.
Search for Sections: This link provides a procedure for looking for certain courses being taught
during the semester which meet a given criteria. For example, this link may be used to list all ART
111 courses taught on MWF between the hours of 9:00 a.m.and1:00 p.m.
My Class Schedule: This link will provide a list of all the courses assigned to the faculty member
during a current term. The class name, title, days of the week, start and end times, building and room
number, and the start and end date of the course are listed.
Student Profile: This link will provide the faculty member the student’s address, phone number,
academic program, and advisor information.
Persistence and Retention Menu Options

        My to do List: This area is not used by general faculty members.

        Retention Case Reminder Pref : This area is not used by general faculty members.

        My Contributions to Cases: This area is not used by general faculty members.

        Count of Open Retention Cases: This area is not used by general faculty members.

        Closed Retention Cases: This area is not used by general faculty members.

        Contribute Retention Info: This link will provide the faculty member an area to submit a
        student to the persistence and retention coordinator for the division. Student

        Retention Cases for Student: This link will provide the faculty member an area to review
        previously submitted retention cases.

Web Attendance Tracking: This link provides a list of the courses a faculty member is teaching
during a current term and generates the spreadsheet where course attendance will be entered.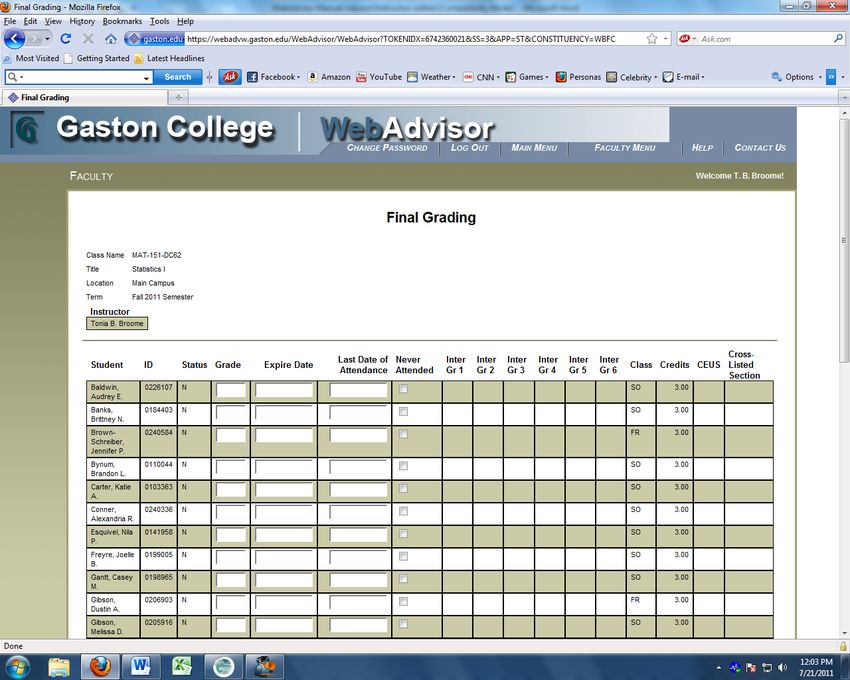
Class Roster

Step 1. Log-in to WebAdvisor and access the Faulty Menu. Click on the Class Roster link.

                                   Click here.

Step 2. A list of all of the courses you are teaching during the current semester and classes
you have taught during past semesters will appear.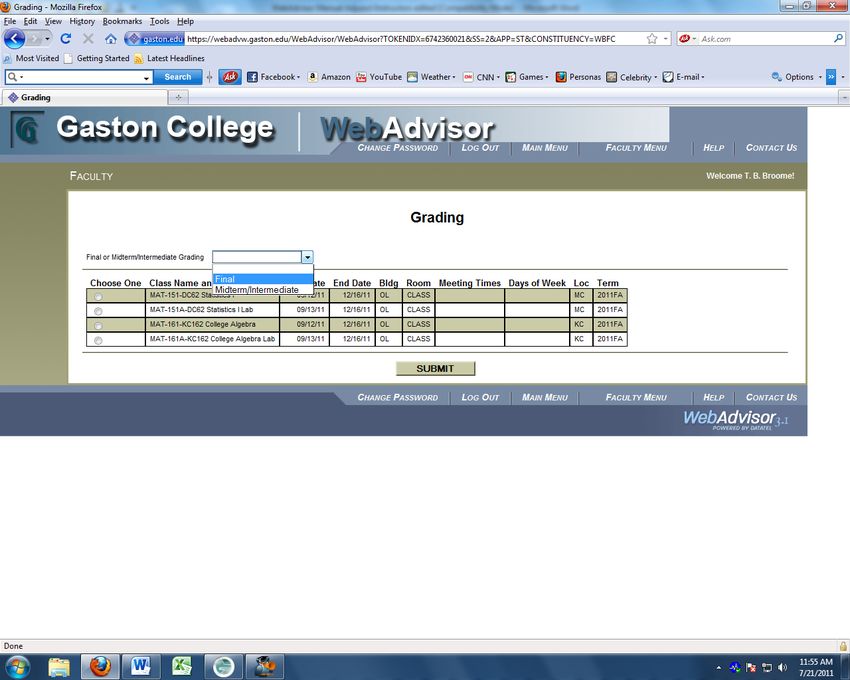
Step 3. Click on the course link to view the course roster.

                            Click on the course link to view
                            the roster.

Step 4. The course roster will appear on the screen. The course name and title, instructor,
meeting information and number of students registered for the course will appear at the top
of this page.
                                                                  Course details appear across
                                                                  the top.

For each student in the course, the student’s name, ID, E-mail address and phone number will
be listed. Use the browser’s print function to print out the roster.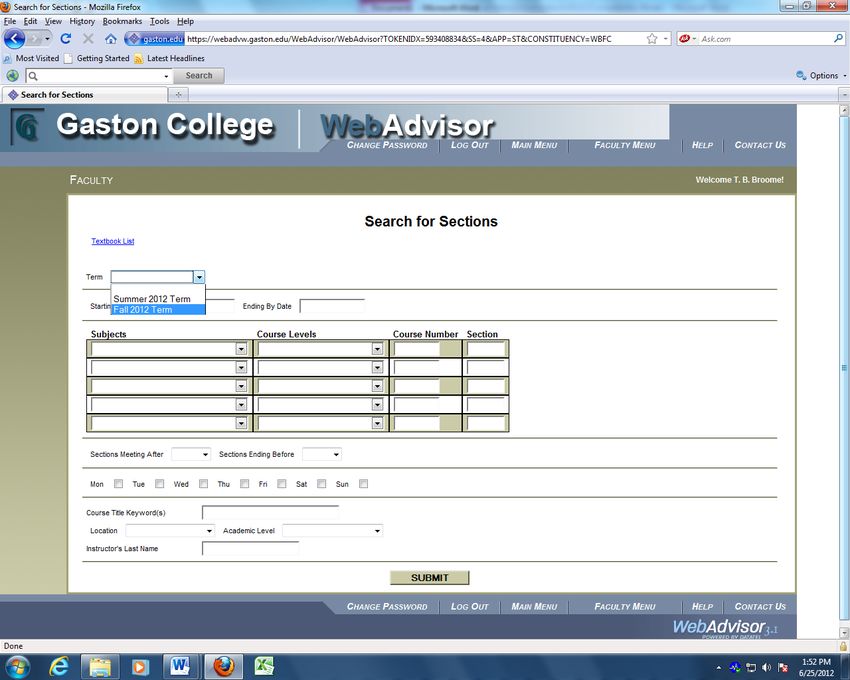
Step 5: If you click on the student’s name link, you will receive the student’s profile page.
The profile page supplies additional information about the student which is not listed on the
roster page. For example, the student’s home address, academic program and advisor are
listed. To return to the roster click on the “Close Window” box.

 To close this window, click
 here.

Step 6: You can submit a Retention Alert for a student from the student profile page. Begin
by clicking on the Add Retention Alert Info link at the bottom of the screen.

                         Click here.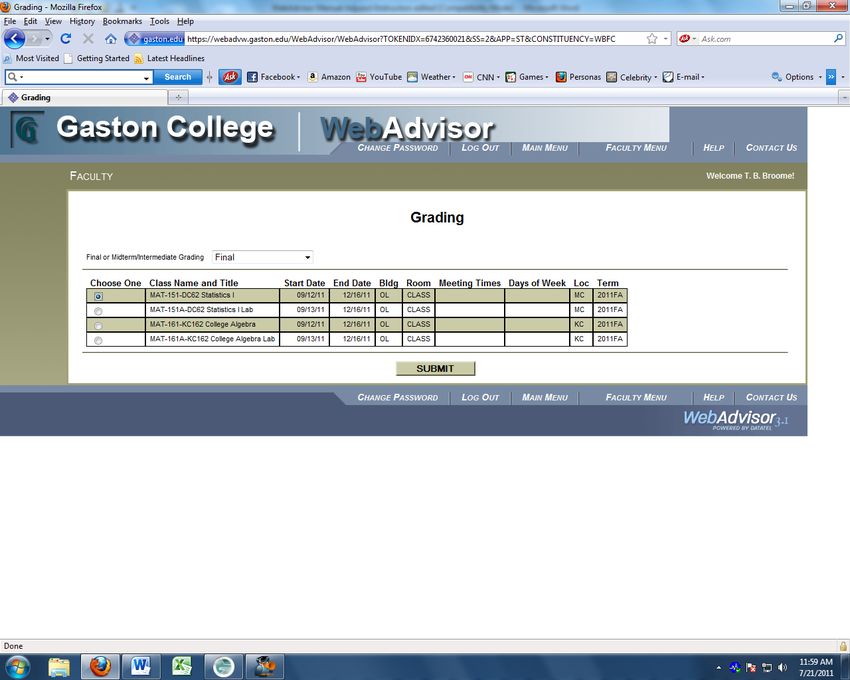
Select the academic or financial issue from the “Type of Issue” drop-down box.

                                                                   Select appropriate
                                                                   option here.

In “Summary” include a brief statement of the issue beginning with the course and section
number.

                                                                        Enter Course and
                                                                        Section Number
                                                                        here.
Expand upon the referral and provide additional details about the case in the “Detailed
Notes” area.
Enter detailed notes
here.Mark the appropriate check box(es) regarding how you contacted the student.
Check any that
apply here.Completing the referral
At this point, either click submit to complete the referral or check the box next to “Do you
want to report..” to submit another referral about the same student.
Click submit OR check the box
to continue with another
referral for this student.
After you have filled out all appropriate referrals for a student and click on the submit button,
the case confirmation form page will show.Grading
Step 1. Log-in to WebAdvisor and access the Faulty Menu. Click on the Grading link to
enter grades for your courses.
Click on Grading to enter grades
for your course.
Step 2. Select a term or date range to restrict your class list. You must select a term or
provide a valid range of dates for the semester containing the desired course grade report. It
is easier to select the term. Click on the Submit button
Select a term from the
pull-down menu
Once you have selected the
term OR date range, click the
submit button.Step 3. To enter your final grades, use the pull-down menu to select Final.
Select final from the pull-down
menu.
Step 4. Select the desired class from the available list for which you wish to enter grades by
clicking on the radio button to the left of the class name.
Choose the class for which you
want to enter final grades or to
withdraw a student.
After choosing the class, click
on the submit button.Step 5. To withdraw a student from your course: Enter a letter grade of WI (withdraw
instructor) for each student you wish to withdraw from your course, due to attendance issues,
etc. You must also enter the students last date of attendance. Once you enter the WI grade,
click on the submit button at the bottom of the page. Do not click on the box “I hereby
certify that all grades…” at this time.
To enter final course grades for all students: Enter a letter grade for each student in the box
under the column titled “Grade”.
NOTE:
If you are giving an incomplete (I) grade, you MUST enter an expiration date after
which it will become an F, this date will be provided to you by the registrar’s office.
If you are giving a failing grade (F), you MUST enter the last date of
attendance/participation for the student.
Enter an expiration date for
incomplete grades. These
grades will turn into an F when
the time expires. Any student with an F or WI
Use the expiration date for I grade must also have a Last
grades only. Date of Attendance recorded.
Enter the grade for each student.
For any student you marked
as a “no show” on the web
attendance roster, the “Never
Attended” box will be
selected or the student will no
longer appear in the grading
roster.Step 6. After entering ALL of the grades, click on the box beside of the statement “I hereby
certify that all grades are entered for this section and I am submitting final grades via
electronic transmission in lieu of a signature”. Click on the Submit button to complete the
transaction.
If all of the grades are not entered at the same time, you can click on the Submit button to
“save” the grades entered. You can enter the grades one student at a time or one course at a
time as you finish grading. However, do not click the box beside of the statement to certify
your grades until they are all entered. If you do, you will have to submit a grade change for
the students not yet entered.
Click on the box “certifying”
your grades, only after they
have all been entered.
I encourage you to re-enter the grading area and print a copy of the grades entered. You will
need to use the browser’s print feature to print a copy.Search for Sections
Step 1. Log-in to WebAdvisor and access the Faculty Menu. Click on the Search for
Sections link.
Click here.Step 2. The, Search for Sections, option is used by the advisor or student to search for
information about courses being offered during a particular semester. A variety of searches
may be performed. The advisor/student can search for information about a specific course,
search for open sections, search for courses within a certain time frame, search for courses
being taught on specific days, search for courses being taught by a particular instructor, etc.
To begin your search, you must select a term or provide a valid range of dates for the
semester containing the courses for which you wish to search, it is easier to select a term.
Select a term from the
pull-down menuStep 3: Once you have selected a term or supplied a valid date range, you will enter the
course(s) involved in your search. Searches can be performed several ways. Below are
several examples of possible search agendas.
To search for information concerning a particular course, enter the course subject,
course number and section number. Do not enter a “Course Level”, leave this field
blank. Scroll to the bottom of the page and click on the Submit button.
For example, below is a search for information about ART 111.DC01 and
MAT 151.DC01.
Enter the course subject, course
number, and section number.
DO NOT enter a
“Course Level”The results of this search are displayed below. For each course in the search the following information is listed: Term: Fall Semester 2011, Spring Semester 2012, etc. Status: open, closed, canceled, etc. Section Name and Title Location Meeting Information Faculty Available/Capacity: this information may be used to see the number of available seats remaining in a particular section of a course Credits CEUs (if applicable) Academic Level
To search for a list of all courses available in a particular subject area, enter the
course subject only and submit.

For example, to see a list of all English courses being offered in the Fall 2011
semester, choose English as the subject and submit.
The results of this search are displayed below. The search results contain a list of every
English course being offered during the Fall 2012 semester, from ENG 080 to ENG 275.

       A search for all courses being taught by a particular instructor, at a particular time,
       during a range of times, or on particular days can also be performed.

       For example, to see a list of all ENG 111 courses taught on Monday and Wednesday
       nights between 5 p.m. and 10 p.m., enter the search constraints and submit.

The results of this search are displayed below. Only two ENG 111 courses are being offered
during the Fall 2012 semester on Monday and Wednesday nights between 5 p.m. and 10 p.m.
To search for all courses being taught by a particular instructor, enter the course
subject and the instructor’s last name.
For example, to search for all math courses being taught during the Fall 2012
semester by Tonia Broome, enter Mathematics as the course subject and type
“Broome” in the “Instructor’s Last Name” field.
The results of this search are displayed below.My Class Schedule
Step 1. Log-in to WebAdvisor and access the Faculty Menu. Click on the My Class
Schedule link.
Click here.
Step 2. Select a term by using the pull-down menu and click on the submit button.
Select a term from the pull-
down menu.
Once you have selected the term
click the submit button.Step 3. After clicking on the Submit button, you will be able to view your schedule of classes for the term or dates specified. Step 4. You may use your browser’s print feature to print out this view.
Student Profile

Step 1. Log-in to WebAdvisor and access the Faulty Menu. Click on the Student Profile
link. You can also access the student’s profile from the course roster page.

                                         Click here.

Step 2. Enter the student’s ID number or social security number. Click on the Submit
button.

                                                        Enter the student’s ID or
                                                        social security number
                                                        and submit.
Step 3. The student’s profile will appear at this time. The profile contains the student’s name, ID, address, email address (if supplied by the student), and phone number. The student’s academic program is also listed in the profile along with the student’s assigned advisor.
Contribute Retention Info

Step 1: Log-in to WebAdvisor and access the Faulty Menu. Click on the Contribute
Retention Info link.
                                           S

                                                     Click here.

Step 2: Enter the student’s name or ID number and click submit.

                                               Enter student’s
                                               name or ID here.
Step 3: Select the academic or financial issue from the “Type of Issue” drop-down box.
Select appropriate
option here.
Step 4: In “Summary” include a brief statement of the issue beginning with the course and
section number.
Enter Course and
Section Number
here.Step 5: Expand upon the referral and provide additional details about the case in the
“Detailed Notes” area.
Enter detailed notes
here.Step 6: Mark the appropriate check box(es) regarding how you contacted the student.
Check any that
apply here.Step 7: Completing the referral. At this point, either click submit to complete the referral
or check the box next to “Do you want to report..” to submit another referral about the same
student.
Click submit OR check the box
to continue with another
referral for this student.
After you have filled out all appropriate referrals for a student and click on the submit button,
the case confirmation form page will show.Retention Cases for Student
Step 1: Log-in to WebAdvisor and access the Faulty Menu. To check on the status of a
referral click on the Retention Cases for Student link.
Click here.
Step 2: Enter the student’s name or ID number and click submit.
Enter student’s
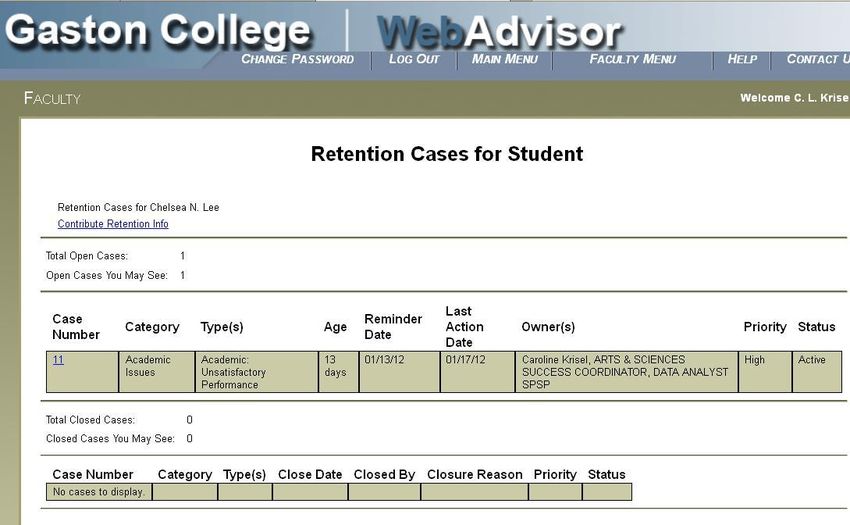
name or ID here.Step 3: This screen will show all cases created for a student. Click on the underlined case
number to view details on the specific case.
Click on the case number
to view specific details.
Step 4: View the summary line of the case’s action steps or click “Expanded Case History”
to view the details.
Click on the case number
to view specific details.Step 5: From the “Expanded Case History” screen, view all the case notes and follow up in chronological order.
Web Attendance Tracking

Step 1. Log-in to WebAdvisor and access the Faulty Menu. Click on the Web Attendance
Tracking link.

                                               Click here.

Step 2. Click on the “Attendance Tracking” link.

                                           Click here.
Step 3. Attendance Tracking Screen.
Complete the following steps to select course section meetings or contact hour sections for
tracking attendance. (* = Required fields.)
*Step 1. Select section
An error will be displayed if the user does not select a section. The form will be redisplayed
to allow the user to correct the invalid data.
*Step 2. Form Start Date – Required: Enter a date to start attendance tracking.
An error will be displayed if the date entered is not within the section start and end dates or
if the date is a future date. (Note: This date will automatically default to current date.)
*Step 3. Click the SUBMIT button
After clicking the SUBMIT button, the Attendance Entry web form will be displayed if
batch entry was not selected. The Attendance Batch Entry web form will be displayed if
the attendance entry method is Unscheduled Makeup or Class Cancelled (more about
these entries later).
You must enter the date for which you wish to begin
entering attendance. The current date will always be the
default date. You can enter any date after the start date
up to the current date. You cannot list dates in the future.
Use the
radio button
to select a
class.Step 4. Attendance Entry Screen.
The form will display the student names, profile, no show status, seat total, 10 scheduled
meeting dates starting from the attendance start date entered on the Web Attendance
Tracking web form, and the last date of attendance. Enter an attendance type of “E” to
indicate the first day of attendance. Any blank dates after “E” attendance type are
considered present and are included in the attendance totals.
Step 1. No Show: Check the box to indicate a student never attended class. You will also
need to access the Grades Screen and enter an “NS” as a grade for the student once you
complete the attendance tracking entries. Once a student has been marked as a ‘No Show’
and saved, the field cannot be removed through the web process. You must complete a
reinstate form and submit to the Registrar’s Office to remove a ‘No Show’.
Step 2. Attendance must be entered daily to comply with auditing standards.
Attendance Type: Valid codes for Scheduled Membership attendance are:
Code Description Comments
A Absent
E Entry First day student entered class
ET Entry, Tardy First day student entered class but was tardy
EL Entry, Last day First /last day student entered class (withdrawals)
T Tardy
L Last date of attendance
TL Tardy, Last date attendedStep 3. Previous/Next: This field will recalculate the Form Start Date and redisplay the
form with a new list of dates.
*Step 4. Electronic Signature: This check box serves as your signature confirming the
attendance information. This is required if data is added or changed. This includes
blank dates after all “E” attendance types. You must log in at least every 10 days even
if all students are present in the course.
Step 5. Click Submit button.
An error will be displayed if the user does not enter valid attendance type codes or if data is
entered for dates that occur in the future. The form will be redisplayed to allow the user to
correct the invalid data.
After clicking on the SUBMIT button, the Faculty Menu will be displayed. If the user does
not wish to track student attendance at this time, they can click Faculty Menu to return to the
menu.
Click on the box “I
hereby certify that I am
submitting this At the end of the semester
attendance information you must click on the box
via electronic stating “This is my final
transmission in lieu of submission. All attendance
a signature.” has been entered for this
section.”Webattendance Summary
• Log in to WebAdvisor and select Faculty (Using Internet Explorer)
• Select Web Attendance Tracking then Attendance Tracking
• Be sure to enter Form Start Date if you are entering attendance for any day prior to
the current date.
• Select your class and click Submit.
• Enter all attendance and click the top electronic signature box. Only click the bottom
one when it is actually your final submission at the end of the class.
• REMEMBER, YOU MUST ACCESS WEBATTENDANCE AT LEAST
EVERY 10 DAYS FOR ATTENDANCE TO CALCULATE CORRECTLY.
• If you have any problems please contact the Registrar’s Office immediately at 704-
922-6232 or gcregistrar@gaston.eduYou can also read