MANAGED GIGABIT POE SWITCH - WEB CONFIG MANUAL - V1.0.1
←
→
Page content transcription
If your browser does not render page correctly, please read the page content below
Managed Gigabit PoE Switch

     Web Config Manual

           V1.0.1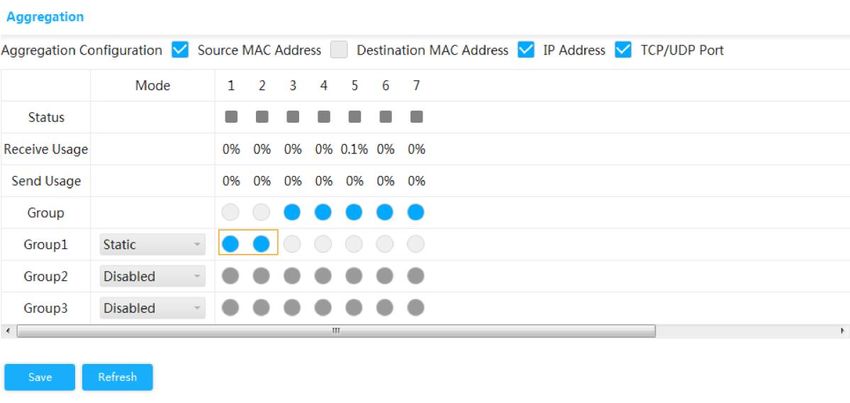
Foreword
General
This Web Configuration Manual (hereinafter referred to as "the manual") introduces
operations on web interface of Managed Gigabit PoE Switch (hereinafter referred to as "the
Switch"). You can visit the switch on web browser, configure and manage the switch.
Safety Instructions
The following categorized signal words with defined meaning might appear in the manual.
Signal Words Meaning
Indicates a high potential hazard which, if not avoided, will result in
DANGER death or serious injury.
Indicates a medium or low potential hazard which, if not avoided,
WARNING could result in slight or moderate injury.
Indicates a potential risk which, if not avoided, could result in
property damage, data loss, lower performance, or unpredictable
CAUTION result.
TIPS Provides methods to help you solve a problem or save you time.
Provides additional information as the emphasis and supplement to
NOTE
the text.
Revision History
Version Revision Content Release Time
V1.0.0 First release. July 2019
Added PoE watchdog and function
V1.0.1 of network management system. November 2020
Updated figures.
Privacy Protection Notice
As the device user or data controller, you might collect personal data of others such as face,
fingerprints, car plate number, Email address, phone number, GPS and so on. You need to be
in compliance with the local privacy protection laws and regulations to protect the legitimate
rights and interests of other people by implementing measures include but not limited to:
providing clear and visible identification to inform data subject the existence of surveillance
area and providing related contact.
Foreword I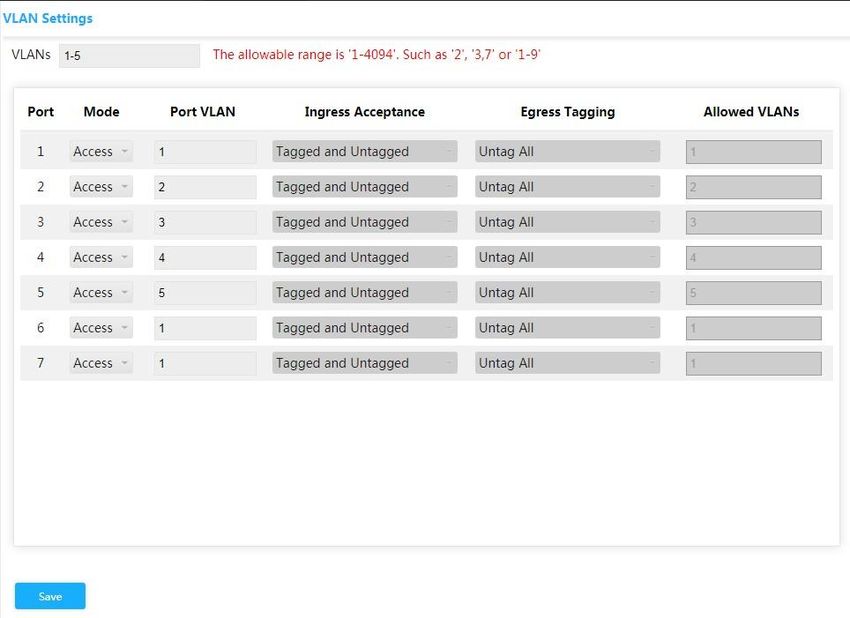
About the Manual
The manual is for reference only. If there is inconsistency between the manual and the
actual product, the actual product shall prevail.
We are not liable for any loss caused by the operations that do not comply with the
manual.
The manual would be updated according to the latest laws and regulations of related
regions. For detailed information, see the paper manual, CD-ROM, QR code or our
official website. If there is inconsistency between paper manual and the electronic
version, the electronic version shall prevail.
All the designs and software are subject to change without prior written notice. The
product updates might cause some differences between the actual product and the
manual. Please contact the customer service for the latest program and supplementary
documentation.
There still might be deviation in technical data, functions and operations description, or
errors in print. If there is any doubt or dispute, please refer to our final explanation.
Upgrade the reader software or try other mainstream reader software if the manual (in
PDF format) cannot be opened.
All trademarks, registered trademarks and the company names in the manual are the
properties of their respective owners.
Please visit our website, contact the supplier or customer service if there is any problem
occurred when using the device.
If there is any uncertainty or controversy, please refer to our final explanation.
Foreword II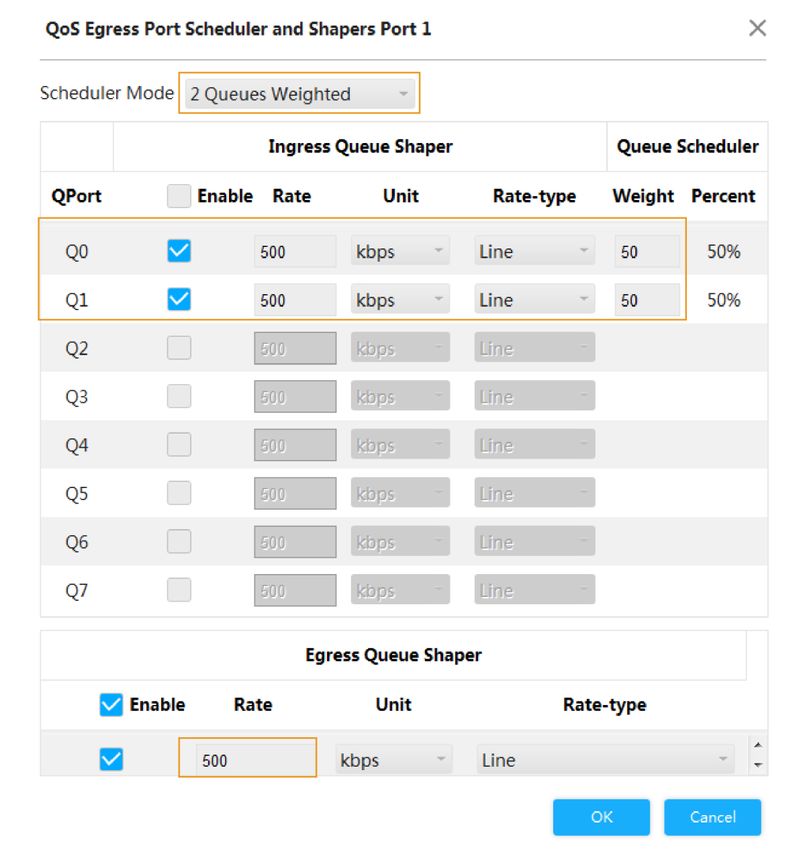
Important Safeguards and Warnings
The manual helps you to use our product properly. To avoid danger and property damage,
read the manual carefully before using the product, and we highly recommend you to keep it
well for future reference.
Operating Requirements
Do not expose the device directly to the sunlight, and keep it away from heat source.
Do not install the device in the damp environment, and avoid dust and soot.
Make sure the device is in horizontal installation, and install the device on solid and flat
surface to avoid falling down.
Avoid liquid spattering on the device. Do not place object full of liquid on the device to
avoid liquid flowing into the device.
Install the device in the well-ventilated environment. Do not block the air vent of the
device.
Use the device at rated input and output voltage.
Do not dissemble the device without professional instruction.
Transport, use, and store the device in allowed ranges of humidity and temperature.
Power Supply Requirements
Use the battery properly to avoid fire, explosion, and other dangers.
Replace the battery with battery of the same type.
Use locally recommended power cord in the limit of rated specifications.
Use the standard power adapter. We will assume no responsibility for any problems
caused by nonstandard power adapter.
The power supply shall meet the SELV requirement. Use the power supply that conforms
to Limited Power Source, according to IEC60950-1. Refer to the device label.
Adopt GND protection for I-type device.
The coupler is the disconnecting apparatus. Keep it at the angle for easy to operate.
Important Safeguards and Warnings III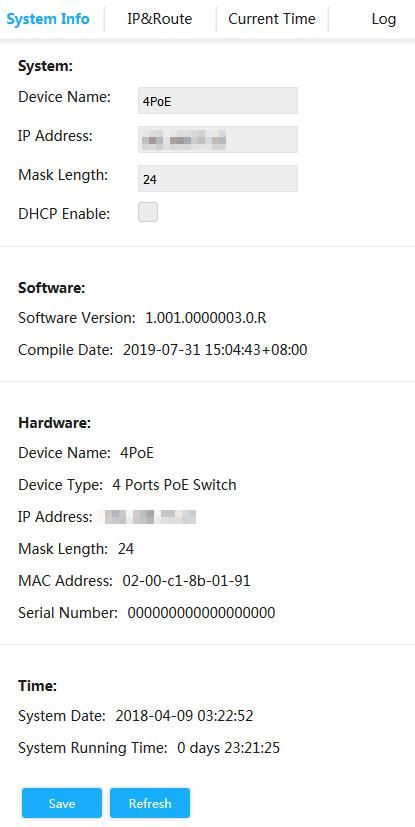
Table of Contents
Foreword .................................................................................................................................................... I
Important Safeguards and Warnings .................................................................................................... III
1 Login ....................................................................................................................................................... 1
2 Quick Settings ....................................................................................................................................... 2
    2.1 System Information ....................................................................................................................... 2
    2.2 Local .............................................................................................................................................. 3
    2.3 VLAN ............................................................................................................................................. 3
    2.4 Aggregation ................................................................................................................................... 4
         2.4.1 Static Aggregation Configuration ........................................................................................ 5
         2.4.2 Dynamic Aggregation Configuration ................................................................................... 6
    2.5 IP and Route ................................................................................................................................. 6
3 Advanced Settings ................................................................................................................................ 9
    3.1 Common Configuration ................................................................................................................. 9
         3.1.1 System Configuration ......................................................................................................... 9
         3.1.2 Port Configuration ............................................................................................................. 15
         3.1.3 VLAN Configuration .......................................................................................................... 17
         3.1.4 Aggregation ....................................................................................................................... 18
         3.1.5 MAC Table ........................................................................................................................ 20
         3.1.6 Spanning Tree .................................................................................................................. 25
         3.1.7 Long Distance PoE ........................................................................................................... 28
    3.2 Seldom-used Configurations ...................................................................................................... 28
         3.2.1 ERPS ................................................................................................................................ 28
         3.2.2 ACL ................................................................................................................................... 36
         3.2.3 Loop Protection................................................................................................................. 39
         3.2.4 Security ............................................................................................................................. 39
         3.2.5 IGMP Snooping ................................................................................................................ 44
         3.2.6 QoS ................................................................................................................................... 46
         3.2.7 SNMP................................................................................................................................ 56
         3.2.8 DHCP Server .................................................................................................................... 59
         3.2.9 LLDP ................................................................................................................................. 61
         3.2.10 485 Config ...................................................................................................................... 63
         3.2.11 PoE ................................................................................................................................. 64
4 Maintenance ......................................................................................................................................... 69
    4.1 System Reboot............................................................................................................................ 69
    4.2 Restoring Default Settings .......................................................................................................... 69
    4.3 Config Manage ............................................................................................................................ 69
         4.3.1 Exporting Config File ........................................................................................................ 69
         4.3.2 Uploading Config File ....................................................................................................... 70
    4.4 Software Update ......................................................................................................................... 70
    4.5 Mirroring ...................................................................................................................................... 71
    4.6 Ping ............................................................................................................................................. 72
    4.7 Function of Network Management System ................................................................................. 72
         4.7.1 Function enabling and Login ............................................................................................ 72
         4.7.2 Exporting Network Management Configuration File ........................................................ 73

                                                                                                                        Table of Contents                    IV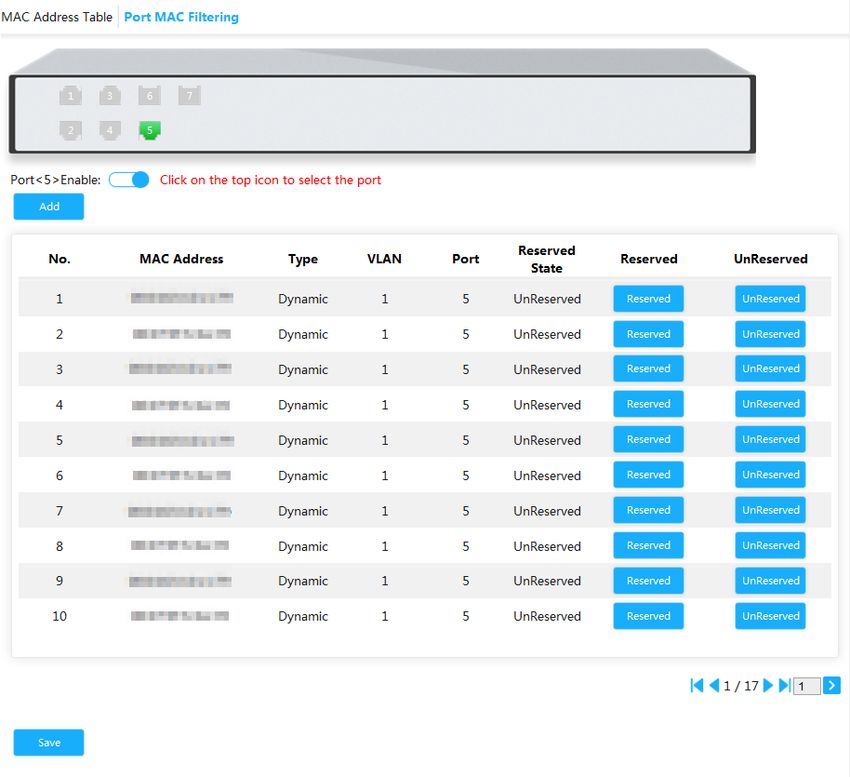
4.7.3 Uploading Network Management Configuration File ....................................................... 73
Appendix 1 Cybersecurity Recommendations ................................................................................... 74

                                                                                               Table of Contents             V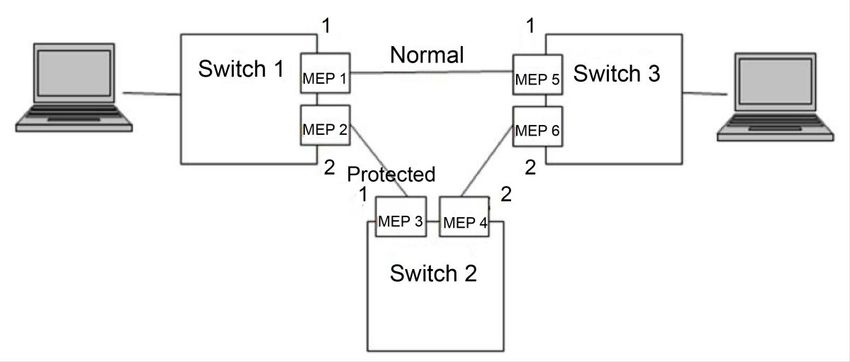
1 Login
Before login, make sure:
You already configure the IP address of the switch. The IP address of VLAN 1 is
192.168.1.110 by default.
The PC with web browser is connected to the network, and the PC can ping the switch
successfully.
Step 1 Enter the IP address (192.168.1.110 by default) of the switch in the address bar of the
web browser, and then press Enter.
The Login interface is displayed. See Figure 1-1.
Figure 1-1 Web login
Step 2 Enter user name and password. The user name and the password are admin by
default.
Step 3 Click Login.
The Quick Setting interface is displayed.
Modify the password after first login. The password must consist of 8 to 32 non-blank
characters and contain at least two types of characters among upper case, lower case,
number, and special character (excluding ' " ; : &).
Login 1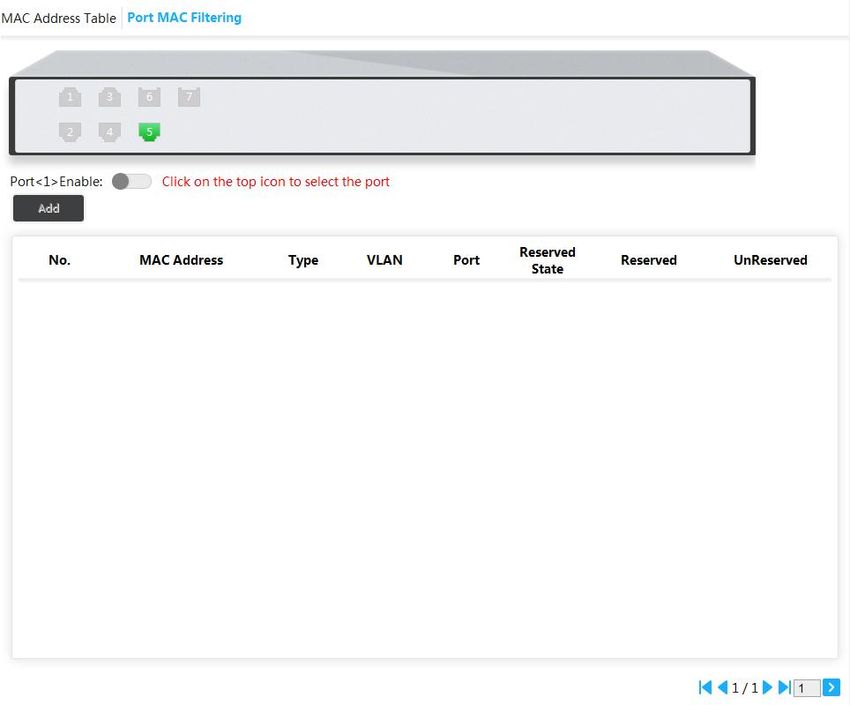
2 Quick Settings
You can view the system information, and set the device parameters, VLAN, link aggregation,
IP address and route. Take 4-port PoE switch for example. The quick setting interface is
different depending on the models of switch. The actual interface shall prevail.
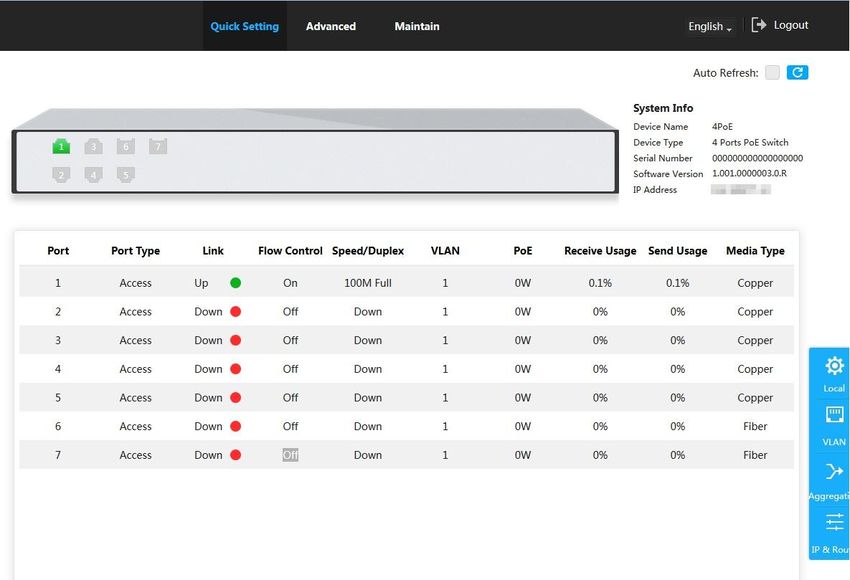
2.1 System Information
You can view the name, type, serial number, software version, IP address, port status and port
information of the device.
After logging in the system, the Quick Setting interface is displayed. See Figure 2-1. On the
switch, if the port shows green, it means the port is connected successfully. And If the port
shows gray, it means the port is not connected or the connection fails. See Table 2-1.
Figure 2-1 System information
Table 2-1 Port information
Parameter Description
Displays all ports of the switch.
Port
This switch contains 7 ports. Port quantity might vary depending on the
model you purchased, and the actual product shall prevail.
Port Type Three types: Access, Hybrid, and Trunk.
Two link states: Up and Down. Up indicates the port is connected
Link successfully, and Down indicates the port is not connected or the
connection fails.
Quick Settings 2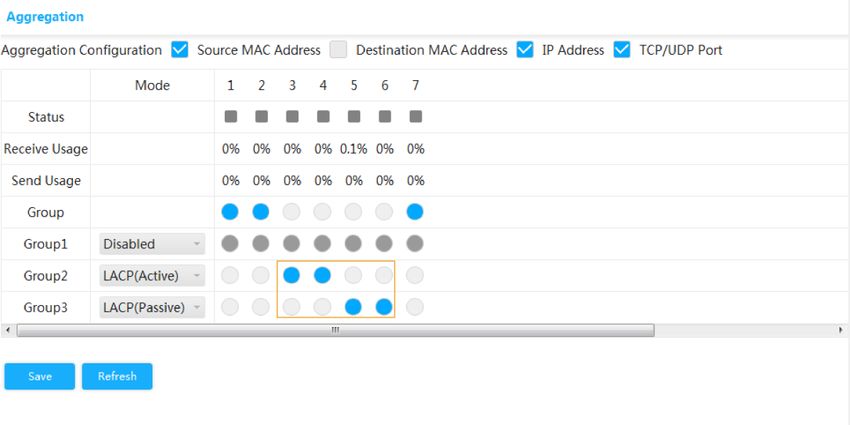
Parameter Description
Flow Control Displays the flow control state.
Online: It displays the port rate and the duplex mode.
Speed/Duplex
Offline: It displays Down.
VLAN VLAN port. It is VLAN 1 by default.
POE Displays the power consumption of POE. Only 1–4 ports are PoE ports.
The current receiving speed is divided by the average speed in a
Receive Usage
certain period (5 minutes usually).
The current sending speed is divided by the average speed in a certain
Send Usage
period (5 minutes usually).
Two media types: Copper and Fiber. Copper indicates RJ-45 port,
Media Type
and Fiber indicates fiber port.
2.2 Local
You can set the system name, IP address, and subnet mask.
Step 1 Click Local on the right of Quick setting interface.
The Local interface is displayed. See Figure 2-2.
Figure 2-2 Local
Step 2 Enter the system name, IP address, and mask length.
Step 3 Click OK.
2.3 VLAN
Add the port to the VLAN, and configure the VLAN. By default, the port is VLAN1.
Step 1 Click Vlan on the Quick Setting interface.
The Vlan interface is displayed. See Figure 2-3.
Quick Settings 3
Figure 2-3 VLAN
Step 2 Configure the port VLAN parameters. See Table 2-2.
Table 2-2 Port VLAN configuration parameter
Parameter Description
Port Displays all ports of the switch.
Three modes: Access, Hybrid, and Trunk.
Access: When the port connects to terminal devices (such as PC and
Mode IPC), select Access.
Trunk: When the port connects to switch, select Trunk.
Hybrid: Not often used.
Add the port to a VLAN. By default, the port belongs to VLAN1, and the
Port VLAN
range is 1–4094.
Allowed VLANs Set the allowed VLAN. When the mode is Trunk, you can set it.
Step 3 Click OK.
2.4 Aggregation
Add the port to the aggregation. For details, see "3.1.4 Aggregation."
Click Aggregation on Quick Setting interface, and the Aggregation interface is displayed.
See Figure 2-4.
Quick Settings 4Figure 2-4 Aggregation
2.4.1 Static Aggregation Configuration
Static aggregation is a method of combining or bundling of multiple switch ports or NICs to form
a single etherchannel. For example, add port 1 and port 2 to Static Group 1.
Step 1 Select Model as Static in group 1, which indicates that the group is static aggregation.
Step 2 Select port 1 and port 2 in group 1 to add the two ports to static aggregation. See
Figure 2-5.
For 4-port PoE switch, you can configure up to 3 groups of static aggregation. Static
aggregation is different depending on different models of PoE switch. The actual
interface shall prevail.
Figure 2-5 Static configuration
Step 3 Click OK.
The port 1 and port 2 form a logical port.
Quick Settings 52.4.2 Dynamic Aggregation Configuration
Dynamic aggregation differs from static aggregation in that port quantity is fixed in static
aggregation, but quantity of actually aggregated port is adjusted dynamically according to flow
rate strategy.
Step 1 Add the ports to the dynamic group.
1) Select LACP (Active) in the Mode area, and add the ports to the aggregation
group. For example, add port 3 and port 4 to aggregation group 2. See Figure 2-6.
2) Select LACP (Passive) in the Mode area, and add the ports to the aggregation
group. For example, add port 5 and port 6 to aggregation group 3. See Figure 2-6.
Figure 2-6 Dynamic configuration
Step 2 Click OK.
2.5 IP and Route
You can add the IP address of VLAN virtual interface and IP route. For details, see "3.1.1.2 IP
and Route."
Step 1 Click IP & Route on the Quick Setting interface.
The IP & Route interface is displayed. See Figure 2-7.
Quick Settings 6Figure 2-7 IP and route
Step 2 Add the VLAN interface.
1) Click Add in the IP Config area.
A new record is added. See Figure 2-8.
Figure 2-8 VLAN interface
2) For the parameters, see Table 2-3.
Table 2-3 VLAN interface
Parameter Description
VLAN Enter VLAN number.
IP address Set the IP address of the VLAN interface.
Mask Length Set the mask length of the VLAN interface.
Step 3 Add the IP route.
1) Click Add in the Route Config area.
Quick Settings 7A new record is added. See Figure 2-9.
Figure 2-9 IP route
2) For the parameters, see Table 2-4.
Table 2-4 IP routes
Parameter Description
Network It is the destination of the IP packet.
Mask length, with the destination address, is to identify the IP address
of the destination host or the route. After Logical AND between
Mask Length
destination address and network mask, you can get the IP address of
the destination host or the route.
Next Hop The next hop IP of the route.
Step 4 Click OK.
Quick Settings 83 Advanced Settings
You can configure system, port, VLAN, aggregation, MAC table and other parameters on the
advanced settings interface. The advanced settings interface is different depending on the
models of switch, and the actual interface shall prevail. Take 4-port PoE switch for example.
3.1 Common Configuration
3.1.1 System Configuration
3.1.1.1 System Information
You can set the device name, IP address, mask length and DHCP enable, and view the
software information, hardware information and time.
Be careful when you enable DHCP Client. After enabling DHCP Client, the IP router or DHCP
server connecting to the switch will assign IP address to the switch automatically and the
existing IP address will be invalided, and then you cannot access the web interface.
Step 1 Select Advanced > Common > System Config > System Info.
The System Info interface is displayed. See Figure 3-1.
Advanced Settings 9Figure 3-1 System information
Step 2 Enter the device name, IP address and mask length and DHCP enable.
Step 3 Click Save.
3.1.1.2 IP and Route
The hosts of different VLANs cannot communicate. Route or the layer 3 switch is needed for
forwarding.
The switch supports layer 3 forwarding through VLAN interface. VLAN interface is the virtual
interface of layer 3 mode, for layer 3 communication between the VLANs. It is not the physical
Advanced Settings 10entity on the device. Every VLAN is related to a VLAN interface, and the VLAN interface can
forward packet for the VLAN. Generally, because the VLAN can isolate the broadcasting
domain, every VLAN corresponds to a network segment. VLAN interface is the gateway of the
network segment, and it supports layer 3 forwarding for the message based on IP address.
Step 1 Select Advanced > Common > System Config > IP&Route.
The IP&Route interface is displayed. See Figure 3-2.
Figure 3-2 IP and route
Step 2 Add the VLAN interface.
1) Click Add in IP Setting region.
The Add IP interface is displayed. See Figure 3-3.
Advanced Settings 11Figure 3-3 Add IP
2) For the parameters, see Table 3-1.
Table 3-1 VLAN interface
Parameter Description
VLAN Enter VLAN number.
IP address Set the IP address of the VLAN interface.
Mask Length Set the mask length of the IP address.
3) Click OK.
Step 3 Add the IP route.
1) Click Add in the Route Setting region.
The Add Route interface is displayed. See Figure 3-4.
Figure 3-4 Add route
2) For the parameters, see Table 3-2.
Table 3-2 IP routes
Parameter Description
Network It is the destination of the IP packet.
Mask length, with destination address, is to identify the IP address of
the destination host or the route. After Logical AND between
Mask Length
destination address and network mask, you can get the IP address of
the destination host or the route.
Next Hop The next hop IP of the route.
3) Click OK.
Advanced Settings 12Step 4 Click Save.
3.1.1.3 System time
Set the system time of switch.
Select Advanced > Common > System Config > Current Time.
The Current Time interface is displayed. See Figure 3-5.
Figure 3-5 Current time (1)
You can set the system time through the following three methods:
Set the time manually
Set the date and time on Current Time interface, and then click Save.
Sync time
Click Sync PC, and the switch time synchronizes with the local PC time automatically.
Sync NTP server time
Only with NTP server configured in the network can you enable this function in the
following steps:
Step 1 Select the NTP Enable box to enable the NTP service.
Step 2 Set the IP address of the NTP server. See Figure 3-6.
Advanced Settings 13Figure 3-6 Current time (2)
Step 3 Click Save.
The switch time automatically synchronizes with the time of server 1.
3.1.1.4 Log
You can view logs, export logs and clear logs.
Select Advanced > Common > System Config > Log. The Log interface is displayed. See
Figure 3-7.
Advanced Settings 14Figure 3-7 Log
View logs.
Set the start time, end time and log level, and then click Search to view the details
of the logs. Log Level includes Error, Warning, Notice and Information.
Click Export to export all logs.
Click Clear to clear all logs.
3.1.2 Port Configuration
You can set the port parameters, including speed, full duplex and half duplex, and so on.
Step 1 Select Advanced > Common > Port.
The Port Configuration interface is displayed. See Figure 3-8.
Advanced Settings 15Figure 3-8 Port configuration
Step 2 For the parameters, see Table 3-3.
Table 3-3 Port parameter
Parameter Description
Port Displays all ports of the switch.
Green Up indicates the port is connected successfully, and Red
Link
Down indicates the port is not connected or the connection fails.
Down means disconnection, and the specific speed means
Speed Duplex Status successful connection.
Full means full duplex; Half means half duplex.
Set the speed and the duplex mode.
Speed Duplex Setting
The speed and duplex mode of combo port is fixed to Auto.
Displays flow control actual negotiator or enable status, including
ON and OFF.
Flow Control State
ON: Negotiation succeeds.
OFF: Negotiation fails.
ON/OFF flow control function.
: Flow control is ON.
Flow Control Setting
: Flow control is OFF.
Enable/Disable ingress limit.
: Ingress enable is enabled.
Ingress Limit Enable
: Ingress enable is disabled.
Advanced Settings 16Parameter Description
Ingress Limit (kbps) Set the ingress limit.
Enable/Disable egress limit.
: Egress enable is enabled.
Egress Limit Enable
: Egress enable is disabled.
Egress Limit (kbps) Set the egress limit.
Receive Usage Displays the acceptance usage.
Send Usage Displays the send usage.
Step 3 Click Save.
3.1.3 VLAN Configuration
Add the port to the VLAN, and configure the VLAN. By default, the port belongs to VLAN1.
Step 1 Select Advanced > Common > VLAN Settings.
The VLAN Settings interface is displayed. See Figure 3-9.
Figure 3-9 VLAN Settings
Step 2 Enter 1, 2 in VLANs to create VLAN 1 and VLAN 2.
Step 3 Configure the port VLAN parameters. See Table 3-4.
Table 3-4 Port VLAN configuration parameter
Parameter Description
Port Displays all ports of the switch.
Mode Three modes: Access, Hybrid, and Trunk.
Advanced Settings 17Parameter Description
Add the port to a VLAN. By default, the port belongs to VLAN1. The
Port VLAN
range is 1–4094.
Displays whether data can flow into the port. Only Hybrid supports the
configuration (By default, all date flows into the port under other
models). See the following situations:
Ingress Acceptance
Tagged and Untagged: All data flows into the port.
Tagged only: Only tagged data can flows into the port.
Untagged only: Only untagged data can flow into the port.
Displays whether to tag the data that will egress the port. See the
following three situations:
Untag Port VLAN: If the data flow tag is the same with PVID, the
Egress Tagging
tag will be peeled.
Tag All: All data will be tagged.
Untag All: All data will not be tagged.
Allowed VLANs Set the allowed VLAN.
Step 4 Click Save.
3.1.4 Aggregation
Aggregation is to form the multiple physical ports of the switch into the logical port. The multiple
links in the same group can be regarded as a logical link with the larger bandwidth.
Through aggregation, the ports in the same group can share the communication flow, to make a
larger bandwidth. Besides, the ports in the same group can back up reciprocally and
dynamically to enhance the link reliability.
3.1.4.1 Static Configuration
Step 1 Select Advanced > Common > Aggregation.
The Aggregation interface is displayed. See Figure 3-10.
Figure 3-10 Aggregation
Advanced Settings 18Step 2 Select the aggregation load balancing algorithm mode in Aggregation Configuration.
There are four types:
Source MAC Address: The aggregation load balancing algorithm based on MAC
address.
Destination MAC Address: The aggregation load balancing algorithm based on
destination MAC address.
IP Address: The aggregation load balancing algorithm based on source IPv4
address and destination IPv4 address.
TCP/UDP Port: The aggregation load balancing algorithm based on source and
destination TCP/UDP port.
Step 3 Select Static in the Mode area, and add the ports to the dynamic aggregation group.
For example, add port 1 and port 2 to aggregation group. See Figure 3-11.
Regarding 4-port PoE switch, at most 3 static aggregation groups can be set at the
same time. The static aggregation group is different depending on the models of switch.
The actual interface shall prevail.
Figure 3-11 Static configuration
Step 4 Click Save.
The port 1 and port 2 form a logical port.
3.1.4.2 LACP
LACP (Link Aggregation Control Protocol) is the protocol for link dynamic aggregation. LACP
communicates with another port through LACPDU (Link Aggregation Control Protocol Data
Unit).
Select the port role from the drop-down list in Mode. There are two types:
Active: The port can send LACPDU packet actively to the opposite port, and analyzes the
LACP.
Passive: The port cannot send LACPDU packet actively. After receiving the LACP packet
sent by the opposite port, the port analyzes the LACP.
Step 1 Select Advanced > Common > Aggregation.
The Aggregation interface is displayed. See Figure 3-12.
Advanced Settings 19Figure 3-12 LACP (1)
Step 2 Select LACP (Passive) in the Mode area, and add the port member to the dynamic
aggregation group. For example, add port 3 and port 4 to aggregation Group 2. See
Figure 3-13.
Step 3 Select LACP (Passive) in the Mode area, and add the port member to the dynamic
aggregation group. For example, add port 5 and port 6 to aggregation Group 3. See
Figure 3-13.
Figure 3-13 LACP (2)
Step 4 Click Save.
3.1.5 MAC Table
MAC (Media Access Control) Table records the relationship between the MAC address and the
port, and the information including the VLAN that the port belongs to. When the device is
forwarding the packet, it queries in the MAC address table for the destination MAC address of
the packet. If the destination MAC address of the packet is contained in the MAC address table,
the packet is forwarded through the port in the table directly. And if the destination MAC
Advanced Settings 20address of the packet is not contained in the MAC address table, the device adopts
broadcasting to forward the packet to all the ports except the receiving port in VLAN.
3.1.5.1 Adding Static MAC Table
Step 1 Select Advanced > Common > MAC Table > MAC Address Table.
The MAC Address Table interface is displayed. See Figure 3-14.
Figure 3-14 MAC address table
Step 2 Bind the MAC address to the port in the certain VLAN. For example, bind the MAC
address 00:00:00:00:00:01 to the port 3 in VLAN 2.
1) Click Add.
The Add Static MAC Address interface is displayed.
2) Set the MAC address, port and VLAN. See Figure 3-15.
Advanced Settings 21Figure 3-15 Adding static MAC table
3) Click OK.
3.1.5.2 Port MAC Filtering
After enabling port MAC filtering, the following two MAC devices can communicate with the
port.
Devices in MAC whitelist
The static MAC devices changing from the dynamic MAC devices
Step 1 Select Advanced > Common > MAC Table > Port MAC Filtering.
The Port MAC Filtering interface is displayed. See Figure 3-16.
Advanced Settings 22Figure 3-16 Port MAC filtering
Step 2 Select the port, such as port 5.
Step 3 Click behind Port Enable to enable the port. See Figure 3-17.
Advanced Settings 23Figure 3-17 Enable port MAC filtering
Change dynamic MAC device to static.
1) Select one record, and click Reserved.
2) Click Save. The type changes from Dynamic to Static.
Static MAC devices can communicate with the port normally.
Add MAC whitelist.
1) Click Add.
The Add MAC Whitelist interface is displayed. See Figure 3-18.
Figure 3-18 Add MAC whitelist.
Advanced Settings 242) Set MAC address and VLAN.
3) Click OK.
The devices in MAC whitelist can communicate with port normally.
3.1.6 Spanning Tree
The spanning tree protocol is the protocol of layer 2. It can eliminate the ring cycle of layer 2 by
choosing to block the redundant links in the network, and it can back up the links.
Similar to other protocols, the spanning tree protocol is updated with the development of the
network: From STP (Spanning Tree Protocol), to RSTP (Rapid Spanning Tree Protocol), and to
the latest MSTP (Multiple Spanning Tree Protocol).
Step 1 Select Advanced > Common > Spanning Tree > STP Ports Settings.
The STP Ports Settings interface is displayed. See Figure 3-19.
Figure 3-19 STP ports settings
Step 2 Select the STP mode: STP, RSTP and MSTP.
STP: The most basic spanning tree protocol.
RSTP: Improved based on STP, and realizes rapid convergence of network
topology.
MSTP: Remedies the defects of STP and RSTP. MSTP not only realizes rapid
convergence, but also provides better load sharing mechanism for the redundant
links by forwarding the flow from different VLANs through their own paths.
Step 3 Click Save, and the results are various according to the different modes. See Figure
3-20, Figure 3-21 and Figure 3-22.
Advanced Settings 25Figure 3-20 STP
Figure 3-21 RSTP
Advanced Settings 26Figure 3-22 MSTP
Step 4 Select 3 ports at least to combine an STP/RSTP/MSTP snoop. For example: Port 1,
port 2 and port 3 combine an STP snoop. See Figure 3-23.
Figure 3-23 STP snoop
Step 5 Click Save.
The states of port 1, port 2 and port 3 will change.
Advanced Settings 273.1.7 Long Distance PoE
After you enable long distance PoE, the maximum transmission distance will change from 100
m to 250 m, and the transmission speed will be reduced from 1 Gbps to 10 Mbps.
Select Advanced > System Config > Long Distance PoE, and then select the check box of
the corresponding port to enable long distance PoE. Click Save.
Figure 3-24 Long distance PoE
3.2 Seldom-used Configurations
3.2.1 ERPS
ERPS (Ethernet Ring Protection Switching) is the loop prevention protocol standard of layer 2
defined by ITU-T, and the standard number is ITU-T G.8032/Y1344. So it is also called G.8032.
It defines RAPS (Ring Auto Protection Switching) protocol packet and protection switching
scheme.
ERPS supports two versions (V1 and V2). V1 was released by ITU-T in June 2008, and V2 was
released by ITU-T in August 2010. V2 is compatible with V1, and adds the following functions:
1. Multi-ring networks including crossing ring.
2. Sub-ring switch RAPS packet by virtual channel or non-virtual channel.
3. Forcedly and manually switch blocks.
4. ERPS reverse switch is configurable.
3.2.1.1 MEP Configuration
MEP (Maintenance Entity Point) is a part of ERPS.
Advanced Settings 28The layer 2 device added into ERPS are called node. Add no more than 2 ports into an ERPS
for each node.
Step 1 Select Advanced > Seldom-used > ERPS > MEP Setting.
The MEP Setting interface is displayed. See Figure 3-25.
Figure 3-25 MEP configuration
Step 2 Click Add.
The Add interface is displayed. See Figure 3-26.
Figure 3-26 Add
Step 3 For the parameters, see Table 3-5.
Table 3-5 MEP parameters
Parameter Description
Instance Enter MEP instance number, such as 1.
Residence Port Enter the port number that MEP belongs to, such as Port 1.
Level Maintenance level. It is recommended to set it to be 0.
Tagged VID Enter protocol VLAN, such as VLAN 3.
Step 4 Click OK.
3.2.1.2 ERPS Configuration
Step 1 Select Advanced > Seldom-used > ERPS > ERPS Settings.
The ERPS Settings interface is displayed. See Figure 3-27.
Advanced Settings 29Figure 3-27 ERPS configuration
Step 2 Click Add.
The Add ERPS interface is displayed. See Figure 3-28.
Figure 3-28 Add ERPS
Step 3 For the parameters, see Table 3-6.
Table 3-6 ERPS parameters
Parameter Description
ERPS ID The ID number of ERPS.
Port 0
The two ports added into the ERPS.
Port 1
Port 0 APS MEP The corresponding protocol packet ERPS to ERPS port. Keep
Port 0 APS MEP consistent with Port 0 SF MEP. Keep Port 1
Port 1 APS MEP APS MEP consistent with Port 1 SF MEP. For example: Port 0
APS MEP is 1 and Port 1 APS MEP is 2.
Port 0 SF MEP The corresponding aggregation inspection MEP of ERPS port.
Keep Port 0 APS MEP consistent with Port 0 SF MEP. Keep Port
Port 1 SF MEP 1 APS MEP consistent with Port 1 SF MEP. For example: Port 0
SF MEP is 1 and Port 1 SF MEP is 2.
Advanced Settings 30Step 4 Click OK.
3.2.1.3 Example: ERPS Single Ring Configuration
Networking Requirement
Three switches, port 1 and port 2 are requested to combine an ERPS. See Figure 3-29. The
corresponding relationship: Switch 1: MEP 1 and MEP 2; Switch 2: MEP3 and MEP 4; Switch 3:
MEP 5 and MEP 6.
Figure 3-29 ERPS single ring configuration
Configuration
Configure the ERPS with the following thoughts:
1) Confirm Topology, and plan protection VLAN and protocol VLAN.
2) Confirm RPL owner port.
3) Ensure to disable the mutex function of the ports.
4) VLAN Configuration
5) Create MEP.
6) Create ERPS, and configure control VLAN and protection instance.
7) View the status.
Example
Plan protection VLAN and protocol VLAN to be 2 and 3. Set port 2 of switch 1 to be RPL owner
port. Ensure to disable the mutex function of the ports, including STP function and LLDP
function.
The configurations of the switch are as following:
Step 1 Configure protection VLAN and protocol VLAN are 2 and 3 separately.
1) Select Advanced > Common > VLAN Settings.
The VLAN Settings interface is displayed.
2) Set the mode of port 1 and port 2 to be Trunk. See Figure 3-30.
3) Set the port VLAN of port 1 and port 2 to be 1.
4) Set the allowed VLAN to be 2 and 3.
Advanced Settings 315) Click Save.
Figure 3-30 Add port 1 and port 2 into VLAN 1
Step 2 Create MEP1 and MEP 2
1) Select Advanced > Seldom-used > ERPS > MEP Setting.
The MEP Setting interface is displayed.
2) Click Add.
The Add interface is displayed.
3) Set Instance to be 1. See Figure 3-31.
4) Set Residence Port to be 1.
5) Set Level to be 0.
6) Set Tagged VID to be 3, that is protocol VLAN.
7) Click OK.
Advanced Settings 32Figure 3-31 Add MEP
Add MEP2 in the same way. Set Instance to be 2, Residence port to be 2, Level to be 0
and Tagged VID to be 3.
Step 3 Click 1 and 2 separately under Instance to enter the configuration interface. Modify
MEP ID and add peer ID. See Figure 3-32 and Figure 3-33.
Figure 3-32 Configure the peer ID of MEP 1
Advanced Settings 33Figure 3-33 Configure the peer ID of MEP 2
Step 4 Click OK.
Step 5 Create ERPS.
1) Select Advanced > Seldom-used > ERPS > ERPS Setting.
The ERPS Setting interface is displayed.
2) Click Add.
The Add New ERPS interface is displayed.
3) Set ERPS ID to be 1. See Figure 3-34.
4) Set Port 0 to be1 and Port 1 to be 2.
5) Set Port 0 APS MEP to 1 and Port 1 APS MEP to be 2.
6) Set Port 0 SF MEP to be1 and Port 1 SF MEP to be 2.
7) Click OK.
Advanced Settings 34Figure 3-34 Add ERPS
Step 6 Click 1 under ERPSID to enter the configuration interface. For ERPS configuration, see
Figure 3-35.
Figure 3-35 ERPS configuration
1) Click VLANconfig.
Advanced Settings 35The ERPS VLAN Configuration interface is displayed.
2) Click Add.
3) Set ERPS VLAN to be 2. See Figure 3-36.
4) Click OK.
Figure 3-36 ERPS VLAN configuration
5) Set port 2 of switch 1 to be RPL owner in RPL Configuration. See Figure 3-37.
Figure 3-37 Owner port configuration
Step 7 Click OK.
Step 8 Configure switch 2 and switch 3 in the same way.
Step 9 View the state in Instance State on the ERPS Configuration interface.
Figure 3-38 Instance state
3.2.2 ACL
ACL (Access Control List) is for flow identification. For filtering the packet, the network device
needs to configure a series of matching conditions to classify the packets. The conditions can
be the source address, destination address, and the port number of the packet.
Advanced Settings 36When the device port receives the packet, it can analyze the packet field according to the ACL
rule of the current port. And after the specific packet is identified, the packet is allowed or
forbidden to pass according the preset rule.
3.2.2.1 ACL Configuration
Step 1 Select Advanced > Seldom-used > ACL > ACL Setting.
The ACL Setting interface is displayed. See Figure 3-39.
Figure 3-39 ACL configuration
Step 2 Click Add.
The Add interface is displayed. See Figure 3-40.
Advanced Settings 37Figure 3-40 Add
Step 3 Set the ACL ID, and the range is 1–128.
Step 4 Click OK.
3.2.2.2 ACL Group Configuration
Step 1 Select Advanced > Seldom-used > ACL > ACL Group Setting.
The ACL Group Setting interface is displayed. See Figure 3-41.
Figure 3-41 ACL group configuration
Step 2 Enter ACL ID. Ensure the ACL ID has been added during ACL configuration.
Step 3 Click Save.
Advanced Settings 383.2.3 Loop Protection
Detect the loop among the ports. After the device has detected the loop, it will break the loop.
Step 1 Select Advanced > Seldom-used > Loop Protection.
The Loop Protection interface is displayed. See Figure 3-42.
Figure 3-42 Loop protection
Step 2 Click to enable Loop Protection
3.2.4 Security
3.2.4.1 User Management
You can add, edit, and delete the user.
Select Advanced > Seldom-used > Security > User Management. And the User
Management interface is displayed. See Figure 3-43.
Figure 3-43 User management
Add user
Step 1 Click Add.
The Add User interface is displayed. See Figure 3-44.
Advanced Settings 39Figure 3-44 Add user
Step 2 Enter the user name, password, and confirm password. The password must consist of
8 to 32 non-blank characters and contain at least two types of characters among upper
case, lower case, number, and special character (excluding ' " ; : &). For example, add
the new user test 01.
Step 3 Click Save.
The new user test 01 is added. See Figure 3-45.
Figure 3-45 New user added
Modify and Delete User
Click , and the Modify User interface is displayed. See Figure 3-46.
Advanced Settings 40Figure 3-46 Modify user
Click to delete the user.
You cannot delete the admin user.
SSH
You can enable or disable SSH function.
Click corresponding to SSH on the upper right corner of the User Management
interface.
HTTPS
HTTPS (Hyper Text Transfer Protocol over Secure Socket Layer) is the HTTP channel for
security target. SSL layer and TLS layer are added to HTTP. SSL and TLS are the security
foundation of HTTP, so SSL/TLS are requested for encryption. HTTPS is the URI scheme, and
the syntax is similar to HTTP, and it is used for security HTTP data transmission. Built in the
web Netscape Navigator, it provides authentication and encryption communication. It is widely
applied in world wide web for security sensitive communication. For example, protect account
security and user information.
Click corresponding to HTTPS on the upper right corner of the User Management
interface to enable HTTPS service.
3.2.4.2 NAS Configuration
NAS (Network Access Server) is a server that allows ISP to provide Internet access service.
Step 1 Select Advanced > Seldom-used > Security > NAS Settings.
The NAS Settings interface is displayed. See Figure 3-47.
Advanced Settings 41Figure 3-47 NAS configuration
Step 2 Select Enabled in the Mode area to enable mirroring function.
Step 3 Select the Reauthentication Enabled box to enable reauthentication.
Step 4 Set Admin State: Force Authorized, Force Unauthorized, Port based 802.1X or
MAC-based Auth.
Step 5 Click Save.
3.2.4.3 Radius Configuration
RADIUS (Remote Authentication Dial-In User Service) is a common protocol to realize AAA
(Authentication, Authorization and Accounting).
Advanced Settings 42RADIUS is an information interaction protocol of distributed and C/S construction. It can protect
the network from unauthorized visits. It is used in the network that allows remote visits but
requests the higher security. It defines the RADIUS packet format and the message
transmission mechanism. It stipulates that using UDP as transport layer protocol to encapsulate
the RADIUS packet.
At the beginning, RADIUS is the AAA protocol for the dial-up users only. With the development
of the user accesses, RADIUS adapts to various access, including Ethernet access and ADSL
access. It accesses server through authentication and authorization, and collects records the
usage of network source through accounting.
Step 1 Select Advanced > Seldom-used > Security > Radius Settings.
The Radius Settings interface is displayed. See Figure 3-48.
Figure 3-48 Radius configuration
Step 2 Click Add.
The Add New Server interface is displayed. See Figure 3-49.
Advanced Settings 43Figure 3-49 Add new server
Step 3 Set the server address, auth port, acct port, restransmit and key.
Step 4 Click OK.
3.2.5 IGMP Snooping
IGMP Snooping (Internet Group Management Protocol Snooping) is the multicast constraint
mechanism running on the device of layer 2, for managing and controlling the multicast.
Through analyzing the received IGMP packet, the device of layer 2, which runs IGMP Snooping,
creates the mapping between the port and the MAC multicast address, and forwards the
multicast data according to the mapping.
Step 1 Select Advanced > Seldom-used > IGMP Snooping.
The IGMP Snooping interface is displayed. See Figure 3-50.
Advanced Settings 44Figure 3-50 IGMP snooping
Step 2 Select Enable in the IGMP Snooping area to enable the function.
Step 3 Select Disable or Enable in the Discarding Unknown IGMP Packets area.
Step 4 Click Add.
The Add VLAN interface is displayed. See Figure 3-51.
Figure 3-51 Add VLAN
Step 5 Set VLAN ID and querier address, and select the Querier Election box to enable the
querier
Step 6 Click OK.
Advanced Settings 453.2.6 QoS
QoS (Quality of Service) is used to evaluate the capability that server meets customer’s service
demands. In Internet, what QoS evaluates is the service capability of network forwarding and
packet.
QoS can evaluate from the different aspects according to the various services provided by the
network. QoS evaluates bandwidth, delay, dithering and packet loss during packet and
forwarding.
Congestion
Congestion is common in a complex Internet packet switched environment. See the following
example:
Figure 3-52 Flow congestion
1) The packet comes in the device by the high-speed link and exits by low-speed link.
2) The packet comes in the device from multiple ports and exits from one port (The speed
rate of multiple ports larger than that of the exit port).
If the flow arrives at linear speed, it will encounter the resource chock point, and then the
congestion will generate.
Besides the aggression bandwidth, any other resource shortages (such as the shortages of
distributive processing time, buffer and memory resources) will cause congestion. Additionally,
the poor control of the arrived flow in a certain time, which leads to the flow exceeding the
distributive network resource, is also a factor for generating congestion.
3.2.6.1 Port
Through setting CoS, the priority for packet passing egress port of switch can be decided.
If the congestion occurs at the egress port, the switch will give a CoS value to the packet after it
passes the ingress port. The larger the CoS value, the higher the priority.
Step 1 Select Advanced > Seldom-used > QoS > Port Classification.
The Port Classification interface is displayed. See Figure 3-53.
Advanced Settings 46Figure 3-53 Port classification
Step 2 Set CoS. For example: Set port 1 to be 1, and port 2 to be 2. See Figure 3-54.
Port 1 and port 2 are ingress ports, and port 3 is egress port. The CoS value of port 2 is
large than that of port 1, so the data of port 2 will pass port 3 first.
Advanced Settings 47Figure 3-54 Set CoS
Step 3 Click Save.
3.2.6.2 Port Schedulers
The two modes of port schedulers:
Strict Priority. When congestion occurs, the priority for packet passing egress port of
switch depends on the CoS value in Port Classification.
2–8 Queues Weighted. When congestion occurs, the priority for packet passing egress
port of switch depends on the proportion of total rate.
Step 1 Select Advanced > Seldom-used > QoS> Port Schedulers.
The Port Schedulers interface is displayed. See Figure 3-55.
Advanced Settings 48Figure 3-55 Port schedulers
Step 2 Click the port, such as port 1.
The QoS Egress Port Schedulers and Shapers Port 1 interface is displayed. See
Figure 3-56. The CoS of Q0 is 0, and so on.
Advanced Settings 49Figure 3-56 Port configuration
Step 3 Select mode.
Strict Priority. The priority for packet passing egress port of switch depends on
the CoS value in Port Classification.
2–8 Queues Weighted. When congestion occurs, the priority for packet passing
egress port of switch depends on the proportion of total rate.
For example, select Scheduler Mode as 2 Queues Weighted. The max speed limit of
port 1 and port 2 is 500 kbps. When congestion occurs, 50% ingress port packet will
pass the egress port. See the following for the configuration:
1) Select Scheduler Mode as 2 Queues Weighted. See Figure 3-57.
2) In Ingress Queue Shaper, set the Rate of Q0 and Q1 to be 500 kbps, and
Rate-type to be Line.
3) In Egress Queue Shaper, set the Rate to be 500 kbps, and Rate-type to be Line.
When congestion occurs and the speed of the two ports is 400 kbps, the speed
passing the egress port is 250 kbps.
Advanced Settings 50Figure 3-57 Port schedulers
Step 4 Click OK.
3.2.6.3 Port Shapers
The configuration is the same for port schedulers and port shapers. The only difference is that
the port schedulers interface shows the weight value and the port shapers interface shows the
speed rate.
Select Advanced > Seldom-used > QoS > Port Shapers. The Port Shapers interface is
displayed. See Figure 3-58.
Advanced Settings 51Figure 3-58 Port shapers
3.2.6.4 DSCP-Based
Make sure that you have enabled DSCP before configuring DSCP function.
Step 1 Select Advanced > Seldom-used > QoS > Port Classification.
The Port Classification interface is displayed.
Step 2 Enable DSCP at DSCP port. Suppose port 3 is the egress port, see Figure 3-59.
Advanced Settings 52Figure 3-59 Port classification
Step 3 Click Save.
Step 4 Select Advanced > Seldom-used > QoS > DSCP-Based.
The DSCP-Based interface is displayed.
Step 5 When setting DSCP to be 4 and 8, the CoS is 2 and DPL are 2 and 1.
1) When DSCP are 4 and 8, select Trust to enable the function. See Figure 3-60.
2) When setting DSCP to be 4, CoS is 2 and DPL is 2.
3) When setting DSCP to be 8, CoS is 2 and DPL is 1.
The larger the CoS of DSCP, the higher the priority. The corresponding port packet
will pass the egress port first.
Advanced Settings 53Figure 3-60 DSCP-Based
Step 6 Click Save.
3.2.6.5 Storm Policer
Inhibit the three packets, including unicast, multicast and broadcast.
Step 1 Select Advanced > Seldom-used > QoS > Storm Policer.
The Storm Policer interface is displayed. See Figure 3-61.
Advanced Settings 54Figure 3-61 Storm policer
Step 2 The port can receive the rate up to 1024 fps. See Figure 3-62.
In Unicast, select the Enable box, and enter 1024 in Rate. It means that the port
can receive the rate up to 1024 fps of unicast packet.
In Multicast, select the Enable box, and enter 1024 in Rate. It means that the port
can receive the rate up to 1024 fps of multicast packet.
In Broadcast, select the Enable box, and enter 1024 in Rate. It means that the
port can receive the rate up to 1024 fps of broadcast packet.
Figure 3-62 Storm policer configuration
Step 3 Click Save.
Advanced Settings 553.2.7 SNMP
SNMP (Simple Network Management Protocol) is the standard protocol for network
management in Internet, and it is widely applied for management device to access and manage
the managed devices. SNMP has the following features:
It supports intelligent management for network device. By using the network management
platform based on SNMP, the network administrator can query the running status and the
parameters of the network device, and can configure the parameter, find the error, perform
fault diagnosis, and then plan the capacity and create the report.
SNMP supports to manage the devices of different physical features. SNMP provides only
the most basic function library. It makes the management task and the physical feature and
the networking technology of the managed device independent, to manage the devices
from different manufacturers.
SNMP network provides two elements, NMS and Agent.
NMS (Network Management System) is the manager in SNMP network, and it provides
friendly human-machine interface to help the network administrator to finish most of the
network management work.
Agent is the managed role in SNMP network, and it receives and handles the request
packet from NMS. In some emergency circumstances, for example, if the port status
changes, Agent can send alarm packet to NMS proactively.
3.2.7.1 Enabling SNMP Function
Step 1 Select Advanced > Seldom-used > SNMP.
The SNMP interface is displayed. See Figure 3-63.
Advanced Settings 56Figure 3-63 SNMP
Step 2 Click in SNMP to enable SNMP.
Every SNMP v3 agent has an engine ID as its unique identifier.
3.2.7.2 Configuring SNMP v1/v2
Example: Configure SNMP v1. The configuration of SNMP v2 is the same as that of SNMP v1.
Step 1 Select SNMP v1 in SNMP Version.
Step 2 Set the read-only community, read&write community, trap address and trap port.
Step 3 Click Save.
3.2.7.3 Configuring SNMP v3
Step 1 Select SNMP v3 in SNMP Version. See Figure 3-64.
Advanced Settings 57Figure 3-64 SNMP v3
Step 2 Set the trap address, trap port and trap name.
Step 3 Set the read-only username, authentication type, authentication password, encryption
type and encryption password.
Advanced Settings 58Step 4 Set the read&write username, authentication type, authentication password, encryption
type and encryption password.
Step 5 Click Save.
3.2.8 DHCP Server
DHCP Server is the server for managing DHCP standard in the specific network. DHCP Server
is to allocate IP address for the workstation and make sure that the IP address for every
workstation is different. DHCP Server simplifies the network management task which should be
done manually before.
Generally, in the following scenes, DHCP Server is adopted to allocate IP address.
The network scale is large. The workload is too heavy if manually configured, and
centralized management for network will be difficult.
The quantity of PC is larger than the quantity of IP address in the network, and it is
impossible to allocate a static IP address for every PC. For example, the user quantity that
can access network at the same time is limited by ISP, and the user needs to acquire the IP
address dynamically.
Only a small number of PC need the static IP address, and most of the PC do not need the
static IP address.
There are three parts of DHCP Server configuration: VLAN Mode, Excluded IP and Pool.
Step 1 Select Advanced > Seldom-used > DHCP > DHCP Server.
The DHCP Server interface is displayed. See Figure 3-65.
Figure 3-65 DHCP Server
Advanced Settings 59Step 2 Click in Global Mode, to enable DHCP Server function.
Step 3 Configure DHCP mode.
Add VLAN interface first. See "3.1.1.2 IP and Route."
1) Click Add in VLAN Mode.
The Add VLAN Mode interface is displayed. See Figure 3-66.
Figure 3-66 Add VLAN mode
2) Enter the VLAN range, such as 2-4.
3) Click OK.
Step 4 Configure network segment of excluded IP.
Excluded IP refers to the IP reserved for the server, which will not assign to the client.
1) Click Add in Excluded IP.
The Add Excluded IP interface is displayed. See Figure 3-67.
Figure 3-67 Add excluded IP
2) Enter the IP address range, such as 192.168.100.2–192.168.100.50.
3) Click OK.
Step 5 Add DHCP address pool.
1) Click Add in Pool.
The Add Pool interface is displayed. See Figure 3-68.
Advanced Settings 60Figure 3-68 Add pool
2) For the parameters, see Table 3-7.
Table 3-7 Pool parameters
Parameter Description
Pool Name DHCP address pool name, such as vlan2_test.
Two types: Network and Host.
Type Network: The network segment of an IP.
Host: A specific IP
IP The IP address of the host or the network.
Subnet Mask The subnet mask of the host or the network.
Lease Time Enter the lease time of the address pool.
Gateway Configure the default gateway of the address pool.
3) Click OK.
3.2.9 LLDP
LLDP (Link Layer Discovery Protocol) is a standard link layer discovery way. It can form its
main capabilities, management address, device No. and port No. as TLV (Type Length Value),
encapsulate it in LLDPDU (Link Layer Discovery Protocol Data Unit), and release it to its
neighbor. The neighbor will keep the received information in the form of standard MIB
(Management Information Base), so that the network management can query and judge the
communication state of the link.
LLDP
Step 1 Select Advanced > Seldom-used > LLDP.
The LLDP interface is displayed. See Figure 3-69.
Advanced Settings 61Figure 3-69 LLDP
Step 2 Set LLDP mode.
Select Enable: Both send and receive LLDP packet.
Select Disable: Neither send nor receive LLDP packet.
Select Rx only: Only receive LLDP packet.
Select Tx only: Only send LLDP packet.
Step 3 Click Save.
View the LLDP Neighbor Information.
Select Advanced > Seldom-used > LLDP > LLDP Neighbor. The LLDP Neighbor interface
is displayed. See Figure 3-70.
Advanced Settings 62Figure 3-70 LLDP neighbor
3.2.10 485 Config
Transmit the data of asynchronous serial port RS–232/485 transparently through Ethernet.
Select Advanced > Seldom-used > 485 Config. The 485 Config interface is displayed. See
Figure 3-71.
Advanced Settings 63Figure 3-71 485 config
3.2.11 PoE
PoE (Power over Ethernet) is the function that through Ethernet RJ-45 port, the device can
provide power for the external PD (Powered Device) remotely with twisted pair. PoE function
helps to centralize power supply and facilitate backup. The network terminal does not need the
external power source anymore, and one network cable is enough, It conforms to the standards
of IEEE 802.3af, IEEE 802.3at, and IEEE 802.3bt, adopting the power port globally agreed. It
can be applied in IP telephone, wireless AP (Access Point), portable device charger, card
reader, network camera, date collection, and so on.
Only some models of PoE switches comply with the IEEE 802.3bt standard, and BT supports
Max. 90W. Please refer to the actual situation.
Advanced Settings 64You can also read