Oktoberfest Service Manual "Information On Tap" - American ...
←
→
Page content transcription
If your browser does not render page correctly, please read the page content below
Oktoberfest Service Manual
   “Information On Tap”
............................................................... .......

WARNING!       STOP AND READ – UNPLUGGING BOARD CONNECTORS WHILE THE
               MACHINE IS POWERED ON CAN, AND MOST LIKELY WILL, DESTROY THE
               BOARD!!! THIS IS NOT COVERED UNDER AMERICAN PINBALL’S
               WARRANTY AND YOU WILL BE RESPONSIBLE FOR ALL ASSOCIATED
               REPAIR COSTS. NO EXCEPTIONS.

       Oktoberfest Service Manual

               WWW.AMERICANPINBALL.COM
                          VERSION 1.0111
                    PART NUMBER: DOC0002-01

                                                                              ii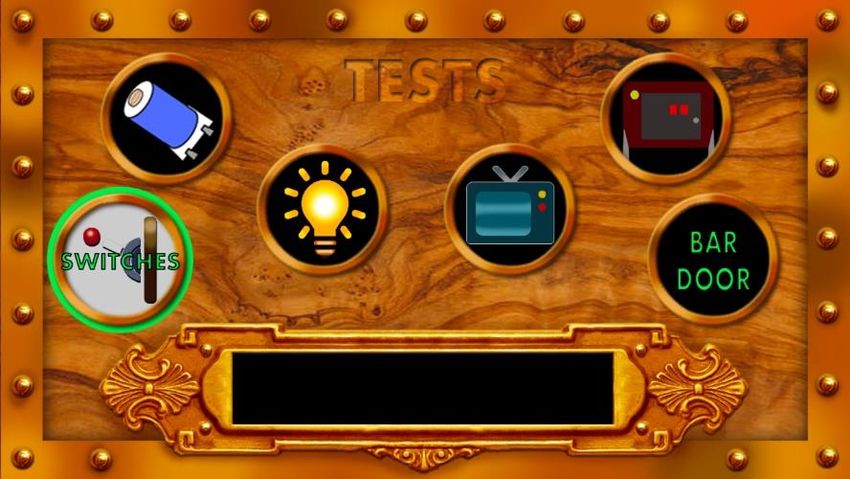
LIMITED WARRANTY
......................................................................

American Pinball Inc. (“Seller”) warrants only the original purchaser of its products that
the items listed below are free of defects in material & workmanship under normal use
and service for the specified warranty period. Warranties are non-transferable.

COVERAGE
The limited Warranty covers defective workmanship and materials as follows:

1. All parts of the pinball machine, excluding standard plastic, bumper post, rubber rings
   and wear and tear parts for 90 days from the date of invoice or shipment by distributor.
2. The LCD monitor for 1 year from the date of invoice or shipment by distributor.

CONDITIONS
The original purchaser must register the Limited Warranty by completing the Product
Registration Form on the American Pinball Website within 15 days of receipt. In the event
of a warranty for the above coverage to apply, the Original Purchaser must open a Service
Ticket at www.americanpinball.com/support/service/ or call 1-833-API-HELP.
Service-related questions can be sent via e–mail to service@americanpinball.com.

Defective parts need to be sent to American Pinball at the purchaser’s expense, if the
defective parts cannot be removed, the entire Pinball Machine will need to be returned to
the Distributor for repair or replacement. All parts must be properly packaged with an
RMA tag/Trouble ticket and returned freight prepaid to the Sellers facility.

EXCLUSIONS
The Limited Warranty does not cover service, labor or shipping and handling. Damage,
wear and or breakage not caused by defective materials or workmanship shall not be
covered by the warranty. Damage incurred during shipping and handling shall not be
covered by the warranty.

DISCLAIMER OF IMPLIED WARRANTY
Except as specifically provided in a written contract between Seller and Purchaser, there
are no other warranties, express or implied, including any implied warranties of
merchantability or fitness for a particular purpose.

                                                                                             iii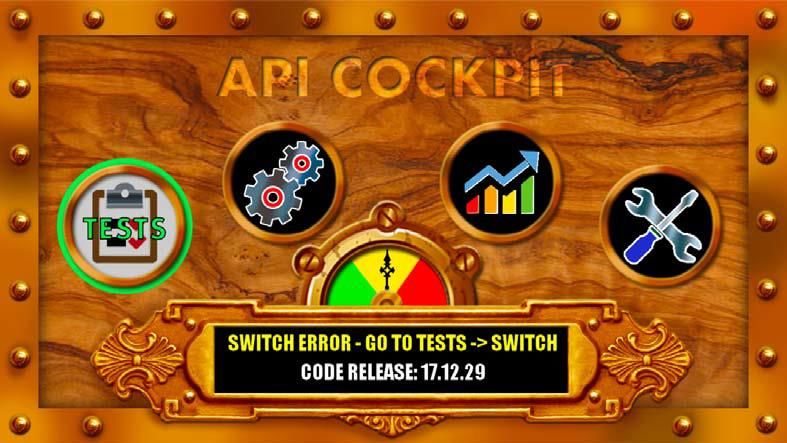
DISCLAIMER OF DAMAGE
This warranty does not apply to any parts damaged to improper handling or due to
improper installation, usage or alteration, In no event shall the Seller be held liable for
any anticipated profits, loss of profits, loss of use, accidental or consequential damages or
any other losses incurred by the customer regarding the purchase of an
AMERICAN PINBALL, INC. product.

CAUTIONS, WARNINGS & NOTICES
......................................................................
CAUTION!       FOR SAFETY AND RELIABILITY, DO NOT SUBSTITUTE PARTS, EQUIPMENT
               OR ADD GAME CIRCUITRY MODIFICATIONS. SUCH MODIFICATIONS MAY
               ADVERSELY AFFECT GAME PLAY OR CAUSE INJURIES AND MAY RESULT
               IN VOIDING OF THE WARRANTY. ALWAYS TRANSPORT PINBALL GAMES
               WITH THE HINDGE BACKBOX IN THE FOLDED POSITION. CONTACT
               AUTHORIZED SERVICE PERSONNEL BEFORE PERFORMING ANY REPAIR.
               ANY SUCH REPAIRS SHOULD BE DONE WITH THE LINE VOLTAGE
               DISCONNECTED. FOR SERVICING TIPS, REFERENCE THE USER MANUAL
               OR CONTACT AMERICAN PINBALL INC. TECHNICAL SUPPORT.
               SUBSTITUTION OF PARTS AND EQUIPMENT MAY VOID FCC TYPE
               ACCEPTANCE.

WARNING!       EQUIPMENT HAS BEEN TESTED AND FOUND TO COMPLY WITH THE LIMITS
               FOR A “CLASS A” COMPUTING DEVICE. PURSUANT TO SUBPART J OF PART
               15 OF THE FCC RULES AND REGULATIONS. FCC RULES ARE DESIGNED TO
               PROVIDE REASONABLE PROTECTION AGAINST RF ENERGY WHEN
               OPERATED IN A COMMERCIAL ENVIRONMENT. OPERATION IN A PRIVATE
               RESIDENTIAL AREA IS LIKELY TO CAUSE INTERFERENCE IN WHICH CASE
               THE USER AT ITS OWN EXPENSE WOULD BE REQUIRED TO TAKE
               WHATEVER MEASURES TO CORRECT SUCH INTERFERENCE.

                                                                                           iv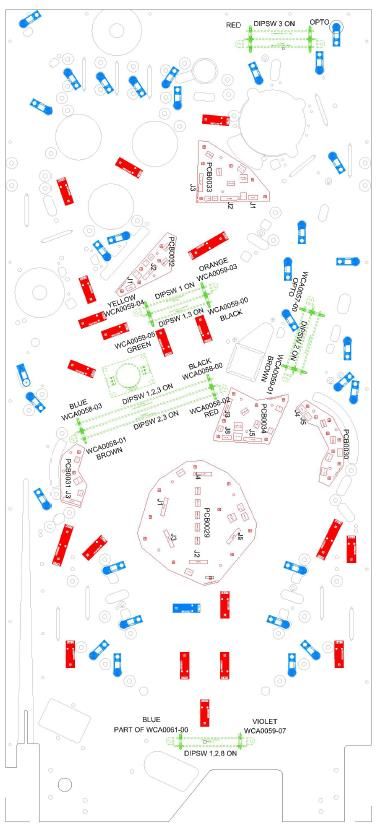
WARNING!              OPENING THE COIN DOOR EXPOSES HIGH VOLTAGE PARTS IN THE
                      GAME, AND DIRECT CONTACT TO THESE HIGH VOLTAGE PARTS
                      CAN LEAD TO SERIOUS OR FATAL INJURIES. THIS EQUIPMENT IS
                      TO BE SERVICED BY TRAINED PROFESSIONALS ONLY.

NOTICES
Cable harness placement and ground strap routing in the game have been designed to
keep RF radiation and conduction within levels accepted by the FCC rules. To maintain
these levels, reposition harnesses and reconnect grounds to their original placements, if
they become disconnected or removed for servicing.

COMPLIANCE, LEGAL AND WARNINGS
RF INTERFERENCE NOTICE
CABLE HARNESS PLACEMENT AND GROUND STRAP ROUTING have been designed to
keep RF radiation and conduction within levels accepted by FCC rules.

DO NOT ALTER WIRING OR GROUND STARPPING. Position wiring and ground strap back to
their original position if they become lose or are removed for service.

LEGAL
OKTOBERFEST, PINBALL ON TAP and all related characters are trademarks of American
Pinball. MAGICGLASS / BEERGLASS and this manual are trademarks of American Pinball.
Any reproductions or modifications are illegal.

                                                                                            v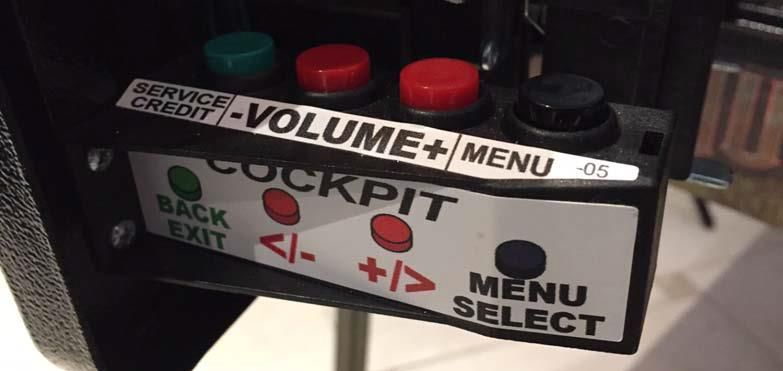
WARNINGS
       American Pinball authorized parts are to be used only. Using ANY unauthorized parts will
       void all warranties and may cause injury to persons or property.

       All servicing of equipment must be completed by competent personnel. Pinball machines
       are complex and present an electrical shock hazard. Not following these guidelines can
       be fatal.

                       DOCUMENT REVISION HISTORY
100-1002                       January 2019                Initial Release of Document
                               July 2019                   Final Release of Document

                             REGIONAL CONTACTS
                             AMERICAN PINBALL
                             1448 YORKSHIRE DRIVE
                             STREAMWOOD, IL 60107
                             847•893•6800
                             833.API.HELP

                                                                                              vi
CONTENTS
......................................................................

               Coverage ……………………..……………………………………………………….………….               iii
               Conditions ………………………..………………………………………….…………………..             iii
               Exclusions ………………………………..…………………….…………………………………              iii
               Disclaimer of Implied Warranty …………………………………..…….……………..     iii
               Disclaimer of Damage …………………………………..………………………………….           iv
               CAUTIONS, WARNINGS & NOTICES ……………………..……………………………           iv
               NOTICES …………………………………..………………………………………………………                 v
               Contents …………………………………………………………………………………………..                vii

            1 Overview …………………….……………..…………………………………………………                  1
              About this Manual …………………………….……………………………………………..             1

            2 Unpacking Instructions ……………………….…………………………………………             4
              Unpacking Oktoberfest …………………………….………………………………..…….           4
               Tools Required for Unpacking ……………….……………….……………………….        4
                To Unpack Oktoberfest .………….…….………………………………………………           5
              Leveling Oktoberfest ………………………………………………………………………..            7

            3 Service Menu …………………………………………………………………………………                  8
              Oktoberfest Service Menu ……………………..…………………………………………           8
              API Cockpit ……………………………………………………………………………………….                9
              Tests …………………………………………………………………………………………………                   10
              To access Oktoberfest’s Test menu …………………………………………………..       12
              Switch Testing ………………………………………………………………………………….               13
              Playfield Switch Map ………………………………………………………………………..            14
              Playfield Coil Map …………………………………………………………………………….             15
              Fuse Table ………………………………………………………………………………………..                16
              Coil Testing ……………………………………………………………………………………….               17
              LED Testing ……………………………………………………………………………………….                17
              Display Test ………………………………………………………………………………………                17
              Cabinet Tests ……………………………………………………………………………………                17
              Bar Door Test …………………………………………………..……………………………….              17
              Coil Interlock Switch …………………………………………………………………………            17
              Coil Adjustment Settings …………………………………………………………………..          18
              To access Oktoberfest’s Coils settings ..…………………………………………….   18
              Oktoberfest Coil Setup …………………………..…………………………………………           18
              Features Adjustment Settings …………………………………………………………..         20

                                                                                  vii
To access Oktoberfest’s Feature settings ………………………………………….      20
  Coin Door and Dollar Bill Acceptor Information ………………………………..   24
  Pricing Adjustment Settings ……………………………………………………………..           25
  To access Oktoberfest’s Pricing settings …………………………………………..     25
  Replay Adjustment Settings ………………………………………………………………             27
  Sound Adjustment ……………………………………………………………………………                  28
  How to Create a Custom Message ……………………………………………………             29
  Standard Adjustment ……………………………………………………………………….                30
  Presets ……………………………………………………………………………………………..                   32
  Switch Table ……………………………………………………………………………………..                 34
  Coil Table ………………………………………………………………………………………….                  38
  Cabinet Board Set …………………………………………………………………………….                39
  Bottom Playfield PCB and Dip Switch Settings ………………………………….     40
  Opto Board Connector ……………………………………………………………………..               41
  Power System Diagram …………………………….………………………………………                42

4 Oktoberfest Code Update ……………………………………………………………..               43
  Code Update Procedure ……………………………………………………………………                43
  Formatting Your USB PC and MAC ….…………………………………………….....         44
  Oktoberfest Log Copy .……………………………………………………………………..              45

5 Oktoberfest Game Rules .....………………………………………………………….. 46

                                                                       viii
LIST OF FIGURES
......................................................................

       Post Locations ………………………………………………………………………………………………….             2
       Rubber Ring Location ……………………………………………………………………………………….           3
       Authorized American Pinball Carton …………………………………………………………………      4
       Service Menu .………………...….....………………………………………………………………………..        9
       Service Menu Navigation Buttons …………………………………………………………………….       12
       Test Menu ………………………………………………………………………………………………………..               12
       Switch Testing Menu ………………………………………………………………………………………..           13
       Switch Map ………………………………………………………………………………………………………                14
       Coil Map …………………………………………………………………………………………………………..               15
       Cabinet Board Assembly …………………………………………………………………………………..          39
       Dipswitch Settings and Bottom PCB Drawing ……………………………………………………    40
       Opto Board Connector ……………………………………………………………………………………..           41

                                                                              ix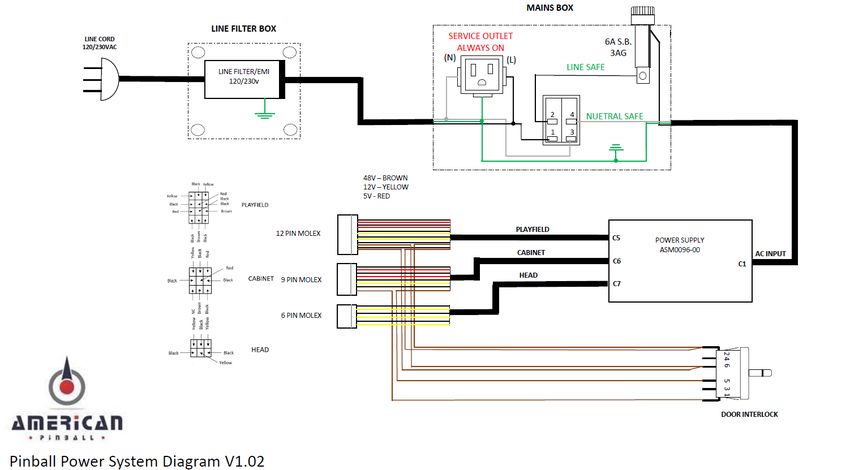
LIST OF TABLES
......................................................................

       Commonly used terms in the Oktoberfest Service Manual documentation ..…...   1
       Service Menu Icons …………………………………………………………………………………………..                      10
       Tests Menu Icons ……………………………………………………………………………………………..                       11
       API Cockpit Navigation ……………………………………………………………………………………..                    13
       Fuse Table ………………………………………………………………………………………………………..                         16
       Coil Adjustment Settings ………………………………………………………………………………….                    18
       Features Adjustment Settings …………………………………………………………………………..                  20
       Price Table ……………………………………………………………………………………………………….                         25
       Pricing Adjustment Settings ……………………………………………………………………………..                  26
       Replay Adjustment Settings ……………………………………………………………………………..                   27
       Sound Adjustments ………………………………………………………………………………………….                        28
       Standard Adjustment Settings ………………………………………………………………………….                   30
       Presets ……………………………………………………………………………………………………………..                          32
       Switch Table ……………………………………………………………………………………………………..                        34
       Coil Table ………………………………………………………………………………………………………….                         38
       Power Distribution ……………………………………………………………………………………………                       42

                                                                                         x
CHAPTER
OVERVIEW
......................................................................
ABOUT THE MANUAL
1
...................................................................
This manual details the integral aspects of the Oktoberfest pinball machine.
The following chapters are included in this manual.
Chapter Title
Chapter 1 Overview
Chapter 2 Unpacking Instructions
Chapter 3 API Cockpit / Service Information
Chapter 4 Code Update / Game Logs / USB
Table 1-1 Commonly used terms in the Oktoberfest Service Manual documentation.
Term Description
ADJ Abbreviation for the adjustment menu, when certain settings are
adjusted/configured
AUD Abbreviation for the Audit menu, where audits can be run for the
machine.
DIAG Abbreviation for the Diagnostic menu, where diagnostics can be run for
the machine.
Plumb Bob Tilt Weighted Tilt Assembly.
P3-ROC Board Designed to control all the real-time signaling on a pinball machine.
Note: The documentation for the P3-ROC Boards is available at
americanpinball.com/support
UTIL Abbreviation for the Utility menu, where utilities can be run for the
machine.
1Figure 1-1 Post Locations
2Figure 1-2 Rubber Ring Location
3CHAPTER
UNPACKING INSTRUCTIONS
........................................................... ...........
UNPACKING OKTOBERFEST
2
......................................................................
In order to fully enjoy Oktoberfest in the manner it is designed to be played, please adhere to
the following unpacking instructions.
CAUTION! OKTOBERFEST WEIGHS IN EXCESS OF 250 LBS. AT LEAST TWO PEOPLE
ARE REQUIRED TO UNPACK AND MANEUVER THE MACHINE.
TOOLS REQUIRED FOR UNPACKING
A pair of scissors or a utility knife is all that you will need to unpack Oktoberfest
To unpack Oktoberfest
Your Oktoberfest machine should appear in the following carton.
Figure 2-1 Authorized American Pinball Carton.
4UNPACKING OKTOBERFEST CONTINUED
Using a pair of scissors, carefully cut the bands highlighted with the red arrows.
Lay the box down on the “Truck this side only” side. Remove the 2 pieces of Styrofoam.
Remove the 2 top corner protectors highlighted in the picture (left) and pull out the game by the
center strap (center). Next remove the 4 legs from the bottom corner protectors (right).
5UNPACKING OKTOBERFEST CONTINUED
Slide the game completely out of the box (left), and carefully stand the game up (center). Cut
the shrink wrap by the front legs and install the legs with the supplied hardware (right).
Lay the game down and cut away the shrink wrap covering the rear leg mounting area.
Carefully lift the game up. Install the 2 rear legs with the included hardware. Stand the game up
on all 4 legs once rear legs are installed.
Cut and remove the center band, all the shrink wrap as well as the 2 cardboard protectors for
the front and back.
6UNPACKING OKTOBERFEST CONTINUED
Lift the head and insert the supplied hex wrench into the lock mechanism and turn clockwise to
lock.
Remove the keys from the ball shooter, one set is for the coin door the other set is for the front
coin door. Open the coin door and move the lock down handle to the left and pull up on the
front trim. Remove the trim from the clear protector. Pull the glass off and follow the
instructions under the glass.
LEVELING YOUR AMERICAN PINBALL MACHINE
The game, by default sits at 6 degrees. However, depending on the floor, you may have to adjust
Oktoberfest so that the game is properly leveled left to right and or at the proper pitch. With the leg
levelers all the way in (no threads showing below the leg) the game will be at 6 degrees.
7CHAPTER
Service Menu
......................................................................
OKTOBERFEST SERVICE MENU
3
...................................................................
This chapter includes service menu settings. The service menu accesses the following
settings for optimal play and maintenance.
• Tests
• Settings
• Statistics
• Utilities
• Health Meter
Before You Begin
• Have you unpacked your Oktoberfest machine and set it up according to the instructions in
the manual?
• Have you downloaded the most current code from American Pinball’s Support site?
• Have you registered your game? https://www.american-pinball.com/support/register/
Games must be registered prior to receiving warranty parts or support
Note: Settings are occasionally updated. Please refer to American Pinball’s Support site for the
most current documentation.
8API COCKPIT
Oktoberfest’s service menu contains tests for all the electrical and mechanical functions within
the game.
Figure 3-1 Service Menu
Table 3-1 Service Menu Icons
This includes tests in the following areas
• Switches
• Coils
Tests • LEDs
• Displays
• Cabinet
• Bar Door
This includes adjustments in the following settings
• Standard Adjustment Settings
• Replay Adjustment Settings
• Coil Adjustment Settings
Settings • Sound Adjustment Settings
• Feature Adjustment Settings
• Pricing Adjustment Settings
• Presets
This includes Audits for the following Statistics
• Basic Statistics
• Feature Statistics
Statistics • Standard Statistics
• Game Time Statistics
• Earning Statistics
• Score Breakdown Statistics
9Table 3-1 Service Menu Continued
This includes Information for the following Utilities
• Oktoberfest Balls
Utilities • Statistic Clear
• Date and Time Set
• Restoration of Default Settings
The Health Meter Provides a Quick Analysis of the
Health Meter Overall State of Oktoberfest
Green
Oktoberfest has no Issues
Health Meter Oktoberfest may have Switch Issues
Yellow
Health Meter Oktoberfest may have Missing Balls
Red
TESTS
The test menu includes several diagnostic tests for assuring that your machine is
operating properly. The Test Menu provides tests for the following items.
• Switches
• Coils
• LEDs
• Display
• Cabinet
• Bar Door
10Table 3-2 Test Menu Icons
Switches
Coils
LED
Display
Cabinet
Bar Door
11To Access Oktoberfest’s Test Menu
1. Power on the Machine
2. Open the coin door
3. Press the MENU SELECT button to access the service mode
Figure 3-2 Service Menu Navigation Buttons
4. Press the Red +/- button to select the Test Icon
5. Press the MENU SELECT button to enter Test
Figure 3-3 Test Menu
6. Use the flipper buttons to toggle through the different tests
12Table 3-3 API Cockpit Navigation
API Cockpit Button Flipper Button Equivalent Functionality
Green Press right and left flipper button • Back one level
simultaneously • Exit
Red (+) Right flipper • Increases through menu by one
• Advance to the right or down
Red (-) Left flipper • Decrease through menu by one
• Advance to the left or up
Black Start • Menu Enter
• Select current choice
SWITCH TESTING
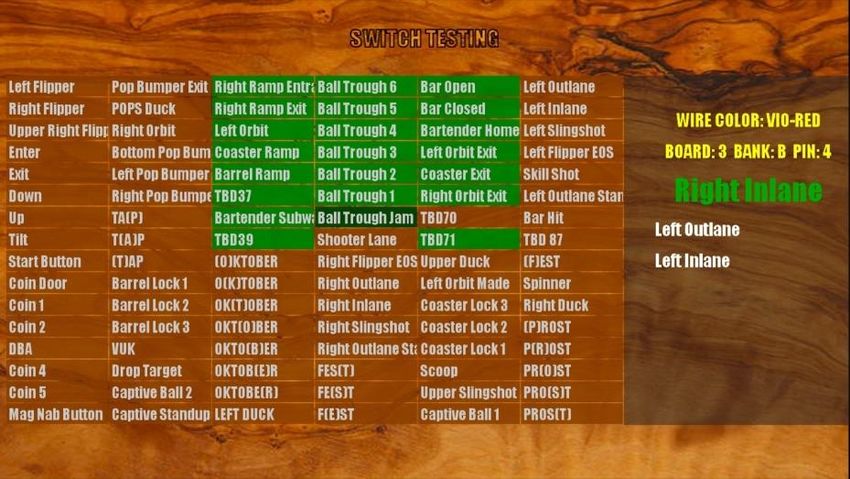
The Switch Test screen shows all the switches, grouped by their boards, there are 16
individual switches per board and are displayed in columns. That means all the switches
in one column are all on the same switch board. Each switch board has 2 groups of 8
switches and each group of 8 switches will all share the same primary wire color. Opto
switches do not share a primary wire color. All contact switches (micro, standup and
rollover) will have a brown background when open, this background color will change to
light green when made. Opto switches will be dark green when they are open, and the
background will change to light green when detecting a ball. A switch with a red
background indicates a switch that has not been made in a while and should be checked
to ensure it is working properly.
Figure 3-4 Switch Testing Menu
Note For a more extensive description of each switch on Oktoberfest, refer to the
Switch Location Chapter.
13PLAYFIELD SWITCH MAP
Figure 3-5 Switch Map
0. Bar Open* 50. Right Orbit
1. Bar Closed* 51. Lower Pop Bumper
2. Bartender Home* 52. Left Pop Bumper
3. Left Orbit Exit* 53. Right Pop Bumper
4. Not Used 54. ta(P)
5. Right Orbit Exit* 55. t(A)p
6. Not Used 56. (F)est
7. Not Used 57. Spinner
8. Scoop Loop Enter* 58. Right Duck
9. Scoop Loop Exit* 59. (P)rost
10. Left Orbit Enter* 60. p(R)ost
11. Coaster Ramp Entrance* 61. pr(O)st
12. Barrel Ramp Enter* 62. pro(S)t
13. Not Used 63. pros(T)
14. Bartender Subway* 64. Ball Trough 1
15. Not Used 65. Ball Trough 2
16. Left Outlane 66. Ball Trough 3
17. Left Inlane 67. Ball Trough 4
18. Left Slingshot 68. Ball Trough 5
19. Left Flip EOS 69. Ball Trough 6
20. Left Standup 70. Ball Trough 7 (Ball Jam)
21. Left Outer Standup 71. Shooter Lane
22. Not Used 72. Right Flipper EOS
23. Bar Hit / Bash 73. Right Outlane
24. (O)ktober 74. Right Inlane
25. O(K)tober 75. Right Slingshot
26. Ok(T)ober 76. Right Outlane
27. Okt(O)ber 77. Fes(T)
28. Okto(B)er 78. fe(S)t
29. Oktob(E)r 79. f(E)st
30. Oktobe(R) 80. Left Flipper Button
31. Left Duck 81. Lower Right Flip Button
32. Upper Duck 82. Upper Right Flip Button
33. Left Orbit Made 83. Enter
34. Coaster Lock Ball 3 84. Exit
35. Coaster Lock Ball 2 85. Down
36. Coaster Lock Ball 1 86. Up
37. Scoop 87. Tilt
38. Upper Slingshot 88. Start Button
39. Captive Ball 1 89. Coin Door Open
40. (T)ap 90. Coin 1
41. Barrel Lock Ball 1 91. Coin 2
42. Barrel Lock Ball 2 92. DBA
43. Barrel Lock Ball 3 93. Coin 3
44. Vuk 94. Coin 4
45. Drop Target 95. Right Flip Magnet
46. Captive Ball 2
47. Captive Ball Standup
48. Pop Bumper Exit
49. Pop Bumper Duck
*OPTO SWITCH
14PLAYFIELD COIL MAP
Figure 3-6 Coil Map
1. Trough Kicker
2. Auto Fire
3. Lower Right Flip Main
4. Lower Right Flip Hold
5. Right Slingshot
6. FEST Magnet
7. Not Used
8. Not Used
9. Lower Left Flip Main
10. Lower Left Flip Hold
11. Left Slingshot
12. OKTOBER Magnet
13. Up Ramp Main
14. Up Ramp Hold
15. Not Used
16. Not Used
17. Upper Right Flip Main
18. Upper Right Flip Hold
19. Flipper Magnet
20. Lower Pop Bumper
21. Right Pop Bumper
22. Left Pop Bumper
23. Lane Magnet
24. Not Used
25. Scoop
26. Barrel Release
27. Upper Slingshot
28. Drop Target Up
29. Not Used
30. VUK
31. Roller Coaster Ball
Release
15Table 3-4 Fuse Table
Fuse Name Fuse Rating Type Fuse Voltage
5 Amp 5x20 Slow Blow 250 Volt
Coil Driver
5 Amp 5x20 Slow Blow 250 Volt
5 Amp 5x20 Slow Blow 250 Volt
Coil Driver
5 Amp 5x20 Slow Blow 250 Volt
Main Fuse 6 Amp 3AG Slow Blow 250 Volt
Add On Board F1 4 Amp 5x20 Slow Blow 250 Volt
Add On Board F2 (1) 4 Amp 5x20 Slow Blow 250 Volt
RGB Playfield 1 Amp 5x20 Slow Blow 250 Volt
RGB Back Panel 4 Amp 5x20 Slow Blow 250 Volt
(1) Only used when 48 Volt Knocker is installed.
16COIL TESTING
To test the coils, you must close the coin door to activate the High-Power Interlock
switch. Press the start button to disable or enable Coil Testing.
LED TESTING
When first entering LED Test, all LED’s flash on the playfield, rotating through red,
green, blue and white.
You also can walk through the LED’s one-by-one. LED testing is designed to follow the
playfield in a logical sequence.
DISPLAY TEST
The main display proceeds through a series of colors (red, green and blue) and a test
pattern.
CABINET TESTS
The Cabinet tests provide diagnostics for the start button, optional shaker motor,
optional knocker, backbox Lighting and playfield back board lighting.
BAR DOOR TEST
A test to ensure that the bar door stepper is functioning.
ATTENTION…. THIS GAME IS EQUIPED WITH AN INTERLOCK SWITCH FOR THE COIL VOLTAGE.
THE INTERLOCK SWITCH DISABLES THE COIL VOLTAGE WHEN THE DOOR IS OPEN.
INTERLOCK SWITCH NEEDS TO BE PULLED OUT TO ENGAGE COIL VOLTAGE WHEN DOOR IS
OPEN FOR COILS TO WORK.
17COIL ADJUSTMENT SETTINGS
...................................................................
Coil settings allow you to control the “strength” of the various mechanisms on the playfield.
To access Oktoberfest’s Coil settings
1. Power on the machine.
2. Open the coin door
3. Press the MENU SELECT button to access the service mode.
4. Press the red +/- button to select the Settings icon.
5. Press the MENU SELECT button to enter the Settings section.
6. Use the red +/- buttons to page through the different settings to the Coil settings.
7. Press the green BACK EXIT button to return to the previous menu.
OKTOBERFEST COIL SETUP
Individual coil strength can be adjusted to enhance game play.
CAUTION! Increasing coil strength can create undesirable results such as broken plastics
as well as expedited playfield wear. Increased coil strength wear and tear is
not covered under our warranty. Keep coil strength as low as possible.
Table 3-5 Coil Adjustment Settings
Name Description Value
Auto Fire Specifies the strength of the Auto Fire feature. Options: 1 to 35
Default: 24
Barrel Release Specifies the strength of the Barrel Release. Options: 1 to 35
Default: 20
Bottom Pop Specifies the strength of the Bottom Pop. Options: 1 to 35
Default: 10
Roller Coaster Release Specifies the strength of the Roller Coaster Release. Options: 1 to 35
Default: 20
Drop Target Specifies the strength of the Drop Target. Options: 1 to 35
Default: 16
Drop Target Trip Specifies the strength of the Drop Target Trip N/U Options: 1 to 35
Default: 20
18Table 3-5 Coil Adjustment Settings Cont.
Name Description Value
FEST Magnet Specifies the strength of the Fest Magnet. Options: 1 to 35
Default: 20
LWR L Flipper Hold Specifies the strength of the Lower Left Flipper Hold. Options: 1 to 35
Default: 20
LWL L Flipper Main Specifies the strength of the Lower Left Flipper Main. Options: 1 to 35
Default: 26
LWR R Flipper Hold Specifies the strength of the Lower Right Flipper Options: 1 to 35
Hold. Default: 20
LWR R Flipper Main Specifies the strength of the Lower Right Flipper Options: 1 to 35
Main. Default: 28
Flipper Magnet Specifies the strength of the Flipper Magnet. Options: 1 to 35
Default: 20
UP R Flipper Hold Specifies the strength of the Upper Right Flipper Options: 1 to 35
Hold. Default: 20
UP R Flipper Main Specifies the strength of the Upper Right Flipper Options: 1 to 35
Main. Default: 26
Lane Magnet Specifies the strength of the Lane Magnet. Options: 1 to 35
Default: 20
Left Pop Specifies the strength of the Left Pop. Options: 1 to 35
Default: 10
Left Slingshot Specifies the strength of the Left Slingshot Options: 1 to 35
Default: 9
Oktober Magnet Specifies the strength of the Oktober Magnet. Options: 1 to 35
Default: 20
Ramp Hold Specifies the strength of the Ramp Hold. Options: 1 to 35
Default: 20
Ramp Lower Specifies the strength of the Ramp Lift. Options: 1 to 35
Default: 10
Right Pop Specifies the strength of the Right Pop. Options: 1 to 35
Default: 10
Right Slingshot Specifies the strength of the Right Slingshot. Options: 1 to 35
Default: 9
Scoop Specifies the strength of the Scoop. Options: 1 to 35
Default: 10
Trough Kicker Specifies the strength of the Trough Kicker. Options: 1 to 35
Default: 16
Upper Slingshot Specifies the strength of the Upper Slingshot. Options: 1 to 35
Default: 9
VUK Specifies the strength of the VUK. Options: 1 to 35
Default: 20
19FEATURE ADJUSTMENT SETTINGS
...................................................................
Feature settings address conditions that are specific to the game.
To access Oktoberfest’s Feature settings
1. Power on the machine.
2. Open the coin door
3. Press the MENU SELECT button to access the service mode.
4. Press the red +/- button to select the Settings icon.
5. Press the MENU SELECT button to enter the Settings section.
6. Use the red +/- buttons to page through the different settings to the Coil settings.
7. Press the green BACK EXIT button to return to the previous menu.
Table 3-6 Feature Adjustment Settings
Name Description Value
Bar Super Skill Difficulty Specifies the level of difficulty for the Super Skill shot Options: Extra Easy –
Extra Hard
Default: Medium
Beer Barrel Lock Difficulty Specifies the level of difficulty for Beer Barrel Lock. Options: Extra Easy –
Extra Hard
Default: Medium
Beer Barrel MB Ball Save Specifies the time Ball Save is on after Beer Barrel MB Options 1 to 30
Time starts. Default: 12
Bumper Cars Hits To Win Specifies the number of pop bumper hits to win Options: 1 to 50
Bumper Cars. Default: 30
Bumper Cars Initial Time Specifies the initial time for Bumper Cars Options: 1 to 90
Default: 45
Bumper Multiplier Time Specifies the time for Bumper Multiplier. Options: 1 to 45
Default: 20
Bumpers For Auto MagNab Specifies the number of pop bumpers for MagNab. Options: 1 to 50
Default: 20
Calorie Coma Start Difficulty Specifies the Calorie Coma Start Difficulty Options: Extra Easy –
Extra Hard
Default: Medium
Chugging Initial Time Specifies the initial time for Chugging. Options: 1 to 90
Default: 45
20Table 3-6 Feature Adjustment Settings Continued
Name Description Value
Corkscrew Last Chance Specifies the Corkscrew Last Chance Time Options: 1 to 31
Time Default: 12
Corkscrew MB Ball Save Specifies the ball save time for Corkscrew MB. Options: 1 to 30
Time Default: 12
Duck Derby Ball Save Time Specifies the ball save time for Duck Derby. Options: 1 to 30
Default: 20
Duck Derby Difficulty Specifies the difficulty of Duck Derby. Options: Extra Easy –
Extra Hard
Default: Medium
Duck Derby Shots To Win Specifies the shots to win Duck Derby. Options: 1 to 15
Default: 8
Duck Hunt Hits To Win Specifies the number of hits to win Duck Hunt. Options: 1 to 10
Default: 5
Duck Hunt Initial Time Specifies the initial time of Duck Hunt Options: 1 to 90
Default: 45
Ducks for Duck Derby Specifies the number of ducks for Duck Derby. Options: 25 to 145
Default: 50
Ducks to Light Extra Ball Specifies the number of ducks to light Extra Ball. Options: 1 to 100
Default: 25
Eating Contest Initial Time Specifies the initial time of Eating Contest. Options: 1 to 90
Default: 45
Food Stand Timer Specifies the Food Stand Timer. Options: 1 to 90
Default: 30
Free Stein at Start of Game Specifies Free Stein at Start of Game. Options: Yes or No
Default: No
Fud Frenzy Initial Time Specifies the initial time of Fud Frenzy. Options: 1 to 90
Default: 45
Fud Frenzy Switches to Win Specifies the number of switches to win Fud Frenzy. Options: 1 to 90
Default: 75
Initial Bar Hits Required Specifies the number of hits to open bar initially. Options: 1 to 10
Default: 1
Initial Corkscrew Jackpot Specifies the initial Corkscrew shots for Jackpot. Options: 1 to 5
Shots Default: 2
Initial Mag-Nabs Specifies the number of initial Mag-Nabs at the Options: 1 to 10
beginning. Default: 2
Initial Spins for Food Stand Specifies the number of spins needed for Food Stand. Options: 1 to 50
Default: 25
Juggling Ball Save Time Specifies the ball save time for Juggling Ball. Options: 1 to 30
Default: 12
Juggling Shots To Win Specifies the number of shots to win Juggling. Options: 1 to 9
Default: 7
Last Call Flipper Delay Specifies Last Call Flipper Delay. Options: Extra Easy –
Extra Hard
Default: Medium
Looper Initial Time Specifies the initial time of Looper. Options: 1 to 90
Default: 45
21Table 3-6 Feature Adjustment Settings Continued
Name Description Value
Looper Loops To Win Specifies the number of Looper Loop[s to win. Options: 1 to 10
Default: 5
Max Bar Hits Required Specifies the maximum number of Bar Hits needed. Options: 1 to 10
Default: 5
Max Steins of Same Kind Specifies the maximum number of the same Steins. Options: 1 to 5
Default: 3
Mechanical Knocker on Specifies Mechanical Knocker on Bumper Cars. Options: Soft, Medium,
Bumper Cars Loud, Off
Default: Off
Mechanical Knocker on Specifies Mechanical Knocker on Shooting Modes. Options: Soft, Medium,
Shooting Modes Loud, Off
Default: Off
One handed Play Specifies if One Handed Play is activated. Options: On/Off/Player
Selected
Default: Player Selected
Otto Specifies if Otto is activated. Options: On - Off
Default: On
Outlane Modes on Save Specifies the number of Saves needed to Award the Options: 2 to 5
Number Outlane Mode to keep your ball. Default: 3
Playfield X Time Specifies the time Playfield X is on. Options: 1 to 45
Default: 20
Release Beer Barrel Locks at Specifies whether to Release Beer Barrel Locked Balls Options: Yes/No
Game End at the End of the Game Default: Yes
Release Roller Coaster Locks Specifies whether to Release Roller Coaster Locked Options: Yes/No
at Game End Balls at the End of the Game Default: Yes
Ring Toss Initial Time Specifies the initial time of Ring Toss. Options: 1 to 90
Default: 45
Rockin' Express Initial Time Specifies the initial time of Rockin’ Express. Options: 1 to 90
Default: 45
Rockin' Express Spins to Specifies the Number of Spins to Win. Options: 5 to 95
Win Default: 25
Rotor Difficulty Specifies the Rotor Difficulty. Options: Extra Easy –
Extra Hard
Default: Medium
Rotor Initial Time Specifies the initial time of Rotor. Options: 1 to 90
Default: 45
Rotor Shots To Win Specifies the number of shots to win Rotor. Options: 1 to 9
Default: 3
Scoop Eject Ball Saver Specifies if ball save is on after a scoop eject. Options: On - Off
Default: On
Skill Shot Timer Specifies how long Skill Shot is active after a ball Options: 1 to 15
launch. Default: 5
Sky Slide Drop Target Time Specifies the Time the Sky Slide Drop Target stays Options: 1 to 30
down. Default:10
Sky Slide Initial Time Specifies the initial time of Sky Slide. Options: 1 to 90
Default: 45
22Table 3-6 Feature Adjustment Settings Continued
Name Description Value
Sky Slide VUKs To Win Specifies the number pf VUK’s to win Sky Slide. Options: 1 to 10
Default: 3
Stein Race Ball Save Time Specifies the time Ball Save is on for Stein Race. Options: 1 to 30
Default: 12
Stein Race Initial Time Specifies the initial time for Stein Race. Options: 1 to 90
Default: 45
Stein Racing Shots to Win Specifies the number of shots to win Stein Racing. Options: 1 to 6
Default: 4
Steins to Light Extra Ball Specifies the number of Steins to light Extra Ball. Options: 1 to 14
Default: 5
Super Skill Timer Specifies the time Super Skill Shot is on. Options: 1 to 10
Default: 5
Tap It Customers To Win Specifies the number of Customers needed to win Options: 1 to 49
Tap It. Default: 20
Tap It Difficulty Specifies Tap It Difficulty. Options: Extra Easy –
Extra Hard
Default: Medium
Target Shooting Initial Time Specifies the initial time of Target Shooting. Options: 1 to 90
Default: 45
Tent Start Difficulty Specifies the Tent Start Difficulty. Options: Extra Easy –
Extra Hard
Default: Medium
Tents to Light Extra Ball Specifies the number of Tents to light Extra Ball. Options: 1 to 14
Default: 5
23COIN DOOR INFORMATION
...................................................................
Dollar Bill Acceptor (DBA)
Any standard up stacker DBA with a bill cassette of 500 or less, operating at 12 Volts DC can be
used.
Coin Door
US Coin Door PUR0001-00
European Coin Door (*not included w/ door) PUR0007-00
*European Coin Door Cable WCA0036-00
*European Interface Board PCB0024-00
Coin Door Lights
Coin Door lights are 12 Volts.
24PRICING ADJUSTMENT SETTINGS
...................................................................
Pricing adjustment settings address settings related to game unit value, free play and currency
management.
Pricing establishes the game unit of value, which should be the lowest denomination of currency
based on coin door configuration.
To access Oktoberfest’s Pricing settings
1. Power on the machine.
2. Open the coin door.
3. Press the MENU SELECT button to access the service mode.
4. Press the red +/- button to select the Setting icon.
5. Press the MENUE SELECT button to enter the setting selection.
6. Use the flipper buttons to page through the different settings to the Pricing settings.
7. Press the green BACK EXIT button to return to the previous menu.
Table 3-7 Price Table
Desired Coinage Set “Pricing Plan”
25 cents per game 1 unit = 1 credit
25 cents per game or 2 games for 75 cents 1 unit for 1 credit, 2 for 3
50 cents per game 2 units for 1 credit
50 cents per game or 5 games for 2 dollars 2 units for 1 credit, 4 for 3
50 cents per game or 5 games for 3 dollars 2 units for 1 credit, 5 for 3
50 cents per game or 5 games for 2 dollars 2 units for 1 credit, 8 for 5
75 cents per game or 3 games for 2 dollars 3 units for 1 credit, 8 for 3
75 cents per game 3 units for 1 credit
1 dollar per game (Default setting) 4 units for 1 credit
1 dollar per game or 3 games for 2 dollars 4 units for 1 credit, 8 for 3
1 swipe per game 1 swipe for 1 credit
Overseas Options Set “Pricing Plan”
10 units for 1 credit
15 units for 1 credit
20 units for 1 credit
10 units for 1 credit, 20 for 3
10 units for 1 credit, 40 for 5
25Table 3-8 Pricing Adjustment Settings
Name Description Value
Bill Validator Set the number of units to a single pulse from the validator is Options: 1 to 19
worth. Determines how many units to credit based on pulses. Default: 1
Coin Slot 1 Units Specifies how many units are credited in Coin Slot 1 when a Options: 1 to 20
coin is inserted. Default: 1
Coin Slot 2 Units Specifies how many units are credited in Coin Slot 2 when a Options: 1 TO 20
coin is inserted. Default: 1
Coin Slot 4 Units Specifies how many units are credited in Coin Slot 4 when a Options: 1 to 20
coin is inserted. Default: 1
Coin Slot 5 Units Specifies how many units are credited in Coin Slot 5 when a Options: 1 to 20
coin is inserted. Default: 1
Credits Specifies the number of credits currently on the machine. Options: 0 to 98
This can be adjusted, as needed. Default: 0
Currency Specifies the currency accepted for game play. Options: Dollar, Euro,
Pound, Kroner
Default: Dollar
Free Play Enables/disables Free Play Options: On, Off
Default: Off
Max Service Credits The highest number of credits that can be added to the Options: 0 to 98
machine. Default: 30
Pricing Plan Specifies the number of units (see unit value) for 1 credit of Options:
play. 1 unit = 1 credit
1 unit for 1 credit, 2 for 3
2 units for 1 credit
2 units for 1 credit, 4 for 3
2 units for 1 credit, 5 for 3
2 units for 1 credit, 8 for 5
3 units for 1 credit, 8 for 3
3 units for 1 credit
4 units for 1 credit
4 units for 1 credit, 8 for 3
10 units for 1 credit
15 units for 1 credit
20 units for 1 credit
10 units for 1 credit, 10 for 3
10 units for 1 credit, 40 for 5
1 swipe for 1 credit
Default:
4 units for 1 credit
Unit Value Specifies the amount in U.S. currency required to play a Options: .1, .2, .25, .5, 1,
game. Default: .25
Note: This applies to the lowest denomination that
Oktoberfest accepts.
26REPLAY ADJUSTMENT SETTINGS
...................................................................
To access Oktoberfest’s Replay Settings
1. Power On the machine.
2. Open the coin door.
3. Press the MENU SELECT button to access the service mode.
4. Press the red +/- button to select the Settings icon.
5. Press the MENU SELECT button to enter the Settings section.
6. Use the red +/- buttons to page through the different settings to the Replay setting.
7. Press the green BACK EXIT button to return to the previous menu.
Table 3-9 Replay Adjustment Settings
Name Description Value
Replay Award Level 1 Specifies the point total required to receive an award Options: 50K, 5M
that is defined in Replay Award Type Increments: 10K
Default: 500K
Replay Award Level 2 Specifies the point total required to receive an award Options: 50K, 5M
that is defined in Replay Award Type Increments: 10K
Default: 750K
Replay Award Level 3 Specifies the point total required to receive an award Options: 50K, 5M
that is defined in Replay Award Type Increments: 10K
Default: 1M
Replay Award Level 4 Specifies the point total required to receive an award Options: 50K, 5M
that is defined in Replay Award Type Increments: 10K
Default: 1.5M
Replay Award Type Specifies the type of reward given to the player based Options: Free game,
upon a defined accomplishment Extra Ball, Points, Off
(refer to Replay Award Level settings) Default: Extra Ball
Replay Boost Specifies the amount of points that each replay value will be Options: 10K, 1M
increased.
Increments: 5K
After each game in which a replay is earned, all replay levels are
increased by the defined replay boost amount. For any game in Default: 50K
which a replay was not won, the amount is reduced by the boost
amount. For example, if three games in a row earn a replay, each
replay amount is set to the original value + (3* boost value). If on
the next game the replay is not earned, it drops to original value+
(2* boost value).
27You can also read


