Cisco Identify Services Engine Hardware Installation Guide, Release 1.4
←
→
Page content transcription
If your browser does not render page correctly, please read the page content below

Cisco Identify Services Engine Hardware Installation Guide, Release
1.4
First Published: February 15, 2015
Last Modified: March 30, 2015

Americas Headquarters
Cisco Systems, Inc.
170 West Tasman Drive
San Jose, CA 95134-1706
USA
http://www.cisco.com
Tel: 408 526-4000
     800 553-NETS (6387)
Fax: 408 527-0883
THE SPECIFICATIONS AND INFORMATION REGARDING THE PRODUCTS IN THIS MANUAL ARE SUBJECT TO CHANGE WITHOUT NOTICE. ALL STATEMENTS,
INFORMATION, AND RECOMMENDATIONS IN THIS MANUAL ARE BELIEVED TO BE ACCURATE BUT ARE PRESENTED WITHOUT WARRANTY OF ANY KIND,
EXPRESS OR IMPLIED. USERS MUST TAKE FULL RESPONSIBILITY FOR THEIR APPLICATION OF ANY PRODUCTS.

THE SOFTWARE LICENSE AND LIMITED WARRANTY FOR THE ACCOMPANYING PRODUCT ARE SET FORTH IN THE INFORMATION PACKET THAT SHIPPED WITH
THE PRODUCT AND ARE INCORPORATED HEREIN BY THIS REFERENCE. IF YOU ARE UNABLE TO LOCATE THE SOFTWARE LICENSE OR LIMITED WARRANTY,
CONTACT YOUR CISCO REPRESENTATIVE FOR A COPY.

The Cisco implementation of TCP header compression is an adaptation of a program developed by the University of California, Berkeley (UCB) as part of UCB's public domain version
of the UNIX operating system. All rights reserved. Copyright © 1981, Regents of the University of California.

NOTWITHSTANDING ANY OTHER WARRANTY HEREIN, ALL DOCUMENT FILES AND SOFTWARE OF THESE SUPPLIERS ARE PROVIDED “AS IS" WITH ALL FAULTS.
CISCO AND THE ABOVE-NAMED SUPPLIERS DISCLAIM ALL WARRANTIES, EXPRESSED OR IMPLIED, INCLUDING, WITHOUT LIMITATION, THOSE OF
MERCHANTABILITY, FITNESS FOR A PARTICULAR PURPOSE AND NONINFRINGEMENT OR ARISING FROM A COURSE OF DEALING, USAGE, OR TRADE PRACTICE.

IN NO EVENT SHALL CISCO OR ITS SUPPLIERS BE LIABLE FOR ANY INDIRECT, SPECIAL, CONSEQUENTIAL, OR INCIDENTAL DAMAGES, INCLUDING, WITHOUT
LIMITATION, LOST PROFITS OR LOSS OR DAMAGE TO DATA ARISING OUT OF THE USE OR INABILITY TO USE THIS MANUAL, EVEN IF CISCO OR ITS SUPPLIERS
HAVE BEEN ADVISED OF THE POSSIBILITY OF SUCH DAMAGES.

Any Internet Protocol (IP) addresses and phone numbers used in this document are not intended to be actual addresses and phone numbers. Any examples, command display output, network
topology diagrams, and other figures included in the document are shown for illustrative purposes only. Any use of actual IP addresses or phone numbers in illustrative content is unintentional
and coincidental.

Cisco and the Cisco logo are trademarks or registered trademarks of Cisco and/or its affiliates in the U.S. and other countries. To view a list of Cisco trademarks, go to this URL: http://
www.cisco.com/go/trademarks. Third-party trademarks mentioned are the property of their respective owners. The use of the word partner does not imply a partnership
relationship between Cisco and any other company. (1110R)

© 2015   Cisco Systems, Inc. All rights reserved.

CONTENTS

CHAPTER 1   Network Deployments in Cisco ISE 1
                 Cisco ISE Network Architecture 1
                 Cisco ISE Deployment Terminology 2
                 Node Types and Personas in Distributed Deployments 3
                   Administration Node 3
                   Policy Service Node 4
                   Monitoring Node 4
                   Inline Posture Node 4
                       Installing an Inline Posture Node 5
                       Inline Posture Node Reuse 5
                 Standalone and Distributed ISE Deployments 5
                 Distributed Deployment Scenarios 6
                 Small Network Deployments 6
                   Split Deployments 7
                 Medium-Sized Network Deployments 7
                 Large Network Deployments 8
                   Centralized Logging 8
                   Load Balancers 8
                   Dispersed Network Deployments 9
                   Considerations for Planning a Network with Several Remote Sites 10
                 Deployment Size and Scaling Recommendations 11
                 Inline Posture Planning Considerations 13
                 Switch and Wireless LAN Controller Configuration Required to Support Cisco ISE Functions 14

CHAPTER 2   Cisco SNS-3400 Series Appliances 15
                 Cisco SNS Support for Cisco ISE 15
                 Cisco SNS-3400 Series Appliance Hardware Specifications 15
                 Cisco SNS-3400 Series Front Panel 16

                                             Cisco Identify Services Engine Hardware Installation Guide, Release 1.4
                                                                                                                       iii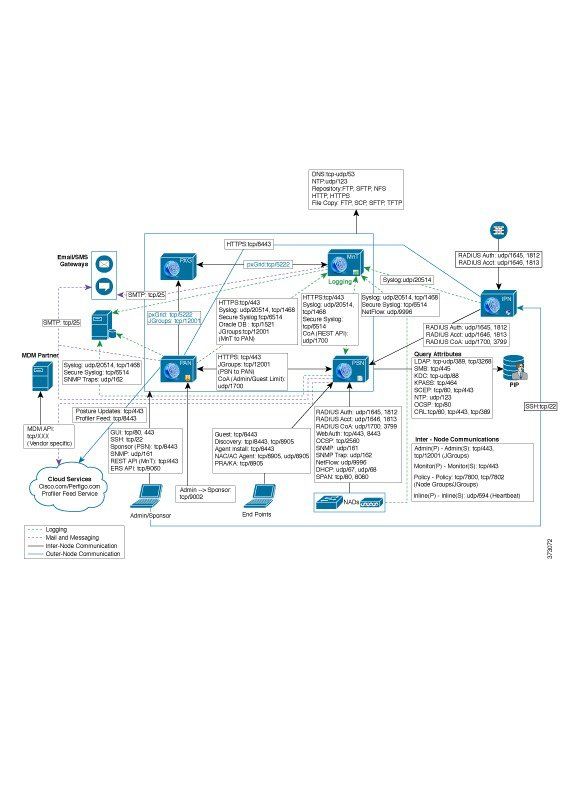
Contents

                                     Cisco SNS-3400 Series Rear Panel 16

CHAPTER 3                     Installing and Configuring a Cisco SNS-3400 Series Appliance 19
                                     Prerequisites for Installing the SNS-3400 Series Appliance 19
                                     Downloading the Cisco ISE ISO Image from Cisco.com 20
                                     Methods for Installing the Cisco ISE Software on a SNS-3400 Series Appliance 20
                                     Configuring Cisco Integrated Management Controller 21
                                     Creating a Bootable USB Drive 22
                                     Cisco ISE Setup Program Parameters 23
                                     Configuring ISE on a Cisco SNS-3400 Series Appliance Using CIMC 25
                                         Supported Time Zones 28
                                     Setup Process Verification 30

CHAPTER 4                     Installing ISE on a VMware Virtual Machine 31
                                     ISE Features Not Supported in a Virtual Machine 31
                                     Supported VMware Versions 31
                                     Support for VMware vMotion 32
                                     Support for Open Virtualization Format 32
                                     Virtual Machine Requirements 32
                                         Virtual Machine Appliance Size Recommendations 34
                                         Disk Space Requirements 35
                                         Disk Space Guidelines 35
                                     Virtual Machine Resource and Performance Checks 36
                                         On Demand Virtual Machine Performance Check Using the Show Tech Support
                                             Command 37
                                         Virtual Machine Resource Check from the Cisco ISE Boot Menu 37
                                     Obtaining the Cisco ISE Evaluation Software 38
                                     Installing Cisco ISE on Virtual Machines 39
                                         Deploying Cisco ISE on Virtual Machines Using OVA Templates 39
                                         Installing Cisco ISE on Virtual Machines Using the ISO File 39
                                              Prerequisites for Configuring a VMware ESXi Server 40
                                                    Virtualization Technology Check 41
                                                    Enabling Virtualization Technology on an ESXi Server 41
                                                    Configuring VMware Server Interfaces for the Cisco ISE Profiler Service 42
                                              Connecting to the VMware Server Using the Serial Console 42

             Cisco Identify Services Engine Hardware Installation Guide, Release 1.4
  iv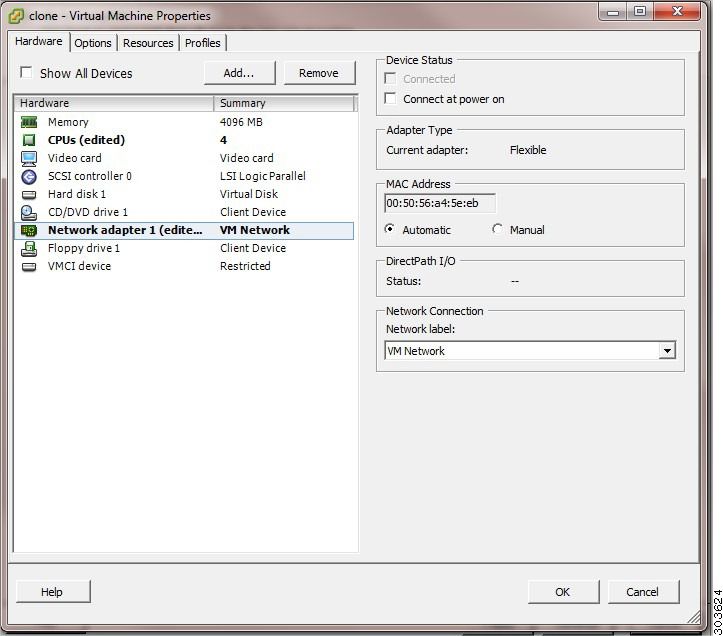
Contents

                           Configuring a VMware Server 43
                           Configuring a VMware System to Boot From a Cisco ISE Software DVD 44
                           Installing Cisco ISE Software on a VMware System 44
                           Cisco ISE ISO Installation on Virtual Machine Fails 46
                       Cloning a Cisco ISE Virtual Machine 46
                           Cloning a Cisco ISE Virtual Machine Using a Template 47
                               Creating a Virtual Machine Template 47
                               Deploying a Virtual Machine Template 48
                           Changing the IP Address and Hostname of a Cloned Virtual Machine 48
                           Connecting a Cloned Cisco Virtual Machine to the Network 50
                    Migrating Cisco ISE VM from Evaluation to Production 50

CHAPTER 5      Installing Cisco ISE Software on Cisco ISE 3300 Series, Cisco NAC, and Cisco Secure ACS
                        Appliances 53
                    Supported Cisco ISE, Secure ACS, and NAC Appliances 53
                    Installing Cisco ISE Software from a DVD 54
                    Installing Cisco ISE Software on a Re-imaged Cisco ISE-3300 Series Appliance 54
                    Installing Cisco ISE Software on a Re-imaged Cisco Secure ACS Appliance 55
                    Installing Cisco ISE Software on a Re-imaged Cisco NAC Appliance 56
                       Resetting the Existing RAID Configuration on a Cisco NAC Appliance 57

CHAPTER 6      Managing Administrator Accounts 59
                    CLI-Admin and Web-Based Admin User Right Differences 59
                    CLI Admin Users Creation 60
                    Web-Based Admin Users Creation 60

CHAPTER 7      Post-Installation Tasks 61
                    Logging in to the Cisco ISE Web-Based Interface 61
                    Cisco ISE Configuration Verification 62
                       Verifying a Configuration Using a Web Browser 63
                       Verifying a Configuration Using the CLI 63
                    VMware Tools Installation Verification 64
                       Verify VMWare Tools Installation Using the Summary Tab in the vSphere Client 65
                       Verify VMWare Tools Installation Using the CLI 65
                       Support for Upgrading VMware Tools 66

                                                 Cisco Identify Services Engine Hardware Installation Guide, Release 1.4
                                                                                                                           v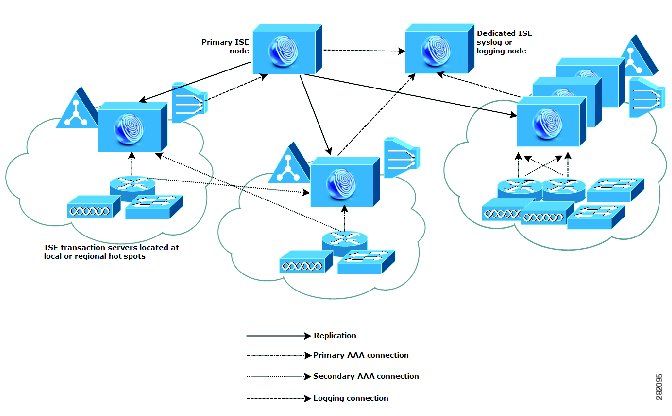
Contents

                                     Administrator Password Reset 66
                                         Resetting a Lost, Forgotten, or Compromised Password using the DVD 66
                                         Resetting a Password Due to Administrator Lockout 67
                                     Changing the IP Address of a Cisco ISE Appliance 68
                                     Viewing Installation and Upgrade History 69
                                     Configuring RAID on SNS-3415 Appliance 70
                                     Configuring RAID on SNS-3495 Appliance Using CIMC 70
                                     Performing a System Erase 71

APPENDIX A                      Cisco SNS-3400 Series Server Specifications 75
                                     Physical Specifications 75
                                     Environmental Specifications 75
                                     Power Specifications 76
                                         450-Watt Power Supply 76
                                         650-Watt Power Supply 77

APPENDIX B                      Cisco SNS-3400 Series Appliance Ports Reference 79
                                     Cisco ISE Infrastructure 79
                                     Cisco ISE Administration Node Ports 81
                                     Cisco ISE Monitoring Node Ports 82
                                     Cisco ISE Policy Service Node Ports 84
                                     Inline Posture Node Ports 87
                                     Cisco ISE pxGrid Service Ports 88
                                     OCSP and CRL Service Ports 89

             Cisco Identify Services Engine Hardware Installation Guide, Release 1.4
  vi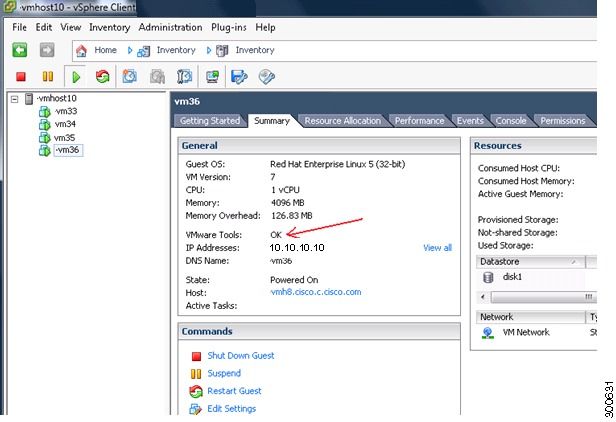
CHAPTER                    1
          Network Deployments in Cisco ISE
            • Cisco ISE Network Architecture, page 1
            • Cisco ISE Deployment Terminology, page 2
            • Node Types and Personas in Distributed Deployments, page 3
            • Standalone and Distributed ISE Deployments, page 5
            • Distributed Deployment Scenarios, page 6
            • Small Network Deployments, page 6
            • Medium-Sized Network Deployments, page 7
            • Large Network Deployments, page 8
            • Deployment Size and Scaling Recommendations, page 11
            • Inline Posture Planning Considerations, page 13
            • Switch and Wireless LAN Controller Configuration Required to Support Cisco ISE Functions, page
              14

Cisco ISE Network Architecture
          Cisco ISE architecture includes the following components:
              • Nodes and persona types
                   ◦Cisco ISE node—A Cisco ISE node can assume any or all of the following personas: Administration,
                    Policy Service, Monitoring, or pxGrid
                   ◦Inline Posture node—A gatekeeping node that takes care of access policy enforcement

              • Network resources
              • Endpoints

          The policy information point represents the point at which external information is communicated to the Policy
          Service persona. For example, external information could be a Lightweight Directory Access Protocol (LDAP)
          attribute.

                                              Cisco Identify Services Engine Hardware Installation Guide, Release 1.4
                                                                                                                        1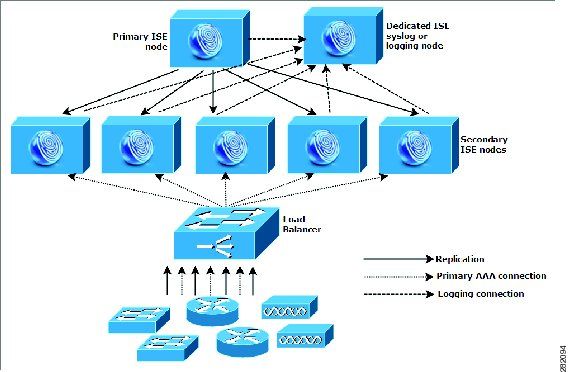
Network Deployments in Cisco ISE
     Cisco ISE Deployment Terminology

                       The following figure shows Cisco ISE nodes and personas (Administration, Policy Service, and Monitoring),
                       an Inline Posture node, and a policy information point.

                       Figure 1: Cisco ISE Architecture

Cisco ISE Deployment Terminology
                       This guide uses the following terms when discussing Cisco ISE deployment scenarios:

                        Term                                                Definition
                        Service                                             A specific feature that a persona provides such as network access,
                                                                            profiling, posture, security group access, monitoring, and
                                                                            troubleshooting.

                        Node                                                An individual instance that runs the Cisco ISE software. Cisco
                                                                            ISE is available as an appliance and as software that can be run
                                                                            on VMware.

                        Node Type                                           A node can be one of two types: A Cisco ISE node or an Inline
                                                                            Posture node. The node type and persona determine the type of
                                                                            functionality provided by a node

           Cisco Identify Services Engine Hardware Installation Guide, Release 1.4
 2
Network Deployments in Cisco ISE
                                                                                      Node Types and Personas in Distributed Deployments

                        Term                                         Definition
                        Persona                                      Determines the services provided by a node. A Cisco ISE node
                                                                     can assume any or all of the following personas: Administration,
                                                                     Policy Service, and Monitoring. The menu options that are
                                                                     available through the administrative user interface depend on the
                                                                     role and personas that a node assumes.

                        Role                                         Determines if a node is a standalone, primary, or secondary node
                                                                     and applies only to Administration and Monitoring nodes.

Node Types and Personas in Distributed Deployments
                       In a Cisco ISE distributed deployment, there are two types of nodes:
                           • Cisco ISE node (Administration, Policy Service, Monitoring)
                           • Inline Posture node

                       A Cisco ISE node can provide various services based on the persona that it assumes. Each node in a deployment,
                       with the exception of the Inline Posture node, can assume the Administration, Policy Service, and Monitoring
                       personas. In a distributed deployment, you can have the following combination of nodes on your network:
                           • Primary and secondary Administration nodes for high availability
                           • A pair of Monitoring nodes for automatic failover
                           • One or more Policy Service nodes for session failover
                           • A pair of Inline Posture nodes for high availability

                       Related Topics
                           Administration Node, on page 3
                           Policy Service Node, on page 4
                           Monitoring Node, on page 4
                           Inline Posture Node, on page 4

Administration Node
                       A Cisco ISE node with the Administration persona allows you to perform all administrative operations on
                       Cisco ISE. It handles all system-related configurations that are related to functionality such as authentication,
                       authorization, and accounting. In a distributed deployment, you can have a maximum of two nodes running
                       the Administration persona. The Administration persona can take on the standalone, primary, or secondary
                       role.

                       Related Topics
                           Node Types and Personas in Distributed Deployments, on page 3

                                                             Cisco Identify Services Engine Hardware Installation Guide, Release 1.4
                                                                                                                                           3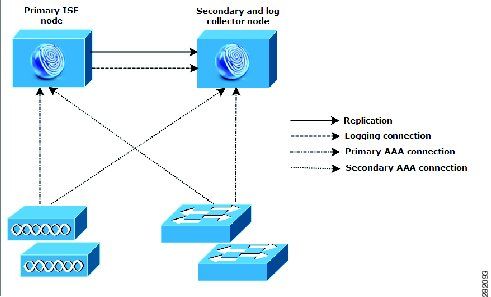
Network Deployments in Cisco ISE
      Policy Service Node

Policy Service Node
                        A Cisco ISE node with the Policy Service persona provides network access, posture, guest access, client
                        provisioning, and profiling services. This persona evaluates the policies and provides network access to
                        endpoints based on the result of the policy evaluation. Typically, there is more than one Policy Service node
                        in a distributed deployment. All Policy Service nodes that reside behind a load balancer share a common
                        multicast address and can be grouped to form a node group. If one of the nodes in a node group goes down,
                        the other nodes detect the failure and reset any pending sessions.
                        At least one node in your distributed setup should assume the Policy Service persona.

                        Related Topics
                             Node Types and Personas in Distributed Deployments, on page 3

Monitoring Node
                        A Cisco ISE node with the Monitoring persona functions as the log collector and stores log messages from
                        all the Administration and Policy Service nodes in a network. This persona provides advanced monitoring
                        and troubleshooting tools that you can use to effectively manage a network and resources. A node with this
                        persona aggregates and correlates the data that it collects, and provides you with meaningful reports. Cisco
                        ISE allows you to have a maximum of two nodes with this persona, and they can take on primary or secondary
                        roles for high availability. Both the primary and secondary Monitoring nodes collect log messages. In case
                        the primary Monitoring node goes down, the secondary Monitoring node automatically becomes the primary
                        Monitoring node.
                        At least one node in your distributed setup should assume the Monitoring persona. We recommend that you
                        do not have the Monitoring and Policy Service personas enabled on the same Cisco ISE node. We recommend
                        that the Monitoring node be dedicated solely to monitoring for optimum performance.

                        Related Topics
                             Node Types and Personas in Distributed Deployments, on page 3

Inline Posture Node
                        An Inline Posture node is a gatekeeping node that is positioned behind network access devices such as wireless
                        LAN controllers (WLCs) and VPN concentrators on the network. Inline Posture enforces access policies after
                        a user has been authenticated and granted access, and handles change of authorization (CoA) requests that a
                        WLC or VPN is unable to accommodate. Cisco ISE allows you to have two Inline Posture nodes, and they
                        can take on primary or secondary roles for high availability.
                        The Inline Posture node must be a dedicated node. It must be dedicated solely for Inline Posture service, and
                        cannot operate concurrently with other Cisco ISE services. Likewise, due to the specialized nature of its
                        service, an Inline Posture node cannot assume any persona. For example, it cannot act as an Administration
                        node (offering administration service), or a Policy Service node (offering network access, posture, profile,
                        and guest services), or a Monitoring node (offering monitoring and troubleshooting services).
                        Inline Posture is not supported on the Cisco SNS 3495 platform. Ensure that you install Inline Posture on any
                        one of the following supported platforms:
                             • Cisco ISE 3315

            Cisco Identify Services Engine Hardware Installation Guide, Release 1.4
  4
Network Deployments in Cisco ISE
Standalone and Distributed ISE Deployments
• Cisco ISE 3355
• Cisco ISE 3395
• Cisco SNS 3415
Related Topics
Node Types and Personas in Distributed Deployments, on page 3
Installing an Inline Posture Node
Before You Begin
• Download the Inline Posture ISO image from Cisco.com
• Configure a certificate for it and register it with the primary Administration node
Procedure
Step 1 Install the Inline Posture ISO image on one of the supported platforms.
Step 2 Log into the CLI.
Step 3 Configure the certificates for the node.
Step 4 Log into the user interface of the primary Administration node.
Step 5 Register the Inline Posture node.
Related Topics
Configuring Certificates for Inline Posture Nodes
Inline Posture Node Reuse
If you decide that you no longer need an Inline Posture node, you cannot add any services or roles to it, but
you can change it to a Cisco ISE node and then assign any persona to it. If you want to reuse an Inline Posture
node, you must first deregister it and then reimage the appliance and install Cisco ISE on it.
Standalone and Distributed ISE Deployments
A deployment that has a single Cisco ISE node is called a standalone deployment. This node runs the
Administration, Policy Service, and Monitoring personas.
A deployment that has more than one Cisco ISE node is called a distributed deployment. To support failover
and to improve performance, you can set up a deployment with multiple Cisco ISE nodes in a distributed
fashion. In a Cisco ISE distributed deployment, administration and monitoring activities are centralized, and
processing is distributed across the Policy Service nodes. Depending on your performance needs, you can
scale your deployment. A Cisco ISE node can assume any of the following personas: Administration, Policy
Cisco Identify Services Engine Hardware Installation Guide, Release 1.4
5Network Deployments in Cisco ISE
Distributed Deployment Scenarios
Service, and Monitoring. An Inline Posture node cannot assume any other persona, due to its specialized
nature and it must be a dedicated node.
Distributed Deployment Scenarios
• Small Network Deployments
• Medium-Sized Network Deployments
• Large Network Deployments
Small Network Deployments
The smallest Cisco ISE deployment consists of two Cisco ISE nodes with one Cisco ISE node functioning as
the primary appliance in a small network.
The primary node provides all the configuration, authentication, and policy capabilities that are required for
this network model, and the secondary Cisco ISE node functions in a backup role. The secondary node supports
the primary node and maintains a functioning network whenever connectivity is lost between the primary
node and network appliances, network resources, or RADIUS.
Centralized authentication, authorization, and accounging (AAA) operations between clients and the primary
Cisco ISE node are performed using the RADIUS protocol. Cisco ISE synchronizes or replicates all of the
content that resides on the primary Cisco ISE node with the secondary Cisco ISE node. Thus, your secondary
node is current with the state of your primary node. In a small network deployment, this type of configuration
model allows you to configure both your primary and secondary nodes on all RADIUS clients by using this
type of deployment or a similar approach.
Figure 2: Small Network Deployment
Cisco Identify Services Engine Hardware Installation Guide, Release 1.4
6Network Deployments in Cisco ISE
Split Deployments
As the number of devices, network resources, users, and AAA clients increases in your network environment,
you should change your deployment configuration from the basic small model and use more of a split or
distributed deployment model.
Split Deployments
In split Cisco ISE deployments, you continue to maintain primary and secondary nodes as described in a small
Cisco ISE deployment. However, the AAA load is split between the two Cisco ISE nodes to optimize the
AAA workflow. Each Cisco ISE appliance (primary or secondary) needs to be able to handle the full workload
if there are any problems with AAA connectivity. Neither the primary node nor the secondary nodes handles
all AAA requests during normal network operations because this workload is distributed between the two
nodes.
The ability to split the load in this way directly reduces the stress on each Cisco ISE node in the system. In
addition, splitting the load provides better loading while the functional status of the secondary node is
maintained during the course of normal network operations.
In split Cisco ISE deployments, each node can perform its own specific operations, such as network admission
or device administration, and still perform all the AAA functions in the event of a failure. If you have two
Cisco ISE nodes that process authentication requests and collect accounting data from AAA clients, we
recommend that you set up one of the Cisco ISE nodes to act as a log collector.
In addition, the split Cisco ISE deployment design provides an advantage because it allows for growth.
Figure 3: Split Network Deployment
Medium-Sized Network Deployments
As small networks grow, you can keep pace and manage network growth by adding Cisco ISE nodes to create
a medium-sized network. In medium-sized network deployments, you can dedicate the new nodes for all AAA
functions, and use the original nodes for configuration and logging functions.
Cisco Identify Services Engine Hardware Installation Guide, Release 1.4
7Network Deployments in Cisco ISE
Large Network Deployments
As the amount of log traffic increases in a network, you can choose to dedicate one or two of the secondary
Cisco ISE nodes for log collection in your network.
Figure 4: Medium-Sized Network Deployment
Large Network Deployments
Centralized Logging
We recommend that you use centralized logging for large Cisco ISE networks. To use centralized logging,
you must first set up a dedicated logging server that serves as a Monitoring persona (for monitoring and
logging) to handle the potentially high syslog traffic that a large, busy network can generate.
Because syslog messages are generated for outbound log traffic, any RFC 3164-compliant syslog appliance
can serve as the collector for outbound logging traffic. A dedicated logging server enables you to use the
reports and alert features that are available in Cisco ISE to support all the Cisco ISE nodes.
You can also consider having the appliances send logs to both a Monitoring persona on the Cisco ISE node
and a generic syslog server. Adding a generic syslog server provides a redundant backup if the Monitoring
persona on the Cisco ISE node goes down.
Load Balancers
In large centralized networks, you should use a load balancer, which simplifies the deployment of AAA clients.
Using a load balancer requires only a single entry for the AAA servers, and the load balancer optimizes the
routing of AAA requests to the available servers.
Cisco Identify Services Engine Hardware Installation Guide, Release 1.4
8Network Deployments in Cisco ISE
Dispersed Network Deployments
However, having only a single load balancer introduces the potential for having a single point of failure. To
avoid this potential issue, deploy two load balancers to ensure a measure of redundancy and failover. This
configuration requires you to set up two AAA server entries in each AAA client, and this configuration remains
consistent throughout the network.
Figure 5: Large Network Deployment
Dispersed Network Deployments
Dispersed Cisco ISE network deployments are most useful for organizations that have a main campus with
regional, national, or satellite locations elsewhere. The main campus is where the primary network resides,
is connected to additional LANs, ranges in size from small to large, and supports appliances and users in
different geographical regions and locations.
Large remote sites can have their own AAA infrastructure for optimal AAA performance. A centralized
management model helps maintain a consistent, synchronized AAA policy. A centralized configuration model
uses a primary Cisco ISE node with secondary Cisco ISE nodes. We still recommend that you use a separate
Cisco Identify Services Engine Hardware Installation Guide, Release 1.4
9Network Deployments in Cisco ISE
Considerations for Planning a Network with Several Remote Sites
Monitoring persona on the Cisco ISE node, but each remote location should retain its own unique network
requirements.
Figure 6: Dispersed Deployment
Considerations for Planning a Network with Several Remote Sites
• Verify if a central or external database is used, such as Microsoft Active Directory or Lightweight
Directory Access Protocol (LDAP). Each remote site should have a synchronized instance of the external
database that is available for Cisco ISE to access for optimizing AAA performance.
• The location of AAA clients is important. You should locate the Cisco ISE nodes as close as possible
to the AAA clients to reduce network latency effects and the potential for loss of access that is caused
by WAN failures.
• Cisco ISE has console access for some functions such as backup. Consider using a terminal at each site,
which allows for direct, secure console access that bypasses network access to each node.
• If small, remote sites are in close proximity and have reliable WAN connectivity to other sites, consider
using a Cisco ISE node as a backup for the local site to provide redundancy.
• Domain Name System (DNS) should be properly configured on all Cisco ISE nodes to ensure access to
the external databases.
Related Topics
Cisco ISE Setup Program Parameters, on page 23
Cisco Identify Services Engine Hardware Installation Guide, Release 1.4
10Network Deployments in Cisco ISE
Deployment Size and Scaling Recommendations
Deployment Size and Scaling Recommendations
The following table provides guidance on the type of deployment, number of Cisco ISE nodes, and the type
of appliance (small, medium, large) that you need based on the number of endpoints that connect to your
network.
Table 1: Cisco ISE Deployment—Size and Scaling Recommendations
Deployment Type Number of Appliance Platform Maximum Number Number of Active
Nodes/Personas of Dedicated Policy Endpoints
Service Nodes
Small Standalone or Cisco ISE 3300 0 Maximum of 2,000
redundant (2) nodes Series (3315, 3355, endpoints
with 3395)
Administration,
Policy Service, and Cisco ISE 3415 0 Maximum of 5,000
Monitoring personas endpoints
enabled
Cisco ISE 3495 0 Maximum of 10,000
endpoints
Medium Administration and Cisco ISE-3355 or 5 Maximum of 5,000
Monitoring personas Cisco SNS 3415 endpoints
on single or appliances for
redundant nodes. Administration and
Maximum of 2 Monitoring personas
Administration and
Monitoring nodes. Cisco ISE 3395 or 5 Maximum of 10,000
Cisco SNS 3495 endpoints
appliances for
Administration and
Monitoring personas
Cisco Identify Services Engine Hardware Installation Guide, Release 1.4
11Network Deployments in Cisco ISE
Deployment Size and Scaling Recommendations
Deployment Type Number of Appliance Platform Maximum Number Number of Active
Nodes/Personas of Dedicated Policy Endpoints
Service Nodes
Large Dedicated Cisco ISE 3395 40 Maximum of
Administration appliances for 100,000 endpoints
node/nodes. Administration and
Maximum of 2 Monitoring personas
Administration
nodes. Cisco SNS 3495 40 Maximum of
Dedicated appliances for 250,000 endpoints
Monitoring Administration and
node/nodes. Monitoring personas
Maximum of 2
Monitoring nodes.
Dedicated Policy
Service nodes.
Maximum of 40
Policy Service
nodes.
The following table provides guidance on the type of appliance that you would need for a dedicated Policy
Service node based on the number of active endpoints the node services.
Table 2: Policy Service Node Size Recommendations
Form Factor Platform Size Appliance Maximum Endpoints
Physical Small Cisco ISE-3315 3,000
Cisco SNS-3415 5,000
Medium Cisco ISE-3355 6,000
Large Cisco ISE-3395 10,000
Cisco SNS-3495 20,000
Virtual Machine Small/Medium/Large Comparable to physical 3,000 to 20,000
appliance
The following table provides the maximum throughput and the maximum number of endpoints that a single
Inline Posture node can support.
Cisco Identify Services Engine Hardware Installation Guide, Release 1.4
12Network Deployments in Cisco ISE
Inline Posture Planning Considerations
Table 3: Inline Posture Node Sizing Recommendations
Attribute Performance
Maximum number of endpoints per 5,000 to 20,000 (gated by Policy Service nodes)
physical appliance
Maximum throughput per any physical 936 Mbps
appliance
Related Topics
Virtual Machine Requirements, on page 32
Migrating Cisco ISE VM from Evaluation to Production, on page 50
Inline Posture Planning Considerations
A network or system architect must address the following basic questions when planning to deploy Inline
Posture nodes:
• Will deployment plans include an Inline Posture primary-secondary pair configuration? Cisco ISE
networks support up to two Inline Posture nodes configured on a network at any one time.
• What type of Inline Posture operating modes will you choose?
Caution The untrusted interface on an Inline Posture node should be disconnected when an Inline
Posture node is being configured. If the trusted and untrusted interfaces are connected
to the same VLAN during initial configuration, and the Inline Posture node boots up
after changing persona, multicast packet traffic gets flooded out of the untrusted interface.
This multicast event can potentially bring down devices that are connected to the same
subnet or VLAN. The Inline Posture node at this time is in the maintenance mode.
Caution Do not change the CLI password for Inline Posture node once it has been added to the
deployment. If the password is changed, when you access the Inline Posture node through
the Administration node, a Java exception error is displayed and the CLI gets locked.
You need to recover the password by using the installation DVD and rebooting the
Inline Posture node. Or, you can set the password to the original one.
If you need to change the password, then deregister the Inline Posture node from the
deployment, modify the password, and then add the node to the deployment with the
new credentials.
Cisco Identify Services Engine Hardware Installation Guide, Release 1.4
13Network Deployments in Cisco ISE
Switch and Wireless LAN Controller Configuration Required to Support Cisco ISE Functions
Switch and Wireless LAN Controller Configuration Required to
Support Cisco ISE Functions
To ensure that Cisco ISE can interoperate with network switches and that functions from Cisco ISE are
successful across the network segment, you must configure your network switches with certain required
Network Time Protocol (NTP), RADIUS/AAA, IEEE 802.1X, MAC Authentication Bypass (MAB), and
other settings.
Cisco Identify Services Engine Hardware Installation Guide, Release 1.4
14CHAPTER 2
Cisco SNS-3400 Series Appliances
• Cisco SNS Support for Cisco ISE, page 15
• Cisco SNS-3400 Series Appliance Hardware Specifications, page 15
• Cisco SNS-3400 Series Front Panel, page 16
• Cisco SNS-3400 Series Rear Panel, page 16
Cisco SNS Support for Cisco ISE
The Cisco ISE software run on a dedicated Cisco SNS-3400 series appliance or on a VMware server. Cisco
ISE software does not support the installation of any other packages or applications on this dedicated platform.
This Cisco ISE software is also supported on Cisco ISE 3300 series, Cisco NAC 3300 series, and Cisco Secure
ACS 1121 appliances. You can upgrade an existing Cisco ISE 3300 series appliance to the latest release.
Related Topics
Installing Cisco ISE Software on a VMware System, on page 44
Installing Cisco ISE Software on Cisco ISE 3300 Series, Cisco NAC, and Cisco Secure ACS Appliances,
on page 53
Cisco SNS-3400 Series Appliance Hardware Specifications
Cisco SNS-3400 series appliance hardware consists of Cisco SNS 3415 and 3495 appliances. See the Cisco
Identity Services Engine (ISE) Data Sheet for the appliance hardware specifications (Table 3).
Cisco Identify Services Engine Hardware Installation Guide, Release 1.4
15Cisco SNS-3400 Series Appliances
Cisco SNS-3400 Series Front Panel
Cisco SNS-3400 Series Front Panel
Figure 7: Cisco SNS 3415/3495 Front Panel
1 Power button/power status LED 6 Power supply status LED
2 Identification button LED 7 Network link activity LED
3 System status LED 8 Asset tag (serial number)
4 Fan status LED 9 Keyboard, video, mouse (KVM) connector (used
with the KVM cable that provides two USBs,
one Video Graphics Adapter (VGA), and one
serial connector)
5 Temperature status LED 10 Drives (up to eight hot-swappable, 2 to 5-inch
drives)
Cisco SNS-3400 Series Rear Panel
Figure 8: SNS 3415/3495 Rear Panel
Cisco Identify Services Engine Hardware Installation Guide, Release 1.4
16Cisco SNS-3400 Series Appliances
Cisco SNS-3400 Series Rear Panel
1 Power supplies (up to two) 7 Serial port (RJ-45 connector)
2 Slot 2: Low-profile Peripheral 8 1-GB Ethernet dedicated management port used
Component Interconnect Express to access CIMC (labeled M)
(PCIe) slot on riser (half-height,
half-length, x16 connector, x16 lane
width)
3 Slot 1: PCIe1 card containing 1-GB 9 1-GB Ethernet port 1 (GigE0) for Cisco ISE
Ethernet ports (GigE2 and GigE3) management communication
4 1-GB Ethernet port 3 (GigE2) 10 1-GB Ethernet port 2 (GigE1)
5 1-GB Ethernet port 4 (GigE3) 11 USB ports
6 VGA video connector 12 Rear identification button
Serial Number Location
The serial number for the server is printed on a label on the top of the server, near the front.
Cisco Identify Services Engine Hardware Installation Guide, Release 1.4
17Cisco SNS-3400 Series Appliances
Cisco SNS-3400 Series Rear Panel
Cisco Identify Services Engine Hardware Installation Guide, Release 1.4
18CHAPTER 3
Installing and Configuring a Cisco SNS-3400
Series Appliance
• Prerequisites for Installing the SNS-3400 Series Appliance, page 19
• Downloading the Cisco ISE ISO Image from Cisco.com, page 20
• Methods for Installing the Cisco ISE Software on a SNS-3400 Series Appliance, page 20
• Configuring Cisco Integrated Management Controller, page 21
• Creating a Bootable USB Drive, page 22
• Cisco ISE Setup Program Parameters, page 23
• Configuring ISE on a Cisco SNS-3400 Series Appliance Using CIMC, page 25
• Setup Process Verification, page 30
Prerequisites for Installing the SNS-3400 Series Appliance
Review the configuration prerequisites listed in this chapter before you attempt to configure the Cisco ISE
software on a Cisco SNS-3400 series appliance, as well as the physical, environmental, and power specifications
later in this guide. For information about regulatory compliance and safety, refer to the RCSI for Cisco
SNS-3415 and Cisco SNS-3495 Appliances.
Cisco SNS-3400 series appliances are preinstalled with the Cisco Application Deployment Engine operating
system (ADE-OS) and the Cisco ISE software.
Make sure that you identify all of the following configuration settings for each node in your deployment
before proceeding:
• Hostname
• IP address for the Gigabit Ethernet 0 (eth0) interface
• Netmask
• Default gateway
• Domain Name System (DNS) domain
Cisco Identify Services Engine Hardware Installation Guide, Release 1.4
19Installing and Configuring a Cisco SNS-3400 Series Appliance
Downloading the Cisco ISE ISO Image from Cisco.com
• Primary name server
• Primary Network Time Protocol (NTP) server
• System time zone
• Username (username for CLI-admin user)
• Password (password for CLI-admin user)
See the Cisco ISE Setup Program Parameters, on page 23 for a description of these parameters with example
values.
Note The Cisco SNS-3400 series appliance must have the RAID configured before you can install Cisco ISE
on it. In case you have deleted the RAID configuration on the Cisco SNS-3400 series appliance, you must
reconfigure it. See Configuring RAID on SNS-3415 Appliance, on page 70 and Configuring RAID on
SNS-3495 Appliance Using CIMC, on page 70 for more information.
Related Topics
Installing Cisco ISE Software on a Re-imaged Cisco ISE-3300 Series Appliance
Downloading the Cisco ISE ISO Image from Cisco.com
Download the ISO image to install Cisco ISE on Cisco SNS-3400 series appliance.
Before You Begin
For Inline Posture nodes, you must download the Inline Posture Node ISO and continue with the installation
process.
Step 1 Go to http://www.cisco.com/go/ise. You must already have valid Cisco.com login credentials to access this link.
Step 2 Click Download Software for this Product
The Cisco ISE software image comes with a 90-day evaluation license already installed, so you can begin testing all
Cisco ISE services when the installation and initial configuration is complete.
Methods for Installing the Cisco ISE Software on a SNS-3400
Series Appliance
If your SNS-3400 series appliance is running an earlier version of Cisco ISE, you have the option to upgrade
it using the application upgrade command. Alternatively, you can reimage your existing SNS-3400 Series
appliance to perform a fresh installation of Cisco ISE and register it to an existing deployment.
Cisco Identify Services Engine Hardware Installation Guide, Release 1.4
20Installing and Configuring a Cisco SNS-3400 Series Appliance
Configuring Cisco Integrated Management Controller
After you download the ISO image, you can install it on your SNS-3400 Series appliance in any one of the
following ways:
• Install the ISO image using the CIMC Remote Management Utility. You must configure the CIMC to
perform this remote installation.
1 Configure CIMC.
2 Install the Cisco ISE software remotely.
• Install the ISO image using a USB flash drive.
1 Create a bootable USB flash drive using the iso-to-usb.sh script.
2 Connect the USB flash device to the SNS-3400 Series appliance.
3 Install the Cisco ISE software using the local KVM or remotely using the CIMC KVM.
• Install the ISO using an external DVD drive with a USB port.
1 Burn the ISO image on to a DVD.
2 Connect the external USB DVD to the SNS-3400 Series appliance.
3 Install the Cisco ISE software via the local KVM or remotely using the CIMC KVM.
Note For installing the Cisco ISE software using a USB flash device or an external DVD with a USB port,
CIMC configuration is optional.
Related Topics
Configuring Cisco Integrated Management Controller, on page 21
Creating a Bootable USB Drive, on page 22
Cisco ISE Setup Program Parameters, on page 23
Configuring ISE on a Cisco SNS-3400 Series Appliance Using CIMC, on page 25
Configuring Cisco Integrated Management Controller
You can perform all operations on Cisco SNS-3400 series appliance through the CIMC, including monitoring
the server and system event logs. To do this, you must first configure an IP address and IP gateway to access
the CIMC from a web-based browser.
Step 1 Plug in the power cord.
Step 2 Press the Power button to boot the server.
Step 3 During bootup, press F8 when prompted to open the BIOS CIMC Configuration Utility.
Step 4 Set the NIC mode to specify which ports access the CIMC for server management. Cisco ISE can use up to four Gigabit
Ethernet ports.
Cisco Identify Services Engine Hardware Installation Guide, Release 1.4
21Installing and Configuring a Cisco SNS-3400 Series Appliance
Creating a Bootable USB Drive
• Dedicated—The 1-Gb Ethernet management port is used to access the CIMC. You must select NIC redundancy
None and select IP settings.
• Shared LOM (default)—The two 1-Gb Ethernet ports are used to access the CIMC. This is the factory default
setting, along with active-active NIC redundancy and DHCP enabled.
• Cisco Card—The ports on an installed Cisco UCS P81E VIC are used to access the CIMC. You must select a NIC
redundancy and IP setting.
Note The Cisco Card NIC mode is currently supported only with a Cisco UCS P81E VIC (N2XX-ACPCI01)
that is installed in PCIe slot 1.
Step 5 Specify the NIC redundancy setting:
• None—The Ethernet ports operate independently and do not fail over if there is a problem.
• Active-standby—If an active Ethernet port fails, traffic fails over to a standby port.
• Active-active—All Ethernet ports are utilized simultaneously.
Step 6 Choose whether to enable DHCP for dynamic network settings or to enter static network settings.
Note Before you enable DHCP, this DHCP server must be preconfigured with the range of MAC addresses for the
server. The MAC address is printed on a label on the rear of the server. This server has a range of six MAC
addresses assigned to the CIMC. The MAC address printed on the label is the beginning of the range of six
contiguous MAC addresses.
Step 7 (Optional) Specify VLAN setting and set a default CIMC user password.
Note Changes to the settings take effect after approximately 45 seconds. Press F5 to refresh and wait until the new
settings appear before you reboot the server in the next step.
Step 8 Press F10 to save your settings and reboot the server.
Note If you chose to enable DHCP, the dynamically assigned IP and MAC addresses are displayed on the console
screen during bootup.
What to Do Next
Configuring ISE on a Cisco SNS-3400 Series Appliance using CIMC
Related Topics
Methods for Installing the Cisco ISE Software on a SNS-3400 Series Appliance, on page 20
Creating a Bootable USB Drive
The Cisco ISE ISO image contains an “images” directory that has a Readme file and a script to create a bootable
USB drive to install Cisco ISE.
Before You Begin
• Ensure that you have read the Readme file in the “images” directory
• You need the following:
Cisco Identify Services Engine Hardware Installation Guide, Release 1.4
22Installing and Configuring a Cisco SNS-3400 Series Appliance
Cisco ISE Setup Program Parameters
◦Linux machine with RHEL-6.4, CentOS 6.4. If you are going to use a PC or MAC, ensure that
you have installed a Linux virtual machine (VM) on it.
◦An 8-GB USB drive
◦The iso-to-usb.sh script
Step 1 Plug the USB drive into the USB port.
Step 2 Copy the iso-to-usb.sh script and the Cisco ISE ISO image to a directory on the Linux machine.
Step 3 Enter the following command:
iso-to-usb.sh source_iso usb_device
For example, # ./iso-to-usb.sh ise-1.4.0.253-x86_64.iso /dev/sdb where iso-to-usb.sh is the name of the script,
ise-1.4.0.253-x86_64.iso /dev/sdb is the name of the ISO image, and /dev/sdb is your USB device.
Step 4 Enter a value for the appliance that you want to install the image on.
Step 5 Enter Y to continue.
Step 6 A success message appears.
Step 7 Unplug the USB drive.
What to Do Next
Configuring ISE on a Cisco SNS-3400 Series Appliance using CIMC
Related Topics
Methods for Installing the Cisco ISE Software on a SNS-3400 Series Appliance, on page 20
Cisco ISE Setup Program Parameters
When the Cisco ISE software configuration begins, an interactive CLI prompts you to enter required parameters
to configure the system.
Note If you are installing Cisco ISE software on a VMware server, Cisco ISE also installs and configures
VMware Tools, Version 8.3.2, during the initial setup.
Cisco Identify Services Engine Hardware Installation Guide, Release 1.4
23Installing and Configuring a Cisco SNS-3400 Series Appliance
Cisco ISE Setup Program Parameters
Table 4: Cisco ISE Setup Program Parameters
Prompt Description Example
Hostname Must not exceed 15 characters. Valid characters include isebeta1
alphanumerical (A–Z, a–z, 0–9), and the hyphen (-). The
first character must be a letter.
Note We recommend that you use lowercase letters to
ensure that certificate authentication in Cisco ISE
is not impacted by minor differences in
certificate-driven verifications. You cannot use
"localhost" as hostname for a node.
(eth0) Ethernet Must be a valid IPv4 address for the Gigabit Ethernet 0 10.12.13.14
interface (eth0) interface.
address
Netmask Must be a valid IPv4 netmask. 255.255.255.0
Default gateway Must be a valid IPv4 address for the default gateway. 10.12.13.1
DNS domain Cannot be an IP address. Valid characters include ASCII example.com
name characters, any numerals, the hyphen (-), and the period (.).
Primary name Must be a valid IPv4 address for the primary name server. 10.15.20.25
server
Add/Edit Must be a valid IPv4 address for an additional name server. (Optional) Allows you to
another name configure multiple name
server servers. To do so, enter y to
continue.
Primary NTP Must be a valid IPv4 address or hostname of a Network clock.nist.gov
server Time Protocol (NTP) server.
Add/Edit Must be a valid NTP domain. (Optional) Allows you to
another NTP configure multiple NTP
server servers. To do so, enter y to
continue.
Cisco Identify Services Engine Hardware Installation Guide, Release 1.4
24Installing and Configuring a Cisco SNS-3400 Series Appliance
Configuring ISE on a Cisco SNS-3400 Series Appliance Using CIMC
Prompt Description Example
System Time Must be a valid time zone. For example, for Pacific Standard UTC (default)
Zone Time (PST), the System Time Zone is PST8PDT (or
Coordinated Universal Time (UTC) minus 8 hours).
You can run the show timezones command from the Cisco
ISE CLI for a complete list of supported time zones.
Note We recommend that you set all Cisco ISE nodes
to the UTC time zone. This time zone setting
ensures that the reports, logs, and posture agent log
files from the various nodes in your deployment
are always synchronized with regard to the time
stamps.
Username Identifies the administrative username used for CLI access admin (default)
to the Cisco ISE system. If you choose not to use the default
(admin), you must create a new username. The username
must be three to eight characters in length and be composed
of valid alphanumeric characters (A–Z, a–z, or 0–9).
Password Identifies the administrative password that is used for CLI MyIseYPass2
access to the Cisco ISE system. You must create this
password because there is no default. The password must
be a minimum of six characters in length and include at least
one lowercase letter (a–z), one uppercase letter (A–Z), and
one numeral (0–9).
Related Topics
Considerations for Planning a Network with Several Remote Sites, on page 10
Verifying a Configuration Using a Web Browser, on page 63
VMware Tools Installation Verification, on page 64
Methods for Installing the Cisco ISE Software on a SNS-3400 Series Appliance, on page 20
Installing Cisco ISE Software from a DVD
Installing Cisco ISE Software on a Re-imaged Cisco ISE-3300 Series Appliance
Installing Cisco ISE Software on a Re-imaged Cisco Secure ACS Appliance
Installing Cisco ISE Software on a VMware System, on page 44
Configuring ISE on a Cisco SNS-3400 Series Appliance Using
CIMC
After you configure the CIMC for your appliance, you can use it to manage a Cisco SNS-3400 series appliance.
You can perform all operations including BIOS configuration through the CIMC.
Cisco Identify Services Engine Hardware Installation Guide, Release 1.4
25Installing and Configuring a Cisco SNS-3400 Series Appliance
Configuring ISE on a Cisco SNS-3400 Series Appliance Using CIMC
Caution Changing the time zone on a Cisco ISE appliance after installation causes the Cisco ISE application on
that node to be unusable.
Before You Begin
• Ensure that you have configured the CIMC on your appliance.
• Ensure that you have properly installed, connected, and powered up the supported appliance by following
the recommended procedures.
• Ensure that you have the Cisco ISE ISO image on the client machine from which you are accessing the
CIMC or you have a bootable USB with the image for installation.
• Cisco ISE appliances track time internally using UTC time zones. If you do not know your specific time
zone, you can enter one based on the city, region, or country where the Cisco ISE appliance is located.
We recommend that you configure the preferred time zone (the default is UTC) during installation when
the setup program prompts you to configure the setting.
• Research how to configure certificates on an Inline Posture node.
Step 1 Connect to the CIMC for server management. Connect the Ethernet cables from the LAN to the server using the ports
selected by the Network Interface Card (NIC) Mode setting. The active-active and active-passive NIC redundancy settings
require you to connect to two ports.
Step 2 Use a browser and the IP address of the CIMC to log in to the CIMC Setup Utility. The IP address is based on the CIMC
configuration that you made (either a static address or the address assigned by the Dynamic Host Configuration Protocol
(DHCP) server).
Note The default username for the server is admin. The default password is password.
Step 3 Click Launch KVM Console.
Step 4 Use your CIMC credentials to log in.
Step 5 Click the Virtual Media tab.
Step 6 Click Add Image to choose the Cisco ISE ISO image from the system running your client browser.
Step 7 Check the Mapped check box against the virtual CD/DVD drive that you have created.
Step 8 Click the KVM tab.
Step 9 Choose Macros > Ctrl-Alt-Del to boot the SNS-3400 series appliance using the ISO image.
Step 10 Press F6 to bring up the boot menu.
Step 11 Choose the CD/DVD that you mapped and press Enter.
Step 12 At the boot prompt, enter 2 and press Enter.
**********************************************
Please type 'setup' to configure the appliance
**********************************************
Step 13 At the prompt, type setup to start the setup program. You are prompted to enter networking parameters and credentials.
The following illustrates a sample setup program and default prompts:
Press 'Ctrl-C' to abort setup
Enter hostname[]: ise-server-1
Enter IP address[]: 10.1.1.10
Cisco Identify Services Engine Hardware Installation Guide, Release 1.4
26Installing and Configuring a Cisco SNS-3400 Series Appliance
Configuring ISE on a Cisco SNS-3400 Series Appliance Using CIMC
Enter IP netmask[]: 255.255.255.0
Enter IP default gateway[]: 172.10.10.10
Enter default DNS domain[]: cisco.com
Enter primary nameserver[]: 200.150.200.150
Add secondary nameserver? Y/N [N]: n
Enter NTP server[time.nist.gov]: 200.150.200.151
Add another NTP server? Y/N[N]: n
Enter system time zone[UTC]: UTC
Enable SSH service?: Y/N [N]: Y
Enter username [admin]: admin
Enter password:
Enter password again:
Copying first CLI user to be first ISE admin GUI user...
Bringing up the network interface...
Pinging the gateway...
Pinging the primary nameserver...
Do not use `Ctrl-C' from this point on...
Installing Applications...
Installing ISE...
Unbundling Application Package...
Initiating Application Install...
Application bundle (ISE) installed successfully
===Initial Setup for Application: ISE ===
Welcome to the ISE initial setup. The purpose of this setup is to provision the internal ISE database.
This setup is non-interactive, and will take roughly 15 minutes to complete.
Running database cloning script...
Running database network config assistant tool...
Extracting ISE database contents...
Starting ISE database processes...
...
After the Cisco ISE node software is configured, the Cisco ISE system reboots automatically. To log back in to the CLI,
you must enter the CLI-admin user credentials that you configured during setup.
Step 14 Log in to the Cisco ISE CLI shell, and run the following CLI command to check the status of the Cisco ISE application
processes:
ise-server/admin# show application status ise
ISE PROCESS NAME STATE PROCESS ID
--------------------------------------------------------------------
Database Listener running 3638
Database Server running 45 PROCESSES
Application Server running 5992
Profiler Database running 4481
AD Connector running 6401
M&T Session Database running 2319
M&T Log Collector running 6245
M&T Log Processor running 6286
Certificate Authority Service running 6211
pxGrid Infrastructure Service disabled
pxGrid Publisher Subscriber Service disabled
pxGrid Connection Manager disabled
pxGrid Controller disabled
Identity Mapping Service disabled
Step 15 After you confirm that the Cisco ISE Application Server is running, you can log in to the Cisco ISE user interface by
using one of the supported web browsers. To log in to the Cisco ISE user interface using a web browser, enter
https:///admin/ in the Address field: Here “your-ise-hostname or IP address”
represents the hostname or IP address that you configured for the Cisco SNS-3400 series appliance during setup. Enter
Cisco Identify Services Engine Hardware Installation Guide, Release 1.4
27Installing and Configuring a Cisco SNS-3400 Series Appliance
Supported Time Zones
the web-based admin login credentials (username and password) to access the Cisco ISE user interface. You can initially
access the Cisco ISE web interface by using the CLI-admin user’s username and password that you defined during the
setup process. The username and password credentials that you use for web-based access to the Cisco ISE user interface
are not the same as the CLI-admin user credentials that you created during the setup for accessing the Cisco ISE CLI
interface. After you log in to the Cisco ISE user interface, you can then configure your devices, user stores, policies, and
other components.
Related Topics
Methods for Installing the Cisco ISE Software on a SNS-3400 Series Appliance, on page 20
Supported Time Zones
This section provides three tables that provide more information about common Coordinated Universal Time
(UTC) time zones for Europe, the United States and Canada, Australia, and Asia. The Cisco ISE CLI show
timezones command displays a list of all time zones available to you.
Note We recommend that you set all Cisco ISE nodes to the UTC time zone. This time zone setting ensures
that the reports, logs, and posture agent log files from the various nodes in the deployment are always
synchronized with regard to the time stamps.
The format for time zones is POSIX or System V. POSIX time zone format syntax looks like
America/Los_Angeles, and System V time zone syntax looks like PST8PDT.
Table 5: Europe, United States, and Canada Time Zones
Acronym or Name Time Zone Name
Europe
GMT, GMT0, GMT-0, Greenwich Mean Time, as UTC
GMT+0, UTC,
Greenwich, Universal,
Zulu
GB British
GB-Eire, Eire Irish
WET Western Europe Time, as UTC
CET Central Europe Time, as UTC plus 1 hour
EET Eastern Europe Time, as UTC plus 2 hours
United States and Canada
Cisco Identify Services Engine Hardware Installation Guide, Release 1.4
28Installing and Configuring a Cisco SNS-3400 Series Appliance
Supported Time Zones
Acronym or Name Time Zone Name
EST, EST5EDT Eastern Standard Time, as UTC minus 5 hours
CST, CST6CDT Central Standard Time, as UTC minus 6 hours
MST, MST7MDT Mountain Standard Time, as UTC minus 7 hours
PST, PST8PDT Pacific Standard Time, as UTC minus 8 hours
HST Hawaiian Standard Time, as UTC minus 10 hours
Table 6: Australia Time Zones
Australia
Enter the country and city together with a forward slash (/) between them; for example, Australia/Currie.
ACT (Australian Capital Adelaide Brisbane Broken_Hill
Territory)
Canberra Currie Darwin Hobart
Lord_Howe Lindeman LHI (Lord Howe Island) Melbourne
North NSW (New South Wales) Perth Queensland
South Sydney Tasmania Victoria
West Yancowinna — —
Table 7: Asia Time Zones
Asia
Aden Almaty Amman Anadyr
Aqtau Aqtobe Ashgabat Ashkhabad
Baghdad Bahrain Baku Bangkok
Beirut Bishkek Brunei Kolkata
Choibalsan Chongqing Columbo Damascus
Dhakar Dili Dubai Dushanbe
Gaza Harbin Hong_Kong Hovd
Cisco Identify Services Engine Hardware Installation Guide, Release 1.4
29Installing and Configuring a Cisco SNS-3400 Series Appliance
Setup Process Verification
Asia
Irkutsk Istanbul Jakarta Jayapura
Jerusalem Kabul Kamchatka Karachi
Kashgar Katmandu Kuala_Lumpur Kuching
Kuwait Krasnoyarsk — —
Note The Asia time zone includes cities from East Asia, Southern Southeast Asia, West Asia, and Central
Asia. Enter the region and city or country together separated by a forward slash (/); for example,
Asia/Aden
Setup Process Verification
To verify that you have correctly completed the initial setup process, use one of the following two methods
to log in to the Cisco ISE appliance:
• Web browser
• Cisco ISE CLI
After you log in to the Cisco ISE user interface, you should perform the following tasks:
• Register a license—Refer to the Register Licenses section in the Cisco ISE Administrator Guide for
more information.
• Configure the Cisco ISE System—Refer to the Cisco ISE Administrator Guide for the configuration
tasks.
Cisco Identify Services Engine Hardware Installation Guide, Release 1.4
30CHAPTER 4
Installing ISE on a VMware Virtual Machine
• ISE Features Not Supported in a Virtual Machine, page 31
• Supported VMware Versions, page 31
• Support for VMware vMotion, page 32
• Support for Open Virtualization Format, page 32
• Virtual Machine Requirements, page 32
• Virtual Machine Resource and Performance Checks, page 36
• Obtaining the Cisco ISE Evaluation Software, page 38
• Installing Cisco ISE on Virtual Machines, page 39
• Migrating Cisco ISE VM from Evaluation to Production, page 50
ISE Features Not Supported in a Virtual Machine
The Inline Posture node is supported only on Cisco SNS-3415 and Cisco ISE 3300 series appliances. It is not
supported on Cisco SNS-3495 series or VMware server systems. All the other designated roles are supported
for use on VMware virtual machines.
Supported VMware Versions
Cisco ISE supports the following VMware servers and clients:
• VMware version 8 (default) for ESXi 5.x
• VMware version 11 (default) for ESXi 6.0 (requires Cisco ISE 1.4 Patch 3)
Cisco Identify Services Engine Hardware Installation Guide, Release 1.4
31You can also read


