User manual TRANSFER KIT for Xbox 360
←
→
Page content transcription
If your browser does not render page correctly, please read the page content below
User manual
                 TRANSFER KIT for Xbox 360™
                    Including Xchange 360 software application

Index
1. Introduction
2. Getting Started
        a. Pack Contents
        b. System Requirements
        c. Installing Xchange 360
        d. Running Xchange 360 for the First Time
3. Using Xchange 360
        a. Backing Up
        b. Restoring
4. Options
5. Frequently Asked Questions
6. Technical Support

1. Introduction
Transfer Kit for Xbox 360™ from Datel allows you to transfer data from your Xbox
360™ memory cards to your PC. Use your PC’s storage capacity to back up
unlimited ‘images’ of your Xbox 360 memory cards, allowing you to archive and
restore them at any time.

The sleek, easy-to-use Xchange 360 PC software makes the task of backing up and
restoring memory card images a breeze, giving you access to all your backups in
seconds.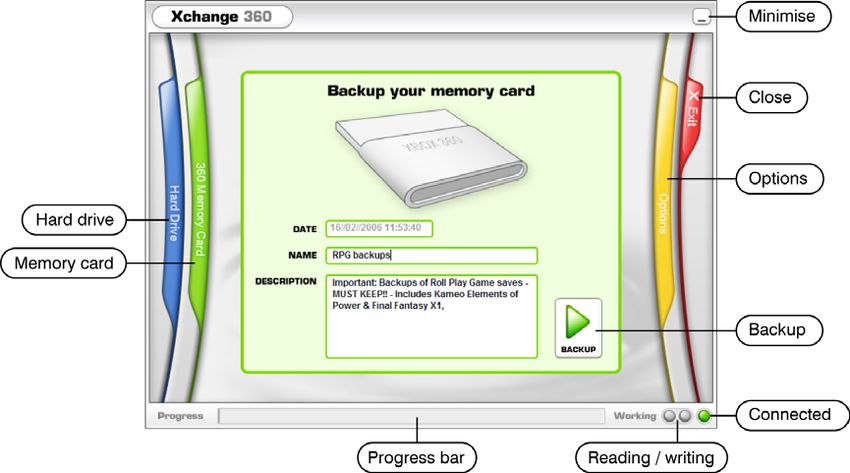
2. Getting Started
a. Pack Contents

Before getting started, unpack your Transfer Kit for Xbox 360 and ensure that you
have all the necessary components:

   •   Memory card to USB adapter cable
   •   PC software CD
   •   User manual

b. System Requirements

To use the Xchange 360 software that comes with your Transfer Kit for Xbox 360™
you need a computer set-up that meets the following minimum system
requirements:

MINIMUM SYSTEM REQUIREMENTS

Computer /         Computer with one free USB port. A USB 2.0 port is
Processor          recommended, for high-speed transfer.

Operating          Windows XP (recommended), Windows 2000,
System             Windows ME.

                   At the time of writing Windows 98 is not supported,
                   though you can use the online update feature to
                   check for new Windows 98 drivers.
Graphics Display Graphics card running 800x600 resolution (higher
recommended) in 16bit or 32bit color mode.
Memory 256MB RAM, 512MB+ Recommended.
Storage Capacity 20MB of free hard drive space (software installation),
additional free hard drive space per memory card
back-up.
Connectivity Active Internet connection required for online
updates (optional).
c. Installing Xchange 360
Insert the installation CD into your PC. If you have Autorun enabled, wait for the
installation to start. If you don’t have Autorun enabled, browse to the installation CD
and run the ‘setup.exe’ file.
Follow the on-screen prompts to install the software. Once complete, you see a
program icon installed on your desktop and a new entry in your Start Menu.
Next, connect the supplied memory card adapter to a free USB port on your
computer (for maximum speed, connect it to a USB 2.0 port, if you have one) and
connect your Xbox 360™ memory card into the adapter.
Windows recognises the adapter and prompts you to install drivers for it. The
drivers are included on the installation disc. Direct Windows towards the drive
containing the installation CD. Windows then needs to install a second driver, which
can also be found on the root of the installation CD.
Congratulations, installation is now complete.
d. Running Xchange 360 for the First Time
When you run the software for the first time, you’re asked whether you want to go
online and check for updates to the application. We recommend you do this as new
features or improvements to the software may have been added since your disc was
produced.
In the future, you’re prompted to update if a newer version of the software is
detected. You need an active Internet connection for this feature to work.
3. Using Xchange 360
a. Backing Up
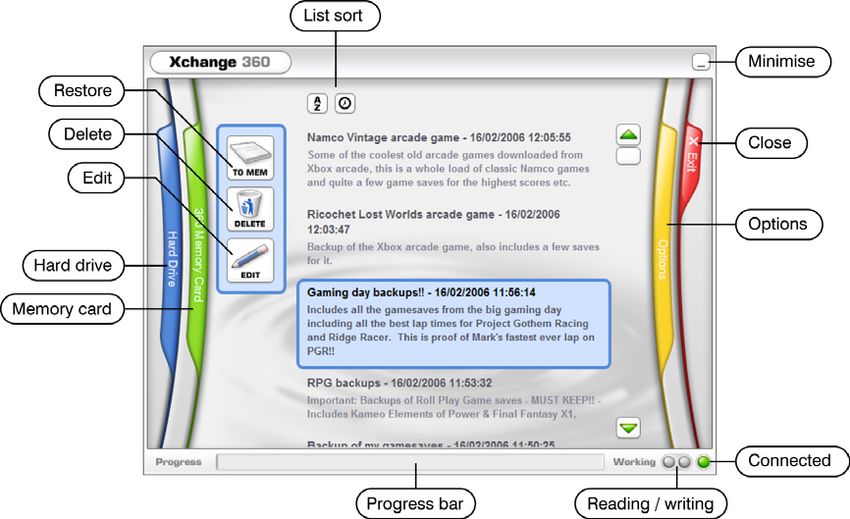
OverviewXchange 360’s interface is divided into three blades; Hard Drive, 360 Memory Card and Options. When backing up your memory card, you need to be on the ‘Memory card’ blade. Click to select it and you see the screen as shown. To back up a memory card, make sure you have it connected to the memory card adapter and the adapter connected to your PC. You see the ‘Connected’ LED shown in the bottom right corner of the interface. When backing up, the date and time are entered for you. You need only enter a meaningful name and description in the dialogue box before pressing the ‘Backup’ button. You see the ‘Progress Bar’ displaying the progress of the backup procedure, with the ‘Reading/writing’ LEDs illuminating accordingly. When the backup is complete you’re taken to the ‘Hard Drive’ automatically, where you see your new backup listed. b. Restoring Overview
Once you’ve backed up your memory card at least once (see Section 3.a), you can
browse and restore back-ups to your memory card at any time using the ‘Hard Drive’
blade.

Back-ups you have made are listed in the center of the screen, and can be listed
either alphabetically or chronologically using the ‘List Sort’ buttons.

To restore a backup to your memory card, click it to highlight (it’s then shown with a
blue border). Ensure your memory card is connected to your PC using the memory
card to USB adapter cable (you see the ‘Connected’ LED illuminated), and then click
the ‘Restore’ button (labelled TO MEM).

IMPORTANT: BEFORE YOU RESTORE A BACK-UP

When you restore a backup from your PC’s hard drive to your Xbox 360
memory card, ALL DATA ON THE MEMORY CARD WILL BE OVER-
WRITTEN with the content of the backup you’re restoring. If you want
to keep any of the data on the memory card, be sure to back it up first!

The ‘Progress Bar’ displays the progress of the restore operation with the
‘Reading/writing’ LEDs illuminating accordingly. When complete, ‘Written to memory
card OK’ is shown in the ‘Progress Bar’ area.

Deleting a backup

If you no longer require a backup you have made, highlight it by clicking it before
clicking the ‘Delete’ button. You have the option to cancel or confirm this operation.
Deleting is permanent and cannot be undone.

Editing a backup
If you want to change the name or description of a backup, highlight it by clicking it
before clicking the ‘Edit’ button. The edit screen works in the same way as the
‘Memory Card’ blade. Make your amendments then click ‘Save’.

4. Options
Access the Options screen by clicking on the ‘Options’ blade at any time from within
the application.

Online updates

You can check online for updates to the application at any time by clicking the
‘Update’ button on the ‘Options’ blade. You need an active Internet connection for
this feature to work. You’re then informed if any updates to the software are
available for download.

Archive folder

You may wish to change the folder where your backups are stored (for instance if
you have another hard drive with more storage capacity). Do this by clicking the
‘Folder’ button on the ‘Options’ blade. Browse to the new location you wish to use
and choose OK.

5. Frequently Asked Questions
Q. Can I back up individual files at a time, rather than the whole memory card?

A. No. Because of the way the file system works on an Xbox 360 memory card, you
must to back up and restore whole ‘images’ of the memory card contents.

Q. Can other people use my backups, if they have the Transfer Kit too?

A. Yes and No. Some content is locked to your actual Xbox 360 console, other
content is locked to your Xbox Live account profile, and some content is not locked
at all. Only content that is not locked to either your hardware or your profile can be
used by other gamers or on other consoles.

For example, if you download a demo from Xbox Live arcade and then back up that
demo, it would work if restored to someone else’s Xbox/memory card. However, if
you downloaded a full version of an arcade game (which you paid for using credits),
the full version of the game is locked to your console. You can’t use the game on
someone else’s console. Experiment!

6. Technical Support
If you are experiencing difficulties with any aspect of your Transfer Kit for Xbox 360,
please ensure you have read and understood the contents of this user manual before
contacting Datel’s Technical Support department.

DATEL CUSTOMER SERVICES EUROPE:

Customers Services,
Datel Ltd,
Stafford Road,
Stone,
STAFFS
ST15 0DG
UNITED KINGDOM

Email: support@datel.co.uk
Web: www.codejunkies.com

DATEL CUSTOMER SERVICES USA:

ATTN: Customer Services,
Datel Design & Development Inc,
33 North Garden Avenue,
Suite 900, Clearwater, FL 33755

Email: support@dateldesign.com
Customer service knowledgebase: www.datelcustomerservice.com
Main website: www.codejunkies.com
©2006 Datel Design and Development Ltd. TRANSFER KIT and XCHANGE 360 are
trademarks of Datel Design & Development Ltd. Xbox, Xbox 360 and Xbox Live are
registered trademark of Microsoft Corporation in the U.S and/or other countries.
This product is not sponsored, endorsed or approved by Microsoft Corporation.
You can also read